LAND ROVER DISCOVERY 1999 Workshop Manual
Manufacturer: LAND ROVER, Model Year: 1999, Model line: DISCOVERY, Model: LAND ROVER DISCOVERY 1999Pages: 1529, PDF Size: 34.8 MB
Page 851 of 1529
REAR SUSPENSION
64-42 REPAIRS
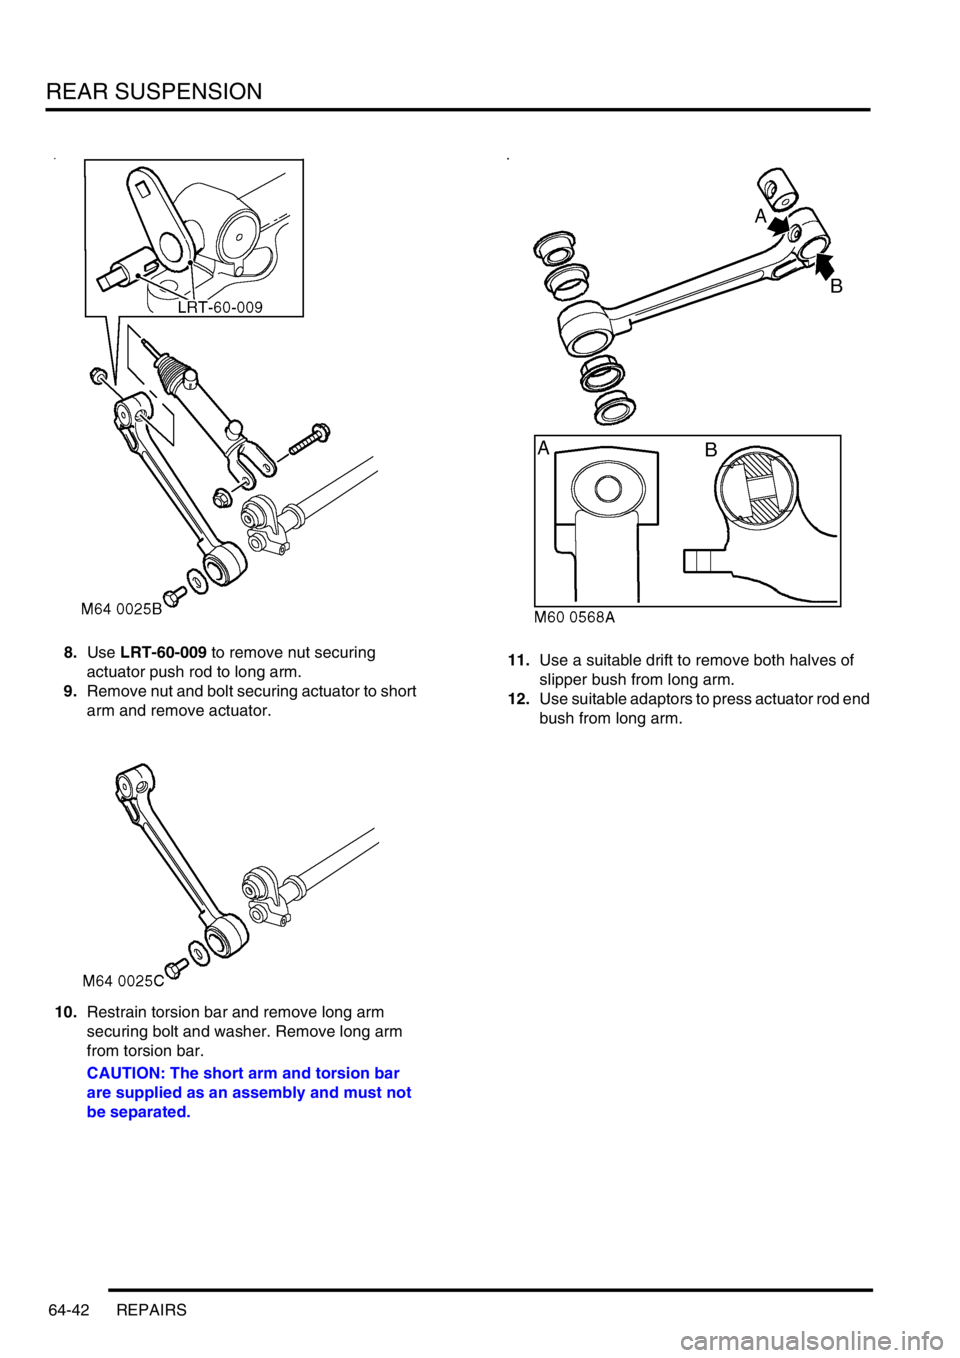
8.Use LRT-60-009 to remove nut securing
actuator push rod to long arm.
9.Remove nut and bolt securing actuator to short
arm and remove actuator.
10.Restrain torsion bar and remove long arm
securing bolt and washer. Remove long arm
from torsion bar.
CAUTION: The short arm and torsion bar
are supplied as an assembly and must not
be separated.11.Use a suitable drift to remove both halves of
slipper bush from long arm.
12.Use suitable adaptors to press actuator rod end
bush from long arm.
Page 852 of 1529
REAR SUSPENSION
REPAIRS 64-43
Refit
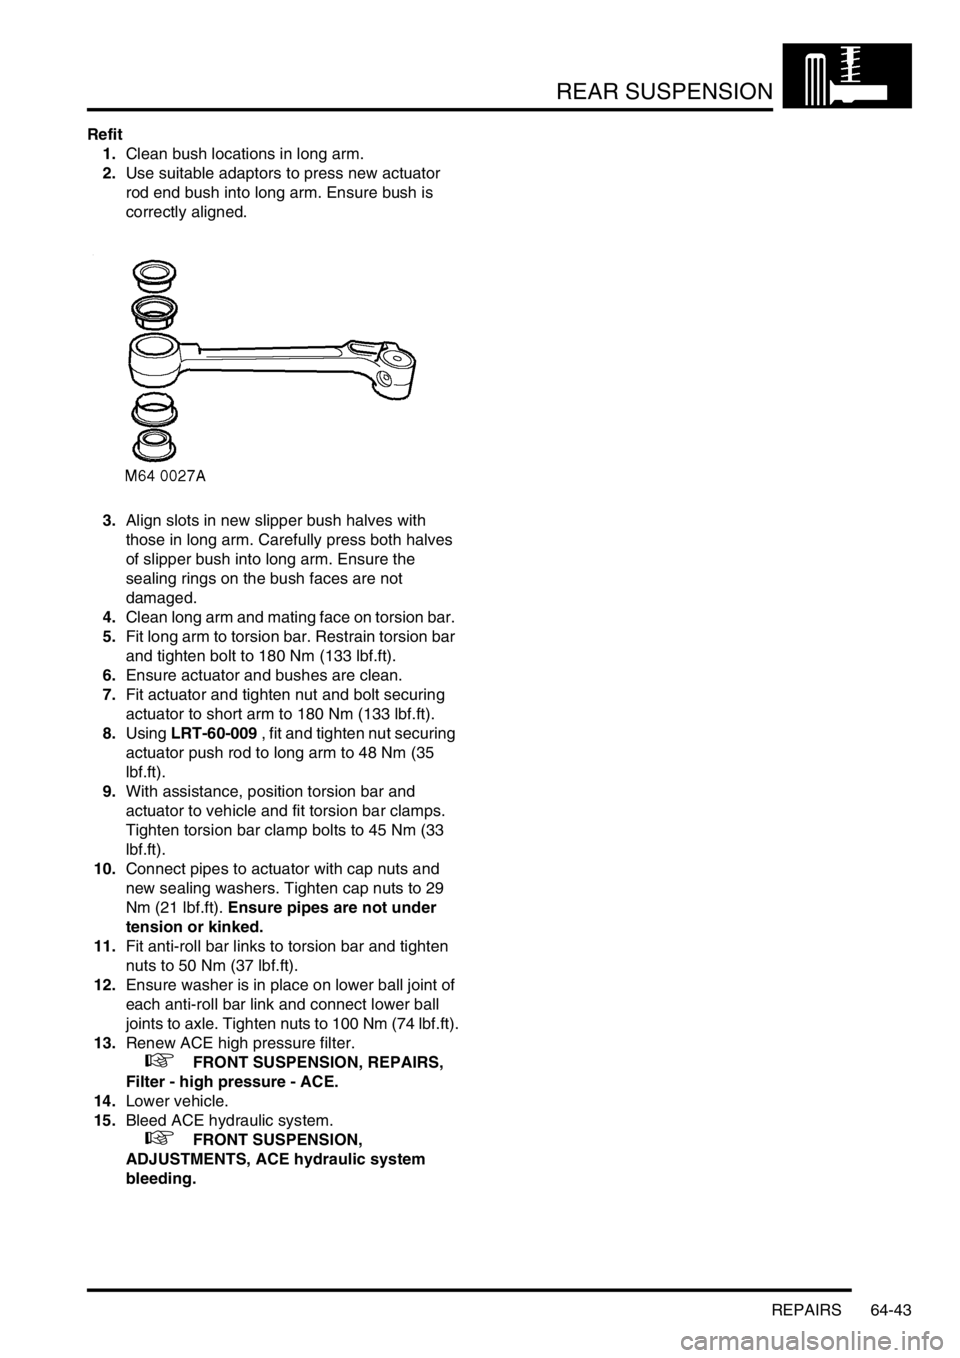
1.Clean bush locations in long arm.
2.Use suitable adaptors to press new actuator
rod end bush into long arm. Ensure bush is
correctly aligned.
3.Align slots in new slipper bush halves with
those in long arm. Carefully press both halves
of slipper bush into long arm. Ensure the
sealing rings on the bush faces are not
damaged.
4.Clean long arm and mating face on torsion bar.
5.Fit long arm to torsion bar. Restrain torsion bar
and tighten bolt to 180 Nm (133 lbf.ft).
6.Ensure actuator and bushes are clean.
7.Fit actuator and tighten nut and bolt securing
actuator to short arm to 180 Nm (133 lbf.ft).
8.Using LRT-60-009 , fit and tighten nut securing
actuator push rod to long arm to 48 Nm (35
lbf.ft).
9.With assistance, position torsion bar and
actuator to vehicle and fit torsion bar clamps.
Tighten torsion bar clamp bolts to 45 Nm (33
lbf.ft).
10.Connect pipes to actuator with cap nuts and
new sealing washers. Tighten cap nuts to 29
Nm (21 lbf.ft). Ensure pipes are not under
tension or kinked.
11.Fit anti-roll bar links to torsion bar and tighten
nuts to 50 Nm (37 lbf.ft).
12.Ensure washer is in place on lower ball joint of
each anti-roll bar link and connect lower ball
joints to axle. Tighten nuts to 100 Nm (74 lbf.ft).
13.Renew ACE high pressure filter.
+ FRONT SUSPENSION, REPAIRS,
Filter - high pressure - ACE.
14.Lower vehicle.
15.Bleed ACE hydraulic system.
+ FRONT SUSPENSION,
ADJUSTMENTS, ACE hydraulic system
bleeding.
Page 853 of 1529

Page 854 of 1529
BRAKES
DESCRIPTION AND OPERATION 70-1
BRAKES DESCRIPTION AND OPERAT ION
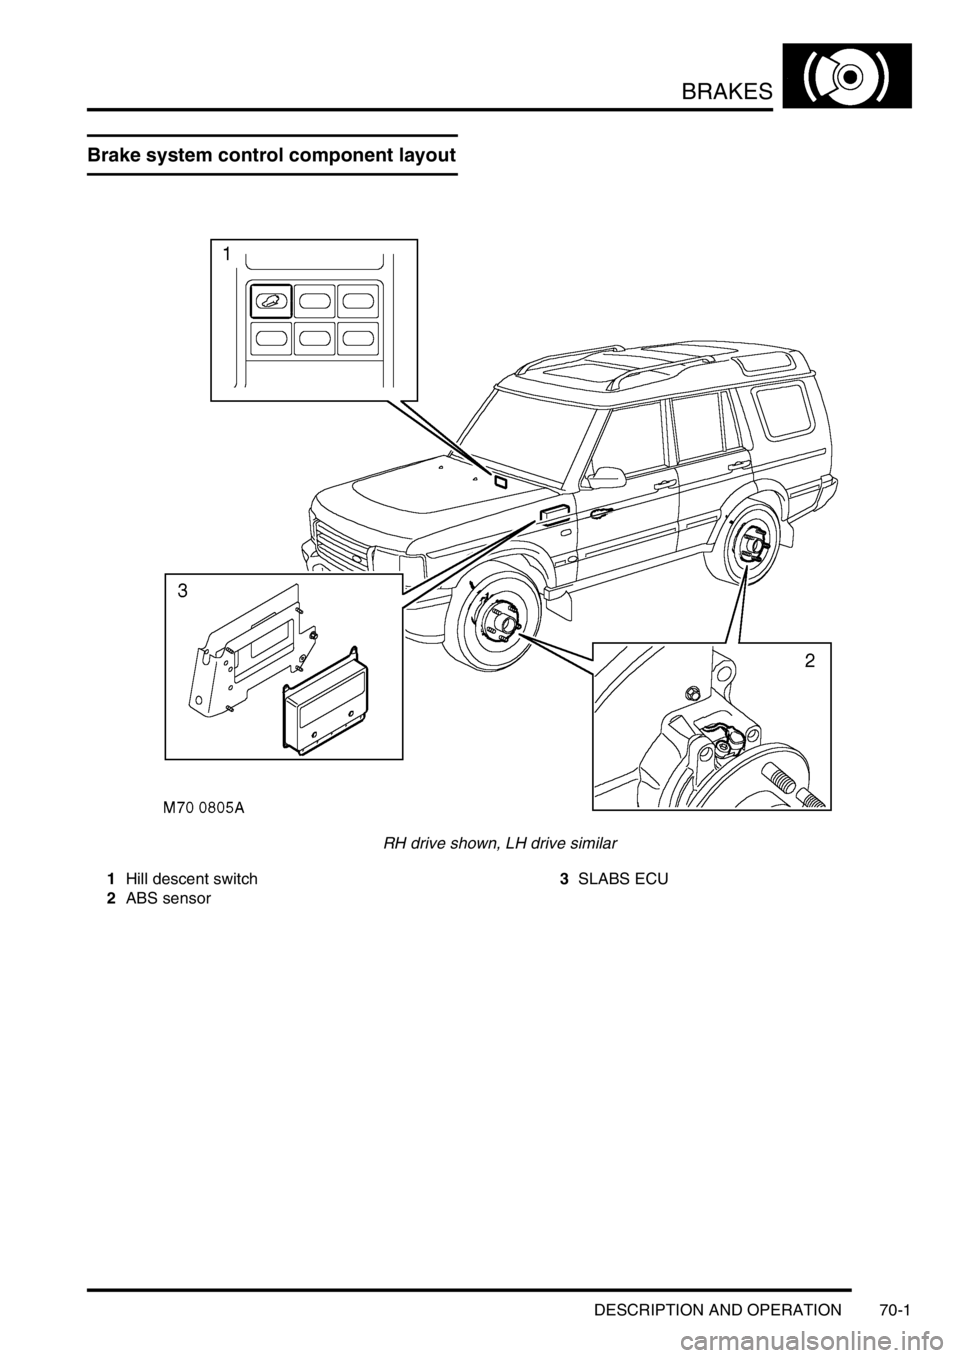
Brake system control component layout
RH drive shown, LH drive similar
1Hill descent switch
2ABS sensor3SLABS ECU
Page 855 of 1529
BRAKES
70-2 DESCRIPTION AND OPERATION
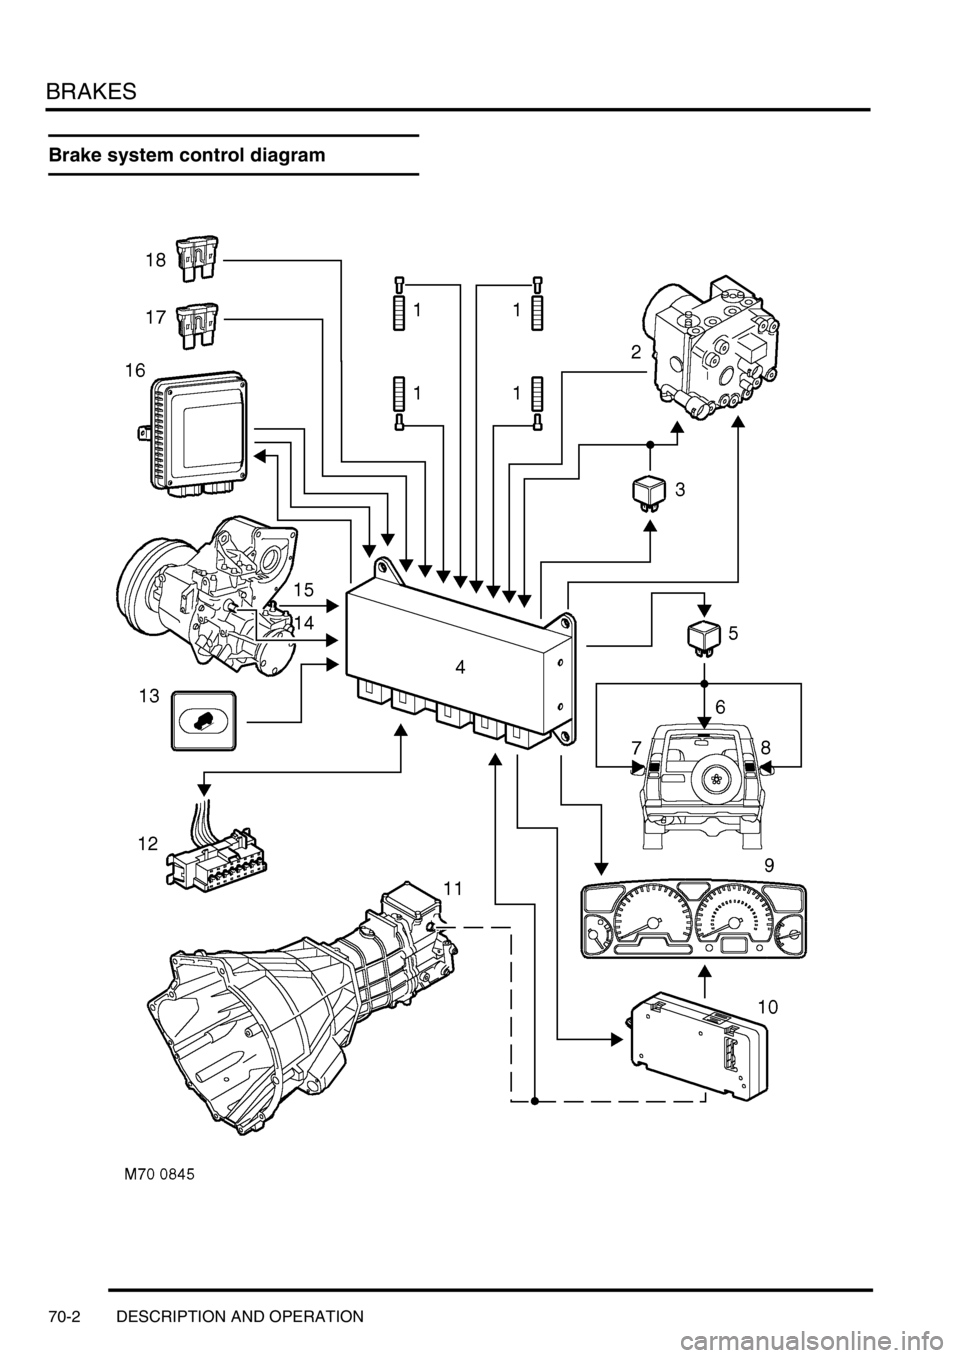
Brake system control diagram
Page 856 of 1529

BRAKES
DESCRIPTION AND OPERATION 70-3
1ABS sensor
2ABS modulator
3Return pump relay
4SLABS ECU
5Brake lamp relay
6Centre high mounted stop lamp
7LH brake lamp
8RH brake lamp
9Instrument pack10Body control unit
11Reverse lamp switch (manual gearbox)
12Diagnostic socket
13HDC switch
14Transmission high/low switch
15Centre differential lock switch
16Engine control module
17Battery power supply
18Ignition power supply
Page 857 of 1529
BRAKES
70-4 DESCRIPTION AND OPERATION
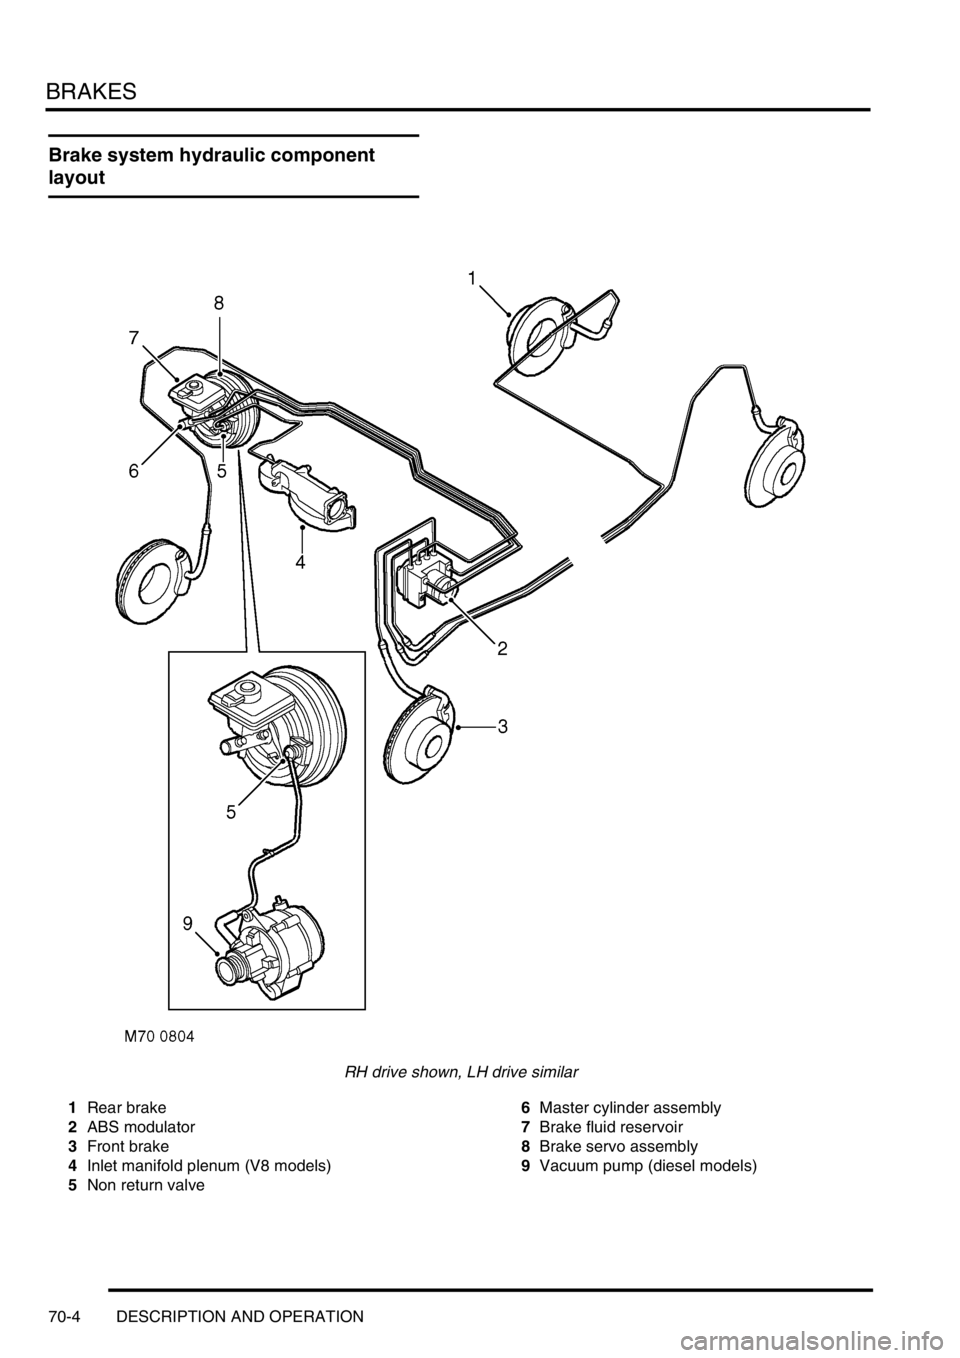
Brake system hydraulic component
layout
RH drive shown, LH drive similar
1Rear brake
2ABS modulator
3Front brake
4Inlet manifold plenum (V8 models)
5Non return valve6Master cylinder assembly
7Brake fluid reservoir
8Brake servo assembly
9Vacuum pump (diesel models)
Page 858 of 1529
BRAKES
DESCRIPTION AND OPERATION 70-5
Description
General
The brakes consist of front and rear disc brakes operated by a diagonally split, dual circuit hydraulic system with
vacuum servo power assistance. The system incorporates the following control functions as standard on all models:
lAnti-lock Brakes (ABS), to prevent road wheels locking during brake application.
lElectronic Brake Distribution (EBD), to control distribution of hydraulic pressure between front and rear axles.
Replaces mechanical pressure limiting valve of previous systems.
lElectronic Traction Control (ETC), to maintain even torque distribution to the road wheels.
lHill Descent Control (HDC), to provide controlled descent ability in off road conditions.
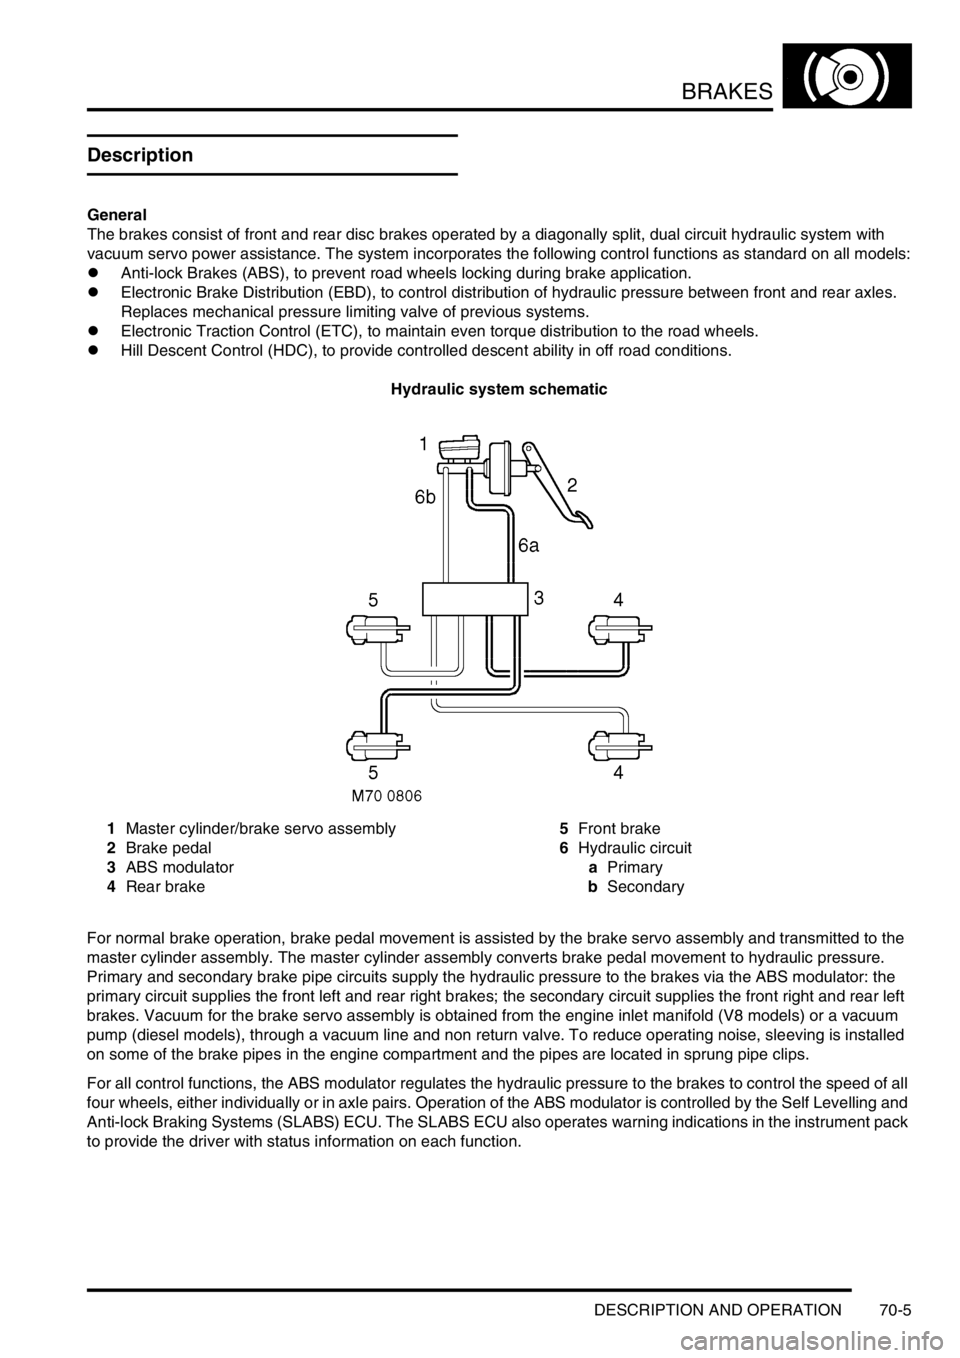
Hydraulic system schematic
1Master cylinder/brake servo assembly
2Brake pedal
3ABS modulator
4Rear brake5Front brake
6Hydraulic circuit
aPrimary
bSecondary
For normal brake operation, brake pedal movement is assisted by the brake servo assembly and transmitted to the
master cylinder assembly. The master cylinder assembly converts brake pedal movement to hydraulic pressure.
Primary and secondary brake pipe circuits supply the hydraulic pressure to the brakes via the ABS modulator: the
primary circuit supplies the front left and rear right brakes; the secondary circuit supplies the front right and rear left
brakes. Vacuum for the brake servo assembly is obtained from the engine inlet manifold (V8 models) or a vacuum
pump (diesel models), through a vacuum line and non return valve. To reduce operating noise, sleeving is installed
on some of the brake pipes in the engine compartment and the pipes are located in sprung pipe clips.
For all control functions, the ABS modulator regulates the hydraulic pressure to the brakes to control the speed of all
four wheels, either individually or in axle pairs. Operation of the ABS modulator is controlled by the Self Levelling and
Anti-lock Braking Systems (SLABS) ECU. The SLABS ECU also operates warning indications in the instrument pack
to provide the driver with status information on each function.
Page 859 of 1529

BRAKES
70-6 DESCRIPTION AND OPERATION
Brake servo assembly
The brake servo assembly provides power assistance to reduce the pedal load when braking. If the brake servo
assembly fails, the hydraulic system still functions but will require greater brake pedal effort due to the lack of vacuum
assistance.
Two integral tie bolts attach the brake servo assembly to the pedal and bracket assembly on the engine bulkhead.
The master cylinder assembly is attached to the forward ends of the tie bolts.
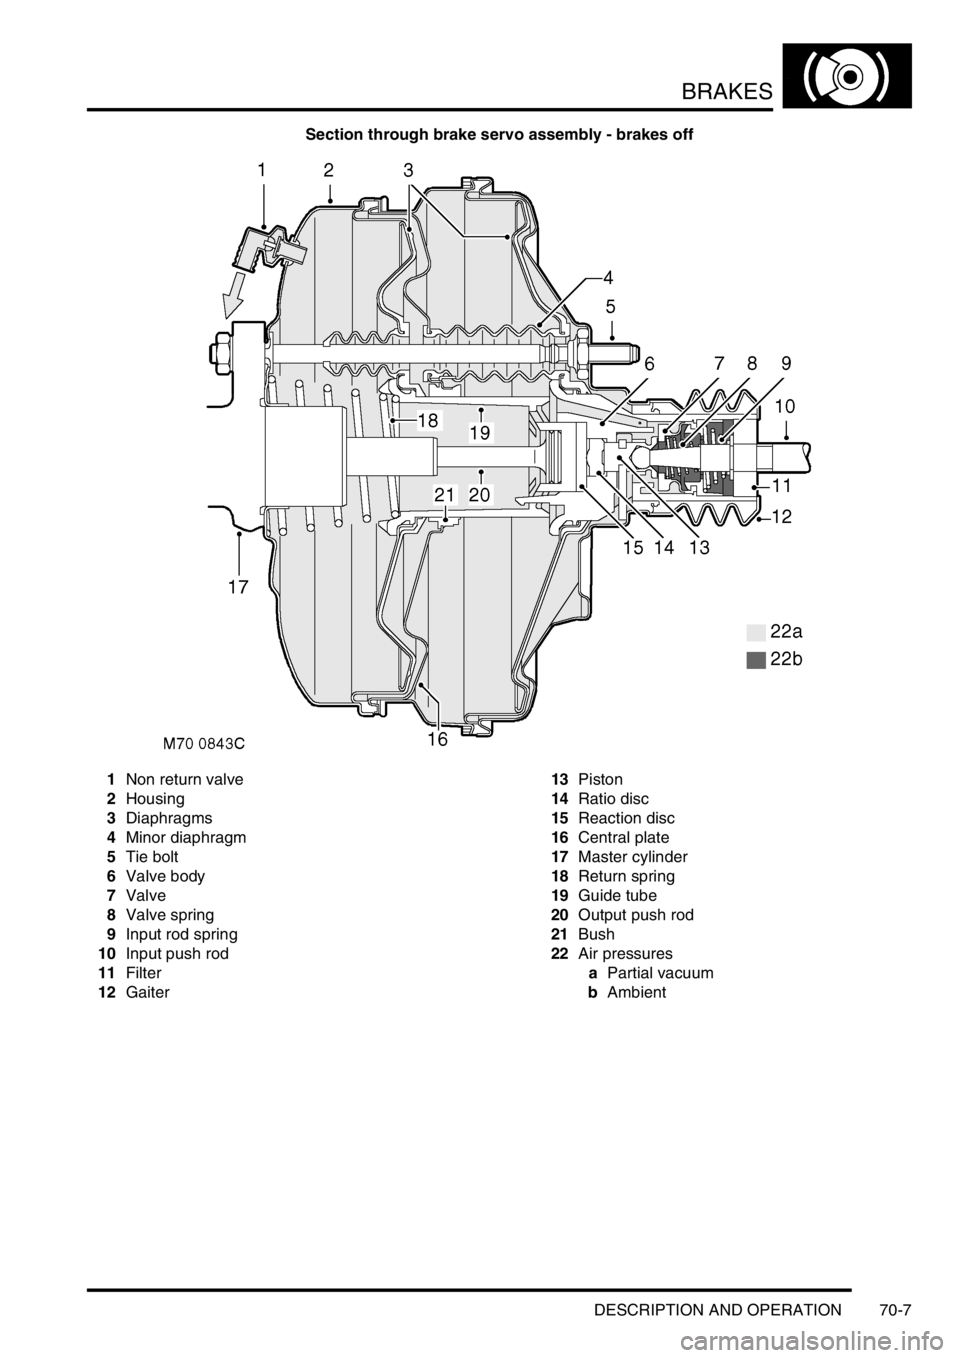
The brake servo assembly consists of a circular housing which contains two diaphragms, a central plate, a control
valve assembly, input and output push rods and a filter. The input push rod is connected to the brake pedal. The output
push rod locates in the primary piston of the master cylinder. A protective gaiter is installed on the control valve
assembly where it extends from the rear of the housing. A non return valve, installed in a port in the front face of the
housing, is connected to a vacuum line from the engine.
The control valve assembly consists of a valve body containing a valve, a piston, a valve spring and an input rod
spring. The valve controls a vacuum port in the valve body. The piston controls an air inlet port between the valve and
the piston. A reaction disc and a ratio disc separate the piston from the output push rod. A guide tube on the front of
the valve body is attached to the front diaphragm and supported in a bush in the central plate. A return spring locates
in the open end of the guide tube.
The two diaphragms and the central plate separate the interior of the housing into four sealed chambers. The
chambers at the front of the diaphragms are connected together through fixed passages in the valve assembly. The
chambers at the rear of the diaphragms are connected together through the interior of minor diaphragms on the tie
bolts.
Brakes off
With the brake pedal released, the piston in the control valve assembly positions the valve so that the vacuum port is
open and the two pairs of chambers are connected together. When the engine is running air is evacuated through the
vacuum line and non return valve, creating a partial vacuum in all four chambers. When the engine stops, the non
return valve closes to maintain the partial vacuum and, on V8 models, prevent fuel vapour entering the brake servo.
Page 860 of 1529
BRAKES
DESCRIPTION AND OPERATION 70-7
Section through brake servo assembly - brakes off
1Non return valve
2Housing
3Diaphragms
4Minor diaphragm
5Tie bolt
6Valve body
7Valve
8Valve spring
9Input rod spring
10Input push rod
11Filter
12Gaiter13Piston
14Ratio disc
15Reaction disc
16Central plate
17Master cylinder
18Return spring
19Guide tube
20Output push rod
21Bush
22Air pressures
aPartial vacuum
bAmbient