LAND ROVER DISCOVERY 2002 Workshop Manual
Manufacturer: LAND ROVER, Model Year: 2002, Model line: DISCOVERY, Model: LAND ROVER DISCOVERY 2002Pages: 1672, PDF Size: 46.1 MB
Page 171 of 1672

ENGINE - TD5
12-1-32 DESCRIPTION AND OPERATION
When the engine temperature is below 74° C, the thermostat in the full-flow filter housing is closed and a proportion
of the oil flow to the main oil gallery is diverted to the oil cooler to supply an oil feed to the turbocharger bearings. Oil
passes through the oil cooler to the front gallery in the oil cooler housing where there is a tapping to connect the feed
pipe to the turbocharger. Oil used by the turbocharger bearings is returned to the sump through an oil drain pipe which
connects to a port in the LH side of the cylinder block.
The remainder of the oil flow leaving the full-flow filter outlet is passed into the cylinder block via a port at the rear of
oil cooler rear gallery.
When the oil temperature rises above 74
° C the thermostat in the full-flow filter adaptor housing begins to open to
allow a proportion of the oil from the full-flow filter to pass through the oil cooler before it reaches the main oil gallery
in the cylinder block. In this instance, oil supply to the turbocharger bearings is fed directly from the full-flow filter
without first passing through the oil cooler. Between 74
° C and 88° C the thermostat valve plunger opens by about
9mm to allow proportionally more oil to flow through the oil cooler before being passed to the cylinder block main oil
delivery gallery. Above 88
°C the thermostat valve continues to open by about 1mm for every 10° C increase in
temperature until the valve is fully open, when all the oil flow to the cylinder block is forced to pass to the cylinder block
via the oil cooler.
An oil pressure switch is located in a port in the rear gallery of the oil cooler housing to sense the oil pressure level
before flow enters the main oil gallery in the engine block. A warning lamp in the instrument cluster is switched on if
the oil pressure is detected as being too low.
+ INSTRUMENTS, DESCRIPTION AND OPERATION, Description.
Drillings from the cylinder block main oil gallery direct oil to the crankshaft main bearings and cross drillings in the
crankshaft direct oil to the big-end bearings. An additional five drillings in the cylinder block supply oil at reduced
pressure to the oil squirt jets for piston cooling and gudgeon pin lubrication.
Oil supply from the cylinder block is then passed to the cylinder head galleries through a non-return valve which is
included as an integral item in the lower face of the cylinder head.
Page 172 of 1672

ENGINE - TD5
DESCRIPTION AND OPERATION 12-1-33
Cylinder head flow
1Cast-in groove between cylinder head and
camshaft carrier
2Rocker shaft flow
3Lash adjuster supply channels (10 off)
4Non-return valve
5Chain lubrication jet supply6Oil return from vacuum pump
7Oil supply to timing chain tensioner adjuster
8Oil supply to vacuum pump
9Oil supply hole to camshaft sprocket and timing
chain
Oil passes to the cylinder head from the cylinder block via a non-return valve which is included to prevent oil draining
away from the lash adjusters when the engine is switched off.
Oil is passed to a cast-in groove between the top of the cylinder head and the camshaft carrier. The part of the channel
on the top left hand side of the cylinder head has ten cross-drillings which supply oil to the hydraulic lash adjusters
and finger followers. Lubrication oil fed to the lash adjusters passes up through the lash adjuster body and into the
socket of the finger followers. The oil exits the finger followers through a small hole to lubricate the surfaces between
the camshaft lobes and rollers.
An additional tapping is included at the front left hand side of the cylinder head to supply oil to the chain lubrication
jet, and a through hole near the front centre of the cylinder head allows a passage of oil through from the cast-in
groove to lubricate the timing chain and camshaft sprocket.
At the centre front of the cylinder head, the cast-in groove channels oil into the rockershaft via the front rockershaft
fixing. Oil flow through the rockershaft and clearance around the rockershaft fixings provides oil feed to the camshaft
bearings.
Page 173 of 1672

ENGINE - TD5
12-1-34 DESCRIPTION AND OPERATION
A tapping towards the right hand side of the cylinder head diverts oil supply from the cast-in groove down to a stub
pipe which attaches to a feed line to the vacuum pump. An hydraulic tensioner is located below the vacuum stub pipe
which receives oil through a small hole in the side of the tensioner body to force a plunger against a plastic faced
adjuster shoe for timing chain tensioning. Oil from the vacuum pump is returned to a port in the timing chain cover via
a short hose which connects to stub pipes at both ends using spring clips.
Page 174 of 1672

ENGINE - TD5
ADJUSTMENTS 12-1-35
ADJUST ME NTS
Engine oil pressure check
$% 12.90.09.01
Check
1.Remove oil pressure switch.
+ ENGINE - Td5, REPAIRS, Switch -
oil pressure.
2.Connect pressure check kit LRT-12-052C
adaptor and gauge to oil pressure switch
position on oil cooler.
3.Check and if necessary top up engine oil.
4.Run engine at idle speed and check that oil
pressure is within limits given.
+ GENERAL DATA, Engine - Td5.
5.Switch off ignition.
6.Remove pressure check kit LRT-12-052C.
7.Clean oil spillage.
8.Fit oil pressure switch.
+ ENGINE - Td5, REPAIRS, Switch -
oil pressure.
Adjust
1.If engine oil pressure is outside of specified
limits, check condition of oil pump and/or main
and connecting rod bearings.
Page 175 of 1672

ENGINE - TD5
12-1-36 ADJUSTMENTS
Page 176 of 1672

ENGINE - TD5
REPAIRS 12-1-37
REPAIRS
Pulley - crankshaft
$% 12.21.01
Remove
1.Remove fixings and underbelly panel.
2.Remove radiator.
+ COOLING SYSTEM - Td5, REPAIRS,
Radiator.
3.Using a 15 mm ring spanner, release the
auxiliary drive belt tensioner.
4.Remove auxiliary drive belt.
5.Remove 3 bolts and remove crankshaft TV
damper.
6.Position tool LRT-51-003 to crankshaft pulley
and secure with 2 bolts.
7.Remove and discard crankshaft pulley bolt.
Remove crankshaft pulley.
8.Remove 2 bolts and remove tool LRT-51-003
Refit
1.Position new crankshaft pulley to vice.
2.Remove 3 bolts and remove TV damper from
new crankshaft pulley.
3.Using a lint free cloth, thoroughly clean oil seal
recess and the running surface on crankshaft
pulley.
4.Fit crankshaft pulley. 5.Fit tool LRT-51-003 to crankshaft pulley and
secure with 2 bolts.
6.Fit new crankshaft pulley bolt and tighten to
460 Nm (340 lbf.ft), using a torque multiplier.
7.Remove 2 bolts and remove tool LRT-51-003
from crankshaft pulley.
8.Fit TV damper to crankshaft pulley and tighten
– TV damper bolts to 80 Nm (59 lbf.ft) .
9.Fit auxiliary drive belt to pulleys.
10.Fit radiator.
+ COOLING SYSTEM - Td5, REPAIRS,
Radiator.
11.Fit underbelly panel and secure with fixings.
Page 177 of 1672

ENGINE - TD5
12-1-38 REPAIRS
Seal - crankshaft - rear
$% 12.21.20
Remove
1. Automatic models: Remove drive plate
+ ENGINE - Td5, REPAIRS, Plate -
drive - automatic.
2. Manual models: Remove flywheel.
+ ENGINE - Td5, REPAIRS, Flywheel.
3.Remove sump gasket.
+ ENGINE - Td5, REPAIRS, Gasket -
sump.
4.Remove 5 bolts securing crankshaft oil seal
housing to cylinder block.
5.Remove crankshaft oil seal housing.
Refit
1.Clean interface between crankshaft oil seal
housing and cylinder block.
2.Position seal protector, LRT-12-061 over
crankshaft boss. Fit new seal and remove tool
LRT-12-061 .
CAUTION: Oil seal must be fitted dry.3.Fit crankshaft rear oil seal housing bolts and
using sequence shown, tighten to 9 Nm (7
lbf.ft).
4.Fit new sump gasket.
+ ENGINE - Td5, REPAIRS, Gasket -
sump.
5. Automatic models: Fit drive plate
+ ENGINE - Td5, REPAIRS, Plate -
drive - automatic.
6. Manual models: Fit flywheel.
+ ENGINE - Td5, REPAIRS, Flywheel.
Page 178 of 1672

ENGINE - TD5
REPAIRS 12-1-39
Gasket - cylinder head
$% 12.29.02
Remove
Note: The following procedures cover engines
fitted with or without an EGR cooler. The EGR
cooler is bolted to the front of the cylinder head.
1.Remove bonnet.
+ EXTERIOR FITTINGS, REPAIRS,
Bonnet.
2.Release turnbuckles and remove battery cover.
3.Disconnect battery earth lead.
4.Drain cooling system.
+ COOLING SYSTEM - Td5,
ADJUSTMENTS, Drain and refill.
5.Remove camshaft cover gasket.
+ ENGINE - Td5, REPAIRS, Gasket -
cover - camshaft.
6.Remove cooling fan coupling.
+ COOLING SYSTEM - Td5, REPAIRS,
Fan - viscous.
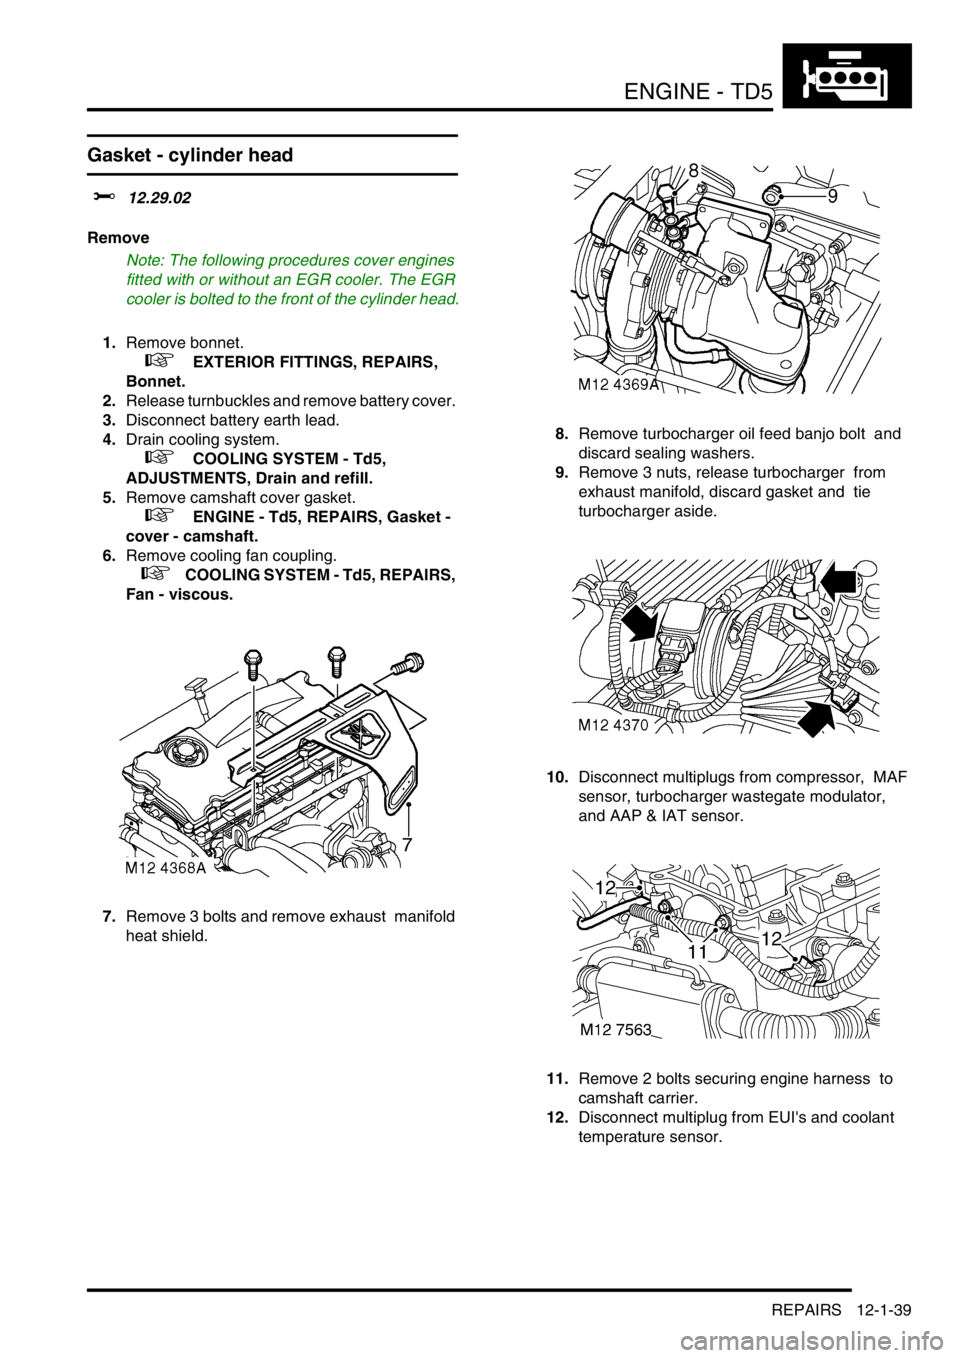
7.Remove 3 bolts and remove exhaust manifold
heat shield. 8.Remove turbocharger oil feed banjo bolt and
discard sealing washers.
9.Remove 3 nuts, release turbocharger from
exhaust manifold, discard gasket and tie
turbocharger aside.
10.Disconnect multiplugs from compressor, MAF
sensor, turbocharger wastegate modulator,
and AAP & IAT sensor.
11.Remove 2 bolts securing engine harness to
camshaft carrier.
12.Disconnect multiplug from EUI's and coolant
temperature sensor.
Page 179 of 1672

ENGINE - TD5
12-1-40 REPAIRS
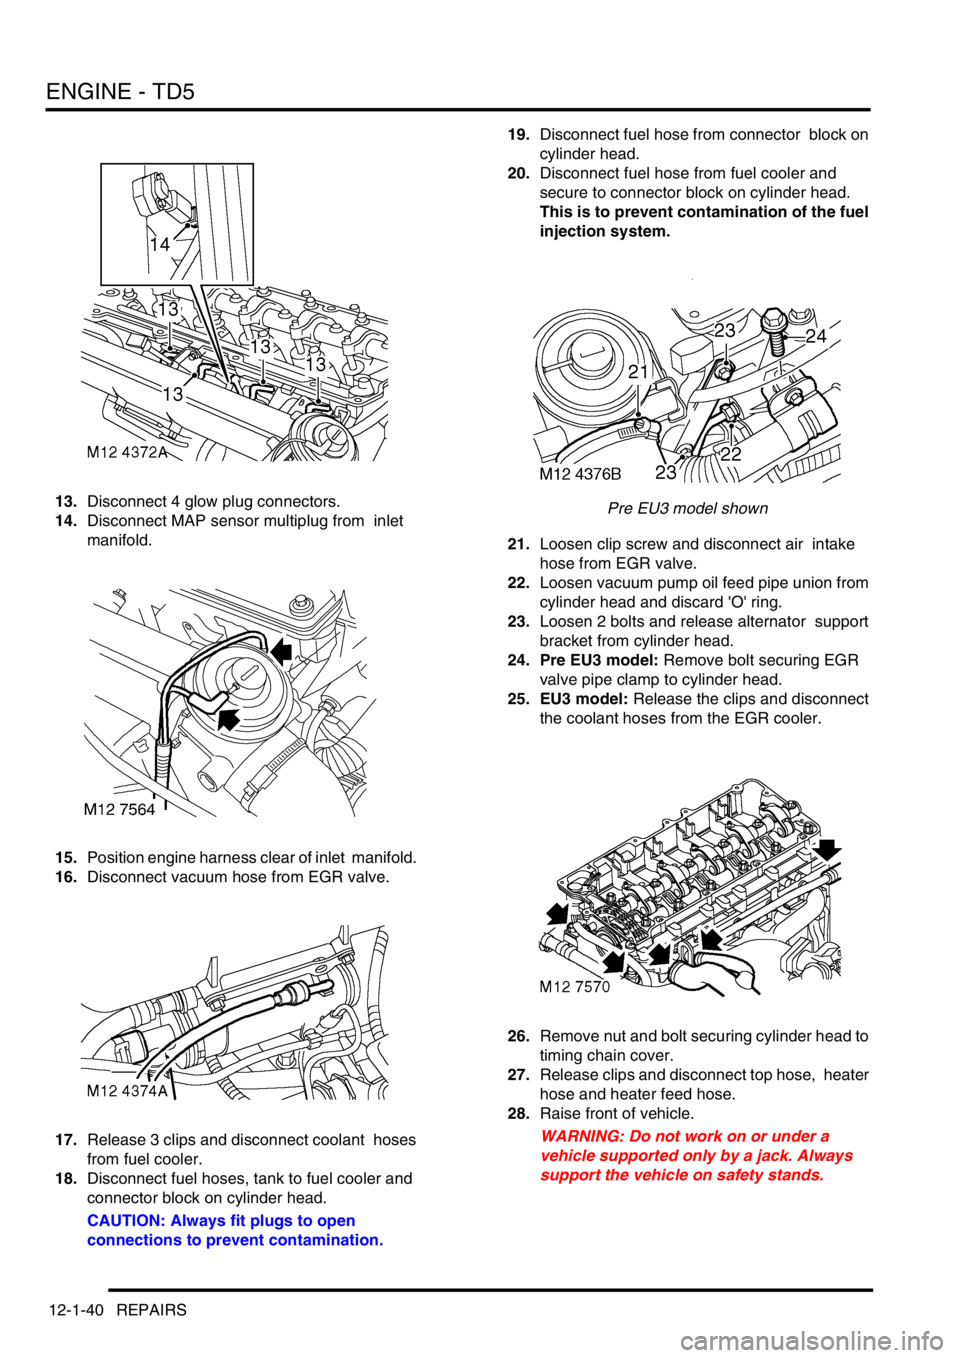
13.Disconnect 4 glow plug connectors.
14.Disconnect MAP sensor multiplug from inlet
manifold.
15.Position engine harness clear of inlet manifold.
16.Disconnect vacuum hose from EGR valve.
17.Release 3 clips and disconnect coolant hoses
from fuel cooler.
18.Disconnect fuel hoses, tank to fuel cooler and
connector block on cylinder head.
CAUTION: Always fit plugs to open
connections to prevent contamination.19.Disconnect fuel hose from connector block on
cylinder head.
20.Disconnect fuel hose from fuel cooler and
secure to connector block on cylinder head.
This is to prevent contamination of the fuel
injection system.
Pre EU3 model shown
21.Loosen clip screw and disconnect air intake
hose from EGR valve.
22.Loosen vacuum pump oil feed pipe union from
cylinder head and discard 'O' ring.
23.Loosen 2 bolts and release alternator support
bracket from cylinder head.
24. Pre EU3 model: Remove bolt securing EGR
valve pipe clamp to cylinder head.
25. EU3 model: Release the clips and disconnect
the coolant hoses from the EGR cooler.
26.Remove nut and bolt securing cylinder head to
timing chain cover.
27.Release clips and disconnect top hose, heater
hose and heater feed hose.
28.Raise front of vehicle.
WARNING: Do not work on or under a
vehicle supported only by a jack. Always
support the vehicle on safety stands.
Page 180 of 1672

ENGINE - TD5
REPAIRS 12-1-41
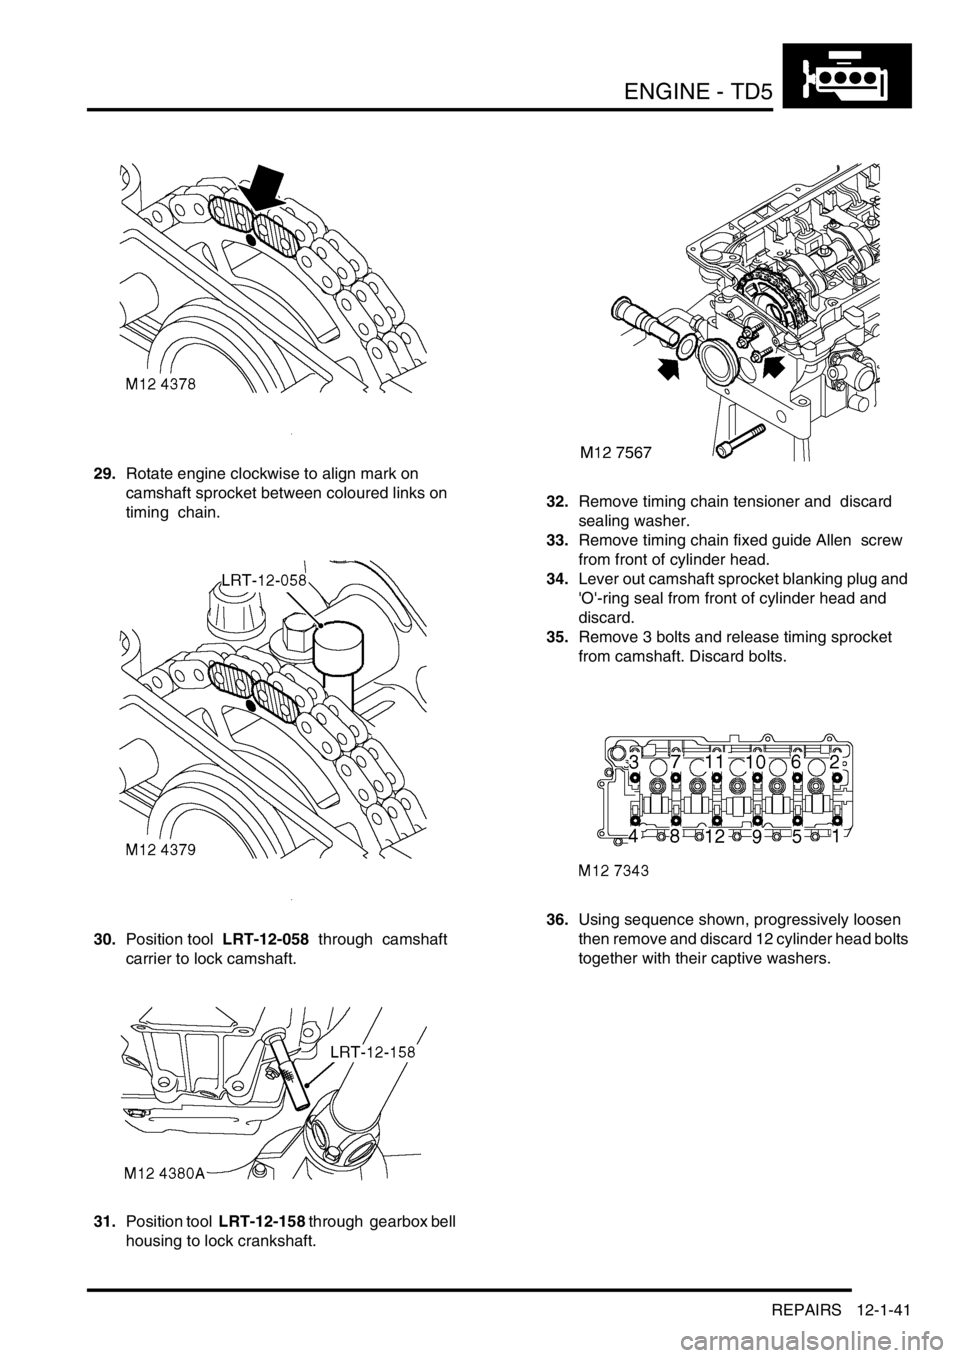
29.Rotate engine clockwise to align mark on
camshaft sprocket between coloured links on
timing chain.
30.Position tool LRT-12-058 through camshaft
carrier to lock camshaft.
31.Position tool LRT-12-158 through gearbox bell
housing to lock crankshaft. 32.Remove timing chain tensioner and discard
sealing washer.
33.Remove timing chain fixed guide Allen screw
from front of cylinder head.
34.Lever out camshaft sprocket blanking plug and
'O'-ring seal from front of cylinder head and
discard.
35.Remove 3 bolts and release timing sprocket
from camshaft. Discard bolts.
36.Using sequence shown, progressively loosen
then remove and discard 12 cylinder head bolts
together with their captive washers.