gearbox LAND ROVER DISCOVERY 2002 Workshop Manual
[x] Cancel search | Manufacturer: LAND ROVER, Model Year: 2002, Model line: DISCOVERY, Model: LAND ROVER DISCOVERY 2002Pages: 1672, PDF Size: 46.1 MB
Page 820 of 1672

AUTOMATIC GEARBOX - ZF4HP22 - 24
REPAIRS 44-23
REPAIRS
Cable and lever assembly - selector
$% 44.15.08
Remove
1.Remove centre console.
+ INTERIOR TRIM COMPONENTS,
REPAIRS, Console - centre - automatic
models.
2.Raise vehicle on ramp.
3.Loosen selector cable trunnion nut.
4.Remove 'C' clip and release selector cable
from gearbox bracket.
5.Lower vehicle on ramp.
6.Remove sound deadener pad. 7.Remove 3 bolts securing selector lever bracket
to tunnel, remove selector lever.
8.Remove 'C' clip securing outer cable to
selector lever bracket.
9.Remove locking ring securing inner cable to
selector lever.
10.Release inner cable from selector lever,
release cable from grommet and remove cable
from selector lever bracket.
Refit
1.Position cable through grommet, align to
bracket and secure with 'C' clip.
2.Fit inner cable to selector lever and secure with
locking ring.
3.Feed selector cable through tunnel, align
bracket, fit and tighten bolts.
4.Fit sound deadener pad.
5.Fit centre console.
+ INTERIOR TRIM COMPONENTS,
REPAIRS, Console - centre - automatic
models.
6.Position selector cable through trunnion and
gearbox bracket, secure with 'C' clip.
7.Adjust selector cable.
+ AUTOMATIC GEARBOX - ZF4HP22
- 24, ADJUSTMENTS, Cable - selector.
Page 821 of 1672

AUTOMATIC GEARBOX - ZF4HP22 - 24
44-24 REPAIRS
Selector indicator
$% 44.15.10
Remove
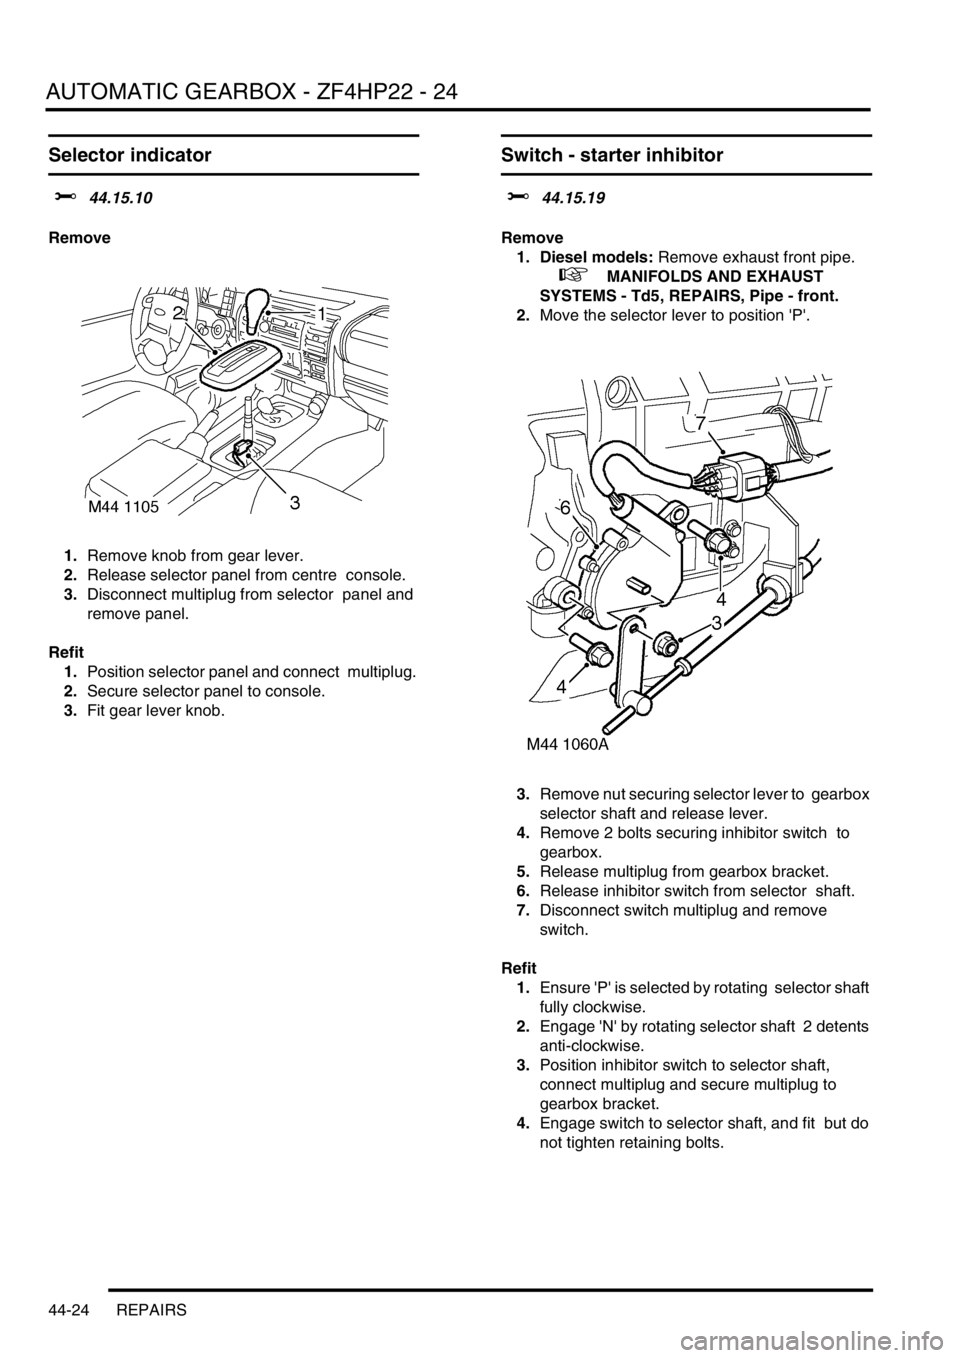
1.Remove knob from gear lever.
2.Release selector panel from centre console.
3.Disconnect multiplug from selector panel and
remove panel.
Refit
1.Position selector panel and connect multiplug.
2.Secure selector panel to console.
3.Fit gear lever knob.
Switch - starter inhibitor
$% 44.15.19
Remove
1. Diesel models: Remove exhaust front pipe.
+ MANIFOLDS AND EXHAUST
SYSTEMS - Td5, REPAIRS, Pipe - front.
2.Move the selector lever to position 'P'.
3.Remove nut securing selector lever to gearbox
selector shaft and release lever.
4.Remove 2 bolts securing inhibitor switch to
gearbox.
5.Release multiplug from gearbox bracket.
6.Release inhibitor switch from selector shaft.
7.Disconnect switch multiplug and remove
switch.
Refit
1.Ensure 'P' is selected by rotating selector shaft
fully clockwise.
2.Engage 'N' by rotating selector shaft 2 detents
anti-clockwise.
3.Position inhibitor switch to selector shaft,
connect multiplug and secure multiplug to
gearbox bracket.
4.Engage switch to selector shaft, and fit but do
not tighten retaining bolts.
Page 822 of 1672

AUTOMATIC GEARBOX - ZF4HP22 - 24
REPAIRS 44-25
5.Fit tool LRT-44-011 to selector shaft.
6.Insert setting pin into tool. Rotate switch until
setting pin engages with hole in switch as
shown and tighten bolts to 10 Nm (7 lbf.ft).
7.Remove setting tool LRT-44-011.
8.Position selector lever to selector shaft and
tighten nut to 26 Nm (19 lbf.ft).
9. Diesel models: Fit exhaust front pipe.
+ MANIFOLDS AND EXHAUST
SYSTEMS - Td5, REPAIRS, Pipe - front.
Seal - selector shaft
$% 44.15.34
Remove
1.Remove valve body assembly.
+ AUTOMATIC GEARBOX - ZF4HP22
- 24, REPAIRS, Valve body assembly.
2.Remove nut securing selector shaft lever and
release lever from shaft.
3.Remove 2 bolts securing gear selector switch
to gearbox and remove switch.
4.Drift out and discard selector quadrant roll pin.
Remove selector shaft.
5.Remove selector quadrant and connecting rod.
6.Remove oil seal taking care not to damage
seal housing.
Page 823 of 1672

AUTOMATIC GEARBOX - ZF4HP22 - 24
44-26 REPAIRS
Refit
1.Clean shaft and seal housing.
2.Using a suitable adapter, fit new seal.
3.Position selector quadrant and connecting rod.
4.Position selector shaft and secure to quadrant
using new roll pin.
5.Fit valve body assembly.
+ AUTOMATIC GEARBOX - ZF4HP22
- 24, REPAIRS, Valve body assembly.
Gearbox - convertor and transfer
gearbox - Diesel
$% 44.20.04.99
Remove
1.Release fixings and remove battery cover.
2.Disconnect battery earth lead.
3.Raise vehicle on a ramp.
4.Remove starter motor
+ CHARGING AND STARTING,
REPAIRS, Starter motor - diesel.
5.Remove 2 upper bolts securing gearbox
housing to engine.
6.Remove bolt securing closing plate to gearbox
housing.
7.Remove exhaust front pipe.
+ MANIFOLDS AND EXHAUST
SYSTEMS - Td5, REPAIRS, Pipe - front.
8.Remove 3 nuts securing intermediate silencer
to tail pipe.
9.Release and remove silencer from rubber
mountings.
10.Drain automatic gearbox oil.
+ MAINTENANCE, PROCEDURES,
Automatic gearbox.
Page 824 of 1672

AUTOMATIC GEARBOX - ZF4HP22 - 24
REPAIRS 44-27
11.Drain transfer gearbox oil.
+ MAINTENANCE, PROCEDURES,
Transfer box.
12.Remove front propeller shaft
+ PROPELLER SHAFTS, REPAIRS,
Propeller shaft - front.
13.Remove rear propeller shaft
+ PROPELLER SHAFTS, REPAIRS,
Propeller shaft - rear.
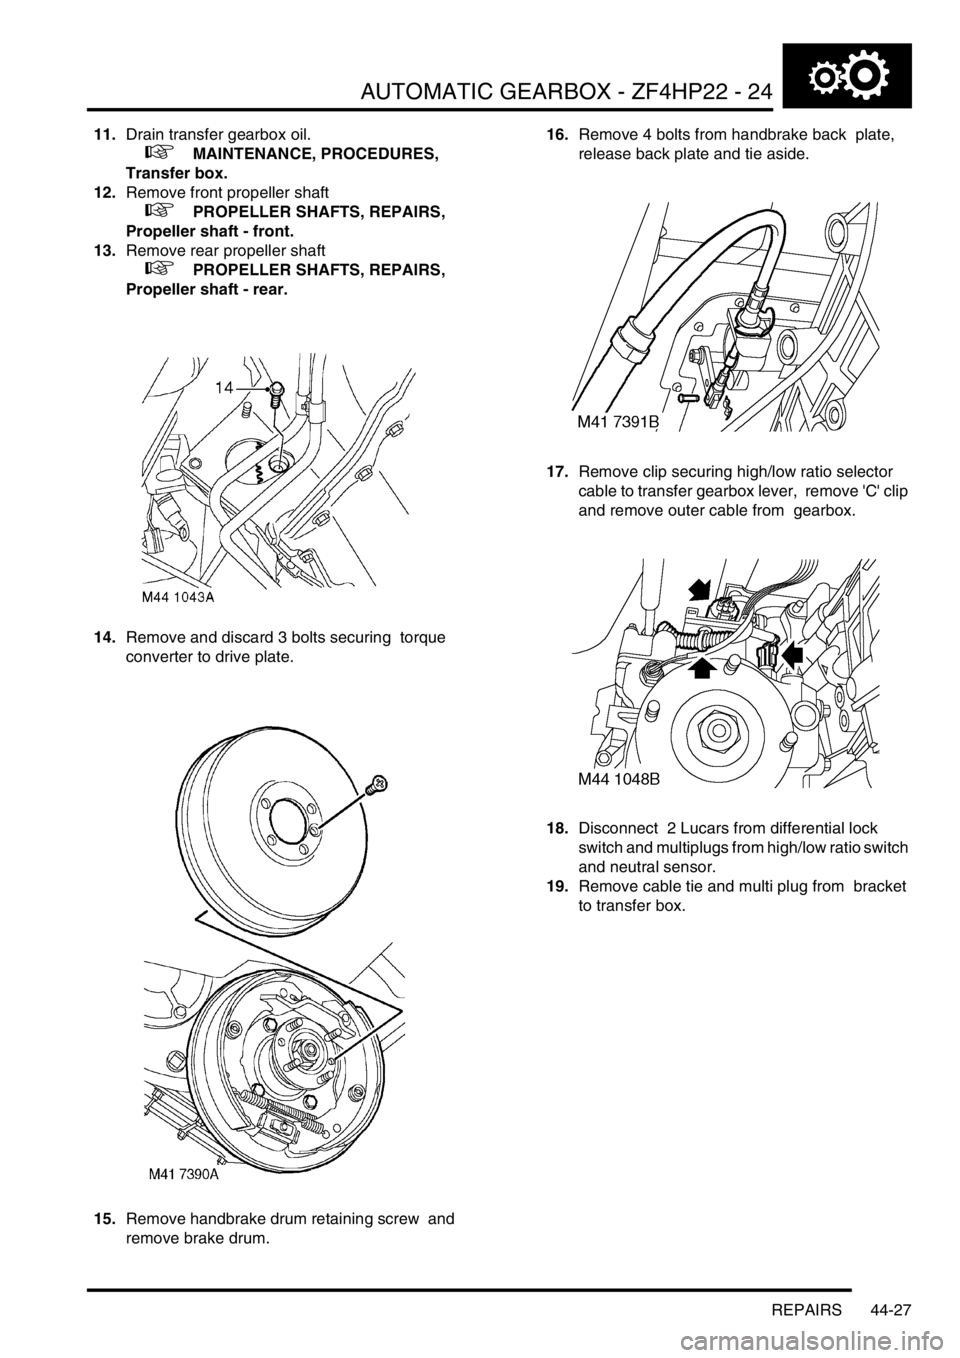
14.Remove and discard 3 bolts securing torque
converter to drive plate.
15.Remove handbrake drum retaining screw and
remove brake drum. 16.Remove 4 bolts from handbrake back plate,
release back plate and tie aside.
17.Remove clip securing high/low ratio selector
cable to transfer gearbox lever, remove 'C' clip
and remove outer cable from gearbox.
18.Disconnect 2 Lucars from differential lock
switch and multiplugs from high/low ratio switch
and neutral sensor.
19.Remove cable tie and multi plug from bracket
to transfer box.
Page 825 of 1672

AUTOMATIC GEARBOX - ZF4HP22 - 24
44-28 REPAIRS
20.Release transfer and automatic gearbox
breather pipes from clip at rear of cylinder
block.
21.Position gearbox support jack and secure tool
LRT-99-008A to support plate on jack.
22.Position a second support jack under engine
using a block between engine sump and jack
to prevent damage to sump.
23.Remove 4 bolts and nut, remove engine LH
rear mounting. 24.Remove 4 bolts and nut, remove engine RH
rear mounting.
25.Remove 2 bolts securing gearbox oil cooler
pipe clips to engine sump and alternator
mounting bracket.
26.Remove bolt and 2 nuts securing clamps to oil
cooler pipes and remove clamps.
Page 826 of 1672

AUTOMATIC GEARBOX - ZF4HP22 - 24
REPAIRS 44-29
27.Loosen gearbox oil cooler pipe unions, release
pipes from gearbox and discard 'O' rings.
CAUTION: Always fit plugs to open
connections to prevent contamination.
28.Remove 'C' clip securing selector cable to
gearbox bracket.
29.Remove nut securing selector lever to inhibitor
switch and release lever.
30.Disconnect multiplug from inhibitor switch.
31.Loosen gearbox multi plug locking ring and
disconnect plug. 32.Remove 6 remaining gearbox housing bolts.
33.With assistance remove automatic gearbox
from engine.
34.Fit suitable strap to retain torque converter.
Refit
1.Clean gearbox to engine mating faces.
2.Remove torque converter retaining strap.
3.With assistance position gearbox to engine.
4.Fit but do not tighten six bolts securing gearbox
housing to engine.
5.Connect multiplug to gearbox and tighten
locking ring.
6.Connect multiplug to inhibitor switch.
7.Position selector lever to inhibitor switch and
tighten nut to 25 Nm (18 lbf.ft).
8.Position selector cable to gearbox and secure
with 'C' clip.
9.Clean oil pipe unions and fit new 'O' rings.
10.Position and tighten pipe unions to gearbox.
11.Position and tighten oil cooler pipe clamps.
12.Position and tighten oil cooler pipe clips to
engine sump and alternator bracket.
13.Position engine RH and LH rear mountings
and tighten bolts to 85 Nm (63 lbf.ft) and nuts to
85 Nm (63 lbf.ft).
Page 827 of 1672

AUTOMATIC GEARBOX - ZF4HP22 - 24
44-30 REPAIRS
14.Secure gearbox breather pipes to bulkhead
clip.
15.Connect multiplugs to high/low ratio switch and
neutral sensor. Connect Lucars to differential
lock switch.
16.Position cable tie and multi plug to transfer box
bracket.
17.Connect high/low ratio cable to transfer box
and secure with retaining clips.
18.Position hand brake back plate and tighten
bolts to 75 Nm (55 lbf.ft).
19.Fit hand brake drum and tighten screw.
20.Remove bolts securing tool LRT-99-008A to
gearbox.
21.Rotate engine to align torque converter, fit new
bolts and tighten to 50 Nm (37 lbf.ft).
22.Fit rear propeller shaft.
+ PROPELLER SHAFTS, REPAIRS,
Propeller shaft - rear.
23.Fit front propeller shaft.
+ PROPELLER SHAFTS, REPAIRS,
Propeller shaft - front.
24.Fill transfer gearbox with oil.
+ MAINTENANCE, PROCEDURES,
Transfer box.
25.Fill automatic gearbox with oil.
+ MAINTENANCE, PROCEDURES,
Automatic gearbox.
26.Position intermediate silencer and secure to
mounting rubbers.
27.Clean silencer and tail pipe mating faces.
28.Position new gasket to tail pipe and tighten
nuts to 25 Nm (18 lbf.ft).
29.Fit exhaust front pipe.
+ MANIFOLDS AND EXHAUST
SYSTEMS - Td5, REPAIRS, Pipe - front.
30.Fit bolt securing closing plate to gearbox
housing and tighten to 7 Nm (5.2 lbf.ft).
31.Fit upper bolts securing gearbox housing to
engine and tighten to 50 Nm (37 lbf.ft).
32.Fit starter motor.
+ CHARGING AND STARTING,
REPAIRS, Starter motor - diesel.
33.Tighten remaining gearbox housing to engine
bolts to 50 Nm (37 lbf.ft).
34.Connect battery earth lead.
35.Fit battery cover and secure with fixings.
36.Check and adjust selector cable.
+ AUTOMATIC GEARBOX - ZF4HP22
- 24, ADJUSTMENTS, Cable - selector.
Gearbox - convertor and transfer
gearbox - V8
$% 44.20.04.99
Remove
1.Release fixings and remove battery cover.
2.Disconnect battery earth lead.
3.Raise vehicle on a ramp.
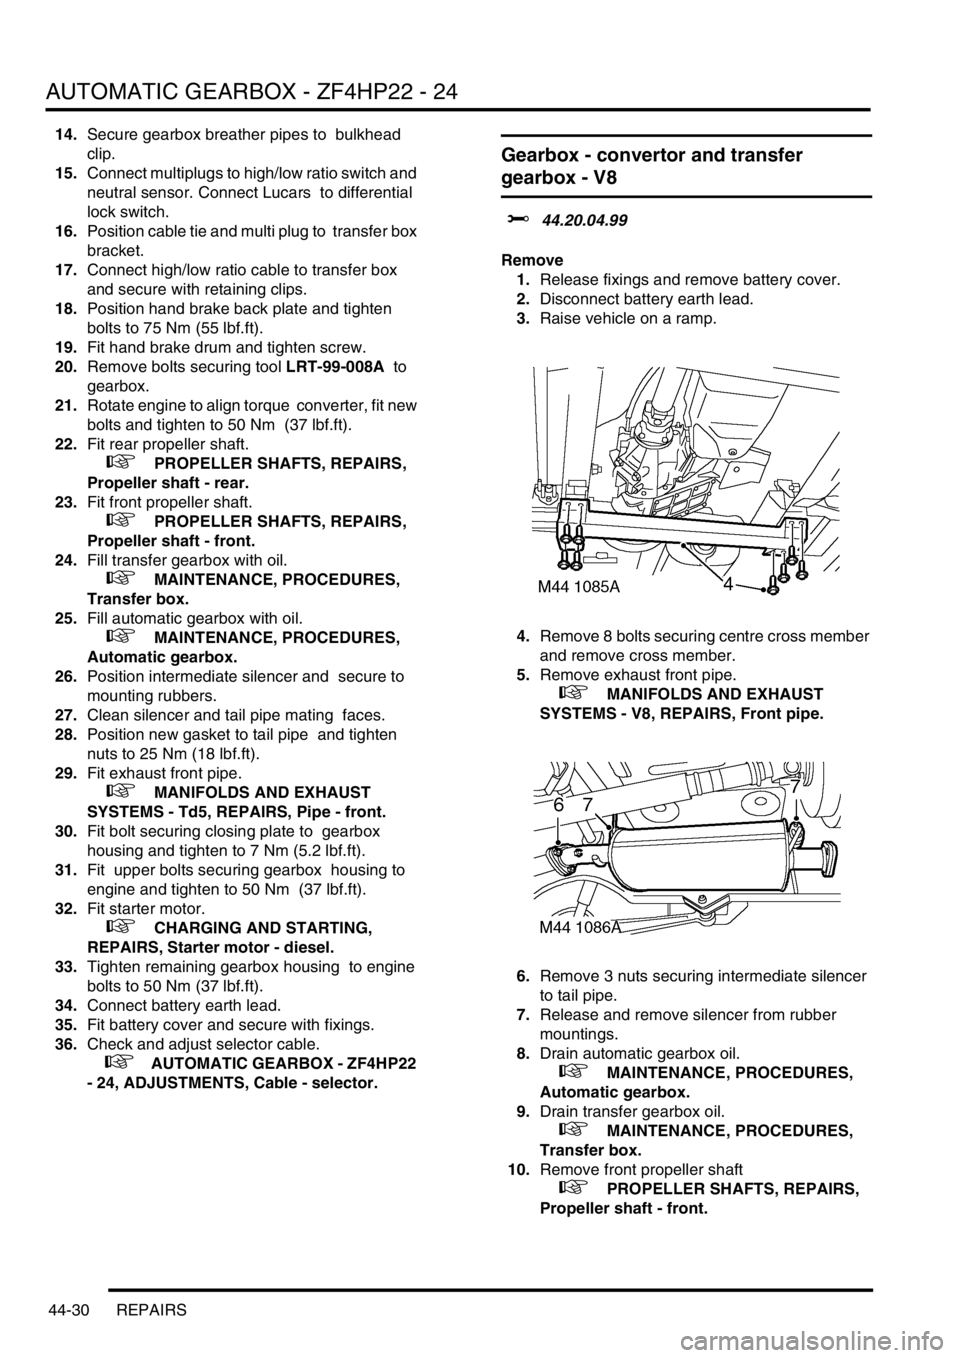
4.Remove 8 bolts securing centre cross member
and remove cross member.
5.Remove exhaust front pipe.
+ MANIFOLDS AND EXHAUST
SYSTEMS - V8, REPAIRS, Front pipe.
6.Remove 3 nuts securing intermediate silencer
to tail pipe.
7.Release and remove silencer from rubber
mountings.
8.Drain automatic gearbox oil.
+ MAINTENANCE, PROCEDURES,
Automatic gearbox.
9.Drain transfer gearbox oil.
+ MAINTENANCE, PROCEDURES,
Transfer box.
10.Remove front propeller shaft
+ PROPELLER SHAFTS, REPAIRS,
Propeller shaft - front.
Page 828 of 1672

AUTOMATIC GEARBOX - ZF4HP22 - 24
REPAIRS 44-31
11.Remove rear propeller shaft
+ PROPELLER SHAFTS, REPAIRS,
Propeller shaft - rear.
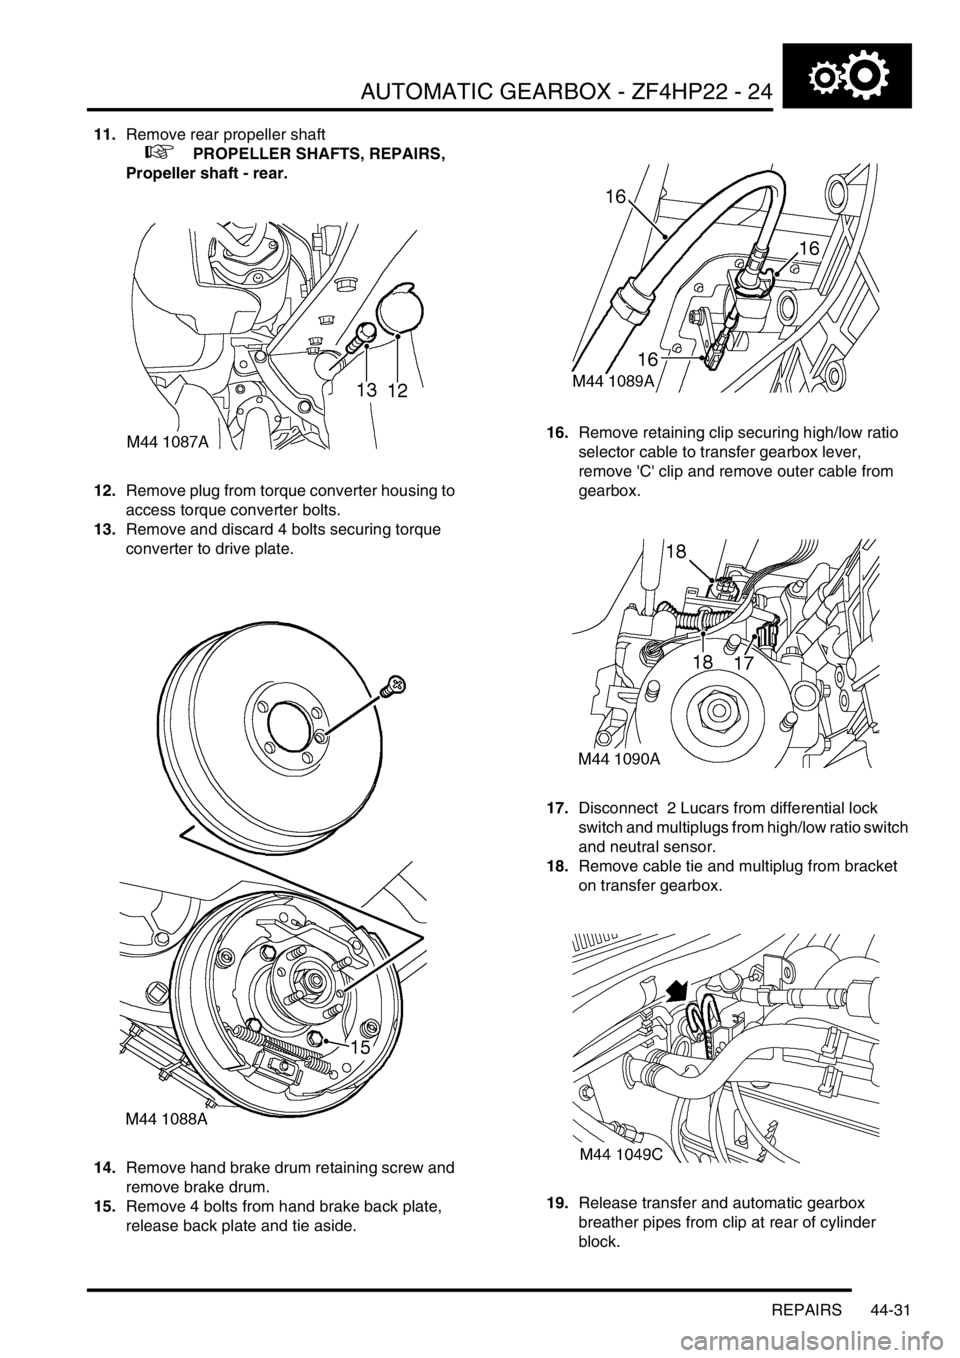
12.Remove plug from torque converter housing to
access torque converter bolts.
13.Remove and discard 4 bolts securing torque
converter to drive plate.
14.Remove hand brake drum retaining screw and
remove brake drum.
15.Remove 4 bolts from hand brake back plate,
release back plate and tie aside. 16.Remove retaining clip securing high/low ratio
selector cable to transfer gearbox lever,
remove 'C' clip and remove outer cable from
gearbox.
17.Disconnect 2 Lucars from differential lock
switch and multiplugs from high/low ratio switch
and neutral sensor.
18.Remove cable tie and multiplug from bracket
on transfer gearbox.
19.Release transfer and automatic gearbox
breather pipes from clip at rear of cylinder
block.
Page 829 of 1672

AUTOMATIC GEARBOX - ZF4HP22 - 24
44-32 REPAIRS
20.Position gearbox support jack and secure tool
LRT-99-008A to support plate on jack.
21.Position a second support jack under engine
using a block between engine sump and jack to
prevent damage to sump.
22.Remove 4 bolts and nut, remove engine LH
rear mounting.
23.Remove 4 bolts and nut, remove engine RH
rear mounting. 24.Remove bolt securing gearbox oil cooler pipe
clips to engine.
25.Remove bolt and 2 nuts securing clamps to oil
cooler pipes and remove clamps.
26.Loosen gearbox oil cooler pipe unions, release
pipes from gearbox and discard 'O' rings.
CAUTION: Always fit plugs to open
connections to prevent contamination.