engine coolant LAND ROVER DISCOVERY 2002 Service Manual
[x] Cancel search | Manufacturer: LAND ROVER, Model Year: 2002, Model line: DISCOVERY, Model: LAND ROVER DISCOVERY 2002Pages: 1672, PDF Size: 46.1 MB
Page 283 of 1672
ENGINE - V8
12-2-40 REPAIRS
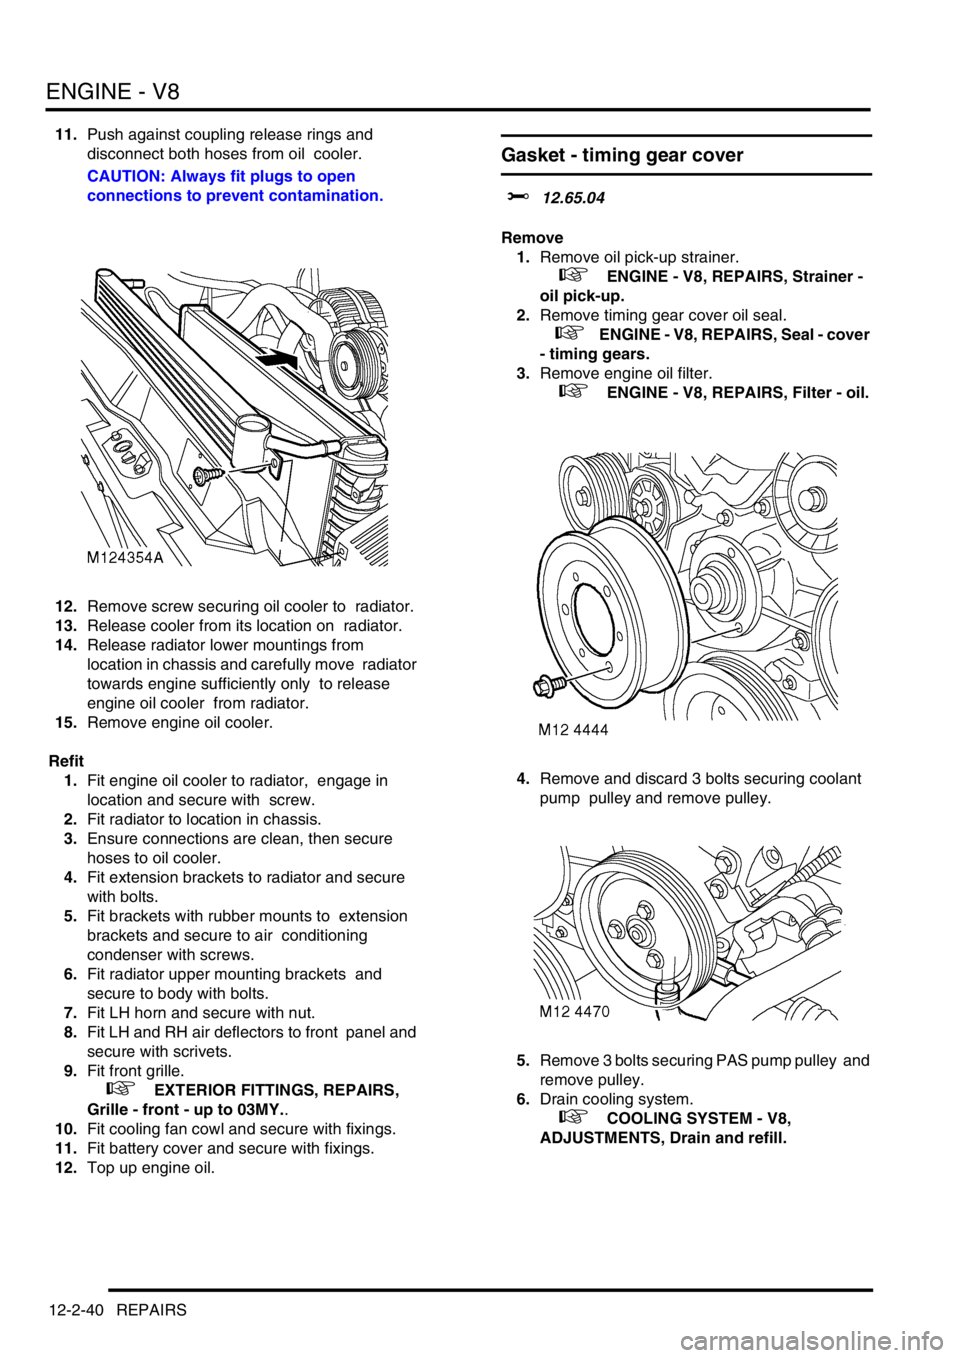
11.Push against coupling release rings and
disconnect both hoses from oil cooler.
CAUTION: Always fit plugs to open
connections to prevent contamination.
12.Remove screw securing oil cooler to radiator.
13.Release cooler from its location on radiator.
14.Release radiator lower mountings from
location in chassis and carefully move radiator
towards engine sufficiently only to release
engine oil cooler from radiator.
15.Remove engine oil cooler.
Refit
1.Fit engine oil cooler to radiator, engage in
location and secure with screw.
2.Fit radiator to location in chassis.
3.Ensure connections are clean, then secure
hoses to oil cooler.
4.Fit extension brackets to radiator and secure
with bolts.
5.Fit brackets with rubber mounts to extension
brackets and secure to air conditioning
condenser with screws.
6.Fit radiator upper mounting brackets and
secure to body with bolts.
7.Fit LH horn and secure with nut.
8.Fit LH and RH air deflectors to front panel and
secure with scrivets.
9.Fit front grille.
+ EXTERIOR FITTINGS, REPAIRS,
Grille - front - up to 03MY..
10.Fit cooling fan cowl and secure with fixings.
11.Fit battery cover and secure with fixings.
12.Top up engine oil.
Gasket - timing gear cover
$% 12.65.04
Remove
1.Remove oil pick-up strainer.
+ ENGINE - V8, REPAIRS, Strainer -
oil pick-up.
2.Remove timing gear cover oil seal.
+ ENGINE - V8, REPAIRS, Seal - cover
- timing gears.
3.Remove engine oil filter.
+ ENGINE - V8, REPAIRS, Filter - oil.
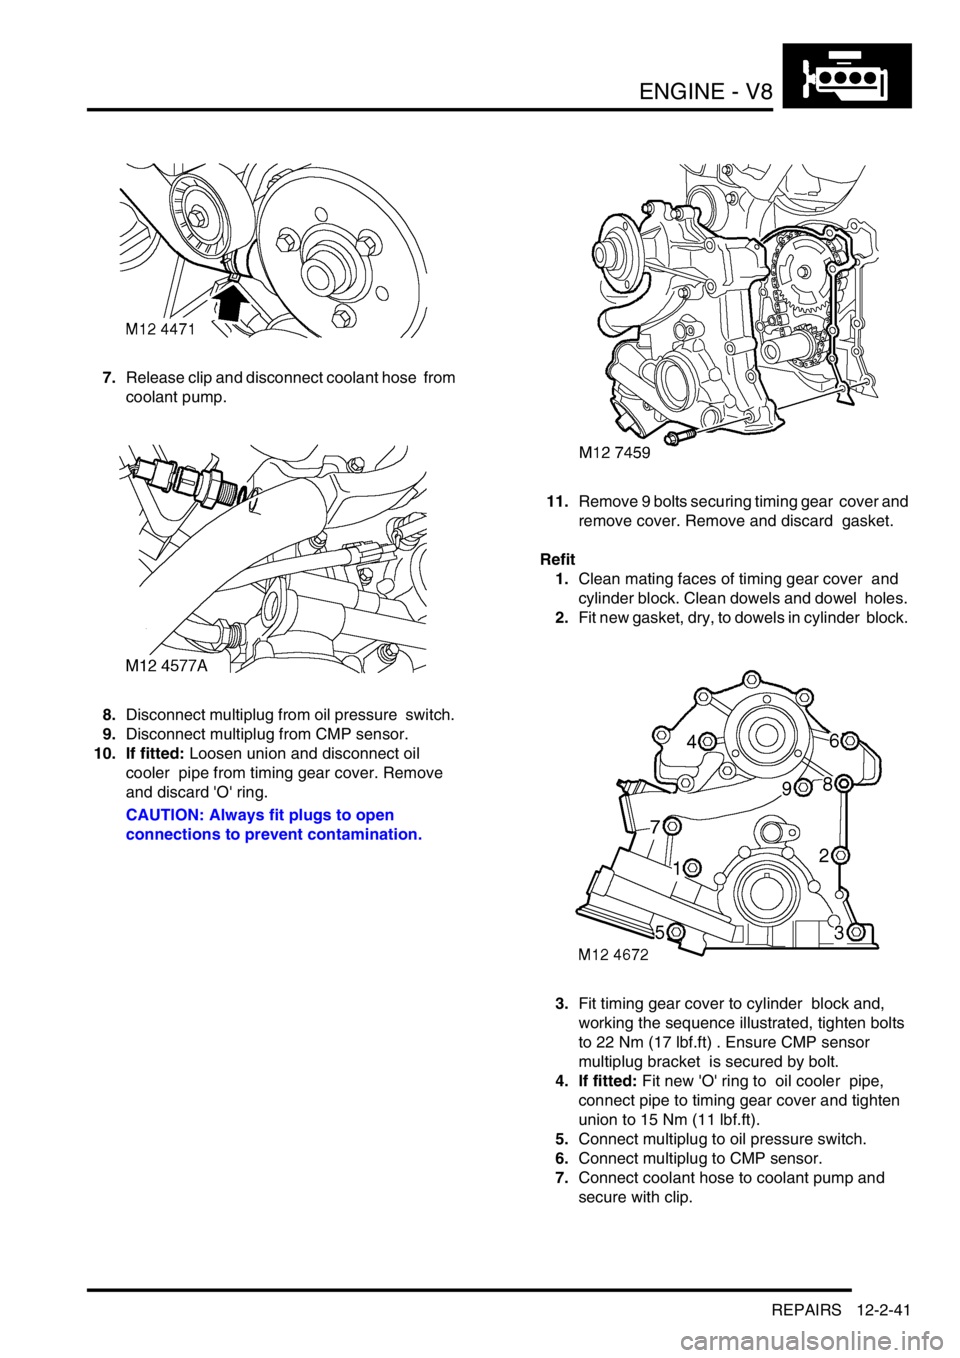
4.Remove and discard 3 bolts securing coolant
pump pulley and remove pulley.
5.Remove 3 bolts securing PAS pump pulley and
remove pulley.
6.Drain cooling system.
+ COOLING SYSTEM - V8,
ADJUSTMENTS, Drain and refill.
Page 284 of 1672
ENGINE - V8
REPAIRS 12-2-41
7.Release clip and disconnect coolant hose from
coolant pump.
8.Disconnect multiplug from oil pressure switch.
9.Disconnect multiplug from CMP sensor.
10. If fitted: Loosen union and disconnect oil
cooler pipe from timing gear cover. Remove
and discard 'O' ring.
CAUTION: Always fit plugs to open
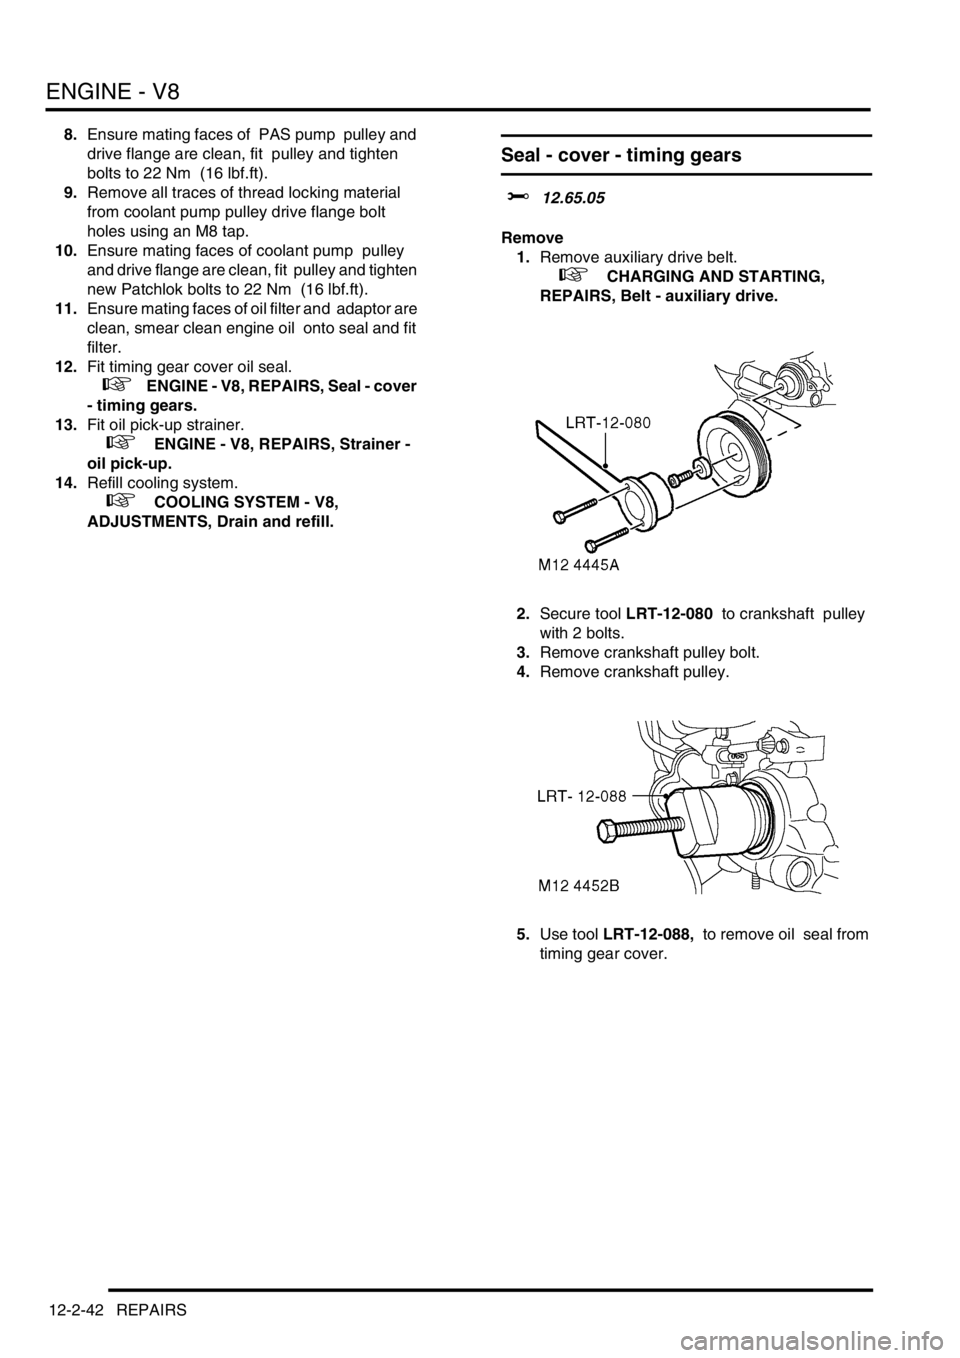
connections to prevent contamination.11.Remove 9 bolts securing timing gear cover and
remove cover. Remove and discard gasket.
Refit
1.Clean mating faces of timing gear cover and
cylinder block. Clean dowels and dowel holes.
2.Fit new gasket, dry, to dowels in cylinder block.
3.Fit timing gear cover to cylinder block and,
working the sequence illustrated, tighten bolts
to 22 Nm (17 lbf.ft) . Ensure CMP sensor
multiplug bracket is secured by bolt.
4. If fitted: Fit new 'O' ring to oil cooler pipe,
connect pipe to timing gear cover and tighten
union to 15 Nm (11 lbf.ft).
5.Connect multiplug to oil pressure switch.
6.Connect multiplug to CMP sensor.
7.Connect coolant hose to coolant pump and
secure with clip.
Page 285 of 1672
ENGINE - V8
12-2-42 REPAIRS
8.Ensure mating faces of PAS pump pulley and
drive flange are clean, fit pulley and tighten
bolts to 22 Nm (16 lbf.ft).
9.Remove all traces of thread locking material
from coolant pump pulley drive flange bolt
holes using an M8 tap.
10.Ensure mating faces of coolant pump pulley
and drive flange are clean, fit pulley and tighten
new Patchlok bolts to 22 Nm (16 lbf.ft).
11.Ensure mating faces of oil filter and adaptor are
clean, smear clean engine oil onto seal and fit
filter.
12.Fit timing gear cover oil seal.
+ ENGINE - V8, REPAIRS, Seal - cover
- timing gears.
13.Fit oil pick-up strainer.
+ ENGINE - V8, REPAIRS, Strainer -
oil pick-up.
14.Refill cooling system.
+ COOLING SYSTEM - V8,
ADJUSTMENTS, Drain and refill.
Seal - cover - timing gears
$% 12.65.05
Remove
1.Remove auxiliary drive belt.
+ CHARGING AND STARTING,
REPAIRS, Belt - auxiliary drive.
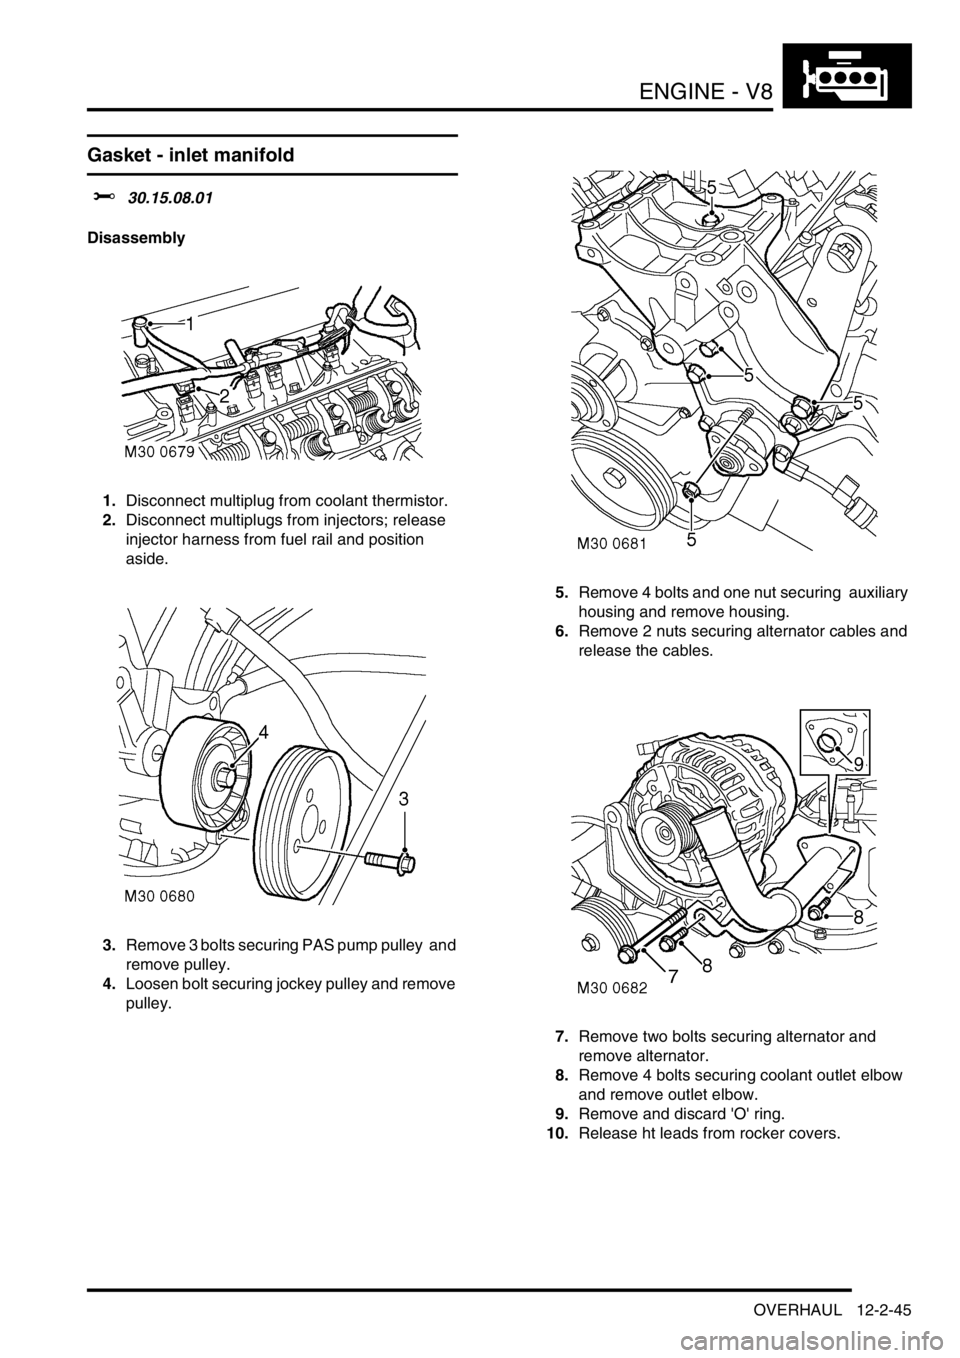
2.Secure tool LRT-12-080 to crankshaft pulley
with 2 bolts.
3.Remove crankshaft pulley bolt.
4.Remove crankshaft pulley.
5.Use tool LRT-12-088, to remove oil seal from
timing gear cover.
Page 288 of 1672
ENGINE - V8
OVERHAUL 12-2-45
OVERHAUL
Gasket - inlet manifold
$% 30.15.08.01
Disassembly
1.Disconnect multiplug from coolant thermistor.
2.Disconnect multiplugs from injectors; release
injector harness from fuel rail and position
aside.
3.Remove 3 bolts securing PAS pump pulley and
remove pulley.
4.Loosen bolt securing jockey pulley and remove
pulley. 5.Remove 4 bolts and one nut securing auxiliary
housing and remove housing.
6.Remove 2 nuts securing alternator cables and
release the cables.
7.Remove two bolts securing alternator and
remove alternator.
8.Remove 4 bolts securing coolant outlet elbow
and remove outlet elbow.
9.Remove and discard 'O' ring.
10.Release ht leads from rocker covers.
Page 291 of 1672
ENGINE - V8
12-2-48 OVERHAUL
10.Clean mating faces of rocker covers and
cylinder heads.
11.Fit new rocker cover gaskets, dry, position
rocker cover, fit bolts and working in diagonal
sequence, tighten to:
lStage 1 - 3 Nm (2.5 lbf.ft)
lStage 2 - 8 Nm (6 lbf.ft)
12.Ensure that outer rim of gasket is correctly
positioned around periphery of rocker cover.
13.Secure ht leads to rocker cover.
14.Clean coolant outlet elbow mating faces.
15.Lubricate and fit new 'O' ring to outlet pipe.
16.Position coolant outlet elbow, fit bolts and
tighten to 22 Nm (17 lbf.ft).
17.Position alternator, fit mounting bolts and
tighten to 45 Nm (34 lbf.ft).
18.Position alternator cables and tighten terminal
B+ to 18 Nm (13 lbf.ft) and terminal D+ to 5 Nm
(3.5 lbf.ft).
19.Position auxiliary housing, fit bolts and tighten
to 40 Nm (30 lbf.ft). Fit nut and tighten to 22 Nm
(17 lbf.ft).
20.Clean jockey pulley mating faces.
21.Position jockey pulley and tighten bolt to 50 Nm
(37 lbf.ft).
22.Clean PAS pump pulley mating faces.
23.Position PAS pump pulley, fit bolts and tighten
to 22 Nm (17 lbf.ft).
24.Secure injector harness and connect injector
multiplugs.
25.Connect multiplug to coolant thermistor.
Gasket - exhaust manifold
$% 30.15.12.01
Disassembly
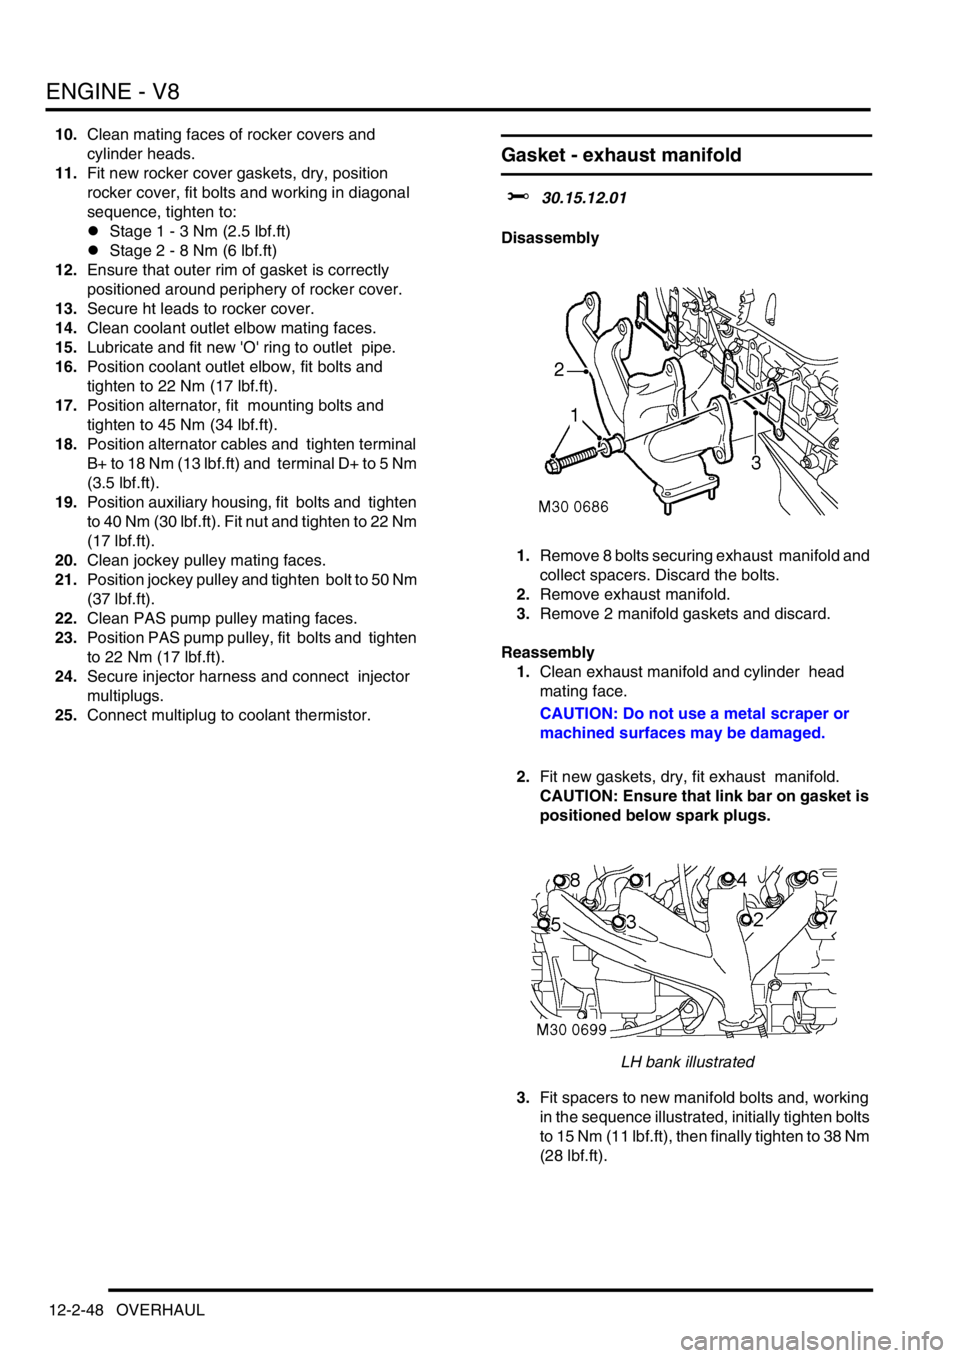
1.Remove 8 bolts securing exhaust manifold and
collect spacers. Discard the bolts.
2.Remove exhaust manifold.
3.Remove 2 manifold gaskets and discard.
Reassembly
1.Clean exhaust manifold and cylinder head
mating face.
CAUTION: Do not use a metal scraper or
machined surfaces may be damaged.
2.Fit new gaskets, dry, fit exhaust manifold.
CAUTION: Ensure that link bar on gasket is
positioned below spark plugs.
LH bank illustrated
3.Fit spacers to new manifold bolts and, working
in the sequence illustrated, initially tighten bolts
to 15 Nm (11 lbf.ft), then finally tighten to 38 Nm
(28 lbf.ft).
Page 298 of 1672
ENGINE - V8
OVERHAUL 12-2-55
Reassembly
1.Clean seal register in timing gear cover and
crankshaft pulley.
2.Apply Retinax LX grease to inner recess of new
oil seal until recess is half filled with grease.Do
not allow grease to coat any other part of
seal. Do not apply oil to seal.
3.Apply smear of Retinax LX grease to seal
running surface on crankshaft.
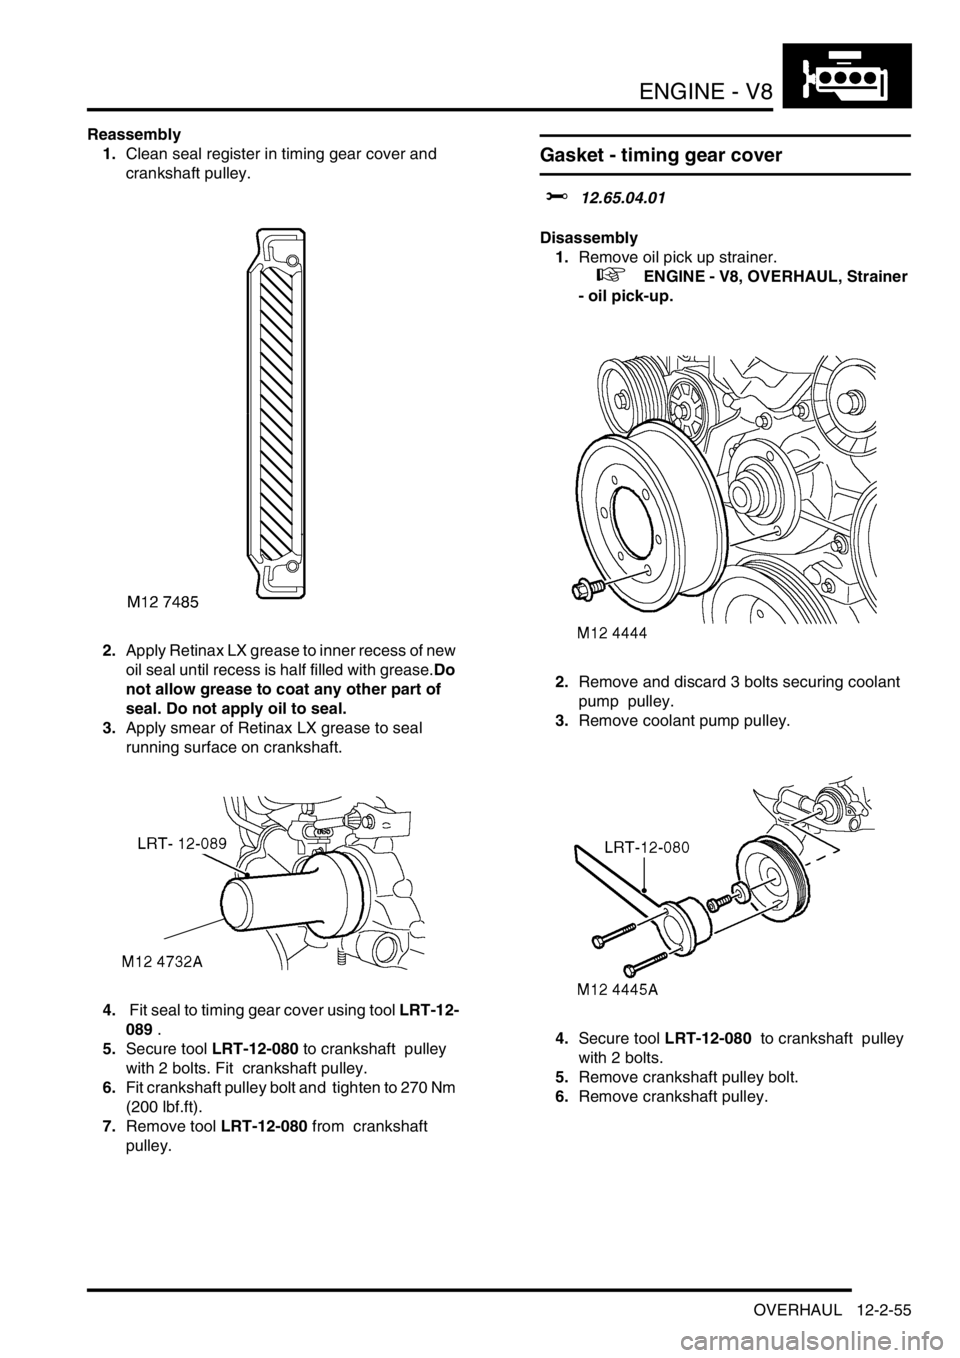
4. Fit seal to timing gear cover using tool LRT-12-
089 .
5.Secure tool LRT-12-080 to crankshaft pulley
with 2 bolts. Fit crankshaft pulley.
6.Fit crankshaft pulley bolt and tighten to 270 Nm
(200 lbf.ft).
7.Remove tool LRT-12-080 from crankshaft
pulley.
Gasket - timing gear cover
$% 12.65.04.01
Disassembly
1.Remove oil pick up strainer.
+ ENGINE - V8, OVERHAUL, Strainer
- oil pick-up.
2.Remove and discard 3 bolts securing coolant
pump pulley.
3.Remove coolant pump pulley.
4.Secure tool LRT-12-080 to crankshaft pulley
with 2 bolts.
5.Remove crankshaft pulley bolt.
6.Remove crankshaft pulley.
Page 300 of 1672
ENGINE - V8
OVERHAUL 12-2-57
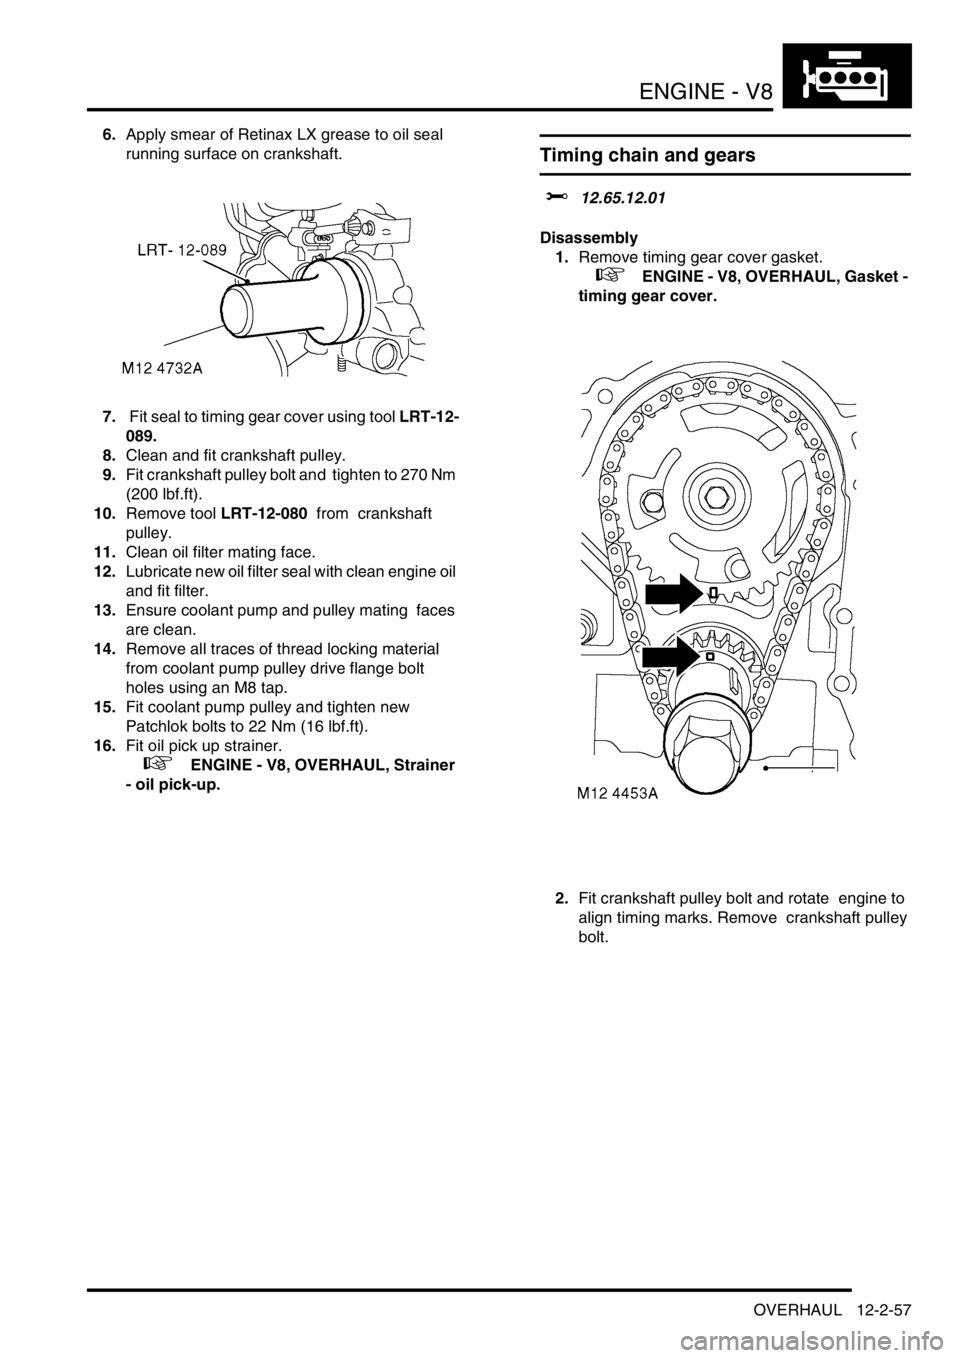
6.Apply smear of Retinax LX grease to oil seal
running surface on crankshaft.
7. Fit seal to timing gear cover using tool LRT-12-
089.
8.Clean and fit crankshaft pulley.
9.Fit crankshaft pulley bolt and tighten to 270 Nm
(200 lbf.ft).
10.Remove tool LRT-12-080 from crankshaft
pulley.
11.Clean oil filter mating face.
12.Lubricate new oil filter seal with clean engine oil
and fit filter.
13.Ensure coolant pump and pulley mating faces
are clean.
14.Remove all traces of thread locking material
from coolant pump pulley drive flange bolt
holes using an M8 tap.
15.Fit coolant pump pulley and tighten new
Patchlok bolts to 22 Nm (16 lbf.ft).
16.Fit oil pick up strainer.
+ ENGINE - V8, OVERHAUL, Strainer
- oil pick-up.
Timing chain and gears
$% 12.65.12.01
Disassembly
1.Remove timing gear cover gasket.
+ ENGINE - V8, OVERHAUL, Gasket -
timing gear cover.
2.Fit crankshaft pulley bolt and rotate engine to
align timing marks. Remove crankshaft pulley
bolt.
Page 318 of 1672
ENGINE - V8
OVERHAUL 12-2-75
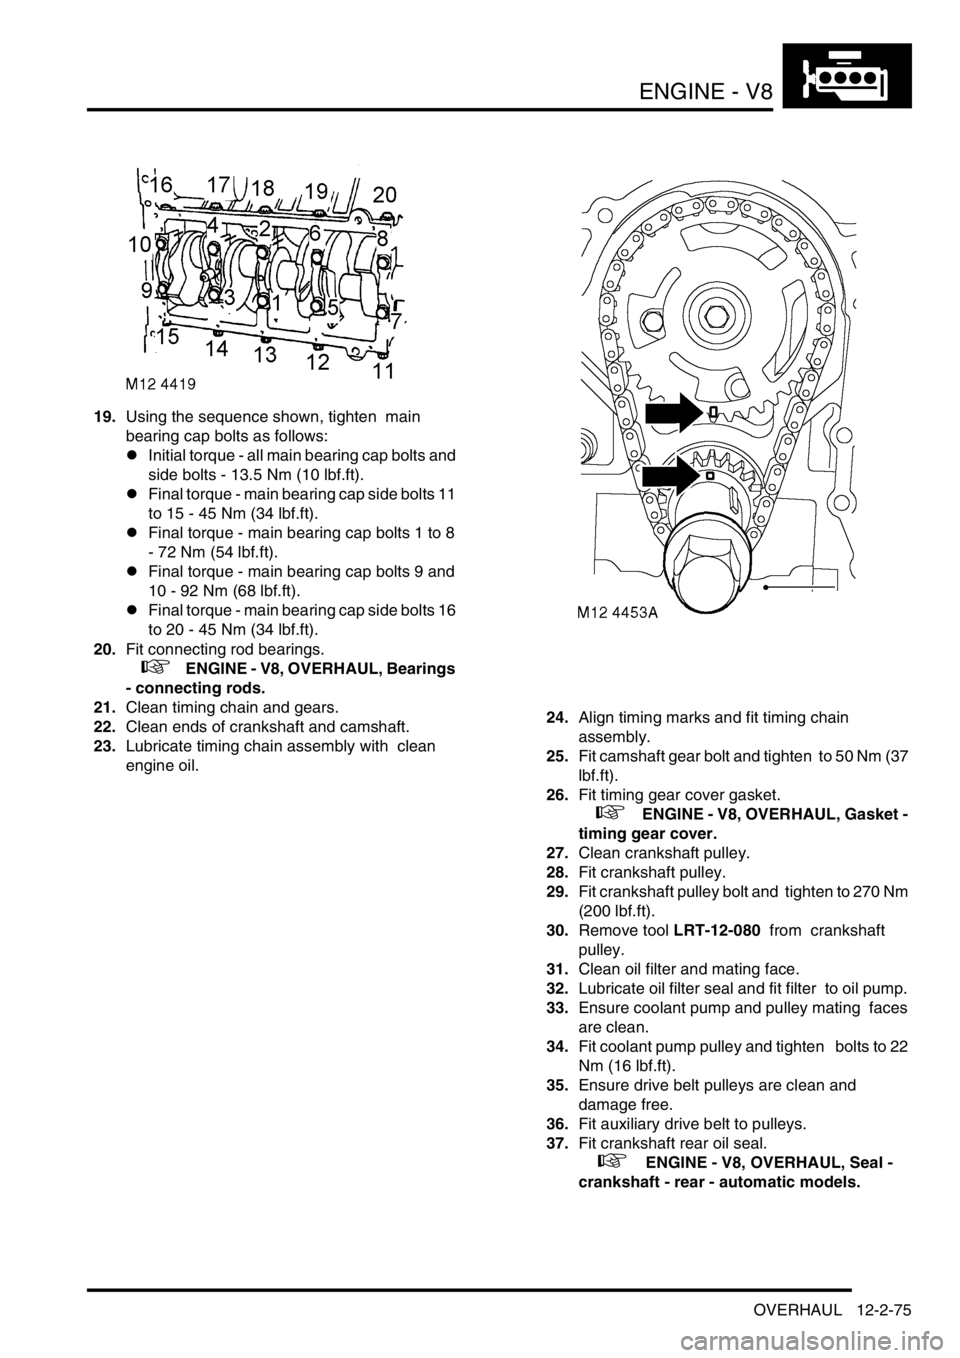
19.Using the sequence shown, tighten main
bearing cap bolts as follows:
lInitial torque - all main bearing cap bolts and
side bolts - 13.5 Nm (10 lbf.ft).
lFinal torque - main bearing cap side bolts 11
to 15 - 45 Nm (34 lbf.ft).
lFinal torque - main bearing cap bolts 1 to 8
- 72 Nm (54 lbf.ft).
lFinal torque - main bearing cap bolts 9 and
10 - 92 Nm (68 lbf.ft).
lFinal torque - main bearing cap side bolts 16
to 20 - 45 Nm (34 lbf.ft).
20.Fit connecting rod bearings.
+ ENGINE - V8, OVERHAUL, Bearings
- connecting rods.
21.Clean timing chain and gears.
22.Clean ends of crankshaft and camshaft.
23.Lubricate timing chain assembly with clean
engine oil. 24.Align timing marks and fit timing chain
assembly.
25.Fit camshaft gear bolt and tighten to 50 Nm (37
lbf.ft).
26.Fit timing gear cover gasket.
+ ENGINE - V8, OVERHAUL, Gasket -
timing gear cover.
27.Clean crankshaft pulley.
28.Fit crankshaft pulley.
29.Fit crankshaft pulley bolt and tighten to 270 Nm
(200 lbf.ft).
30.Remove tool LRT-12-080 from crankshaft
pulley.
31.Clean oil filter and mating face.
32.Lubricate oil filter seal and fit filter to oil pump.
33.Ensure coolant pump and pulley mating faces
are clean.
34.Fit coolant pump pulley and tighten bolts to 22
Nm (16 lbf.ft).
35.Ensure drive belt pulleys are clean and
damage free.
36.Fit auxiliary drive belt to pulleys.
37.Fit crankshaft rear oil seal.
+ ENGINE - V8, OVERHAUL, Seal -
crankshaft - rear - automatic models.
Page 326 of 1672
EMISSION CONTROL - TD5
DESCRIPTION AND OPERATION 17-1-5
Exhaust gas recirculation
The exhaust gas recirculation (EGR) valve permits a controlled amount of exhaust gas to combine with the fresh air
entering the engine. The exhaust gas reduces the combustion temperature by delaying the fuel burning rate, which
assists in reducing the quantity of oxides of nitrogen.
On EU3 models, an EGR cooler is employed to further reduce the combustion temperature. By passing the exhaust
gas through a bundle of pipes flooded by coolant, the density of the exhaust gas going into the engine is increased.
This process further reduces the amount of oxygen, which in turn, further reduces the amount of NO
2 in the exhaust.
Recirculating too much exhaust gas can result in higher emissions of soot, HC and CO due to insufficient air. The
recirculated exhaust gas must be limited so that there is sufficient oxygen available for combustion of the injected fuel
in the combustion chamber, to do this the Engine Control Module (ECM) is used to control the precise quantity of
exhaust gas to be recirculated in accordance with the prevailing operating conditions. Influencing factors include:
lthe mass of air flow detected by the mass air flow sensor.
+ ENGINE MANAGEMENT SYSTEM - Td5, DESCRIPTION AND OPERATION, Description.
lthe ambient air pressure, determined by the ambient air pressure sensor which is used to initiate adjustments
to reduce the amount of smoke produced at high altitudes.
+ ENGINE MANAGEMENT SYSTEM - Td5, DESCRIPTION AND OPERATION, Description.
Other factors which are taken into consideration by the engine management system for determining the optimum
operating condition include:
lManifold inlet air temperature
lCoolant temperature
lEngine speed
lFuel delivered
The main components of the EGR system are as follows.
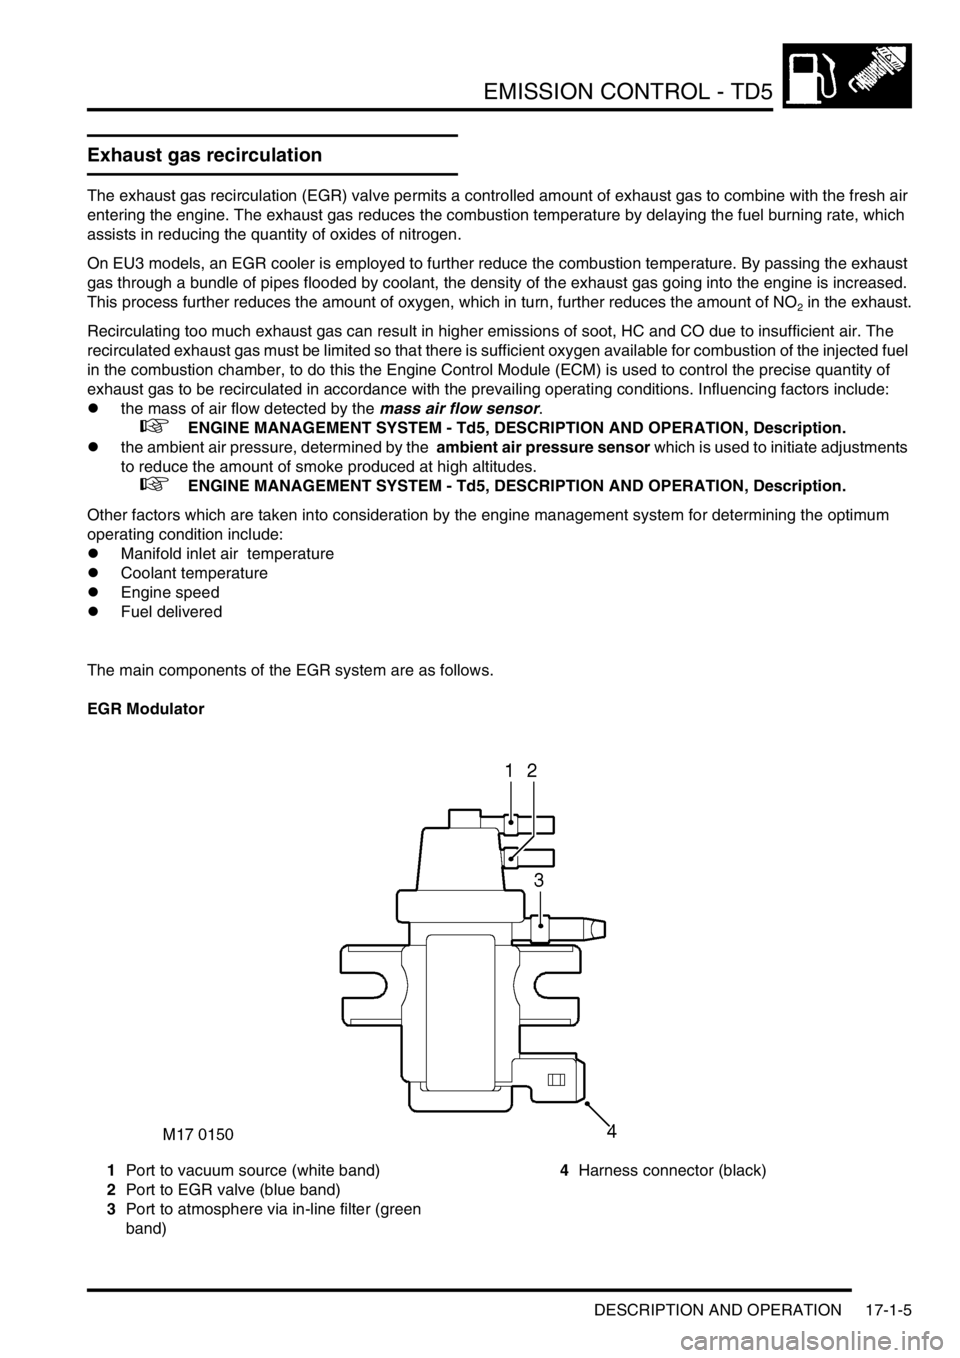
EGR Modulator
1Port to vacuum source (white band)
2Port to EGR valve (blue band)
3Port to atmosphere via in-line filter (green
band)4Harness connector (black)
Page 363 of 1672

EMISSION CONTROL - V8
17-2-26 DESCRIPTION AND OPERATION
Secondary air injection system
The secondary air injection (SAI) system comprises the following components:
lSecondary air injection pump
lSAI vacuum solenoid valve
lSAI control valves (2 off, 1 for each bank of cylinders)
lSAI pump relay
lVacuum reservoir
lVacuum harness and pipes
The secondary air injection system is used to limit the emission of carbon monoxide (CO) and hydrocarbons (HCs)
that are prevalent in the exhaust during cold starting of a spark ignition engine. The concentration of hydrocarbons
experienced during cold starting at low temperatures are particularly high until the engine and catalytic converter
reach normal operating temperature. The lower the cold start temperature, the greater the prevalence of
hydrocarbons emitted from the engine.
There are several reasons for the increase of HC emissions at low cold start temperatures, including the tendency for
fuel to be deposited on the cylinder walls, which is then displaced during the piston cycle and expunged during the
exhaust stroke. As the engine warms up through operation, the cylinder walls no longer retain a film of fuel and most
of the hydrocarbons will be burnt off during the combustion process.
The SAI pump is used to provide a supply of air into the exhaust ports in the cylinder head, onto the back of the
exhaust valves, during the cold start period. The hot unburnt fuel particles leaving the combustion chamber mix with
the air injected into the exhaust ports and immediately combust. This subsequent combustion of the unburnt and
partially burnt CO and HC particles help to reduce the emission of these pollutants from the exhaust system. The
additional heat generated in the exhaust manifold also provides rapid heating of the exhaust system catalytic
converters. The additional oxygen which is delivered to the catalytic converters also generate an exothermic reaction
which causes the catalytic converters to 'light off' quickly.
The catalytic converters only start to provide effective treatment of emission pollutants when they reach an operating
temperature of approximately 250
°C (482°F) and need to be between temperatures of 400°C (752°F) and 800°C
(1472
°F) for optimum efficiency. Consequently, the heat produced by the secondary air injection “afterburning”,
reduces the time delay before the catalysts reach an efficient operating temperature.
The engine control module (ECM) checks the engine coolant temperature when the engine is started, and if it is below
60º C (131
°F), the SAI pump is started. Secondary air injection will remain operational for a period controlled by the
ECM (76 seconds for NAS vehicles, 64 seconds for EU-3 vehicles). The SAI pump operation can be cut short due to
excessive engine speed or load.
Air from the SAI pump is supplied to the SAI control valves via pipework and an intermediate T-piece which splits the
air flow evenly to each bank.
At the same time the secondary air pump is started, the ECM operates a SAI vacuum solenoid valve, which opens to
allow vacuum from the reservoir to be applied to the vacuum operated SAI control valves on each side of the engine.
When the vacuum is applied to the SAI control valves, they open simultaneously to allow the air from the SAI pump
through to the exhaust ports. Secondary air is injected into the inner most exhaust ports on each bank.
When the ECM breaks the ground circuit to de-energise the SAI vacuum solenoid valve, the vacuum supply to the
SAI control valves is cut off and the valves close to prevent further air being injected into the exhaust manifold. At the
same time as the SAI vacuum solenoid valve is closed, the ECM opens the ground circuit to the SAI pump relay, to
stop the SAI pump.
A vacuum reservoir is included in the vacuum line between the intake manifold and the SAI vacuum solenoid valve.
This prevents changes in vacuum pressure from the intake manifold being passed on to cause fluctuations of the
secondary air injection solenoid valve. The vacuum reservoir contains a one way valve and ensures a constant
vacuum is available for the SAI vacuum solenoid valve operation. This is particularly important when the vehicle is at
high altitude.