LAND ROVER FRELANDER 2 2006 Repair Manual
FRELANDER 2 2006
LAND ROVER
LAND ROVER
https://www.carmanualsonline.info/img/64/57251/w960_57251-0.png
LAND ROVER FRELANDER 2 2006 Repair Manual
Trending: check transmission fluid, seat adjustment, fuse diagram, transmission, oil level, USB, AUX
Page 2411 of 3229
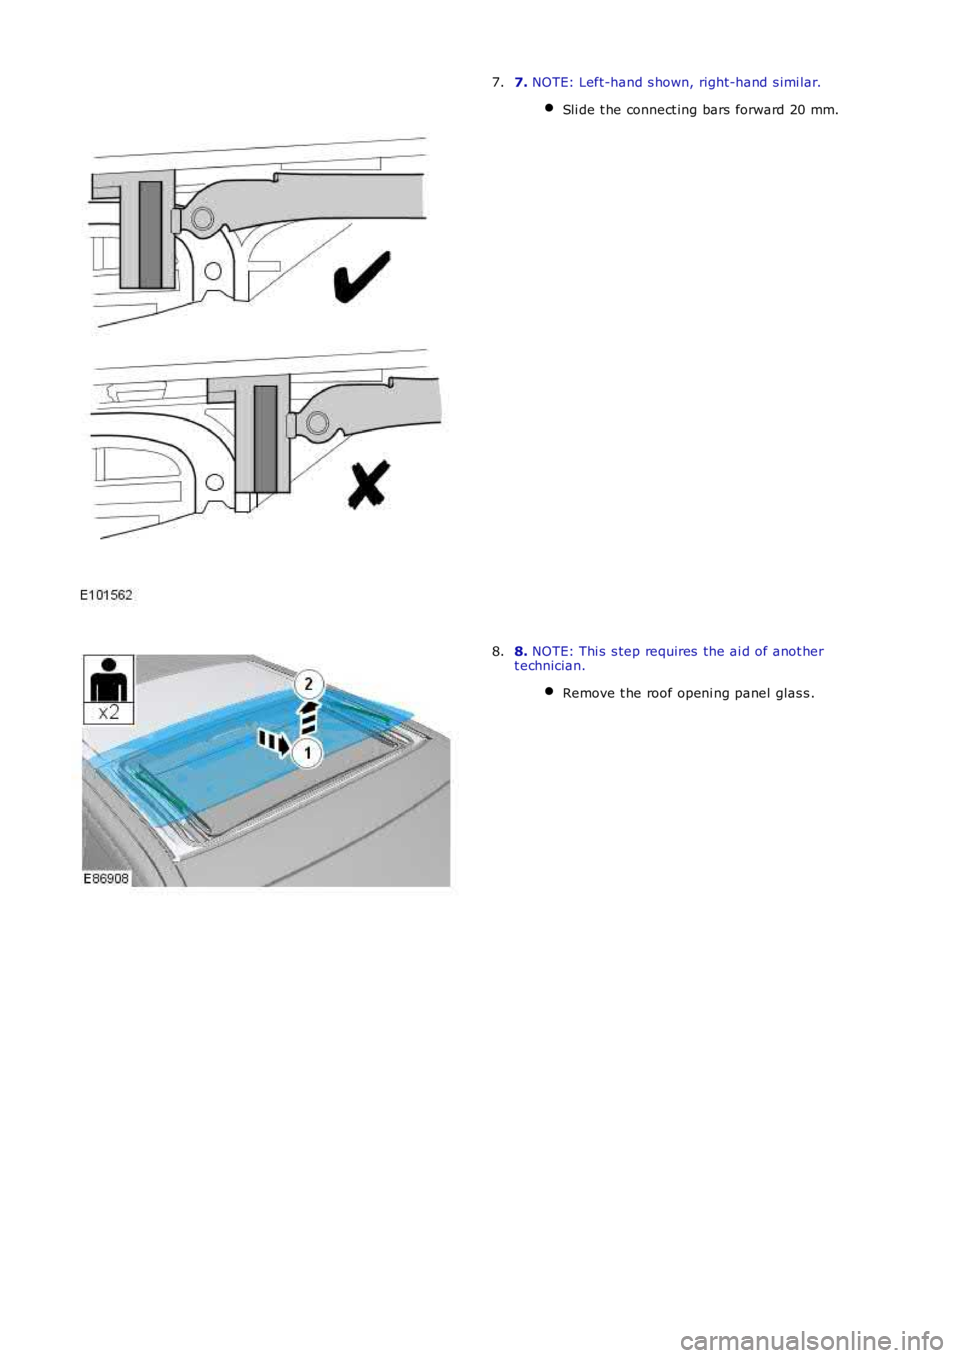
7. NOTE: Left-hand s hown, right-hand s imi lar.
Sli de t he connect ing bars forward 20 mm.
7.
8. NOTE: Thi s s tep requires the ai d of anot hert echnician.
Remove t he roof openi ng panel glas s .
8.
Page 2412 of 3229
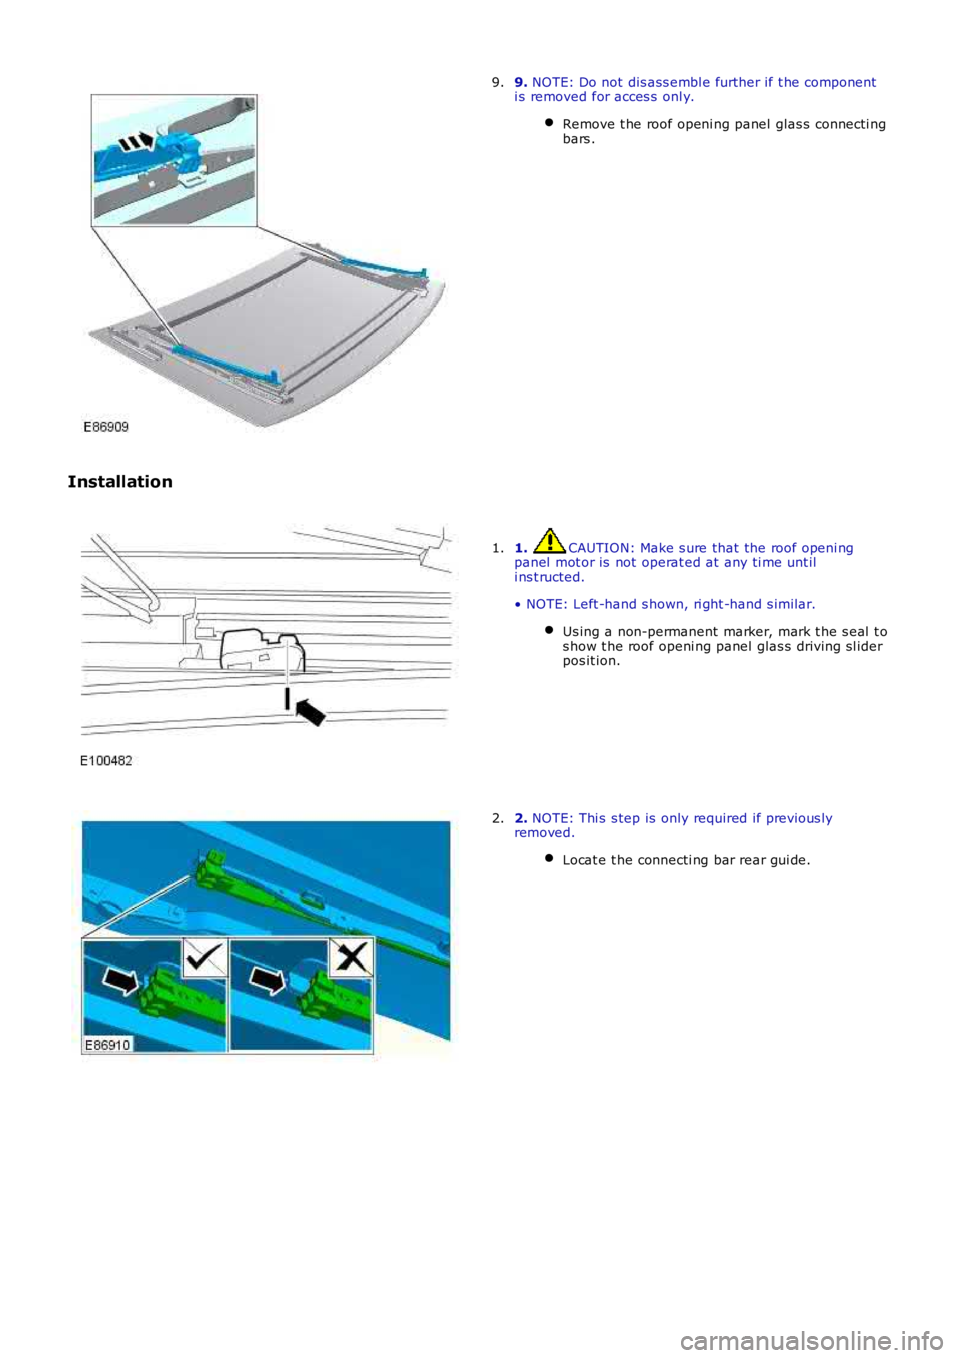
9. NOTE: Do not dis ass embl e further if t he componenti s removed for acces s onl y.
Remove t he roof openi ng panel glas s connecti ngbars .
9.
Installation
1. CAUTION: Make s ure that the roof openi ngpanel mot or is not operat ed at any ti me unt ili ns t ructed.
• NOTE: Left -hand s hown, ri ght -hand s imilar.
Us ing a non-permanent marker, mark t he s eal t os how t he roof openi ng panel glas s driving s l iderpos it ion.
1.
2. NOTE: Thi s s tep is only required if previous lyremoved.
Locat e t he connecti ng bar rear gui de.
2.
Page 2413 of 3229
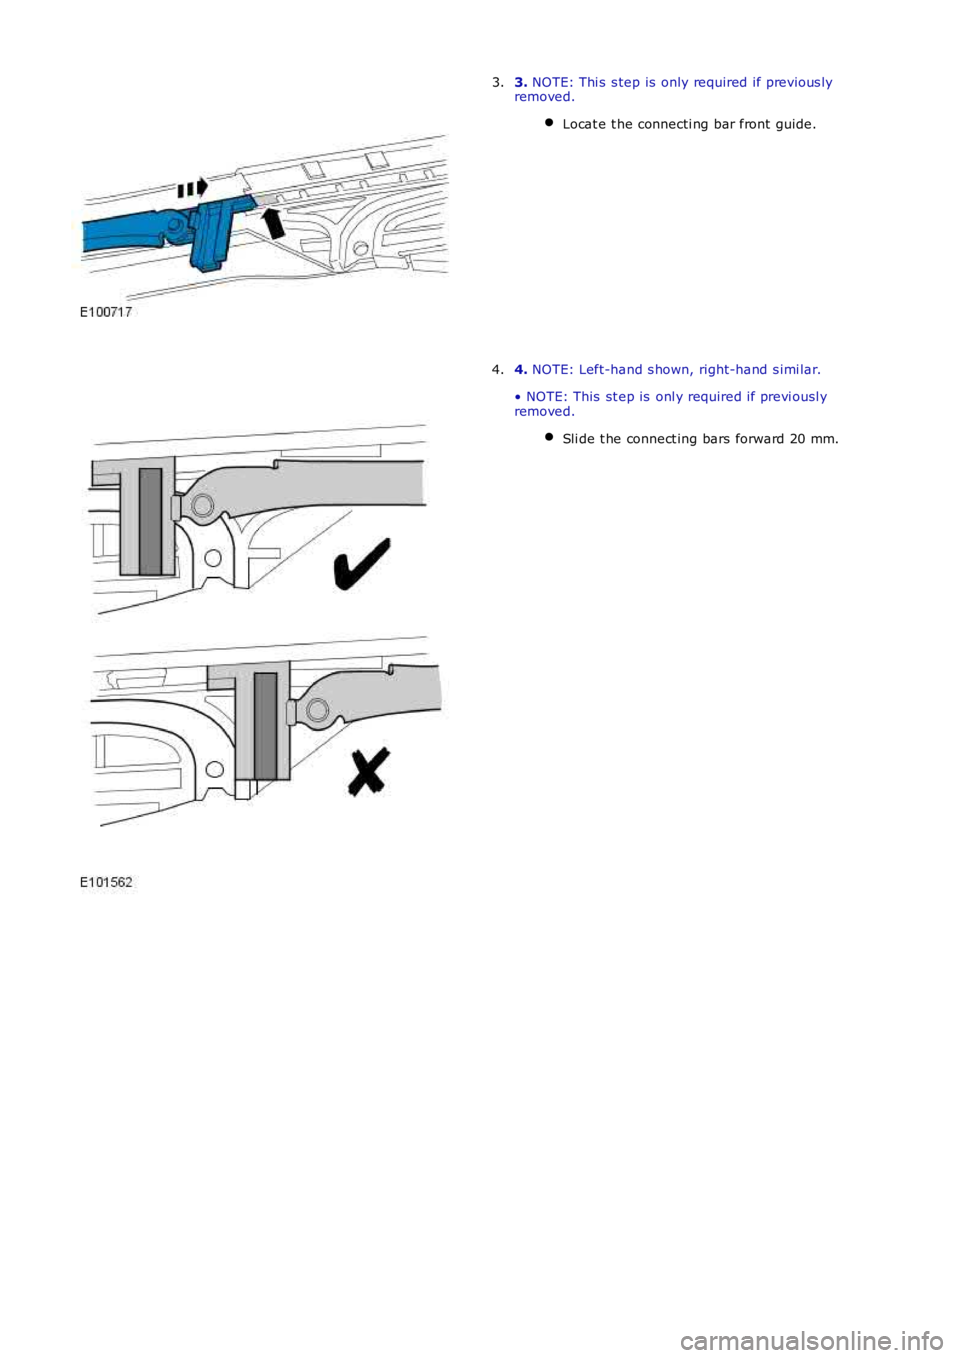
3. NOTE: Thi s s tep is only required if previous lyremoved.
Locat e t he connecti ng bar front guide.
3.
4. NOTE: Left-hand s hown, right-hand s imi lar.
• NOTE: This st ep is onl y required i f previ ousl yremoved.
Sli de t he connect ing bars forward 20 mm.
4.
Page 2414 of 3229
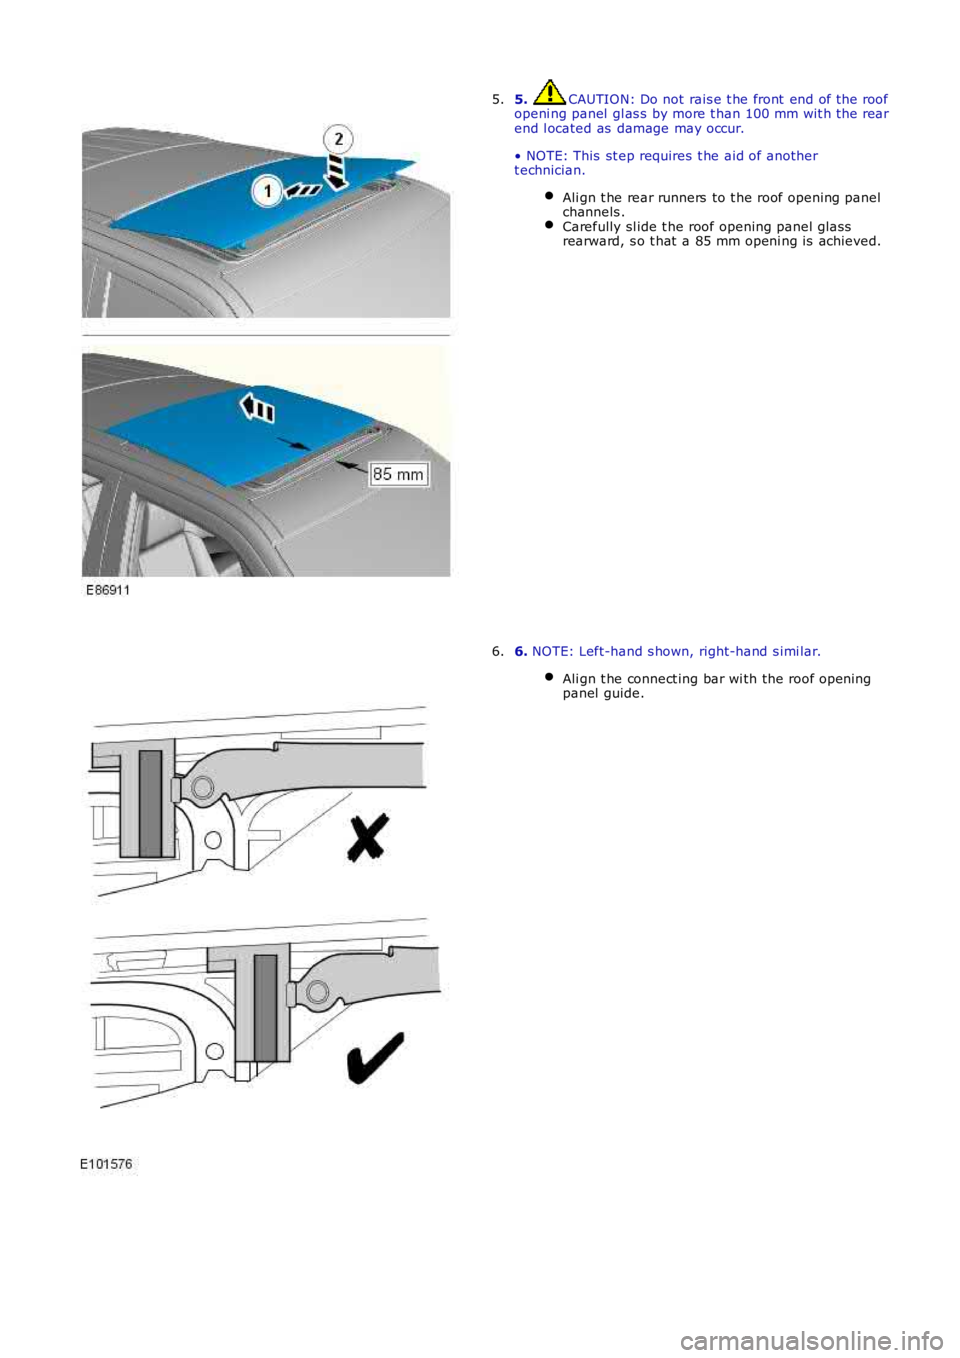
5. CAUTION: Do not rais e t he front end of t he roofopeni ng panel gl as s by more t han 100 mm wit h t he rearend l ocated as damage may occur.
• NOTE: This st ep requires t he aid of anothert echnician.
Ali gn t he rear runners to t he roof opening panelchannels .Carefully sl ide t he roof opening panel gl assrearward, s o t hat a 85 mm openi ng is achieved.
5.
6. NOTE: Left-hand s hown, right-hand s imi lar.
Ali gn t he connect ing bar wi th the roof openingpanel guide.
6.
Page 2415 of 3229
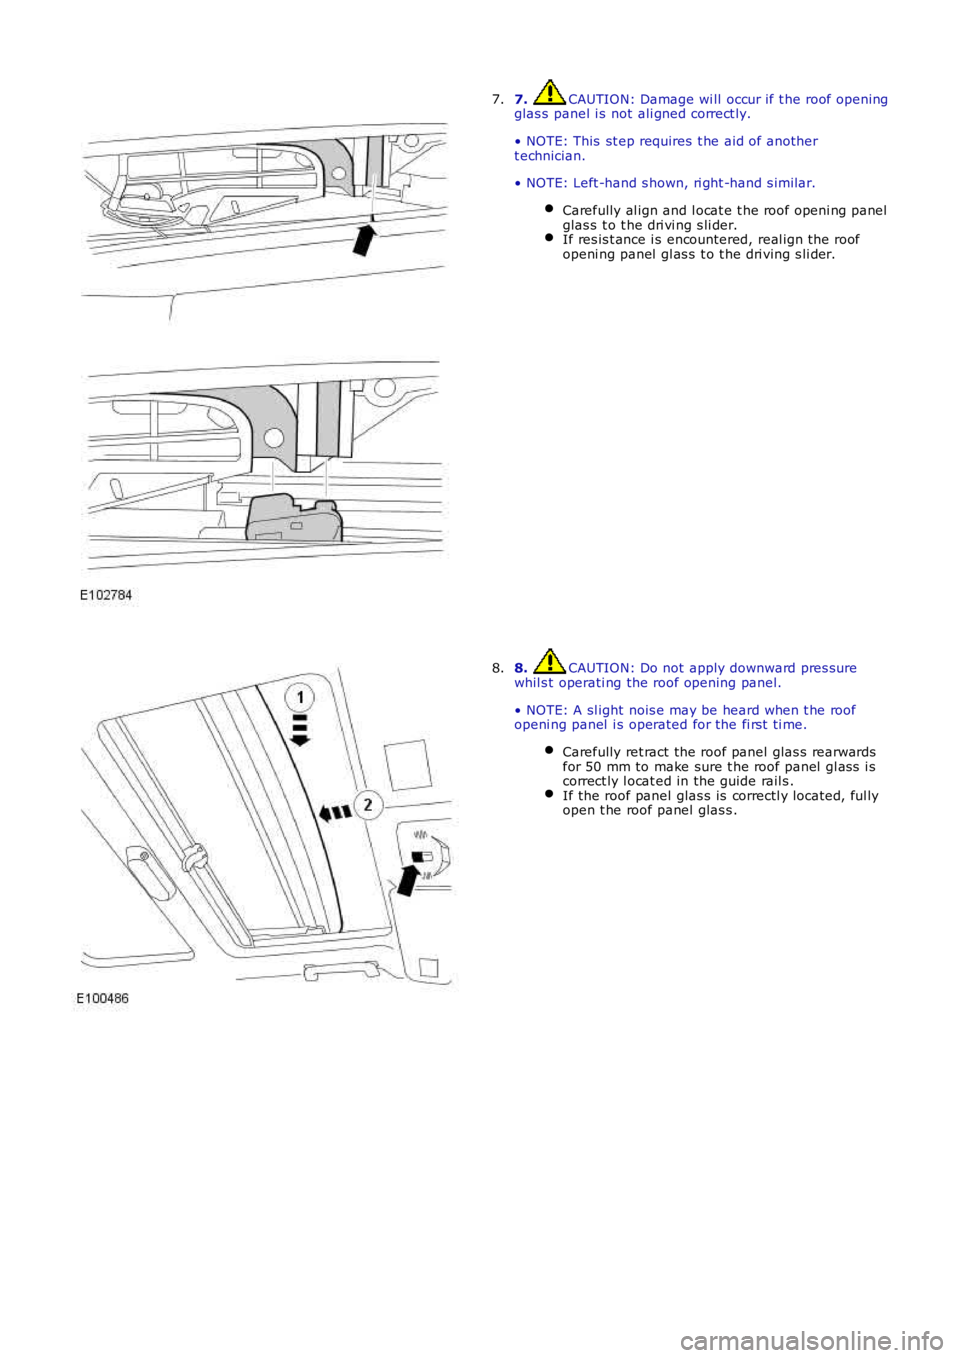
7. CAUTION: Damage wi ll occur if t he roof openingglas s panel i s not ali gned correct ly.
• NOTE: This st ep requires t he aid of anothert echnician.
• NOTE: Left -hand s hown, ri ght -hand s imilar.
Carefully al ign and l ocat e t he roof openi ng panelglas s t o t he dri vi ng s li der.If res is t ance i s encountered, real ign t he roofopeni ng panel gl as s t o t he dri ving s li der.
7.
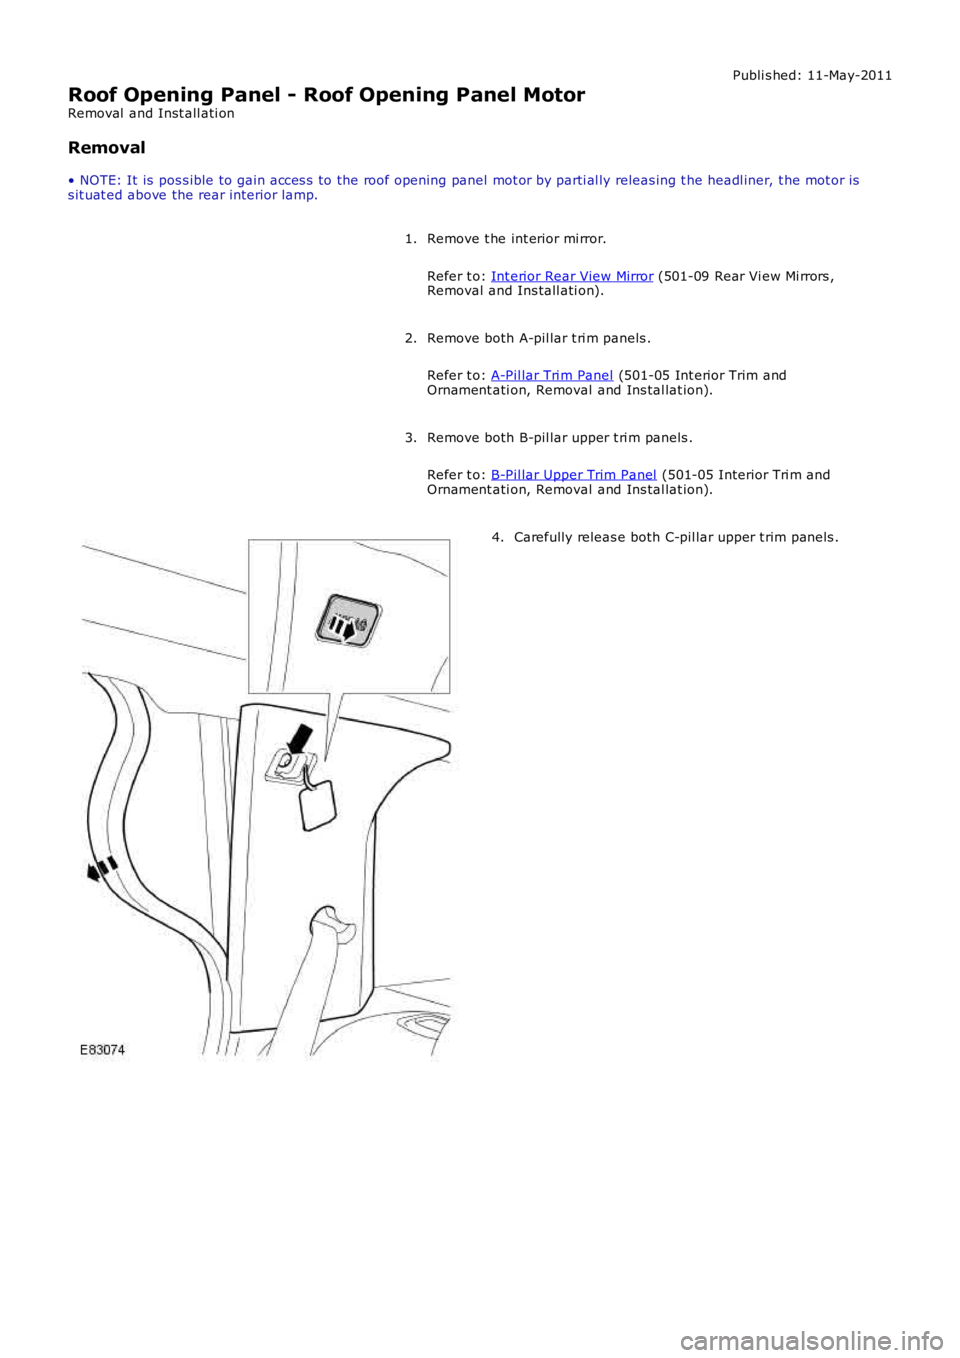
8. CAUTION: Do not apply downward pres surewhil s t operati ng the roof opening panel.
• NOTE: A sl ight nois e may be heard when t he roofopeni ng panel i s operated for the fi rs t ti me.
Carefully ret ract the roof panel glas s rearwardsfor 50 mm to make sure t he roof panel gl as s i scorrect ly l ocat ed in the guide rail s .If the roof panel glas s is correctl y located, ful lyopen t he roof panel glas s .
8.
Page 2416 of 3229
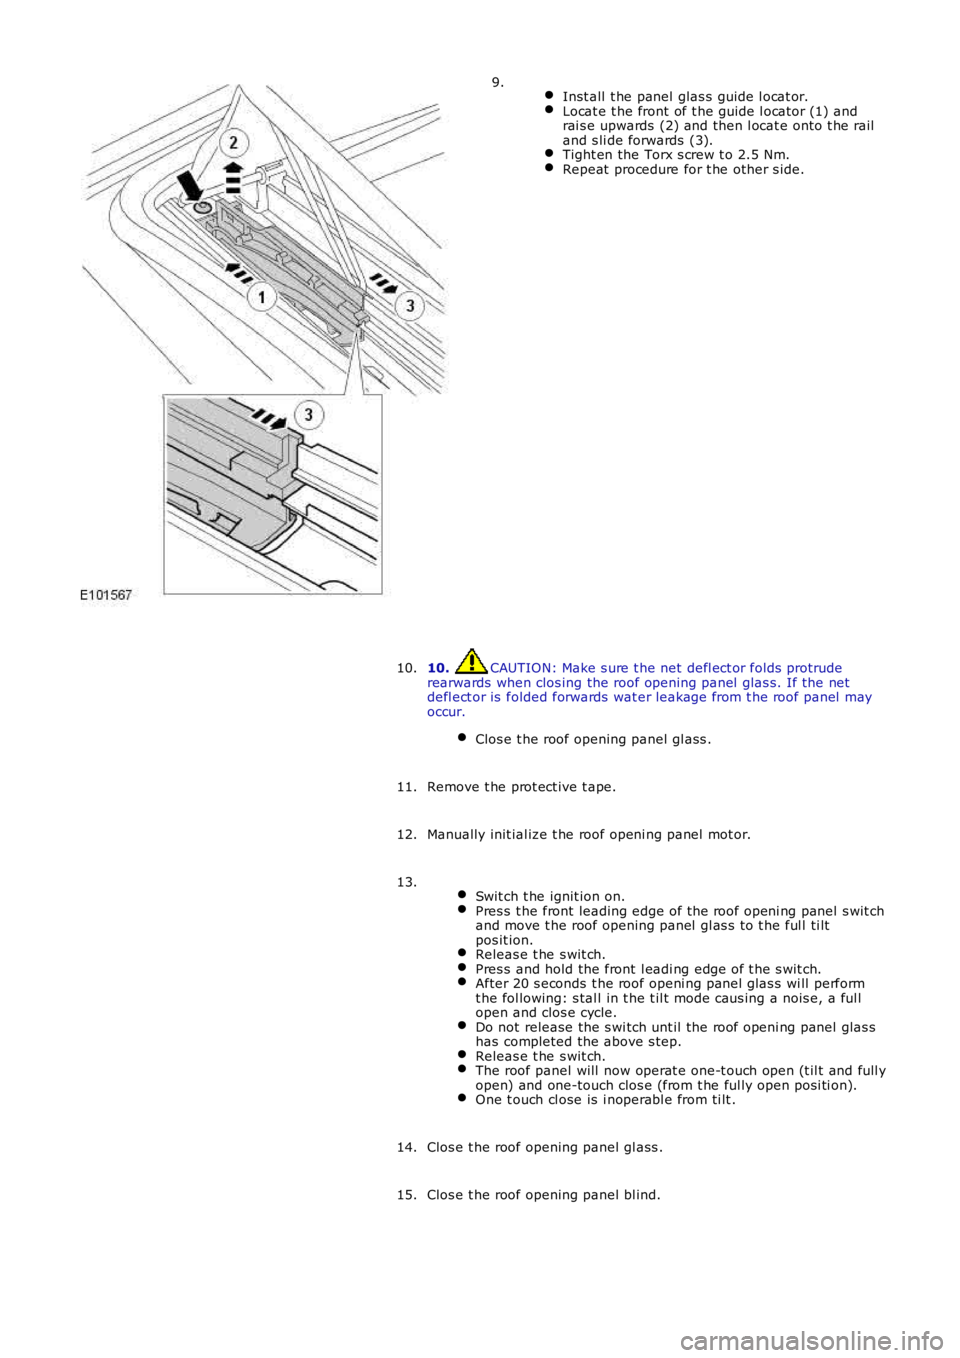
Inst all t he panel glas s guide l ocat or.Locat e t he front of t he guide l ocat or (1) andrai s e upwards (2) and then l ocat e onto t he railand s li de forwards (3).Tight en the Torx s crew t o 2.5 Nm.Repeat procedure for t he other s ide.
9.
10. CAUTION: Make s ure t he net defl ect or folds prot ruderearwards when clos ing the roof opening panel glas s. If the netdefl ect or is folded forwards wat er leakage from t he roof panel mayoccur.
Clos e t he roof opening panel gl ass .
10.
Remove t he prot ect ive t ape.11.
Manually init ial ize t he roof openi ng panel mot or.12.
Swit ch t he ignit ion on.Pres s t he front leading edge of t he roof openi ng panel s wit chand move t he roof opening panel gl as s t o t he ful l ti ltpos it ion.Releas e t he s wit ch.Pres s and hold the front l eadi ng edge of t he s wit ch.After 20 s econds t he roof openi ng panel glas s wi ll performt he fol lowing: s tal l in t he t il t mode caus ing a nois e, a ful lopen and clos e cycle.Do not release the s wi tch unt il the roof openi ng panel glas shas completed the above s tep.Releas e t he s wit ch.The roof panel will now operat e one-t ouch open (t il t and full yopen) and one-touch clos e (from t he ful ly open posi ti on).One t ouch cl ose is i noperabl e from ti lt .
13.
Clos e t he roof opening panel gl ass .14.
Clos e t he roof opening panel bl ind.15.
Page 2417 of 3229
Publi s hed: 11-May-2011
Roof Opening Panel - Roof Opening Panel Motor
Removal and Inst all ati on
Removal
• NOTE: It is pos s ible to gai n acces s to the roof opening panel mot or by parti al ly releas ing t he headl iner, t he mot or iss it uat ed above the rear interior lamp.
Remove t he int erior mi rror.
Refer t o: Int erior Rear View Mirror (501-09 Rear Vi ew Mi rrors ,Removal and Ins tall ati on).
1.
Remove both A-pil lar t ri m panels .
Refer t o: A-Pil lar Tri m Panel (501-05 Int erior Trim andOrnament ati on, Removal and Ins tal lat ion).
2.
Remove both B-pil lar upper t ri m panels .
Refer t o: B-Pil lar Upper Trim Panel (501-05 Interior Tri m andOrnament ati on, Removal and Ins tal lat ion).
3.
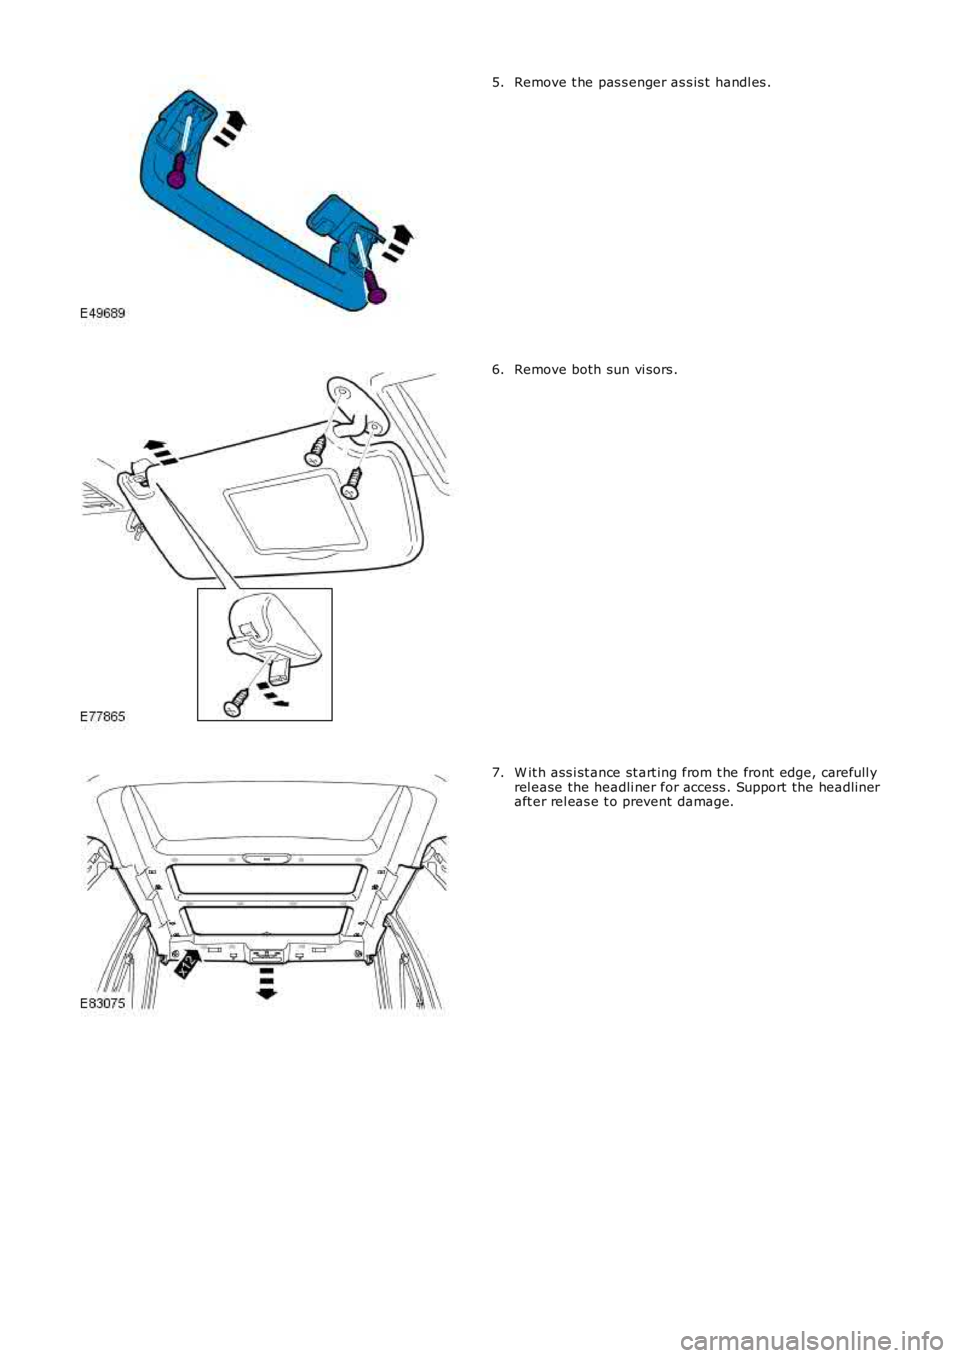
Carefully releas e both C-pil lar upper t rim panels .4.
Page 2418 of 3229
Remove t he pas s enger as s is t handl es .5.
Remove both sun vi sors .6.
W it h ass i st ance st art ing from t he front edge, carefull yrel ease the headli ner for access . Support the headli neraft er rel eas e t o prevent damage.
7.
Page 2419 of 3229
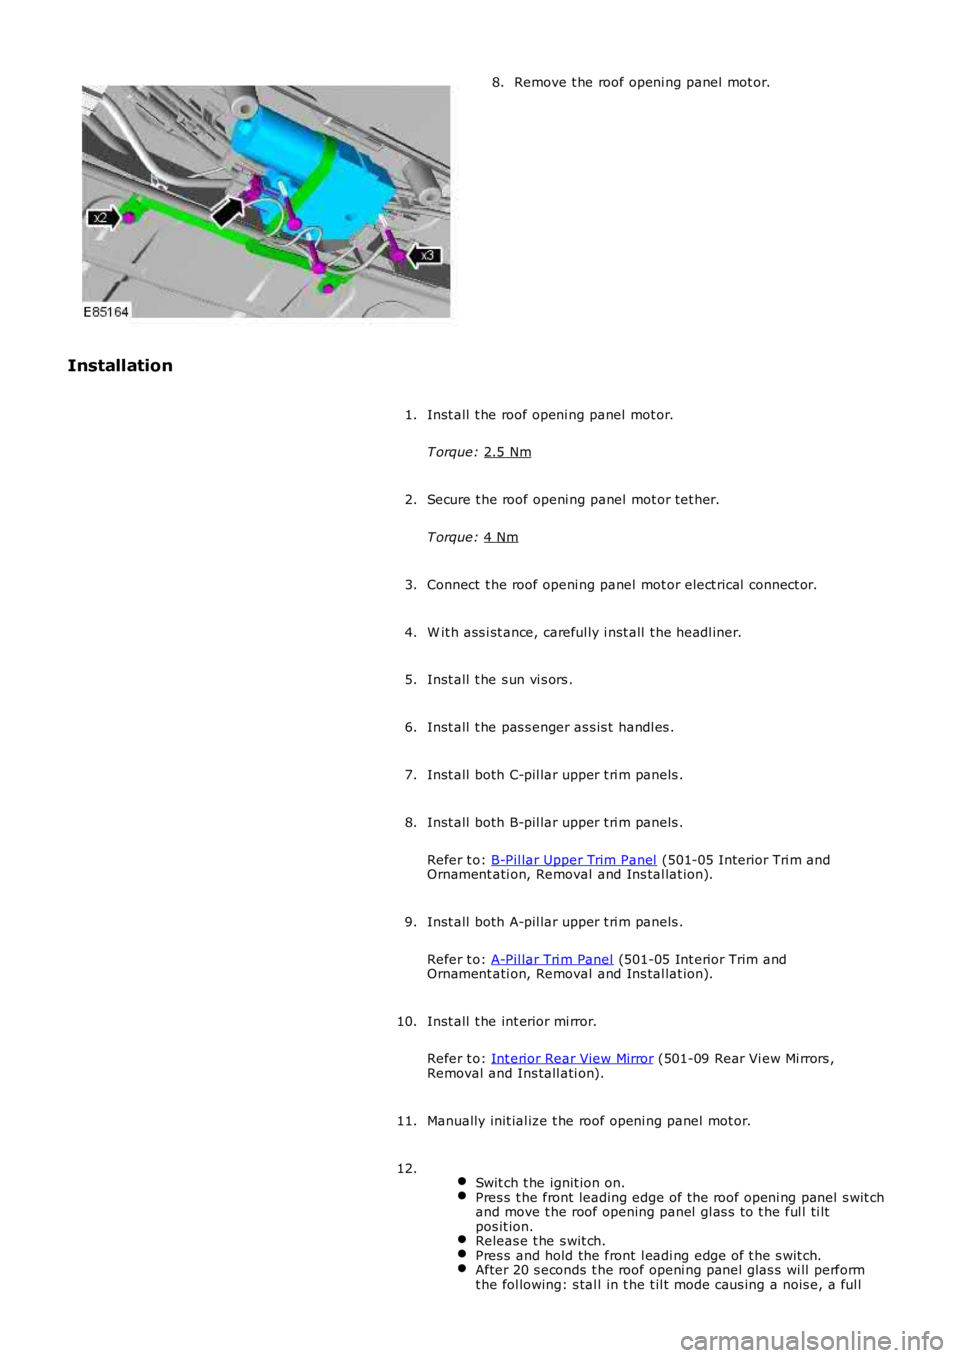
Remove t he roof openi ng panel mot or.
8.
Installation Inst all t he roof openi ng panel mot or.
T orque: 2.5 Nm 1.
Secure t he roof openi ng panel mot or tet her.
T orque: 4 Nm 2.
Connect t he roof openi ng panel mot or elect rical connect or.
3.
W it h ass i st ance, careful ly i nst all t he headl iner.
4.
Inst all t he s un vi s ors .
5.
Inst all t he pas s enger as s is t handl es .
6.
Inst all both C-pil lar upper t ri m panels .
7.
Inst all both B-pil lar upper t ri m panels .
Refer t o: B-Pil lar Upper Trim Panel (501-05 Interior Tri m and
Ornament ati on, Removal and Ins tal lat ion).
8.
Inst all both A-pil lar upper t ri m panels .
Refer t o: A-Pil lar Tri m Panel (501-05 Int erior Trim and
Ornament ati on, Removal and Ins tal lat ion).
9.
Inst all t he int erior mi rror.
Refer t o: Int erior Rear View Mirror (501-09 Rear Vi ew Mi rrors ,
Removal and Ins tall ati on).
10.
Manually init ial ize t he roof openi ng panel mot or.
11.
Swit ch t he ignit ion on. Pres s t he front leading edge of t he roof openi ng panel s wit ch
and move t he roof opening panel gl as s t o t he ful l ti lt
pos it ion. Releas e t he s wit ch.
Pres s and hold the front l eadi ng edge of t he s wit ch.
After 20 s econds t he roof openi ng panel glas s wi ll perform
t he fol lowing: s tal l in t he t il t mode caus ing a nois e, a ful l 12.
Page 2420 of 3229
open and clos e cycle.Do not release the s wi tch unt il the roof openi ng panel glas shas completed the above s tep.Releas e t he s wit ch.The roof panel will now operat e one-t ouch open (t il t and full yopen) and one-touch clos e (from t he ful ly open posi ti on).One t ouch cl ose is i noperabl e from ti lt .
Trending: diagnostic menu, water pump, bulb, turn signal, parking sensors, oil level, engine oil
