LAND ROVER FRELANDER 2 2006 Repair Manual
FRELANDER 2 2006
LAND ROVER
LAND ROVER
https://www.carmanualsonline.info/img/64/57251/w960_57251-0.png
LAND ROVER FRELANDER 2 2006 Repair Manual
Trending: refrigerant type, ignition, wiper fluid, maintenance reset, engine overheat, tow, deactivate airbag
Page 2421 of 3229
Publi s hed: 11-May-2011
Roof Opening Panel - Air Deflector
Removal and Inst all ati on
Removal
Open t he roof openi ng panel .1.
Remove t he int erior mi rror.
Refer t o: Int erior Rear View Mirror (501-09 Rear Vi ew Mi rrors ,Removal and Ins tall ati on).
2.
Remove both A-pil lar t ri m panels .
Refer t o: A-Pil lar Tri m Panel (501-05 Int erior Trim andOrnament ati on, Removal and Ins tal lat ion).
3.
Remove both B-pil lar upper t ri m panels .
Refer t o: B-Pil lar Upper Trim Panel (501-05 Interior Tri m andOrnament ati on, Removal and Ins tal lat ion).
4.
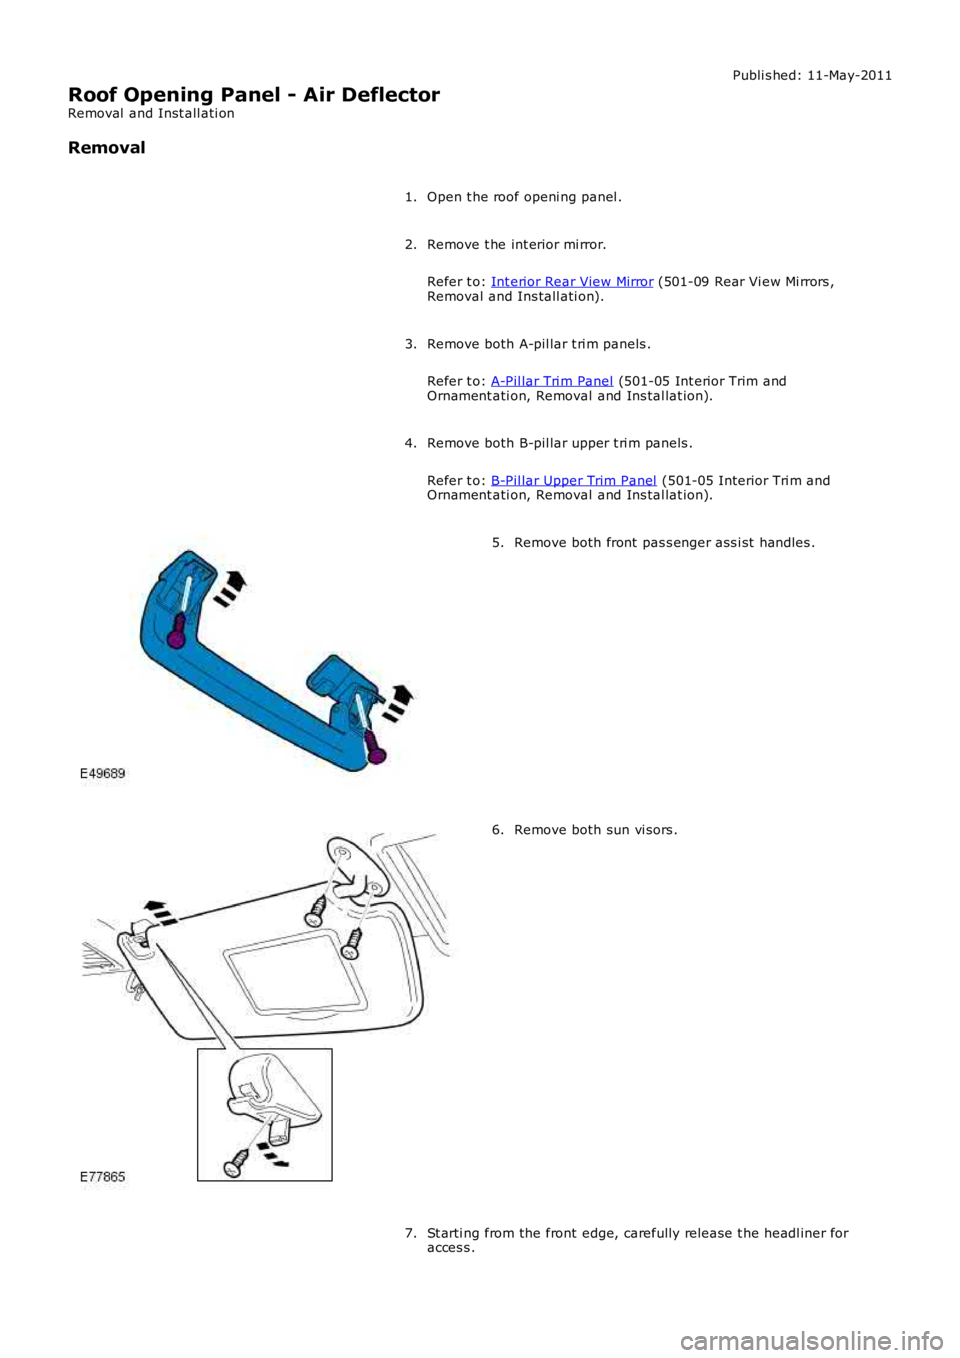
Remove both front pas s enger ass i st handles .5.
Remove both sun vi sors .6.
St arti ng from the front edge, carefully releas e t he headl iner foracces s .7.
Page 2422 of 3229
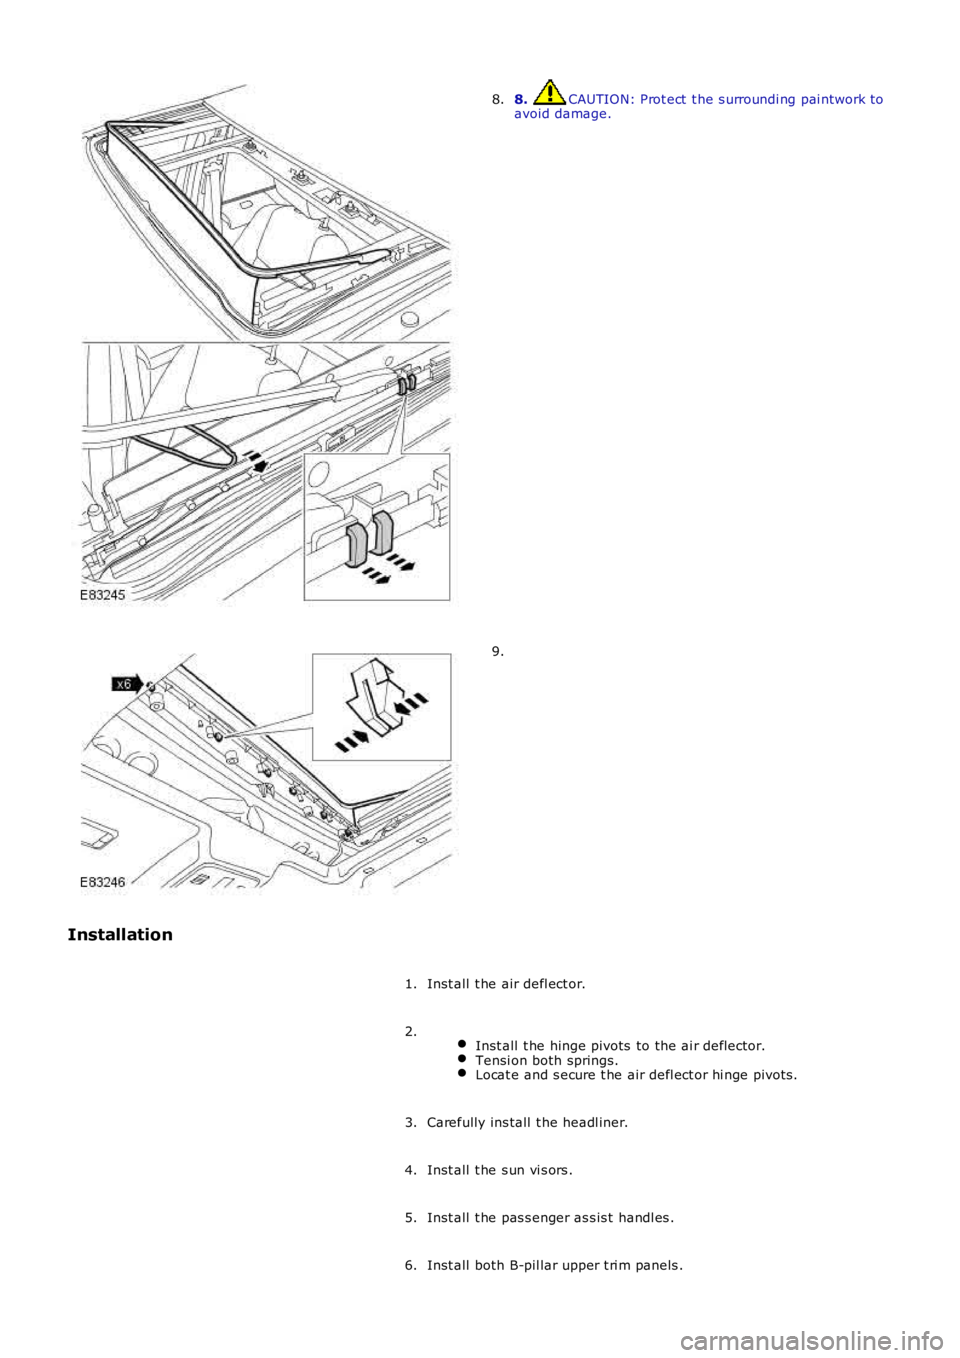
8. CAUTION: Prot ect t he s urroundi ng pai ntwork toavoid damage.8.
9.
Installation
Inst all t he air defl ect or.1.
Inst all t he hinge pivots to the ai r deflector.Tensi on both springs.Locat e and s ecure t he air defl ect or hi nge pivots .
2.
Carefully ins tall t he headl iner.3.
Inst all t he s un vi s ors .4.
Inst all t he pas s enger as s is t handl es .5.
Inst all both B-pil lar upper t ri m panels .6.
Page 2423 of 3229
Refer t o: B-Pil lar Upper Trim Panel (501-05 Interior Tri m andOrnament ati on, Removal and Ins tal lat ion).
Inst all both A-pil lar upper t ri m panels .
Refer t o: A-Pil lar Tri m Panel (501-05 Int erior Trim andOrnament ati on, Removal and Ins tal lat ion).
7.
Inst all t he int erior mi rror.
Refer t o: Int erior Rear View Mirror (501-09 Rear Vi ew Mi rrors ,Removal and Ins tall ati on).
8.
Manually check the operat ion of t he air deflector.9.
Page 2424 of 3229
Publi s hed: 11-May-2011
Roof Opening Panel - Roof Opening Panel Seal
Removal and Inst all ati on
Removal
Remove t he roof openi ng panel glas s .
Refer t o: Roof Opening Panel Glas s (501-17 Roof Opening Panel,Removal and Ins tall ati on).
1.
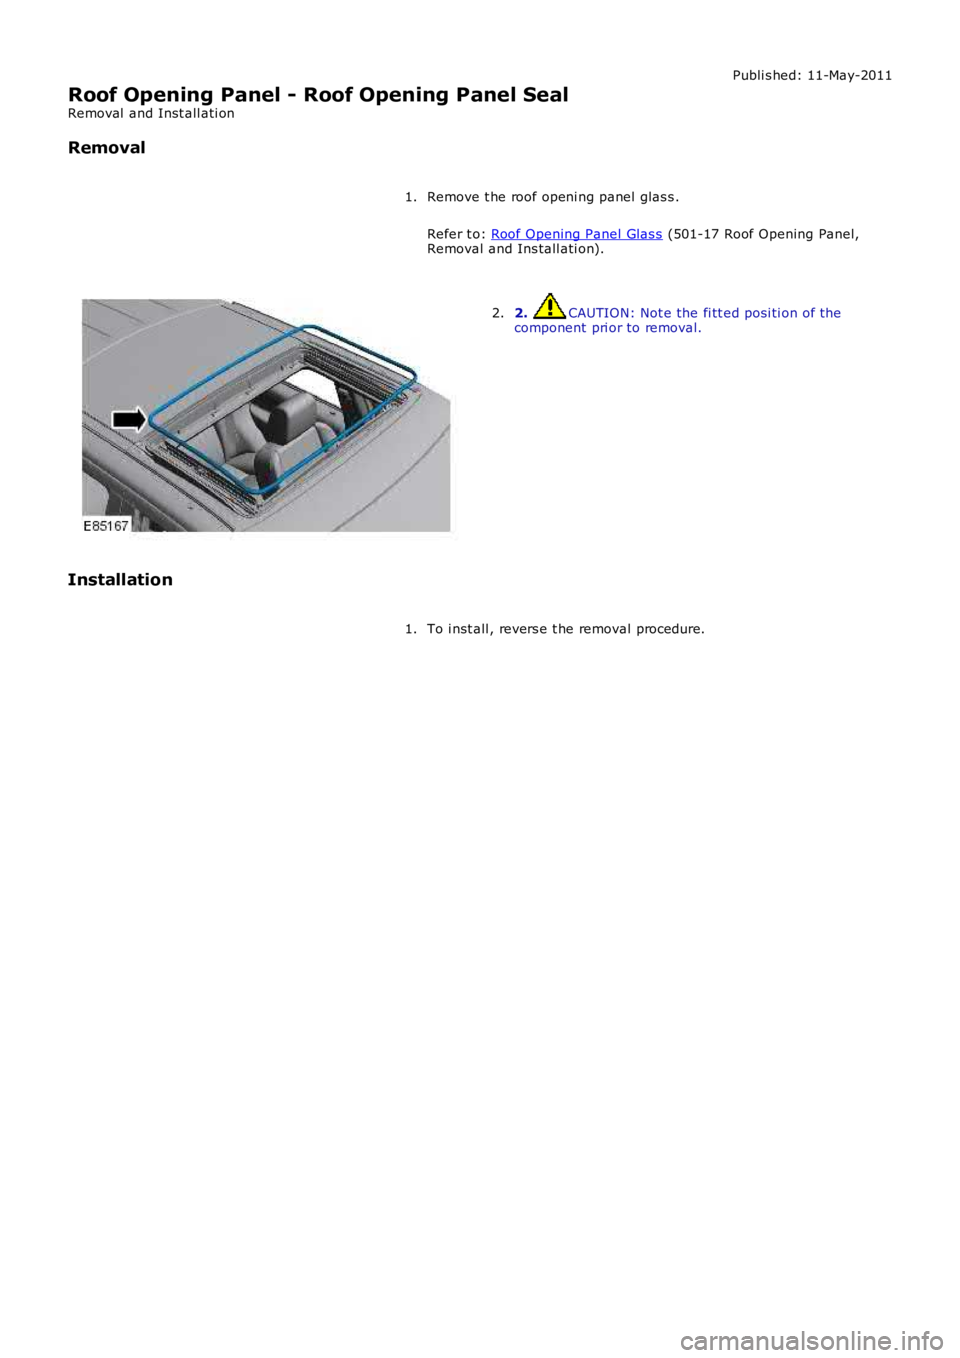
2. CAUTION: Not e the fi tt ed posi ti on of thecomponent pri or to removal.2.
Installation
To i nst all , revers e t he removal procedure.1.
Page 2425 of 3229
Publi s hed: 11-May-2011
Roof Opening Panel - Glass Roof Panel Blind
Removal and Inst all ati on
Removal
Remove both A-pil lar t ri m panels .
Refer t o: A-Pil lar Tri m Panel (501-05 Int erior Trim andOrnament ati on, Removal and Ins tal lat ion).
1.
Remove both B-pil lar upper t ri m panels .
Refer t o: B-Pil lar Upper Trim Panel (501-05 Interior Tri m andOrnament ati on, Removal and Ins tal lat ion).
2.
Remove both C-pil lar t ri m panels .
Refer t o: C-Pil lar Tri m Panel (501-05 Int erior Trim andOrnament ati on, Removal and Ins tal lat ion).
3.
Remove both D-pil lar upper t rim panels .
Refer t o: D-Pi llar Trim Panel (501-05 Int eri or Trim andOrnament ati on, Removal and Ins tal lat ion).
4.
Remove t he int erior rear vi ew mi rror.
Refer t o: Int erior Rear View Mirror (501-09 Rear Vi ew Mi rrors ,Removal and Ins tall ati on).
5.
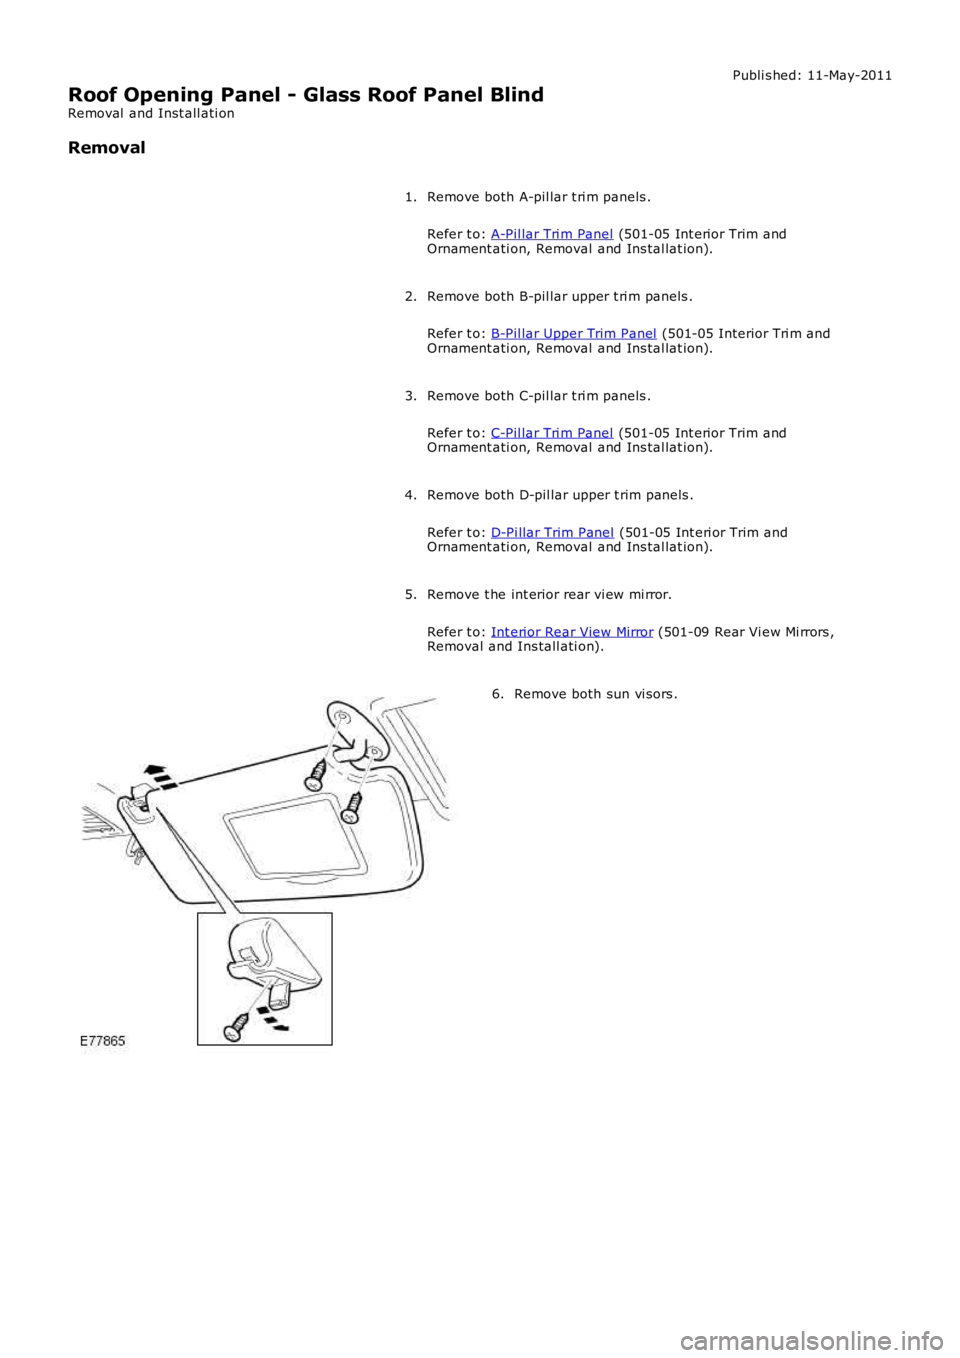
Remove both sun vi sors .6.
Page 2426 of 3229
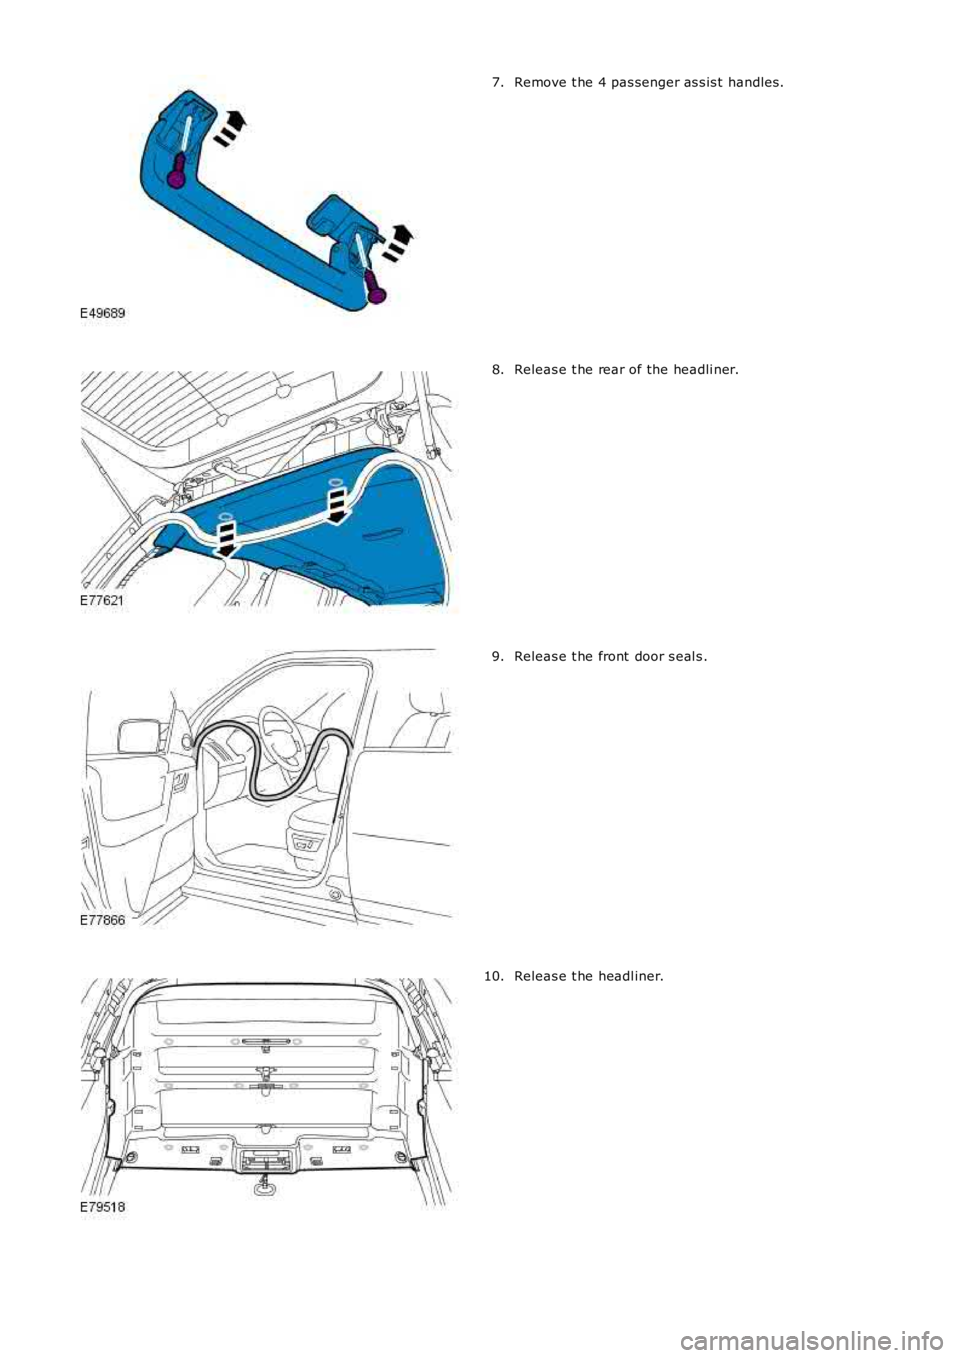
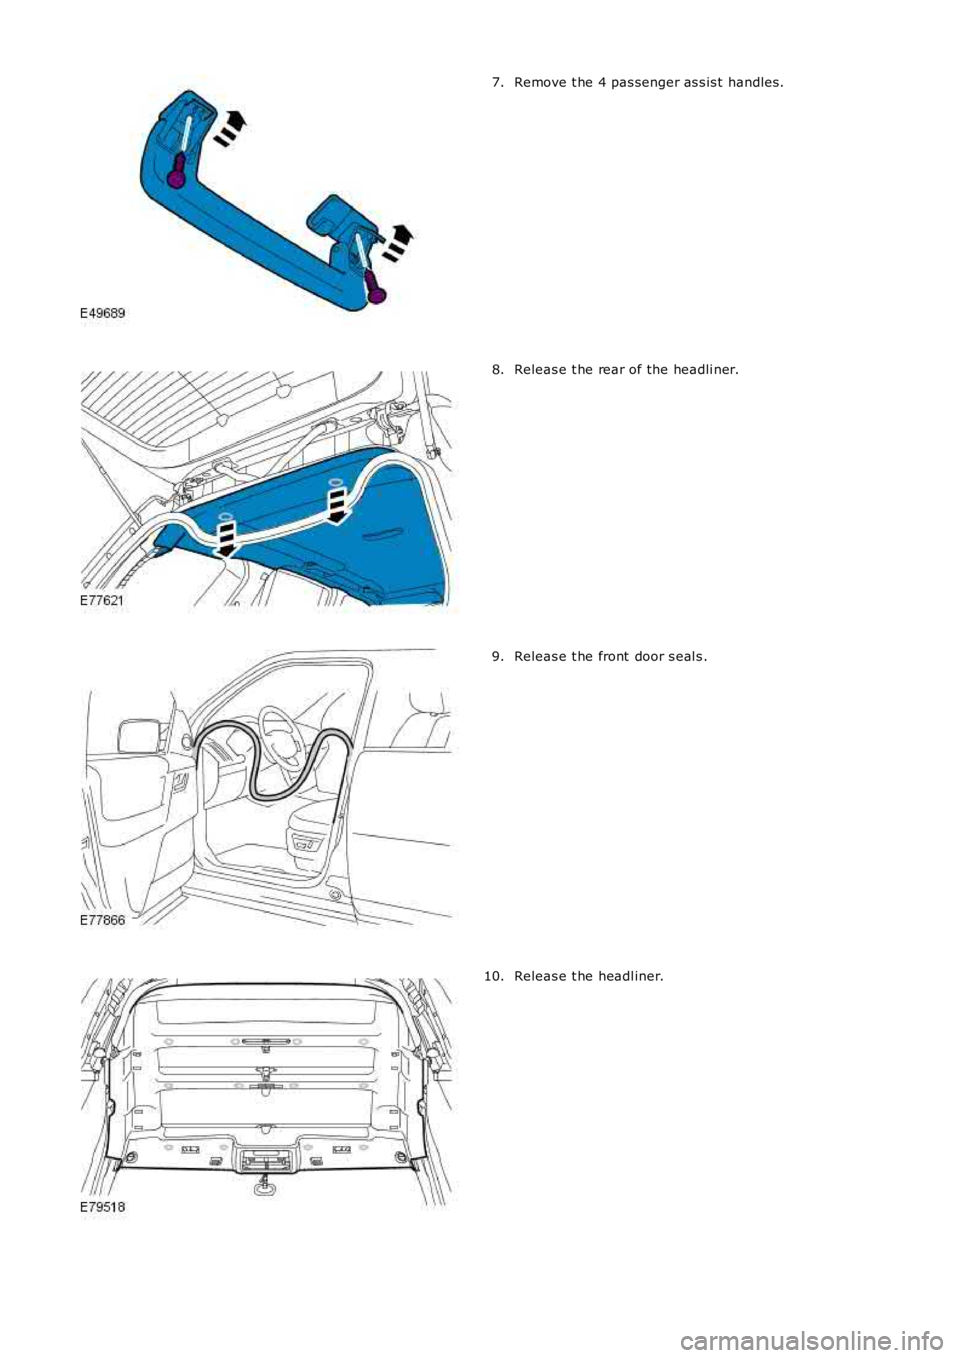
Remove t he 4 pas senger as s is t handles .7.
Releas e t he rear of the headli ner.8.
Releas e t he front door s eal s .9.
Releas e t he headl iner.10.
Page 2427 of 3229
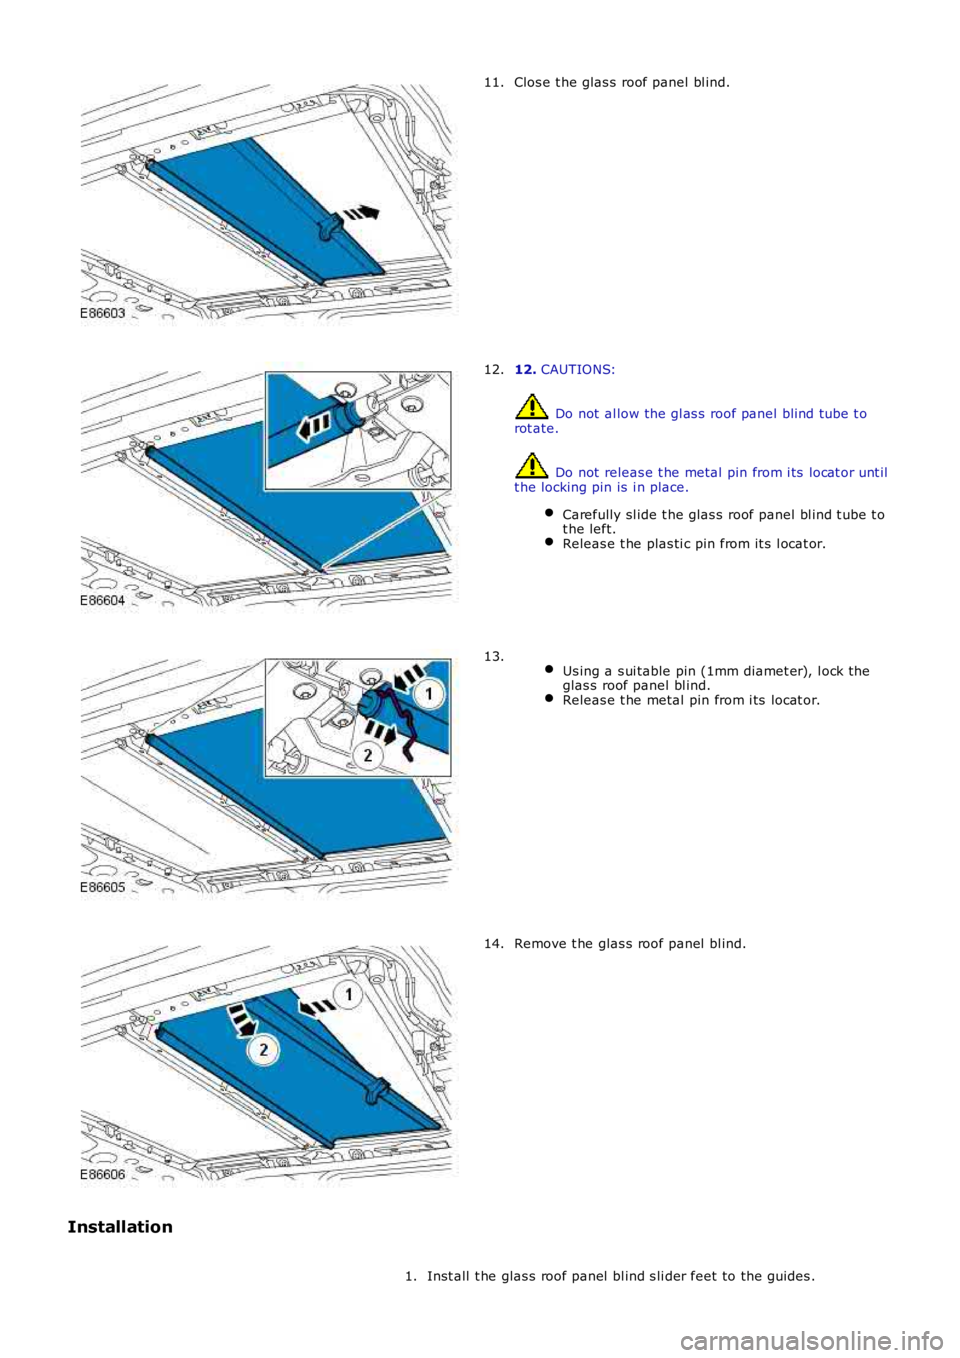
Clos e t he glas s roof panel bl ind.11.
12. CAUTIONS:
Do not al low the gl as s roof panel blind tube t orot ate.
Do not releas e t he metal pin from i ts locat or unt ilt he locking pin is i n place.
Carefully sl ide t he glas s roof panel bl ind t ube t ot he left.Releas e t he plas ti c pin from it s l ocat or.
12.
Us ing a s ui table pin (1mm diamet er), l ock theglas s roof panel bl ind.Releas e t he metal pin from i ts locat or.
13.
Remove t he glas s roof panel bl ind.14.
Installation
Inst all t he glas s roof panel bl ind s li der feet to the guides .1.
Page 2428 of 3229
2. CAUTION: Do not all ow t he glas s roof panel bl ind t ube t orot ate unt il t he plas t ic pin is s ecure i n it s l ocat or.
Secure t he met al pi n to it s locator.Remove t he locki ng pin from t he glas s roof panel bl ind.
2.
Carefully sl ide t he glas s roof panel bl ind t ube t o t he left .Ali gn and s ecure t he plas ti c pin t o i ts l ocat or.
3.
Open t he glas s roof panel bl ind.4.
Secure t he headl iner.5.
At tach t he front door s eal s .6.
At tach t he rear of the headli ner.7.
Inst all t he pas s enger as s is t handl es .8.
Inst all t he s un vi s ors .9.
Inst all t he int erior rear vi ew mi rror.
Refer t o: Int erior Rear View Mirror (501-09 Rear Vi ew Mi rrors ,Removal and Ins tall ati on).
10.
Inst all t he D-pi llar t ri m panels .
Refer t o: D-Pi llar Trim Panel (501-05 Int eri or Trim andOrnament ati on, Removal and Ins tal lat ion).
11.
Inst all t he C-pi llar t ri m panels .
Refer t o: C-Pil lar Tri m Panel (501-05 Int erior Trim andOrnament ati on, Removal and Ins tal lat ion).
12.
Inst all t he B-pi llar t ri m panels .
Refer t o: B-Pil lar Upper Trim Panel (501-05 Interior Tri m andOrnament ati on, Removal and Ins tal lat ion).
13.
Inst all t he A-pi llar t ri m panels .
Refer t o: A-Pil lar Tri m Panel (501-05 Int erior Trim andOrnament ati on, Removal and Ins tal lat ion).
14.
Page 2429 of 3229
Publi s hed: 11-May-2011
Roof Opening Panel - Roof Opening Panel Blind
Removal and Inst all ati on
Removal
Remove both A-pil lar t ri m panels .
Refer t o: A-Pil lar Tri m Panel (501-05 Int erior Trim and
Ornament ati on, Removal and Ins tal lat ion).
1.
Remove both B-pil lar upper t ri m panels .
Refer t o: B-Pil lar Upper Trim Panel (501-05 Interior Tri m and
Ornament ati on, Removal and Ins tal lat ion).
2.
Remove both C-pil lar t ri m panels .
Refer t o: C-Pil lar Tri m Panel (501-05 Int erior Trim and
Ornament ati on, Removal and Ins tal lat ion).
3.
Remove both D-pil lar upper t rim panels .
Refer t o: D-Pi llar Trim Panel (501-05 Int eri or Trim and
Ornament ati on, Removal and Ins tal lat ion).
4.
Remove t he int erior rear vi ew mi rror.
Refer t o: Int erior Rear View Mirror (501-09 Rear Vi ew Mi rrors ,
Removal and Ins tall ati on).
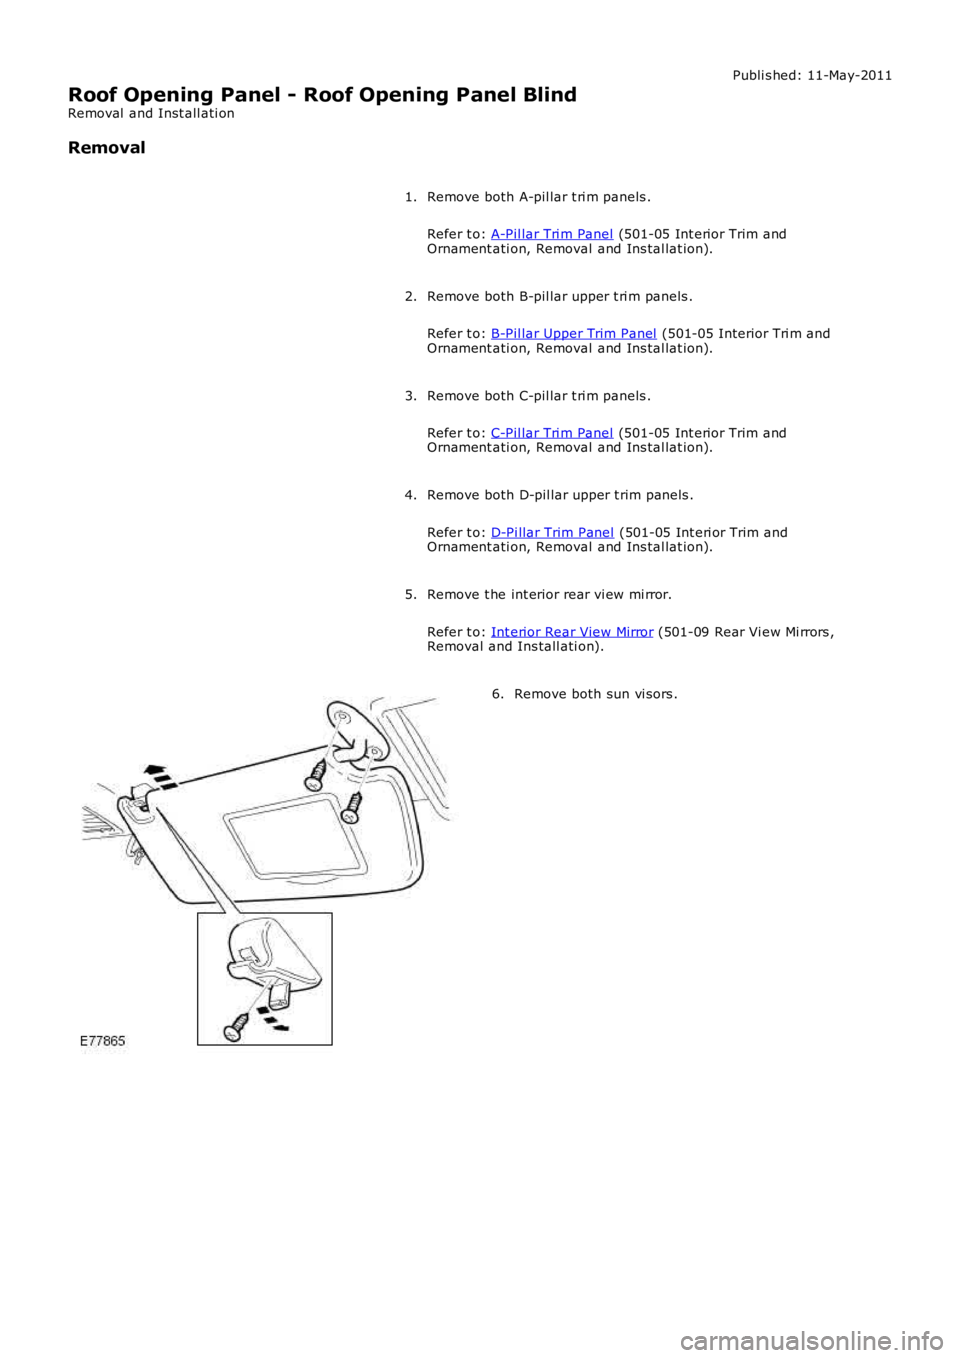
5. Remove both sun vi sors .
6.
Page 2430 of 3229
Remove t he 4 pas senger as s is t handles .
7. Releas e t he rear of the headli ner.
8. Releas e t he front door s eal s .
9. Releas e t he headl iner.
10.
Trending: ECU, brake pads, radio, jacking points, airbag disable, ABS, CD changer
