LAND ROVER FRELANDER 2 2006 Repair Manual
FRELANDER 2 2006
LAND ROVER
LAND ROVER
https://www.carmanualsonline.info/img/64/57251/w960_57251-0.png
LAND ROVER FRELANDER 2 2006 Repair Manual
Trending: charging, cabin filter, tow bar, wheel bolt torque, oil level, deactivate passenger airbag, fuel cap
Page 371 of 3229
Publi s hed: 11-May-2011
Front Drive Halfshafts - Front Drive Halfshafts
Diagnosi s and Tes ti ng
For addit ional informat ion.
REFER to: Driveli ne Sys t em (205-00 Driveline Sys tem - General Informat ion, Diagnosi s and Test ing).
Page 372 of 3229
Publi s hed: 13-May-2011
Front Drive Halfshafts - Front Halfshaft LH
Removal and Inst all ati on
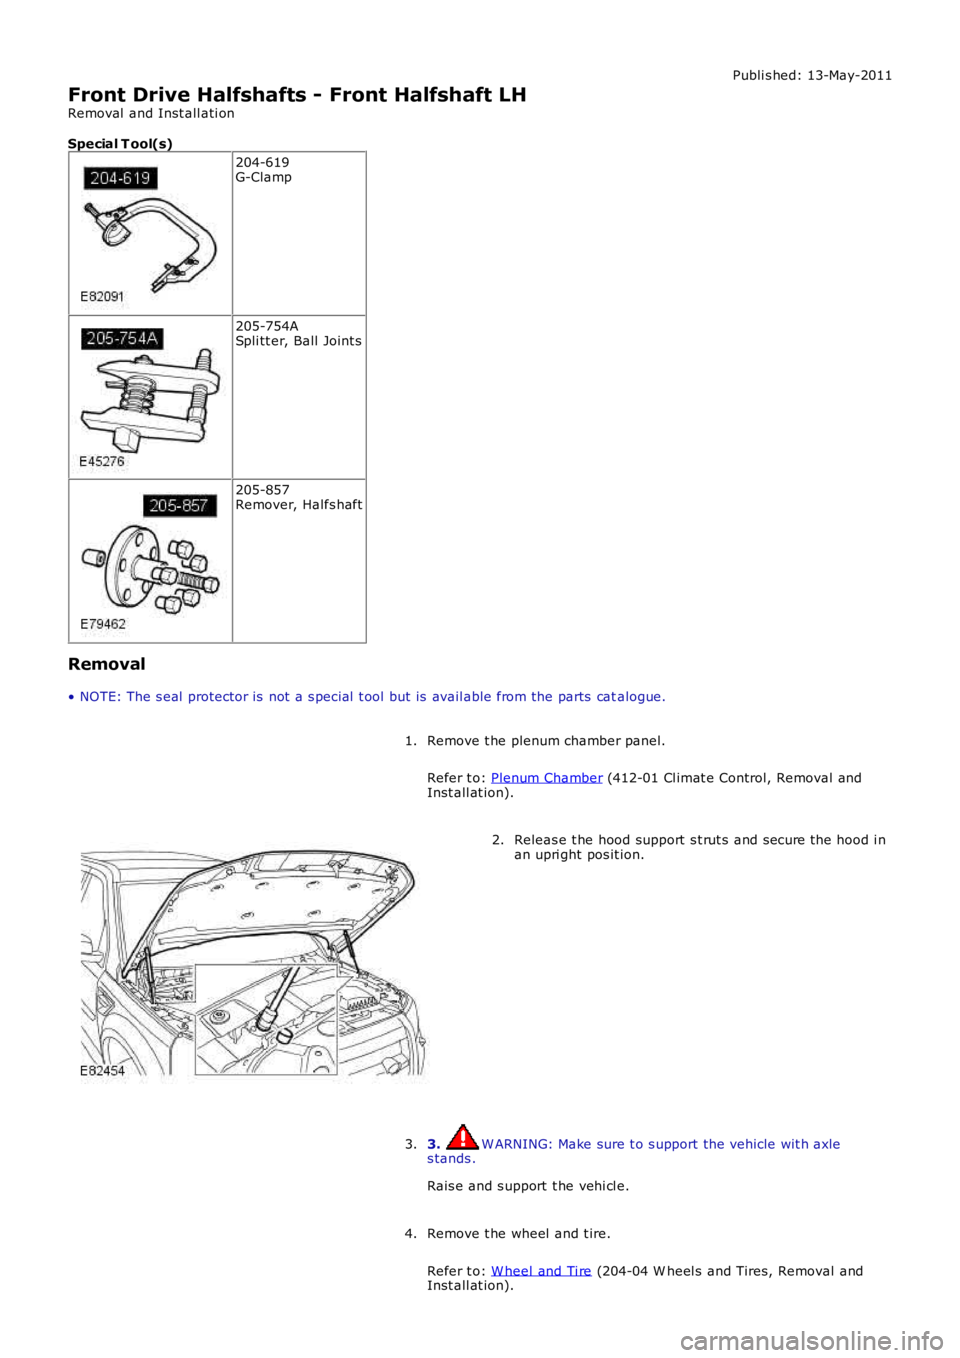
Special T ool(s)
204-619G-Clamp
205-754ASpli tt er, Ball Joint s
205-857Remover, Halfs haft
Removal
• NOTE: The s eal protector is not a s pecial t ool but is avail able from the parts catalogue.
Remove t he plenum chamber panel.
Refer t o: Plenum Chamber (412-01 Cl imat e Control, Removal andInst all at ion).
1.
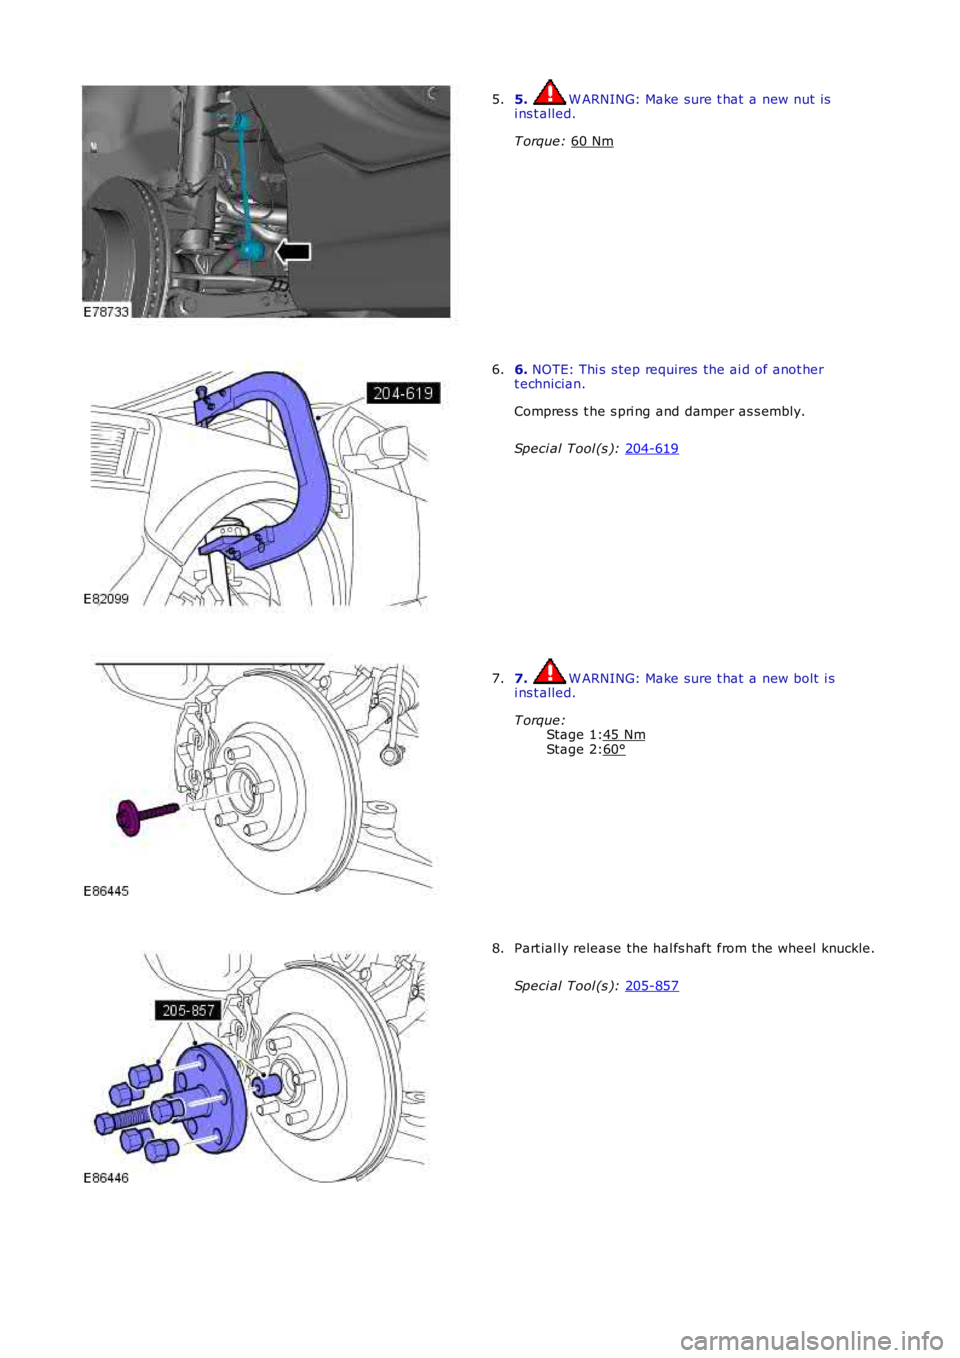
Releas e t he hood support s t rut s and s ecure the hood i nan upri ght pos it ion.2.
3. W ARNING: Make sure t o s upport the vehicle wit h axles tands .
Rais e and s upport t he vehi cl e.
3.
Remove t he wheel and t ire.
Refer t o: W heel and Ti re (204-04 W heel s and Tires, Removal andInst all at ion).
4.
Page 373 of 3229
Stage 1:
Stage 2: 5. W ARNING: Make sure t hat a new nut is
i ns t alled.
T orque: 60 Nm 5.
6.
NOTE: Thi s s tep requires the ai d of anot her
t echnician.
Compres s t he s pri ng and damper as s embly.
Speci al Tool (s ): 204-619 6.
7. W ARNING: Make sure t hat a new bolt i s
i ns t alled.
T orque: 45 Nm 60°7.
Part ial ly release the hal fs haft from the wheel knuckle.
Speci al Tool (s ): 205-857 8.
Page 374 of 3229
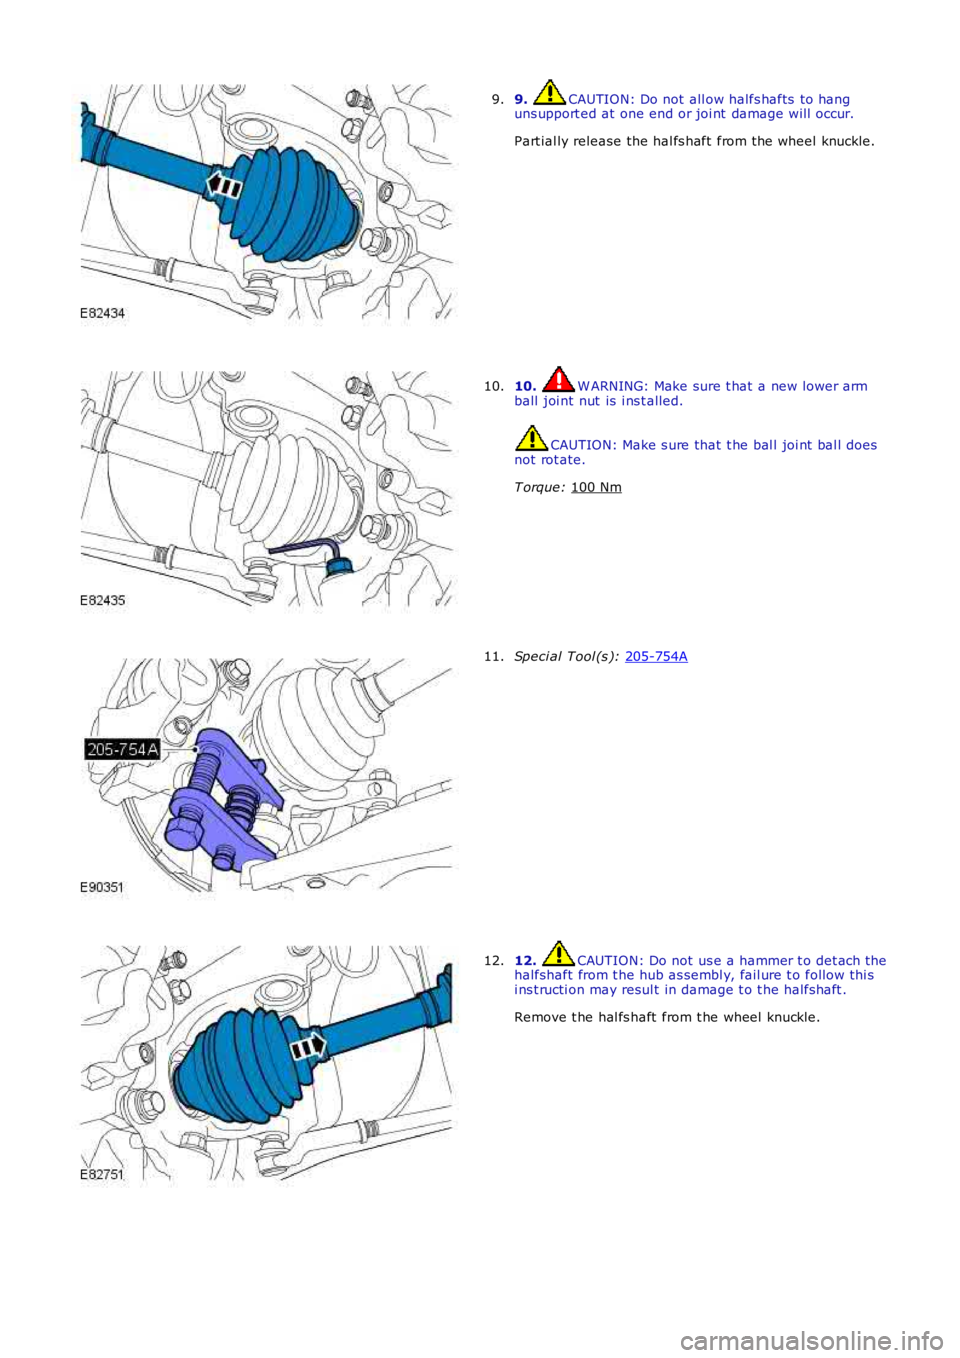
9. CAUTION: Do not all ow halfs hafts to hang
uns upport ed at one end or joi nt damage will occur.
Part ial ly release the hal fs haft from the wheel knuckle.
9. 10. W ARNING: Make sure t hat a new lower arm
ball joi nt nut is i ns t alled. CAUTION: Make s ure that t he bal l joi nt bal l does
not rot ate.
T orque: 100 Nm 10.
Speci al Tool (s ):
205-754A 11.
12. CAUTION: Do not us e a hammer t o det ach t he
halfshaft from t he hub as sembl y, fail ure t o follow thi s
i ns t ructi on may resul t in damage t o t he halfshaft .
Remove t he hal fs haft from t he wheel knuckle.
12.
Page 375 of 3229
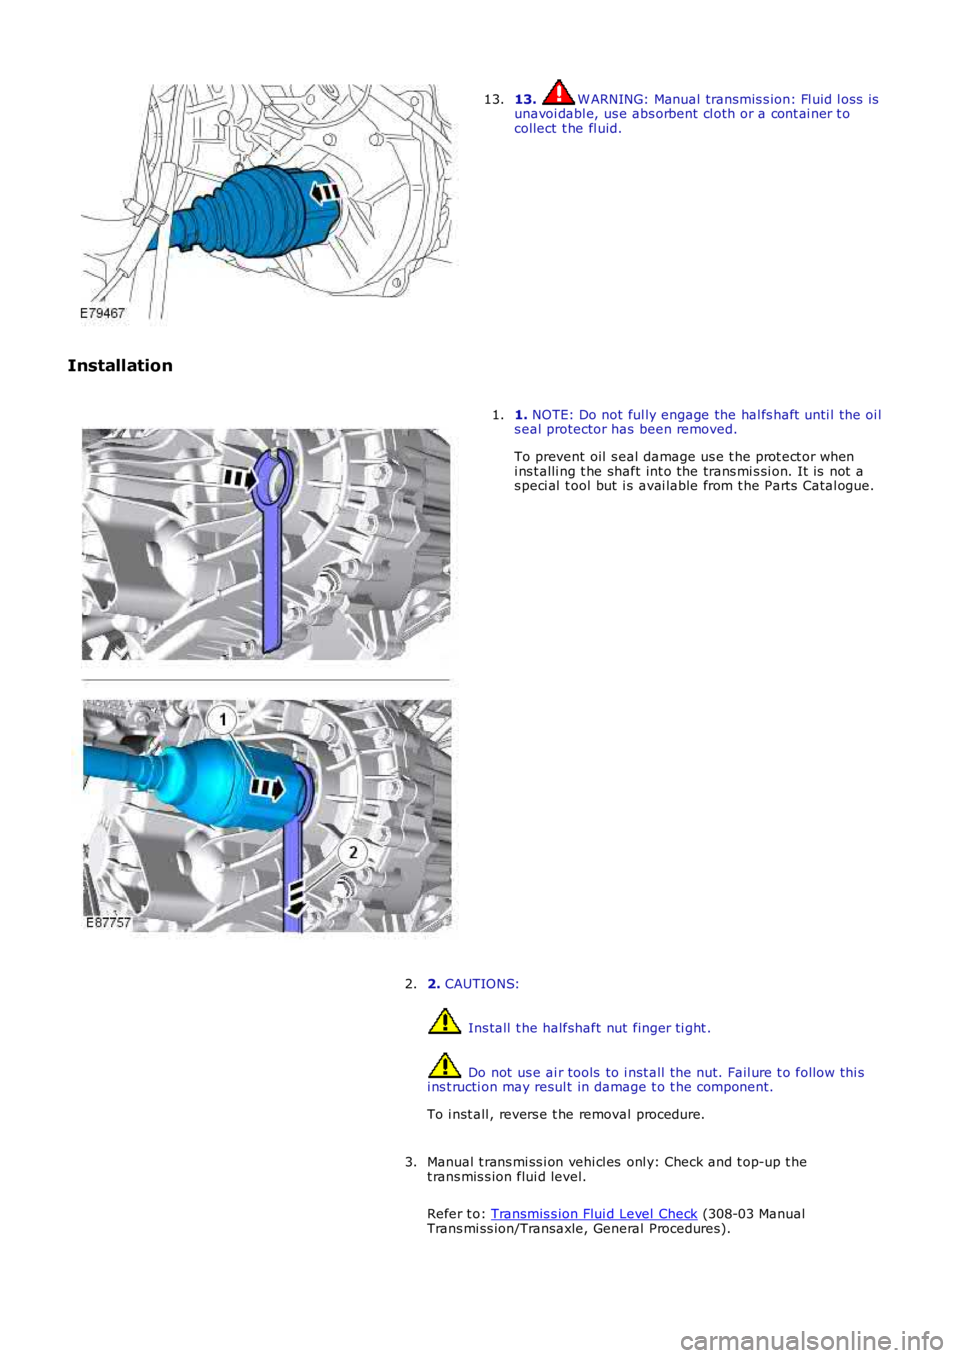
13. W ARNING: Manual transmis s ion: Fl uid l oss isunavoi dabl e, us e abs orbent cl oth or a cont ai ner t ocollect t he fl uid.
13.
Installation
1. NOTE: Do not ful ly engage the hal fs haft unti l the oi ls eal protector has been removed.
To prevent oil s eal damage us e t he prot ect or wheni ns t alli ng t he shaft int o the trans mi s si on. It is not as peci al t ool but i s avai lable from t he Part s Catal ogue.
1.
2. CAUTIONS:
Ins tall t he halfshaft nut finger ti ght .
Do not us e ai r tools to i nst all t he nut. Fail ure t o follow thi si ns t ructi on may resul t in damage t o t he component.
To i nst all , revers e t he removal procedure.
2.
Manual t rans mi ss i on vehi cl es onl y: Check and t op-up t het rans mis s ion flui d level.
Refer t o: Transmis s ion Flui d Level Check (308-03 ManualTrans mi ss ion/Transaxle, General Procedures).
3.
Page 376 of 3229
Publi s hed: 18-May-2011
Front Drive Halfshafts - Front Halfshaft RH
Removal and Inst all ati on
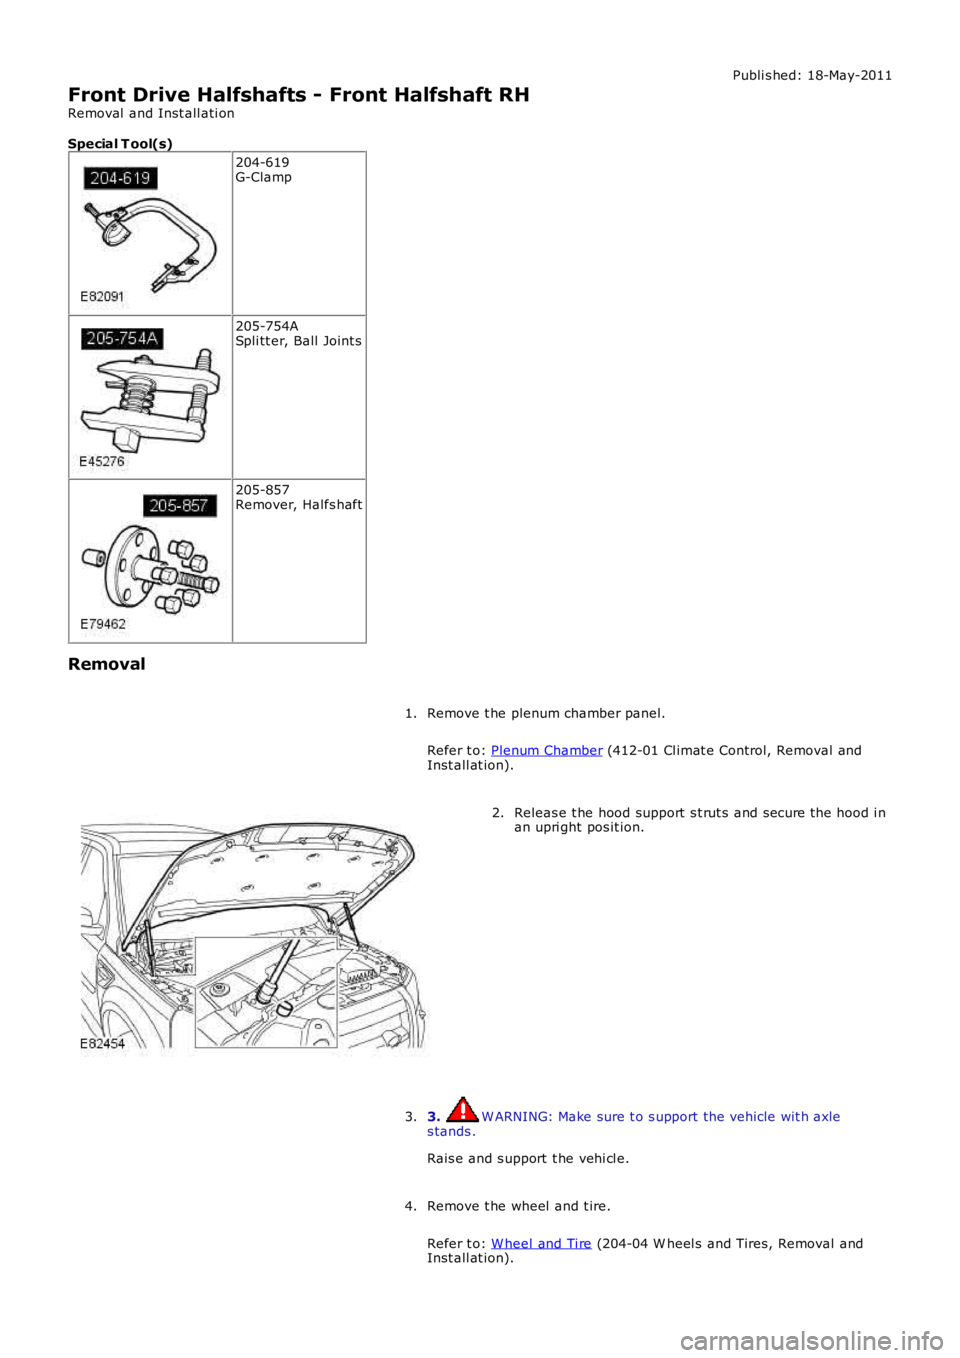
Special T ool(s) 204-619
G-Clamp 205-754A
Spli tt er, Ball Joint s 205-857
Remover, Halfs haft
Removal Remove t he plenum chamber panel.
Refer t o: Plenum Chamber (412-01 Cl imat e Control, Removal and
Inst all at ion).
1. Releas e t he hood support s t rut s and s ecure the hood i n
an upri ght pos it ion.
2.
3. W ARNING: Make sure t o s upport the vehicle wit h axle
s tands .
Rais e and s upport t he vehi cl e.
3.
Remove t he wheel and t ire.
Refer t o: W heel and Ti re (204-04 W heel s and Tires, Removal and
Inst all at ion).
4.
Page 377 of 3229
Stage 1:
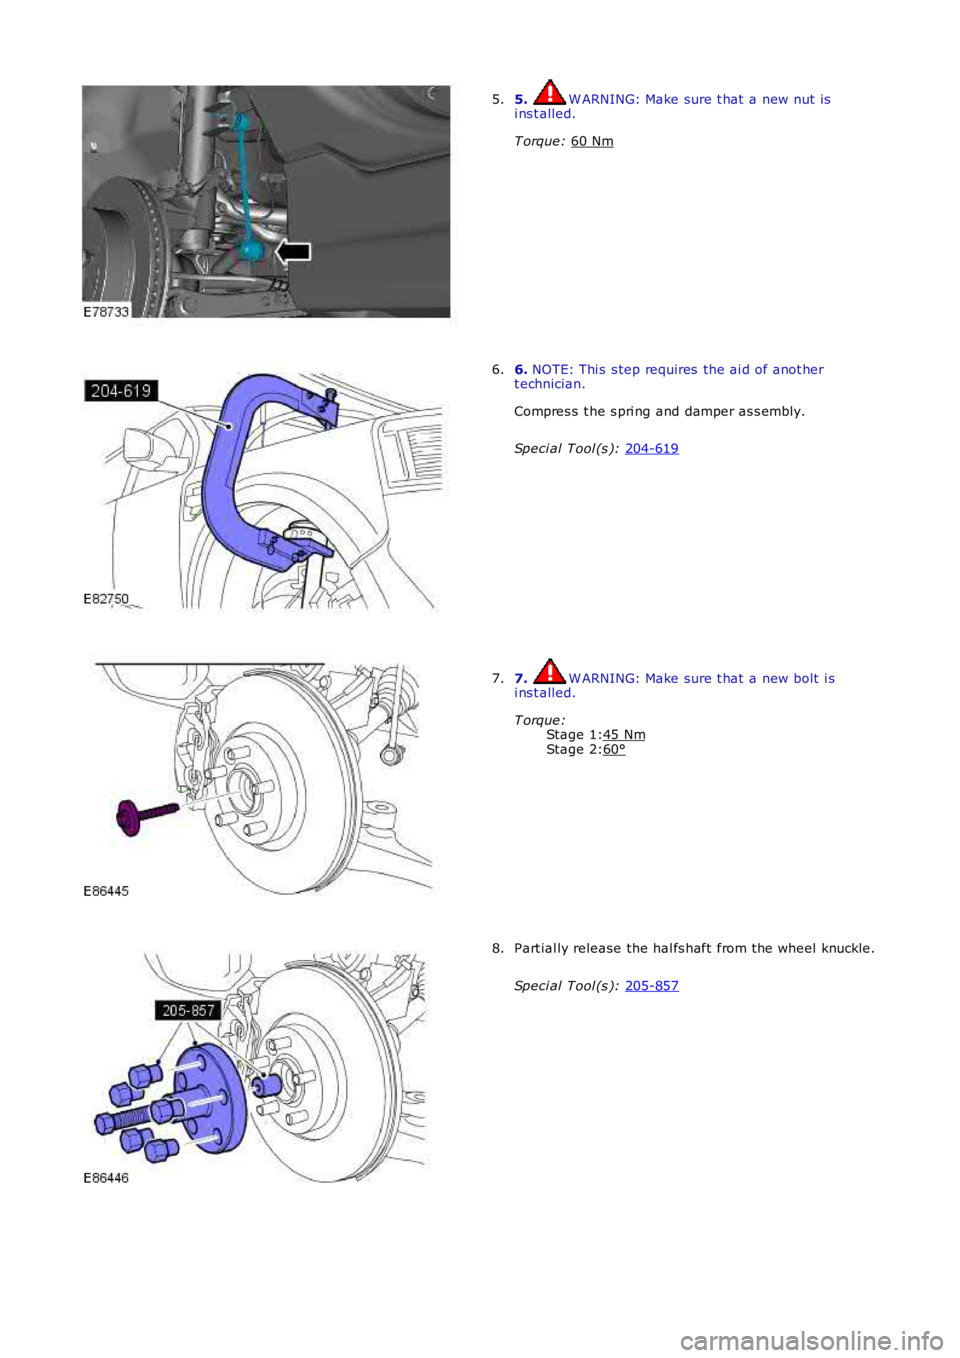
Stage 2: 5. W ARNING: Make sure t hat a new nut is
i ns t alled.
T orque: 60 Nm 5.
6.
NOTE: Thi s s tep requires the ai d of anot her
t echnician.
Compres s t he s pri ng and damper as s embly.
Speci al Tool (s ): 204-619 6.
7. W ARNING: Make sure t hat a new bolt i s
i ns t alled.
T orque: 45 Nm 60°7.
Part ial ly release the hal fs haft from the wheel knuckle.
Speci al Tool (s ): 205-857 8.
Page 378 of 3229
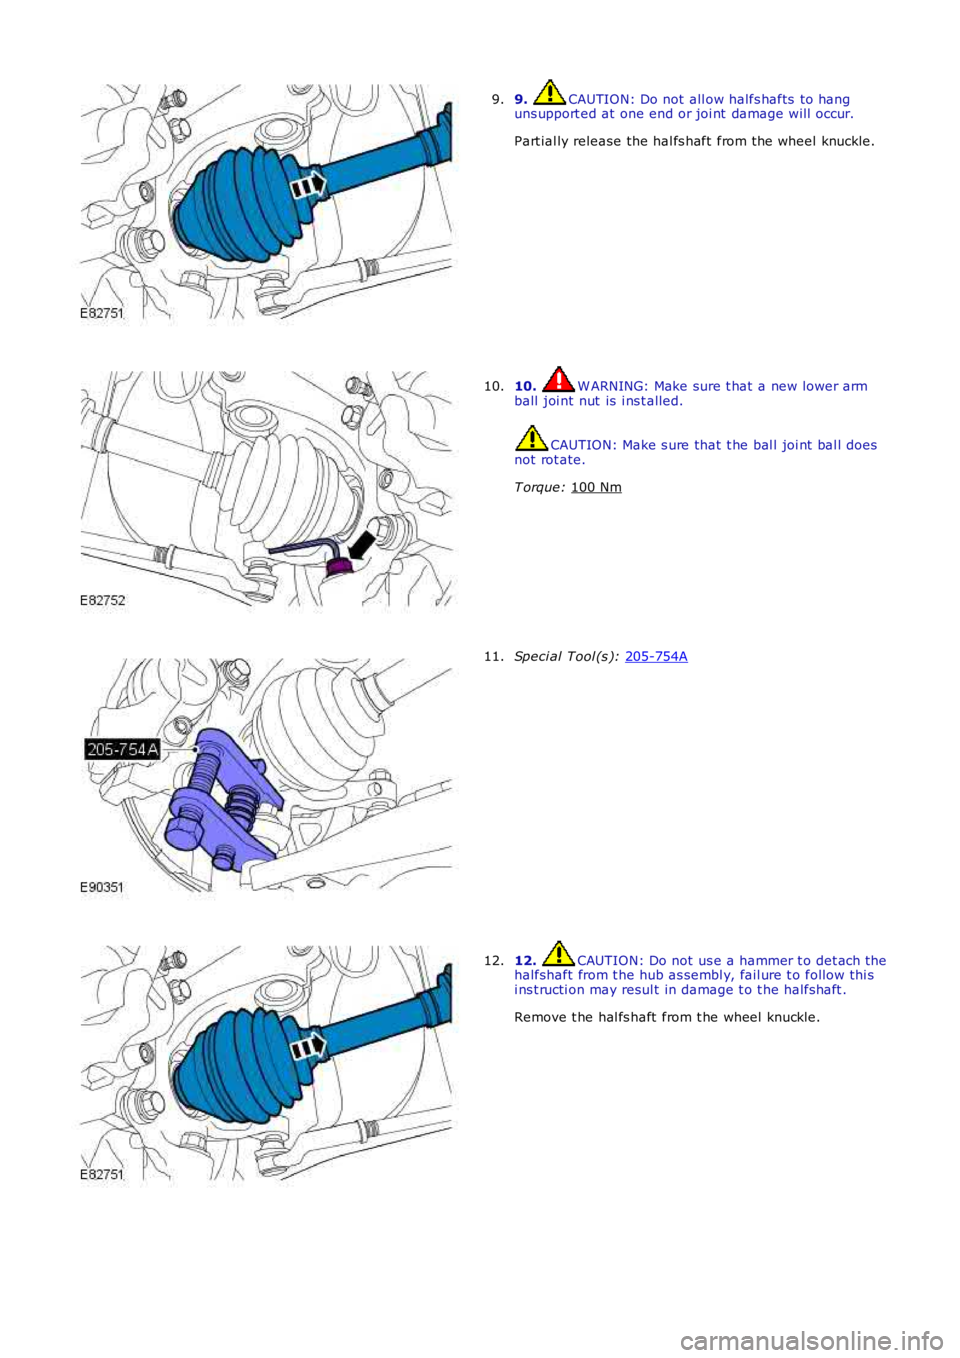
9. CAUTION: Do not all ow halfs hafts to hang
uns upport ed at one end or joi nt damage will occur.
Part ial ly release the hal fs haft from the wheel knuckle.
9. 10. W ARNING: Make sure t hat a new lower arm
ball joi nt nut is i ns t alled. CAUTION: Make s ure that t he bal l joi nt bal l does
not rot ate.
T orque: 100 Nm 10.
Speci al Tool (s ):
205-754A 11.
12. CAUTION: Do not us e a hammer t o det ach t he
halfshaft from t he hub as sembl y, fail ure t o follow thi s
i ns t ructi on may resul t in damage t o t he halfshaft .
Remove t he hal fs haft from t he wheel knuckle.
12.
Page 379 of 3229
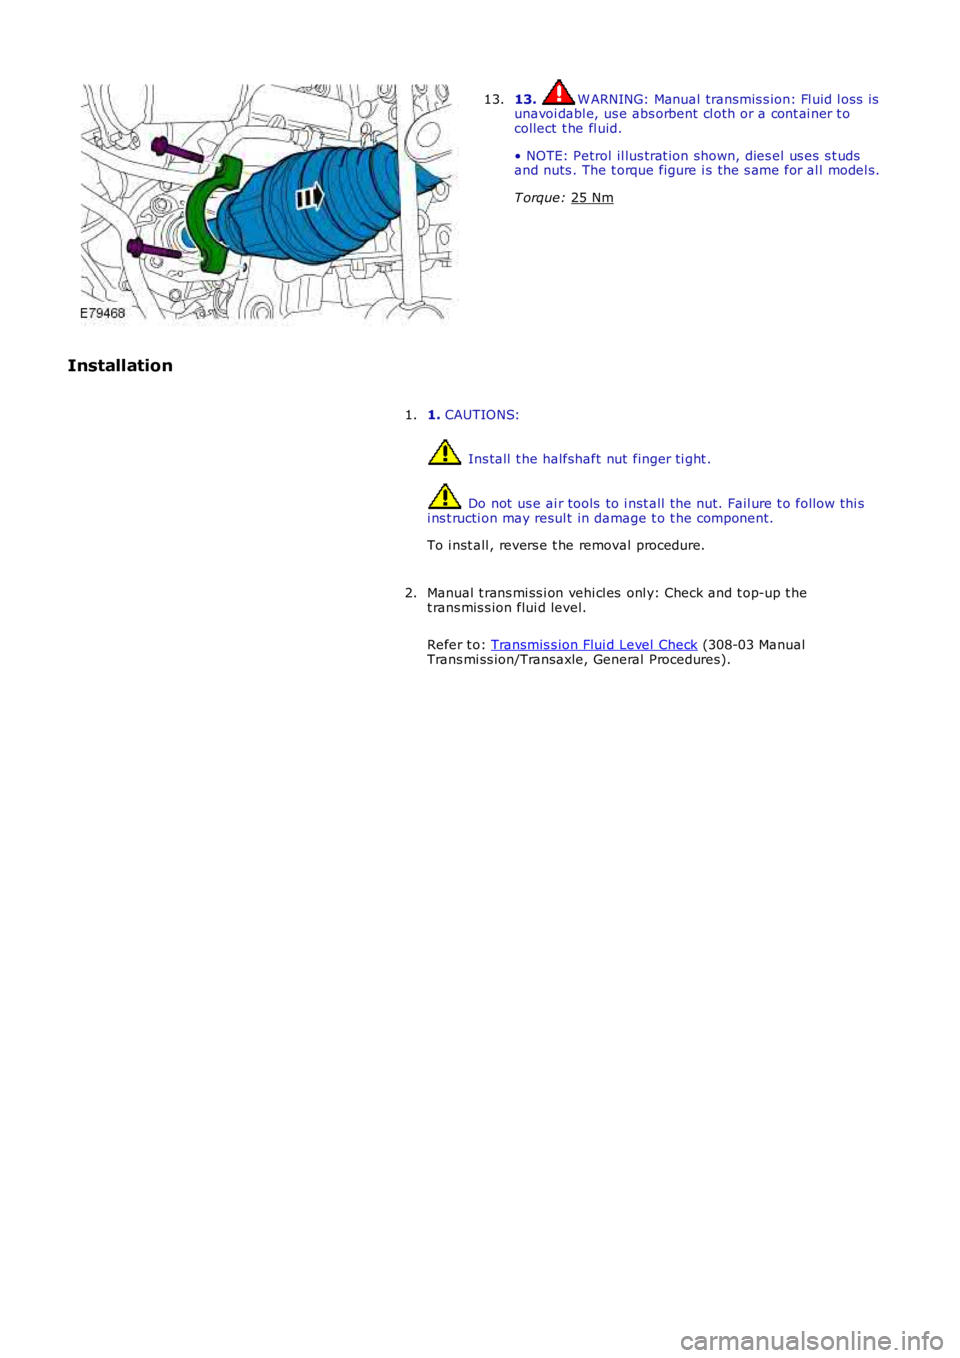
13. W ARNING: Manual transmis s ion: Fl uid l oss is
unavoi dabl e, us e abs orbent cl oth or a cont ai ner t o
collect t he fl uid.
• NOTE: Petrol il lus trat ion shown, dies el us es s t uds
and nuts . The t orque figure i s t he s ame for al l model s.
T orque: 25 Nm 13.
Installation 1. CAUTIONS: Ins tall t he halfshaft nut finger ti ght .
Do not us e ai r tools to i nst all t he nut. Fail ure t o follow thi s
i ns t ructi on may resul t in damage t o t he component.
To i nst all , revers e t he removal procedure.
1.
Manual t rans mi ss i on vehi cl es onl y: Check and t op-up t he
t rans mis s ion flui d level.
Refer t o: Transmis s ion Flui d Level Check (308-03 Manual
Trans mi ss ion/Transaxle, General Procedures).
2.
Page 380 of 3229
Publi s hed: 11-May-2011
Front Drive Halfshafts - Inner Constant Velocity (CV) Joint Boot
Removal and Inst all ati on
Special T ool(s)
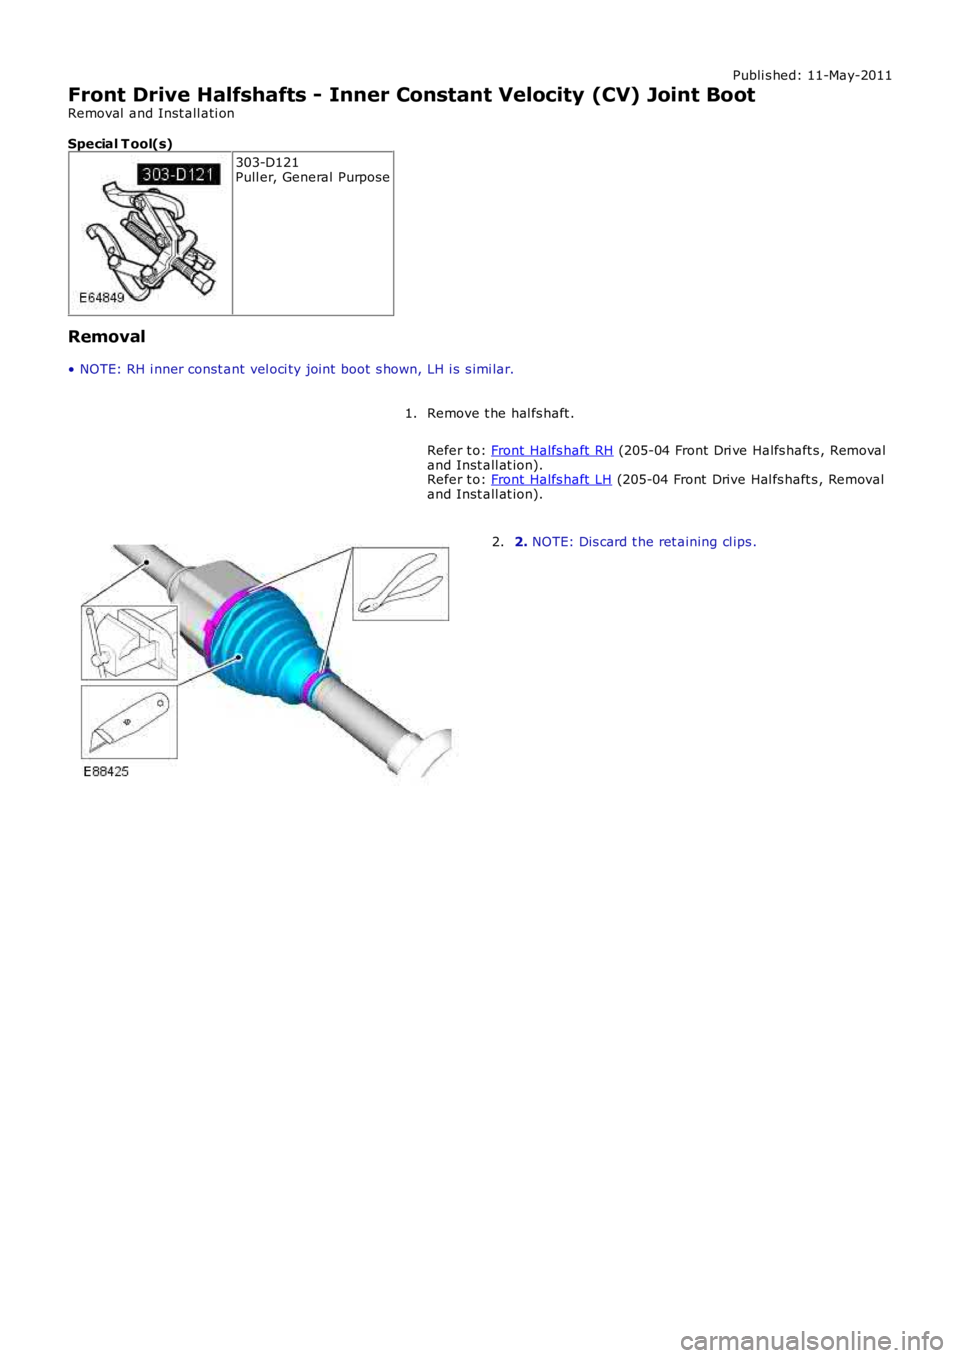
303-D121Pull er, General Purpose
Removal
• NOTE: RH i nner const ant vel oci ty joint boot s hown, LH i s s imi lar.
Remove t he hal fs haft .
Refer t o: Front Halfs haft RH (205-04 Front Dri ve Halfs haft s , Removaland Inst all at ion).Refer t o: Front Halfs haft LH (205-04 Front Drive Hal fs haft s , Removaland Inst all at ion).
1.
2. NOTE: Dis card t he ret aining cl ips .2.
Trending: phone, fan, power steering fluid, fuel cap, turn signal bulb, isofix, wiring diagram

