display Lexus CT200h 2014 (in English) Repair Manual
[x] Cancel search | Manufacturer: LEXUS, Model Year: 2014, Model line: CT200h, Model: Lexus CT200h 2014Pages: 622
Page 265 of 622
265
5
5-2. Using the audio system
Audio system
CT200h_OM_OM76135E_(EE)
Optimal use of the audio system
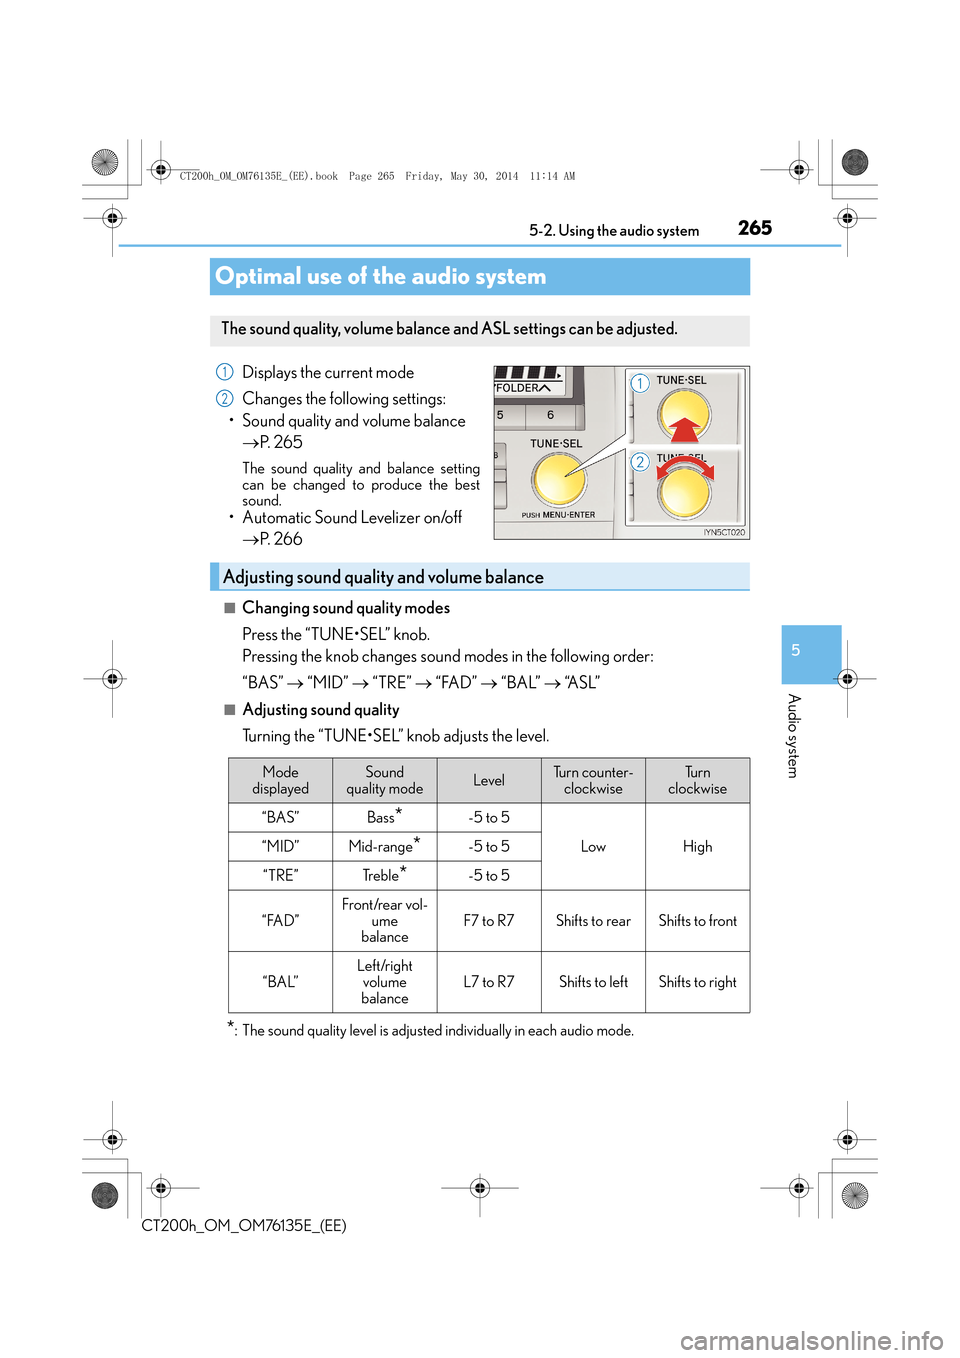
Displays the current mode
Changes the following settings:
• Sound quality and volume balance → P. 2 6 5
The sound quality and balance setting
can be changed to produce the best
sound.
• Automatic Sound Levelizer on/off
→ P. 2 6 6
■Changing sound quality modes
Press the “TUNE•SEL” knob.
Pressing the knob changes sound modes in the following order:
“BAS” → “MID” → “TRE” → “FAD” → “BAL” → “A S L ”
■Adjusting sound quality
Turning the “TUNE•SEL” knob adjusts the level.
*: The sound quality level is adjusted individually in each audio mode.
The sound quality, volume balance and ASL settings can be adjusted.
1
2
Adjusting sound quality and volume balance
Mode
displayedSound
quality modeLevelTurn counter- clockwiseTu r n
clockwise
“BAS”Bass*-5 to 5
LowHigh“MID”Mid-range*-5 to 5
“TRE”Tr e b l e*-5 to 5
“FAD”Front/rear vol- ume
balanceF7 to R7Shifts to rearShifts to front
“BAL”
Left/right
volume
balance
L7 to R7Shifts to leftShifts to right
CT200h_OM_OM76135E_(EE).book Page 265 Friday, May 30, 2014 1 1:14 AM
Page 267 of 622
267
5
5-3. Using the radio
Audio system
CT200h_OM_OM76135E_(EE)
Radio operation
Press the “AM•DAB” or “FM” button
to begin listening to the radio.
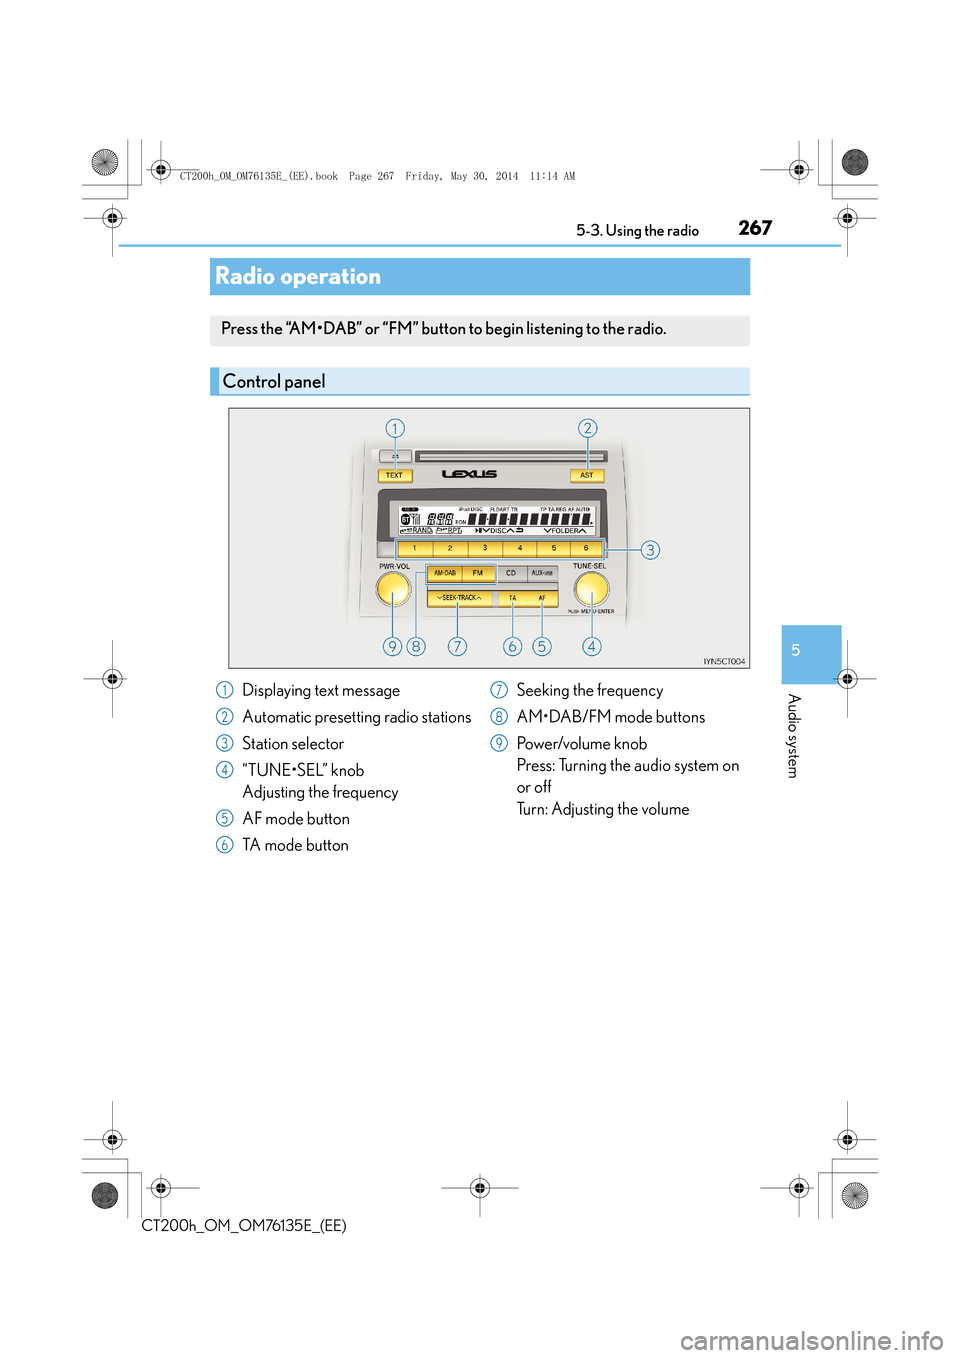
Control panel
Displaying text message
Automatic presetting radio stations
Station selector
“TUNE•SEL” knob
Adjusting the frequency
AF mode button
TA mode button Seeking the frequency
AM•DAB/FM mode buttons
Po w e r/v o l u m e k n o b
Press: Turning the audio system on
or off
Turn: Adjusting the volume1
2
3
4
5
6
7
8
9
CT200h_OM_OM76135E_(EE).book Page 267 Friday, May 30, 2014 1
1:14 AM
Page 269 of 622
2695-3. Using the radio
5
Audio system
CT200h_OM_OM76135E_(EE)
■Traffic information
Press the “TA” button.
TP mode:
The system automatically switches to traffic information when a broadcast
with a traffic information signal is received.
The station returns to the previous one when the traffic information ends.
TA m o d e :
Traffic information can be heard only when a signal is received. The system
switches to the mute mode when a signal is not received. In CD or MP3/WMA
mode, the system automatically switches to traffic information when a signal is
received.
The audio system returns to the mute, CD or MP3/WMA mode when the traffic
information ends.
Audio system mode changes as follows each time the “TA” button is pressed:
FM modes: “TP” → “TA” → off
Modes other than the radio modes: “TA” → off
■Emergency broadcast reception mode
“ALARM” appears in the display in the event that an emergency broadcast is
received, and the emergency broadcast is aired.
■EON (Enhanced Other Network) system (for traffic announcement function)
If the RDS station (with EON data) you are liste ning to is not broadcasting a traffic infor-
mation program and the audio system is in the TA (traffic announcement) mode, the
radio will be switched automatically to a station broadcasting a traffic information pro-
gram in the EON AF list when traffic information begins.
■When the 12-volt battery is disconnected
All preset stations are erased.
■Reception sensitivity
●Maintaining perfect radio reception at all time s is difficult due to the continually chang-
ing position of the antenna, differences in si gnal strength and surrounding objects, such
as trains, transmitters, etc.
●When the “AST” button is used, automati c station selection may not be possible.
●The radio antenna is mounted inside the rear window. To maintain clear radio reception,
do not attach metallic window tinting or other metallic objects to the antenna wire
mounted inside the rear window.
■Digital Audio Broadcast (DAB) radio
The optional radio antenna and tuner are necessary for the use of Digital Audio Broad-
cast (DAB) radio.
CT200h_OM_OM76135E_(EE).book Page 269 Friday, May 30, 2014 1 1:14 AM
Page 270 of 622
2705-4. Playing audio CDs and MP3/WMA discs
CT200h_OM_OM76135E_(EE)
CD player operation
Insert a disc or press the “CD” button to begin listening to a disc.
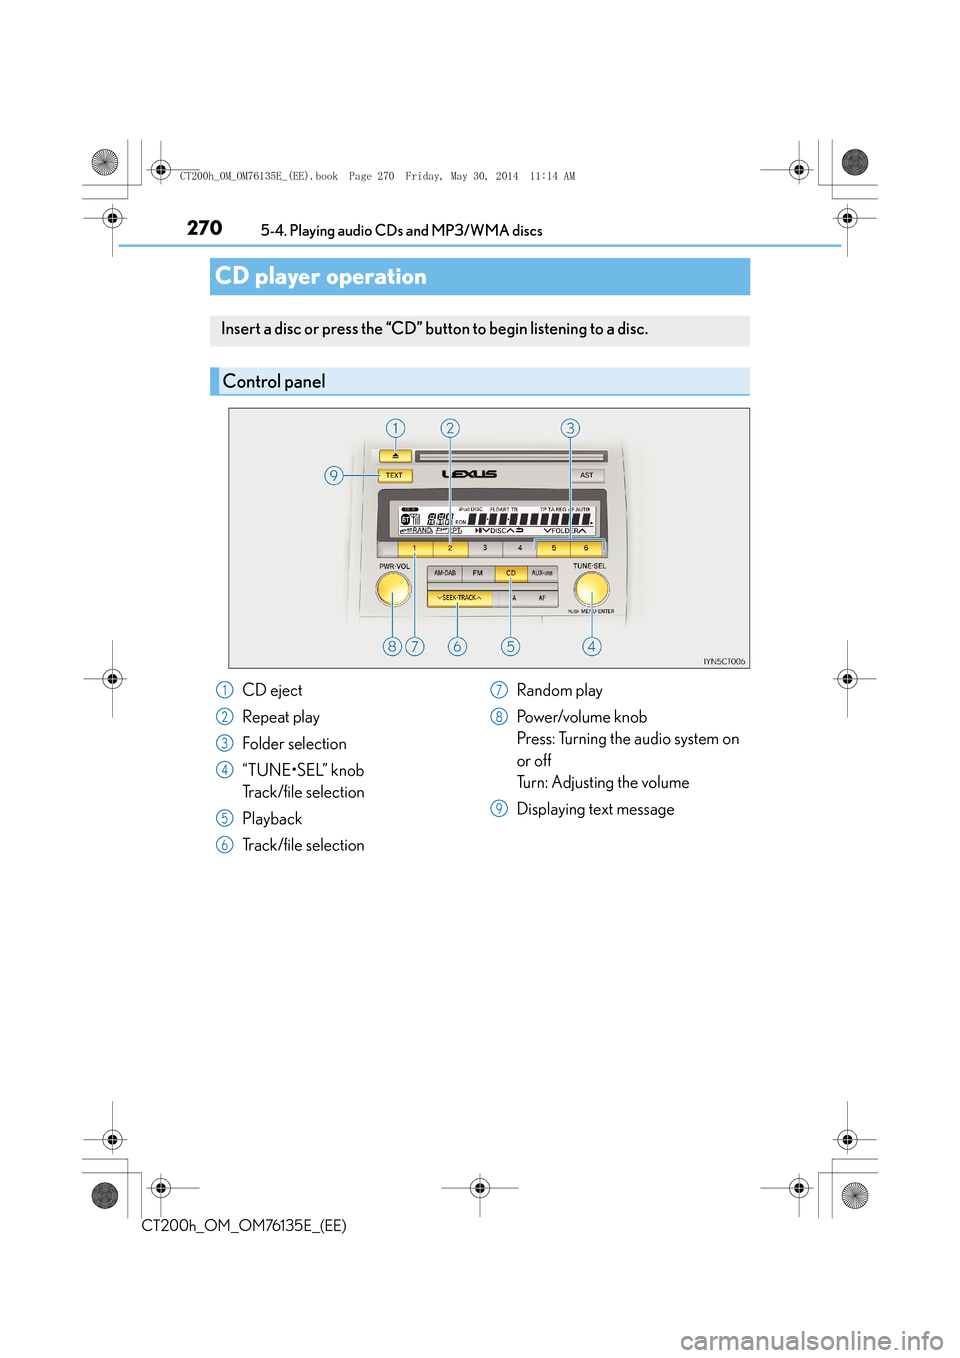
Control panel
CD eject
Repeat play
Folder selection
“TUNE•SEL” knob
Track/file selection
Playback
Track/file selection Random play
Po w e r/v o l u m e k n o b
Press: Turning the audio system on
or off
Turn: Adjusting the volume
Displaying text message1
2
3
4
5
6
7
8
9
CT200h_OM_OM76135E_(EE).book Page 270 Friday, May 30, 2014 1
1:14 AM
Page 271 of 622
2715-4. Playing audio CDs and MP3/WMA discs
5
Audio system
CT200h_OM_OM76135E_(EE)
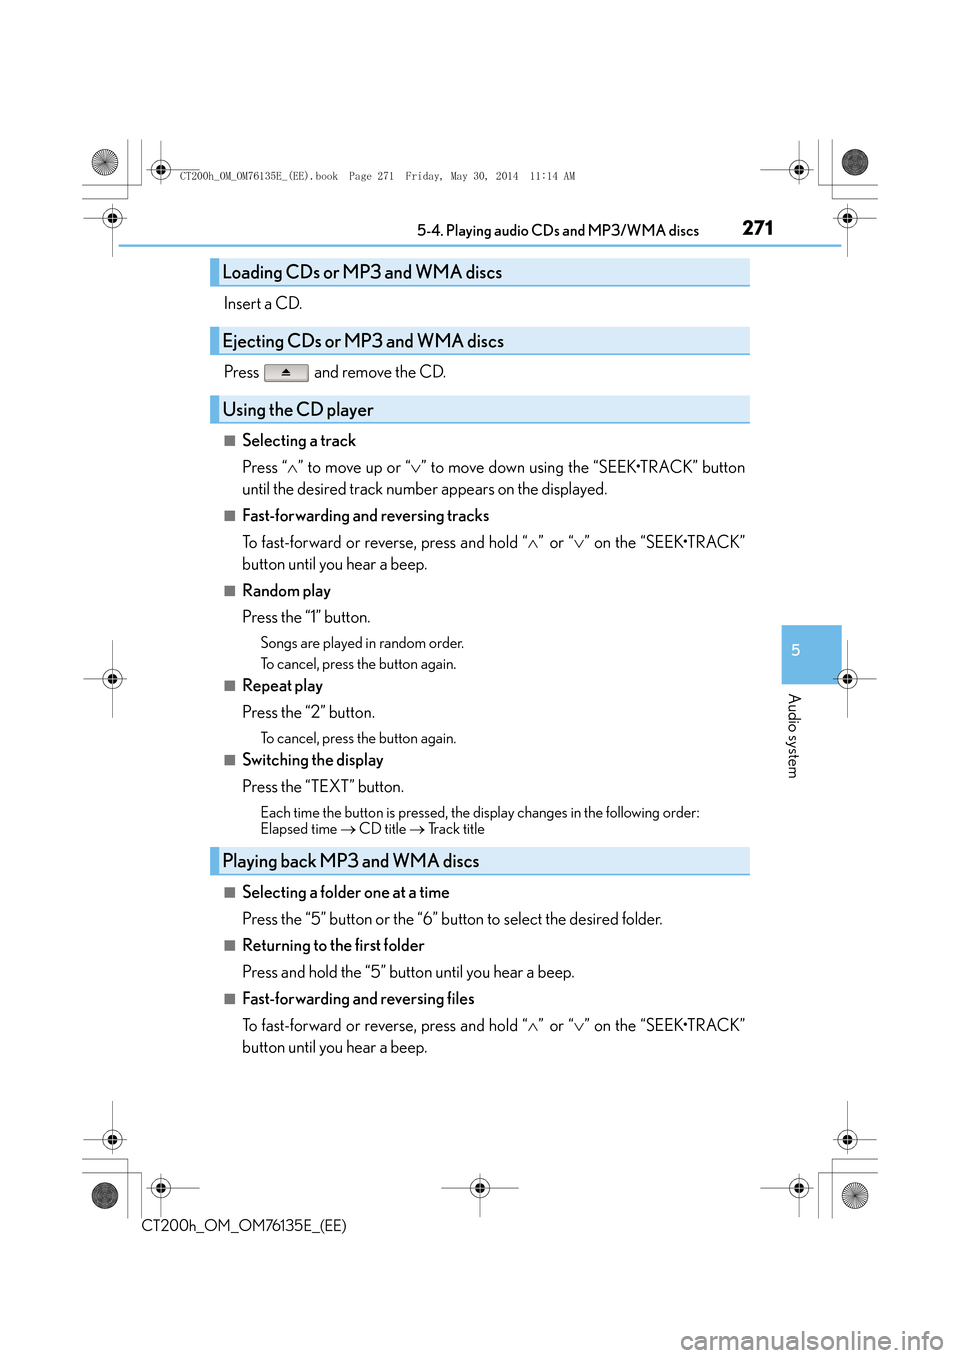
Insert a CD.
Press and remove the CD.
■Selecting a track
Press “∧” to move up or “ ∨” to move down using the “SEEK•TRACK” button
until the desired track number appears on the displayed.
■Fast-forwarding and reversing tracks
To fast-forward or reverse, press and hold “ ∧” or “ ∨” on the “SEEK•TRACK”
button until you hear a beep.
■Random play
Press the “1” button.
Songs are played in random order.
To cancel, press the button again.
■Repeat play
Press the “2” button.
To cancel, press the button again.
■Switching the display
Press the “TEXT” button.
Each time the button is pressed, the display changes in the following order:
Elapsed time → CD title → Track title
■Selecting a folder one at a time
Press the “5” button or the “6” bu tton to select the desired folder.
■Returning to the first folder
Press and hold the “5” button until you hear a beep.
■Fast-forwarding and reversing files
To fast-forward or reverse, press and hold “ ∧” or “ ∨” on the “SEEK•TRACK”
button until you hear a beep.
Loading CDs or MP3 and WMA discs
Ejecting CDs or MP3 and WMA discs
Using the CD player
Playing back MP3 and WMA discs
CT200h_OM_OM76135E_(EE).book Page 271 Friday, May 30, 2014 1 1:14 AM
Page 272 of 622
2725-4. Playing audio CDs and MP3/WMA discs
CT200h_OM_OM76135E_(EE)
■Selecting file
Turn the “TUNE•SEL” knob or press “∧” or “ ∨” on the “SEEK•TRACK” button
to select the desired file.
■Random play
�XPlaying files from a folder in random order
Press the “1” button.
To cancel, press the button again.
�XPlaying all the files from a disc in random order
Press and hold the “1” button until you hear a beep.
To cancel, press the button again.
■Repeat play
�XRepeating a file
Press the “2” button.
To cancel, press the button again.
�XRepeating all the files in a folder
Press and hold the “2” button until you hear a beep.
To cancel, press the button again.
■Switching the display
Press the “TEXT” button.
Each time the button is pressed, the display changes in the following order:
Folder no./File no./Elapsed time → Folder name → File name →
Album title (MP3 only) → Track title → Artist name
■CD player protection feature
To protect the internal components, playback is automatically stopped when a problem is
detected.
■Display
Up to 12 characters can be displayed at a time.
If there are 13 or more characters, pressing and holding the “TEXT” button for 1 second
or more enables to display the remaining characters.
A maximum of 24 characters can be displayed.
If the “TEXT” button is pressed for more than 1 second again or has not been operated
for more than 6 seconds, the display will return to the first 12 characters.
Depending on the contents recorded, the characters may not be displayed properly or
may not be displayed at all.
CT200h_OM_OM76135E_(EE).book Page 272 Friday, May 30, 2014 1 1:14 AM
Page 273 of 622
2735-4. Playing audio CDs and MP3/WMA discs
5
Audio system
CT200h_OM_OM76135E_(EE)
■When “ERROR”, “WAIT” or “NO MUSIC” is shown on the display
“ERROR”:
This indicates a trouble either in the CD or inside the player. The CD may be dirty, dam-
aged, or inserted up-side down.
“WAIT”:
This indicates that operation is stopped due to a high temperature inside the player. Wait
for a while and then press the “CD” button. If the CD still cannot be played back, contact
any authorized Lexus dealer or repairer, or another duly qualified and equipped profes-
sional.
“NO MUSIC”:
This indicates that an MP3/WMA fi le is not included in the CD.
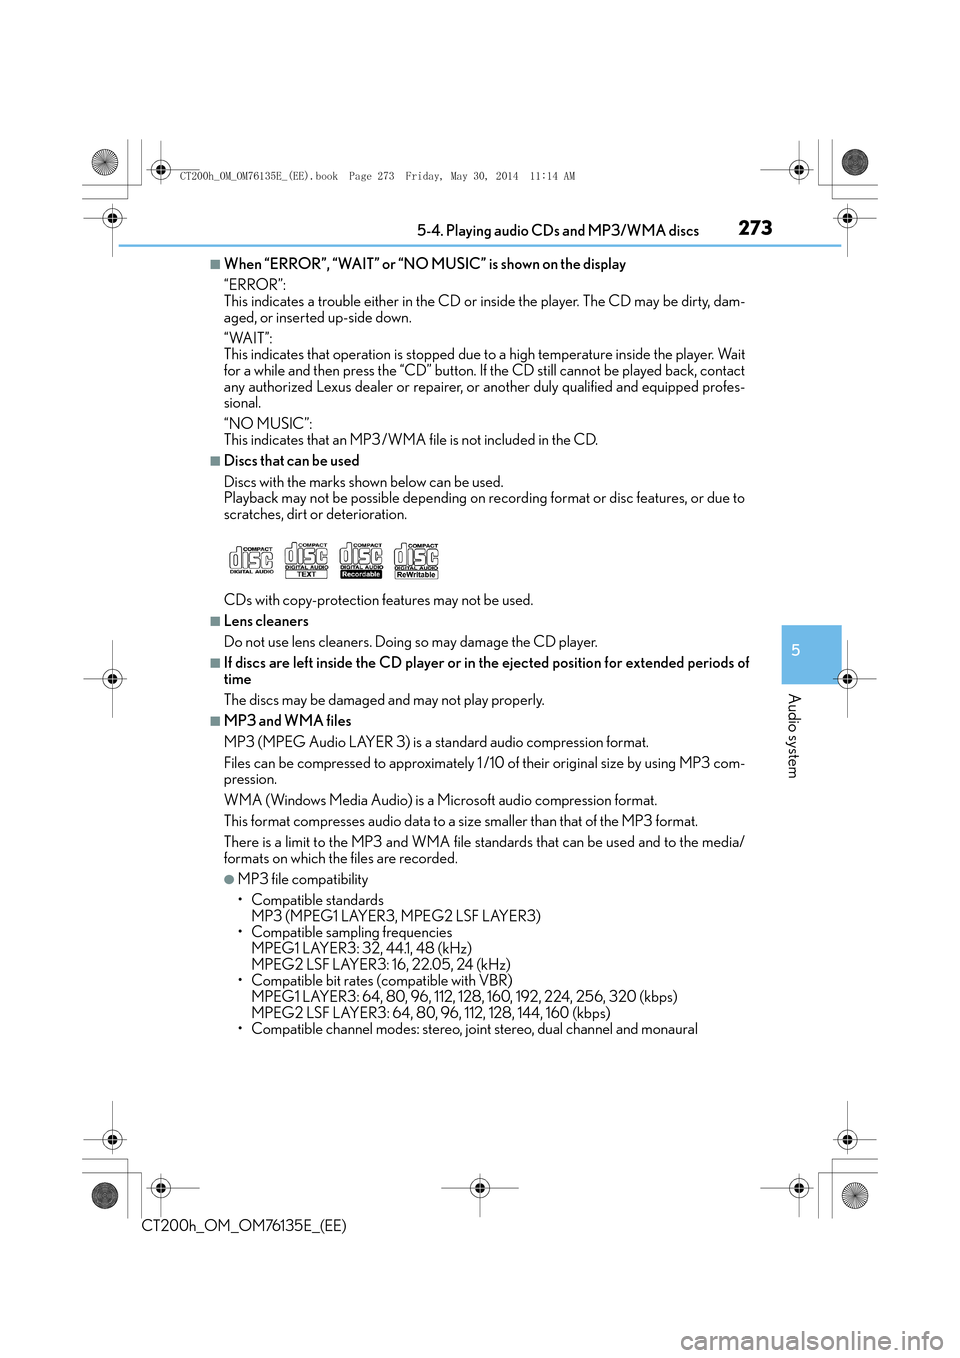
■Discs that can be used
Discs with the marks shown below can be used.
Playback may not be possible depending on recording format or disc features, or due to
scratches, dirt or deterioration.
CDs with copy-protection features may not be used.
■Lens cleaners
Do not use lens cleaners. Doing so may damage the CD player.
■If discs are left inside the CD player or in the ejected position for extended periods of
time
The discs may be damaged and may not play properly.
■MP3 and WMA files
MP3 (MPEG Audio LAYER 3) is a standard audio compression format.
Files can be compressed to approximately 1 /10 of their original size by using MP3 com-
pression.
WMA (Windows Media Audio) is a Microsoft audio compression format.
This format compresses audio data to a size smaller than that of the MP3 format.
There is a limit to the MP3 and WMA file st andards that can be used and to the media/
formats on which the files are recorded.
●MP3 file compatibility
• Compatible standards MP3 (MPEG1 LAYER3, MPEG2 LSF LAYER3)
• Compatible sampling frequencies MPEG1 LAYER3: 32, 44.1, 48 (kHz)
MPEG2 LSF LAYER3: 16, 22.05, 24 (kHz)
• Compatible bit rates (compatible with VBR) MPEG1 LAYER3: 64, 80, 96, 112, 128, 160, 192, 224, 256, 320 (kbps)
MPEG2 LSF LAYER3: 64, 80, 96, 112, 128, 144, 160 (kbps)
• Compatible channel modes: stereo, joint stereo, dual channel and monaural
CT200h_OM_OM76135E_(EE).book Page 273 Friday, May 30, 2014 1 1:14 AM
Page 274 of 622
2745-4. Playing audio CDs and MP3/WMA discs
CT200h_OM_OM76135E_(EE)
●WMA file compatibility
• Compatible standardsWMA Ver. 7, 8, 9
• Compatible sampling frequencies 32, 44.1, 48 (kHz)
• Compatible bit rates (only compatible with 2-channel playback)
Ver. 7, 8: CBR 48, 64, 80, 96, 128, 160, 192 (kbps)
Ver. 9: CBR 48, 64, 80, 96, 128, 160, 192, 256, 320 (kbps)
●Compatible media
Media that can be used for MP3 and WMA playback are CD-Rs and CD-RWs.
Playback in some instances may not be possible if the CD-R or CD-RW is not final-
ized. Playback may not be possible or the audio may jump if the disc is scratched or
marked with fingerprints.
●Compatible disc formats
The following disc formats can be used:
• Disc formats: CD-ROM Mode 1 and Mode 2CD-ROM XA Mode 2, Form 1 and Form 2
• File formats: ISO9660 Level 1, Level 2, (Romeo, Joliet) MP3 and WMA files written in any format other than those listed above may not
play correctly, and their file names and folder names may not be displayed correctly.
Items related to standards an d limitations are as follows:
• Maximum directory hierarchy: 8 levels (including the root)
• Maximum length of folder names/file names: 32 characters
• Maximum number of folders: 192 (including the root)
• Maximum number of files per disc: 255
●File names
The only files that can be recognized as MP3/WMA and played are those with the
extension .mp3 or .wma.
●Discs containing multi-session recordings
As the audio system is compatible with multi- sessions, it is possible to play discs that
contain MP3 and WMA files. However, only the first session can be played.
●ID3 and WMA tags
ID3 tags can be added to MP3 files, making it possible to record the track title, artist
name, etc.
The system is compatible with ID3 Ver. 1.0, 1.1, and Ver. 2.2, 2.3 ID3 tags. (The number
of characters is based on ID3 Ver. 1.0 and 1.1.)
WMA tags can be added to WMA files, making it possible to record the track title and
artist name in the same way as with ID3 tags.
●MP3 and WMA playback
When a disc containing MP3 or WMA files is inserted, all files on the disc are first
checked. Once the file check is finished, the first MP3 or WMA file is played. To make
the file check finish more quickly, we re commend you do not write in any files other
than MP3 or WMA files or create any unnecessary folders.
Discs that contain a mixture of music data and MP3 or WMA format data cannot be
played.
CT200h_OM_OM76135E_(EE).book Page 274 Friday, May 30, 2014 1 1:14 AM
Page 277 of 622
277
5
5-5. Using an external device
Audio system
CT200h_OM_OM76135E_(EE)
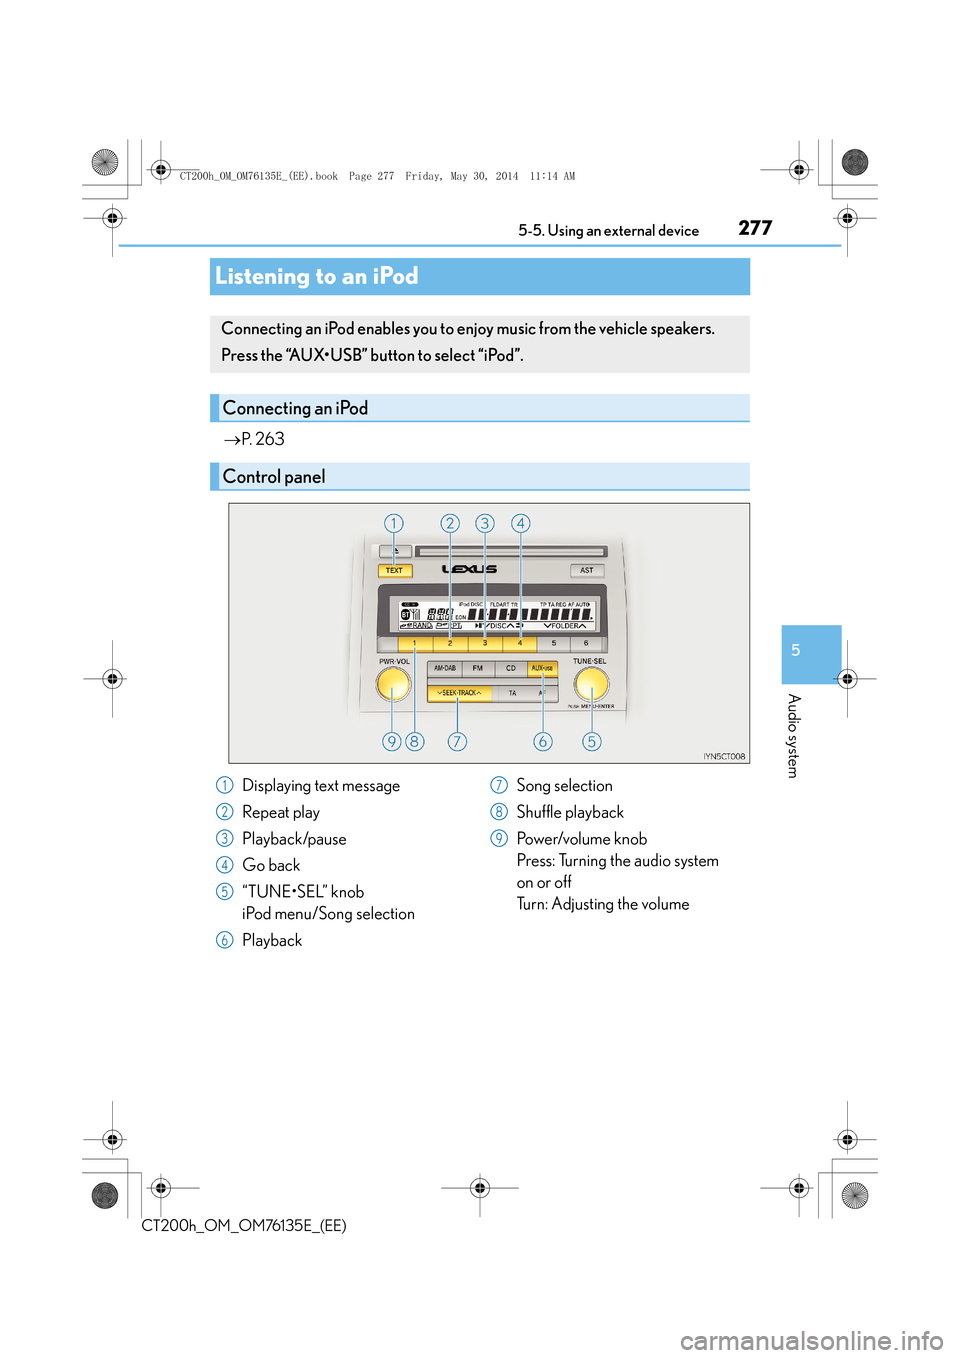
Listening to an iPod
→
P. 2 6 3
Connecting an iPod enables you to enjoy music from the vehicle speakers.
Press the “AUX•USB” button to select “iPod”.
Connecting an iPod
Control panel
Displaying text message
Repeat play
Playback/pause
Go back
“TUNE•SEL” knob
iPod menu/Song selection
Playback Song selection
Shuffle playback
Po w e r/v o l u m e k n o b
Press: Turning the audio system
on or off
Turn: Adjusting the volume1
2
3
4
5
6
7
8
9
CT200h_OM_OM76135E_(EE).book Page 277 Friday, May 30, 2014 1
1:14 AM
Page 278 of 622
2785-5. Using an external device
CT200h_OM_OM76135E_(EE)
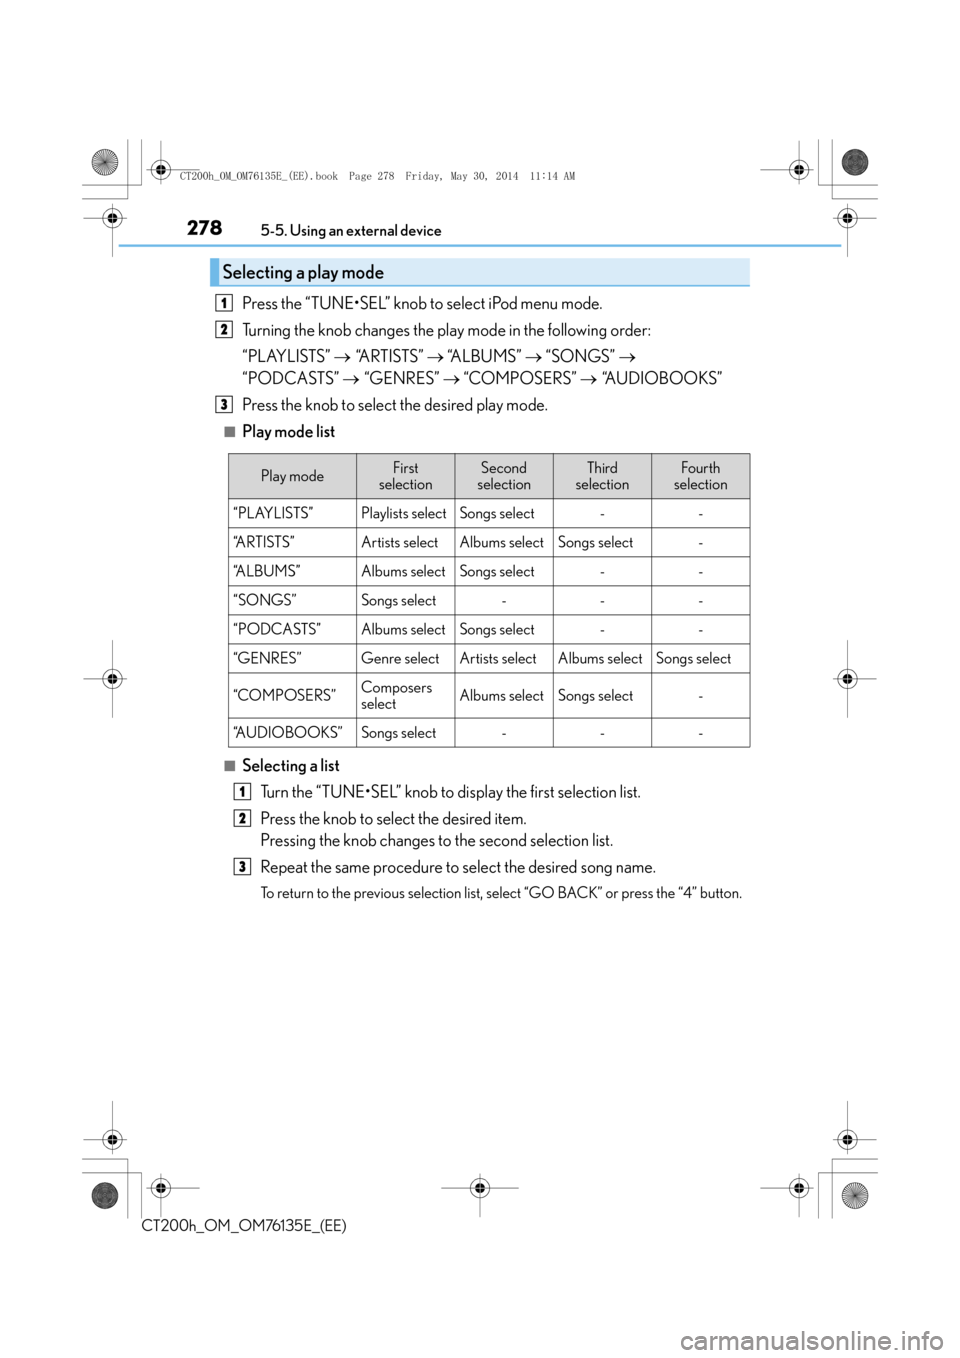
Press the “TUNE•SEL” knob to select iPod menu mode.
Turning the knob changes the play mode in the following order:
“PLAYLISTS” → “A R T I S T S ” → “A L B U M S ” → “SONGS” →
“PODCASTS” → “GENRES” → “COMPOSERS” → “A U D I O B O O K S ”
Press the knob to select the desired play mode.
■Play mode list
■Selecting a list Turn the “TUNE•SEL” knob to display the first selection list.
Press the knob to select the desired item.
Pressing the knob changes to the second selection list.
Repeat the same procedure to select the desired song name.
To return to the previous selection list, select “GO BACK” or press the “4” button.
Selecting a play mode
1
2
3
Play modeFirst
selectionSecond
selectionThird
selectionFour th
selection
“PLAYLISTS”Playlists selectSongs select--
“A R T I S T S ”Artists selectAlbums selectSongs select-
“A L B U M S ”Albums selectSongs select--
“SONGS”Songs select---
“PODCASTS”Albums selectSongs select--
“GENRES”Genre selectArtists selectAlbums selectSongs select
“COMPOSERS”Composers
selectAlbums selectSongs select-
“A U D I O B O O K S ”Songs select---
1
2
3
CT200h_OM_OM76135E_(EE).book Page 278 Friday, May 30, 2014 1 1:14 AM