Lexus IS300h 2013 Navigation manual
IS300h 2013
Lexus
Lexus
https://www.carmanualsonline.info/img/36/30038/w960_30038-0.png
Lexus IS300h 2013 Navigation manual
Trending: USB, radio, lock, pairing phone, display, tow, map update
Page 361 of 415
359
2. SETUP
IS300h/250_Navi_EE
7
TELEPHONE
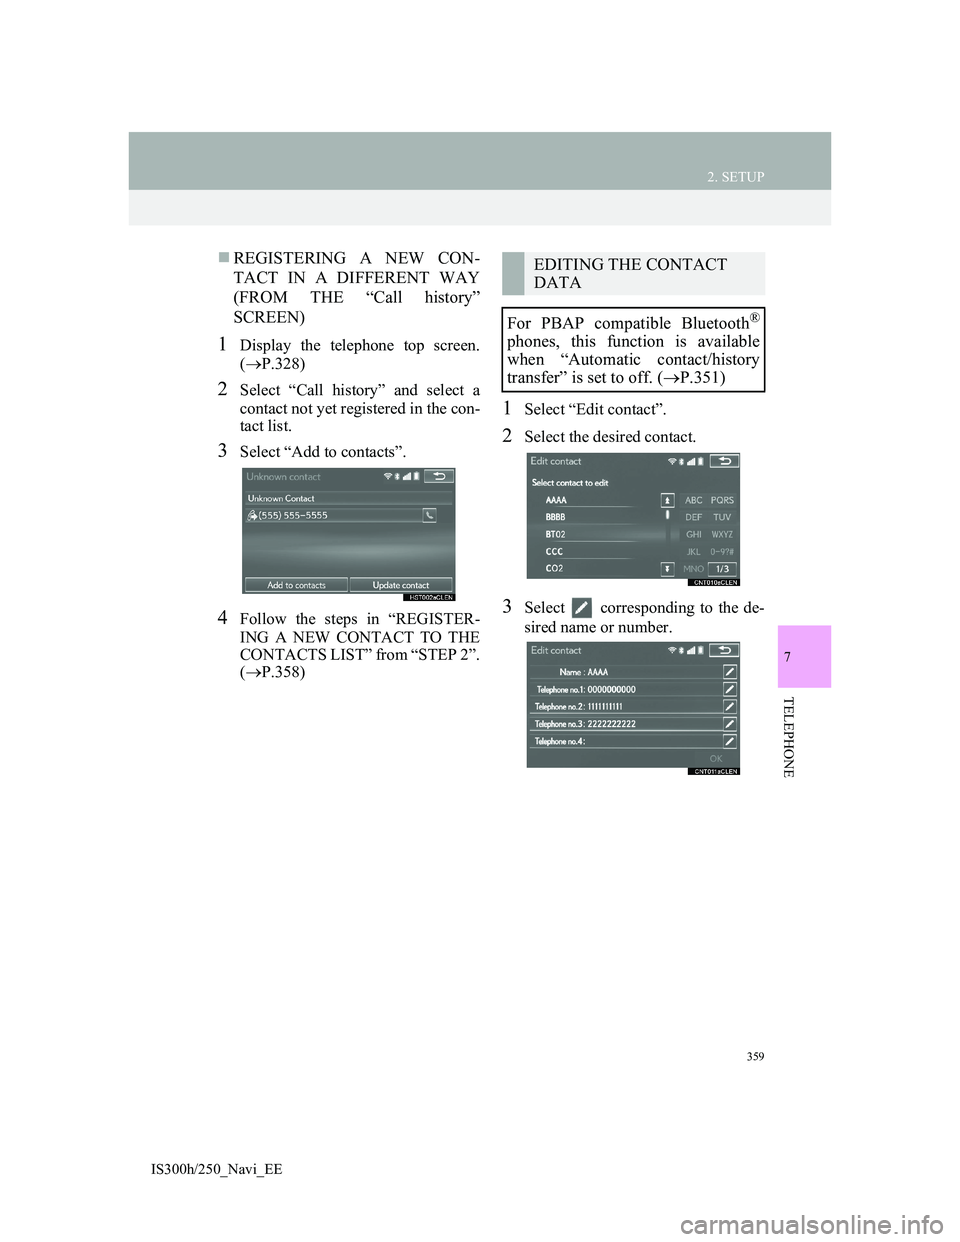
REGISTERING A NEW CON-
TACT IN A DIFFERENT WAY
(FROM THE “Call history”
SCREEN)
1Display the telephone top screen.
(P.328)
2Select “Call history” and select a
contact not yet registered in the con-
tact list.
3Select “Add to contacts”.
4Follow the steps in “REGISTER-
ING A NEW CONTACT TO THE
CONTACTS LIST” from “STEP 2”.
(P.358)
1Select “Edit contact”.
2Select the desired contact.
3Select corresponding to the de-
sired name or number.
EDITING THE CONTACT
DATA
For PBAP compatible Bluetooth
®
phones, this function is available
when “Automatic contact/history
transfer” is set to off. (P.351)
Page 362 of 415
360
2. SETUP
IS300h/250_Navi_EE
For editing the name
4Follow the steps in “REGISTER-
ING A NEW CONTACT TO THE
CONTACTS LIST” from “STEP 2”.
(P.358)
For editing the number
4Follow the steps in “REGISTER-
ING A NEW CONTACT TO THE
CONTACTS LIST” from “STEP 3”.
(P.358)
EDITING THE CONTACT IN A
DIFFERENT WAY (FROM THE
“Contact details” SCREEN)
1Display the telephone top screen.
(P.328)
2Select “Contacts”, “Call history” or
“Favourites” and select the desired
contact.
3Select “Edit contact”.
“E-mail addresses”: Select to display all
registered e-mail addresses for the con-
tact.
4Follow the steps in “EDITING THE
CONTACT DATA” from “STEP
3”. (P.359)
Page 363 of 415
361
2. SETUP
IS300h/250_Navi_EE
7
TELEPHONE
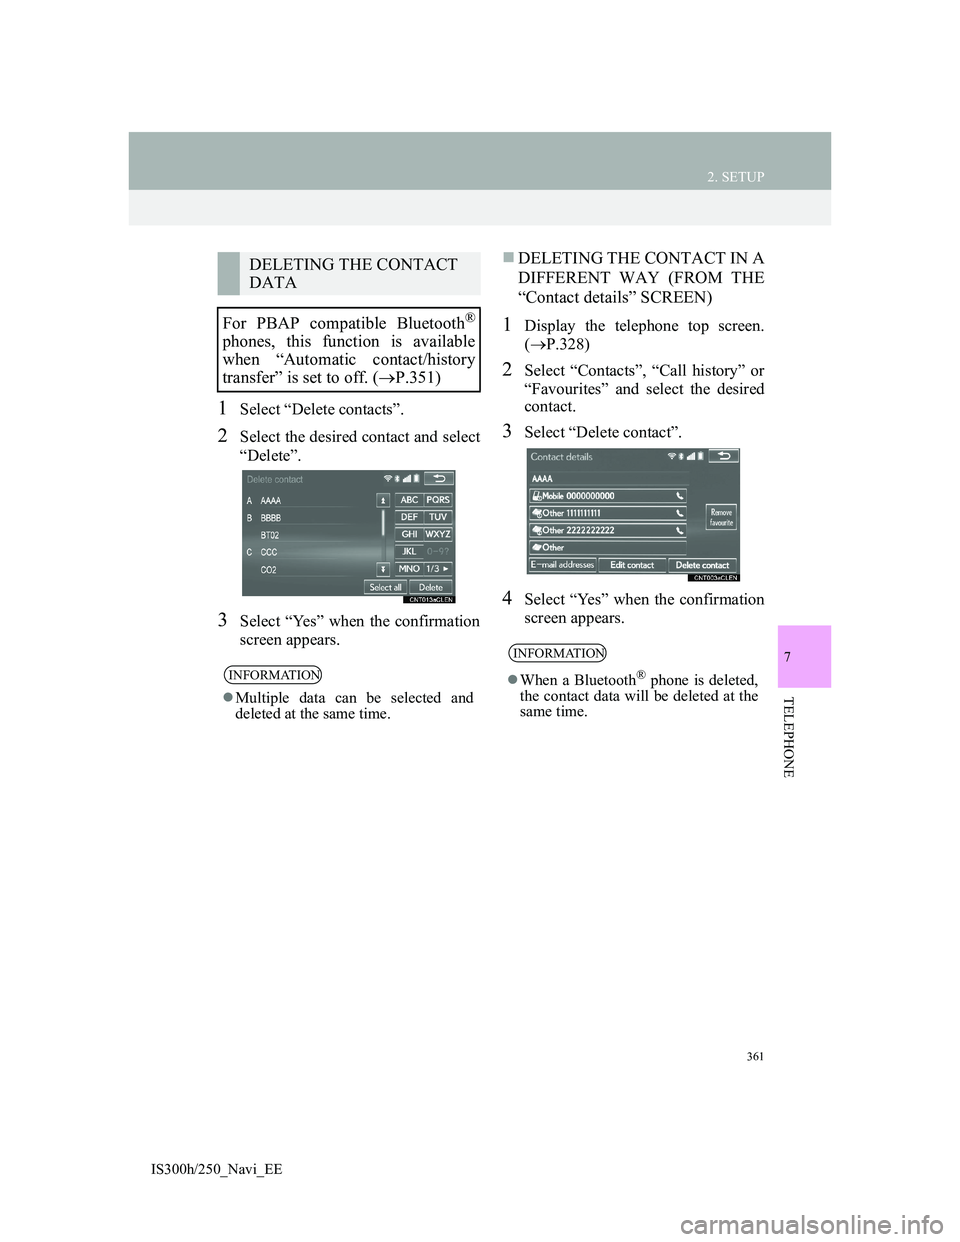
1Select “Delete contacts”.
2Select the desired contact and select
“Delete”.
3Select “Yes” when the confirmation
screen appears.
DELETING THE CONTACT IN A
DIFFERENT WAY (FROM THE
“Contact details” SCREEN)
1Display the telephone top screen.
(P.328)
2Select “Contacts”, “Call history” or
“Favourites” and select the desired
contact.
3Select “Delete contact”.
4Select “Yes” when the confirmation
screen appears.
DELETING THE CONTACT
DATA
For PBAP compatible Bluetooth
®
phones, this function is available
when “Automatic contact/history
transfer” is set to off. (P.351)
INFORMATION
Multiple data can be selected and
deleted at the same time.
INFORMATION
When a Bluetooth® phone is deleted,
the contact data will be deleted at the
same time.
Page 364 of 415
362
2. SETUP
IS300h/250_Navi_EE
1Display the “Contacts” screen.
(P.354)
2Select “Manage favourites”.
3Select the desired item to be set.
DISPLAYING THE “Favourites”
SCREEN IN A DIFFERENT WAY
From the “Contacts” screen
1Display the telephone top screen.
(P.328)
2Select “Contacts”.
3Select “Options”.
4Select “Manage favourite”.
From the “Favourites” screen
1Display the telephone top screen.
(P.328)
2Select “Favourites”.
3Select “Options”.
4Select “Manage favourites”.
“Favourites” SCREEN
Up to 14 contacts (maximum of 4
numbers per contact) can be regis-
tered in the favourites list.
No.FunctionPage
Select to add contacts to
the favourites list.363
Select to delete contacts
from the favourites list.365
Page 365 of 415
363
2. SETUP
IS300h/250_Navi_EE
7
TELEPHONE
1Select “Add”.
2Select the desired contact to add to
the favourites list.
Dimmed contacts are already stored as
a favourite.
3Check that a confirmation screen is
displayed when the operation is
complete.When 14 contacts have already been
registered to the favourites list
1When 14 contacts have already been
registered to the favourites list, a
registered contact needs to be re-
placed.
Select “Yes” when the confirmation
screen appears to replace a contact.
2Select the contact to be replaced.
3Check that a confirmation screen is
displayed when the operation is
complete.
REGISTERING THE
CONTACTS IN THE
FAVOURITES LIST
Page 366 of 415
364
2. SETUP
IS300h/250_Navi_EE
REGISTERING CONTACTS IN
THE FAVOURITES LIST IN A
DIFFERENT WAY
From the “Contacts” screen
1Display the telephone top screen.
(P.328)
2Select “Contacts”.
3Select (grey) at the beginning of
the desired contact list name to be
registered in the favourites list.
When selected, (grey) is changed to
(yellow), and the contact is regis-
tered in the favourites list.
From the “Contact details” screen
1Display the telephone top screen.
(P.328)
2Select “Contacts” or “Call history”
and select the desired contact.
3Select “Add favourite”.
4Check that a confirmation screen is
displayed when the operation is
complete.
Page 367 of 415
365
2. SETUP
IS300h/250_Navi_EE
7
TELEPHONE
1Select “Remove”.
2Select the desired contact and select
“Remove”.
3Select “Yes” when the confirmation
screen appears.
4Check that a confirmation screen is
displayed when the operation is
complete.
DELETING CONTACTS IN THE
FAVOURITES LIST IN A DIF-
FERENT WAY
From the “Contacts” screen
1Display the telephone top screen.
(P.328)
2Select “Contacts”.
3Select (yellow) at the beginning
of the contact list name to be deleted
from the favourites list.
When selected, (yellow) is changed
to
(grey), and the data is deleted
from the list.DELETING THE CONTACTS
IN THE FAVOURITES LIST
Page 368 of 415
366
2. SETUP
IS300h/250_Navi_EE
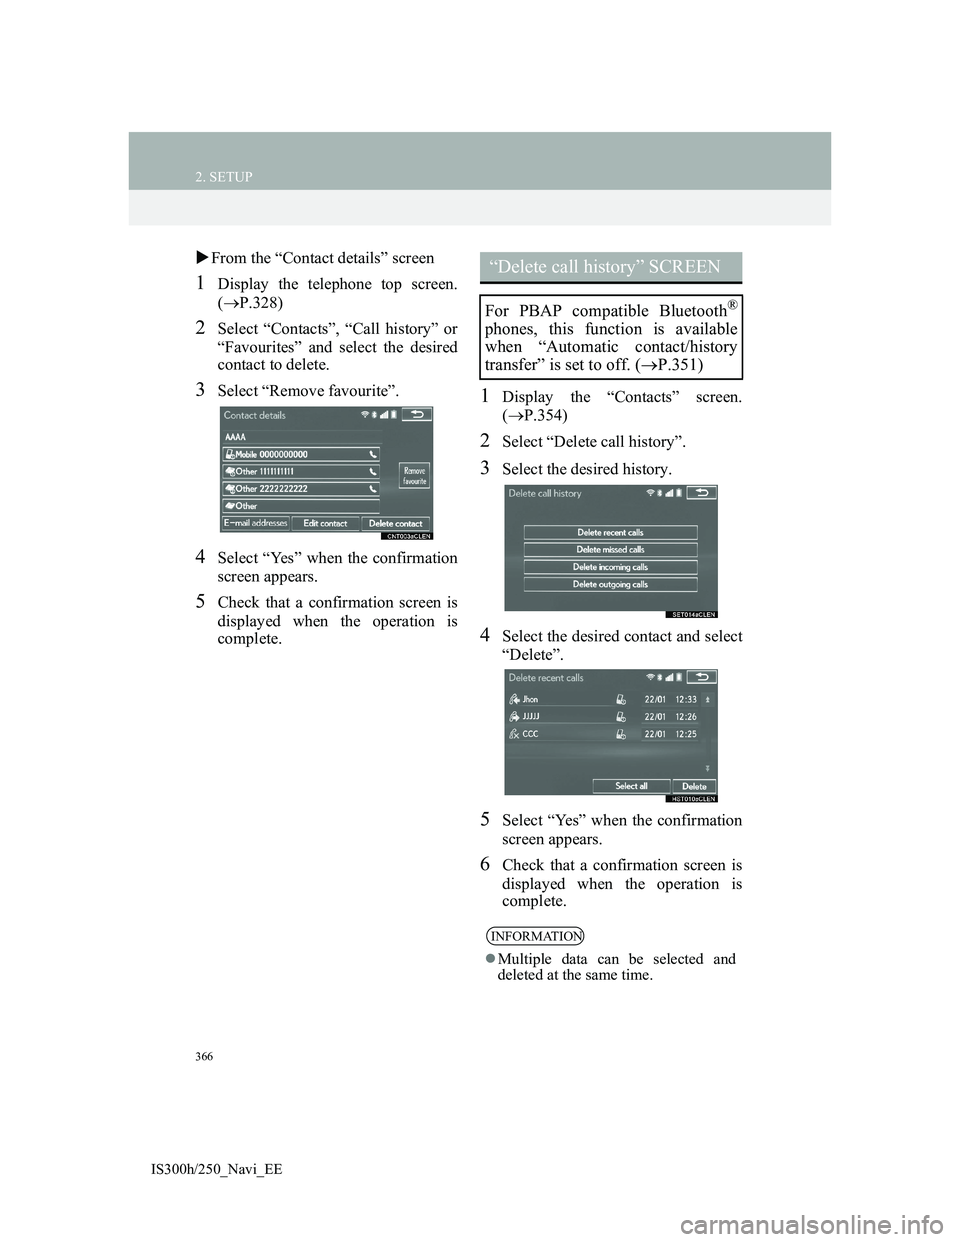
From the “Contact details” screen
1Display the telephone top screen.
(P.328)
2Select “Contacts”, “Call history” or
“Favourites” and select the desired
contact to delete.
3Select “Remove favourite”.
4Select “Yes” when the confirmation
screen appears.
5Check that a confirmation screen is
displayed when the operation is
complete.
1Display the “Contacts” screen.
(P.354)
2Select “Delete call history”.
3Select the desired history.
4Select the desired contact and select
“Delete”.
5Select “Yes” when the confirmation
screen appears.
6Check that a confirmation screen is
displayed when the operation is
complete.
“Delete call history” SCREEN
For PBAP compatible Bluetooth®
phones, this function is available
when “Automatic contact/history
transfer” is set to off. (P.351)
INFORMATION
Multiple data can be selected and
deleted at the same time.
Page 369 of 415
367
2. SETUP
IS300h/250_Navi_EE
7
TELEPHONE
DELETING CALL HISTORY IN
A DIFFERENT WAY
1Display the telephone top screen.
(P.328)
2Select “Call history” and select the
desired tab.
3Select “Delete”.
4Follow the steps in ““Delete call his-
tory” SCREEN” from “STEP 4”.
(P.366)
Page 370 of 415
367
IS300h/250_Navi_EE
7
TELEPHONE
3. WHAT TO DO IF...
1. TROUBLESHOOTING
When using the hands-free system with a Bluetooth® device
If there is a problem with the hands-free system or a Bluetooth® device, first
check the table below.
SymptomLikely causeSolution
Page
Cellular
phoneThis
system
The hands-free sys-
tem or Bluetooth®
device does not
work.
The connected de-
vice may not be a
compatible
Bluetooth
® cellular
phone.
For a list of specific
devices which op-
eration has been
confirmed on this
system, check with
your Lexus dealer.
The Bluetooth®
version of the con-
nected cellular
phone may be older
than the specified
version.
Use a cellular
phone with
Bluetooth
® ver-
sion 2.0 or higher
(recommended:
Ver. 3.0 +EDR or
higher).52
Trending: suspension, bluetooth, change language, engine, horn, tyre pressure, ECO mode


