torque MAZDA 6 2002 Suplement Owner's Manual
[x] Cancel search | Manufacturer: MAZDA, Model Year: 2002, Model line: 6, Model: MAZDA 6 2002Pages: 909, PDF Size: 17.16 MB
Page 75 of 909
OIL PAN
D–11
D
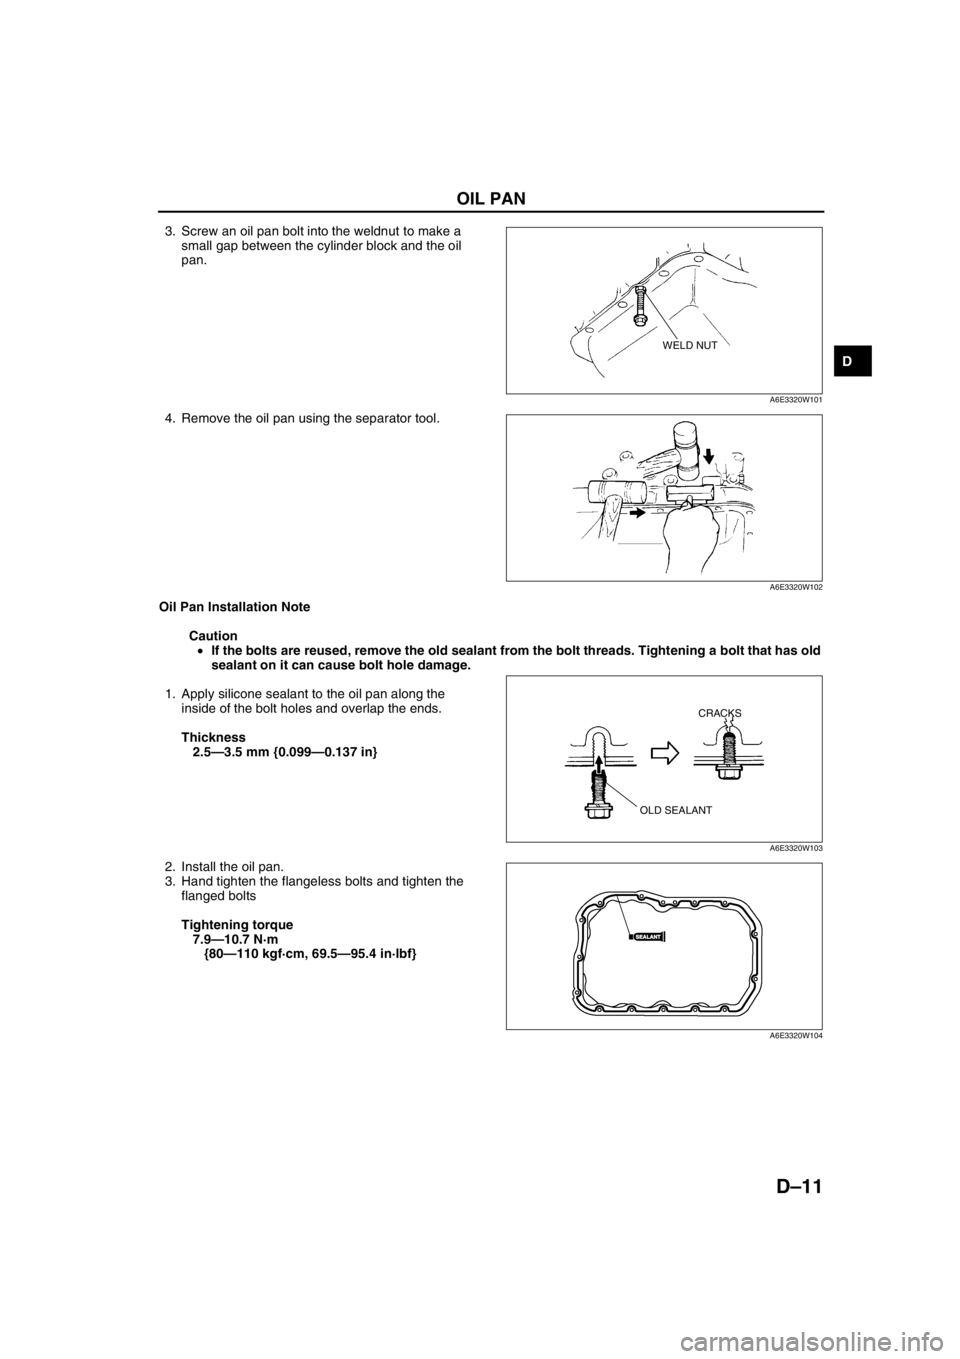
3. Screw an oil pan bolt into the weldnut to make a
small gap between the cylinder block and the oil
pan.
4. Remove the oil pan using the separator tool.
Oil Pan Installation Note
Caution
•If the bolts are reused, remove the old sealant from the bolt threads. Tightening a bolt that has old
sealant on it can cause bolt hole damage.
1. Apply silicone sealant to the oil pan along the
inside of the bolt holes and overlap the ends.
Thickness
2.5—3.5 mm {0.099—0.137 in}
2. Install the oil pan.
3. Hand tighten the flangeless bolts and tighten the
flanged bolts
Tightening torque
7.9—10.7 N·m
{80—110 kgf·cm, 69.5—95.4 in·lbf}
End Of Sie
WELD NUT
A6E3320W101
A6E3320W102
OLD SEALANTCRACKS
A6E3320W103
SEALANTSEALANT
A6E3320W104
Page 109 of 909
CONTROL SYSTEM
F1–21
F1
CONTROLLER AREA NETWORK (CAN)A6E394018880205•PCM transmit/received the information in the CAN. For detail information of the CAN, see the “MULTIPLEX
COMMUNICATION SYSTEM.” (See T–3 OUTLINE.)
Transmit Information (4WD ATX Model)
•Engine control condition
•Torque reduction inhibit
•Engine speed
•Vehicle Speed
•TP
•Engine torque (without torque reduction)
•Engine torque (with torque reduction)
•Battery reconnection
•Engine loss torque
•ECT
•Travelled distance
•Fuel injection information
•MIL condition
•Generator warning light conditions
•Engine displacement
•Number of cylinders
•Air induction type
•Fuel type and delivery
•Country
•Transmission/axle type
•Tire circumference (front/rear)
Received Information (4WD ATX Model)
From ABS HU/CM, ABS/TCS HU/CM, or DSC HU/CM
•Wheel speed
—Front left, Front right, Rear left, and Rear right
•Travelled distance
•Brake system status
•Torque reduction request
•Brake system configuration
From TCM
•Desired torque
•Upper torque limit
•Turbineshaft speed
•Vehicle speed
•Torque reduction request
•Idle speed up request
•Racing select determination
•MIL indicate request
•Desired gear/selector lever position
•AT warning indicator light condition
•TCC condition
End Of Sie
Page 116 of 909
F1–28
FUEL SYSTEM
Fuel Pump Cap Installation Note
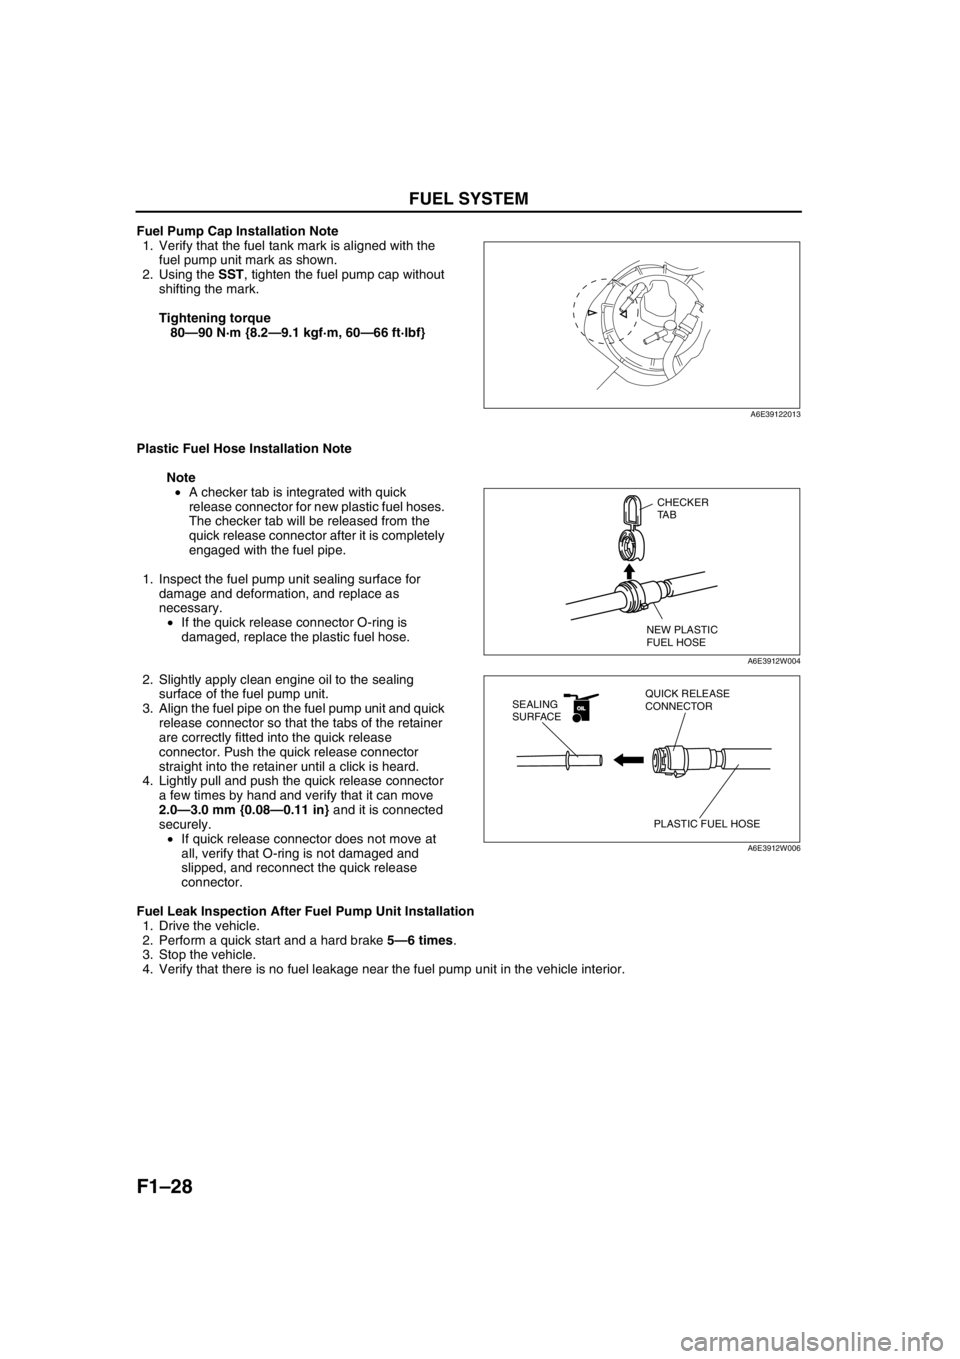
1. Verify that the fuel tank mark is aligned with the
fuel pump unit mark as shown.
2. Using the SST, tighten the fuel pump cap without
shifting the mark.
Tightening torque
80—90 N·m {8.2—9.1 kgf·m, 60—66 ft·lbf}
Plastic Fuel Hose Installation Note
Note
•A checker tab is integrated with quick
release connector for new plastic fuel hoses.
The checker tab will be released from the
quick release connector after it is completely
engaged with the fuel pipe.
1. Inspect the fuel pump unit sealing surface for
damage and deformation, and replace as
necessary.
•If the quick release connector O-ring is
damaged, replace the plastic fuel hose.
2. Slightly apply clean engine oil to the sealing
surface of the fuel pump unit.
3. Align the fuel pipe on the fuel pump unit and quick
release connector so that the tabs of the retainer
are correctly fitted into the quick release
connector. Push the quick release connector
straight into the retainer until a click is heard.
4. Lightly pull and push the quick release connector
a few times by hand and verify that it can move
2.0—3.0 mm {0.08—0.11 in} and it is connected
securely.
•If quick release connector does not move at
all, verify that O-ring is not damaged and
slipped, and reconnect the quick release
connector.
Fuel Leak Inspection After Fuel Pump Unit Installation
1. Drive the vehicle.
2. Perform a quick start and a hard brake 5—6 times.
3. Stop the vehicle.
4. Verify that there is no fuel leakage near the fuel pump unit in the vehicle interior.
End Of Sie
A6E39122013
CHECKER
TA B
NEW PLASTIC
FUEL HOSE
A6E3912W004
OILOIL
PLASTIC FUEL HOSE QUICK RELEASE
CONNECTOR SEALING
SURFACE
A6E3912W006
Page 120 of 909
F1–32
EXHAUST SYSTEM
Exhaust Manifold Installation Note
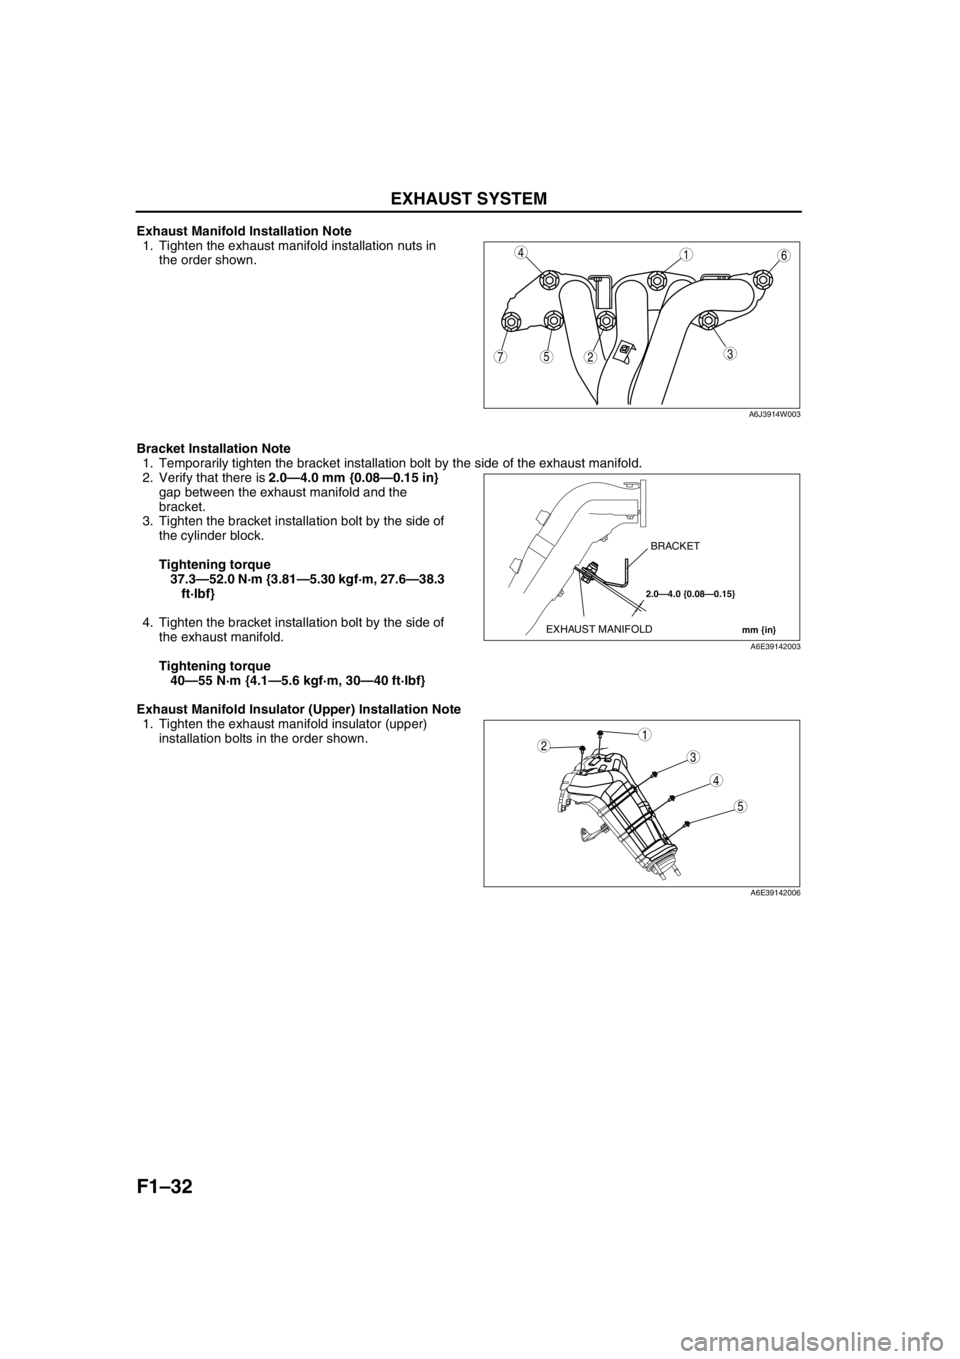
1. Tighten the exhaust manifold installation nuts in
the order shown.
Bracket Installation Note
1. Temporarily tighten the bracket installation bolt by the side of the exhaust manifold.
2. Verify that there is 2.0—4.0 mm {0.08—0.15 in}
gap between the exhaust manifold and the
bracket.
3. Tighten the bracket installation bolt by the side of
the cylinder block.
Tightening torque
37.3—52.0 N·m {3.81—5.30 kgf·m, 27.6—38.3
ft·lbf}
4. Tighten the bracket installation bolt by the side of
the exhaust manifold.
Tightening torque
40—55 N·m {4.1—5.6 kgf·m, 30—40 ft·lbf}
Exhaust Manifold Insulator (Upper) Installation Note
1. Tighten the exhaust manifold insulator (upper)
installation bolts in the order shown.
End Of Sie
75
4
3
1
2
6
A6J3914W003
2.0—4.0 {0.08—0.15}
mm {in}EXHAUST MANIFOLDBRACKET
A6E39142003
5
4
3
12
A6E39142006
Page 176 of 909
F2–24
CONTROL SYSTEM, ON-BOARD DIAGNOSTIC
CONTROLLER AREA NETWORK (CAN)A6E404018881206Outline
•The PCM transmit/received the information other units using CAN to simplify the system.
Transmit Information
•Engine speed
•Vehicle speed
•Accelerator pedal position
•Fuel injection information
•Torque reduction inhibit
•Intake air temperature
•Engine coolant temperature
•Travelled distance
•Glow indicator light conditions
•Engine displacement
•Number of cylinders
•Air induction type
•Fuel type and delivery
•Country
•Transmission/axle type
•Tire circumference (front/rear)
•Cruise main indicator light conditions
•Cruise set indicator light conditions
Received Information
•Torque reduction request from DSC HU/CM
•Wheel speed from ABS HU/CM or DSC HU/CM
—Front left
—Front right
•Travelled distance from ABS HU/CM or DSC HU/CM
End Of Sie
OUTLINEA6E407018881201•The on-board diagnostic system is essentially carried over from that of the current MPV (LW) MZR-CD (RF
Turbo) engine models, except for the following. (See MPV Workshop Manual Supplement 1737-1*-02C.)
—DTCs, PID monitoring items, and simulation items have been changed.
—KOEO/KOER self-test items have been changed.
End Of Sie
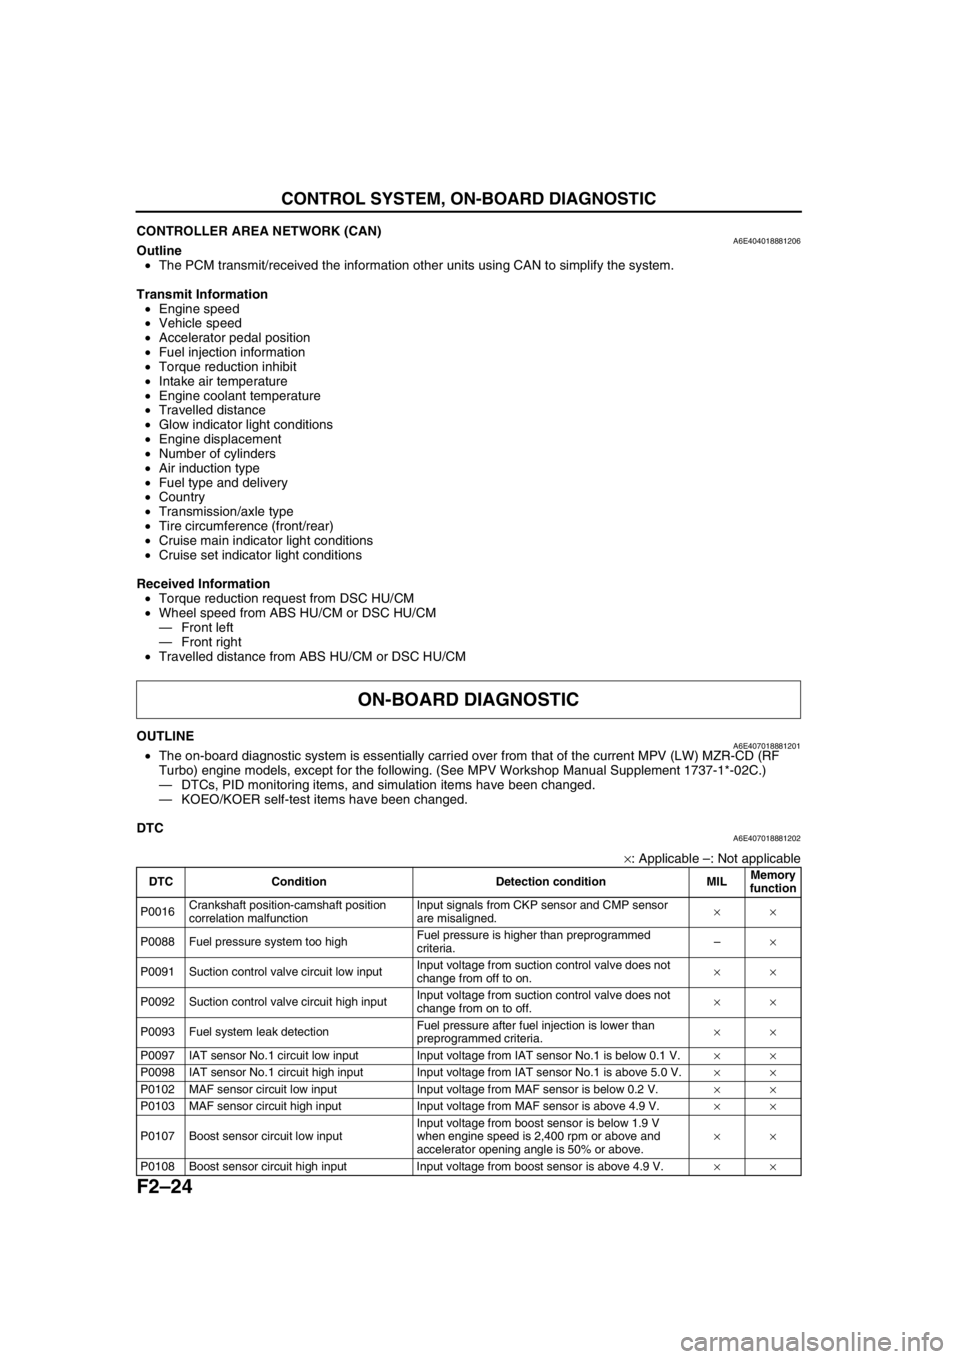
DTCA6E407018881202
×: Applicable –: Not applicable
ON-BOARD DIAGNOSTIC
DTC Condition Detection condition MILMemory
function
P0016Crankshaft position-camshaft position
correlation malfunctionInput signals from CKP sensor and CMP sensor
are misaligned.××
P0088 Fuel pressure system too highFuel pressure is higher than preprogrammed
criteria.–×
P0091 Suction control valve circuit low inputInput voltage from suction control valve does not
change from off to on.××
P0092 Suction control valve circuit high inputInput voltage from suction control valve does not
change from on to off.××
P0093 Fuel system leak detectionFuel pressure after fuel injection is lower than
preprogrammed criteria.××
P0097 IAT sensor No.1 circuit low input Input voltage from IAT sensor No.1 is below 0.1 V.××
P0098 IAT sensor No.1 circuit high input Input voltage from IAT sensor No.1 is above 5.0 V.××
P0102 MAF sensor circuit low input Input voltage from MAF sensor is below 0.2 V.××
P0103 MAF sensor circuit high input Input voltage from MAF sensor is above 4.9 V.××
P0107 Boost sensor circuit low inputInput voltage from boost sensor is below 1.9 V
when engine speed is 2,400 rpm or above and
accelerator opening angle is 50% or above.××
P0108 Boost sensor circuit high input Input voltage from boost sensor is above 4.9 V.××
Page 205 of 909
FUEL SYSTEM
F2–53
F2
SUPPLY PUMP REMOVAL/INSTALLATIONA6E401213350201
Caution
•Fuel line spills and leakage on the parts are dangerous. Fuel can ignite and also deteriorate the
parts. To prevent this, always cover the mouths of the removed parts in the fuel system with rags
to soak up the fuel.
•To prevent the fuel injection pipe from clogging, be careful that foreign material has not entered
the pipe. Also, be sure to tighten the bolts with the specified tightening torque when installing the
fuel injection pipe.
•To prevent fuel leakage, follow the procedure indicated in the workshop manual when removing
and installing the fuel injector.
•The fuel injection pipe can be removed and reinstalled up to five times. Be sure to record in the
service record when removing and installing the fuel injection pipe. If removing it for the sixth
time, be sure to replace it with a new one.
1. Disconnect the negative battery cable.
2. Complete the “BEFORE REPAIR PROCEDURE”. (See F2–45 BEFORE REPAIR PROCEDURE.)
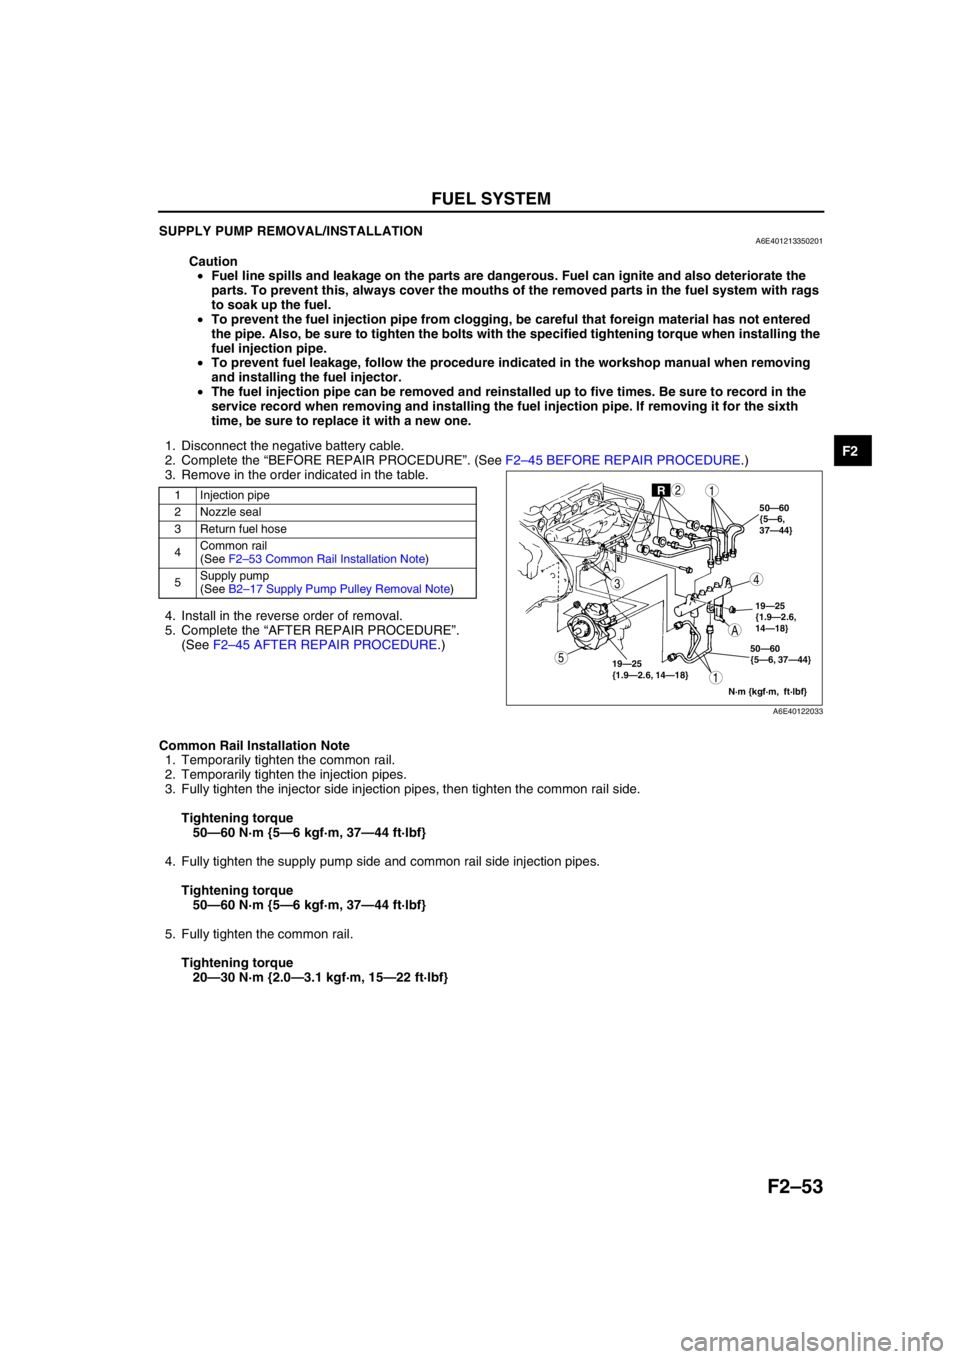
3. Remove in the order indicated in the table.
.
4. Install in the reverse order of removal.
5. Complete the “AFTER REPAIR PROCEDURE”.
(See F2–45 AFTER REPAIR PROCEDURE.)
Common Rail Installation Note
1. Temporarily tighten the common rail.
2. Temporarily tighten the injection pipes.
3. Fully tighten the injector side injection pipes, then tighten the common rail side.
Tightening torque
50—60 N·m {5—6 kgf·m, 37—44 ft·lbf}
4. Fully tighten the supply pump side and common rail side injection pipes.
Tightening torque
50—60 N·m {5—6 kgf·m, 37—44 ft·lbf}
5. Fully tighten the common rail.
Tightening torque
20—30 N·m {2.0—3.1 kgf·m, 15—22 ft·lbf}
End Of Sie
1 Injection pipe
2 Nozzle seal
3 Return fuel hose
4Common rail
(See F2–53 Common Rail Installation Note)
5Supply pump
(See B2–17 Supply Pump Pulley Removal Note)
19—25
{1.9—2.6, 14—18}19—25
{1.9—2.6,
14—18} 50—60
{5—6,
37—44}
50—60
{5—6, 37—44}
N·m {kgf·m, ft·lbf}
A
R
A
5
43
12
1
A6E40122033
Page 207 of 909
FUEL SYSTEM
F2–55
F2
FUEL INJECTOR REMOVAL/INSTALLATIONA6E401213250201
Caution
•Fuel line spills and leakage on the parts are dangerous. Fuel can ignite and also deteriorate the
parts. To prevent this, always cover the mouths of the removed parts in the fuel system with rags
to soak up the fuel.
•To prevent the fuel injection pipe from clogging, be careful that foreign material has not entered
the pipe. Also, be sure to tighten the bolts with the specified tightening torque when installing the
fuel injection pipe.
•To prevent fuel leakage, follow the procedure indicated in the workshop manual when removing
and installing the fuel injector.
•The fuel injection pipe can be removed and reinstalled up to five times. Be sure to record in the
service record when removing and installing the fuel injection pipe. If removing it for the sixth
time, be sure to replace it with a new one.
Note
•Perform “Correction after Parts Installation” after replacing fuel injector. (See F2–34 Correction after Parts
Installation.)
1. Disconnect the negative battery cable.
2. Complete the “BEFORE REPAIR PROCEDURE”. (See F2–45 BEFORE REPAIR PROCEDURE.)
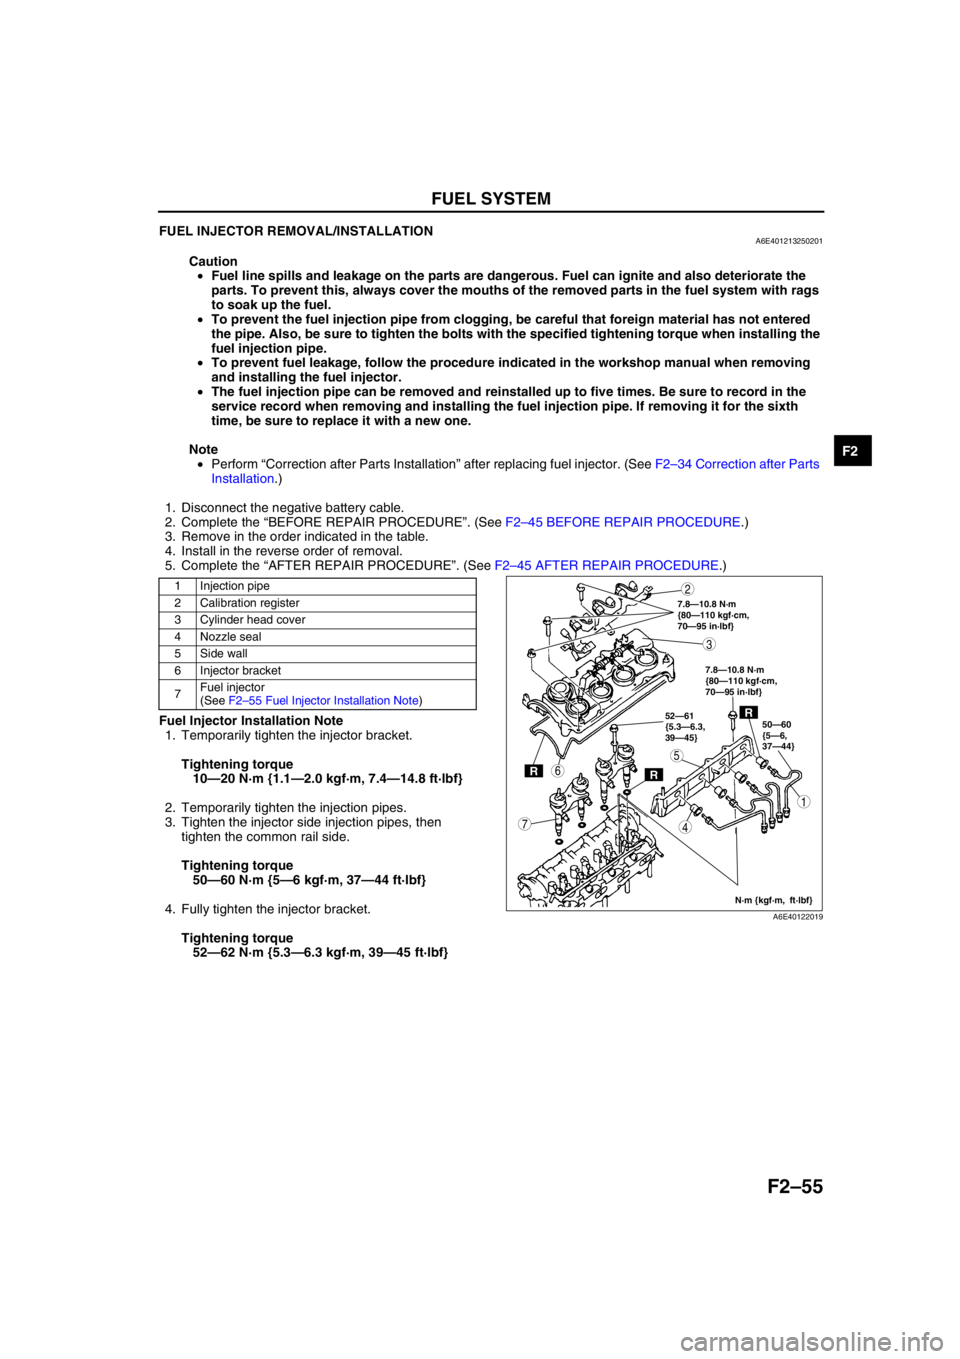
3. Remove in the order indicated in the table.
4. Install in the reverse order of removal.
5. Complete the “AFTER REPAIR PROCEDURE”. (See F2–45 AFTER REPAIR PROCEDURE.)
.
Fuel Injector Installation Note
1. Temporarily tighten the injector bracket.
Tightening torque
10—20 N·m {1.1—2.0 kgf·m, 7.4—14.8 ft·lbf}
2. Temporarily tighten the injection pipes.
3. Tighten the injector side injection pipes, then
tighten the common rail side.
Tightening torque
50—60 N·m {5—6 kgf·m, 37—44 ft·lbf}
4. Fully tighten the injector bracket.
Tightening torque
52—62 N·m {5.3—6.3 kgf·m, 39—45 ft·lbf}
1 Injection pipe
2 Calibration register
3 Cylinder head cover
4 Nozzle seal
5Side wall
6 Injector bracket
7Fuel injector
(See F2–55 Fuel Injector Installation Note)
RR
R50—60
{5—6,
37—44} 52—61
{5.3—6.3,
39—45}
N·m {kgf·m, ft·lbf} 7.8—10.8 N·m
{80—110 kgf·cm,
70—95 in·lbf}
7.8—10.8 N·m
{80—110 kgf·cm,
70—95 in·lbf}
5
4
3
1
2
7
6
A6E40122019
Page 211 of 909
EMISSION SYSTEM
F2
F2–59
EGR VALVE REMOVAL/INSTALLATIONA6E4016203002011. Disconnect the negative battery cable.
2. R em ove t he a ir c le a ne r. (S ee F 2–36 IN TA K E-A IR SYS TEM RE MOVA L/I NSTA LL AT IO N.)
3 . R em ove t he co m mon r ai l. (S ee F 2–53 SUPPLY PU MP R EM OVA L/IN STA LLAT IO N.)
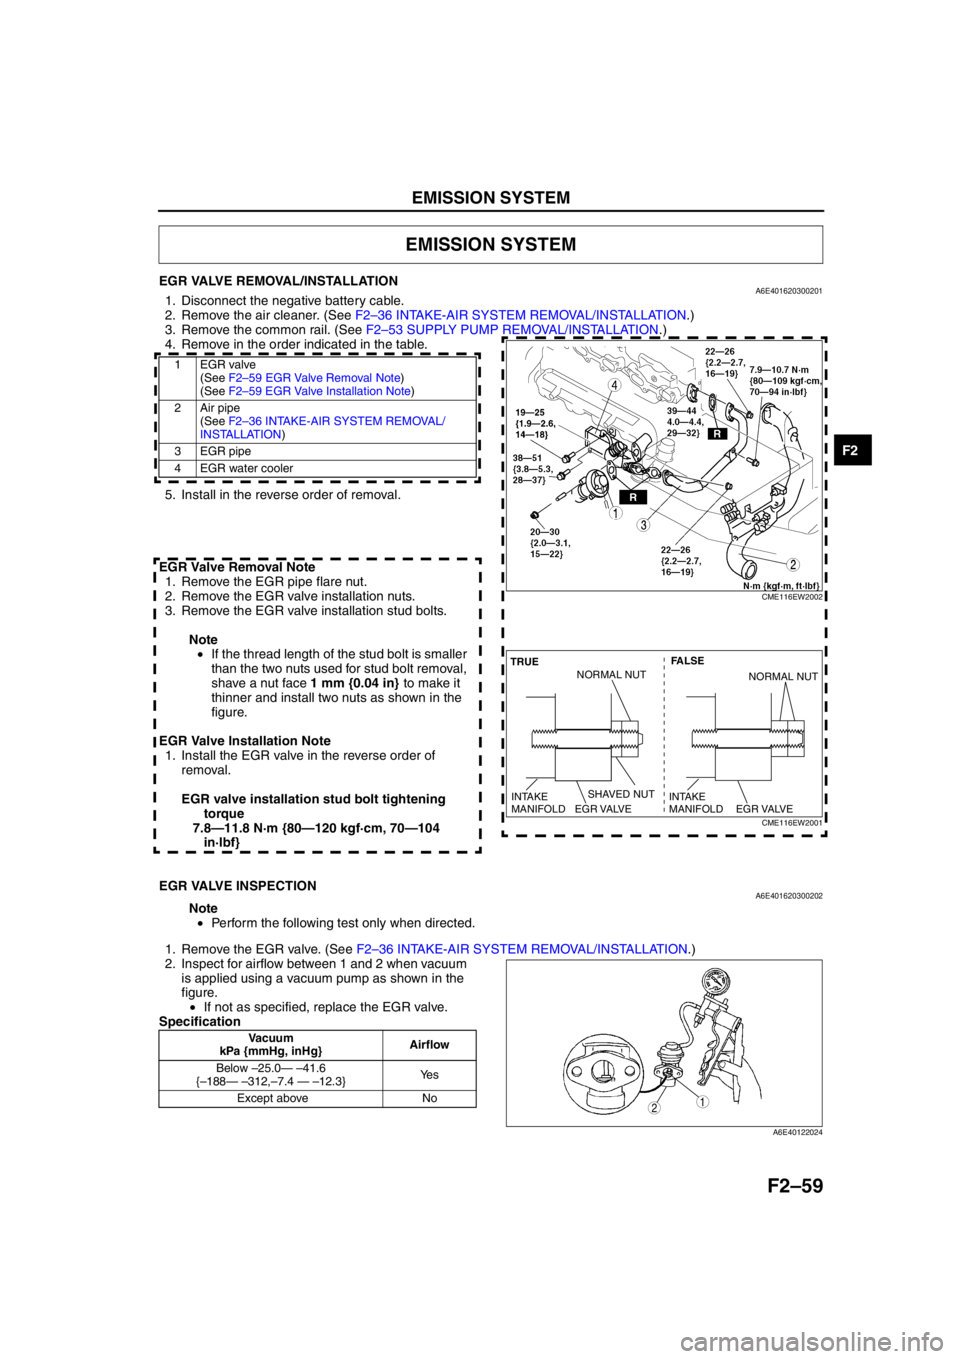
4. Remove in the order indicated in the table.
.
5. Install in the reverse order of removal.
EGR Valve Removal Note 1. Remove the EGR pipe flare nut.
2. Remove the EGR valve installation nuts.
3. Remove the EGR valve installation stud bolts.
Note• If the thread length of the stud bolt is smaller
than the two nuts used for stud bolt removal,
shave a nut face 1 mm {0.04 in} to make it
thinner and install two nuts as shown in the
figure.
EGR Valve Installation Note 1. Install the EGR valve in the reverse order of removal.
EGR valve installation stud bolt tightening torque
7.8—11.8 N·m {80—120 kgf·cm, 70—104 in·lbf}
End Of Sie
EGR VALVE INSPECTIONA6E401620300202
Note
• Perform the following test only when directed.
1 . R em ove t h e EG R va lv e . ( See F 2–36 IN TA K E-A IR SYS TEM RE MOVA L/I NSTA LL AT IO N.)
2. Inspect for airflow between 1 and 2 when vacuum is applied using a vacuum pump as shown in the
figure.• If not as specified, replace the EGR valve.
Specification
End Of Sie
EMISSION SYSTEM
1EGR valve (See F 2–5 9 EG R V alv e R em oval N ote )
(See F2 –5 9 E G R V alv e In sta llat ion Not e)
2Air pipe (See F2 –3 6 IN TAKE-AIR SYSTEM RE MOVAL/
INS TA LL ATION )
3 EGR pipe
4 EGR water cooler
CME116EW2002
SHAVED NUT FALSE
TRUE
EGR VALVE
INTAKE
MANIFOLDEGR VALVE
INTAKE
MANIFOLD
NORMAL NUTNORMAL NUT
CME116EW2001
Vacuum
kPa {mmHg, inHg} Airflow
Below –25.0 — – 41.6
{ – 188 — – 312, –7.4 — – 12.3} Ye s
Except above No
12
A6E40122024
Page 396 of 909
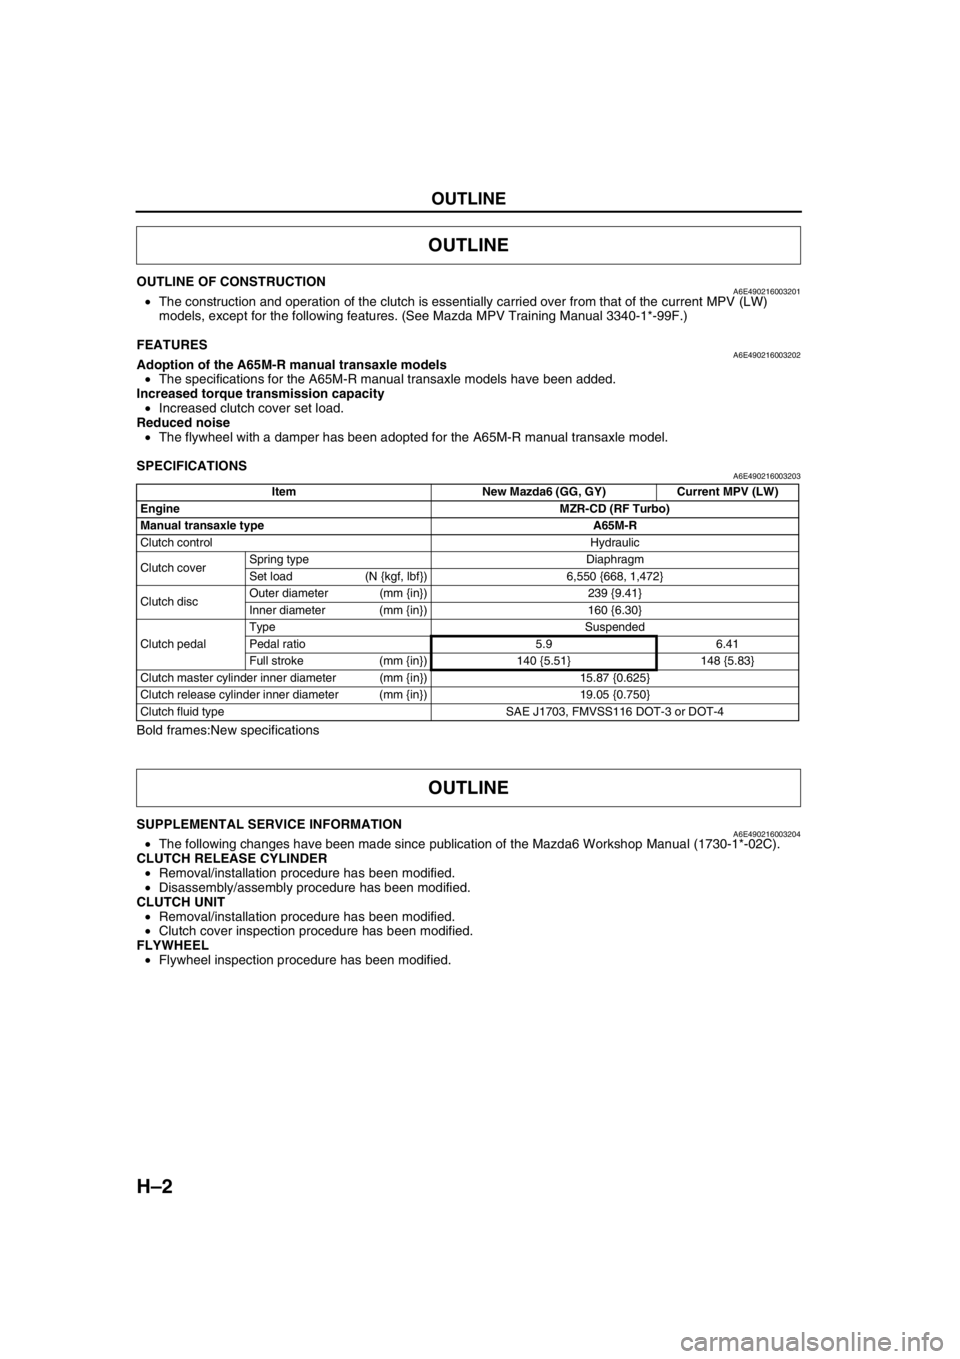
H–2
OUTLINE
OUTLINE OF CONSTRUCTIONA6E490216003201•The construction and operation of the clutch is essentially carried over from that of the current MPV (LW)
models, except for the following features. (See Mazda MPV Training Manual 3340-1*-99F.)
End Of Sie
FEATURESA6E490216003202Adoption of the A65M-R manual transaxle models
•The specifications for the A65M-R manual transaxle models have been added.
Increased torque transmission capacity
•Increased clutch cover set load.
Reduced noise
•The flywheel with a damper has been adopted for the A65M-R manual transaxle model.
End Of Sie
SPECIFICATIONSA6E490216003203
Bold frames:New specifications
End Of Sie
SUPPLEMENTAL SERVICE INFORMATIONA6E490216003204•The following changes have been made since publication of the Mazda6 Workshop Manual (1730-1*-02C).
CLUTCH RELEASE CYLINDER
•Removal/installation procedure has been modified.
•Disassembly/assembly procedure has been modified.
CLUTCH UNIT
•Removal/installation procedure has been modified.
•Clutch cover inspection procedure has been modified.
FLYWHEEL
•Flywheel inspection procedure has been modified.
End Of Sie
OUTLINE
Item New Mazda6 (GG, GY) Current MPV (LW)
EngineMZR-CD (RF Turbo)
Manual transaxle type A65M-R
Clutch control Hydraulic
Clutch coverSpring type Diaphragm
Set load (N {kgf, lbf}) 6,550 {668, 1,472}
Clutch discOuter diameter (mm {in}) 239 {9.41}
Inner diameter (mm {in}) 160 {6.30}
Clutch pedalType Suspended
Pedal ratio 5.9 6.41
Full stroke (mm {in}) 140 {5.51} 148 {5.83}
Clutch master cylinder inner diameter (mm {in}) 15.87 {0.625}
Clutch release cylinder inner diameter (mm {in}) 19.05 {0.750}
Clutch fluid type SAE J1703, FMVSS116 DOT-3 or DOT-4
OUTLINE
Page 400 of 909
H–6
CLUTCH UNIT
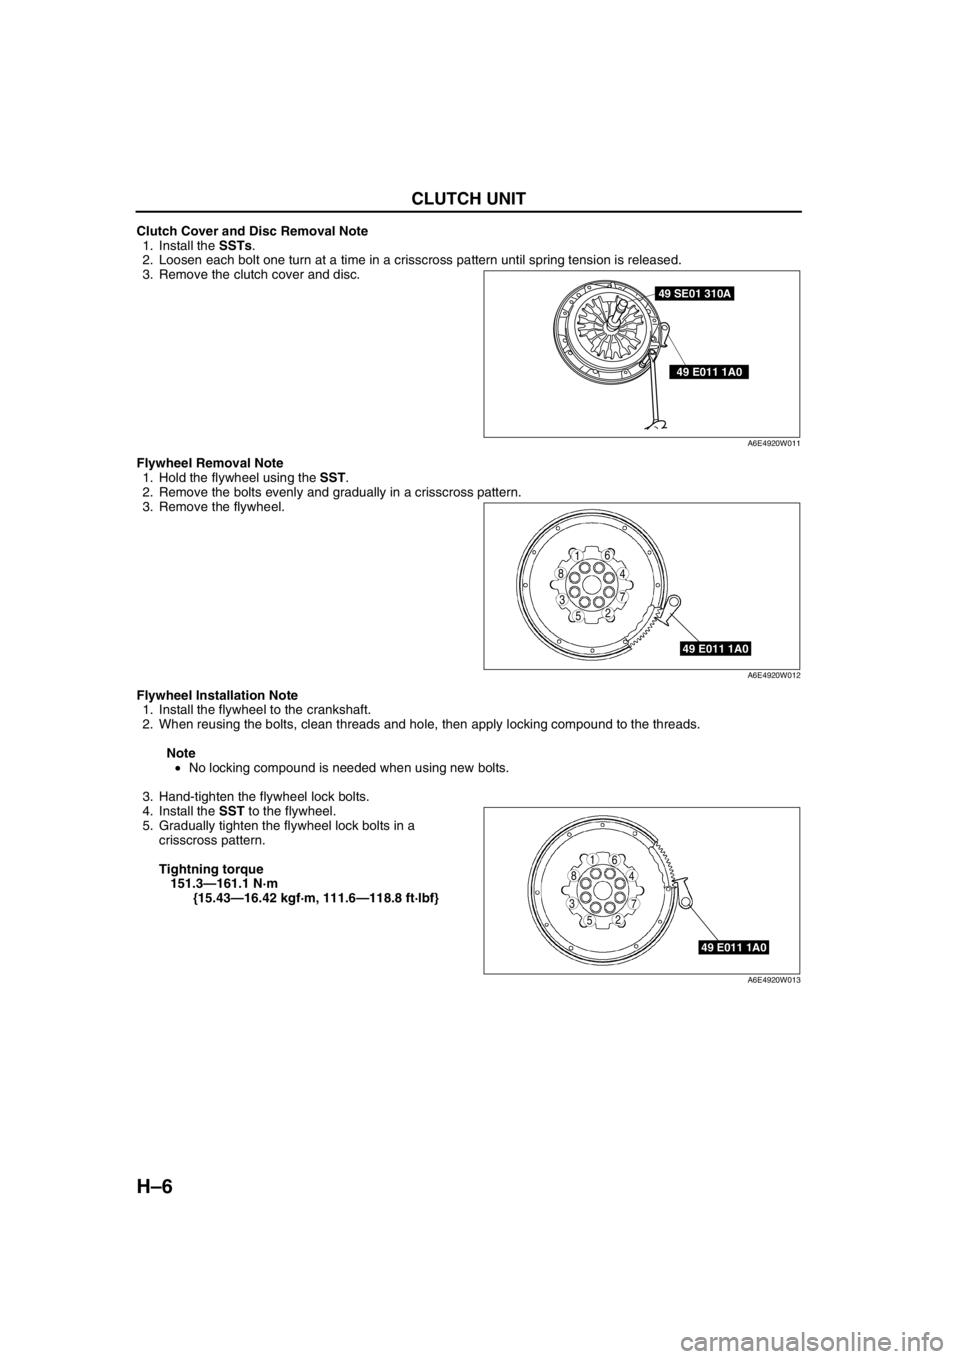
Clutch Cover and Disc Removal Note
1. Install the SSTs.
2. Loosen each bolt one turn at a time in a crisscross pattern until spring tension is released.
3. Remove the clutch cover and disc.
Flywheel Removal Note
1. Hold the flywheel using the SST.
2. Remove the bolts evenly and gradually in a crisscross pattern.
3. Remove the flywheel.
Flywheel Installation Note
1. Install the flywheel to the crankshaft.
2. When reusing the bolts, clean threads and hole, then apply locking compound to the threads.
Note
•No locking compound is needed when using new bolts.
3. Hand-tighten the flywheel lock bolts.
4. Install the SST to the flywheel.
5. Gradually tighten the flywheel lock bolts in a
crisscross pattern.
Tightning torque
151.3—161.1 N·m
{15.43—16.42 kgf·m, 111.6—118.8 ft·lbf}
49 SE01 310A
49 E011 1A0
A6E4920W011
49 E011 1A0
5
4
3
61
2
8
7
A6E4920W012
49 E011 1A0
5
4
3
61
2
8
7
A6E4920W013