brake sensor MAZDA 6 2002 Suplement Service Manual
[x] Cancel search | Manufacturer: MAZDA, Model Year: 2002, Model line: 6, Model: MAZDA 6 2002Pages: 909, PDF Size: 17.16 MB
Page 507 of 909
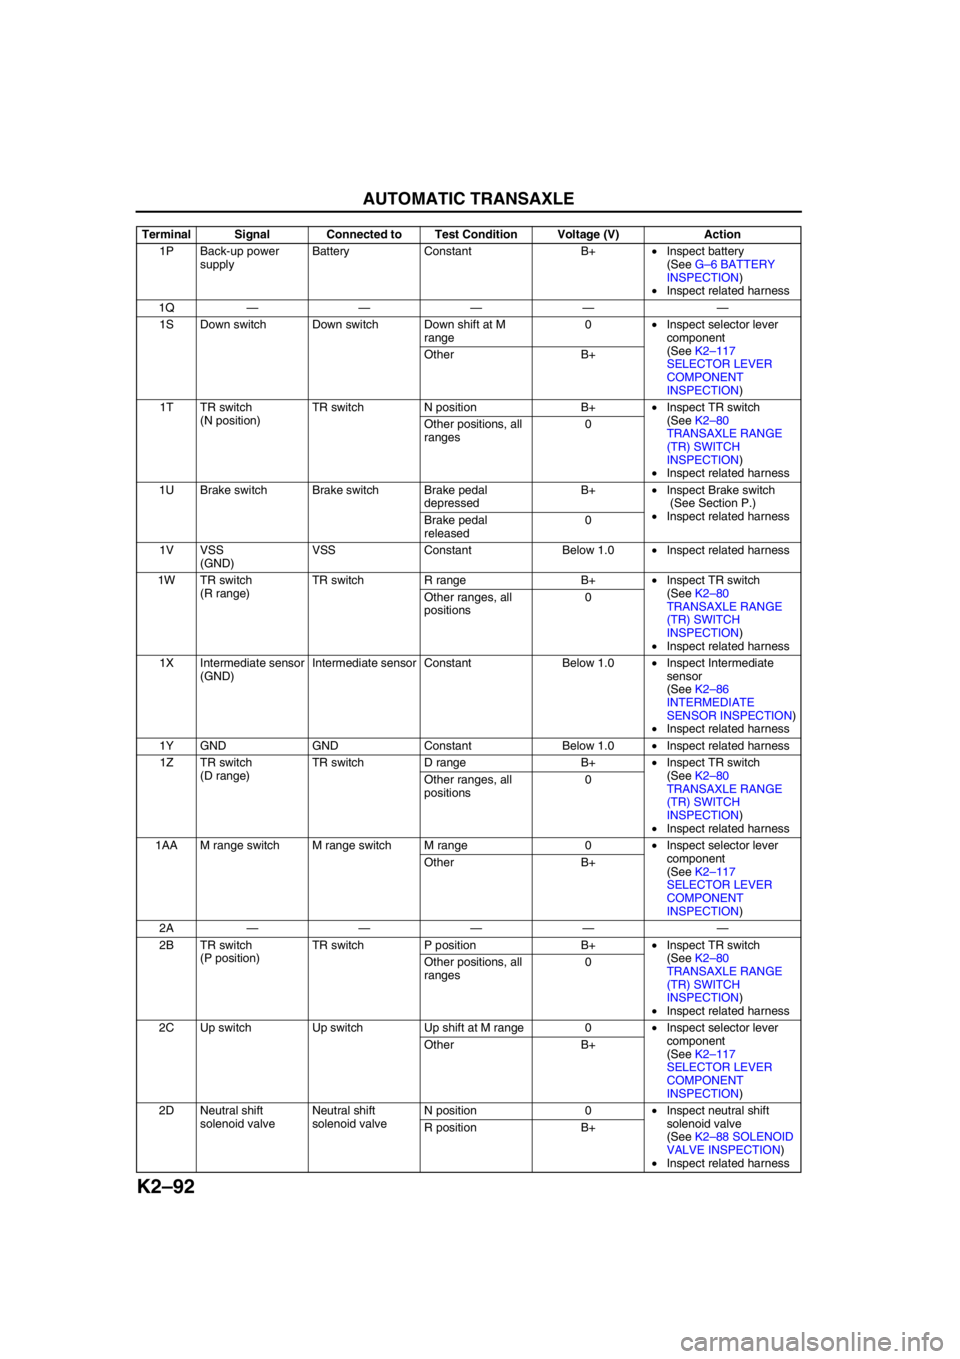
K2–92
AUTOMATIC TRANSAXLE
1P Back-up power
supplyBattery Constant B+•Inspect battery
(See G–6 BATTERY
INSPECTION)
•Inspect related harness
1Q———— —
1S Down switch Down switch Down shift at M
range0•Inspect selector lever
component
(See K2–117
SELECTOR LEVER
COMPONENT
INSPECTION) Other B+
1T TR switch
(N position)TR switch N position B+•Inspect TR switch
(See K2–80
TRANSAXLE RANGE
(TR) SWITCH
INSPECTION)
•Inspect related harness Other positions, all
ranges0
1U Brake switch Brake switch Brake pedal
depressedB+•Inspect Brake switch
(See Section P.)
•Inspect related harness
Brake pedal
released0
1V VSS
(GND)VSS Constant Below 1.0•Inspect related harness
1W TR switch
(R range)TR switch R range B+•Inspect TR switch
(See K2–80
TRANSAXLE RANGE
(TR) SWITCH
INSPECTION)
•Inspect related harness Other ranges, all
positions0
1X Intermediate sensor
(GND)Intermediate sensor Constant Below 1.0•Inspect Intermediate
sensor
(See K2–86
INTERMEDIATE
SENSOR INSPECTION)
•Inspect related harness
1Y GND GND Constant Below 1.0•Inspect related harness
1Z TR switch
(D range)TR switch D range B+•Inspect TR switch
(See K2–80
TRANSAXLE RANGE
(TR) SWITCH
INSPECTION)
•Inspect related harness Other ranges, all
positions0
1AA M range switch M range switch M range 0•Inspect selector lever
component
(See K2–117
SELECTOR LEVER
COMPONENT
INSPECTION) Other B+
2A———— —
2B TR switch
(P position)TR switch P position B+•Inspect TR switch
(See K2–80
TRANSAXLE RANGE
(TR) SWITCH
INSPECTION)
•Inspect related harness Other positions, all
ranges0
2C Up switch Up switch Up shift at M range 0•Inspect selector lever
component
(See K2–117
SELECTOR LEVER
COMPONENT
INSPECTION) Other B+
2D Neutral shift
solenoid valveNeutral shift
solenoid valveN position 0•Inspect neutral shift
solenoid valve
(See K2–88 SOLENOID
VALVE INSPECTION)
•Inspect related harness R position B+ Terminal Signal Connected to Test Condition Voltage (V) Action
Page 508 of 909
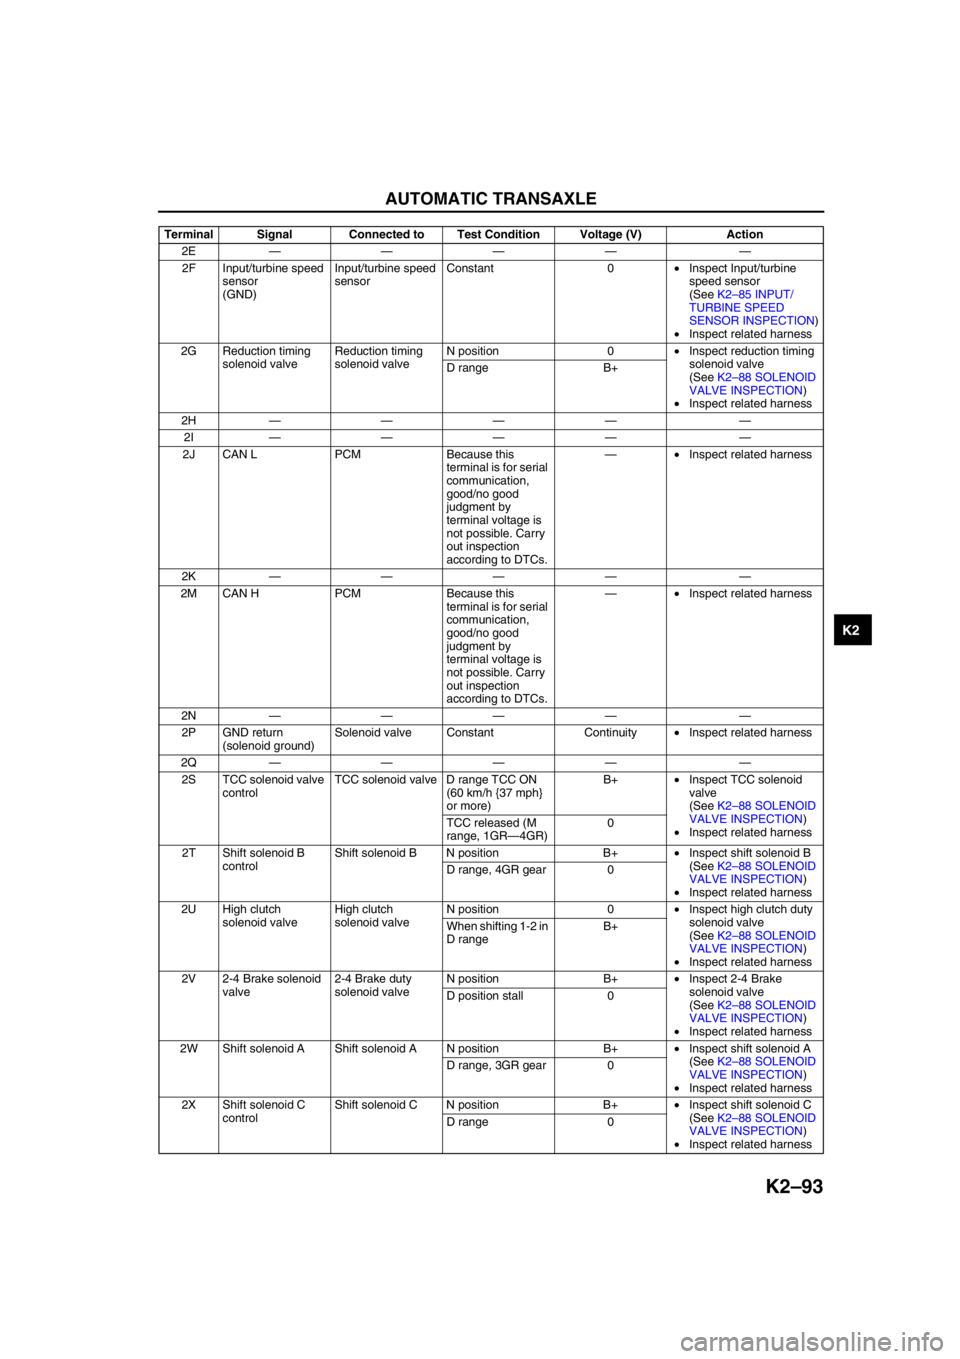
AUTOMATIC TRANSAXLE
K2–93
K2
2E———— —
2F Input/turbine speed
sensor
(GND)Input/turbine speed
sensorConstant 0•Inspect Input/turbine
speed sensor
(See K2–85 INPUT/
TURBINE SPEED
SENSOR INSPECTION)
•Inspect related harness
2G Reduction timing
solenoid valveReduction timing
solenoid valveN position 0•Inspect reduction timing
solenoid valve
(See K2–88 SOLENOID
VALVE INSPECTION)
•Inspect related harness D range B+
2H———— —
2I———— —
2J CAN L PCM Because this
terminal is for serial
communication,
good/no good
judgment by
terminal voltage is
not possible. Carry
out inspection
according to DTCs.—•Inspect related harness
2K———— —
2M CAN H PCM Because this
terminal is for serial
communication,
good/no good
judgment by
terminal voltage is
not possible. Carry
out inspection
according to DTCs.—•Inspect related harness
2N———— —
2P GND return
(solenoid ground)Solenoid valve Constant Continuity•Inspect related harness
2Q———— —
2S TCC solenoid valve
controlTCC solenoid valve D range TCC ON
(60 km/h {37 mph}
or more)B+•Inspect TCC solenoid
valve
(See K2–88 SOLENOID
VALVE INSPECTION)
•Inspect related harness TCC released (M
range, 1GR—4GR)0
2T Shift solenoid B
controlShift solenoid B N position B+•Inspect shift solenoid B
(See K2–88 SOLENOID
VALVE INSPECTION)
•Inspect related harness D range, 4GR gear 0
2U High clutch
solenoid valveHigh clutch
solenoid valveN position 0•Inspect high clutch duty
solenoid valve
(See K2–88 SOLENOID
VALVE INSPECTION)
•Inspect related harness When shifting 1-2 in
D rangeB+
2V 2-4 Brake solenoid
valve2-4 Brake duty
solenoid valveN position B+•Inspect 2-4 Brake
solenoid valve
(See K2–88 SOLENOID
VALVE INSPECTION)
•Inspect related harness D position stall 0
2W Shift solenoid A Shift solenoid A N position B+•Inspect shift solenoid A
(See K2–88 SOLENOID
VALVE INSPECTION)
•Inspect related harness D range, 3GR gear 0
2X Shift solenoid C
controlShift solenoid C N position B+•Inspect shift solenoid C
(See K2–88 SOLENOID
VALVE INSPECTION)
•Inspect related harness D range 0 Terminal Signal Connected to Test Condition Voltage (V) Action
Page 541 of 909
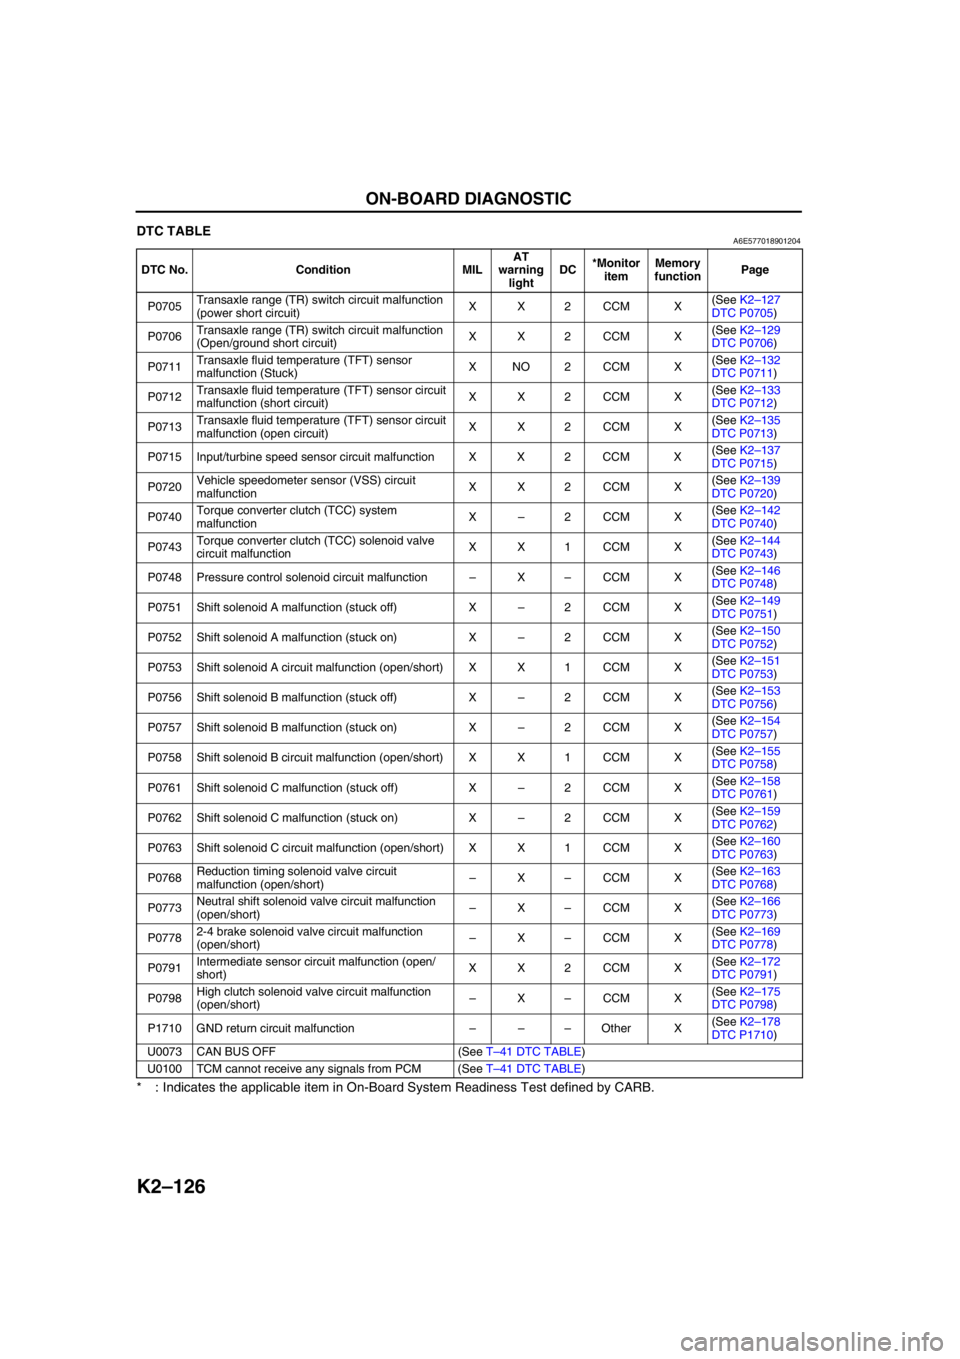
K2–126
ON-BOARD DIAGNOSTIC
DTC TABLEA6E577018901204
* : Indicates the applicable item in On-Board System Readiness Test defined by CARB.
End Of Sie
DTC No. Condition MILAT
warning
lightDC*Monitor
itemMemory
functionPage
P0705Transaxle range (TR) switch circuit malfunction
(power short circuit)XX2CCM X(See K2–127
DTC P0705)
P0706Transaxle range (TR) switch circuit malfunction
(Open/ground short circuit)XX2CCM X(See K2–129
DTC P0706)
P0711Transaxle fluid temperature (TFT) sensor
malfunction (Stuck)XNO2CCM X(See K2–132
DTC P0711)
P0712Transaxle fluid temperature (TFT) sensor circuit
malfunction (short circuit)XX2CCM X(See K2–133
DTC P0712)
P0713Transaxle fluid temperature (TFT) sensor circuit
malfunction (open circuit)XX2CCM X(See K2–135
DTC P0713)
P0715 Input/turbine speed sensor circuit malfunction X X 2 CCM X(See K2–137
DTC P0715)
P0720Vehicle speedometer sensor (VSS) circuit
malfunctionXX2CCM X(See K2–139
DTC P0720)
P0740Torque converter clutch (TCC) system
malfunctionX–2CCM X(See K2–142
DTC P0740)
P0743Torque converter clutch (TCC) solenoid valve
circuit malfunctionXX1CCM X(See K2–144
DTC P0743)
P0748 Pressure control solenoid circuit malfunction–X–CCM X(See K2–146
DTC P0748)
P0751 Shift solenoid A malfunction (stuck off) X–2CCM X(See K2–149
DTC P0751)
P0752 Shift solenoid A malfunction (stuck on) X–2CCM X(See K2–150
DTC P0752)
P0753 Shift solenoid A circuit malfunction (open/short) X X 1 CCM X(See K2–151
DTC P0753)
P0756 Shift solenoid B malfunction (stuck off) X–2CCM X(See K2–153
DTC P0756)
P0757 Shift solenoid B malfunction (stuck on) X–2CCM X(See K2–154
DTC P0757)
P0758 Shift solenoid B circuit malfunction (open/short) X X 1 CCM X(See K2–155
DTC P0758)
P0761 Shift solenoid C malfunction (stuck off) X–2CCM X(See K2–158
DTC P0761)
P0762 Shift solenoid C malfunction (stuck on) X–2CCM X(See K2–159
DTC P0762)
P0763 Shift solenoid C circuit malfunction (open/short) X X 1 CCM X(See K2–160
DTC P0763)
P0768Reduction timing solenoid valve circuit
malfunction (open/short)–X–CCM X(See K2–163
DTC P0768)
P0773Neutral shift solenoid valve circuit malfunction
(open/short)–X–CCM X(See K2–166
DTC P0773)
P07782-4 brake solenoid valve circuit malfunction
(open/short)–X–CCM X(See K2–169
DTC P0778)
P0791Intermediate sensor circuit malfunction (open/
short)XX2CCM X(See K2–172
DTC P0791)
P0798High clutch solenoid valve circuit malfunction
(open/short)–X–CCM X(See K2–175
DTC P0798)
P1710 GND return circuit malfunction–––Other X(See K2–178
DTC P1710)
U0073 CAN BUS OFF (See T–41 DTC TABLE)
U0100 TCM cannot receive any signals from PCM (See T–41 DTC TABLE)
Page 595 of 909
K2–180
ON-BOARD DIAGNOSTIC
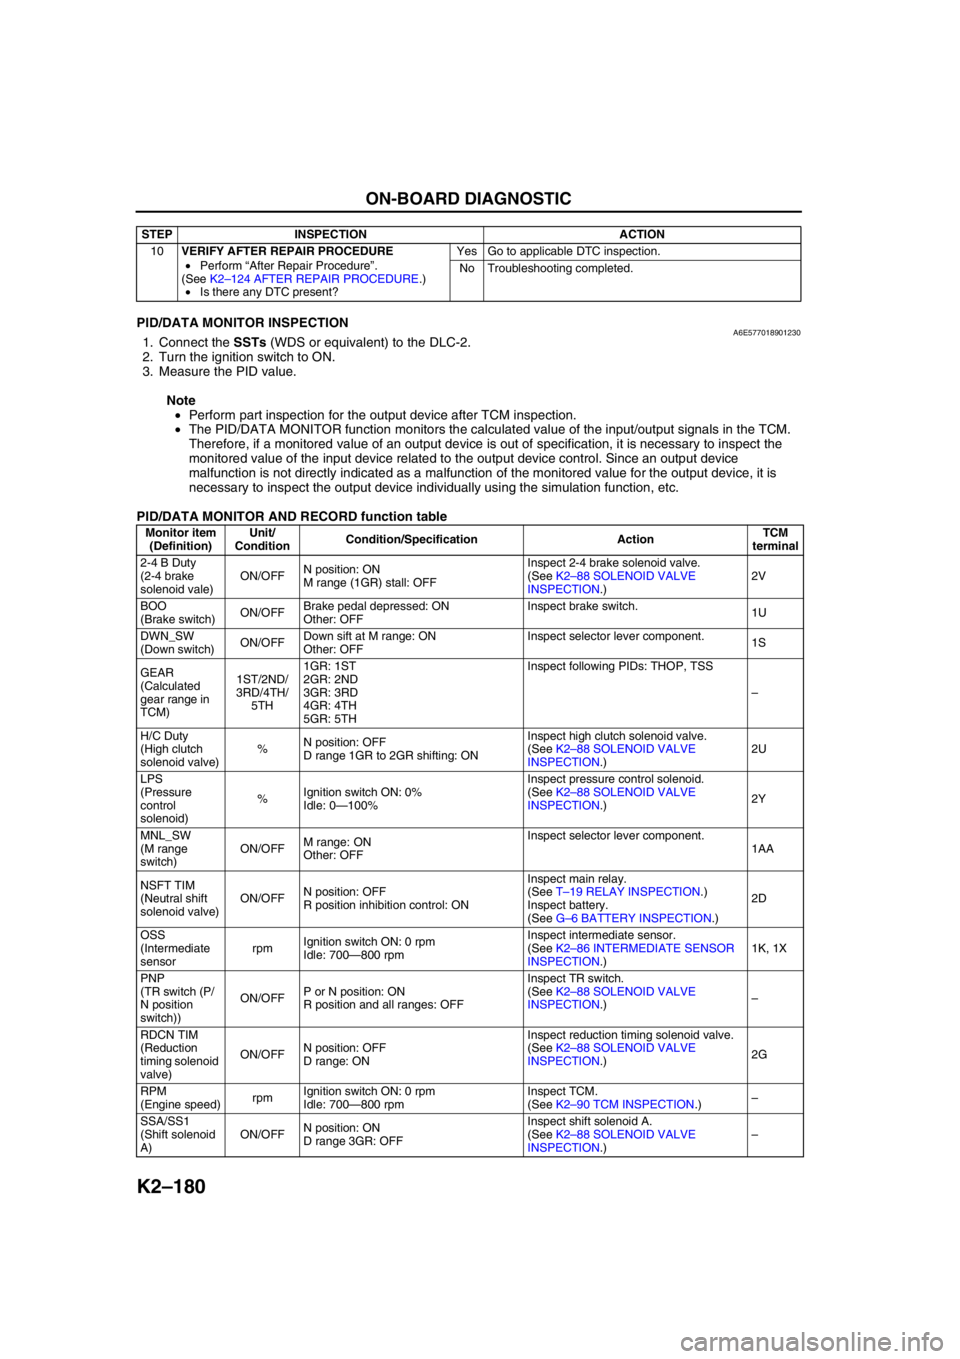
End Of SiePID/DATA MONITOR INSPECTIONA6E5770189012301. Connect the SSTs (WDS or equivalent) to the DLC-2.
2. Turn the ignition switch to ON.
3. Measure the PID value.
Note
•Perform part inspection for the output device after TCM inspection.
•The PID/DATA MONITOR function monitors the calculated value of the input/output signals in the TCM.
Therefore, if a monitored value of an output device is out of specification, it is necessary to inspect the
monitored value of the input device related to the output device control. Since an output device
malfunction is not directly indicated as a malfunction of the monitored value for the output device, it is
necessary to inspect the output device individually using the simulation function, etc.
PID/DATA MONITOR AND RECORD function table
10VERIFY AFTER REPAIR PROCEDURE
•Perform “After Repair Procedure”.
(See K2–124 AFTER REPAIR PROCEDURE.)
•Is there any DTC present?Yes Go to applicable DTC inspection.
No Troubleshooting completed. STEP INSPECTION ACTION
Monitor item
(Definition)Unit/
ConditionCondition/Specification ActionTCM
terminal
2-4 B Duty
(2-4 brake
solenoid vale)ON/OFFN position: ON
M range (1GR) stall: OFFInspect 2-4 brake solenoid valve.
(See K2–88 SOLENOID VALVE
INSPECTION.)2V
BOO
(Brake switch)ON/OFFBrake pedal depressed: ON
Other: OFFInspect brake switch.
1U
DWN_SW
(Down switch)ON/OFFDown sift at M range: ON
Other: OFFInspect selector lever component.
1S
GEAR
(Calculated
gear range in
TCM)1ST/2ND/
3RD/4TH/
5TH1GR: 1ST
2GR: 2ND
3GR: 3RD
4GR: 4TH
5GR: 5THInspect following PIDs: THOP, TSS
–
H/C Duty
(High clutch
solenoid valve)%N position: OFF
D range 1GR to 2GR shifting: ONInspect high clutch solenoid valve.
(See K2–88 SOLENOID VALVE
INSPECTION.)2U
LPS
(Pressure
control
solenoid)%Ignition switch ON: 0%
Idle: 0—100%Inspect pressure control solenoid.
(See K2–88 SOLENOID VALVE
INSPECTION.)2Y
MNL_SW
(M range
switch)ON/OFFM range: ON
Other: OFFInspect selector lever component.
1AA
NSFT TIM
(Neutral shift
solenoid valve)ON/OFFN position: OFF
R position inhibition control: ONInspect main relay.
(See T–19 RELAY INSPECTION.)
Inspect battery.
(See G–6 BATTERY INSPECTION.)2D
OSS
(Intermediate
sensorrpmIgnition switch ON: 0 rpm
Idle: 700—800 rpmInspect intermediate sensor.
(See K2–86 INTERMEDIATE SENSOR
INSPECTION.)1K, 1X
PNP
(TR switch (P/
N position
switch))ON/OFFP or N position: ON
R position and all ranges: OFFInspect TR switch.
(See K2–88 SOLENOID VALVE
INSPECTION.)–
RDCN TIM
(Reduction
timing solenoid
valve)ON/OFFN position: OFF
D range: ONInspect reduction timing solenoid valve.
(See K2–88 SOLENOID VALVE
INSPECTION.)2G
RPM
(Engine speed)rpmIgnition switch ON: 0 rpm
Idle: 700—800 rpmInspect TCM.
(See K2–90 TCM INSPECTION.)–
SSA/SS1
(Shift solenoid
A)ON/OFFN position: ON
D range 3GR: OFFInspect shift solenoid A.
(See K2–88 SOLENOID VALVE
INSPECTION.)–
Page 601 of 909

K2–186
TROUBLESHOOTING
CAN signal
Vehicle dose not move in D range, or in R position
X
XXX X
X
X X
X
XX
X
X
X
X
X
XX
XX
XX
XXX
XX
XX
X
XXX X
XX X
XX X
XX X
XXX
XX
X
XX
X XX XX
X
XX
XX
X XX
X XXXX
XXXX
XXXXX XX XXX
X
X
XX
X
X
X
X
X
X
X
X
X
X X
X
X
X X
XXX
XX
XX X X
X 1
Excessive creep 4
No creep at all 5
Low maximum speed and poor acceleration 6
No shifting 7
Does not shift to fifth gear (5GR) 8
Abnormal shifting 9
Frequent shifting 10
Shift point is high or low 11
Torque converter clutch (TCC) non-operation 12
No kickdown 13
Engine flares up or slips when upshifting or downshifting 14
Engine flares up or slip when accelerating vehicle 15
Judder upon torque converter clutch (TCC) operation 16
Excessive shift shock from N to D or N to R position/range 17
Excessive shift shock on torque converter clutch (TCC) 19
No engine braking in 1GR position of M range 22
Transaxle overheats 23
Engine stalls when shifted to D range, or in R position 24
Engine stalls when driving at slow speeds or stopping 25
Starter does not work 26Excessive shift shock is given when upshifting and
downshifting 18
Noise occurs at idle when vehicle is stopped in all
positions/ranges 20
Noise occurs at idle when vehicle is stopped in D
range, or in R position 21
Gear position indicator light illuminates in D range or P, N,
R positions 28Gear position indicator light does not illuminate in M range
Electrical system components
ATX inner parts
ATX outer parts
Hydraulic system
components
Control valve body 27
Does not shift up in M range
29
Does not shift down in M rangeSymptom item
Cause of trouble
Open/short
Malfunction signal is inputed Signal is inputed
Open/short
Open/short Open/short
Open/short
Open/short
Open/short
Open/short
Open/short Open/short
Open/short
Open/short Open/short
Control valve spool is not operating properly ATF amount
2-4 brake accumulator is not operating properly Low clutch solenoid accumulator is not operating properly
Direct clutch accumulator is not operating properly High clutch accumulator is not operating properly2-4 brake solenoid valve Pressure control solenoid
TCC solenoid valve
High clutch solenoid valve TFT sensor N-D select
Transaxle range switch
Power supply, GND
Shift solenoid A
Shift solenoid B
Shift solenoid C
Neutral shift solenoid valve
Reducation timing solenoid
GND return line
30Vehicle moves in N position 2
Vehicle moves in P position, or parking gear does not
disengage when P is disengaged 3
A6E5780W002
Page 603 of 909

K2–188
TROUBLESHOOTING
NO.1 VEHICLE DOES NOT MOVE IN D RANGE, OR IN R POSITIONA6E578001030204
Diagnostic procedure
End Of SieNO.2 VEHICLE MOVES IN N POSITIONA6E578001030205
1 Vehicle does not move in D range, or in R position
DESCRIPTION•Vehicle does not move when accelerator pedal depressed.
POSSIBLE
CAUSE•If vehicle does not move in D range or R position, basically, malfunction is in ATX. (Vehicle will move
even with a malfunction in TCM.) Since a malfunction in sensor circuit or output circuit is cause of
malfunction in ATX, inspect sensors, output circuit, and related harnesses.
—Clutch slipped, worn (D range-Low clutch, Low one-way clutch, Reduction one-way clutch, R
position-Reverse clutch, Low and reverse brake, Reduction brake)
•Line pressure low
•Malfunction of shift solenoid A, B, or C
•Malfunction of sensor ground
•Malfunction of body ground
•Malfunction of control valve body
—Malfunction of selector lever
—Parking mechanism not properly operated
—Malfunction of torque converter
Note
•Before following troubleshooting steps, make sure that Automatic Transaxle On-Board Diagnostic
and Automatic Transaxle Basic Inspection are conducted.
STEP INSPECTION ACTION
1•With vehicle stopped on a flat, paved road
and engine off, does vehicle move when
pushed? (in D ranges or N, R positions and
brake released)Yes Go to next step.
No Inspect for parking mechanism.
(See ATX Workshop Manual.)
2•Start engine.
•Does vehicle move when selector lever in
between N position and D range?Yes Inspect or adjust selector lever.
(See K2–117 SELECTOR LEVER INSPECTION.)
(See K2–118 SELECTOR CABLE ADJUSTMENT.)
No Go to next step.
3•Stop engine.
•Inspect pressure control solenoid circuit.
•Is it okay?Yes•Overhaul control valve body and repair or replace any
defective parts.
(See ATX Workshop Manual.)
—If problem remains, replace or overhaul transaxle and
repair or replace any defective parts.
(See K2–99 AUTOMATIC TRANSAXLE AND
TRANSFER REMOVAL/INSTALLATION.)
(See ATX workshop Manual.)
No•Inspect for pressure control solenoid mechanical stuck.
(See K2–88 SOLENOID VALVE INSPECTION.)
—If pressure control solenoid okay, inspect for open or
short circuit between TCM connector terminal 2Y and
pressure control solenoid connector terminal D.
4•Verify test results.
—If okay, return to diagnostic index to service any additional symptoms.
—If malfunction remains, inspect related Service Informations and perform repair or diagnosis.
—If vehicle repaired, troubleshooting completed.
—If vehicle not repaired or additional diagnostic information not available, replace TCM.
2 Vehicle moves in N position
DESCRIPTION•Vehicle creeps in N position.
•Vehicle creeps if brake pedal not depressed in N position.
POSSIBLE
CAUSE•If vehicle moves in N position, basically, malfunction is in ATX. Since a malfunction in sensor circuit or
output circuit is cause of malfunction in ATX, inspect sensors, output circuit, and related harnesses.
—Clutch burned (Low clutch, Low one-way clutch, Low and reverse brake)
•Line pressure low
•Malfunction of control valve body
—Selector lever position disparity (Although the selector indicator shows N position, hydraulic circuit
shows D range or R position)
Note
•Before following troubleshooting steps, make sure that Automatic Transaxle On-Board Diagnostic
and Automatic Transaxle Basic Inspection are conducted.
Page 611 of 909

K2–196
TROUBLESHOOTING
NO.15 ENGINE FLARES UP OR SLIPS WHEN ACCELERATING VEHICLEA6E578001030218
End Of SieNO.16 JUDDER UPON TORQUE CONVERTER CLUTCH (TCC) OPERATIONA6E578001030219
End Of SieNO.17 EXCESSIVE SHIFT SHOCK FROM N TO D OR N TO R POSITION/RANGEA6E578001030220
Diagnostic procedure
15 Engine flares up or slips when accelerating vehicle
DESCRIPTION•Engine flares up when accelerator pedal depressed for upshifting.
•Engine flares up suddenly when accelerator pedal depressed for downshifting.
POSSIBLE
CAUSE•Malfunction is basically the same as for No.14 “Engine flares up or slips when upshifting or
downshifting”.
—If conditions for No.14 worsen, malfunction will develop into No.15.
Note
•Before following troubleshooting steps, make sure that Automatic Transaxle On-Board Diagnostic
and Automatic Transaxle Basic Inspection are conducted.
16 Judder upon torque converter clutch (TCC) operation
DESCRIPTION•Vehicle jolts when TCC engaged.
POSSIBLE
CAUSE•Poor TCC engagement due to either slippage because TCC piston is stuck or line pressure is low.
Caution
•If the TCC or piston are stuck, inspect them. In addition, inspect the oil cooler for foreign
particles which may have mixed in with the ATF.
—Torque converter clutch piston slipped, burned
•Line pressure low
•Incorrect throttle position signal
•Malfunction of VSS
•Malfunction of input/turbine speed sensor
•Malfunction of sensor ground
•Malfunction of TCC solenoid valve
•Malfunction of control valve body
—Malfunction of torque converter
Note
•Before following troubleshooting steps, make sure that Automatic Transaxle On-Board Diagnostic
and Automatic Transaxle Basic Inspection are conducted.
17 Excessive shift shock from N to D or N to R position/range
DESCRIPTION•Strong shock felt when shifting from N to D or N to R position/range at idle.
POSSIBLE
CAUSE•Shift shock may worsen when fail-safe is operating. If no DTC is output, shift shock may worsen due to
poor operation of control valve body or sticking of clutch.
—Clutch burned (N→D: Low clutch, N→R: Reverse clutch or low and reverse brake)
•Line pressure low
•Incorrect throttle position signal
•Malfunction of TFT sensor
•Malfunction of sensor ground
•Misadjustment of throttle cable
•Malfunction of control valve body
—Poor hydraulic operation (Malfunction in range change)
—Idle speed high
—Poor tightening torque of engine mount, exhaust mount
—Line pressure high
Note
•Before following troubleshooting steps, make sure that Automatic Transaxle On-Board Diagnostic
and Automatic Transaxle Basic Inspection are conducted.
STEP INSPECTION ACTION
1•Does shift shock occur only when engine
cold?Yes Go to next step.
No Go to Step 3.
2•Inspect TFT sensor and related harness:
vibration, intermittent open/short circuit.
•Is it okay?Yes Go to next step.
No Repair or replace part if necessary.
Page 613 of 909

K2–198
TROUBLESHOOTING
NO.20 NOISE OCCURS AT IDLE WHEN VEHICLE IS STOPPED IN ALL POSITIONS/RANGESA6E578001030223
Diagnostic procedure
End Of SieNO.21 NOISE OCCURS AT IDLE WHEN VEHICLE IS STOPPED IN D RANGE, OR IN R POSITIONA6E578001030224
End Of SieNO.22 NO ENGINE BRAKING IN 1GR POSITION OF M RANGEA6E578001030225
Diagnostic procedure
20 Noise occurs at idle when vehicle is stopped in all positions/ranges
DESCRIPTION•Transaxle noisy in all positions and ranges when vehicle idling.
POSSIBLE
CAUSE•Malfunction is in pressure solenoid or oil pump which causes a high-pitched noise to be emitted from
transaxle at idle.
Note
•If a noise is emitted during shifting only, malfunction is in shift solenoid A, B, or C.
•If a noise is emitted during shifting at certain gears only or during deceleration only, it is gear noise.
•Before following troubleshooting steps, make sure that Automatic Transaxle On-Board Diagnostic
and Automatic Transaxle Basic Inspection are conducted.
STEP INSPECTION ACTION
1•Inspect engine condition.
•Is any engine concern (e.g. Rough idle)?Yes Go to appropriate symptom troubleshooting.
(See F1–57 ENGINE SYMPTOM TROUBLESHOOTING.)
No Replace basic inspection and repair or replace any
defective parts according to inspection result.
2•Verify test results.
—If okay, return to diagnostic index to service any additional symptoms.
—If malfunction remains, inspect related Service Informations and perform repair or diagnosis.
—If vehicle repaired, troubleshooting completed.
—If vehicle not repaired or additional diagnostic information not available, replace TCM.
21 Noise occurs at idle when vehicle is stopped in D range, or in R position
DESCRIPTION•Transaxle noisy in driving ranges when vehicle idling.
POSSIBLE
CAUSE•Although the malfunction is basically the same as No.20 “Noise occurs at idle when vehicle is stopped
in all positions/ranges”, other causes may be selector lever position disparity or TR switch position
disparity.
Note
•Before following troubleshooting steps, make sure that Automatic Transaxle On-Board Diagnostic
and Automatic Transaxle Basic Inspection are conducted.
22 No engine braking in 1GR position of M range
DESCRIPTION•Engine speed drops to idle but vehicle coasts when accelerator pedal released during cruising at
medium to high speeds.
•Engine speed drops to idle but vehicle coasts when accelerator pedal released when in M range (1GR)
at low vehicle speed.
POSSIBLE
CAUSE•Clutch slipped, burned (Reduction brake)
—Line pressure low
•Malfunction of VSS
•Malfunction of input/turbine speed sensor
•Malfunction of sensor ground
•Malfunction of control valve body
—M range switch on not judged by TCM (short, or open circuit, poor operation)
•Malfunction of M range switch signal
Note
•Before following troubleshooting steps, make sure that Automatic Transaxle On-Board Diagnostic
and Automatic Transaxle Basic Inspection are conducted.
STEP INSPECTION ACTION
1•Inspect TR switch adjustment.
•Does TR switch adjusted properly?
•Select PNP PID.
•Is PNP PID reading okay when selecting
range?Yes Go to next step.
No Adjust TR switch as necessary.
(See K2–83 TRANSAXLE RANGE (TR) SWITCH
ADJUSTMENT.)
Inspect TR switch.
Repair or replace any defective parts.
Page 652 of 909
M–22
REAR AXLE
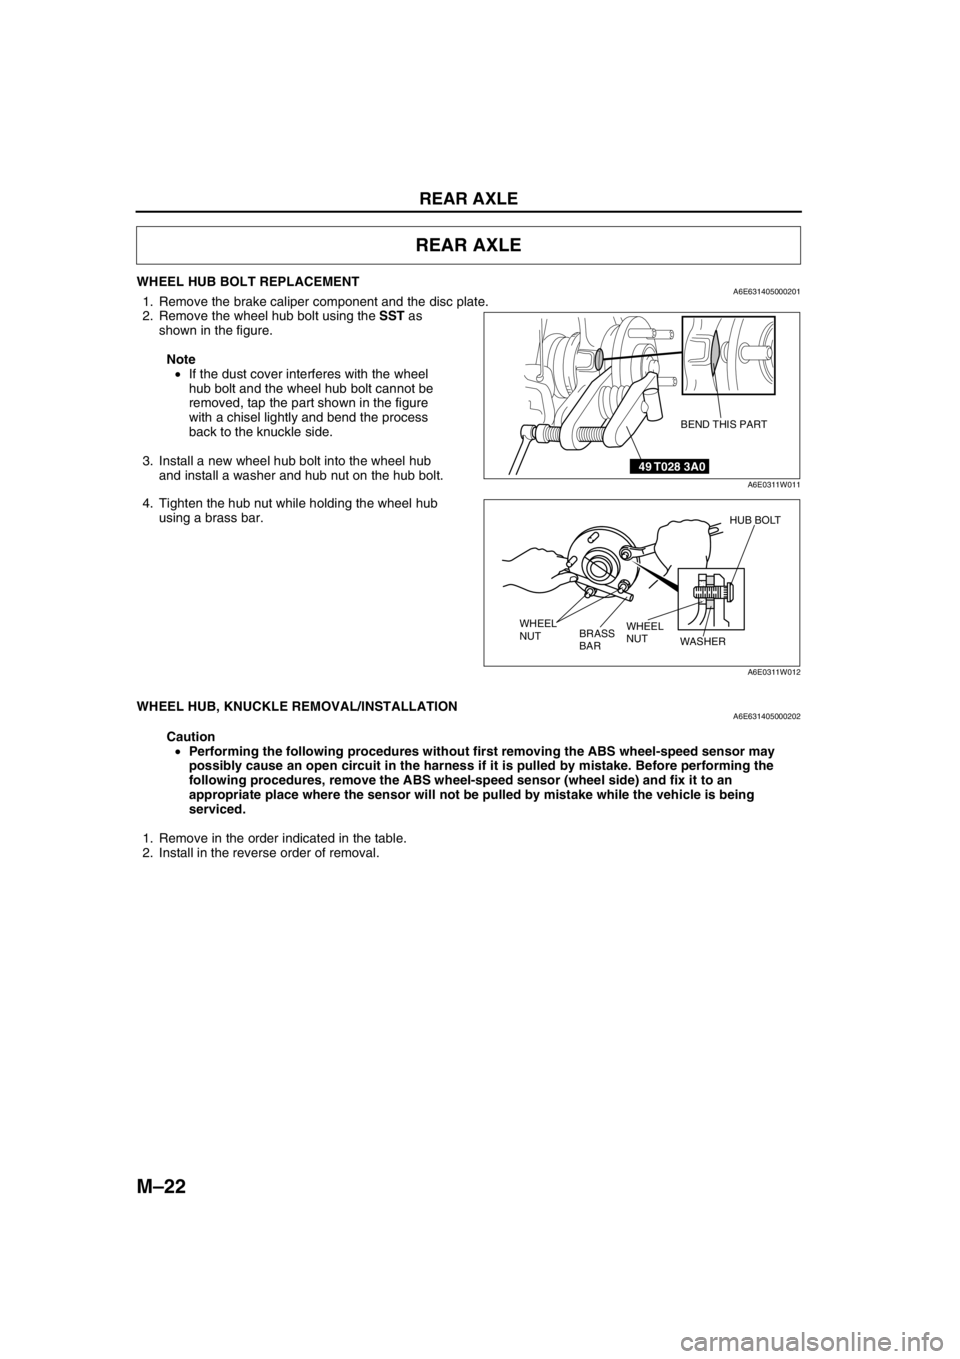
WHEEL HUB BOLT REPLACEMENTA6E6314050002011. Remove the brake caliper component and the disc plate.
2. Remove the wheel hub bolt using the SST as
shown in the figure.
Note
•If the dust cover interferes with the wheel
hub bolt and the wheel hub bolt cannot be
removed, tap the part shown in the figure
with a chisel lightly and bend the process
back to the knuckle side.
3. Install a new wheel hub bolt into the wheel hub
and install a washer and hub nut on the hub bolt.
4. Tighten the hub nut while holding the wheel hub
using a brass bar.
End Of Sie
WHEEL HUB, KNUCKLE REMOVAL/INSTALLATIONA6E631405000202
Caution
•Performing the following procedures without first removing the ABS wheel-speed sensor may
possibly cause an open circuit in the harness if it is pulled by mistake. Before performing the
following procedures, remove the ABS wheel-speed sensor (wheel side) and fix it to an
appropriate place where the sensor will not be pulled by mistake while the vehicle is being
serviced.
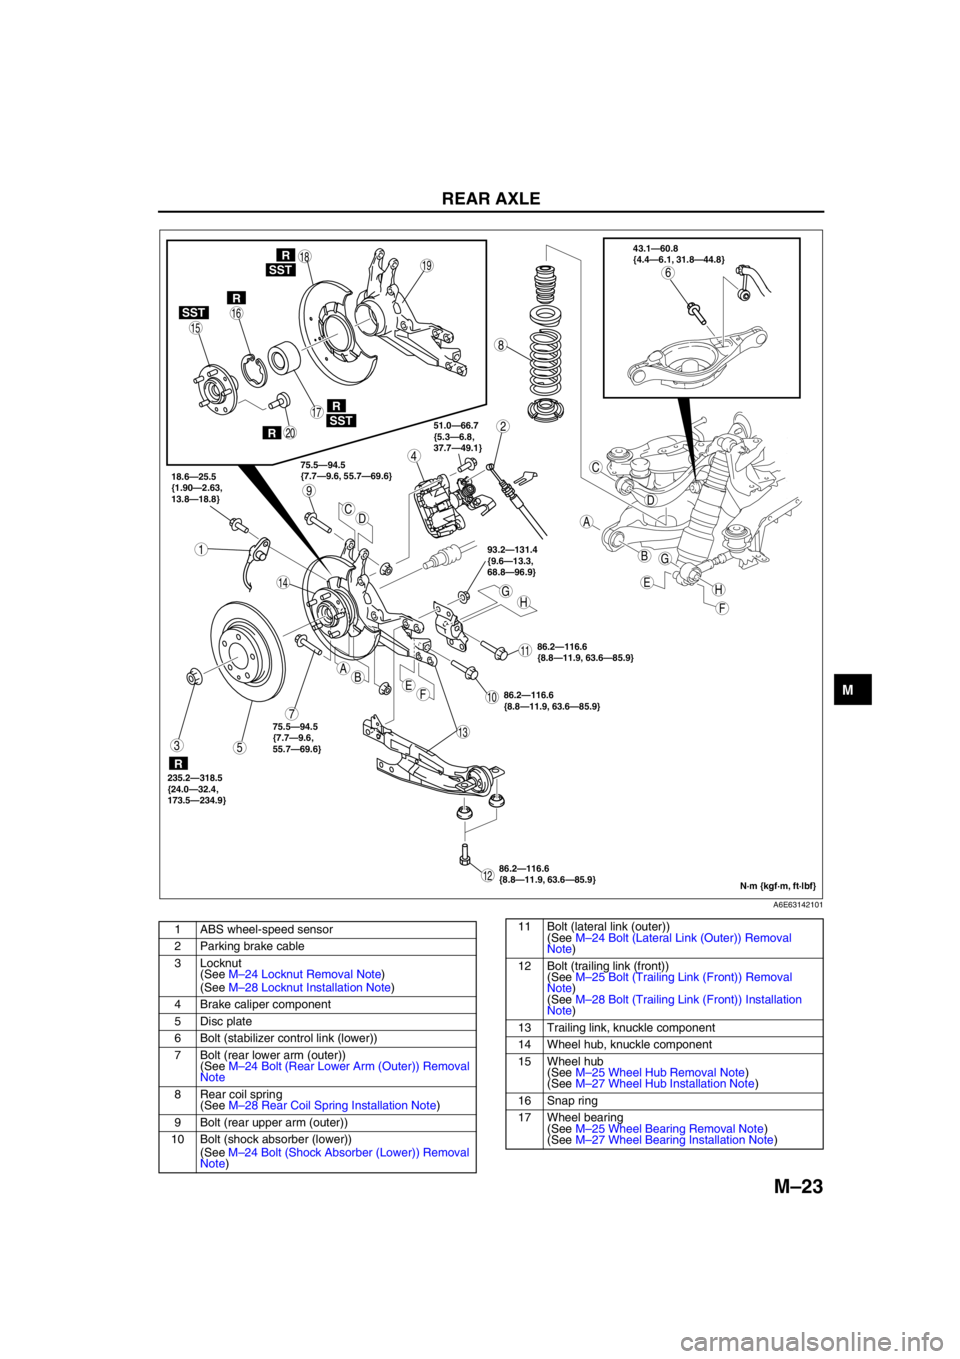
1. Remove in the order indicated in the table.
2. Install in the reverse order of removal.
REAR AXLE
49 T028 3A0
BEND THIS PART
A6E0311W011
HUB BOLT
WHEEL
NUT WHEEL
NUT
WASHER
BRASS
BAR
A6E0311W012
Page 653 of 909
REAR AXLE
M–23
M
.
93.2—131.4
{9.6—13.3,
68.8—96.9}
HHG
G
E
E
F
F
AB
A
B
C
C
D
D
86.2—116.6
{8.8—11.9, 63.6—85.9} 18.6—25.5
{1.90—2.63,
13.8—18.8}75.5—94.5
{7.7—9.6, 55.7—69.6}51.0—66.7
{5.3—6.8,
37.7—49.1}43.1—60.8
{4.4—6.1, 31.8—44.8}
235.2—318.5
{24.0—32.4,
173.5—234.9}
9
8
7
5
4
3
1
2
10
1918
17
15
16
14
13
11
12
20
6SST
SST
R
SST
R
R
R
R
75.5—94.5
{7.7—9.6,
55.7—69.6}
86.2—116.6
{8.8—11.9, 63.6—85.9}
86.2—116.6
{8.8—11.9, 63.6—85.9}
N·m {kgf·m, ft·lbf}
A6E63142101
1 ABS wheel-speed sensor
2 Parking brake cable
3 Locknut
(See M–24 Locknut Removal Note)
(See M–28 Locknut Installation Note)
4 Brake caliper component
5 Disc plate
6 Bolt (stabilizer control link (lower))
7 Bolt (rear lower arm (outer))
(See M–24 Bolt (Rear Lower Arm (Outer)) Removal
Note
8 Rear coil spring
(See M–28 Rear Coil Spring Installation Note)
9 Bolt (rear upper arm (outer))
10 Bolt (shock absorber (lower))
(See M–24 Bolt (Shock Absorber (Lower)) Removal
Note)11 Bolt (lateral link (outer))
(See M–24 Bolt (Lateral Link (Outer)) Removal
Note)
12 Bolt (trailing link (front))
(See M–25 Bolt (Trailing Link (Front)) Removal
Note)
(See M–28 Bolt (Trailing Link (Front)) Installation
Note)
13 Trailing link, knuckle component
14 Wheel hub, knuckle component
15 Wheel hub
(See M–25 Wheel Hub Removal Note)
(See M–27 Wheel Hub Installation Note)
16 Snap ring
17 Wheel bearing
(See M–25 Wheel Bearing Removal Note)
(See M–27 Wheel Bearing Installation Note)