brake sensor MAZDA 6 2002 Suplement Repair Manual
[x] Cancel search | Manufacturer: MAZDA, Model Year: 2002, Model line: 6, Model: MAZDA 6 2002Pages: 909, PDF Size: 17.16 MB
Page 743 of 909

P–10
OUTLINE , GENERAL PROCEDURES
SUPPLEMENTAL SERVICE INFORMATIONA6E690201020205•The following changes have been made since publication of the Mazda6 Workshop Manual (1730-1*-02C).
Power brake unit
•Removal/installation procedure has been modified.
Vacuum switch (MZR-CD (RF Turbo))
•Inspection procedure has been added.
•Removal/installation procedure has been added.
Vacuum pump (MZR-CD (RF Turbo))
•Inspection procedure has been added.
•Removal/installation procedure has been added.
Front brake (disc)
•Inspection procedure has been modified.
•Removal/installation procedure has been modified.
Disc pad (front)
•Replacement procedure has been modified.
Parking brake (lever type)
•Adjustment procedure has been modified.
DSC HU/CM
•Inspection procedure has been modified.
Combine sensor (Forward-G sensor)
•Inspection procedure has been modified.
On-board diagnostic (ABS/TCS)
•4WD and MZR-CD (RF Turbo) have been added.
End Of Sie
PRECAUTION (BRAKES)A6E691001020201Wheels and Tires Removal/Installation
1. The removal and installation procedures for the wheels and tires are not mentioned in this section. When a
wheel is removed, tighten it to 88—118 N·m {9.0—12.0 kgf·m, 65.0—87.0 ft·lbf}.
Brake Lines Disconnection/Connection
Caution
•Brake fluid will damage painted surfaces. If brake fluid does get on a painted surface, wipe it off
immediately.
1. Tighten the brake pipe flare nut using the SST (49 0259 770B). Be sure to modify the brake pipe flare nut
tightening torque to allow for use of a torque wrench-SST combination.
•If any brake line has been disconnected anytime during the procedure, add brake fluid, bleed the brakes,
and inspect for leakage after the procedure has been completed.
Connectors Disconnection
1. Disconnect the negative battery cable before doing any work that requires handling of connectors. Reconnect
the negative battery cable only after the work is completed.
ABS, ABS/TCS, or DSC Components Operations
1. Make sure that there are no DTCs in the ABS, ABS/TCS, or DSC memory after working on ABS, ABS/TCS or
DSC components.
•If there are any DTCs in the memory, clear them.
End Of Sie
OUTLINE
GENERAL PROCEDURES
Page 750 of 909

PARKING BRAKE SYSTEM, DYNAMIC STABILITY CONTROL
P–17
P
PARKING BRAKE (LEVER TYPE) ADJUSTMENTA6E6914440002011. Start the engine and depress the brake pedal several times.
2. Stop the engine.
3. For the 2WD model, remove the rear ashtray case behind the center console
4. For the 4WD model, remove the 4 screws (back side) and pull up the rear of the center console, then remove
the rear ashtray case.
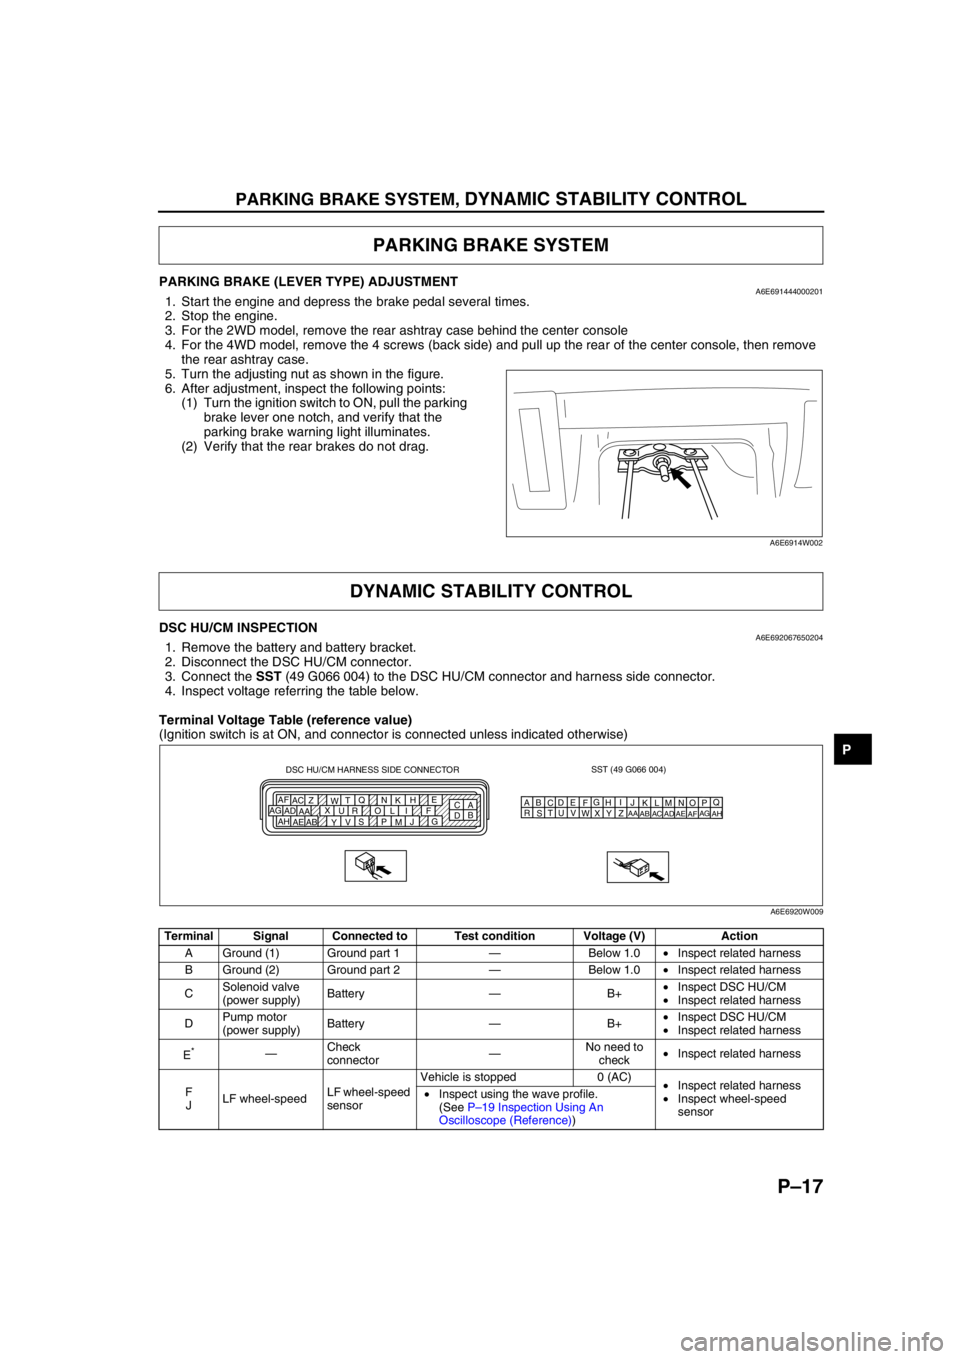
5. Turn the adjusting nut as shown in the figure.
6. After adjustment, inspect the following points:
(1) Turn the ignition switch to ON, pull the parking
brake lever one notch, and verify that the
parking brake warning light illuminates.
(2) Verify that the rear brakes do not drag.
End Of Sie
DSC HU/CM INSPECTIONA6E6920676502041. Remove the battery and battery bracket.
2. Disconnect the DSC HU/CM connector.
3. Connect the SST (49 G066 004) to the DSC HU/CM connector and harness side connector.
4. Inspect voltage referring the table below.
Terminal Voltage Table (reference value)
(Ignition switch is at ON, and connector is connected unless indicated otherwise)
PARKING BRAKE SYSTEM
A6E6914W002
DYNAMIC STABILITY CONTROL
Terminal Signal Connected to Test condition Voltage (V) Action
A Ground (1) Ground part 1—Below 1.0•Inspect related harness
B Ground (2) Ground part 2—Below 1.0•Inspect related harness
CSolenoid valve
(power supply)Battery—B+•Inspect DSC HU/CM
•Inspect related harness
DPump motor
(power supply)Battery—B+•Inspect DSC HU/CM
•Inspect related harness
E
*—Check
connector—No need to
check•Inspect related harness
F
JLF wheel-speedLF wheel-speed
sensorVehicle is stopped 0 (AC)
•Inspect related harness
•Inspect wheel-speed
sensor •Inspect using the wave profile.
(See P–19 Inspection Using An
Oscilloscope (Reference))
SST (49 G066 004)
AQ
B
CDE
FG
HI
J DSC HU/CM HARNESS SIDE CONNECTOR
A
C E
H
K N Q
T
W Z AC AF
F I L O R U X
AA AD AG
G
J
M P S
V
Y AB AE AHB
DKN
T
WZ
AC
AFLO
RU
XAA
ADAGMP
SV
YAB
AEAH
A6E6920W009
Page 751 of 909

P–18
DYNAMIC STABILITY CONTROL
K
HRR wheel-speedRR wheel-
speed sensorVehicle is stopped 0 (AC)
•Inspect related harness
•Inspect wheel-speed
sensor •Inspect using the wave profile.
(See P–19 Inspection Using An
Oscilloscope (Reference))
M
IRF wheel-speedRF wheel-
speed sensorVehicle is stopped 0 (AC)
•Inspect related harness
•Inspect wheel-speed
sensor •Inspect using the wave profile.
(See P–19 Inspection Using An
Oscilloscope (Reference))
Q
NLR wheel-speedLR wheel-speed
sensorVehicle is stopped 0 (AC)
•Inspect related harness
•Inspect wheel-speed
sensor •Inspect using the wave profile.
(See P–19 Inspection Using An
Oscilloscope (Reference))
G Battery (IG) Ignition switch Ignition switch ON B+•Inspect related harness
•Inspect ignition switch
L Brake switch Brake switchWhen brake pedal is
depressed10—14•Inspect related harness
•Inspect brake switch
OLateral-G
(lateral-G signal)Combine
sensorVehicle is stopped 2.2—2.8
•Inspect related harness
•Inspect combine sensor Left corneringFluctuation
between
2.5—4.0 V
Right corneringFluctuation
between
1.0—2.5 V
PCombine sensor
power outputCombine
sensorIgnition switch ON 4.75—5.25•Inspect related harness
•Inspect combine sensor
RSteering angle
(ground)Steering angle
sensor—Below 1.0•Inspect related harness
•Inspect steering angle
sensor
S Combine sensorCombine
sensor—3.5—5.0•Inspect related harness
•Inspect combine sensor
TYaw rate
(yaw rate signal)Combine
sensorVehicle is stopped 2.2—2.8
•Inspect related harness
•Inspect yaw rate sensor Right corneringFluctuation
between
2.5—4.62 V
Left corneringFluctuation
between
2.5—0.33 V
USteering angle
(neutral signal)Steering angle
sensorSteering position:
center position 25°—29°Below 1.0•Inspect related harness
•Inspect steering angle
sensor
Except above condition Approx. 4
VForward-G
(forward-G signal)Combine
sensorVehicle is stopped 2.2—2.8
•Inspect related harness
•Inspect combine sensor AccelerationFluctuation
between
2.5—4.0 V
Deceleration Fluctuation
between
1.0—2.5 V
WSteering angle
(steering angle
signal 2)Steering angle
sensor•Inspect using the wave profile.
(See P–19 Inspection Using An
Oscilloscope (Reference))•Inspect related harness
•Inspect steering angle
sensor
XSteering angle
(steering angle
signal 1)Steering angle
sensor•Inspect using the wave profile.
(See P–19 Inspection Using An
Oscilloscope (Reference))•Inspect related harness
•Inspect steering angle
sensor
YCombine sensor
(ground)Combine
sensor—Below 1.0•Inspect related harness
•Inspect combine sensor
AA DSC OFF switchDSC OFF
switchWhen switch is pressed Below 1.0
•Inspect related harness
•Inspect DSC OFF switch
When switch is not pressed B+
AB OBDKLN terminal of
DLC-2It cannot be determined with terminal
voltage whether the condition is good or bad
because advanced function diagnostic
output is performed with serial
communication. Inspect with service codes.•Inspect related harness
•Inspect DSC HU/CM Terminal Signal Connected to Test condition Voltage (V) Action
Page 754 of 909

ON-BOARD DIAGNOSTIC
P–21
P
DSC ON-BOARD DIAGNOSISA6E697067650201DTC Table
Note
•There is no change except for the code marked with an asterisk *
ON-BOARD DIAGNOSTIC
DTC
Diagnosis system component
WDS or
equivalent
B1318 DSC power supply
B1342 DSC HU/CM
B1483 Stop switch signal (with DSC only)
B1484 Stop switch signal (with DSC only)
B1486 Stop switch signal (with DSC only)
B1627 Reverse signal (with DSC only)
B2477 Module configuration (with DSC only)
C1095 Motor relay, pump motor
C1096 Motor relay, pump motor
C1119* Engine control system
C1125 Brake fluid level sensor (with DSC only)
C1140 DSC HU (pump) (with DSC only)
C1145 Right front wheel-speed sensor
C1148 Right front wheel-speed sensor/sensor rotor
C1155 Left front wheel-speed sensor
C1158 Left front wheel-speed sensor/sensor rotor
C1165 Right rear wheel-speed sensor
C1168 Right rear wheel-speed sensor/sensor rotor
C1175 Left rear wheel-speed sensor
C1178 Left rear wheel-speed sensor/sensor rotor
C1186 Fail-safe relay
C1194 Left front pressure reduction solenoid valve
C1198 Left front pressure retention solenoid valve
C1210 Right front pressure reduction solenoid valve
C1214 Right front pressure retention solenoid valve
C1233 Left front wheel-speed sensor/sensor rotor
C1234 Right front wheel-speed sensor/sensor rotor
C1235 Right rear wheel-speed sensor/sensor rotor
C1236 Left rear wheel-speed sensor/sensor rotor
C1242 Left rear pressure reduction solenoid valve
C1246 Right rear pressure reduction solenoid valve
C1250 Left rear pressure retention solenoid valve
C1254 Right rear ABS pressure retention solenoid valve
C1266 Fail-safe relay
C1280 Combine sensor (with DSC only)
C1400 Right front traction switch solenoid valve (with DSC only)
C1410 Left front traction switch solenoid valve (with DSC only)
C1414 DSC HU/CM (with DSC only)
C1507 DSC control (with DSC only)
C1508 TCS control
C1510 Right front solenoid valve, motor or wheel-speed sensor/sensor rotor
C1511 Left front solenoid valve, motor or wheel-speed sensor/sensor rotor
C1512 Right rear solenoid valve, motor or wheel-speed sensor/sensor rotor
C1513 Left rear solenoid valve, motor or wheel-speed sensor/sensor rotor
Page 755 of 909

P–22
ON-BOARD DIAGNOSTIC
PID/DATA Monitor Table
Note
•There is no change except for the PID marked with an asterisk *
C1730 Combine sensor (with DSC only)
C1949* Combine sensor (with DSC only)
C1950* Combine sensor (with DSC only)
C1951 Combine sensor (with DSC only)
C1952 Combine sensor (with DSC only)
C1953 Brake fluid pressure sensor (with DSC only)
C1954 Brake fluid pressure sensor (with DSC only)
C1955 Steering angle sensor (with DSC only)
C1956 Steering angle sensor (with DSC only)
C1957 Right front DSC switch solenoid valve (with DSC only)
C1958 Left front DSC switch solenoid valve (with DSC only)
C1959 Combine sensor (with DSC only)
U1900 CAN communication
U2021 Invalid/fault data received
U2511* CAN communication
U2516 CAN communicationDTC
Diagnosis system component
WDS or
equivalent
PID Name
(Definition)Unit/Condition Condition/Specification ActionABS (ABS/
TCS) HU/CM or
DSC HU/CM
terminal
RPM
(Engine speed signal input)RPM•Engine is stopped: 0 RPM
•Engine is running: Indicates
engine speedInspect PCM.—
TRANSGR
*
(with DSC only)
(Transaxle gear position)FN4A-EL:
R/N/D/S/L
JA5AX-EL:
R/N/D•Selector lever position is
displayed
—R: R
—N: N
—D: D
—S: SInspect PCM, TR
switch, or DSC HU/
CM.
—
TRAC_SW
(TCS OFF switch input)ON/OFF•TCS (DSC) OFF switch is
depressed: ON
•TCS (DSC) OFF switch is
released: OFFInspect TCS (DSC)
OFF switch.
AA
TC LVAL (with DSC only)
(Traction switch solenoid valve
(LF-RR))ON/OFF•Solenoid valve is activated:
ON
•Solenoid valve is
deactivated: OFFInternal fault of DSC
HU/CM. Replace DSC
HU/CM.—
TC RVAL (with DSC only)
(Traction switch solenoid valve
(RF-LR))ON/OFF•Solenoid valve is activated:
ON
•Solenoid valve is
deactivated: OFFInternal fault of DSC
HU/CM. Replace DSC
HU/CM.—
L_DSC O (with DSC only)
(Stability control solenoid
valve (LF-RR))ON/OFF•Solenoid valve is activated:
ON
•Solenoid valve is
deactivated: OFFInternal fault of DSC
HU/CM. Replace DSC
HU/CM.—
R_DSC O (with DSC only)
(Stability control solenoid
valve (RF-LR))ON/OFF•Solenoid valve is activated:
ON
•Solenoid valve is
deactivated: OFFInternal fault of DSC
HU/CM. Replace DSC
HU/CM.—
CCNTABS
(Number of continuous codes)—DTC is detected: 1—255
DTC is not detected: 0Perform inspection
using appropriate
DTC.—
Page 756 of 909

ON-BOARD DIAGNOSTIC
P–23
P
PMPSTAT
(Pump motor output state)ON/OFF•Pump motor is activated:
ON
•Pump motor is deactivated:
OFFInspect DSC HU/CM
—
BRK_FLUID (with DSC only)
(Brake fluid level sensor input)OK/LOW•Brake fluid is above LOW:
OK
•Brake fluid is below LOW:
LOWInspect brake fluid
level.
Inspect brake fluid
level sensor.—
BOO_ABS
(Brake pedal switch input)ON/OFF•Brake pedal is depressed:
ON
•Brake pedal is released:
OFFInspect brake switch.
ABS (ABS/
TCS): Y
DSC: L
ABS_LAMP
(ABS warning light driver
output state)ON/OFF•ABS warning light is
illuminated: ON
•ABS warning light is not
illuminated: OFFInspect ABS warning
light.
—
BRAKE_LMP
(BRAKE system warning light
output state)ON/OFF•BRAKE system warning
light is illuminated: ON
•BRAKE system warning
light is not illuminated: OFFInspect BRAKE
system warning light.
—
ABSRR_O
(Right rear ABS pressure
reduction solenoid valve
output state)ON/OFF•During ABS control: ON/
OFF
(solenoid valve is activated/
deactivated)
•Not ABS control: OFF
(solenoid valve is
deactivated)Internal fault of ABS
(ABS/TCS) or DSC
HU/CM. Replace ABS
(ABS/TCS) or DSC
HU/CM.—
ABSLR_O
(Left rear ABS pressure
reduction solenoid valve
output state)ON/OFF•During ABS or EBD control:
ON/OFF
(solenoid valve is activated/
deactivated)
•Not ABS and EBD control:
OFF
(solenoid valve is
deactivated)Internal fault of ABS
(ABS/TCS) or DSC
HU/CM. Replace ABS
(ABS/TCS) or DSC
HU/CM.—
ABSRF_O
(Right front ABS pressure
reduction solenoid valve
output state)ON/OFF•During ABS control: ON/
OFF
(solenoid valve is activated/
deactivated)
•Not ABS control: OFF
(solenoid valve is
deactivated)Internal fault of ABS
(ABS/TCS) or DSC
HU/CM. Replace ABS
(ABS/TCS) or DSC
HU/CM.—
ABSLF_O
(Left front ABS pressure
reduction solenoid valve
output state)ON/OFF•During ABS control: ON/
OFF
(solenoid valve is activated/
deactivated)
•Not ABS control: OFF
(solenoid valve is
deactivated)Internal fault of ABS
(ABS/TCS) or DSC
HU/CM. Replace ABS
(ABS/TCS) or DSC
HU/CM.—
ABSRR_I
(Right rear ABS pressure
reduction solenoid valve
output state)ON/OFF•During ABS control: ON/
OFF
(solenoid valve is activated/
deactivated)
•Not ABS control: OFF
(solenoid valve is
deactivated)Internal fault of ABS
(ABS/TCS) or DSC
HU/CM. Replace ABS
(ABS/TCS) or DSC
HU/CM.—
ABSLR_I
(Left rear ABS pressure
retention solenoid valve output
state)ON/OFF•During ABS or EBD control:
ON/OFF
(solenoid valve is activated/
deactivated)
•Not ABS and EBD control:
OFF
(solenoid valve is
deactivated)Internal fault of ABS
(ABS/TCS) or DSC
HU/CM. Replace ABS
(ABS/TCS) or DSC
HU/CM.— PID Name
(Definition)Unit/Condition Condition/Specification ActionABS (ABS/
TCS) HU/CM or
DSC HU/CM
terminal
Page 757 of 909

P–24
ON-BOARD DIAGNOSTIC
ABSRF_I
(Right front ABS pressure
retention solenoid valve output
state)ON/OFF•During ABS control: ON/
OFF
(solenoid valve is activated/
deactivated)
•Not ABS control: OFF
(solenoid valve is
deactivated)Internal fault of ABS
(ABS/TCS) or DSC
HU/CM. Replace ABS
(ABS/TCS) or DSC
HU/CM.—
ABSLF_I
(Left front ABS pressure
retention solenoid valve output
state)ON/OFF•During ABS control: ON/
OFF
(solenoid valve is activated/
deactivated)
•Not ABS control: OFF
(solenoid valve is
deactivated)Internal fault of ABS
(ABS/TCS) or DSC
HU/CM. Replace ABS
(ABS/TCS) or DSC
HU/CM.—
ABSVLVRLY
(Fail-safe relay output state)ON/OFF•Fail-safe relay is
activated: ON
•Fail-safe relay is
deactivated: OFFInspect ABS (ABS/
TCS) or DSC HU/CM.
—
ABSPMPRLY
(Motor relay output state)ON/OFF•Motor relay is activated: ON
•Motor relay is deactivated:
OFFInspect ABS (ABS/
TCS) or DSC HU/CM.—
SWA POS (with DSC only)
(Steering angle sensor input)ANGLE•Steering wheel is in neutral
position: 0 DEG
•Steering wheel is turned to
left: Changes between
0 DEG and -1,638.40 DEG
•Steering wheel is turned to
right: Changes between
0 DEG and 1,638.35 DEGInspect steering angle
sensor.
R, U, W, X
LF_WSPD
(Left front wheel-speed sensor
input)SPEED•Vehicle is stopped: 0 KPH
{0 MPH}
•Vehicle is driving: Indicates
vehicle speedInspect wheel-speed
sensor/sensor rotor.ABS (ABS/
TCS): E, I
DSC: F, J
RF_WSPD
(Right front wheel-speed
sensor input)SPEED•Vehicle is stopped: 0 KPH
{0 MPH}
•Vehicle is driving: Indicates
vehicle speedInspect wheel-speed
sensor/sensor rotor.ABS (ABS/
TCS): D, G
DSC: I, M
LR_WSPD
(Left rear wheel-speed sensor
input)SPEED•Vehicle is stopped: 0 KPH
{0 MPH}
•Vehicle is driving: Indicates
vehicle speedInspect wheel-speed
sensor/sensor rotor.ABS (ABS/
TCS): C, F
DSC: N, Q
RR_WSPD
(Right rear wheel-speed
sensor input)SPEED•Vehicle is stopped: 0 KPH
{0 MPH}
•Vehicle is driving: Indicates
vehicle speedInspect wheel-speed
sensor/sensor rotor.ABS (ABS/
TCS): A, B
DSC: H, K
LAT ACC (with DSC only)
(Lateral-G sensor input)ACCELERATION•Vehicle is stopped or driving
straight: 0 G
•Cornering to left: Changes
between 0 G and 1.27 G
•Cornering to right: Changes
between 0 G and -1.28 GInspect ABS wheel-
speed sensor/sensor
rotor.
O
YAW_RATE (with DSC only)
(Yaw rate sensor input)ACCELERATION•Vehicle is stopped or driving
straight: 0 DG/S
•Cornering to left: Changes
between 0 DG/S and 127
DG/S
•Cornering to right: Changes
between 0 DG/S and -128
DG/SInspect combine
sensor.
T
MCYLI P (with DSC only)
(Brake fluid pressure sensor
input)PRESSURE•Brake pedal is released:
0 MPa
•Brake pedal is depressed:
Changes between 0 MPa
and 25.5 MPaInspect DSC HU/CM.
— PID Name
(Definition)Unit/Condition Condition/Specification ActionABS (ABS/
TCS) HU/CM or
DSC HU/CM
terminal
Page 777 of 909

REAR SUSPENSION
R–15
R
.
1
2
93.2—131.4
{9.51—13.39, 68.75—96.91}
86.2—116.6
{8.80—11.88,
63.58—85.99}
7
5
C
C
A
A
B
B
D
D
E
E
4
6
3
18.6—25.5
{1.90—2.60,
13.8—18.8}
18.6—25.5
{1.90—2.60,
13.8—18.8}
86.2—116.6
{8.80—11.88,
63.58—85.99}86.2—116.6
{8.80—11.88,
63.58—85.99}
N·m {kgf·m, ft·lbf}
A6E74162008
1 ABS wheel-speed sensor
2 Parking brake cable
3 Bolt (shock absorber lower side)
4 Bolt (trailing link front side)
(See R–16 Bolt (Trailing Link Front Side) Removal
Note)
(See R–16 Bolt (Trailing Link Front Side) Installation
Note)5 Bolt (Lateral link outer side)
(See R–16 Bolt (Lateral Link Outer Side) Removal
Note)
(See R–16 Bolt (Lateral Link Outer Side) Installation
Note)
6 Toe link bracket
7 Trailing link
Page 812 of 909

T–1
T
TBODY ELECTRICAL SYSTEM
OUTLINE................................................................ T-2
OUTLINE OF CONSTRUCTION ......................... T-2
FEATURES .......................................................... T-2
POWER SYSTEM................................................... T-2
STRUCTURAL VIEW........................................... T-2
MULTIPLEX COMMUNICATION SYSTEM............ T-3
OUTLINE ............................................................. T-3
STRUCTRURAL VIEW ........................................ T-3
SYSTEM WIRING DIAGRAM .............................. T-4
CAN SIGNAL-CHART.......................................... T-4
ON-BOARD DIAGNOSTIC FUNCTION............... T-6
EXTERIOR LIGHTING SYSTEM............................ T-8
OUTLINE ............................................................. T-8
STRUCTURAL VIEW........................................... T-8
INTERIOR LIGHTING SYSTEM............................. T-8
STRUCTURAL VIEW........................................... T-8
WIPER AND WASHER........................................... T-9
OUTLINE ............................................................. T-9
STRUCTURAL VIEW........................................... T-9
WARNING AND INDICATOR SYSTEM............... T-10
OUTLINE ........................................................... T-10
STRUCTURAL VIEW......................................... T-10
SYSTEM WIRING DIAGRAM ............................ T-11
THEFT-DETERRENT SYSTEM............................ T-11
OUTLINE ........................................................... T-11
INTRUDER SENSOR ........................................ T-11
AUDIO AND NAVIGATION SYSTEM.................. T-13
OUTLINE ........................................................... T-13
STRUCTURAL VIEW......................................... T-13
CRUISE CONTROL SYSTEM.............................. T-13
OUTLINE ........................................................... T-13
AIR BAG SYSTEM............................................... T-13
OUTLINE ........................................................... T-13
OUTLINE.............................................................. T-14
SUPPLEMENTAL SERVICE INFORMATION ... T-14
LOCATION INDEX............................................... T-15
POWER SYSTEM.............................................. T-15
EXTERIOR LIGHTING SYSTEM ....................... T-15
INTERIOR LIGHTING SYSTEM ........................ T-16
WIPER AND WASHER SYSTEM ...................... T-16
WARNING AND INDICATOR SYSTEM............. T-17
THEFT-DETERRENT SYSTEM ........................ T-17
AUDIO AND NAVIGATION SYSTEM ................ T-18
AIR BAG SYSTEM............................................. T-18
POWER SYSTEM................................................. T-19
RELAY LOCATION ............................................ T-19
RELAY INSPECTION ........................................ T-19
EXTERIOR LIGHTING SYSTEM.......................... T-20
REAR AUTO LEVELING SENSOR
REMOVAL/INSTALLATION ............................ T-20HIGH-MOUNT BRAKE LIGHT
REMOVAL/INSTALLATION ............................ T-20
INTERIOR LIGHTING SYSTEM........................... T-21
CARGO COMPARTMENT LIGHT
REMOVAL/INSTALLATION ............................ T-21
CARGO COMPARTMENT LIGHT
INSPECTION .................................................. T-22
WIPER AND WASHER......................................... T-22
REAR WIPER MOTOR
REMOVAL/INSTALLATION ............................ T-22
REAR WIPER MOTOR INSPECTION ............... T-22
REAR WIPER ARM AND BLADE
REMOVAL/INSTALLATION ............................ T-23
REAR WIPER ARM AND BLADE
ADJUSTMENT ................................................ T-24
REAR WASHER NOZZLE
REMOVAL/INSTALLATION ............................ T-24
REAR WASHER NOZZLE ADJUSTMENT ........ T-25
REAR WASHER HOSE
REMOVAL/INSTALLATION ............................ T-25
INTERMITTENT REAR WIPER RELAY
REMOVAL/INSTALLATION ............................ T-26
WARNING AND INDICATOR SYSTEM............... T-27
FUEL GAUGE SENDER UNIT
REMOVAL/INSTALLATION ............................ T-27
FUEL GAUGE SENDER UNIT INSPECTION.... T-28
THEFT-DETERRENT SYSTEM............................ T-29
INTRUDER SENSOR
REMOVAL/INSTALLATION ............................ T-29
AUDIO AND NAVIGATION SYSTEM.................. T-30
NOISE FILTER REMOVAL/INSTALLATION ..... T-30
CONDENSER REMOVAL/INSTALLATION ....... T-30
ANTENNA FEEDER LOCATION ....................... T-31
REAR ANTENNA FEEDER INSPECTION ........ T-31
AIR BAG SYSTEM............................................... T-32
SERVICE WARNINGS....................................... T-32
CURTAIN AIR BAG MODULE
REMOVAL/INSTALLATION ............................ T-35
AIR BAG MODULE AND PRE-TENSIONER
SEAT BELT DEPLOYMENT PROCEDURES. T-35
ON-BOARD DIAGNOSTIC
[MULTIPLEX COMMUNICATION SYSTEM].... T-39
MULTIPLEX COMMUNICATION SYSTEM ....... T-39
DTC TABLE ....................................................... T-41
PID/DATA MONITOR TABLE ............................ T-41
PROCEDURES FOR DETERMINING
THE LOCATION OF A MALFUNCTION ......... T-42
DTC U0073, U1900, U2516 ............................... T-45 FEATURES
SERVICE
Page 813 of 909

T–2
OUTLINE, POWER SYSTEM
OUTLINE OF CONSTRUCTIONA6E810201088201•The construction and operation of the body electrical system is essentially carried over from that of the current
Mazda6 (GG) model, except for the following features. (See Mazda6 Training Manual 3359-1*-02C)
End Of Sie
FEATURESA6E810201088202Improved Safety
•There are two types of high-mount brake lights. (WGN)
Improved Marketability
•A cargo compartment light has been adopted. (WGN)
•The installation positions of the rear wiper and washer components have been changed. (WGN)
•A fuel gauge sender sub-unit has been adopted. (4WD)
•A 4WD indicator light, glow indicator light and sedimentor warning light have been adopted.
•The installation positions of the condenser and the noise filter have been changed. (WGN)
•An antenna feeder has been adopted. (WGN)
•A rear auto leveling sensor especially for the 4WD has been adopted. (4WD)
Improved Security
•A rear intruder sensor has been adopted. (WGN)
End Of Sie
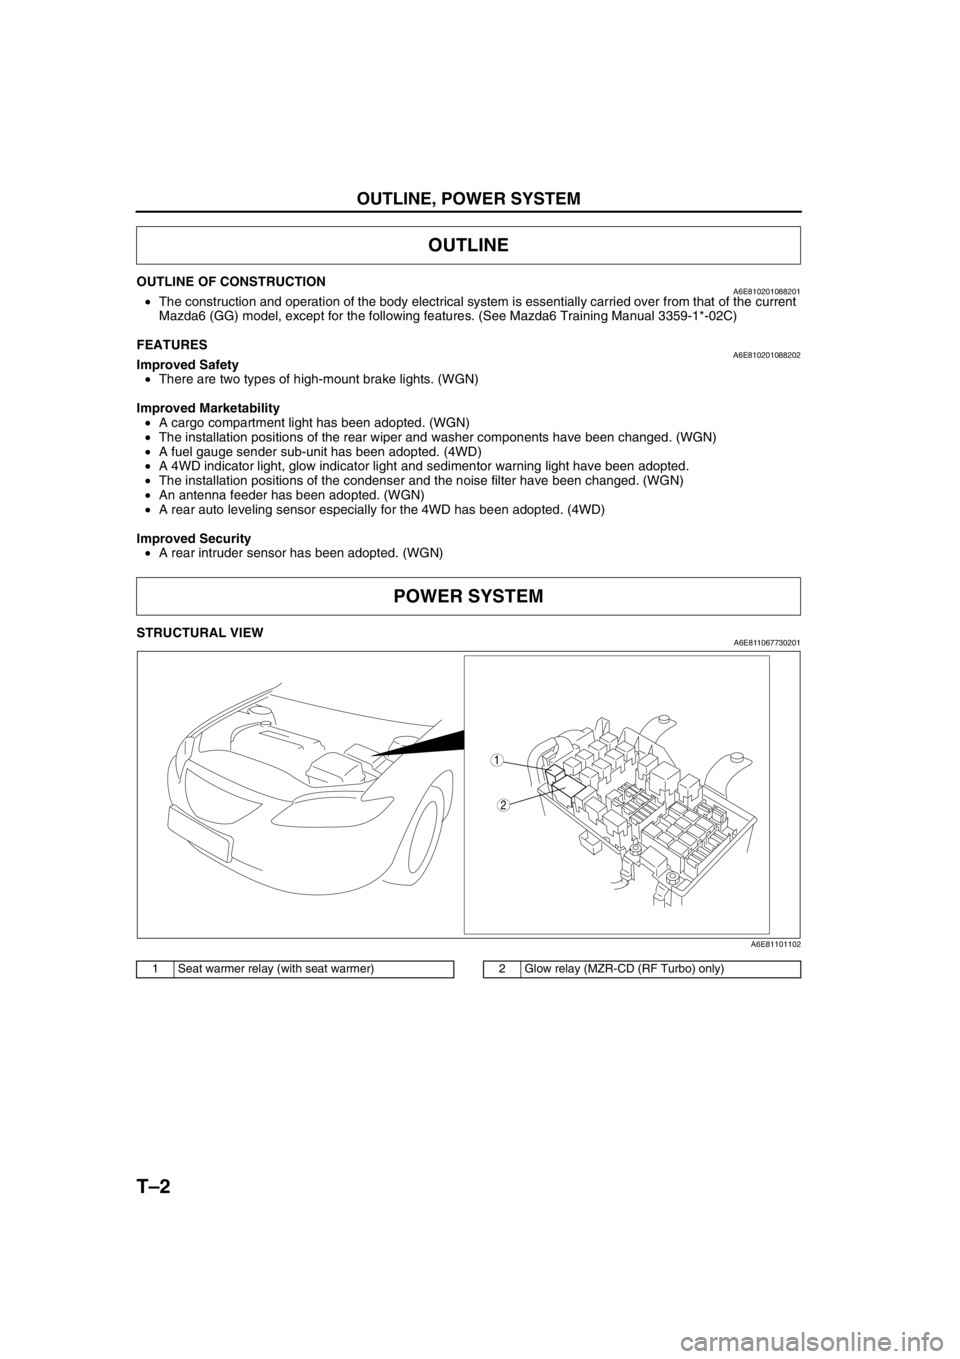
STRUCTURAL VIEWA6E811067730201
.
End Of Sie
OUTLINE
POWER SYSTEM
2
1
A6E81101102
1 Seat warmer relay (with seat warmer)2 Glow relay (MZR-CD (RF Turbo) only)