timing belt MAZDA 626 1987 Repair Manual
[x] Cancel search | Manufacturer: MAZDA, Model Year: 1987, Model line: 626, Model: MAZDA 626 1987Pages: 1865, PDF Size: 94.35 MB
Page 198 of 1865

ASSEMBLY (TIMING BELT) 1 B
76G01B-097
86U01X-163
7. Check the timing belt deflection. If the deflection
is not correct, loosen the tensioner lock bolt and
repeat steps 3—5 above. Replace the tensioner
spring if necessary.
Belt deflection:
7.5—8.5 mm (0.30—0.33 in)
/ 98 N (10 kg, 22 lb)
Baffle Plate
Position the baffle plate on the timing belt pulley.
Timing Belt Cover
Install the lower timing belt cover, upper timing belt
cover, and new gaskets.
Tightening torque:
7—10 Nm (70—100 cm-kg, 61—87 in-lb)
Crankshaft Pulley
Install the crankshaft pulley.
Tightening torque: 12—17 N-m
(1.25—1.75 m-kg, 109—152 in-lb)
69G01B-170
1B—67
Page 213 of 1865

ENGINE
(DIESEL)
OUTLINE 1C— 2
STRUCTURAL VIEW 1C— 2
SPECIFICATIONS 1C— 3
TROUBLESHOOTING GUIDE 1C— 3
TUNE-UP PROCEDURE 1C— 5
ON-VEHICLE INSPECTION 1C—10
COMPRESSION 1C—10
ON-VEHICLE MAINTENANCE 1C—11
TIMING BELT 1C—11
CYLINDER HEAD 1C—16
VALVE SEAL 1C—24
REMOVAL 1C—31
DISASSEMBLY 1C—34
AUXILIARY PARTS 1C—34
TIMING BELT 1C—36
INJECTION PUMP 1C—39
CYLINDER HEAD 1C—40
CYLINDER BLOCK 1C—43
INSPECTION AND REPAIR 1C—47
ASSEMBLY 1C—62
CYLINDER BLOCK 1C—62
CYLINDER HEAD 1C—73
INJECTION PUMP 1C—78
TIMING BELT 1C—81
AUXILIARY PARTS 1C—87
INSTALLATION 1C—91
TRANSAXLE ASSEMBLY 1C—91
ENGINE INSTALLATION 1C—92 76G01C-001
Page 215 of 1865

TROUBLESHOOTING GUIDE 1 C
SPECIFICATIONS
———Engine model
Item ^—_______ RF-CX RF-N
Type Diesel, 4 cycle
Cylinder arrangement and number In line, 4 cylinders
Combustion chamber Swirl chamber
Valve system OHC, belt driven
Displacement cc (cu in) 1,998 (121.9)
Bore and stroke mm (in) 86.0 x 86.0 (3.39 x 3.39)
Compression ratio 21.1 : 1 22.7 : 1
Compression pressure
kPa (kg/cm2, psi)-rpm
Standard 2.943 (30, 427)-200 Compression pressure
kPa (kg/cm2, psi)-rpm Minimum 2.649 (27, 384)-200
Valve timing
IN Open BTDC 13° 13°
Valve timing
IN Close ABDC 15° 39° Valve timing
EX Open BBDC 60° 60° Valve timing
EX Close ATDC 8° 8°
Valve clearance mm (in)
Cold IN 0.25 (0.010)
Valve clearance mm (in)
Cold EX 0.35 (0.014) Valve clearance mm (in) Warm (for ref.)
IN 0.30 (0.012) Valve clearance mm (in) Warm (for ref.) EX 0.40 (0.016)
Idle speed (MTX in neutral) rpm 720
Injection timing ATDC 10 TDC 0°
Injection order 1_3_4_2
76G01C-002
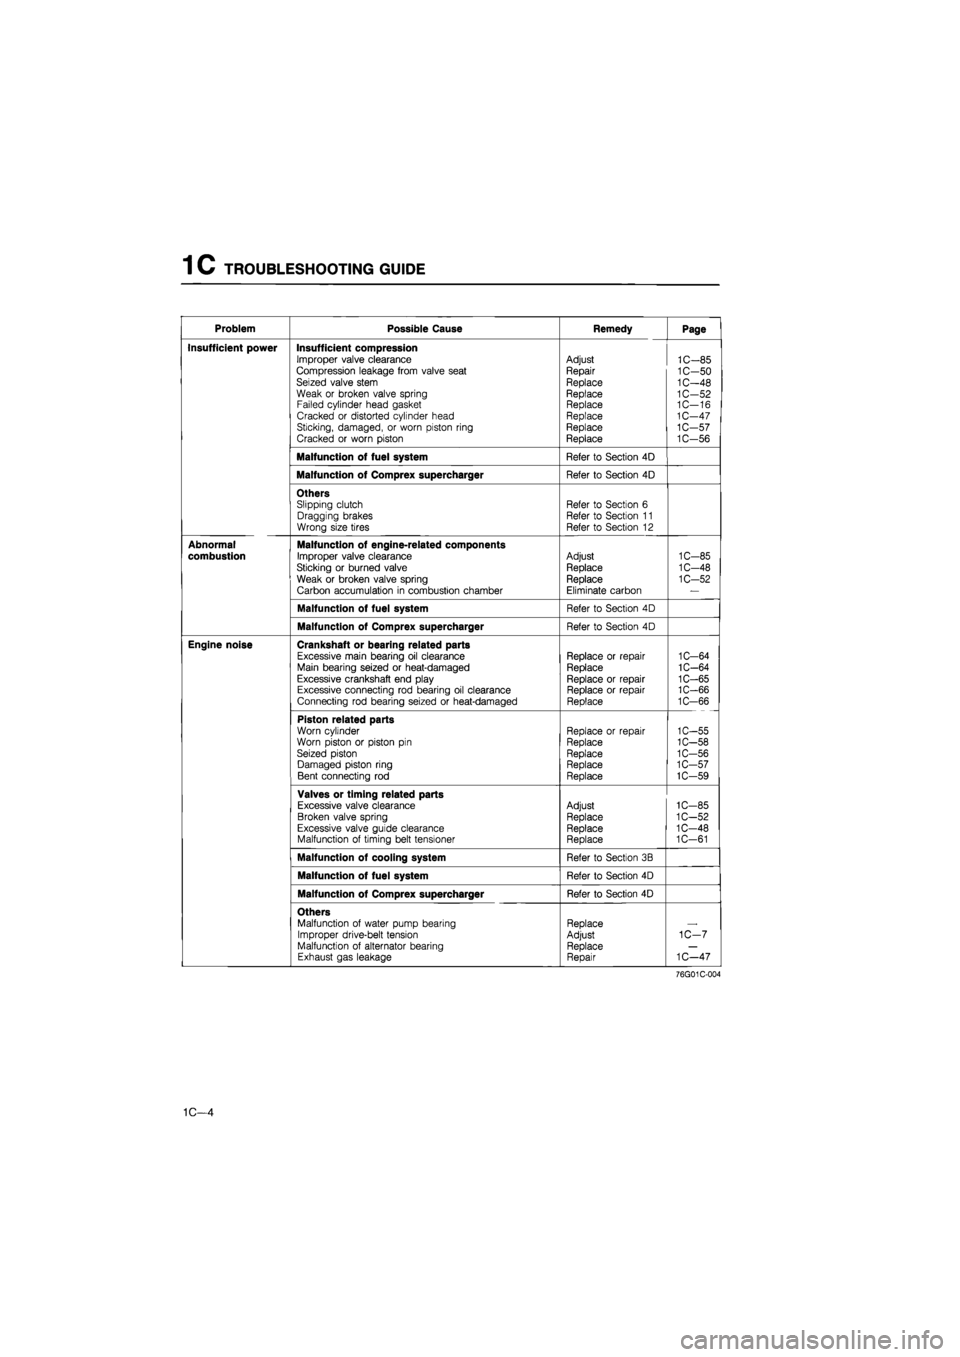
TROUBLESHOOTING GUIDE
Problem Possible Cause Remedy Page
Difficult starting Malfunction of engine-related components
Burned valve Worn piston, piston ring, or cylinder Failed cylinder head gasket
Replace Replace or repair Replace
1C-48 1C—55,56 1C-16
Difficult starting
Malfunction of fuel system Refer to Section 4D
Difficult starting
Malfunction of Comprex supercharger Refer to Section 4D
Difficult starting
Malfunction of electrical system Refer to Section 5
Poor idling Malfunction of engine-related components Improper valve clearance Poor valve to valve seat contact Failed cylinder head gasket
Adjust Repair or replace Replace
1C-85 1C-50 1C—16
Poor idling
Malfunction of fuel system Refer to Section 4D
Poor idling
Malfunction of Comprex supercharger Refer to Section 4D
Excessive oil consumption
Oil working up Worn piston ring groove or sticking piston ring Worn piston or cylinder
Replace Replace or repair
1C-57 1C—55,56
Excessive oil consumption
Oil working down Worn valve seal Worn valve stem or guide
Replace Replace
1C-24 1C-48
Excessive oil consumption
Oil leakage Refer to Section 2B
76G01C-003
1C—3
Page 216 of 1865

1 C TROUBLESHOOTING GUIDE
Problem Possible Cause Remedy Page
Insufficient power Insufficient compression Improper valve clearance Compression leakage from valve seat Seized valve stem Weak or broken valve spring Failed cylinder head gasket Cracked or distorted cylinder head Sticking, damaged, or worn piston ring Cracked or worn piston
Adjust
Repair
Replace Replace Replace Replace Replace Replace
1C-85 1C-50 1C-48 1C-52 1C—16 1C-47 1C-57 1C-56
Malfunction of fuel system Refer to Section 4D
Malfunction of Comprex supercharger Refer to Section 4D
Others Slipping clutch Dragging brakes Wrong size tires
Refer to Section 6 Refer to Section 11 Refer to Section 12
Abnormal
combustion
Malfunction of engine-related components
Improper valve clearance
Sticking or burned valve
Weak or broken valve spring
Carbon accumulation in combustion chamber
Adjust
Replace
Replace Eliminate carbon
1C-85
1C-48
1C-52
Malfunction of fuel system Refer to Section 4D
Malfunction of Comprex supercharger Refer to Section 4D
Engine noise Crankshaft or bearing related parts Excessive main bearing oil clearance Main bearing seized or heat-damaged Excessive crankshaft end play Excessive connecting rod bearing oil clearance Connecting rod bearing seized or heat-damaged
Replace or repair Replace
Replace or repair Replace or repair Replace
1C-64 1C-64 1C-65 1C-66 1C-66
Piston related parts Worn cylinder Worn piston or piston pin Seized piston Damaged piston ring Bent connecting rod
Replace or repair Replace
Replace Replace Replace
1C-55 1C-58 1C-56 1C-57 1C-59
Valves or timing related parts Excessive valve clearance Broken valve spring Excessive valve guide clearance Malfunction of timing belt tensioner
Adjust Replace Replace Replace
1C-85 1C-52 1C-48 1C-61
Malfunction of cooling system Refer to Section 3B
Malfunction of fuel system Refer to Section 4D
Malfunction of Comprex supercharger Refer to Section 4D
Others Malfunction of water pump bearing Improper drive-belt tension Malfunction of alternator bearing Exhaust gas leakage
Replace Adjust Replace Repair
1C-7
1C—47
76G01C-004
1C—4
Page 220 of 1865

1C TUNE-UP PROCEDURE
Comprex supercharger
Deflection mm (in)
New 4 0-6.0 (0.16—0.23)
Used 8.0-10 0 (0 31-0.39)
If necessary, loosen the idler lock nut and adjust
the belt deflection by turning the adjust bolt.
Tightening torque:
16—23 Nm (1.6—2.3 m-kg, 12—17 ft-lb)
76G01C-011
o
INJECTION TIMING
1. Disconnect the negative battery cable.
2. Release the CSD using the screw driver.
3. Remove the cover on the clutch housing.
4. Turn the flywheel and set the indicator at ATDC.
5. Disconnect the injection pipes from the injection
pump.
76G04D-008
6. Remove the hydraulic head plug from the injec-
tion pump.
7. Mount the SST into the plug hole on the hydraulic
head so the tip of the dial gauge pointer touches
the plunger end of the pump and the dial gauge
indicates approx. 2.0 mm (0.08 in).
76G04D-009
8. Turn the crankshaft slowly counterclockwise to
30-50° BTDC.
9. Make sure the dial indicator pointer no longer
moves by slightly turning the crankshaft.
10. Set the dial gauge scale to Zero at the pointer.
76G04D-010
1C-8
Page 223 of 1865

ON-VEHICLE MAINTENANCE (TIMING BELT) 1 C
ON-VEHICLE MAINTENANCE
TIMING BELT
Removal
1. Disconnect the nagative battery cable.
2. Remove in the sequence shown in the figure referring to the removal note for specially marked parts.
76G01C-019
1. Engine side cover
2. A/C and alternator drive belt
3. Crankshaft pulley
4. Left and right timing belt cover
5. Alternator idle pulley
6. Idler pulley
7. No.3 engine mount
8. Timing belt
9. Timing belt tensioner and spring
Note
Loosen the No.3 engine mount nuts and lower the engine to remove the crankshaft pulley.
1C-11
Page 224 of 1865

1 C ON-VEHICLE MAINTENANCE (TIMING BELT)
76G01C-020
76G01C-238
Kww
76G01C-021
Removal note
Timing belt
1. Aligh the timing marks of each pulleys.
2. Affix the injection pump pulley to the bracket us-
ing two bolts (35—40 mm, 1.4—1.6 in).
Caution
a) Do not turn in the reverse direction of en-
gine revolution.
b) After removing the timing belt, do not ro-
tate the crankshaft pulley or camshaft
pulley.
3. Make the forward direction arrow on the timing belt.
Note
Direction arrow is to reassemble the timing
belt in the same direction.
4. Loosen the timing belt tensioner bolt.
5. Shift the tensioner outwards as far as possible, and
temporarily tighten it.
6. Suspend the engine with chain block on the front
engine hanger.
7. Remove the No.3 engine mount.
8. Remove the timing belt.
Caution
Do not allow any oil or grease on the timing
belt.
Inspection and Repair
Inspect the following parts. (Refer to page 1C—60,
61).
1. Timing belt
2. Timing belt tensioner and spring
3. Timing belt idler pulley
4. Timing belt pulley
76G01C-022
1C—12
Page 225 of 1865

ON-VEHICLE MAINTENANCE (TIMING BELT) 1 C
Installation
Install in the reverse order of removal referring to the installation note.
Torque Specifications
85—117 N-m (8.7—11.9 m-kg, 63—86 ft-lb)
67—93 N-m (6.8—9.5 m-kg, 49—69 ft-lb)
37—52 N-m (3.8—5.3 m-kg, 27—38 ft-lb)
7—10 Nm (70—100 cm-kg, 61—87 In-lb)
11 N-m (80—110 m-kg, 69—95 ft-lb)
76G01C-239
Installation note
Timing belt
1. Check that the timing marks of camshaft pulley,
timing belt pulley and injection pump pulley align
with the timing marks.
76G01C-030
1C-13
Page 226 of 1865

ON-VEHICLE MAINTENANCE (TIMING BELT) 1 C
2. Install the timing belt tensioner and spring.
3. Temporarily secure the tensioner with it shifted
outwards.
63G01D-330
4. Install the timing belt.
Caution
a) The timing belt must be reinstalled in the
same direction of previous rotation, if it is
to be reused.
b) Be sure that there is no oil, grease, or dirt
on the timing belt.
76G01C-024
Install the idler pulley.
Tightening torque:
37—52
N
m (3.8—5.3 m-kg, 27-38 ft-lb)
Remove the affixing bolts from the injection pulley.
76G01C-025
7. Loosen the tensioner lock bolt.
8. Turn the crankshaft twice in the direction of rota-
tion (clockwise).
Caution
Do not rotate reverse direction.
9. Check that each timing mark is correcty aligned.
If not aligned, remove the timing belt. Repeat step
1-8.
76G01C-030
1C-14
Page 227 of 1865

ON-VEHICLE MAINTENANCE (TIMING BELT) 1 C
76G01C-027
76G01C-028
76G01C-029
Checking
point
Idler pulley
Crankshaft pulley zQi A/C
Checking point compressor
76G01C-030
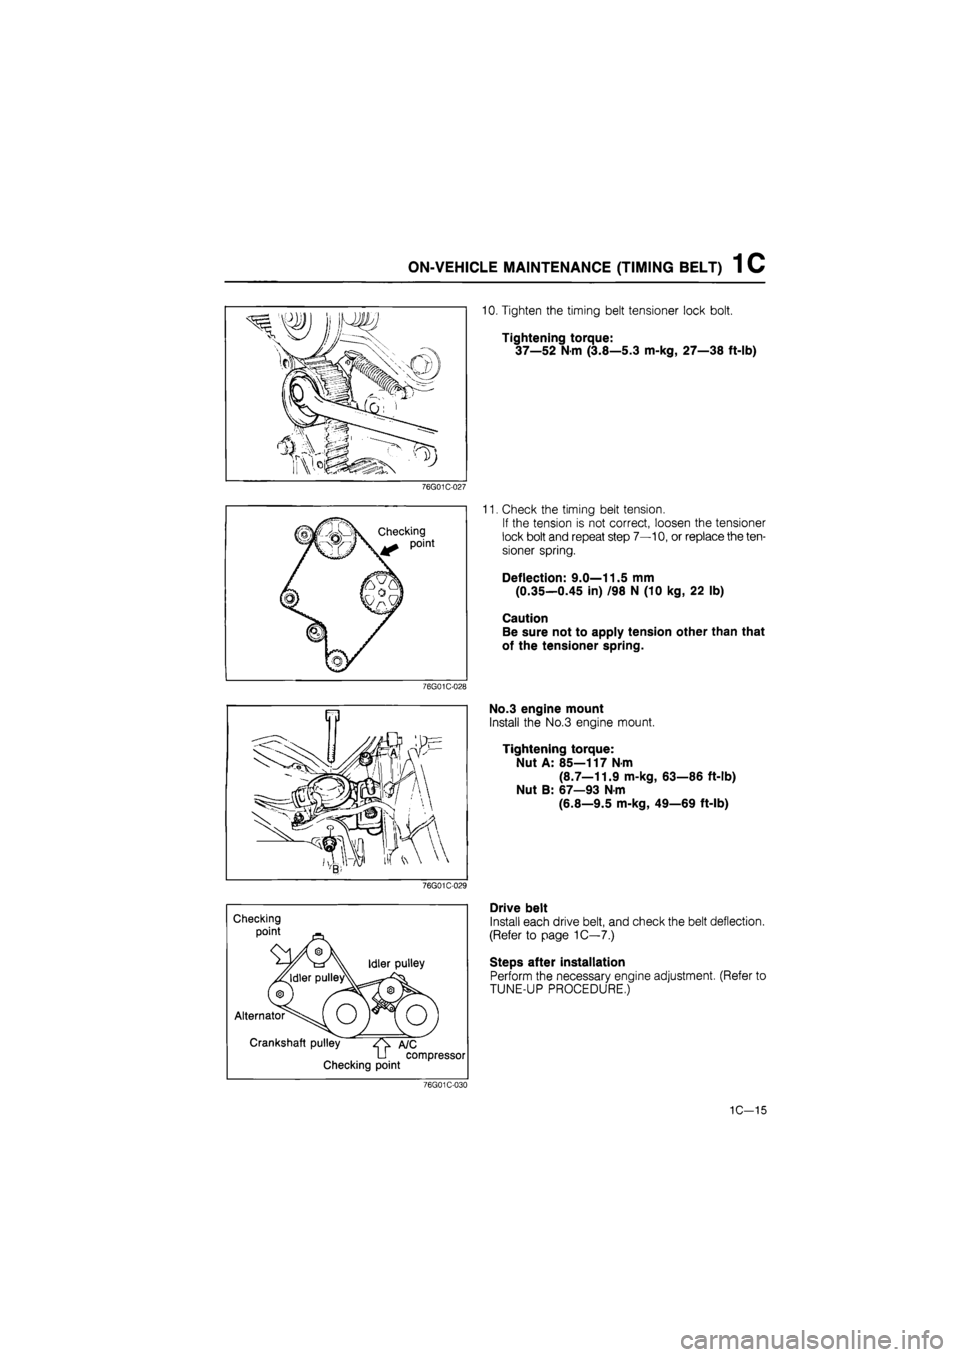
10. Tighten the timing belt tensioner lock bolt.
Tightening torque:
37—52
N
m (3.8—5.3 m-kg, 27—38 ft-lb)
11. Check the timing belt tension.
If the tension is not correct, loosen the tensioner
lock bolt and repeat step 7—10, or replace the ten-
sioner spring.
Deflection: 9.0—11.5 mm
(0.35—0.45 in) /98 N (10 kg, 22 lb)
Caution
Be sure not to apply tension other than that
of the tensioner spring.
No.3 engine mount
Install the No.3 engine mount.
Tightening torque:
Nut A: 85—117 N-m
(8.7—11.9 m-kg, 63—86 ft-lb)
Nut B: 67—93 N-m
(6.8—9.5 m-kg, 49—69 ft-lb)
Drive belt
Install each drive belt, and check the belt deflection.
(Refer to page 1C—7.)
Steps after installation
Perform the necessary engine adjustment. (Refer to
TUNE-UP PROCEDURE,)
1C-15