height MAZDA MX-5 1994 User Guide
[x] Cancel search | Manufacturer: MAZDA, Model Year: 1994, Model line: MX-5, Model: MAZDA MX-5 1994Pages: 1708, PDF Size: 82.34 MB
Page 379 of 1708
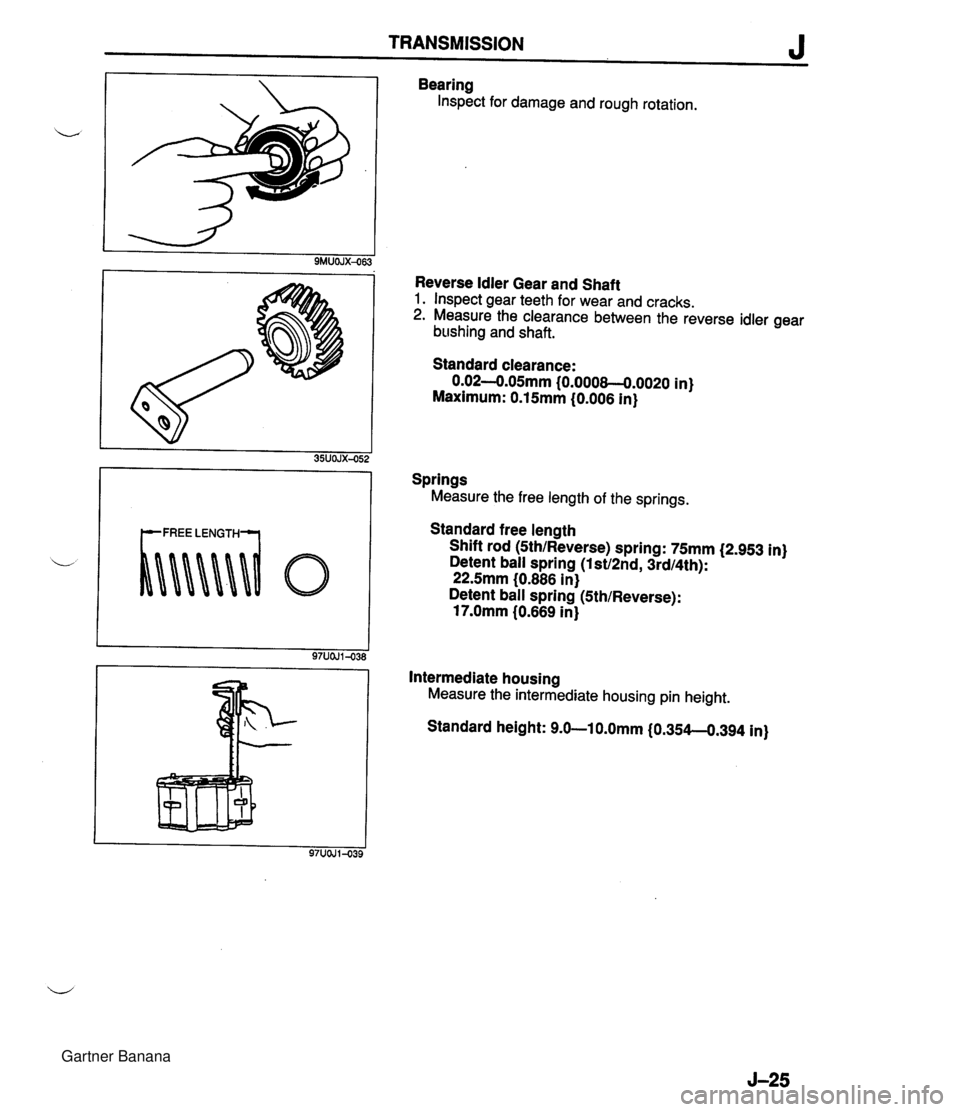
TRANSMISSION J Bearing Inspect for damage and rough rotation. Reverse Idler Gear and Shaft 1. Inspect gear teeth for wear and cracks. 2. Measure the clearance between the reverse idler gear b~~shing and shaft. Standard clearance: 0.02-0.05mm {0.000&-0.0020 in) Maximum: 0.15mm (0.006 in) Springs Measure the free length of the springs. Standard free length Shift rod (Sth/Reverse) spring: 75mm (2.953 in) Detent ball spring (lst/2nd, 3rdI4th): 22.5mm (0.886 in) Detent ball spring (Sth/Reverse): 17.0mm (0.669 in) Intermediate housing Measure the intermediate housing pin height. Standard height: 9.0-10.0mm (0.354-0.394 in) Gartner Banana
Page 543 of 1708
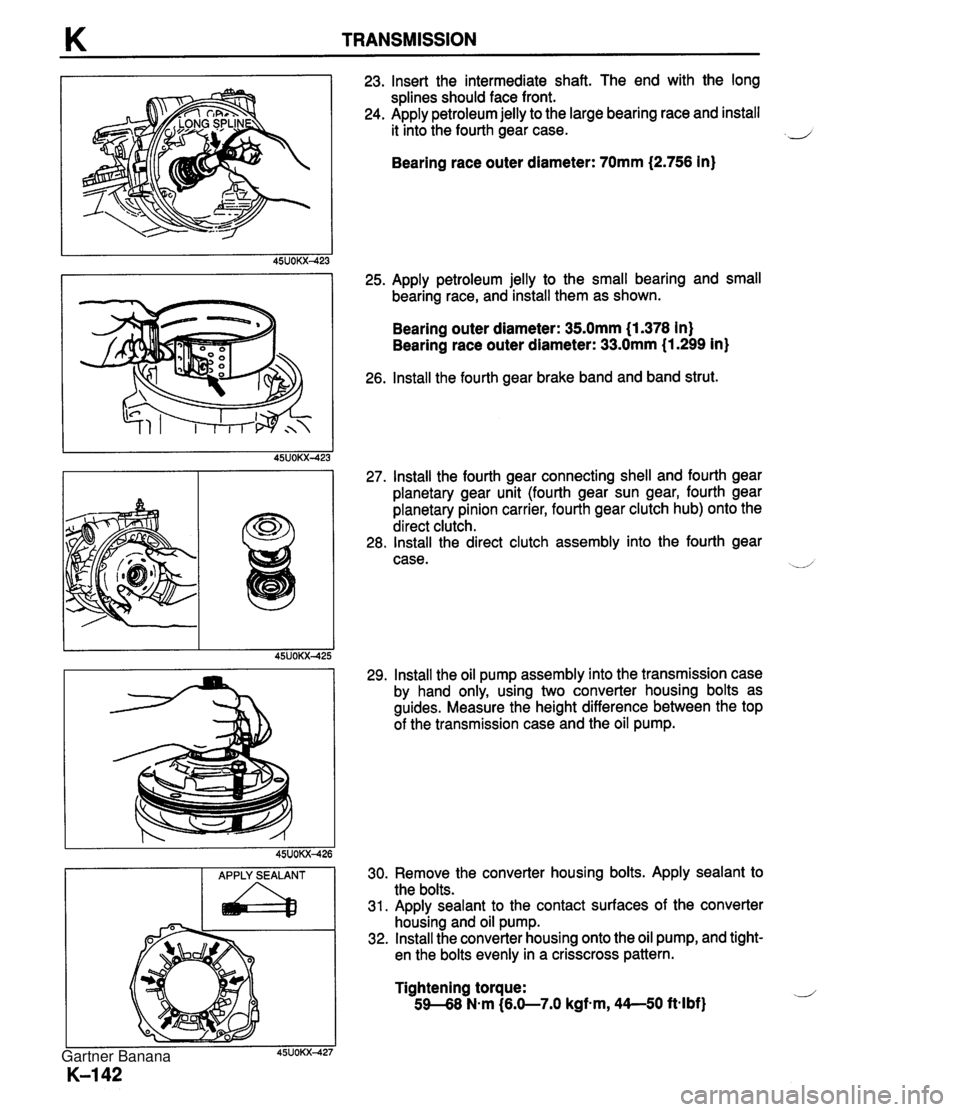
K TRANSMISSION APPLY SEALANT a 23. Insert the intermediate shaft. The end with the long splines should face front. 24. Apply petroleum jelly to the large bearing race and install it into the fourth gear case. 2 Bearing race outer diameter: 70mm (2.756 in) 25. Apply petroleum jelly to the small bearing and small bearing race, and install them as shown. Bearing outer diameter: 35.0mm (1.378 in) Bearing race outer diameter: 33.0mm (1.299 in) 26. lnstall the fourth gear brake band and band strut. 27. lnstall the fourth gear connecting shell and fourth gear planetary gear unit (fourth gear sun gear, fourth gear planetary pinion carrier, fourth gear clutch hub) onto the direct clutch. 28. lnstall the direct clutch assembly into the fourth gear case. --/ 29. lnstall the oil pump assembly into the transmission case by hand only, using two converter housing bolts as guides. Measure the height difference between the top of the transmission case and the oil pump. 30. Remove the converter housing bolts. Apply sealant to the bolts. 31. Apply sealant to the contact surfaces of the converter housing and oil pump. 32. lnstall the converter housing onto the oil pump, and tight- en the bolts evenly in a crisscross pattern. Tightening torque: 59-68 N-m (6.0-7.0 kgfm, 44--50 ft4bf) Gartner Banana
Page 608 of 1708
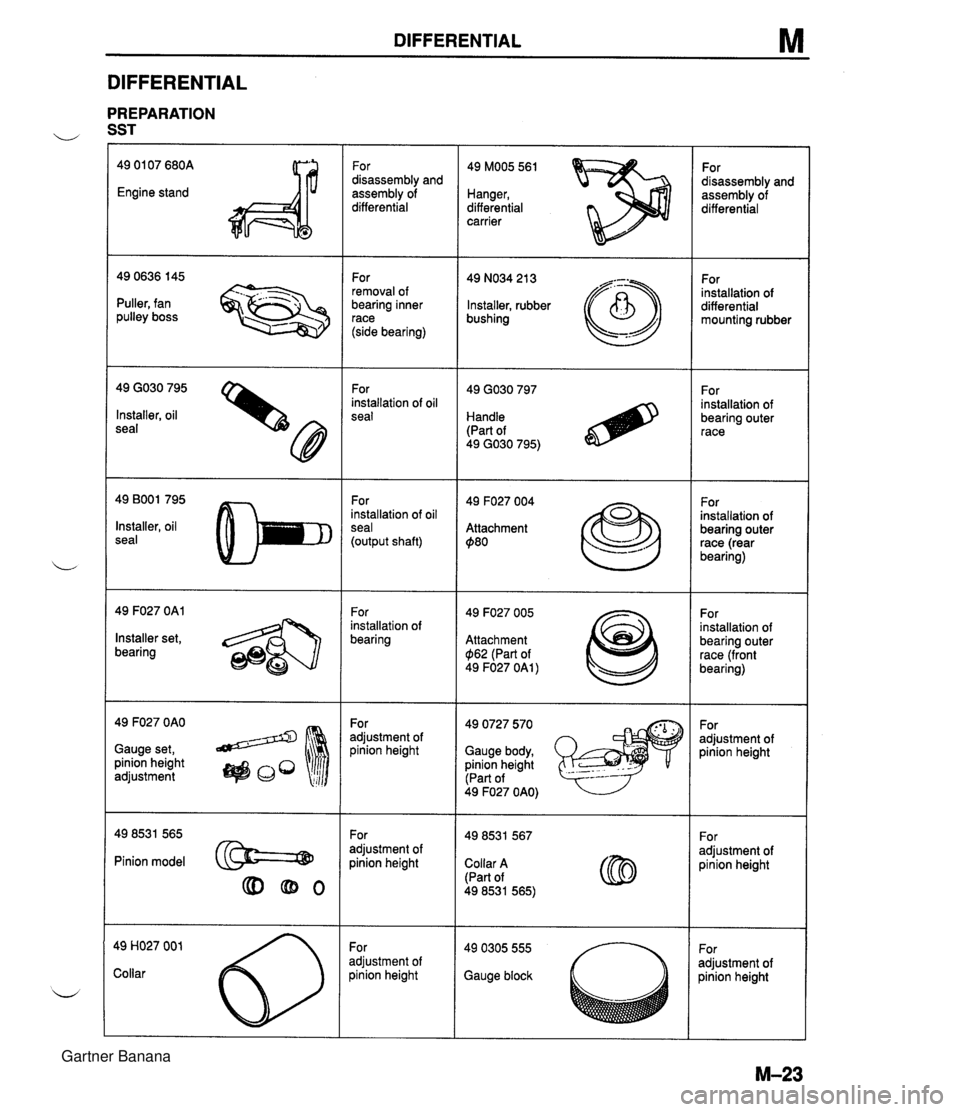
DIFFERENTIAL M DIFFERENTIAL PREPARATION u SST 49 01 07 680A Engine stand For disassembly and assembly of differential 49 MOO5 561 Hanger, differential carrier For disassembly and assembly of differential For removal of bearing inner race (side bearing) 49 NO34 21 3 Installer, rubber bushing For installation of differential mounting rubber - --.. - Puller, fan pulley boss 49 GO30 795 Installer, oil seal For installation of oil seal For installation of bearing outer race Handle (Part of 49 GO30 795) 49 BOO1 795 Installer, oil seal For installation of oil seal (output shaft) 49 F027 004 Attachment $80 For installation of bearing outer race (rear bearing) 49 F027 OAl For installation of bearing 49 F027 005 Attachment $I62 (Part of 49 F027 OAl ) For installation of bearing outer race (front bearing) Installer set, bearing 49 F027 OAO Gauge set, pinion height adjustment 49 0727 570 Gauge body, pinion height (Part of For adjustment of pinion height For adjustment of pinion height 49 F027 OAO) For adjustment of pinion height For adjustment of oinion height Pinion model @==@ Collar A (Part of 49 8531 565) For adjustment of oinion height adjustment of )inion height Gauge block Gartner Banana
Page 622 of 1708
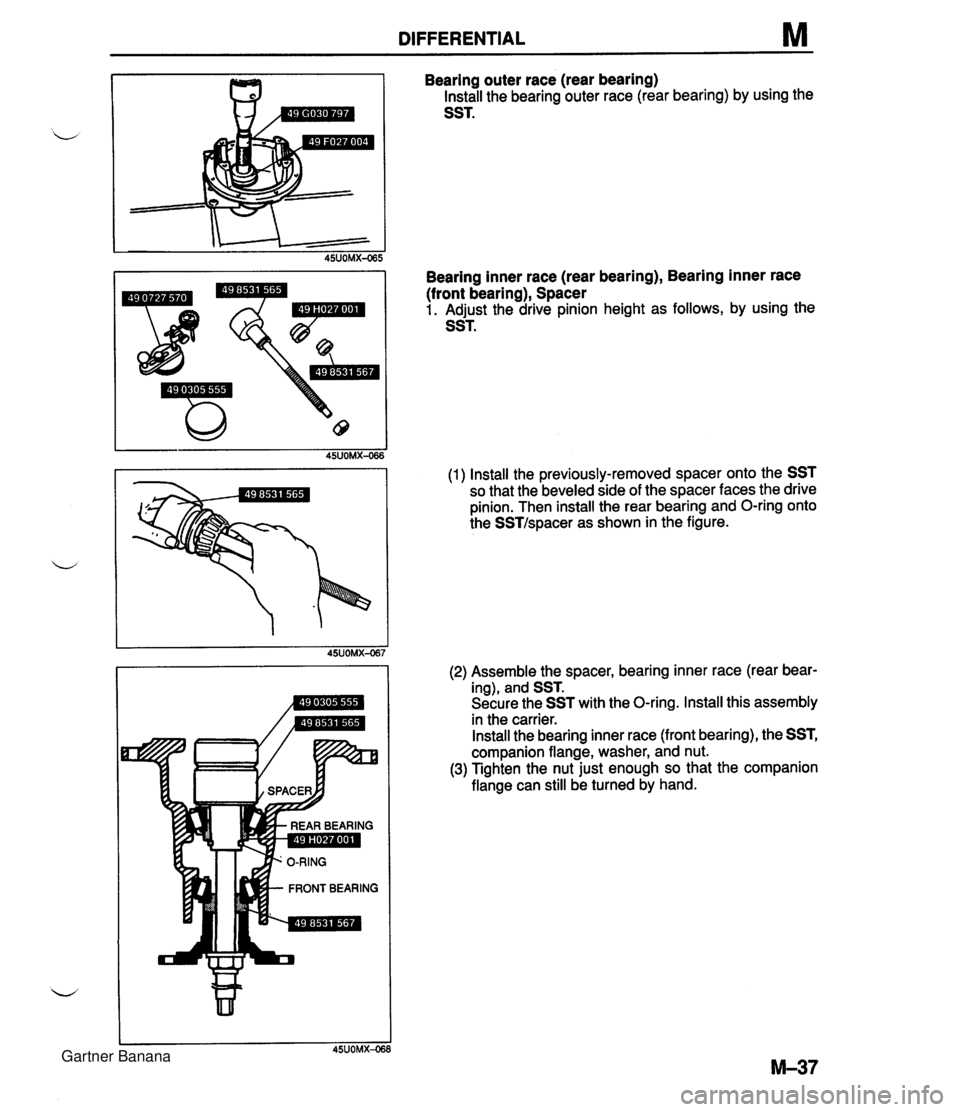
DIFFERENTIAL M Bearing outer race (rear bearing) Install the bearing outer race (rear bearing) by using the SST. Bearing inner race (rear bearing), Bearing inner race (front bearing), Spacer 1. Adjust the drive pinion height as follows, by using the SST. (1) Install the previously-removed spacer onto the SST so that the beveled side of the spacer faces the drive pinion. Then install the rear bearing and O-ring onto the SSTIspacer as shown in the figure. (2) Assemble the spacer, bearing inner race (rear bear- ing), and SST. Secure the SST with the O-ring. Install this assembly in the carrier. Install the bearing inner race (front bearing), the SST, companion flange, washer, and nut. (3) Tighten the nut just enough so that the companion flange can still be turned by hand. Gartner Banana
Page 623 of 1708
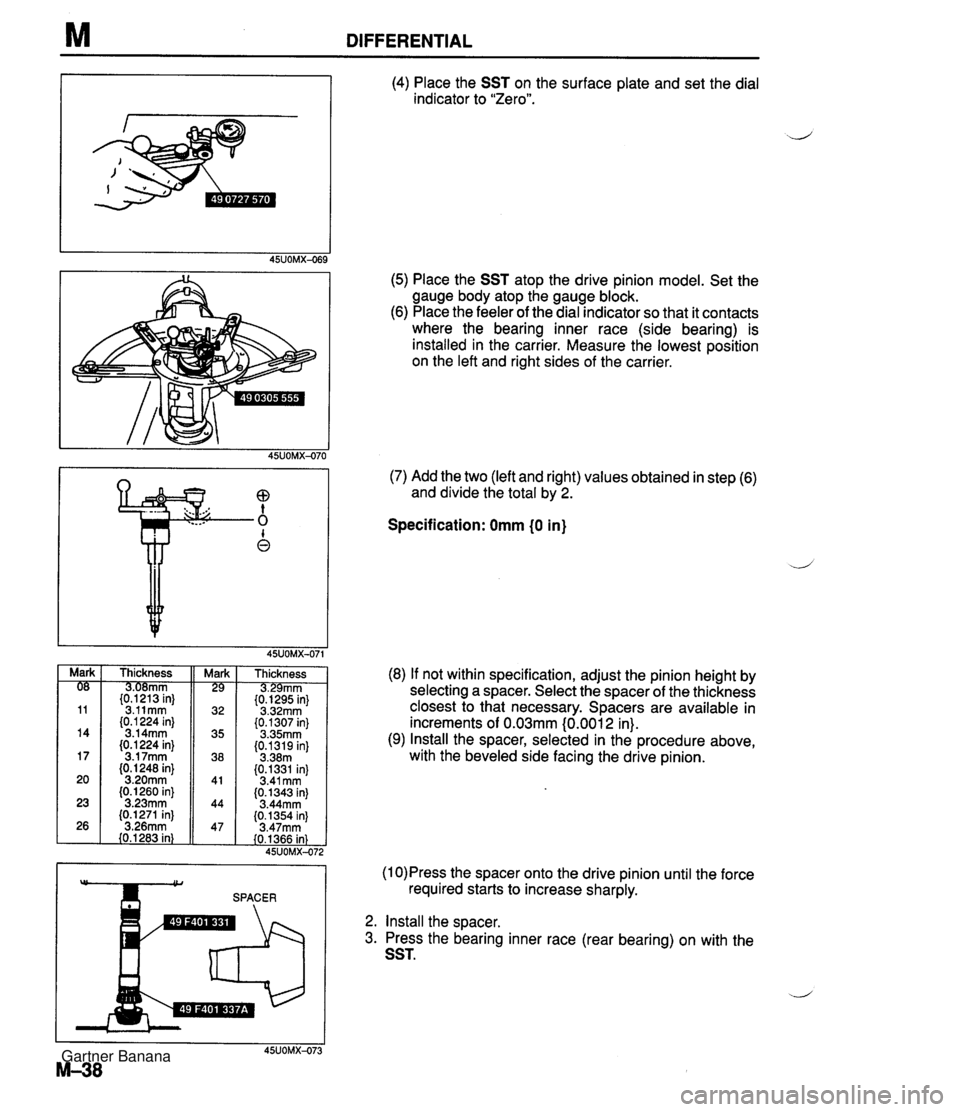
M DIFFERENTIAL (4) Place the SST on the surface plate and set the dial indicator to "Zero". (5) Place the SST atop the drive pinion model. Set the gauge body atop the gauge block. (6) Place the feeler of the dial indicator so that it contacts where the bearing inner race (side bearing) is installed in the carrier. Measure the lowest position on the left and right sides of the carrier. (7) Add the two (left and right) values obtained in step (6) and divide the total by 2. Specification: Omm (0 in) Thickness mm {tP2"13 in} 3.11mm (0.1 224 in} 3.14mm (0.1 224 in} 3.1 7mm (0. I248 in} 3.20mm (0.1260 in} 3.23mm (0.1271 in] 3.26mm 40.1283 in} Thickness rnm {t&5 in} 3.32mm (0.1307 in} 3.35mm (0.1319 in] 3.38m (0.1331 in) 3.41 mm (0.1343 in) 3.44mm {0.1354 in) 3.47rnm (0.1366 in) 45UOMX-47: (8) If not within specification, adjust the pinion height by selecting a spacer. Select the spacer of the thickness closest to that necessary. Spacers are available in increments of 0.03mm (0.001 2 in). (9) Install the spacer, selected in the procedure above, with the beveled side facing the drive pinion. (1 0)Press the spacer onto the drive pinion until the force SPACER required starts to increase sharply. 2. Install the sDacer. 3. Press the bearing inner race (rear bearing) on with the SST. Gartner Banana
Page 626 of 1708
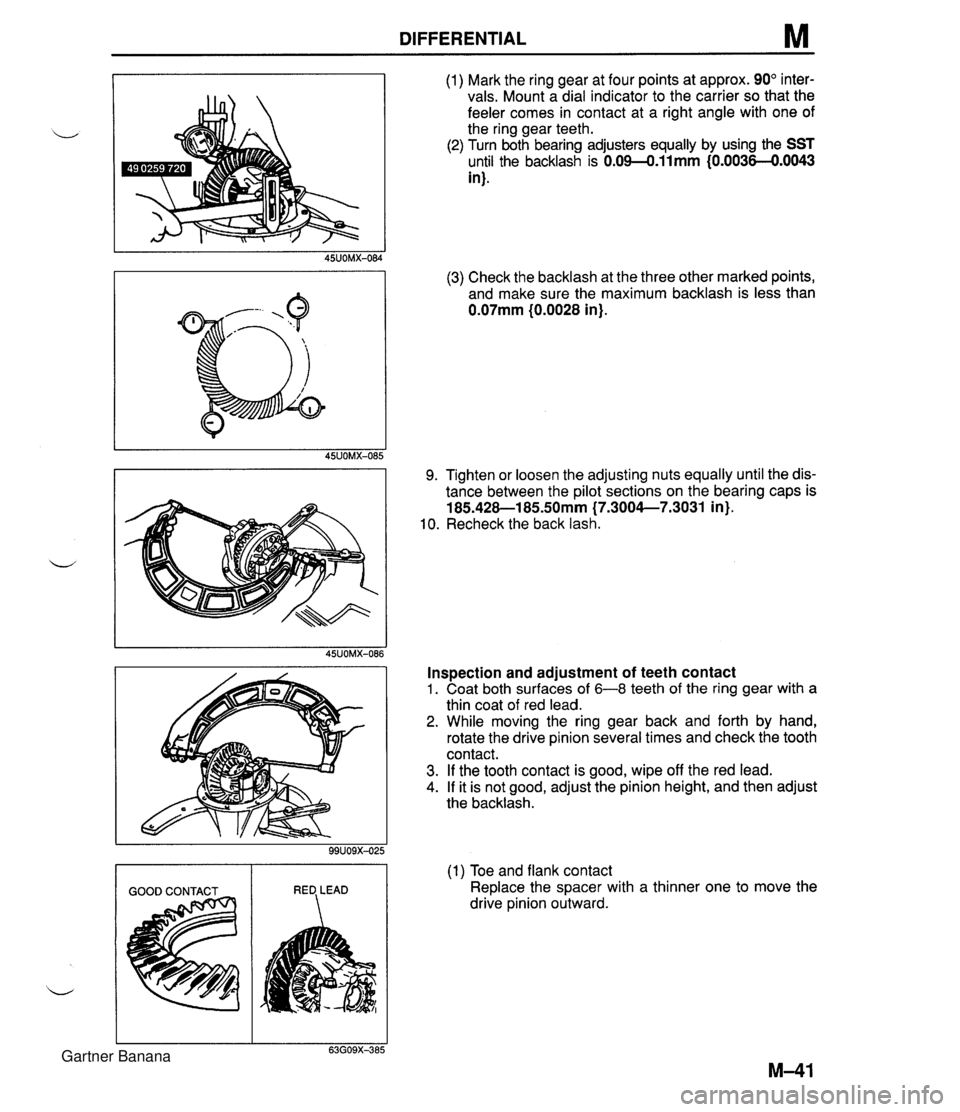
DIFFERENTIAL M (1) Mark the ring gear at four points at approx. 90" inter- vals. Mount a dial indicator to the carrier so that the feeler comes in contact at a right angle with one of the ring gear teeth. (2) Turn both bearing adjusters equally by using the SST until the backlash is 0.09-0.11mm {0.0036-€).0043 in). (3) Check the backlash at the three other marked points, and make sure the maximum backlash is less than 0.07mm (0.0028 in). 9. Tighten or loosen the adjusting nuts equally until the dis- tance between the pilot sections on the bearing caps is 185.428-1 85SOmm (7.3004--7.3031 in). 10. Recheck the back lash. Inspection and adjustment of teeth contact 1. Coat both surfaces of 6-8 teeth of the ring gear with a thin coat of red lead. 2. While moving the ring gear back and forth by hand, rotate the drive pinion several times and check the tooth contact. 3. If the tooth contact is good, wipe off the red lead. 4. If it is not good, adjust the pinion height, and then adjust the backlash. (1) Toe and flank contact Replace the spacer with a thinner one to move the drive pinion outward. Gartner Banana
Page 674 of 1708
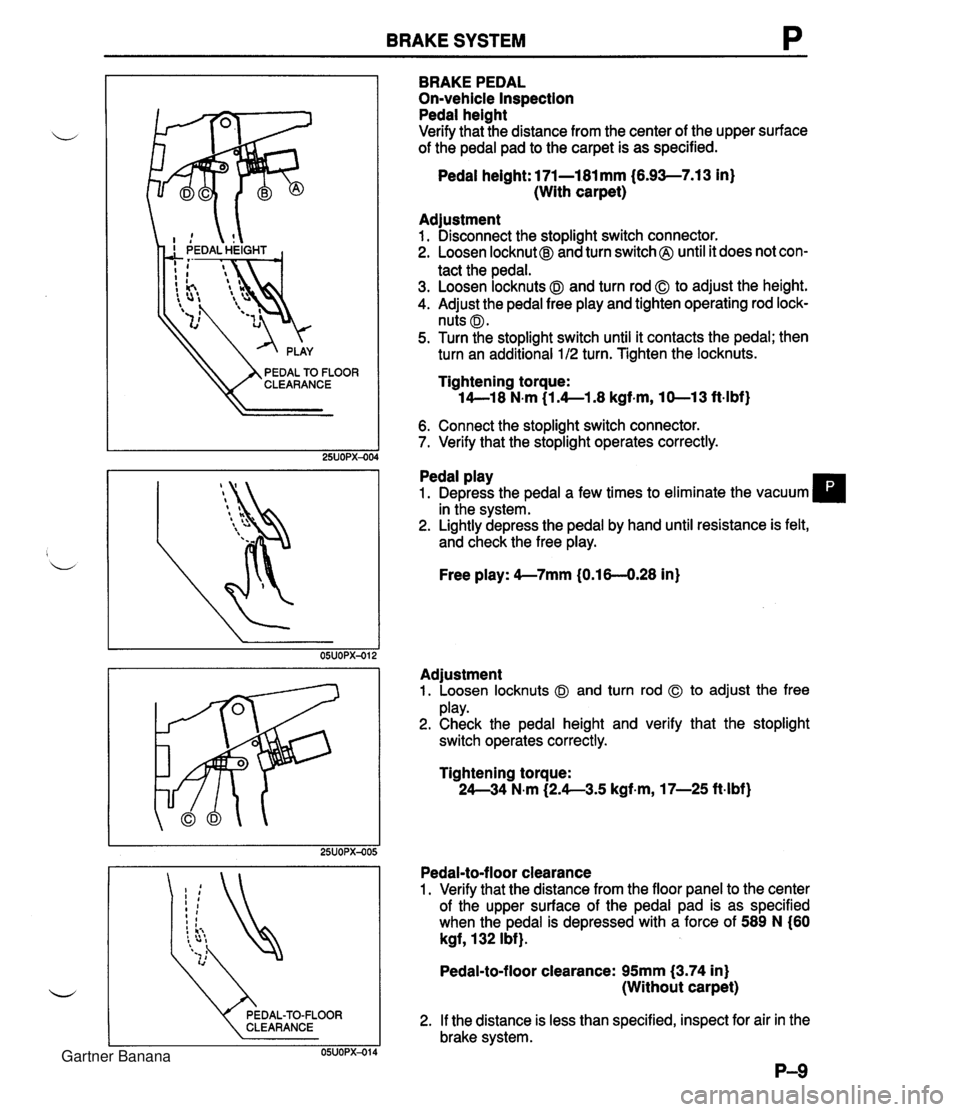
BRAKE SYSTEM P CLEARANCE BRAKE PEDAL On-vehicle Inspection Pedal height Verify that the distance from the center of the upper surface of the pedal pad to the carpet is as specified. Pedal height: l7l-l8l mm (6.93-7.13 in} (With carpet) Adjustment 1. Disconnect the stoplight switch connector. 2. Loosen locknut@ and turn switch @ until it does not con- tact the pedal. 3. Loosen locknuts @I and turn rod 0 to adjust the height. 4. Adjust the pedal free play and tighten operating rod lock- nuts @I. 5. Turn the stoplight switch until it contacts the pedal; then turn an additional 1 /2 turn. Tighten the locknuts. Tightening torque: 14--18 N.m (1.4--1.8 kgf-m, 10-13 ft-lbf) 6. Connect the stoplight switch connector. 7. Verify that the stoplight operates correctly. Pedal play 1. Depress the pedal a few times to eliminate the vacuum in the system. 2. Lightly depress the pedal by hand until resistance is felt, and check the free play. Free play: 4--7mm (0.16-4.28 in) Adjustment 1. Loosen locknuts @I and turn rod to adjust the free play. 2. Check the pedal height and verify that the stoplight switch operates correctly. Tightening torque: 24--34 N.m (2.4--3.5 kgf-m, 17-25 ft-lbf} Pedal-to-floor clearance 1. Verify that the distance from the floor panel to the center of the upper surface of the pedal pad is as specified when the pedal is depressed with a force of 589 N (60 kgf, 132 Ibf}. Pedal-to-floor clearance: 95mm (3.74 in} (Without carpet) 2. If the distance is less than specified, inspect for air in the brake system. Gartner Banana
Page 675 of 1708
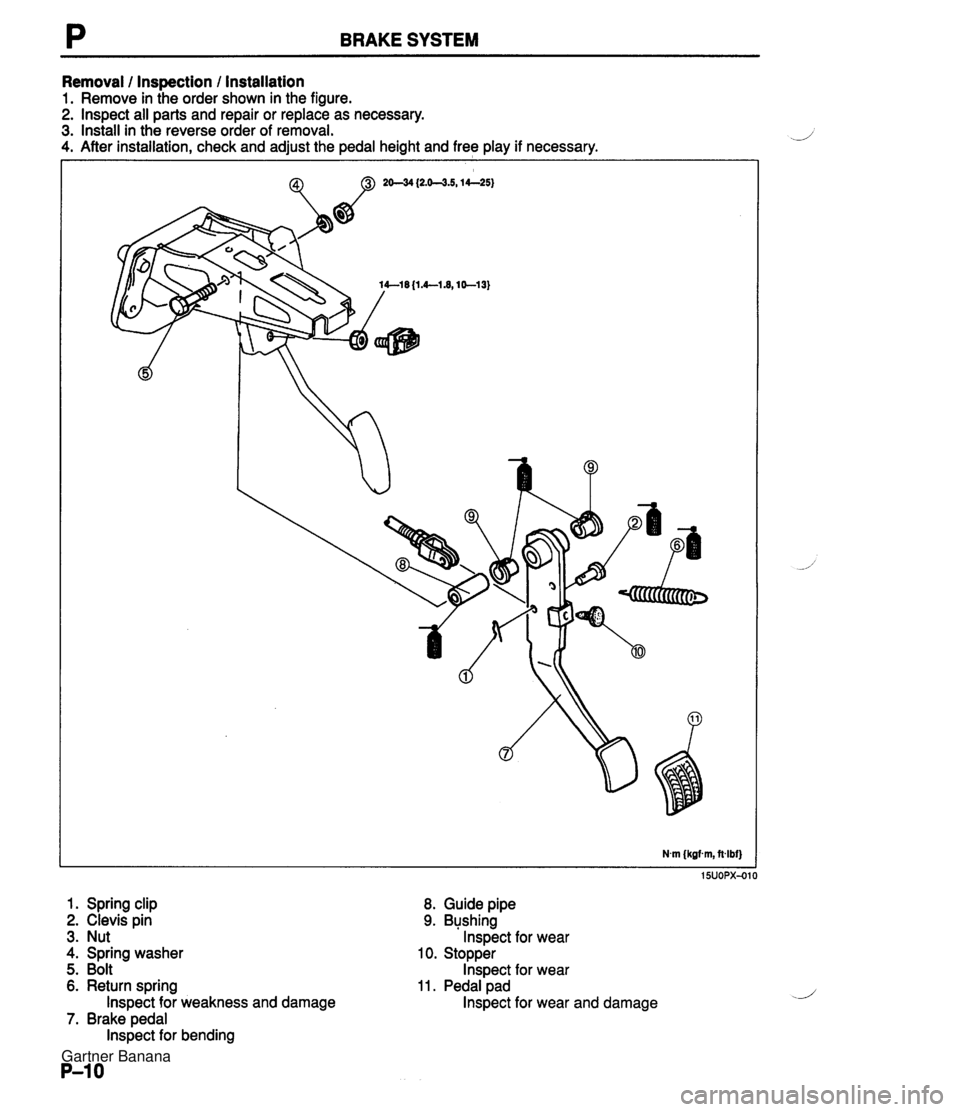
P BRAKE SYSTEM Removal l Inspection / Installation 1. Remove in the order shown in the figure. 2. lnspect all parts and repair or replace as necessary. 3. Install in the reverse order of removal. 4. After installation, check and adjust the pedal height and free play if necessary. 1. Spring clip 2. Clevis pin 3. Nut 4. Spring washer 5. Bolt 6. Return spring lnspect for weakness and damage 7. Brake pedal lnspect for bending I BUOPX-OI 8. Guide pipe 9. Bushing lnspect for wear 10. Stopper lnspect for wear 11. Pedal pad lnspect for wear and damage Gartner Banana
Page 681 of 1708
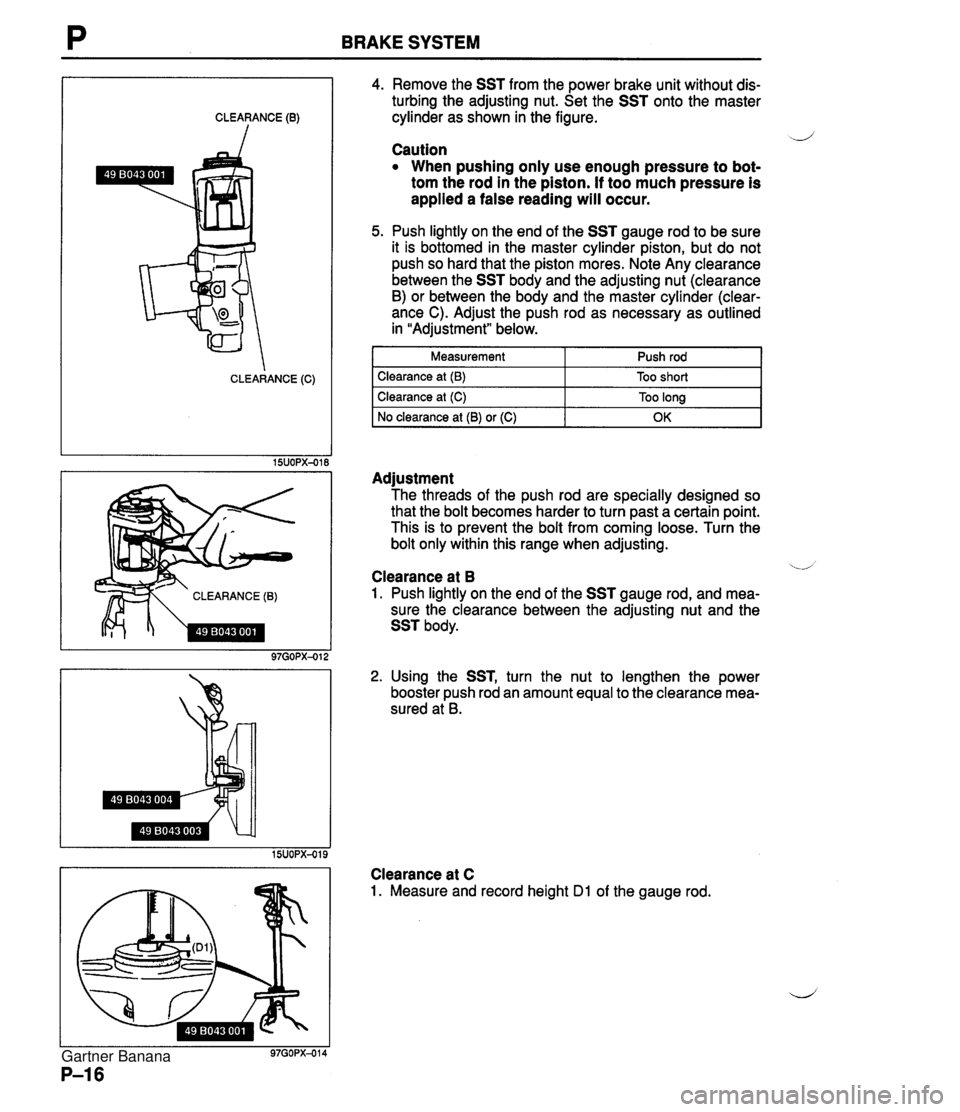
BRAKE SYSTEM CLEARANCE (0) CLEARANCE (C) CLEARANCE (B) 4. Remove the SST from the power brake unit without dis- turbing the adjusting nut. Set the SST onto the master cylinder as shown in the figure. -J Caution When pushing only use enough pressure to bot- tom the rod in the piston. If too much pressure is applied a false reading will occur. 5. Push lightly on the end of the SST gauge rod to be sure it is bottomed in the master cylinder piston, but do not push so hard that the piston mores. Note Any clearance between the SST body and the adjusting nut (clearance B) or between the body and the master cylinder (clear- ance C). Adjust the push rod as necessary as outlined in "Adjustment" below. I Measurement 1 Push rod I I Clearance at (B) I Too short I Adjustment The threads of the push rod are specially designed so that the bolt becomes harder to turn past a certain point. This is to prevent the bolt from coming loose. Turn the bolt only within this range when adjusting. Clearance at (C) No clearance at (B) or (C) '.A Clearance at B 1. Push lightly on the end of the SST gauge rod, and mea- sure the clearance between the adjusting nut and the SST body. Too long OK 2. Using the SST, turn the nut to lengthen the power booster push rod an amount equal to the clearance mea- sured at B. Clearance at C 1. Measure and record height Dl of the gauge rod. Gartner Banana
Page 682 of 1708
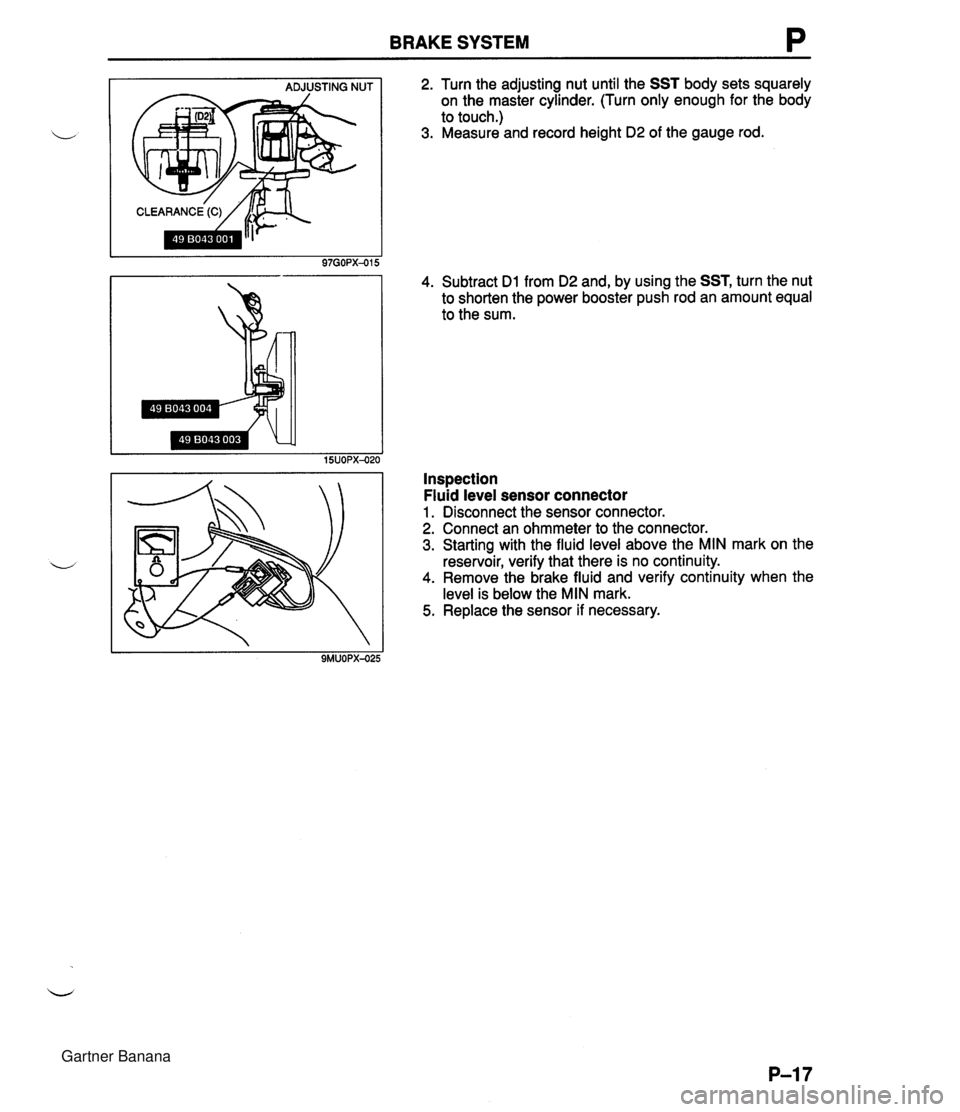
BRAKE SYSTEM ADJUSTING NUT 1 2. Turn the adjusting nut until the SST body sets squarely on the master cylinder. (Turn only enough for the body to touch.) I 3. Measure and record height 02 of the gauge rod. I 4. Subtract Dl from 02 and, by using the SST, turn the nut to shorten the power booster push rod an amount equal to the sum. Inspection Fluid level sensor connector 1. Disconnect the sensor connector. 2. Connect an ohmmeter to the connector. 3. Starting with the fluid level above the MIN mark on the reservoir, verify that there is no continuity. 4. Remove the brake fluid and verify continuity when the level is below the MIN mark. 5. Replace the sensor if necessary. Gartner Banana