torque MAZDA PROTEGE 1992 Workshop Manual
[x] Cancel search | Manufacturer: MAZDA, Model Year: 1992, Model line: PROTEGE, Model: MAZDA PROTEGE 1992Pages: 1164, PDF Size: 81.9 MB
Page 245 of 1164
OIL PAN
BPSOHCANDDOHC
D
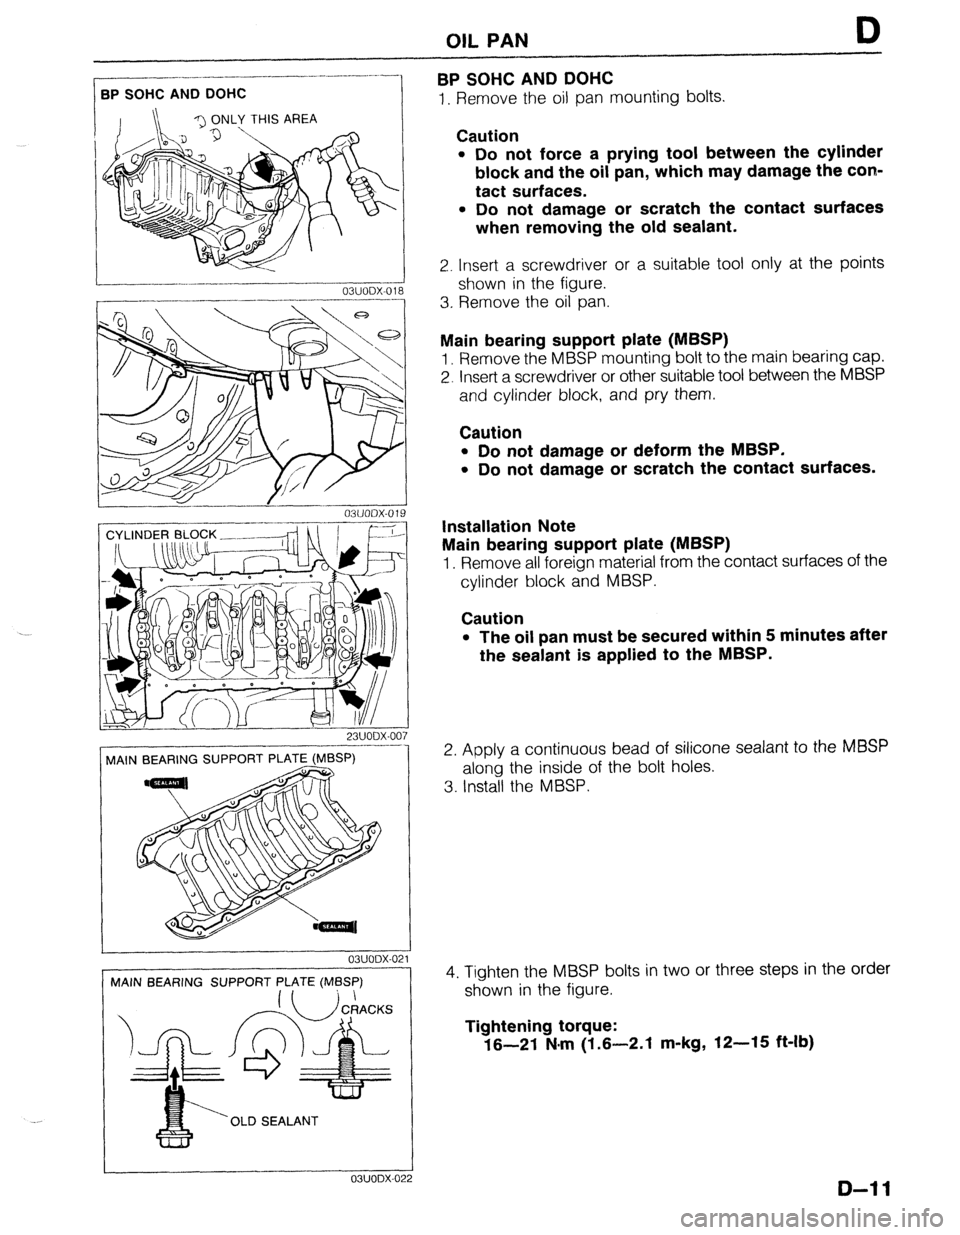
I. Remove the oil pan mounting bolts. .-_-__------- BPSOHCANDDOHC
23UODX-007
MAIN BEARING SUPPORT PLATE (MBSP)
! 03UODX-021
MAIN BEARING SUPPORT PLATE (MBSP)
‘OLD SEALANT ---1_1
OBUODX-0: !2
Caution
l Do not force a prying tool between the cylinder
block and the oil pan, which may damage the con-
tact surfaces.
l Do not damage or scratch the contact surfaces
when removing the old sealant.
2. Insert a screwdriver or a suitable tool only at the points
shown in the figure.
3. Rernove the oil pan.
Main bearing support plate (MBSP)
1. Remove the MBSP mounting bolt to the main bearing cap.
2. Insert a screwdriver or other suitable tool between the MBSP
and cylinder block, and pry them.
Caution
l Do not damage or deform the MBSP.
l Do not damage or scratch the contact surfaces.
Installation Note
Main bearing support plate (MBSP)
1. Remove all foreign material from the contact surfaces of the
cylinder block and MBSP.
Caution
l The oil pan must be secured within 5 minutes after
the sealant is applied to the MBSP.
2. Apply a continuous bead of silicone sealant to the MBSP
along the inside of the bolt holes.
3. Install the MBSP.
4. Tighten the MBSP bolts in two or three steps in the order
shown in the figure.
Tightening torque:
16-21 N.m (1.6-2.1 m-kg, 12-15 ft-lb)
D-l 1
Page 246 of 1164
OIL PAN
I 03UODX.02
05UOBX.20
1
05UODX-021
56 SOHC
03UODX-02
3P s
03UODX-02!
1. Remove all foreign material from the contact surfaces.
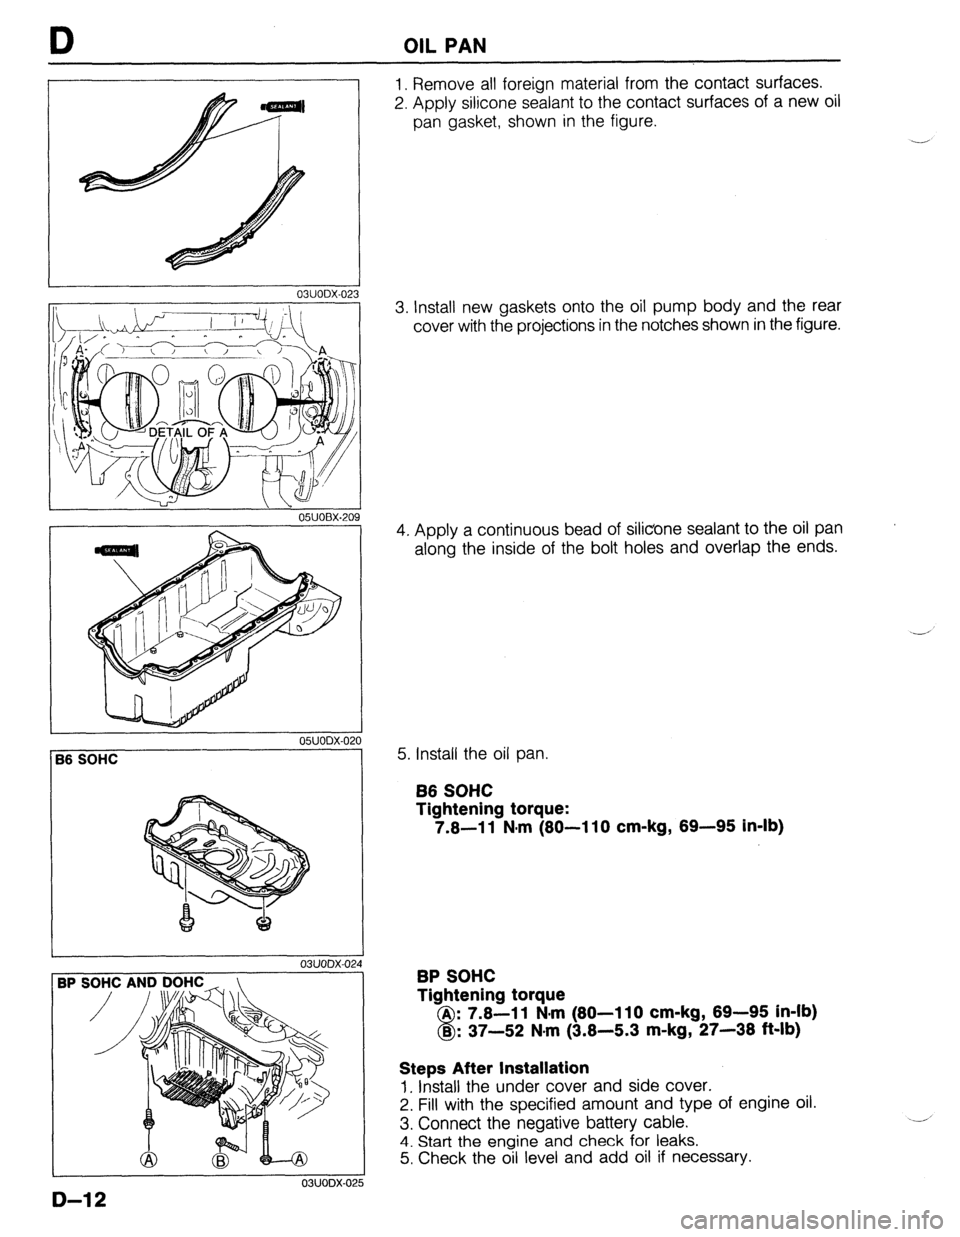
2. Apply silicone sealant to the contact surfaces of a new oil
pan gasket, shown in the figure.
3. Install new gaskets onto the oil pump body and the rear
cover with the projections in the notches shown in the figure.
4. Apply a continuous bead of silicone sealant to the oil pan
along the inside of the bolt holes and overlap the ends.
5. Install the oil pan.
B6 SOHC
Tightening torque:
7.6-11 N-m (80-110 cm-kg, 69-95 in-lb)
BP SOHC
Tightening torque
A : 7.8-l 1 N-m (80-l 10 cm-kg, 69-95 in-lb)
8 B : 37-52 N.m (3.8-5.3 m-kg, 27-38 ft-lb)
Steps After Installation
1. Install the under cover and side cover.
2. Fill with the specified amount and type of engine oil.
3. Connect the negative battery cable.
4. Start the engine and check for leaks.
5. Check the oil level and add oil if necessary.
D-12
Page 264 of 1164
E WATER THERMOSWITCH
WATER THERMOSWITCH
REMOVAL / INSTALLATION
1. Disconnect the negative battery cable.
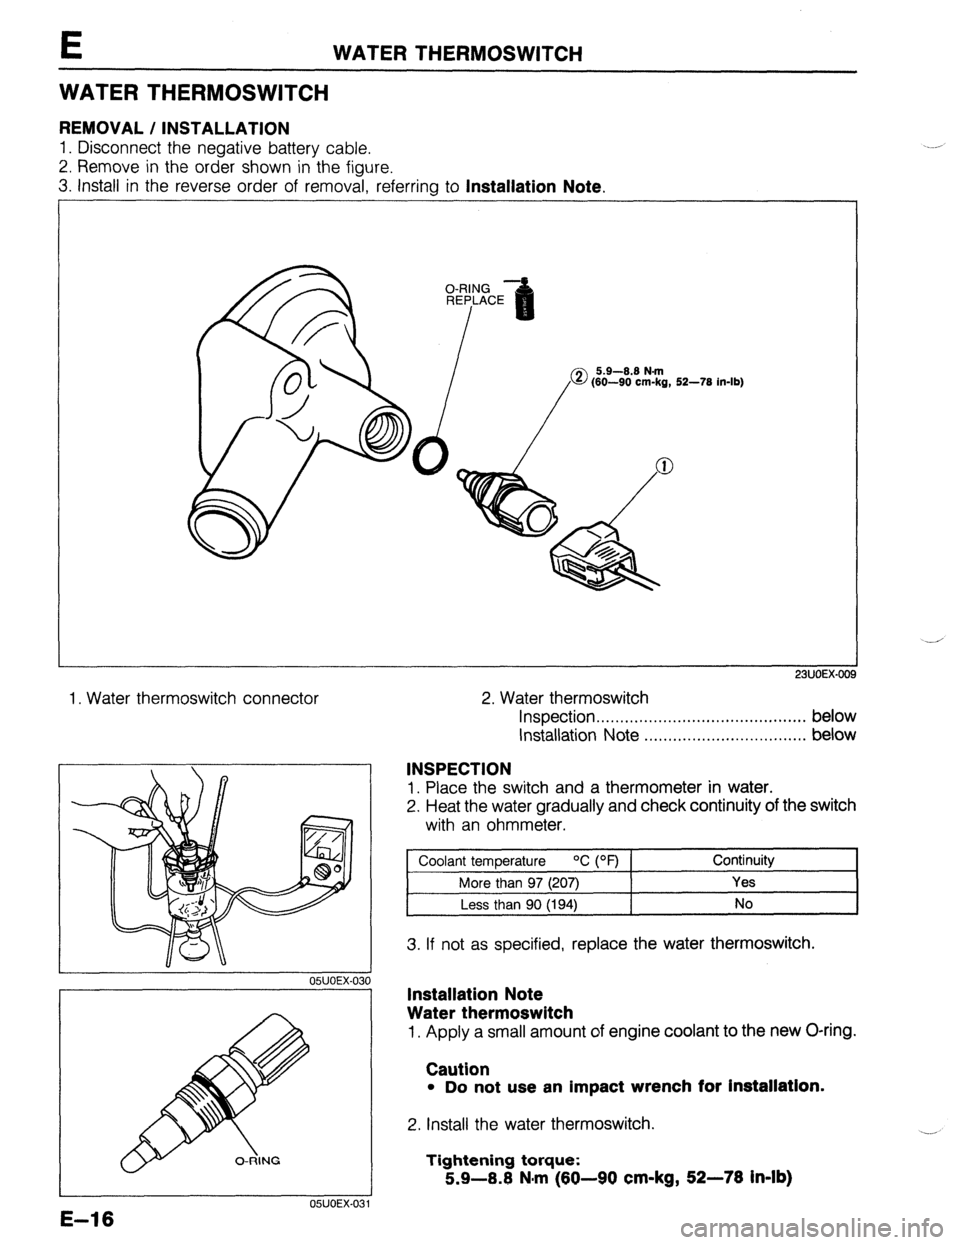
2. Remove in the order shown in the figure.
3. Install in the reverse order of removal, referring to
Installation Note.
2. Water thermoswitch
23UOEX-OO!
1. Water thermoswitch connector
05UOEX-031
05UOEX.03
E-16
Inspection . . . . . . . . . . . . . . . . . . . . . . . . . . . . . . . . . . . . . . . . . . . . below
Installation Note . . . . . . . . . . . . . . . . . . . . . . . . . . . . . . . . . . below
INSPECTION
1. Place the switch and a thermometer in water.
2. Heat the water gradually and check continuity of the switch
with an ohmmeter.
I Coolant temDerature
OC PF) 1 Continuity
I
More than 97 (207) Yes
Less than 90 (194) No
3. If not as specified, replace the water thermoswitch.
Installation Note
Water thermoswitch
1. Apply a small amount of engine coolant to the new O-ring.
Caution
l Do not use an impact wrench for Installation.
2. Install the water thermoswitch.
Tightening torque:
5.9-8.8 N#m (69-90 cm-kg, 52-78 in-lb)
Page 265 of 1164
RADIATOR THERMOSWITCH E
RADIATOR THERMOSWITCH
REMOVAL / INSTALLATION
1. Disconnect the negative battery cable.
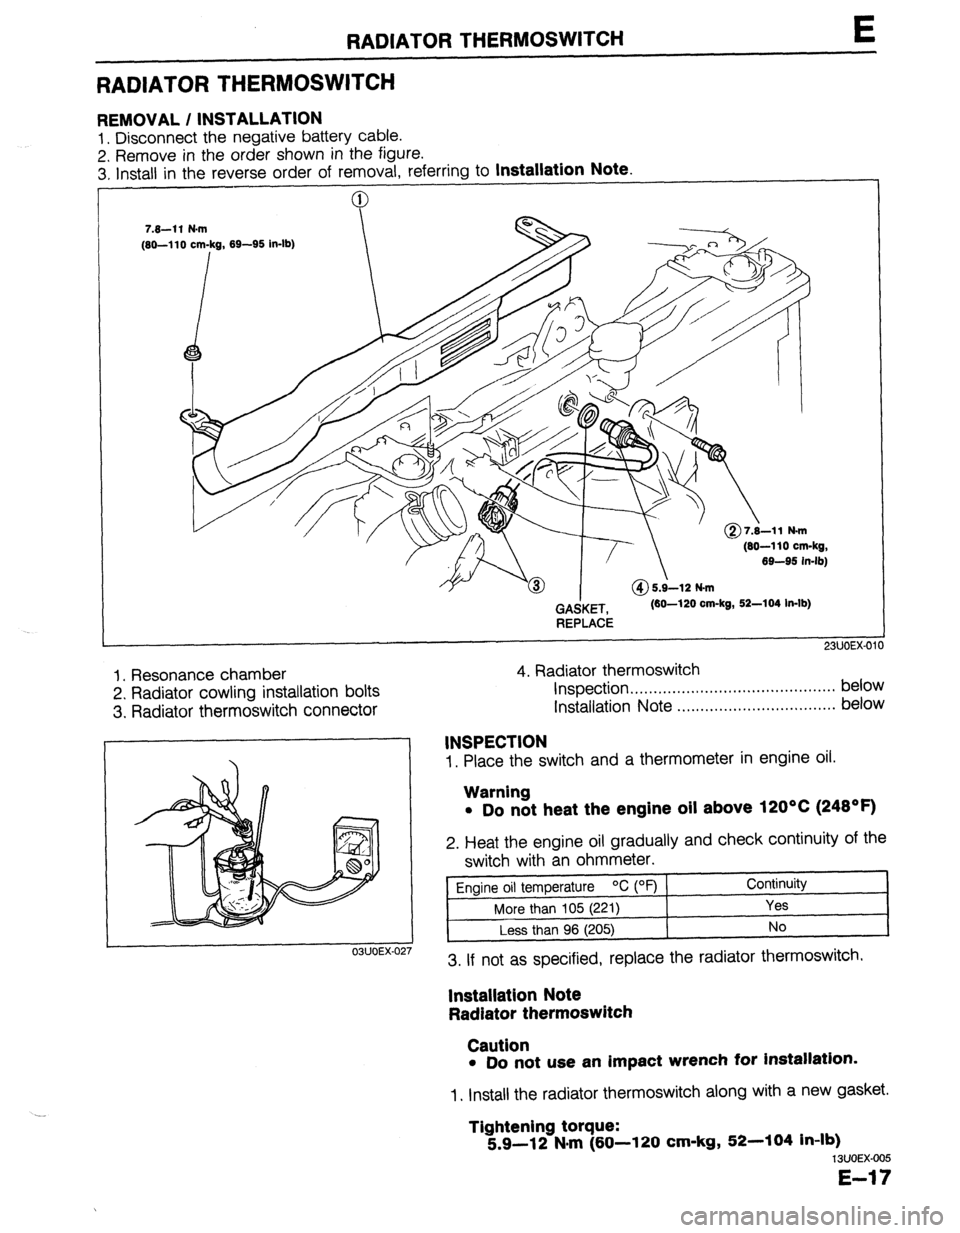
2. Remove in the order shown in the figure.
3. Install in the reverse order of removal. referrina to
Installation Note.
(80-110 cm-kg,
69-95 in-lb)
GAdKET,
REPLACE (60-120 cm-kg, 52-104 In-lb)
1. Resonance chamber
2. Radiator cowling installation bolts
3. Radiator thermoswitch connector 4. Radiator thermoswitch
Inspection . . . . . . . . . . . . . . . ..*...,..,..................* below
Installation Note ..,.,........,.......,........,... below
1. Place the switch and a thermometer in engine oil.
03UOEX-02
INSPECTION
Warning
l Do not heat the engine oil above 120°C (248OF)
2. Heat the engine oil gradually and check continuity of the
switch with an ohmmeter.
Engine oil temperature OC (OF) Continuity
More than 105 (221)
Yes
Less than 96 (205) No
3. If not as specified, replace the radiator thermoswitch.
lnstallatlon Note
Radiator thermoswitch
Caution
l Do not use an impact wrench for installation.
1. Install the radiator thermoswitch along with a new gasket.
Tightening torque:
5.9-12 N#m (60-l 20 cm-kg, 52-104 in-lb)
13UOEX-005
E-17
Page 283 of 1164
OUTLINE
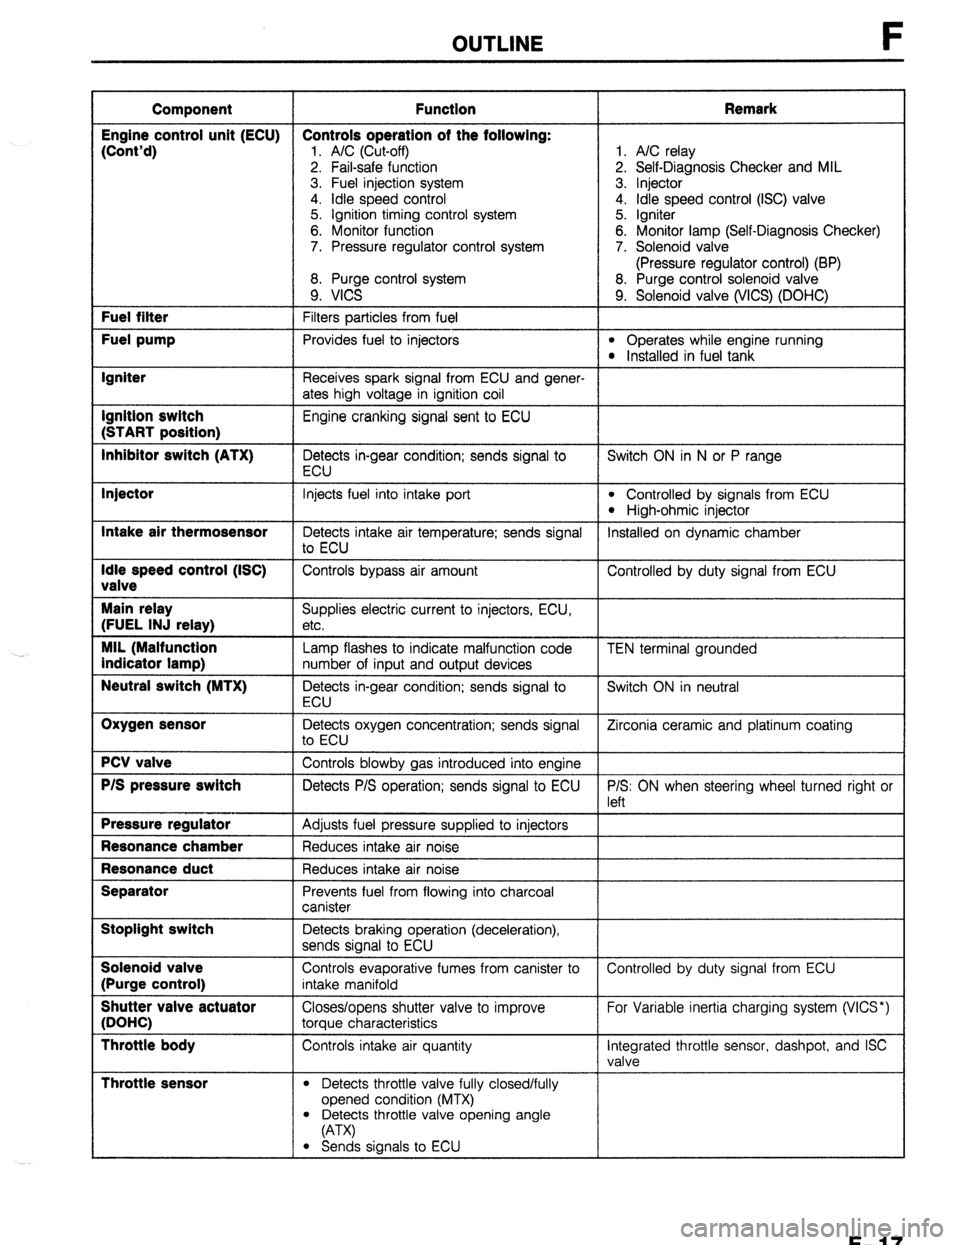
Component Function Remark
Engine control unit (ECU) Controls operation of the following:
(Cont’d)
1. A/C (Cut-off) 1. A/C relay
2. Fail-safe function 2. Self-Diagnosis Checker and MIL
3. Fuel injection system 3. Injector
4. idle speed control 4. Idle speed control (ISC) valve
5. Ignition timing control system 5. Igniter
6. Monitor function 6. Monitor lamp (Self-Diagnosis Checker)
7. Pressure regulator control system 7. Solenoid valve
(Pressure regulator control) (BP)
8. Purge control system 8. Purge control solenoid valve
9. VICS 9. Solenoid valve (WCS) (DOHC) Fuel filter
Filters particles from fuel Fuel pump
Provides fuel to injectors l Operates while engine running l Installed in fuel tank Igniter
Receives spark signal from ECU and gener-
ates high voltage in ignition coil Ignition switch
Engine cranking signal sent to ECU (START position)
Inhibitor switch (ATX)
Detects in-gear condition; sends signal to Switch ON in N or P range
ECU Injector
Intake air thermosensor
Idle speed control (ISC)
valve
Main relay
(FUEL INJ relay)
MIL (Malfunction
indicator lamp)
Neutral switch (MTX)
Oxygen sensor
PCV valve
P/S pressure switch
Pressure regulator
Resonance chamber
Resonance duct
Separator
Stoplight switch
Solenoid valve
(Purge control)
Shutter valve actuator
(DOHC)
Throttle body
Throttle sensor
Injects fuel into intake port l Controlled by signals from ECU
l High-ohmic injector
Detects intake air temperature; sends signal Installed on dynamic chamber
to ECU
Controls bypass air amount Controlled by duty signal from ECU
Supplies electric current to injectors, ECU,
etc.
Lamp flashes to indicate malfunction code
number of input and output devices
Detects in-gear condition; sends signal to
ECU
Detects oxygen concentration; sends signal
to ECU
Controls blowby gas introduced into engine
Detects P/S operation; sends signal to ECU
Adjusts fuel pressure supplied to injectors
Reduces intake air noise
Reduces intake air noise
Prevents fuel from flowing into charcoal
canister
Detects braking operation (deceleration),
sends signal to ECU
Controls evaporative fumes from canister to
intake manifold
Closes/opens shutter valve to improve
torque characteristics
Controls intake air quantity
l Detects throttle valve fully closed/fully
opened condition (MTX) TEN terminal grounded
Switch ON in neutral
Zirconia ceramic and platinum coating
P/S: ON when steering wheel turned right or
left
Controlled by duty signal from ECU
For Variable inertia charging system (VICS*)
Integrated throttle sensor, dashpot, and ISC
valve
l Detects throttle valve opening angle
(A-W
l Sends signals to ECU
F-l 7
Page 345 of 1164
ENGINE TUNE-UP F
03UOFX.051
03UOFX-051
- w4TEN I
Air Cleaner Element
Inspection
1. Check the air cleaner element for excessive dirt, damage,
or oil.
Caution
l Do not use compression air to clean the element.
2. Replace the element if necessary.
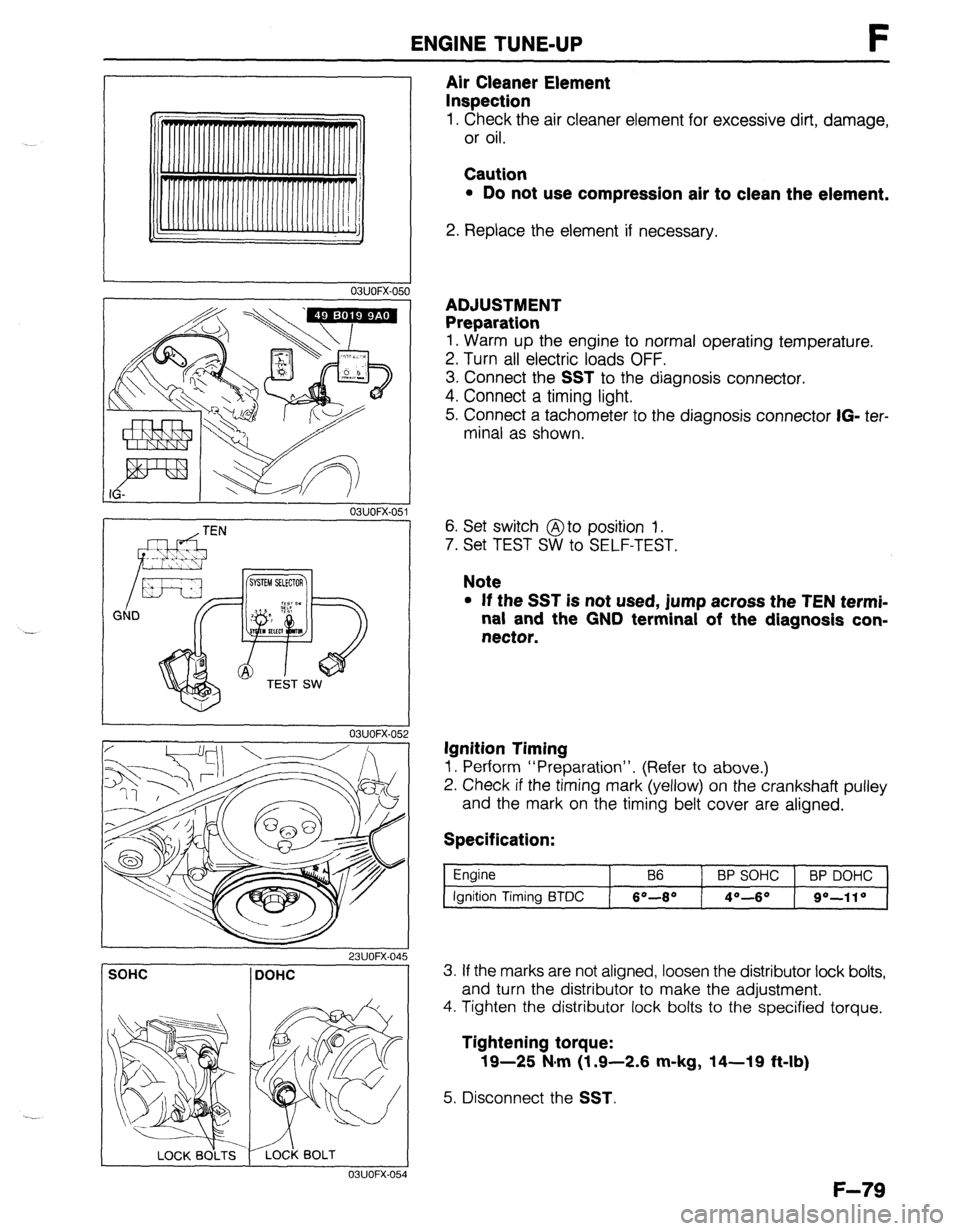
ADJUSTMENT
Preparation
1. Warm up the engine to normal operating temperature.
2. Turn all electric loads OFF.
3. Connect the
SST to the diagnosis connector.
4. Connect a timing light.
5. Connect a tachometer to the diagnosis connector
IG- ter-
minal as shown.
6. Set switch @to position 1.
7. Set TEST SW to SELF-TEST.
Note
l If the SST is not used, jump across the TEN termi-
nal and the GND terminal of the diagnosis con-
nector.
Ignition Timing
1. Perform “Preparation”. (Refer to above.)
2. Check if the timing mark (yellow) on the crankshaft pulley
and the mark on the timing belt cover are aligned.
Specification:
Engine
Ignition Timing BTDC B6 BP SOHC BP DOHC
6O-8* 4O--6O go-110
SOHC DOHC
I 03UOFX-054
3. If the marks are not aligned, loosen the distributor lock bolts,
and turn the distributor to make the adjustment.
4. Tighten the distributor lock bolts to the specified torque.
Tightening torque:
19-25 N#m (1.9-2.6 m-kg, 14-19 ft-lb)
5. Disconnect the SST.
F-79
Page 379 of 1164
INTAKE AIR SYSTEM F
I 23UOFX-096
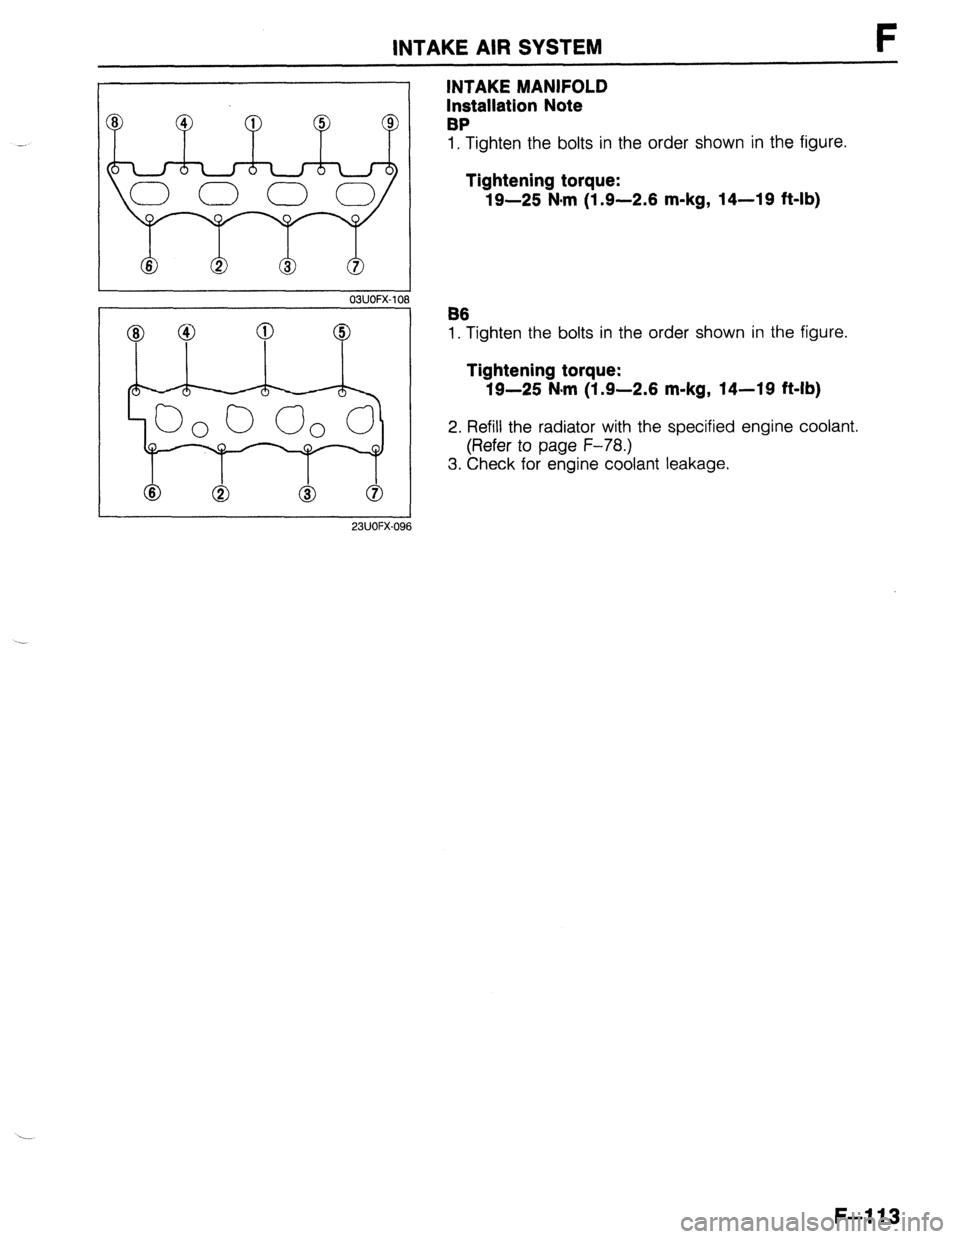
INTAKE MANIFOLD
Installation Note
BP
1, Tighten the bolts in the order shown in the figure.
Tightening torque:
19-25 N-m (1.9-2.6 m-kg, 14-19 ft-lb)
B6
1. Tighten the bolts in the order shown in the figure.
Tightening torque:
19-25 N-m (1.9-2.6 m-kg, 14-19 ft-lb)
2. Refill the radiator with the specified engine coolant.
(Refer to page F-78.)
3. Check for engine coolant leakage.
F-113
Page 383 of 1164
![MAZDA PROTEGE 1992 Workshop Manual VARIABLE INERTIA CHARGING SYSTEM (VI-)
VARIABLE INERTIA
CHARGING SYSTEM (VICS) [DOHC]
DESCRIPTION
VACUUM CHAMBER
SHUTTER VALVE ACTUATOR
F
THREE-WAY VALVE CLOSED
5,000 rpm
SHUTTER VALVE
BELOW MAZDA PROTEGE 1992 Workshop Manual VARIABLE INERTIA CHARGING SYSTEM (VI-)
VARIABLE INERTIA
CHARGING SYSTEM (VICS) [DOHC]
DESCRIPTION
VACUUM CHAMBER
SHUTTER VALVE ACTUATOR
F
THREE-WAY VALVE CLOSED
5,000 rpm
SHUTTER VALVE
BELOW](/img/28/57077/w960_57077-382.png)
VARIABLE INERTIA CHARGING SYSTEM (VI-)
VARIABLE INERTIA
CHARGING SYSTEM (VICS) [DOHC]
DESCRIPTION
VACUUM CHAMBER
SHUTTER VALVE ACTUATOR
F
THREE-WAY VALVE CLOSED
5,000 rpm
SHUTTER VALVE
BELOW 5,000 rpm ABOVE 5,000 rpm
SHUTTER VALVE CLOSED SHUTTER VALVE OPEN
By varying the length of the intake air path in the intake manifold and dynamic chamber, the resonance
induced inertia charging effect is improved, yielding higher torque and a wider torque band.
The length of the intake track is controlled within the intake manifold and dynamic chamber by opening and
closing the shutter valve at 5,000 rpm.
l-R; FCZz consists of the shutter valves, shutter valve actuator, three-way solenoid valve, vacuum chamber,
F-117
Page 396 of 1164
F FUELSYSTEM
DISCONNECT CONNECTOR
TO RELEASE FlJ$L PRESSURE
REAR SEAT C
23UOFX-11
INSTALL CLAMPS 7
03UOFX.I 59
F-l 30
DIAGNOSl&OJNECTOR
/ K
1 SUOFX-10
DISCONNECT CONNECTOR
TO RELEASE
FlJl$L PRESSURE
23UOFX-11
I
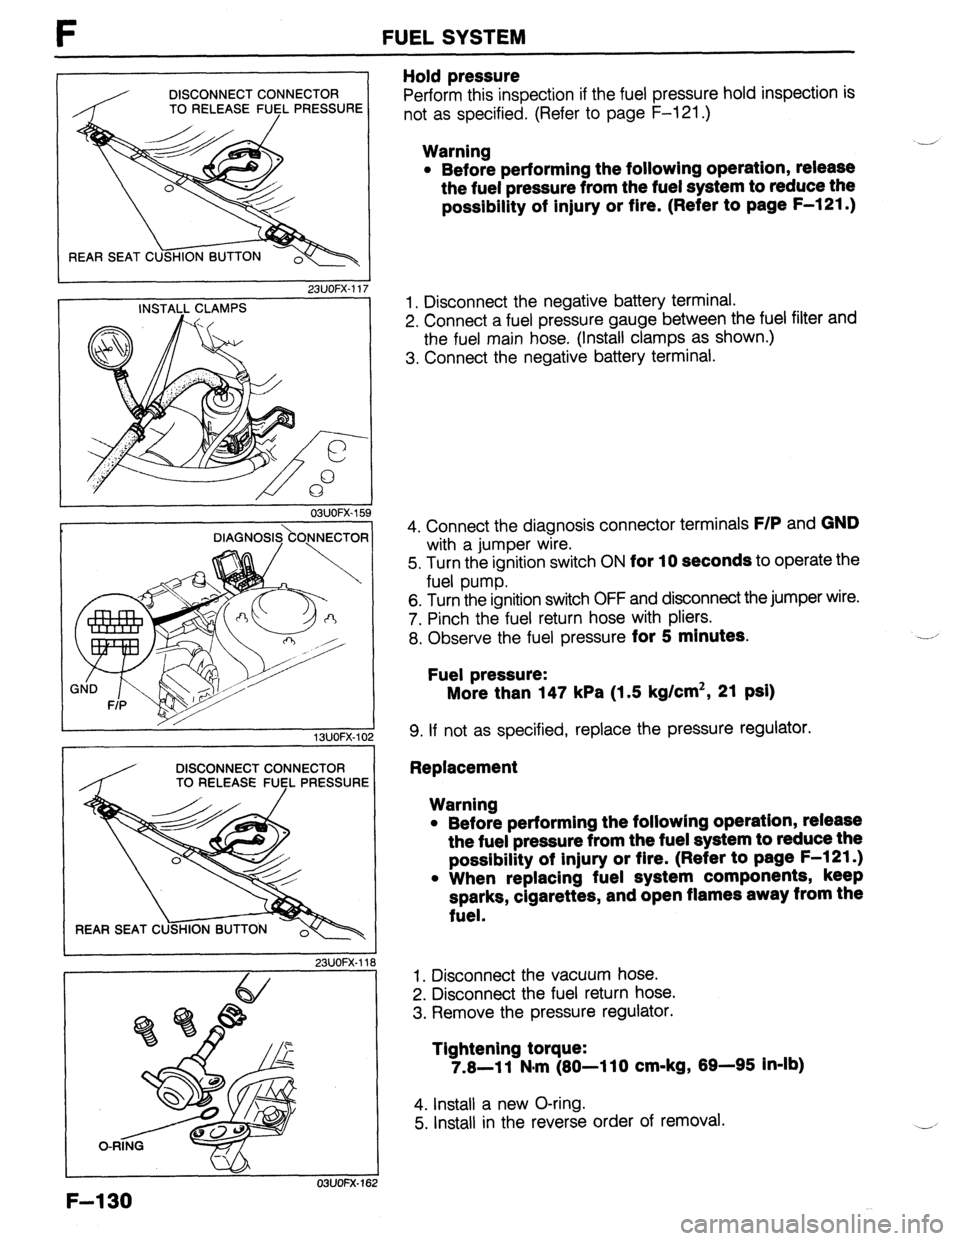
Hold pressure
Perform this inspection if the fuel pressure hold inspection is
not as specified. (Refer to page F-121 .)
Warning
l Before performing the following operation, release
the fuel pressure from the fuel system to reduce the
possibility of injury or fire. (Refer to page F-121 .) ,-
1. Disconnect the negative battery terminal.
2. Connect a fuel pressure gauge between the fuel filter and
the fuel main hose. (Install clamps as shown.)
3. Connect the negative battery terminal.
4. Connect the diagnosis connector terminals
F/P and GND
with a jumper wire.
5. Turn the ignition switch ON
for 10 seconds to operate the
fuel pump.
6. Turn the ignition switch OFF and disconnect the jumper wire.
7. Pinch the fuel return hose with pliers.
8. Observe the fuel pressure
for 5 minutes.
Fuel pressure:
More than 147 kPa (1.5 kg/cm2, 21 psi)
9. If not as specified, replace the pressure regulator.
Replacement
Warning
l Before performing the followlng operation, release
the fuel pressure from the fuel system to reduce the
possibility of injury or flre. (Refer to page F-l 21.)
l When replacing fuel system components, keep
sparks, cigarettes, and open flames away from the
fuel.
1. Disconnect the vacuum hose.
2. Disconnect the fuel return hose.
3. Remove the pressure regulator.
Tightening torque:
7.8-11 N#m (80-110 cm-kg, 89-95 In-lb)
4. Install a new O-ring.
5. Install in the reverse order of removal.
Page 399 of 1164
FUEL SYSTEM I-
9MUOF2-17
INJEC
GRO
,:.: ‘.L.. :
,;:y :.*‘.
+:: ..y&
..: .:: ,: ,:y>
‘$pID~~ :i
..,..:,:,
,.,i. :)I,
./[::/: :
. ...:;.
/jj,.‘, ;.::,::
.’ .::: ij!/ji..
OSUOFX-17
T MANIFOLD DELIVERY’ PIPE
MUOFX-17
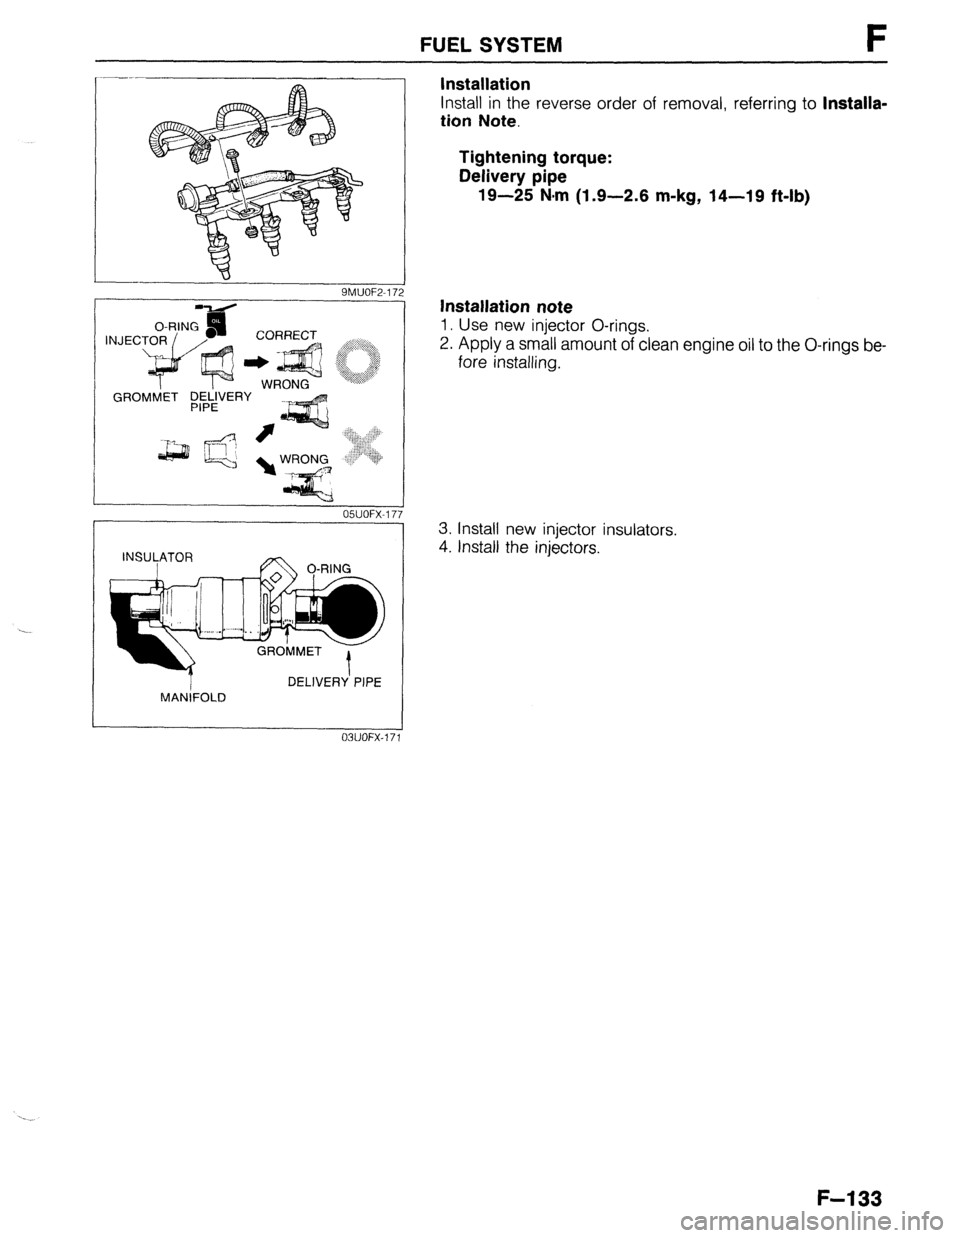
Installation
Install in the reverse order of removal, referring to Installa-
tion Note.
Tightening torque:
Delivery pipe
19-25 N.m (1.9-2.6 m-kg, 14-19 ft-lb)
Installation note
1. Use new injector O-rings.
2. Apply a small amount of clean engine oil to the O-rings be-
fore installing.
3. Install new injector insulators.
4. Install the injectors.
F-l 33