MAZDA PROTEGE 1992 Workshop Manual
Manufacturer: MAZDA, Model Year: 1992, Model line: PROTEGE, Model: MAZDA PROTEGE 1992Pages: 1164, PDF Size: 81.9 MB
Page 561 of 1164

TRANSAXLE J2
Sth/Reverse Gear and Housing Parts
1. Disassemble in the order shown in the figure, referring to Disassembly Note.
1. Rear cover
2. Locknut (Primary shaft)
Disassembly Note . . . . . . . . . . . . . . . . . . . . . page J2-14
3. Locknut (Secondary shaft)
Disassembly Note . . . . . . . . . . . . . . . . . . . . .
page J2-14
4. Primary reverse synchronizer gear
Inspection . . . . . . . . . . . . . . . . . . . . . . . . . . . . . . . . . . page J2-22
5. Synchronizer ring (Reverse)
Inspection . . . . . . . . . . . . . . . . . . . . . . . . . . . . . . . . . . page J2-22
6. Secondary reverse synchronizer gear
Inspection ,,.*.....,.,..............I.,..,.. page J2-22
7. Roll pin
8. 5th/Reverse shift fork
9. Clutch hub assembly (5thIReverse) 14. Lock bolt
15. Guide bolt
16. Lock bolt, ball, and spring
17. Transaxle case assembly
18. Magnet
19. Reverse idler shaft
20. Reverse idler gear
21. Lock bolt
22. 5thlReverse shift rod and clip
23. 5th/Reverse shift rod end
24. Pin
25. Crank lever shaft
26. Crank lever assembly
27. Shift fork and shift rod assembly
.- . .
Inspection . . . . . . . . . . . . . . . . . . . . . . . . . . . . . . . . . .
page J2-22 Disassembly Note . . . . . . . . . . . . . . . . . . . . . page
JZ-14
10. Synchronizer ring (5th) 28. Steel ball
Inspection . . . . . . . . . . . . . . . . . . . . . . . . . . . . . . . . . . page J2-22 29. Spring
11. 5th gear 30. Primary shaft gear assembly
Inspection . . . . . . . . . . . . . . . . . . . . . . . . . . . . . . . . . . page J2-22 31. Secondary shaft gear assembly
12. Gear sleeve 32. Differential assembly
13. Secondary 5th gear 33. Clutch housing
Inspection . . . . . . . . . . . . . . . . . . . . . . . . . . . . . . . . . . page J2-22
52-l 3
Page 562 of 1164

J2 TRANSAXLE
13UOJ2.01
03UOJ2-0:
03UOJ2-0:
. -
03UOJ2-0
76UO7A-22 2
!2
!3
1
.
24
7
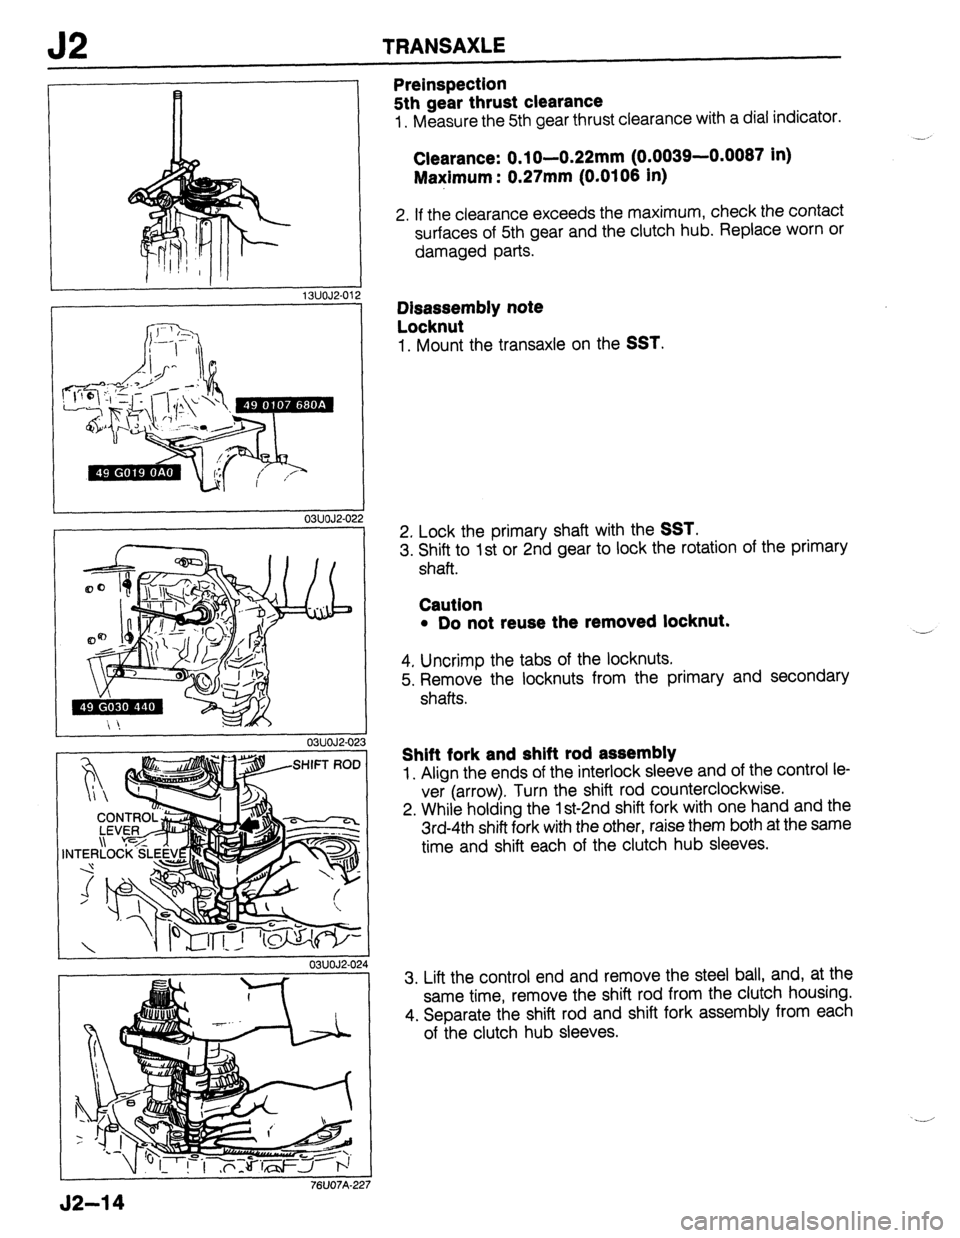
Preinspection
5th gear thrust clearance
1. Measure the 5th gear thrust clearance with a dial indicator.
Clearance: 0.1 O-0.22mm (0.0039-0.0087 in)
Maximum: 0.27mm (0.0108 in)
2. If the clearance exceeds the maximum, check the contact
surfaces of 5th gear and the clutch hub. Replace worn or
damaged parts.
Disassembly note
Locknut
1. Mount the transaxle on the SST,
2. Lock the primary shaft with the SST.
3. Shift to 1st or 2nd gear to lock the rotation of the primary
shaft.
Caution
l Do not reuse the removed locknut.
---
4. Uncrimp the tabs of the locknuts.
5. Remove the locknuts from the primary and secondary
shafts.
Shift fork and shift rod assembly
1. Align the ends of the interlock sleeve and of the control le-
ver (arrow). Turn the shift rod counterclockwise.
2. While holding the lst-2nd shift fork with one hand and the
3rd-4th shift fork with the other, raise them both at the same
time and shift each of the clutch hub sleeves.
3. Lift the control end and remove the steel ball, and, at the
same time, remove the shift rod from the clutch housing.
4. Separate the shift rod and shift fork assembly from each
of the clutch hub sleeves.
Page 563 of 1164

TRANSAXLE J2
Clutch Housing and Transaxle Case Components
Caution
l Do not remove an oil seal if not necessary.
1. Disassemble in the order shown in the figure, referring to Disassembly Note.
ACE
1. Bearing outer race (Primary shaft) 19. Oil seal (differential)
2. Oil seal Replacement (On-vehicle) . . . . . . . . . page J2-16
3. Bearing outer race (Secondary shaft) 20. Bearing outer race (differential)
Disassembly Note . . . . . . . . . . . . . . . . . . . . . page J2-16 Disassembly Note . . . . . . . . . . . . . . . . . . . . . page J2-16
4. Funnel 21. Reverse lever shaft
5. Guide plate 22. Reverse lever
6. Change arm 23. Drain plug and washer
7. Roll pin 24. Neutral switch and gasket
Disassembly Note . . . . . . . . . . . . . . . . . . . . . page J2-16 25. Bearing outer race (transaxle case)
8. Change rod assembly Disassembly Note . . . . . . . . . . . . . . . . . . . . . page J2-16
9. Boot 26. Diaphragm spring
10. Spring 27. Adjust shim
11. Reverse gate 28. Bearing outer race (differential)
12. Selector Disassembly Note . . . . . . . . . . . . . . . . . . . . . page J2-16
13. Oil seal 29. Adjust shim(s)
14. Bleeder cover 30. Oil seal (differential)
15. Bleeder Replacement (On-vehicle) . . . . . . . . . page J2-16
16. Speedometer driven gear assembly 31. Back-up light switch
Inspection ..,.,,.,......,................... page J2-24 32. Oil passage
17. Driven gear 33. Joint
18. Gear case 34. Change rod
52-l 5
Page 564 of 1164

J2 TRANSAXLE
J2-16
BEARING OUTE
23UOJ2-00
86U07A-04
03UOJ2-02
23UOJ2-OC
Disassembly note
Bearing outer race (transaxle case)
Note
l Since removing the bearing outer race is difficult,
use the SST.
1. Remove the bearing outer race.
Bearing outer race (secondary shaft)
1. Remove the bearing outer race by lifting out the funnel and
race together.
Roll pin
1. Align the groove for removal of the clutch housing pin with
the position of the roll pin, then tap the pin out using a pin
punch.
Bearing outer race (differential)
Caution
l Hold the SST with one hand so that it does not fall.
1. Remove the bearing outer race with a press.
Oil seal (differential)
Replacement (On-vehicle)
Jack up the vehicle and support it with safety stands. Drain
the transaxle oil. Next, use the following procedure to replace
the driveshaft oil seal:
1. Remove the front wheel.
2. Remove the splash shield.
3. Separate the front stabilizer from the lower arm.
Page 565 of 1164

TRANSAXLE
03UOJ2-02
03UOJ2-0:
I IO
03UOJ2-031
1
03UOJ2-121
Caution
l Do not damage the dust boots.
4. Remove the clinch bolt and pull the lower arm downward.
Separate the knuckle from the lower arm ball joint.
5. Loosen the nut and disconnect the tie-rod end with the
SST.
Caution
l Do not subject the tripod joint to shock when remov-
ing the driveshaft.
6. Disconnect the driveshaft from the transaxle by prying with
a bar between the outer ring and the transaxle.
7. Suspend the driveshaft with a rope.
8. Remove the oil seal with a screwdriver.
Note
l Tap in until the oil seal installer contacts the case.
l Coat the oil seal lip with transaxle oil.
9. Tap the new oil seal into the transaxle case with the SST.
10. Replace the driveshaft end clip with a new one. Insert the
driveshaft with the end-gap of the clip facing upward.
I I
I 03UOJ2-032
J2-17
Page 566 of 1164

E
REPLACE
J2 TRANSAXLE
Primary Shaft Assembly and Secondary Shaft Assembly
1 Measure the thrust clearance of all gears before disassembly, referring to Pre-inspection.
2: Disassemble in the order shown in the figure, referring to Disassembly Note.
J2-18
Page 567 of 1164

TRANSAXLE J2
1. 3rd/4th shift fork
2. Interlock sleeve
3. Roll pin
4. Control end
5. lst/2nd shift fork
6. Roll pin
7. Control lever
8. Control rod
9. Bearing inner race
Disassembly Note . . . . . . . . . . . . . . . . . . . . . page J2-20
Inspection . . . . . . . . . . . . . . . . . . . . . . . . . . . . . . . . . . page J2-23
10. Secondary 4th gear
Disassembly Note . . . . . . . . . . . . . . . . . . . . . page J2-20
Inspection . . . . . . . . . . . . . . . . . . . . . . . . . . . . . . . . . . page J2-22
11. Retaining ring
12. Secondary 3rd gear
Pre-inspection . . . . . . . . . . . . . . . . . . . . . . . . . . . page J2-20
Disassembly Note . . . . . . . . . . . . . . . . . . . . . page J2-20
Inspection . . . . . . . . . . . . . . . . . . . . . . . . . . . . . . . . . . page J2-22
13 2nd gear
Disassembly Note . . . . . . . . . . . . . . . . . . . . . page J2-20
Inspection .,,.,~,,.,,..........,,..........,
page J2-22
14. Synchronizer ring (2nd)
Inspection . . . . . . . . . . . . . . . . . . . . . . . . . . . . . . . . . . page J2-22
15. Retaining ring
16. Clutch hub assembly (lst/2nd)
Inspection . . . . . . . . . . . . . . . . . . . . . . . . . . . . . . . . . . page J2-22
17. Synchronizer ring (1 st)
Inspection . . . . . . . . . . . . . . . . . . . . . . . . . . . . . . . . . . page J2-22
18. 1st gear
Pre-inspection . . . . . . . . . . . . . . . . . . . . . . . . . . . page J2-19
Disassembly Note . . . . . . . . . . . . . . . . . . . . . page J2-20
Inspection . . . . . . . . . . . . . . . . . . . . . . . . . . . . . . . . . . page J2-22 19. Bearing inner race
Disassem.bly Note . . . . . . . . . . . . . . . . . . . . . page J2-21
20. Secondary shaft
Inspection ,................................. page J2-23
21. Bearing inner race
Pre-inspection ,..,.,..................... page J2-20
Disassembly Note . . . . . . . . . . . . . . . . . . . . . page J2-21
22. 4th gear
Inspection . . . . . . . . . . . . . . . . . . . . . . . . . . . . . . . . . . page J2-22
23. Synchronizer ring (4th)
Inspection . . . . . . . . . . . . . . . . . . . . . . . . . . . . . . . . . . page J2-22
24. Retaining ring
25. Clutch hub assembly (3rd/4th)
Disassembly Note . . . . . . . . . . . . . . . . . . . . . page J2-21
Inspection ..,............................... page J2-22
26. Synchronizer ring (3rd)
Disassembly Note . . . . . . . . . . . . . . . . . . . . . page J2-21
Inspection . . . . . . . . . . . . . . . . . . . . . . . . . . . . . . . . . . page J2-22
27.3rd gear
Pre-inspection . . . . . . . . . . . . . . . . . . . . . . . . . . . page J2-20
Disassembly Note . . . . . . . . . . . . . . . . . . . . . page J2-21
Inspection . . . . . . . . . . . . . . . . . . . . . . . . . . . . . . . . . . page J2-22
28. Bearing inner race
Disassembly Note . . . . . . . . . . . . . . . . . . . . . page J2-21
29. Primary shaft
Inspection . . . . . . . . . . . . . . . . . . . . . . . . . . . . . . . . . . page J2-23
30. Synchronizer spring
31. Synchronizer key
32. Clutch hub
33. Clutch hub sleeve (reverse gear)
34. Synchronizer spring
35. Synchronizer key
36. Clutch hub
37. Clutch hub sleeve
03UOJ2.03! 03UOJ2-034
Pre-inspection
Thrust clearance
1. Measure the clearance between the 2nd gear and secon-
dary 3rd gear.
Clearance: 0.175-0.455mm (0.0069-0.0179 in)
Maximum : OS05mm (0.0199 in)
2. Measure the clearance between the 1 st gear and differen-
tial drive gear.
Clearance: 0.05-0.26mm (0.002-0.011 in)
Maximum : 0.33mm (0.0130 in)
03UOJ2-036
52-l 9
Page 568 of 1164

J2 TRANSAXLE
03UOJ2-03
03UOJ2-03
03UOJ2.04
03UOJ2-041
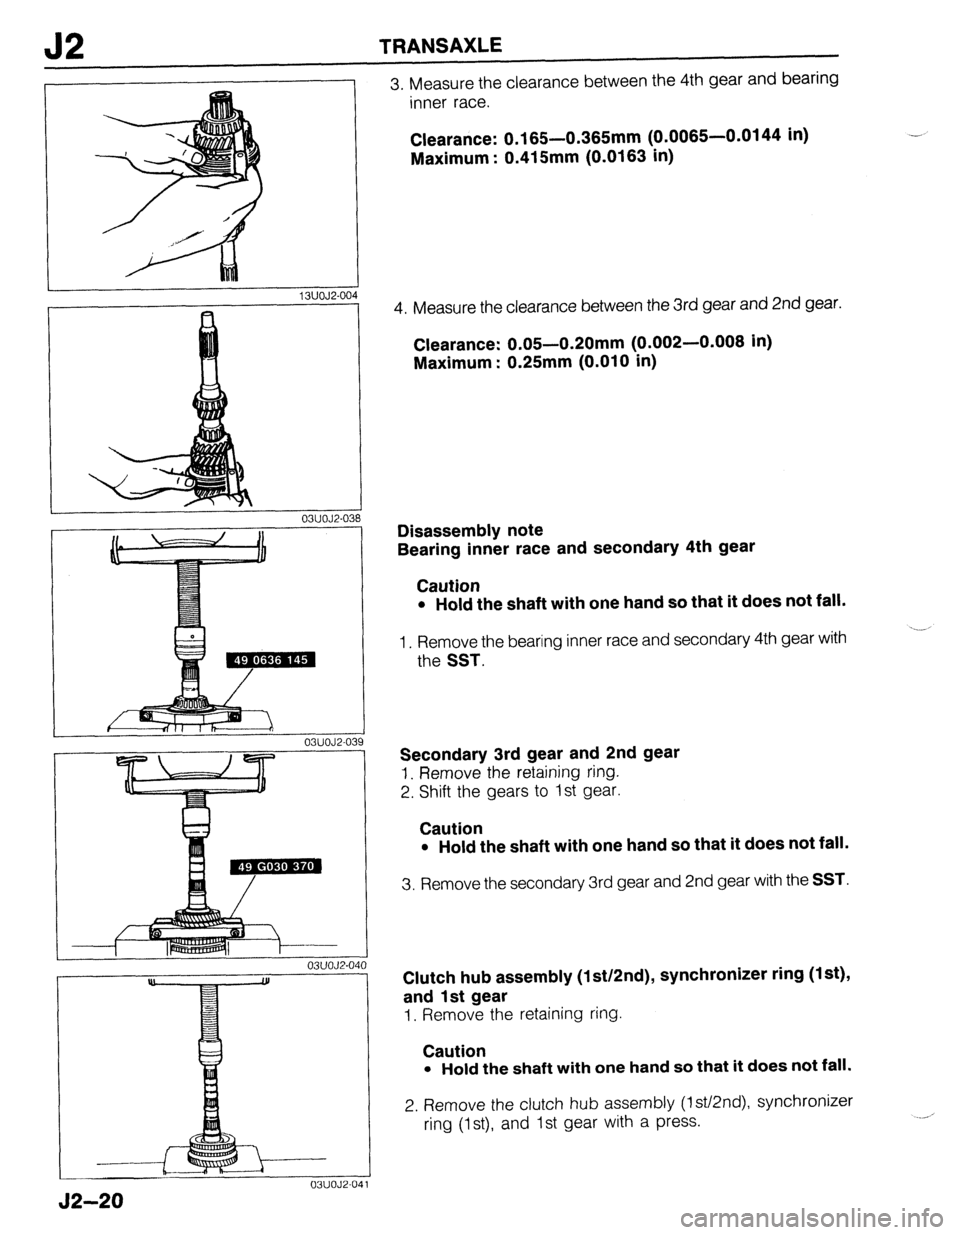
3. Measure the clearance between the 4th gear and bearing
inner race.
Clearance: 0.165-0.365mm (0.0065-0.0144 in)
Maximum : 0.415mm (0.0163 in)
4. Measure the clearance between the 3rd gear and 2nd gear.
Clearance: 0.05-0.20mm (0.002-0.008 in)
Maximum : 0.25mm (0.010 in)
Disassembly note
Bearing inner race and secondary 4th gear
Caution
l Hold the shaft with one hand so that it does not fall.
1. Remove the bearing inner race and secondary 4th gear with
the SST.
Secondary 3rd gear and 2nd gear
1. Remove the retaining ring.
2. Shift the gears to 1st gear.
Caution
l Hold the shaft with one hand so that it does not fall.
3. Remove the secondary 3rd gear and 2nd gear with the SST.
Clutch hub assembly (1 st/2nd), synchronizer ring (1 st),
and 1st gear
1. Remove the retaining ring.
Caution
l Hold the shaft with one hand so that it does not fall.
2. Remove the clutch hub assembly (lst/2nd), synchronizer
ring (1 st), and 1st gear with a press.
52-20
Page 569 of 1164

TRANSAXLE J2
03UOJ2-04
P==7 II
03UOJ2-04
03UOJ2-04d
03UOJ2-04:
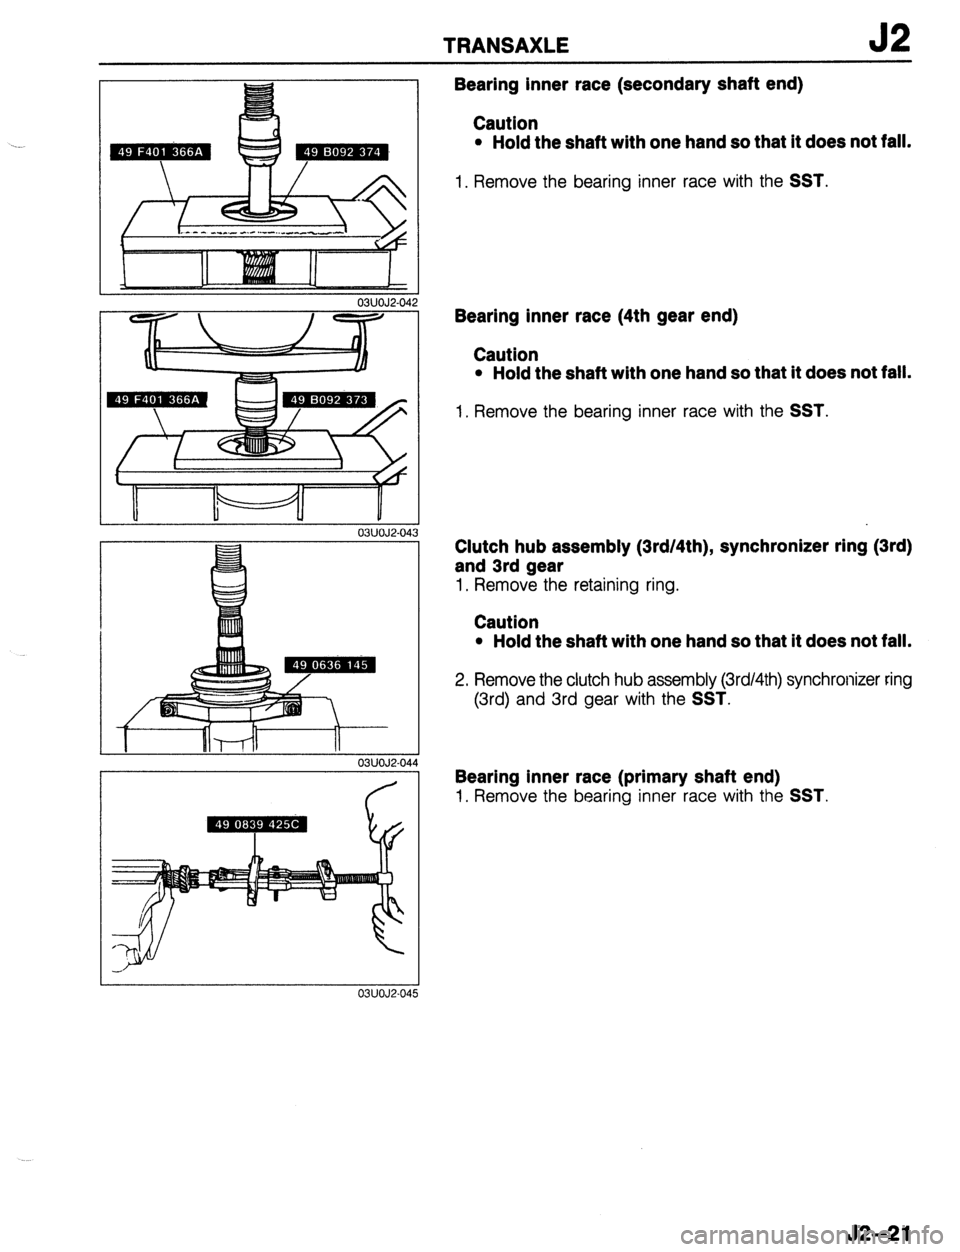
Bearing inner race (secondary shaft end)
Caution
l Hold the shaft with one hand so that it does not fall.
1. Remove the bearing inner race with the SST.
Bearing inner race (4th gear end)
Caution
l Hold the shaft with one hand so that it does not fall.
1. Remove the bearing inner race with the SST.
Clutch hub assembly (3rd/4th), synchronizer ring (3rd)
and 3rd gear
1. Remove the retaining ring.
Caution
l Hold the shaft with one hand so that it does not fall.
2. Remove the clutch hub assembly (3rd/4th) synchronizer ring
(3rd) and 3rd gear with the
SST.
Bearing inner race (primary shaft end)
1. Remove the bearing inner race with the SST.
J2-21
Page 570 of 1164

52 TRANSAXLE
INSPECTION
Inspect all parts and repair or replace as necessary.
05UOJX-023
-’
03UOJ2-04
I
-
03UOJ2-11
13UOJ2-00
9MUOJX-05
52-22
Gears
1. Inspect synchronizer cones for wear.
2. Inspect individual gear teeth for damage, wear, and cracks.
3. Inspect synchronizer ring matching teeth for damage and
wear.
Synchronizer ring
1. Inspect individual synchronizer ring teeth for damage, wear,
and cracks.
2. Inspect taper surface for wear and cracks.
Note
l Set the synchronizer ring squarely in the gear; then
measure around the circumference.
3. Measure the clearance between the synchronizer ring and
flank surface of the gear.
Standard clearance: 1.5mm (0.059 in)
Minimum: 0.8mm (0.032 in)
Clutch hub assembly
1. Inspect the clutch hub sleeve and hub operation.
2. Inspect the individual gear teeth for damage, wear, and
cracks,
3. Inspect the synchronizer key for damage, wear, and cracks.