MERCEDES-BENZ SLK ROADSTER 2014 Owners Manual
Manufacturer: MERCEDES-BENZ, Model Year: 2014, Model line: SLK ROADSTER, Model: MERCEDES-BENZ SLK ROADSTER 2014Pages: 357, PDF Size: 10.22 MB
Page 321 of 357
Tyre pressure
Tyre pressure specifications
G
WARNING
Underinflated or overinflated tyres pose the
following risks:
R the tyres may burst, especially as the load
and vehicle speed increase.
R the tyres may wear excessively and/or
unevenly, which may greatly impair tyre
traction.
R the driving characteristics, as well as steer-
ing and braking, may be greatly impaired.
There is a risk of an accident.
Observe the recommended tyre pressure and check the tyre pressure of all the tyres includ-
ing the spare wheel:
R at least every two weeks
R when the load changes
R before embarking on a longer journey
R for changed operating conditions, e.g. off-
road driving
If necessary, correct the tyre pressure. G
WARNING
If you fit unsuitable accessories onto tyre
valves, the tyre valves may be overloaded and malfunction, which can cause tyre pressure
loss. Due to their design, retrofitted tyre pres-
sure monitors keep the tyre valve open. This
can also result in tyre pressure loss. There is a risk of accident.
Only screw standard valve caps or valve caps
specifically provided by Mercedes-Benz for
your vehicle onto the tyre valve. G
WARNING
If the tyre pressure drops repeatedly, the
wheel, valve or tyre may be damaged. Tyre
pressure that is too low may result in a tyre
blow-out. There is a risk of accident.
R Check the tyre for foreign objects.
R Check whether the wheel is losing air or the
valve is leaking. If you are unable to rectify the damage, con-
tact a qualified specialist workshop.
H
Environmental note
Check the tyre pressure regularly, at least
every 14 days.
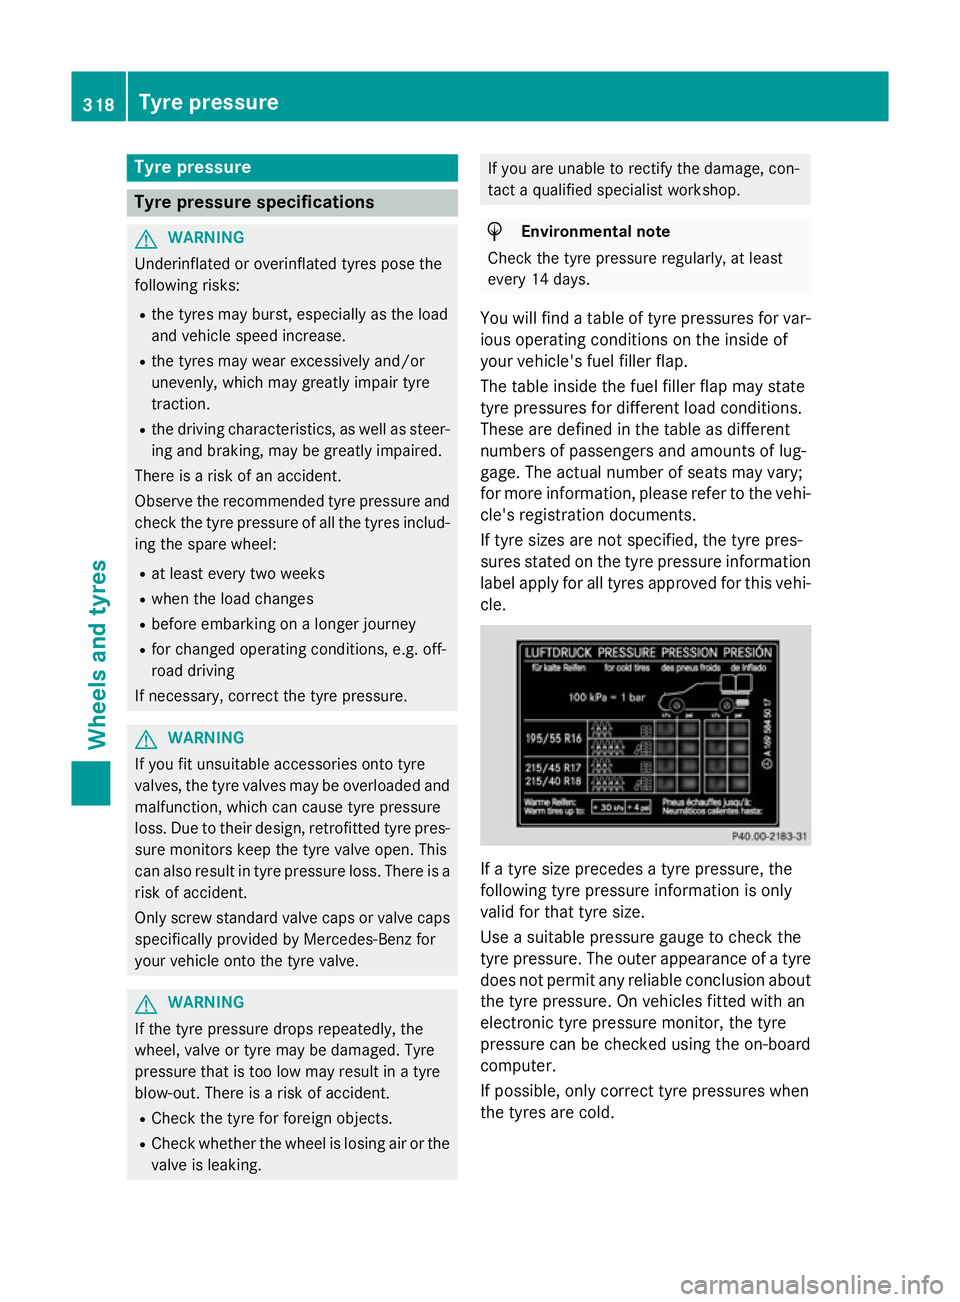
You will find a table of tyre pressures for var- ious operating conditions on the inside of
your vehicle's fuel filler flap.
The table inside the fuel filler flap may state
tyre pressures for different load conditions.
These are defined in the table as different
numbers of passengers and amounts of lug-
gage. The actual number of seats may vary;
for more information, please refer to the vehi-
cle's registration documents.
If tyre sizes are not specified, the tyre pres-
sures stated on the tyre pressure information
label apply for all tyres approved for this vehi- cle. If a tyre size precedes a tyre pressure, the
following tyre pressure information is only
valid for that tyre size.
Use a suitable pressure gauge to check the
tyre pressure. The outer appearance of a tyre
does not permit any reliable conclusion aboutthe tyre pressure. On vehicles fitted with an
electronic tyre pressure monitor, the tyre
pressure can be checked using the on-board
computer.
If possible, only correct tyre pressures when
the tyres are cold. 318
Tyre pressureWheels and tyres
Page 322 of 357
The tyres are cold:
R if the vehicle has been parked with the tyres
out of direct sunlight for at least three
hours and
R if the vehicle has not been driven further
than 1.6 km
Depending on the ambient temperature, the
speed at which you are driving and the load on the tyres, the tyre temperature and thus the
tyre pressure changes by approximately
10 kPa (0.1 bar/1.5 psi) per 10 †. Take this
into account when checking the pressure of
warm tyres. Only correct the tyre pressure if it
is too low for the current operating condi-
tions.
Driving with tyre pressure that is too high or
too low can:
R shorten the service life of the tyres
R cause increased tyre damage
R have a negative effect on handling charac-
teristics and thus driving safety (e.g. aqua- planing)
For speeds up to 210 km/h (does not
apply to AMG vehicles): the values given on
the tyre pressure information label (fuel filler
flap) for speeds up to 210 km/h may be
reduced by 30 kPa (0.3 bar/4 psi) without a
reduction in safety. This improves the ride
comfort of your vehicle; however, the fuel
consumption may increase slightly.
i The tyre pressure values given for low
loads are minimum values which offer you
good ride comfort characteristics.
However, you can also use the values given for higher loads. These are permissible andwill not adversely affect the running of the
vehicle. Tyre pressure loss warning system
General notes While the vehicle is in motion, the tyre pres-
sure loss warning system monitors the set
tyre pressure using the rotational speed of the wheels. This enables the system to detect
significant pressure loss in a tyre. If the speed
of rotation of a wheel changes as a result of a loss of pressure, a corresponding warning
message will appear in the multifunction dis-
play.
You can recognise the tyre pressure loss
warning by the Run Flat Indicator
Run Flat Indicator
active Restart with OK active Restart with OK message which
appears in the Serv.
Serv. menu of the multifunc-
tion display. Information on the message dis- play can be found in the "Restarting the tyre
pressure loss warning system" section
(Y page 320).
Important safety notes The tyre pressure warning system does not
warn you of an incorrectly set tyre pressure.
Observe the notes on the recommended tyre
pressure (Y page 318).
The tyre pressure loss warning does not
replace the need to regularly check the tyre
pressures. An even loss of pressure on sev-
eral tyres at the same time cannot be detec-
ted by the tyre pressure loss warning system.
The tyre pressure monitor is not able to warn you of a sudden loss of pressure, e.g. if the
tyre is penetrated by a foreign object. In the
event of a sudden loss of pressure, bring the
vehicle to a halt by braking carefully. Avoid
abrupt steering manoeuvres.
The function of the tyre pressure loss warning
system is limited or delayed if:
R snow chains are fitted to your vehicle's
tyres.
R road conditions are wintry.
R you are driving on sand or gravel.
R you adopt a very sporty driving style (cor-
nering at high speeds or driving with high
rates of acceleration).
R you drive with a heavy load. Tyre pressure
319Wheels and tyres Z
Page 323 of 357
Restarting the tyre pressure loss warn-
ing system Restart the tyre pressure loss warning system
if you have:
R changed the tyre pressure
R changed the wheels or tyres
R fitted new wheels or tyres
X Before restarting, make sure that the tyre
pressures are set properly on all four tyres
for the respective operating conditions.
The recommended tyre pressures can be
found in the table on the fuel filler flap.
The tyre pressure loss warning system can only give reliable warnings if you have set
the correct tyre pressure. If an incorrect
tyre pressure is set, these incorrect values
will be monitored.
X Observe the notes in the section on tyre
pressures (Y page 318).
X Make sure that the key is in position 2in the
ignition lock (Y page 141).
X Press the =or; button on the steer-
ing wheel to select the Serv.
Serv. menu.
X Press the 9or: button to select
Tyre pressure
Tyre pressure .
X Press the abutton.
The Run Flat Indicator active Run Flat Indicator active
Restart
Restart with
withOK
OKmessage appears in the
multifunction display.
If you wish to confirm the restart: X Press the abutton.
The Tyre press. now OK?
Tyre press. now OK? message
appears in the multifunction display.
X Press the 9or: button to select
Yes
Yes.
X Press the abutton.
The Run Flat Indicator restarted
Run Flat Indicator restarted
message appears in the multifunction dis-
play.
After a teach-in period, the tyre pressure
loss warning system will monitor the set
tyre pressures of all four tyres. If you wish to cancel the restart:
X Press the %button.
or X If the Tyre pressure now OK? Tyre pressure now OK? message
appears, use the 9or: button to
select Cancel Cancel.
X Press the abutton.
The tyre pressure values stored at the last
restart will continue to be monitored. Tyre pressure monitor
General notes If a tyre pressure monitor system is fitted, the
vehicle's wheels have sensors fitted that
monitor the tyre pressures in all four tyres.
The tyre pressure monitor warns you if the
pressure drops in one or more of the tyres.
The tyre pressure monitor only functions if
the corresponding sensors are fitted to all
wheels.
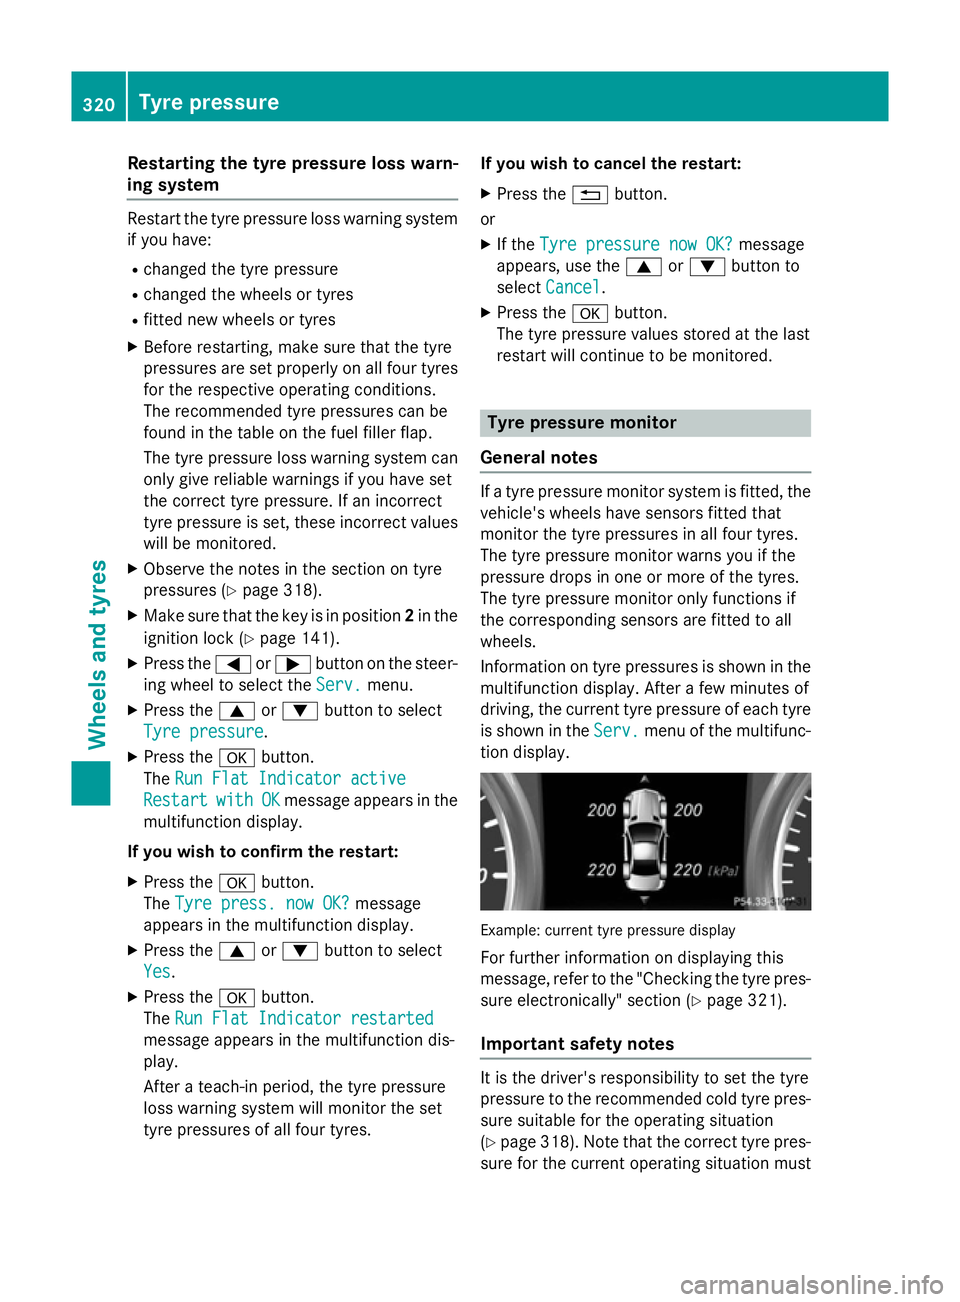
Information on tyre pressures is shown in the multifunction display. After a few minutes of
driving, the current tyre pressure of each tyre
is shown in the Serv. Serv.menu of the multifunc-
tion display. Example: current tyre pressure display
For further information on displaying this
message, refer to the "Checking the tyre pres-
sure electronically" section (Y page 321).
Important safety notes It is the driver's responsibility to set the tyre
pressure to the recommended cold tyre pres-
sure suitable for the operating situation
(Y page 318). Note that the correct tyre pres-
sure for the current operating situation must 320
Tyre pressureWheels and tyres
Page 324 of 357
first be taught-in to the tyre pressure monitor.
If there is a substantial loss of pressure, the
warning threshold for the warning message is aligned to the reference values taught-in.
Restart the tyre pressure monitor after
adjusting to the cold tyre pressure
(Y page 322). The current pressures are
saved as new reference values. This will
ensure that a warning message will only
appear if the tyre pressure drops significantly.
The tyre pressure monitor does not warn you
of an incorrectly set tyre pressure. Observe
the notes on the recommended tyre pressure
(Y page 318).
The tyre pressure monitor is not able to warn
you of a sudden loss of pressure, e.g. if the
tyre is penetrated by a foreign object. In the
event of a sudden loss of pressure, bring the
vehicle to a halt by braking carefully. Avoid
abrupt steering manoeuvres.
The tyre pressure monitor has a yellow warn-
ing lamp in the instrument cluster for indicat- ing a pressure loss or malfunction. Depending
on how the warning lamp flashes or lights up, a tyre pressure that is too low or a malfunc-
tion in the tyre pressure monitor is indicated:
R if the warning lamp is lit continuously, the
tyre pressure on one or more tyres is sig-
nificantly too low. The tyre pressure moni-
tor is not malfunctioning.
R if the warning lamp flashes for around a
minute and then remains lit constantly, the tyre pressure monitor is malfunctioning.
i In addition to the warning lamp, a mes-
sage appears in the multifunction display.
Further information can be found under
(Y page 243).
If the tyre pressure monitor is malfunctioning,
it may take more than ten minutes for the tyre pressure warning lamp to inform you of the
malfunction by flashing for approximately one
minute and then remaining lit. When the fault
has been rectified, the tyre pressure warning lamp goes out after you have driven for a few
minutes. The tyre pressure values indicated by the on-
board computer may differ from those meas-
ured at a filling station using a pressure
gauge. The tyre pressures shown by the on-
board computer refer to those measured at
sea level. At high altitudes, the tyre pressure
values indicated by a pressure gauge are
higher than those shown by the on-board
computer. In this case, do not reduce the tyre
pressures.
The operation of the tyre pressure monitor
can be affected by interference from radio
transmitting equipment (e.g. radio head-
phones, two-way radios) that may be being
operated in or near the vehicle.
Checking the tyre pressure electroni-
cally X
Make sure that the key is in position 2
(Y page 141) in the ignition lock.
X Press the =or; button on the steer-
ing wheel to select the Serv. Serv.menu.
X Press the 9or: button to select
Tyre pressure
Tyre pressure.
X Press the abutton.
The current tyre pressure for each wheel
will be displayed in the multifunction dis-
play.
If the vehicle has been parked for over
20 minutes ,the Tyre Tyre pressures
pressures will
willbe
be
displayed after a few minutes of
displayed after a few minutes of
driving driving message appears.
After a teach-in period, the tyre pressure
monitor automatically detects new wheels or
new sensors. As long as a clear allocation of
the tyre pressure values to the individual
wheels is not possible, the Tyre pressure Tyre pressure
monitor active
monitor active display message is shown
instead of the tyre pressure display. The tyre
pressures are already being monitored.
i If an emergency spare wheel is fitted, for
a few minutes the system may continue to
show the tyre pressure of the wheel that
has been removed. If this occurs, note that the value displayed for the position where Tyre pressure
321Wheels and tyres Z
Page 325 of 357
the spare wheel is fitted is not the same as
the current tyre pressure of the emergencyspare wheel.
Warning messages of the tyre pressure monitor If the tyre pressure monitor detects a pres-
sure loss in one or more tyres, a warning mes-
sage is shown in the multifunction display and the yellow tyre pressure monitor warning
lamp comes on.
R If the Rectify tyre pressure
Rectify tyre pressure message
appears in the multifunction display, the
tyre pressure in at least one tyre is too low and must be corrected at the next oppor-
tunity.
R If the Check tyre(s)
Check tyre(s) message appears in
the multifunction display, the tyre pressure
in one or more tyres has dropped signifi-
cantly and the tyres must be checked.
R If the Warning tyre defect
Warning tyre defect message
appears in the multifunction display, the
tyre pressure in one or more tyres has drop- ped suddenly and the tyres must be
checked.
Observe the instructions and safety notes in
the display messages in the "Tyres" section
(Y page 243).
i If the wheel positions on the vehicle are
interchanged, the tyre pressures may be
displayed for the wrong positions for a
short time. After a few minutes of driving,
this is rectified and the tyre pressures are
displayed for the correct positions.
Restarting the tyre pressure monitor When you restart the tyre pressure monitor,
all existing warning messages are deleted and
the warning lamps go out. The monitor uses
the currently set tyre pressures as the refer-
ence values for monitoring. In most cases, the tyre pressure monitor will automatically
detect the new reference values after you
have changed the tyre pressure. However,
you can also define reference values man- ually as described here. The tyre pressure
monitor then monitors the new tyre pressure
values.
X Use the table on the inside of the fuel filler
flap to ensure that the tyre pressure is set
correctly in all four tyres for the current
operating conditions.
Also observe the notes in the section on
tyre pressures (Y page 318).
X Make sure that the key is in position 2in the
ignition lock.
X Press the =or; button on the steer-
ing wheel to select the Serv.
Serv. menu.
X Press the 9or: button to select
Tyre pressure Tyre pressure.
X Press the abutton.
The multifunction display shows the cur-
rent tyre pressure for the individual tyres or
the Tyre pressures will be dis‐ Tyre pressures will be dis‐
played
played after
aftera
afew
few minutes
minutes of
ofdriv‐
driv‐
ing
ing message.
X Press the :button.
The Use current pressures as new
Use current pressures as new
reference values
reference values message appears in
the multifunction display.
If you wish to confirm the restart: X Press the abutton.
The Tyre press. monitor restarted
Tyre press. monitor restarted
message appears in the multifunction dis-
play.
After you have driven for a few minutes, the system checks whether the current tyre
pressures are within the specified range.
The new tyre pressures are then accepted
as reference values and monitored.
If you wish to cancel the restart:
X Press the %button.
The tyre pressure values stored at the last
restart will continue to be monitored. 322
Tyre pressureWheels and tyres
Page 326 of 357
Radio type approval for the tyre pres-
sure monitor Country Radio type approval number
Brazil 2770-12-8001
Model: MW2433A
0381-13-8001
Model: GG4
Dubai TRA, Registered NO
ER0092100/12
TRA, Registered NO
ER0099792/12
TRA, Registered NO
ER0076990/11
Dealer-NO: DA0047074/10
Jordan Model: Gen Alpha Wal 2 TPMS
transmitter
Type Approval Number:
TRC/LPD/2012/114
Model: Gen Gamma Gen 4
433.92 Mhz.
Type Approval Number:
TRC/LPD/2012/190
Model: Corax 3 MRXMC34MA4
Type Approval Number:
TRC/LPD/2011/158
Type Number: LPD Morocco MR7319 ANRT 2012/
11/07/2012
MR7672 ANRT 2012/
23/11/2012
MR6706 ANRT 2011
Moldova 1024
Philip-
pines No: ESD-1206394C
No: ESD-1306995C
Serbia И 011 12 Country Radio type approval number
Singa-
pore Compliance with IDA Standard
DA- 103365
South
Africa TA-2012/719
TA-2012/1540
TA-2011/1370
Changing a wheel
Flat tyre
You can find information on what to do in the event of a flat tyre in the "Breakdown assis-
tance" section (Y page 296). Information on
driving with MOExtended tyres in the event of a flat tyre can be found under "Breakdown
assistance" (Y page 296). Interchanging the wheels
G
WARNING
Interchanging the front and rear wheels may
severely impair the driving characteristics if
the wheels or tyres have different dimensions. The wheel brakes or suspension components may also be damaged. There is a risk of acci-
dent.
Interchange front and rear wheels only if the
wheels and tyres are of the same dimensions.
! On vehicles fitted with a tyre pressure
monitor, electronic components are loca-
ted in the wheel.
Tyre-fitting tools should not be applied in
the area of the valve, as this could damage
the electronic components.
Only have tyres changed at a qualified spe- cialist workshop.
Interchanging front and rear wheels of differ- ing dimensions can render the general oper-
ating permit invalid.
Always pay attention to the instructions and
safety notes when changing a wheel
(Y page 324). Changing a wheel
323Wheels and tyres Z
Page 327 of 357
The wear patterns on the front and rear tyres
differ, depending on the operating conditions.
Interchange the wheels before a clear wear
pattern has formed on the tyres. Front tyres
typically wear more on the shoulders and the rear tyres in the centre.
On vehicles that have the same size front and
rear wheels, you can interchange the wheels
every 5,000 to 10,000 km depending on the
degree of tyre wear. Ensure the direction of
rotation is maintained.
Clean the contact surfaces of the wheel and
the brake disc thoroughly every time a wheel
is interchanged. Check the tyre pressure and, if necessary, restart the tyre pressure loss
warning system or the tyre pressure monitor. Direction of rotation
Tyres with a specified direction of rotation
have additional benefits, e.g. if there is a risk of aquaplaning. You will only gain these ben-
efits if the correct direction of rotation is
observed.
An arrow on the sidewall of the tyre indicates
its correct direction of rotation. Storing wheels
Store wheels that are not being used in a cool, dry and preferably dark place. Protect the
tyres against oil, grease, petrol and diesel. Cleaning the wheels
G
WARNING
The water jet of circular-jet nozzles (dirt grind- ers) can cause damage not visible from the
outside to tyres or chassis components. Com-
ponents damaged in this way can unexpect-
edly fail. There is a risk of an accident.
Do not use high-pressure cleaners with circu-
lar-jet nozzles to clean the vehicle. Have dam- aged tyres or chassis components replaced
immediately. Fitting a wheel
Preparing the vehicle X
Stop the vehicle on solid, non-slippery and
level ground.
X Apply the electric parking brake manually.
X Move the front wheels to the straight-
ahead position.
X Vehicles with manual transmission:
depress the clutch pedal fully and engage
first or reverse gear.
X Vehicles with automatic transmission:
move the selector lever to P.
X Switch off the engine.
X Vehicles without KEYLESS-GO: remove
the key from the ignition lock.
X Vehicles with KEYLESS-GO: open the
driver's door.
The on-board electronics now have status
0. This is the same as the key having been removed.
X Vehicles with KEYLESS-GO: remove the
Start/Stop button from the ignition lock
(Y page 141).
X If included in the vehicle equipment,
remove the tyre-change tool kit from the
vehicle.
X Secure the vehicle to prevent it from rolling
away.
i Not all vehicles are fitted with a tyre-
change tool kit. For information on which
tools are required to perform a wheel
change on your vehicle, consult a
Mercedes-Benz Service Centre.
Necessary wheel-changing tools may
include, for example:
R jack
R wheel chock
R wheel wrench 324
Changing a wheelWheels and tyres
Page 328 of 357
Securing the vehicle against rolling
away
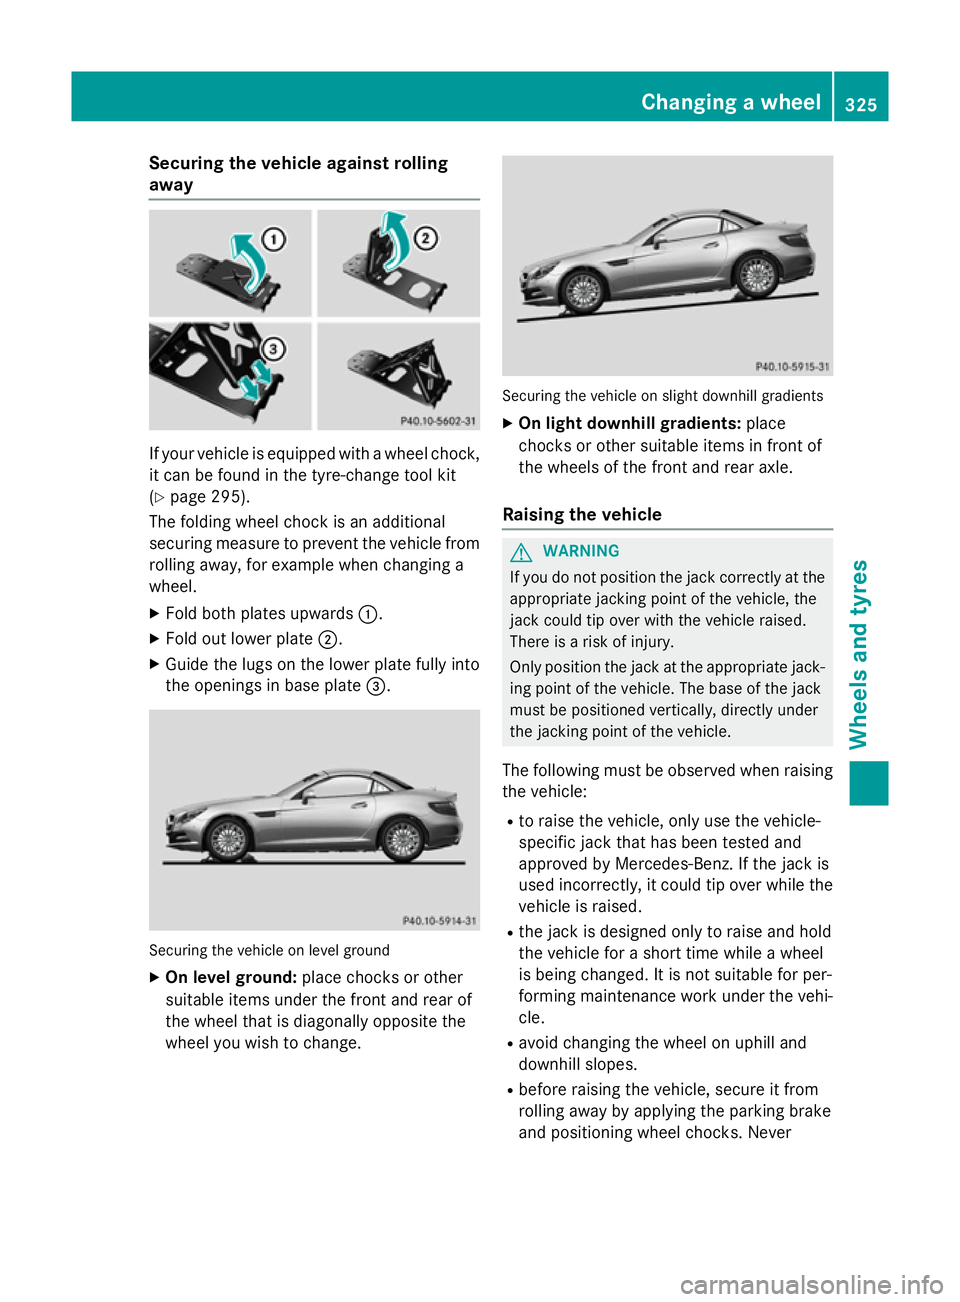
If your vehicle is equipped with a wheel chock,
it can be found in the tyre-change tool kit
(Y page 295).
The folding wheel chock is an additional
securing measure to prevent the vehicle from
rolling away, for example when changing a
wheel.
X Fold both plates upwards :.
X Fold out lower plate ;.
X Guide the lugs on the lower plate fully into
the openings in base plate =.Securing the vehicle on level ground
X On level ground: place chocks or other
suitable items under the front and rear of
the wheel that is diagonally opposite the
wheel you wish to change. Securing the vehicle on slight downhill gradients
X On light downhill gradients: place
chocks or other suitable items in front of
the wheels of the front and rear axle.
Raising the vehicle G
WARNING
If you do not position the jack correctly at the appropriate jacking point of the vehicle, the
jack could tip over with the vehicle raised.
There is a risk of injury.
Only position the jack at the appropriate jack-
ing point of the vehicle. The base of the jack
must be positioned vertically, directly under
the jacking point of the vehicle.
The following must be observed when raising the vehicle:
R to raise the vehicle, only use the vehicle-
specific jack that has been tested and
approved by Mercedes-Benz. If the jack is
used incorrectly, it could tip over while the
vehicle is raised.
R the jack is designed only to raise and hold
the vehicle for a short time while a wheel
is being changed. It is not suitable for per-
forming maintenance work under the vehi-
cle.
R avoid changing the wheel on uphill and
downhill slopes.
R before raising the vehicle, secure it from
rolling away by applying the parking brake
and positioning wheel chocks. Never Changing a wheel
325Wheels and tyres Z
Page 329 of 357
release the parking brake while the vehicle
is raised.
R the jack must be placed on a firm, flat and
non-slip surface. On a loose surface, a
large, flat, load-bearing underlay must be
used. On a slippery surface, a non-slip
underlay must be used, e.g. a rubber mat.
R do not use wooden blocks or similar
objects as a jack underlay. Otherwise, the
jack will not be able to achieve its load-
bearing capacity due to the restricted
height.
R make sure that the distance between the
underside of the tyres and the ground does not exceed 3 cm.
R never place your hands or feet under the
raised vehicle.
R do not lie under the vehicle.
R do not start the engine when the vehicle is
raised.
R do not open or close a door or the boot lid
when the vehicle is raised.
R make sure that no persons are present in
the vehicle when the vehicle is raised. X
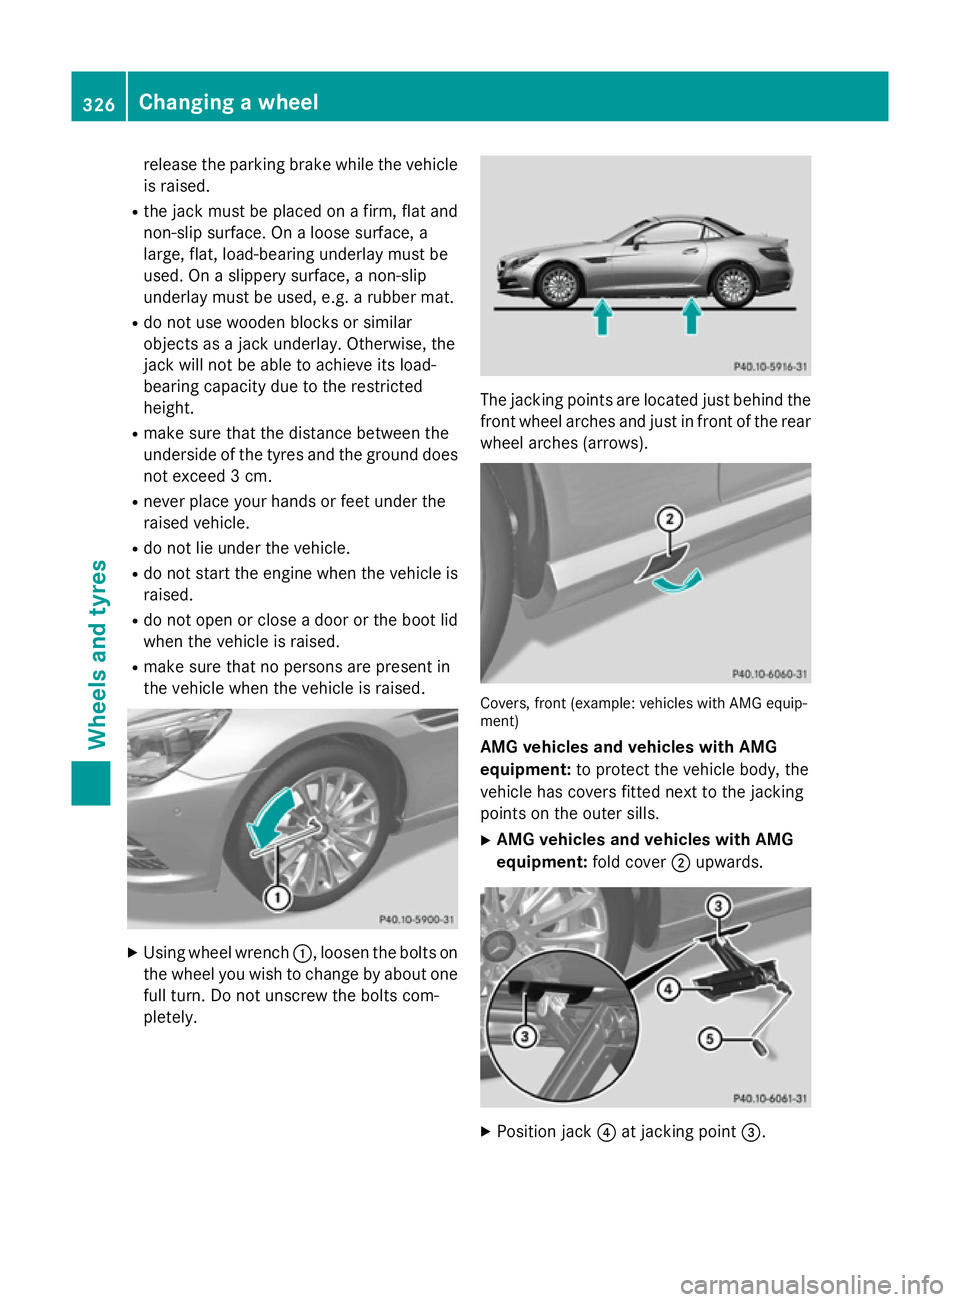
Using wheel wrench :, loosen the bolts on
the wheel you wish to change by about one full turn. Do not unscrew the bolts com-
pletely. The jacking points are located just behind the
front wheel arches and just in front of the rear wheel arches (arrows). Covers, front (example: vehicles with AMG equip-
ment)
AMG vehicles and vehicles with AMG
equipment: to protect the vehicle body, the
vehicle has covers fitted next to the jacking
points on the outer sills.
X AMG vehicles and vehicles with AMG
equipment: fold cover;upwards. X
Position jack ?at jacking point =.326
Changing a wheelWheels and tyres
Page 330 of 357
Example
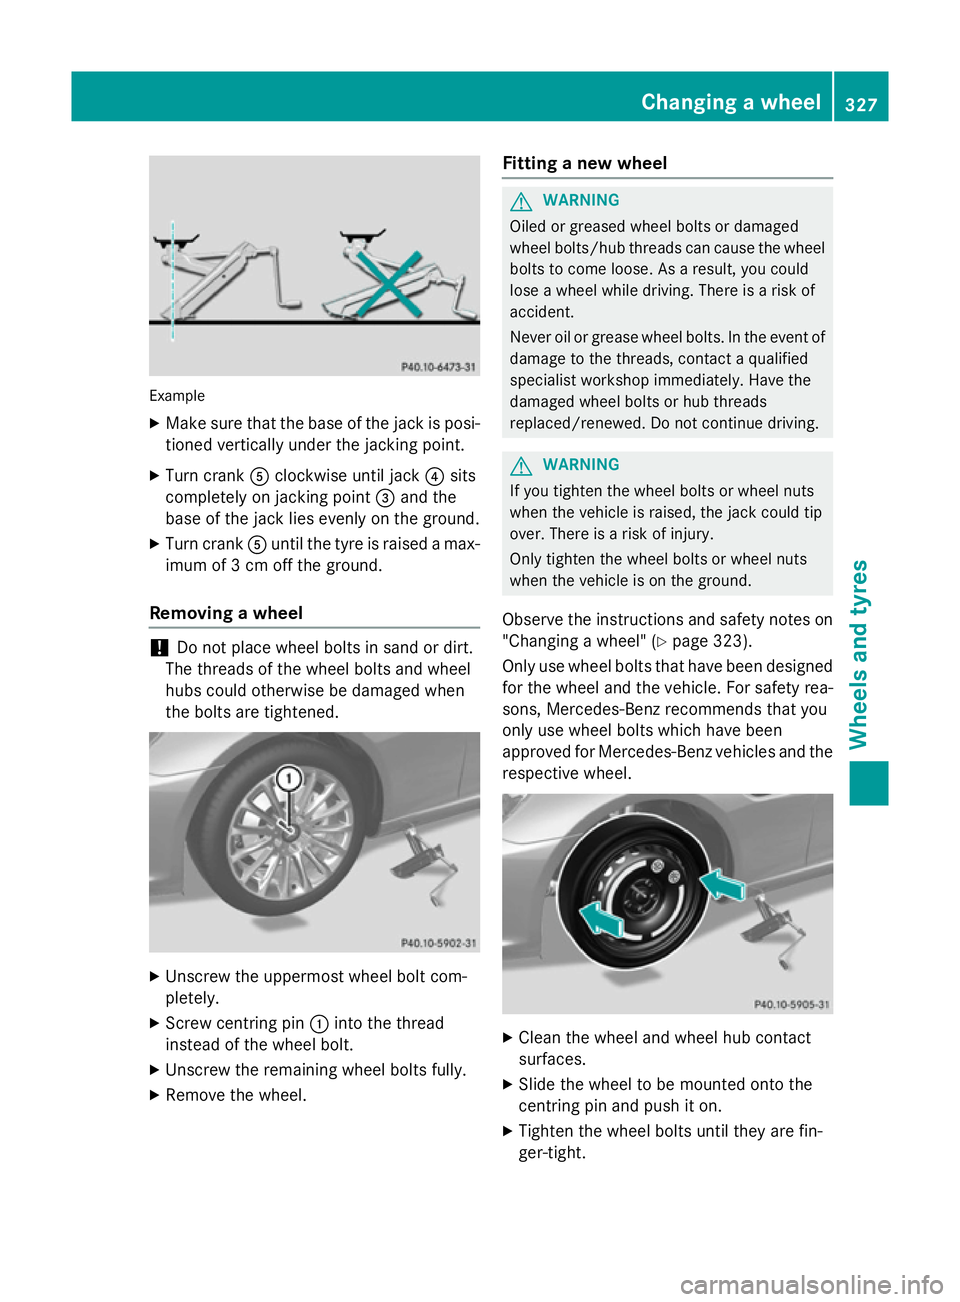
X Make sure that the base of the jack is posi-
tioned vertically under the jacking point.
X Turn crank Aclockwise until jack ?sits
completely on jacking point =and the
base of the jack lies evenly on the ground.
X Turn crank Auntil the tyre is raised a max-
imum of 3 cm off the ground.
Removing a wheel !
Do not place wheel bolts in sand or dirt.
The threads of the wheel bolts and wheel
hubs could otherwise be damaged when
the bolts are tightened. X
Unscrew the uppermost wheel bolt com-
pletely.
X Screw centring pin :into the thread
instead of the wheel bolt.
X Unscrew the remaining wheel bolts fully.
X Remove the wheel. Fitting a new wheel G
WARNING
Oiled or greased wheel bolts or damaged
wheel bolts/hub threads can cause the wheel bolts to come loose. As a result, you could
lose a wheel while driving. There is a risk of
accident.
Never oil or grease wheel bolts. In the event of damage to the threads, contact a qualified
specialist workshop immediately. Have the
damaged wheel bolts or hub threads
replaced/renewed. Do not continue driving. G
WARNING
If you tighten the wheel bolts or wheel nuts
when the vehicle is raised, the jack could tip
over. There is a risk of injury.
Only tighten the wheel bolts or wheel nuts
when the vehicle is on the ground.
Observe the instructions and safety notes on "Changing a wheel" (Y page 323).
Only use wheel bolts that have been designed
for the wheel and the vehicle. For safety rea-
sons, Mercedes-Benz recommends that you
only use wheel bolts which have been
approved for Mercedes-Benz vehicles and the
respective wheel. X
Clean the wheel and wheel hub contact
surfaces.
X Slide the wheel to be mounted onto the
centring pin and push it on.
X Tighten the wheel bolts until they are fin-
ger-tight. Changing a wheel
327Wheels and tyres Z