MERCEDES-BENZ SPRINTER 2005 Service Repair Manual
Manufacturer: MERCEDES-BENZ, Model Year: 2005, Model line: SPRINTER, Model: MERCEDES-BENZ SPRINTER 2005Pages: 1232, PDF Size: 39.23 MB
Page 1121 of 1232
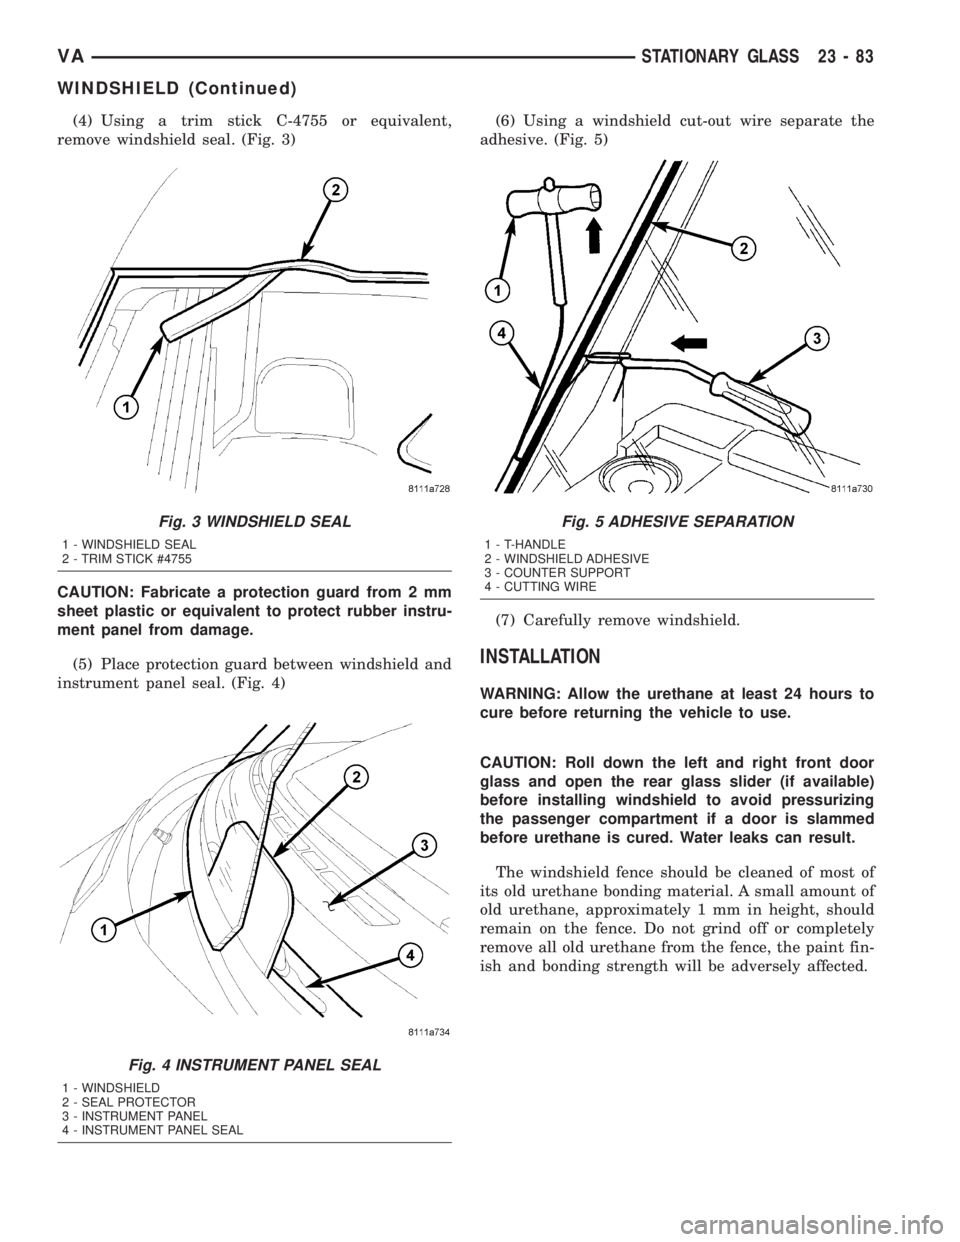
(4) Using a trim stick C-4755 or equivalent,
remove windshield seal. (Fig. 3)
CAUTION: Fabricate a protection guard from 2 mm
sheet plastic or equivalent to protect rubber instru-
ment panel from damage.
(5) Place protection guard between windshield and
instrument panel seal. (Fig. 4)(6) Using a windshield cut-out wire separate the
adhesive. (Fig. 5)
(7) Carefully remove windshield.
INSTALLATION
WARNING: Allow the urethane at least 24 hours to
cure before returning the vehicle to use.
CAUTION: Roll down the left and right front door
glass and open the rear glass slider (if available)
before installing windshield to avoid pressurizing
the passenger compartment if a door is slammed
before urethane is cured. Water leaks can result.
The windshield fence should be cleaned of most of
its old urethane bonding material. A small amount of
old urethane, approximately 1 mm in height, should
remain on the fence. Do not grind off or completely
remove all old urethane from the fence, the paint fin-
ish and bonding strength will be adversely affected.
Fig. 3 WINDSHIELD SEAL
1 - WINDSHIELD SEAL
2 - TRIM STICK #4755
Fig. 4 INSTRUMENT PANEL SEAL
1 - WINDSHIELD
2 - SEAL PROTECTOR
3 - INSTRUMENT PANEL
4 - INSTRUMENT PANEL SEAL
Fig. 5 ADHESIVE SEPARATION
1 - T-HANDLE
2 - WINDSHIELD ADHESIVE
3 - COUNTER SUPPORT
4 - CUTTING WIRE
VASTATIONARY GLASS 23 - 83
WINDSHIELD (Continued)
Page 1122 of 1232
Windshield Preparation - Installing A Previously
Installed Windshield
(1) Level old bead of windshield adhesive to a
thickness of approximately 1 mm (0.04 in.) and
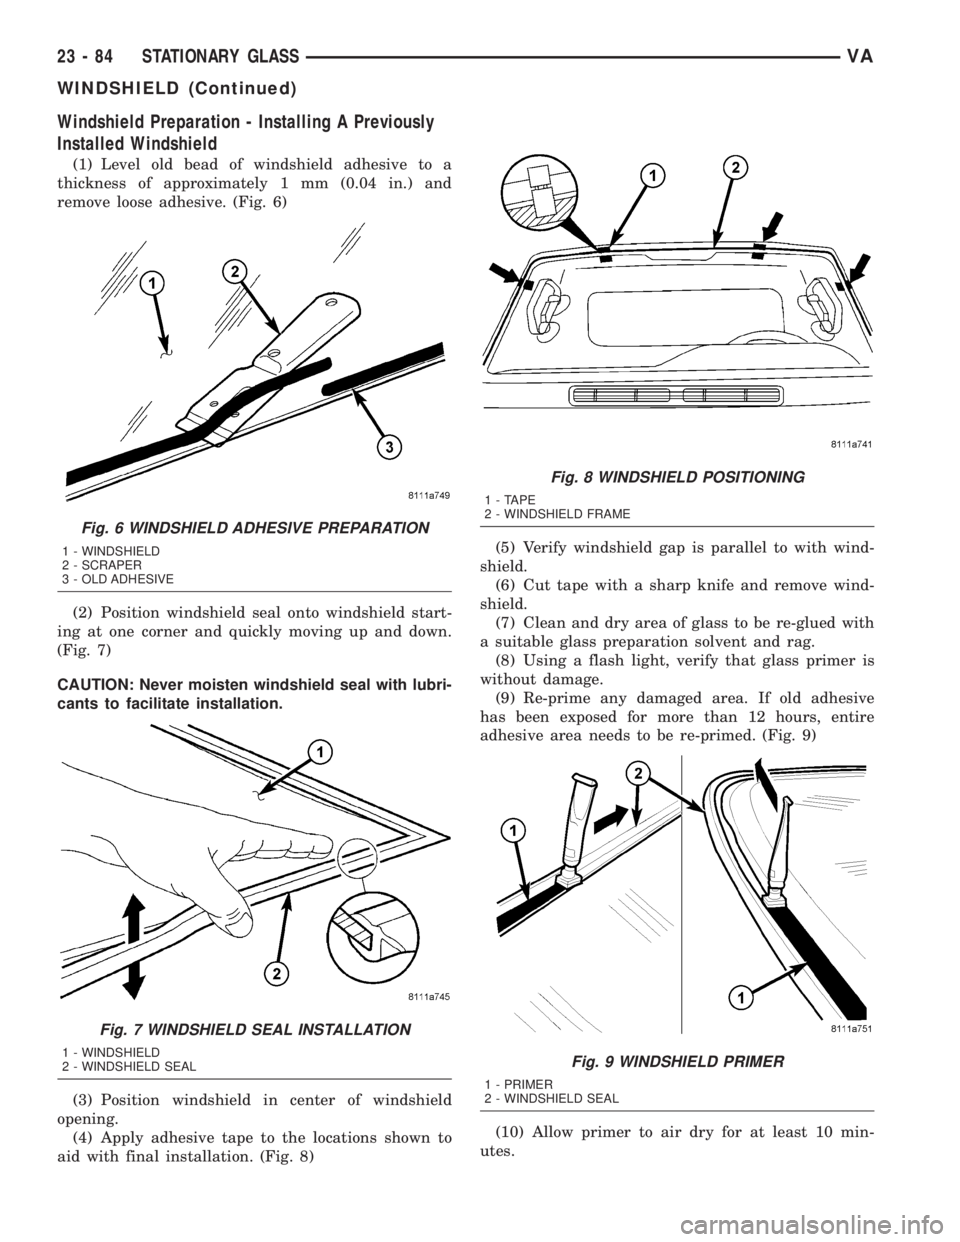
remove loose adhesive. (Fig. 6)
(2) Position windshield seal onto windshield start-
ing at one corner and quickly moving up and down.
(Fig. 7)
CAUTION: Never moisten windshield seal with lubri-
cants to facilitate installation.
(3) Position windshield in center of windshield
opening.
(4) Apply adhesive tape to the locations shown to
aid with final installation. (Fig. 8)(5) Verify windshield gap is parallel to with wind-
shield.
(6) Cut tape with a sharp knife and remove wind-
shield.
(7) Clean and dry area of glass to be re-glued with
a suitable glass preparation solvent and rag.
(8) Using a flash light, verify that glass primer is
without damage.
(9) Re-prime any damaged area. If old adhesive
has been exposed for more than 12 hours, entire
adhesive area needs to be re-primed. (Fig. 9)
(10) Allow primer to air dry for at least 10 min-
utes.
Fig. 6 WINDSHIELD ADHESIVE PREPARATION
1 - WINDSHIELD
2 - SCRAPER
3 - OLD ADHESIVE
Fig. 7 WINDSHIELD SEAL INSTALLATION
1 - WINDSHIELD
2 - WINDSHIELD SEAL
Fig. 8 WINDSHIELD POSITIONING
1 - TAPE
2 - WINDSHIELD FRAME
Fig. 9 WINDSHIELD PRIMER
1 - PRIMER
2 - WINDSHIELD SEAL
23 - 84 STATIONARY GLASSVA
WINDSHIELD (Continued)
Page 1123 of 1232
(11) Using a flash light, verify that glass primer is
without damage.
Windshield Preparation - Installing A New
Windshield
(1) Clean and check windshield for damage.
(2) Position windshield seal onto windshield start-
ing at one corner and quickly moving up and down.
(Fig. 7)
CAUTION: Never moisten windshield seal with lubri-
cants to facilitate installation.
(3) Position windshield in center of windshield
opening.
(4) Apply adhesive tape to the locations shown to
aid with final installation. (Fig. 8)
(5) Verify windshield gap is parallel to with wind-
shield.
(6) Cut tape with a sharp knife and remove wind-
shield.
(7) Clean and dry area of glass to be glued with a
suitable glass preparation solvent and rag.
(8) Apply primer to gluing surface at windshield
seal. (Fig. 9)
(9) Allow primer to air dry for at least 10 minutes.
(10) Using a flash light, verify that glass primer is
without damage.
Windshield Opening Preparation
(1) Clean and vacuum windshield opening.
(2) Level old bead of windshield opening adhesive
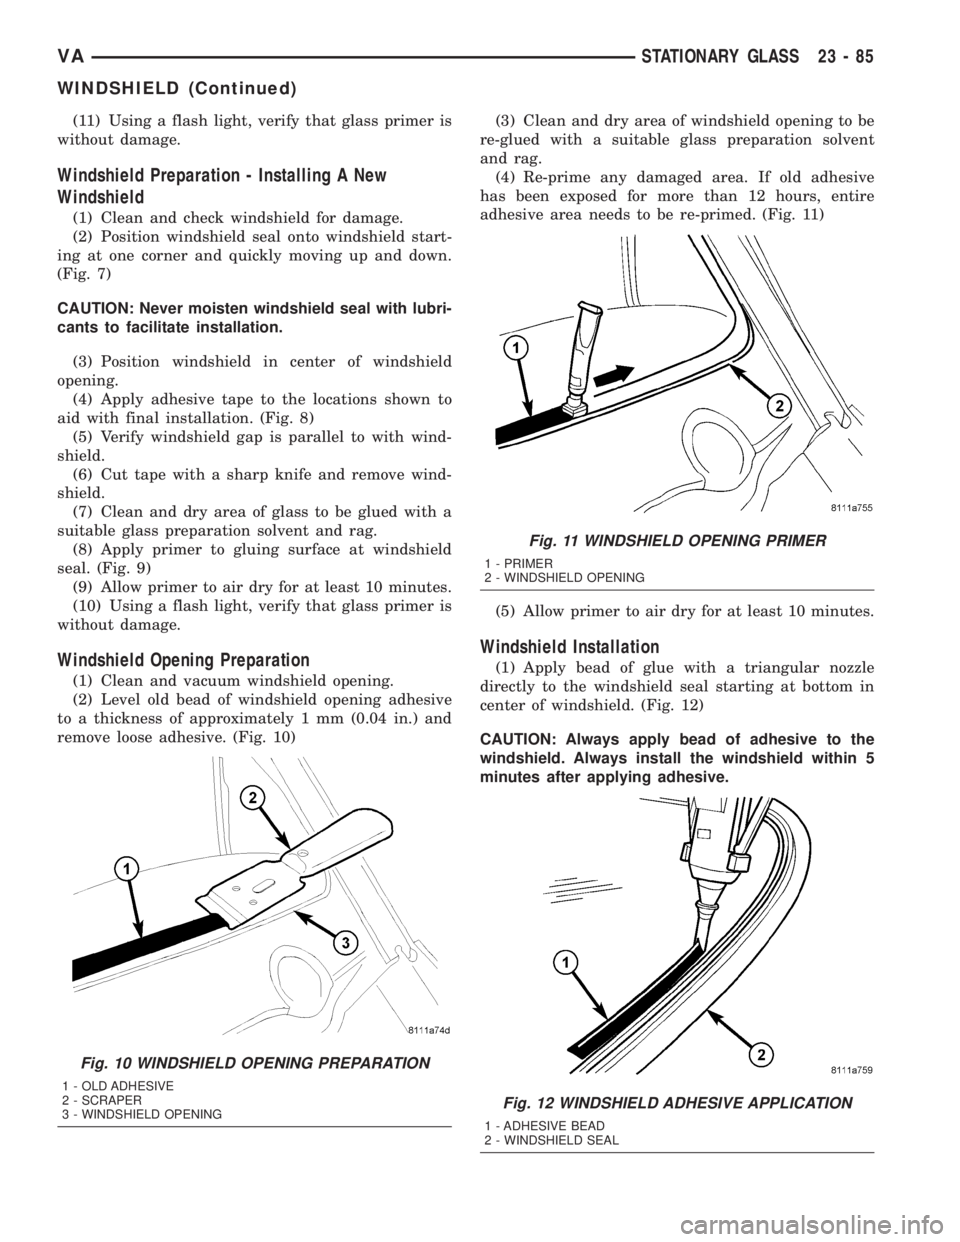
to a thickness of approximately 1 mm (0.04 in.) and
remove loose adhesive. (Fig. 10)(3) Clean and dry area of windshield opening to be
re-glued with a suitable glass preparation solvent
and rag.
(4) Re-prime any damaged area. If old adhesive
has been exposed for more than 12 hours, entire
adhesive area needs to be re-primed. (Fig. 11)
(5) Allow primer to air dry for at least 10 minutes.
Windshield Installation
(1) Apply bead of glue with a triangular nozzle
directly to the windshield seal starting at bottom in
center of windshield. (Fig. 12)
CAUTION: Always apply bead of adhesive to the
windshield. Always install the windshield within 5
minutes after applying adhesive.
Fig. 10 WINDSHIELD OPENING PREPARATION
1 - OLD ADHESIVE
2 - SCRAPER
3 - WINDSHIELD OPENING
Fig. 11 WINDSHIELD OPENING PRIMER
1 - PRIMER
2 - WINDSHIELD OPENING
Fig. 12 WINDSHIELD ADHESIVE APPLICATION
1 - ADHESIVE BEAD
2 - WINDSHIELD SEAL
VASTATIONARY GLASS 23 - 85
WINDSHIELD (Continued)
Page 1124 of 1232
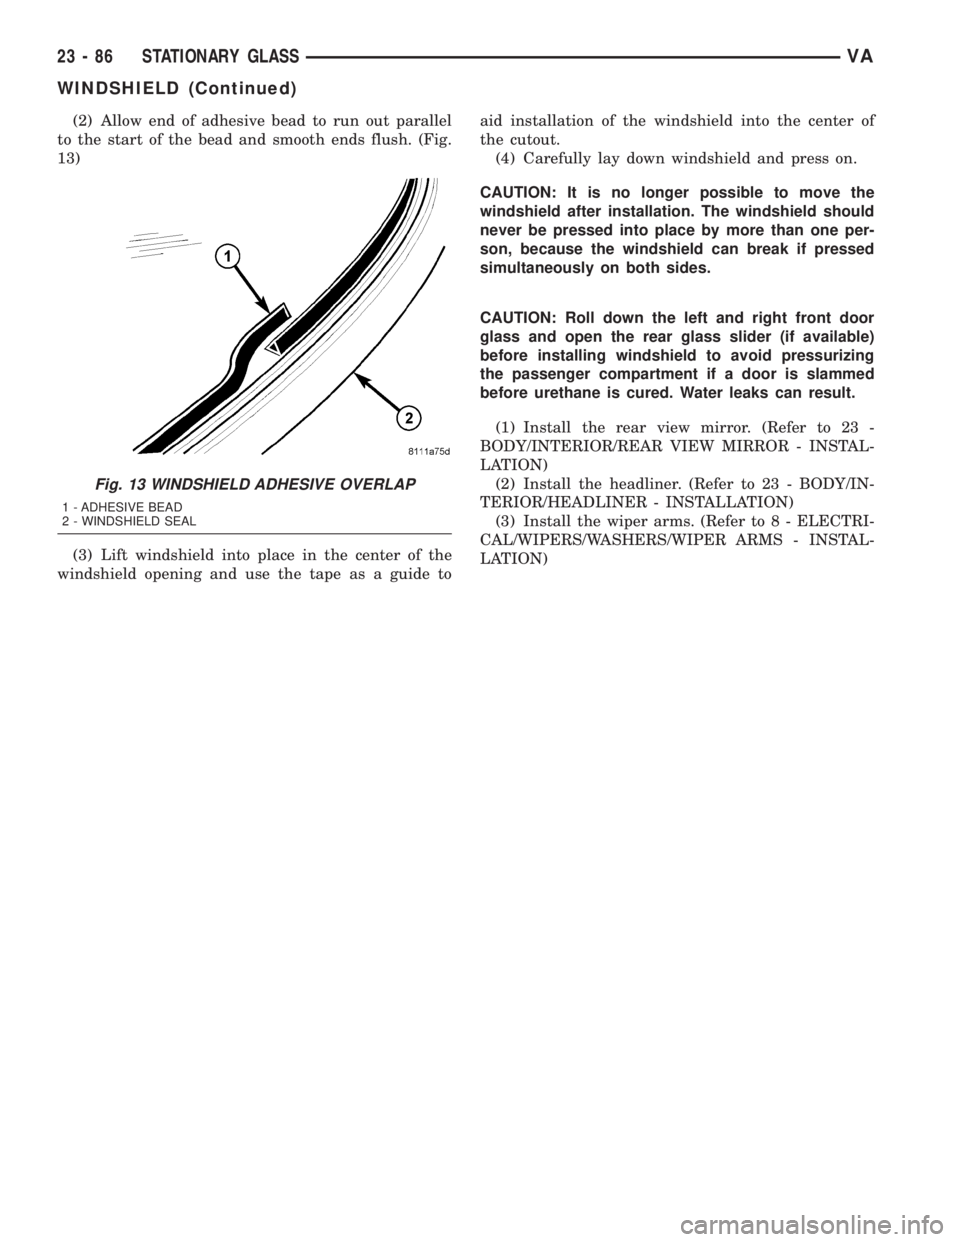
(2) Allow end of adhesive bead to run out parallel
to the start of the bead and smooth ends flush. (Fig.
13)
(3) Lift windshield into place in the center of the
windshield opening and use the tape as a guide toaid installation of the windshield into the center of
the cutout.
(4) Carefully lay down windshield and press on.
CAUTION: It is no longer possible to move the
windshield after installation. The windshield should
never be pressed into place by more than one per-
son, because the windshield can break if pressed
simultaneously on both sides.
CAUTION: Roll down the left and right front door
glass and open the rear glass slider (if available)
before installing windshield to avoid pressurizing
the passenger compartment if a door is slammed
before urethane is cured. Water leaks can result.
(1) Install the rear view mirror. (Refer to 23 -
BODY/INTERIOR/REAR VIEW MIRROR - INSTAL-
LATION)
(2) Install the headliner. (Refer to 23 - BODY/IN-
TERIOR/HEADLINER - INSTALLATION)
(3) Install the wiper arms. (Refer to 8 - ELECTRI-
CAL/WIPERS/WASHERS/WIPER ARMS - INSTAL-
LATION)
Fig. 13 WINDSHIELD ADHESIVE OVERLAP
1 - ADHESIVE BEAD
2 - WINDSHIELD SEAL
23 - 86 STATIONARY GLASSVA
WINDSHIELD (Continued)
Page 1125 of 1232
WEATHERSTRIP/SEALS
TABLE OF CONTENTS
page page
FRONT DOOR INNER BELT WEATHERSTRIP
REMOVAL.............................87
INSTALLATION.........................87
FRONT DOOR OUTER BELT WEATHERSTRIP
REMOVAL.............................87INSTALLATION.........................87
DOOR OPENING SEALS
REMOVAL.............................87
INSTALLATION.........................87
FRONT DOOR INNER BELT
WEATHERSTRIP
REMOVAL
(1) Remove the front door trim panel. (Refer to 23
- BODY/DOOR - FRONT/TRIM PANEL - REMOVAL)
(2) Remove the inner belt weatherstrip.
INSTALLATION
(1) Install the inner belt weatherstrip.
(2) Install the trim panel. (Refer to 23 - BODY/
DOOR - FRONT/TRIM PANEL - INSTALLATION)
FRONT DOOR OUTER BELT
WEATHERSTRIP
REMOVAL
(1) Remove door glass. (Refer to 23 - BODY/DOOR
- FRONT/DOOR GLASS - REMOVAL)
(2) Remove screws at window channel and remove
channel.
(3) Remove outer belt weatherstrip.
INSTALLATION
(1) Install outer belt weatherstrip.
(2) Install glass run channel and install the
screws.
(3) Install the door glass. (Refer to 23 - BODY/
DOOR - FRONT/DOOR GLASS - INSTALLATION)
DOOR OPENING SEALS
REMOVAL
(1) Open door and separate the door opening seal
from the door opening flange.
INSTALLATION
(1) Position the seal to the bottom of the door
opening, with bulb facing outboard, starting the
installation at the center of the lower flange. Press
the seal onto the sill flange and work around the
perimeter of the door opening until fully seated.
Work in one direction, smoothing the seal to avoid
puckers or wrinkles.
(2) When installing a new weatherstrip on the
front door opening, remove the tear strip starting at
the splice and moving around the front of the door to
the back of the opening.
VAWEATHERSTRIP/SEALS 23 - 87
Page 1126 of 1232
BODY STRUCTURE
TABLE OF CONTENTS
page page
GAP AND FLUSH
SPECIFICATIONS.......................88OPENING DIMENSIONS
SPECIFICATIONS.......................90
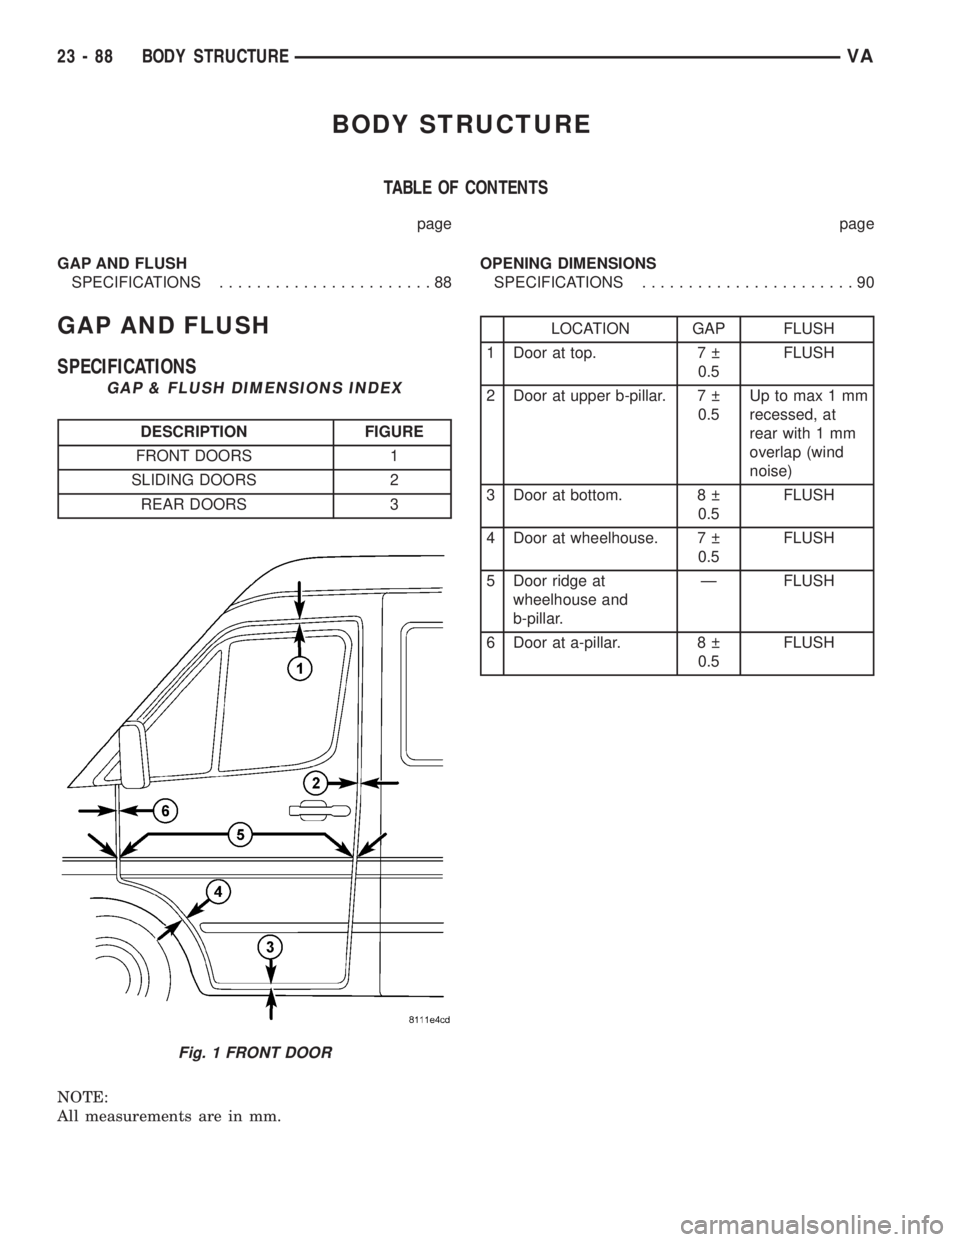
GAP AND FLUSH
SPECIFICATIONS
GAP & FLUSH DIMENSIONS INDEX
DESCRIPTION FIGURE
FRONT DOORS 1
SLIDING DOORS 2
REAR DOORS 3
NOTE:
All measurements are in mm.
LOCATION GAP FLUSH
1 Door at top. 7
0.5FLUSH
2 Door at upper b-pillar. 7
0.5Up to max 1 mm
recessed, at
rear with 1 mm
overlap (wind
noise)
3 Door at bottom. 8
0.5FLUSH
4 Door at wheelhouse. 7
0.5FLUSH
5 Door ridge at
wheelhouse and
b-pillar.Ð FLUSH
6 Door at a-pillar. 8
0.5FLUSH
Fig. 1 FRONT DOOR
23 - 88 BODY STRUCTUREVA
Page 1127 of 1232
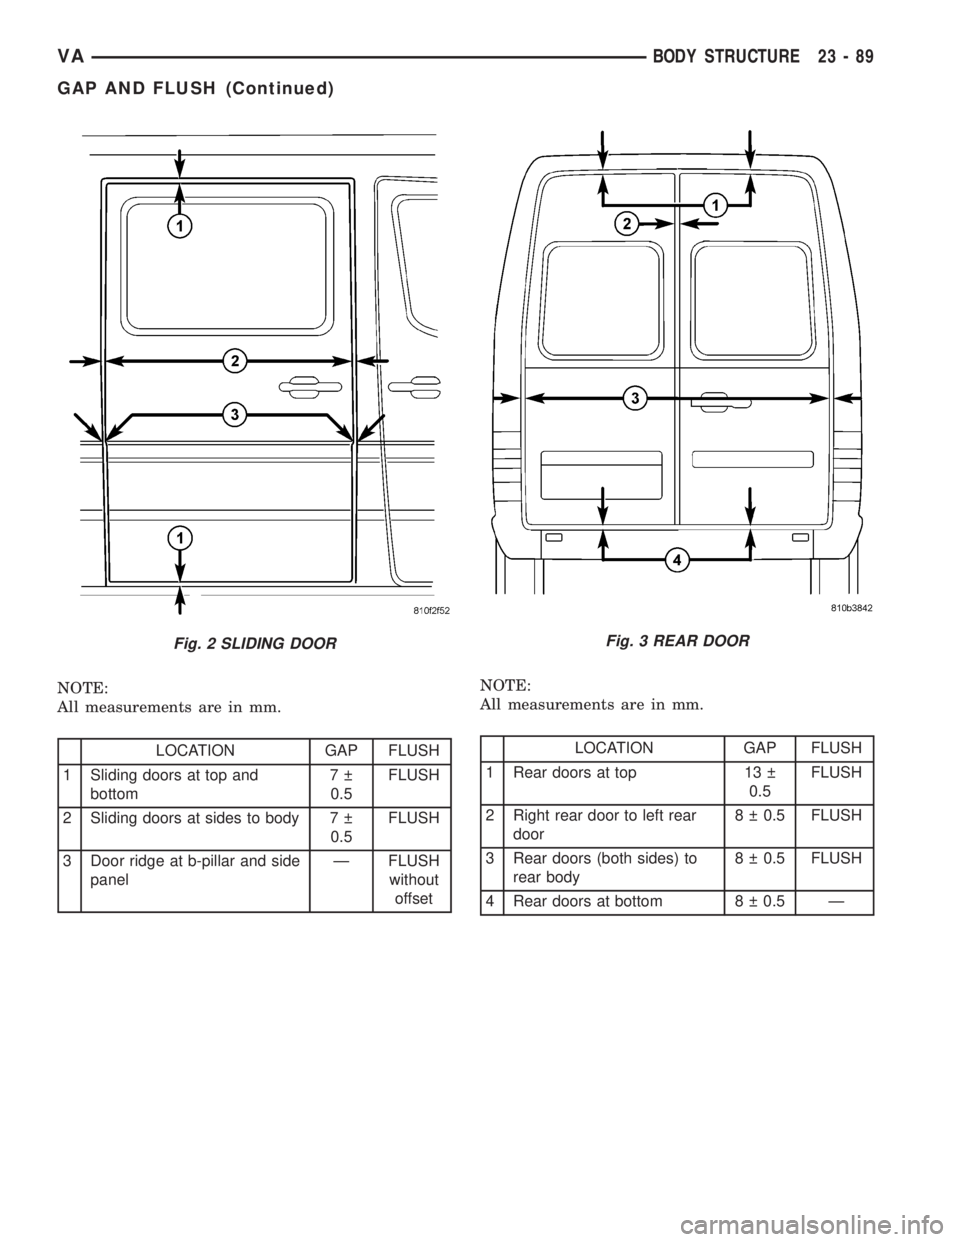
NOTE:
All measurements are in mm.
LOCATION GAP FLUSH
1 Sliding doors at top and
bottom7
0.5FLUSH
2 Sliding doors at sides to body 7
0.5FLUSH
3 Door ridge at b-pillar and side
panelÐ FLUSH
without
offsetNOTE:
All measurements are in mm.LOCATION GAP FLUSH
1 Rear doors at top 13
0.5FLUSH
2 Right rear door to left rear
door8 0.5 FLUSH
3 Rear doors (both sides) to
rear body8 0.5 FLUSH
4 Rear doors at bottom 8 0.5 Ð
Fig. 2 SLIDING DOORFig. 3 REAR DOOR
VABODY STRUCTURE 23 - 89
GAP AND FLUSH (Continued)
Page 1128 of 1232

OPENING DIMENSIONS
SPECIFICATIONS
BODY OPENING DIMENSIONS INDEX
DESCRIPTION FIGURE
WINDSHIELD OPENING 4
Fig. 4 WINDSHIELD OPENING
23 - 90 BODY STRUCTUREVA
Page 1129 of 1232
HEATING & AIR CONDITIONING
TABLE OF CONTENTS
page page
HEATING & AIR CONDITIONING
DESCRIPTION
DESCRIPTION - COOLING SYSTEM
REQUIREMENTS.......................1
DESCRIPTION - HEATER AND AIR
CONDITIONER........................1
OPERATION - HEATER AND AIR
CONDITIONER........................2
DIAGNOSIS AND TESTING
DIAGNOSIS AND TESTING - FUNCTION
TEST................................3
DIAGNOSIS AND TESTING - A/C
PERFORMANCE TEST..................3DIAGNOSIS AND TESTING - HEATER
PERFORMANCE.......................4
SPECIFICATIONS
A/C SYSTEM..........................5
CONTROLS - FRONT......................8
CONTROLS - REAR......................22
DISTRIBUTION - FRONT...................31
DISTRIBUTION - REAR....................39
PLUMBING.............................43
CABIN HEATER.........................72
HEATING & AIR
CONDITIONING
DESCRIPTION
DESCRIPTION - COOLING SYSTEM
REQUIREMENTS
To maintain the performance level of the heating-
air conditioning system, the engine cooling system
must be properly maintained. The use of a bug
screen is not recommended. Any obstructions in front
of the radiator or condenser will reduce the perfor-
mance of the air conditioning and engine cooling sys-
tems.
The engine cooling system includes the radiator,
thermostat, heater core, heater hoses and the engine
coolant pump. Refer to Cooling for more information
before opening or attempting any service to the
engine cooling system.
DESCRIPTION - HEATER AND AIR
CONDITIONER
A automatic temperature control (ATC) single zone
type heating-air conditioning system is standard
equipment on this model. A manually controlled rear
air conditioning system is available as a factory-in-
stalled option.
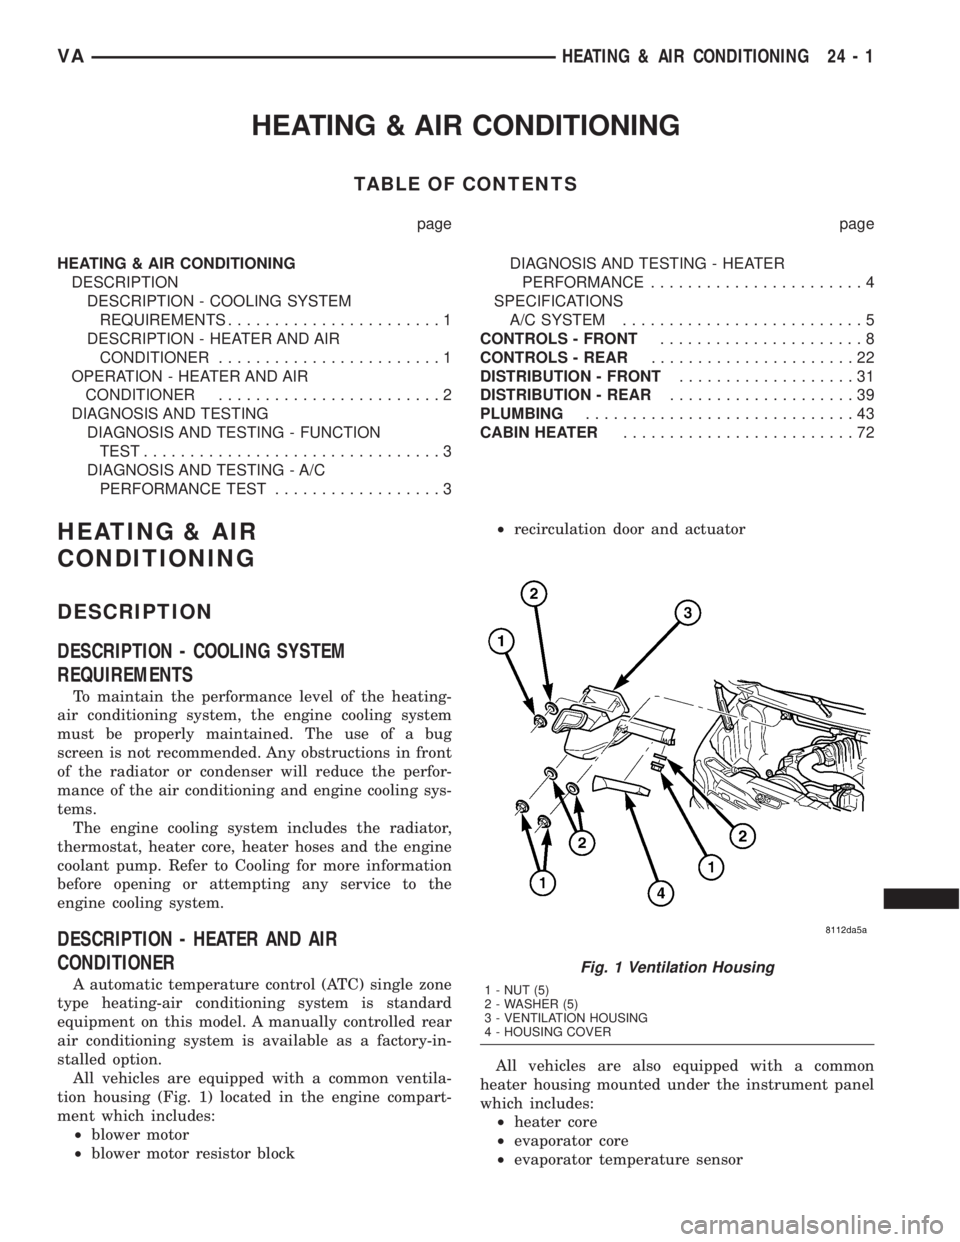
All vehicles are equipped with a common ventila-
tion housing (Fig. 1) located in the engine compart-
ment which includes:
²blower motor
²blower motor resistor block²recirculation door and actuator
All vehicles are also equipped with a common
heater housing mounted under the instrument panel
which includes:
²heater core
²evaporator core
²evaporator temperature sensor
Fig. 1 Ventilation Housing
1 - NUT (5)
2 - WASHER (5)
3 - VENTILATION HOUSING
4 - HOUSING COVER
VAHEATING & AIR CONDITIONING 24 - 1
Page 1130 of 1232
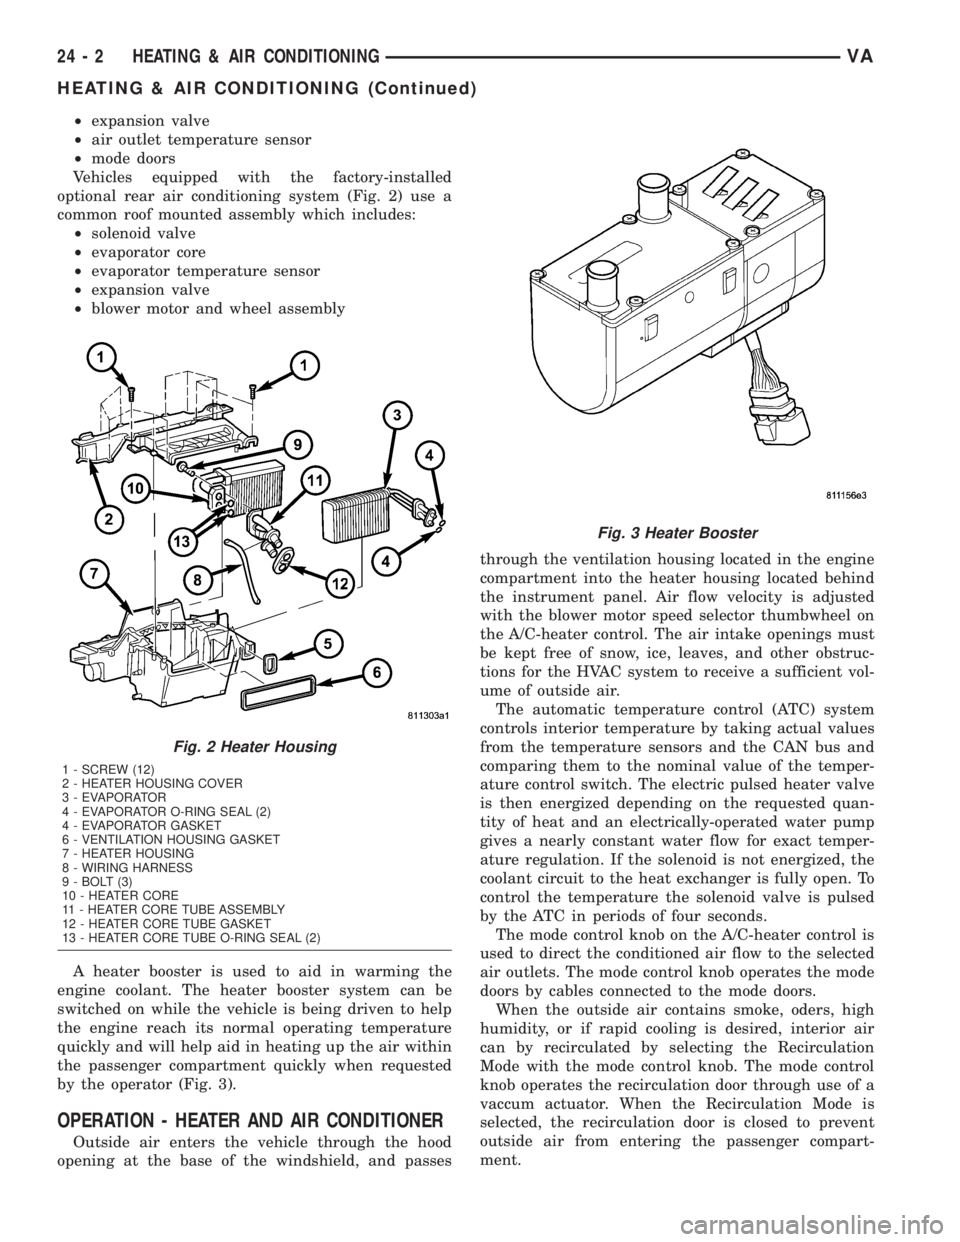
²expansion valve
²air outlet temperature sensor
²mode doors
Vehicles equipped with the factory-installed
optional rear air conditioning system (Fig. 2) use a
common roof mounted assembly which includes:
²solenoid valve
²evaporator core
²evaporator temperature sensor
²expansion valve
²blower motor and wheel assembly
A heater booster is used to aid in warming the
engine coolant. The heater booster system can be
switched on while the vehicle is being driven to help
the engine reach its normal operating temperature
quickly and will help aid in heating up the air within
the passenger compartment quickly when requested
by the operator (Fig. 3).
OPERATION - HEATER AND AIR CONDITIONER
Outside air enters the vehicle through the hood
opening at the base of the windshield, and passesthrough the ventilation housing located in the engine
compartment into the heater housing located behind
the instrument panel. Air flow velocity is adjusted
with the blower motor speed selector thumbwheel on
the A/C-heater control. The air intake openings must
be kept free of snow, ice, leaves, and other obstruc-
tions for the HVAC system to receive a sufficient vol-
ume of outside air.
The automatic temperature control (ATC) system
controls interior temperature by taking actual values
from the temperature sensors and the CAN bus and
comparing them to the nominal value of the temper-
ature control switch. The electric pulsed heater valve
is then energized depending on the requested quan-
tity of heat and an electrically-operated water pump
gives a nearly constant water flow for exact temper-
ature regulation. If the solenoid is not energized, the
coolant circuit to the heat exchanger is fully open. To
control the temperature the solenoid valve is pulsed
by the ATC in periods of four seconds.
The mode control knob on the A/C-heater control is
used to direct the conditioned air flow to the selected
air outlets. The mode control knob operates the mode
doors by cables connected to the mode doors.
When the outside air contains smoke, oders, high
humidity, or if rapid cooling is desired, interior air
can by recirculated by selecting the Recirculation
Mode with the mode control knob. The mode control
knob operates the recirculation door through use of a
vaccum actuator. When the Recirculation Mode is
selected, the recirculation door is closed to prevent
outside air from entering the passenger compart-
ment.
Fig. 2 Heater Housing
1 - SCREW (12)
2 - HEATER HOUSING COVER
3 - EVAPORATOR
4 - EVAPORATOR O-RING SEAL (2)
4 - EVAPORATOR GASKET
6 - VENTILATION HOUSING GASKET
7 - HEATER HOUSING
8 - WIRING HARNESS
9 - BOLT (3)
10 - HEATER CORE
11 - HEATER CORE TUBE ASSEMBLY
12 - HEATER CORE TUBE GASKET
13 - HEATER CORE TUBE O-RING SEAL (2)
Fig. 3 Heater Booster
24 - 2 HEATING & AIR CONDITIONINGVA
HEATING & AIR CONDITIONING (Continued)