torque MITSUBISHI 3000GT 1991 User Guide
[x] Cancel search | Manufacturer: MITSUBISHI, Model Year: 1991, Model line: 3000GT, Model: MITSUBISHI 3000GT 1991Pages: 1146, PDF Size: 76.68 MB
Page 79 of 1146
ENGINE - Timing Belt11-29
OlN004t
& Pin hole
nilnq
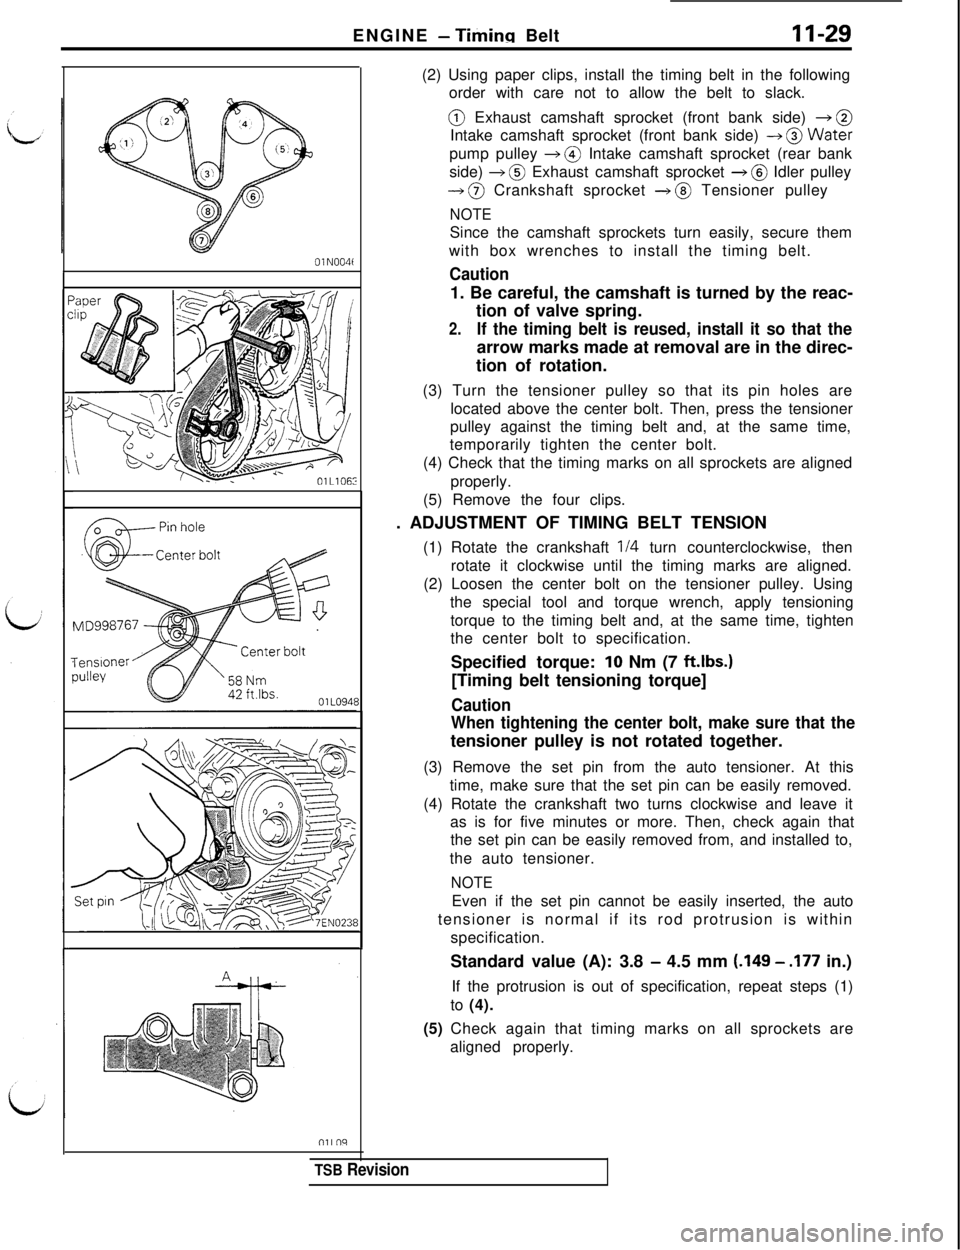
8(2) Using paper clips, install the timing belt in the following
order with care not to allow the belt to slack.@ Exhaust camshaft sprocket (front bank side)
+ @
Intake camshaft sprocket (front bank side)
-+ @Waterpump pulley
+ @ Intake camshaft sprocket (rear bank
side)
+ @ Exhaust camshaft sprocket + @ Idler pulley
-+ @ Crankshaft sprocket + @ Tensioner pulley
NOTESince the camshaft sprockets turn easily, secure them
with box wrenches to install the timing belt.
Caution1. Be careful, the camshaft is turned by the reac-
tion of valve spring.
2.If the timing belt is reused, install it so that thearrow marks made at removal are in the direc-
tion of rotation.
(3) Turn the tensioner pulley so that its pin holes are
located above the center bolt. Then, press the tensioner
pulley against the timing belt and, at the same time,
temporarily tighten the center bolt.
(4) Check that the timing marks on all sprockets are aligned
properly.
(5) Remove the four clips.
. ADJUSTMENT OF TIMING BELT TENSION
(1) Rotate the crankshaft
114 turn counterclockwise, then
rotate it clockwise until the timing marks are aligned.
(2) Loosen the center bolt on the tensioner pulley. Using
the special tool and torque wrench, apply tensioning
torque to the timing belt and, at the same time, tighten
the center bolt to specification.
Specified torque:
10 Nm (7 ftlbs.)
[Timing belt tensioning torque]
Caution
When tightening the center bolt, make sure that thetensioner pulley is not rotated together.
(3) Remove the set pin from the auto tensioner. At this
time, make sure that the set pin can be easily removed.
(4) Rotate the crankshaft two turns clockwise and leave it
as is for five minutes or more. Then, check again that
the set pin can be easily removed from, and installed to,
the auto tensioner.
NOTEEven if the set pin cannot be easily inserted, the auto
tensioner is normal if its rod protrusion is within
specification.
Standard value (A): 3.8
- 4.5 mm (.I49 - .I77 in.)
If the protrusion is out of specification, repeat steps (1)
to (4).
(5) Check again that timing marks on all sprockets are
aligned properly.
TSB Revision
Page 83 of 1146
ENGINE - Rocker Arm and Camshaft11-33
About 10 mm C.39 In.17ENO248
i,(2) Tighten gradually in two or three steps and finally
tighten to specified torque.
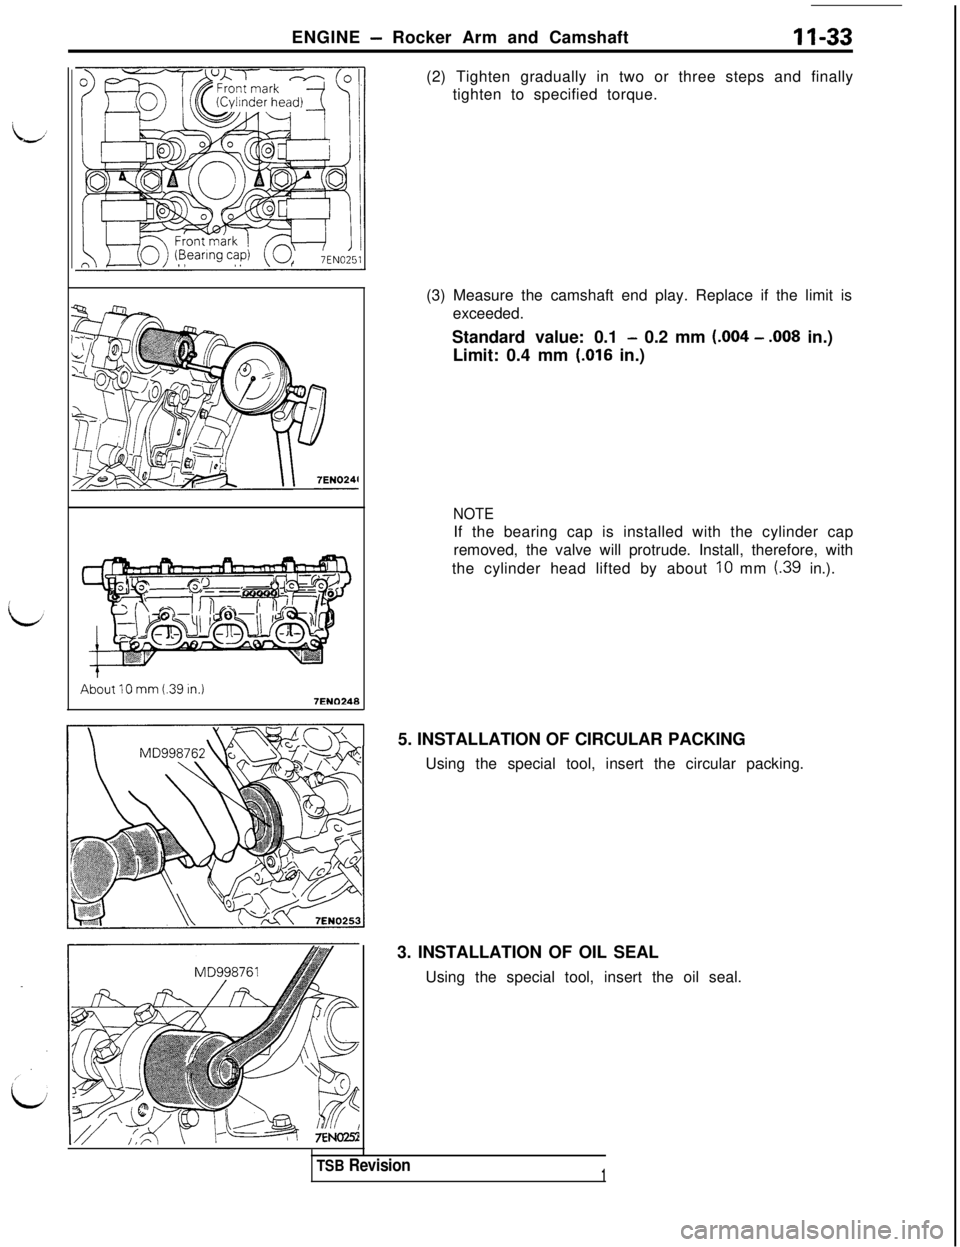
(3) Measure the camshaft end play. Replace if the limit is
exceeded.
Standard value: 0.1
- 0.2 mm (.004 - .008 in.)
Limit: 0.4 mm
(.016 in.)
NOTEIf the bearing cap is installed with the cylinder cap
removed, the valve will protrude. Install, therefore, with
the cylinder head lifted by about
10 mm (.39 in.).
5. INSTALLATION OF CIRCULAR PACKING
Using the special tool, insert the circular packing.
3. INSTALLATION OF OIL SEAL
Using the special tool, insert the oil seal.
TSB Revision1
Page 89 of 1146
L
,
LENGINE
- Cylinder Head and Valve11-391. INSTALLATION OF CYLINDER HEAD BOLT
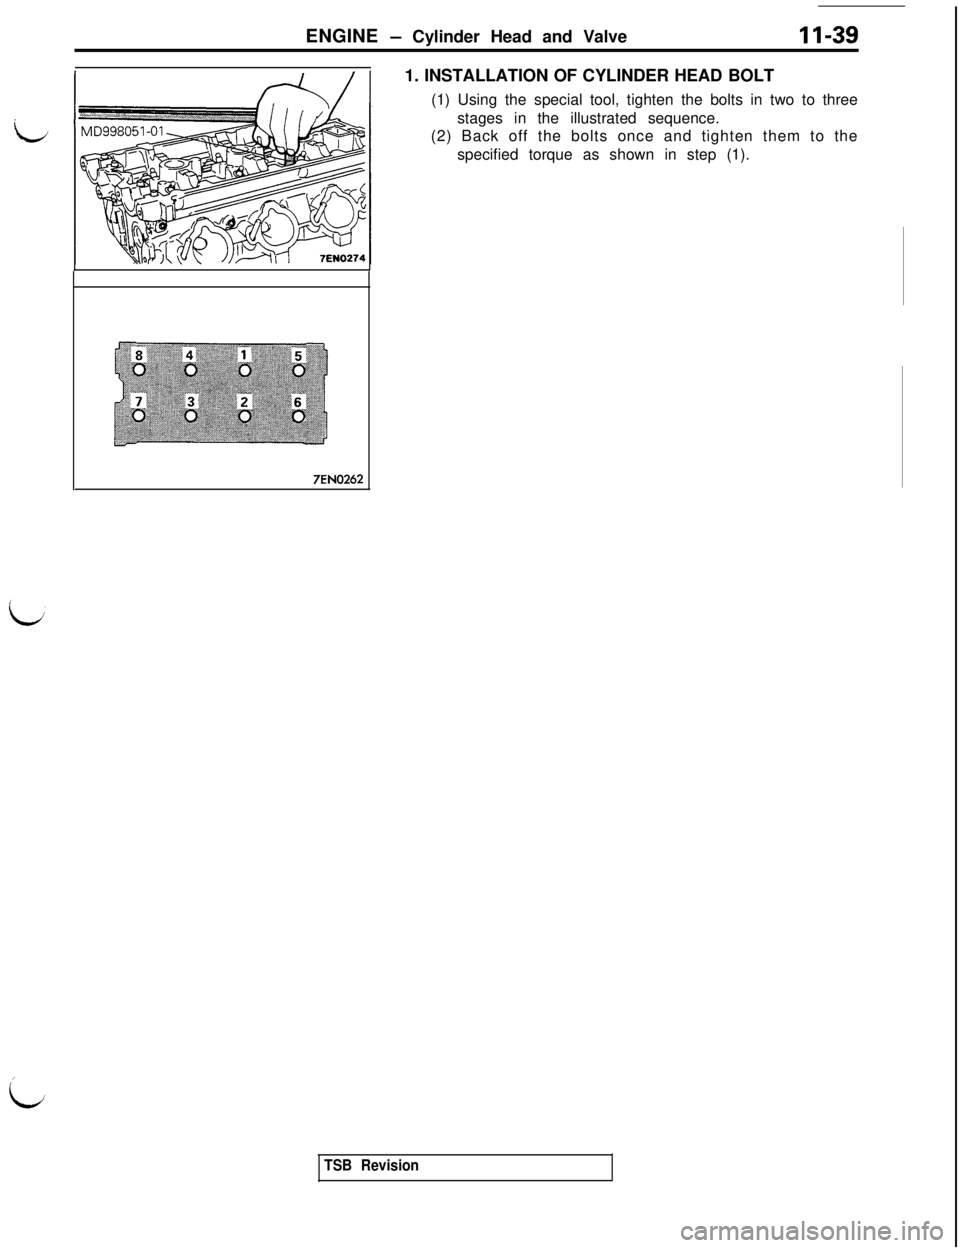
(1) Using the special tool, tighten the bolts in two to three
stages in the illustrated sequence.
(2) Back off the bolts once and tighten them to the
specified torque as shown in step (1).
7EN0262
TSB Revision
Page 101 of 1146
ENGINE - Crankshaft. Flvwheel and Drive Plate11-51
id
PLASTIGAGE METHODMllUlAA
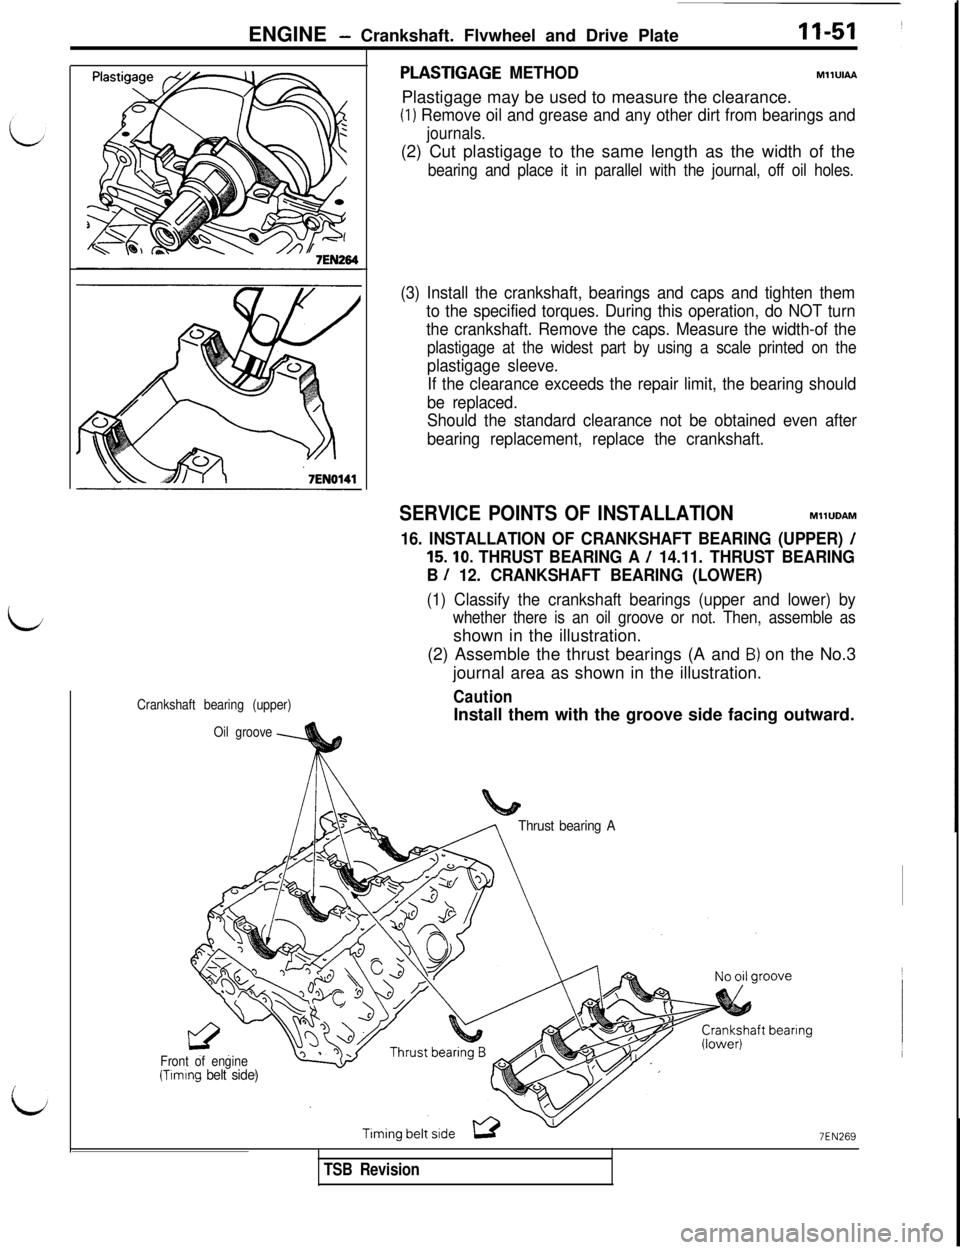
Plastigage may be used to measure the clearance.
(1) Remove oil and grease and any other dirt from bearings and
journals.(2) Cut plastigage to the same length as the width of the
bearing and place it in parallel with the journal, off oil holes.
(3) Install the crankshaft, bearings and caps and tighten them
to the specified torques. During this operation, do NOT turn
the crankshaft. Remove the caps. Measure the width-of the
plastigage at the widest part by using a scale printed on the
plastigage sleeve.
If the clearance exceeds the repair limit, the bearing should
be replaced.
Should the standard clearance not be obtained even after
bearing replacement, replace the crankshaft.
SERVICE POINTS OF INSTALLATIONMllUDAM
16. INSTALLATION OF CRANKSHAFT BEARING (UPPER) /
15.10. THRUST BEARING A / 14.11. THRUST BEARING
B
/ 12. CRANKSHAFT BEARING (LOWER)
(1) Classify the crankshaft bearings (upper and lower) by
whether there is an oil groove or not. Then, assemble asshown in the illustration.
(2) Assemble the thrust bearings (A and
B) on the No.3
journal area as shown in the illustration.
CautionInstall them with the groove side facing outward.Crankshaft bearing (upper)
Oil groove
Thrust bearing A
Front of engine(Tlmlng belt side)
EN269
TSB Revision
Page 102 of 1146
11-52ENGINE - Crankshaft, Flywheel and Drive Plate
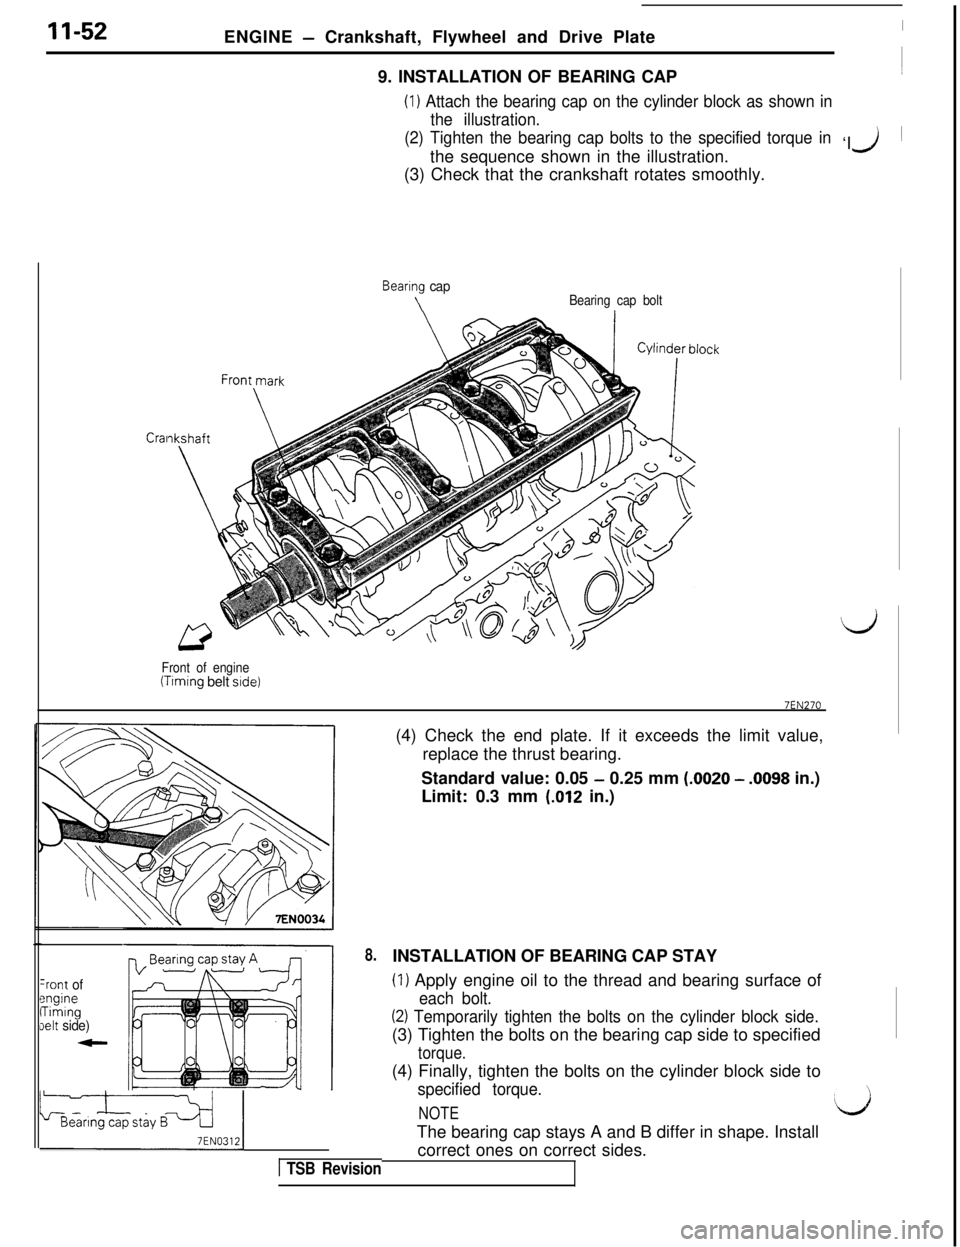
9. INSTALLATION OF BEARING CAP
(1) Attach the bearing cap on the cylinder block as shown in
the illustration.
(2) Tighten the bearing cap bolts to the specified torque in‘I
the sequence shown in the illustration.
J ~
(3) Check that the crankshaft rotates smoothly.
Cral
Bearing cap
\Bearing cap bolt
Front of engine
(Timing belt side)
7EN270(4) Check the end plate. If it exceeds the limit value,
replace the thrust bearing.
Standard value: 0.05
- 0.25 mm (.0020 - .0098 in.)
Limit: 0.3 mm
(.012 in.)
-rent ofengineTimingIelt side)
8.
LLiN03,ij
1 TSB RevisionINSTALLATION OF BEARING CAP STAY
(1) Apply engine oil to the thread and bearing surface of
each bolt.
(2) Temporarily tighten the bolts on the cylinder block side.(3) Tighten the bolts on the bearing cap side to specified
torque.(4) Finally, tighten the bolts on the cylinder block side to
specified torque.
NOTEThe bearing cap stays A and B differ in shape. Install
correct ones on correct sides.d
Page 104 of 1146
11-54ENGINE - Cylinder Block
I
$jA A@/
,12 mm (.47 in.)
I
t+ ‘: ;I 2 Center -
Thrust
direction
-point7EN268
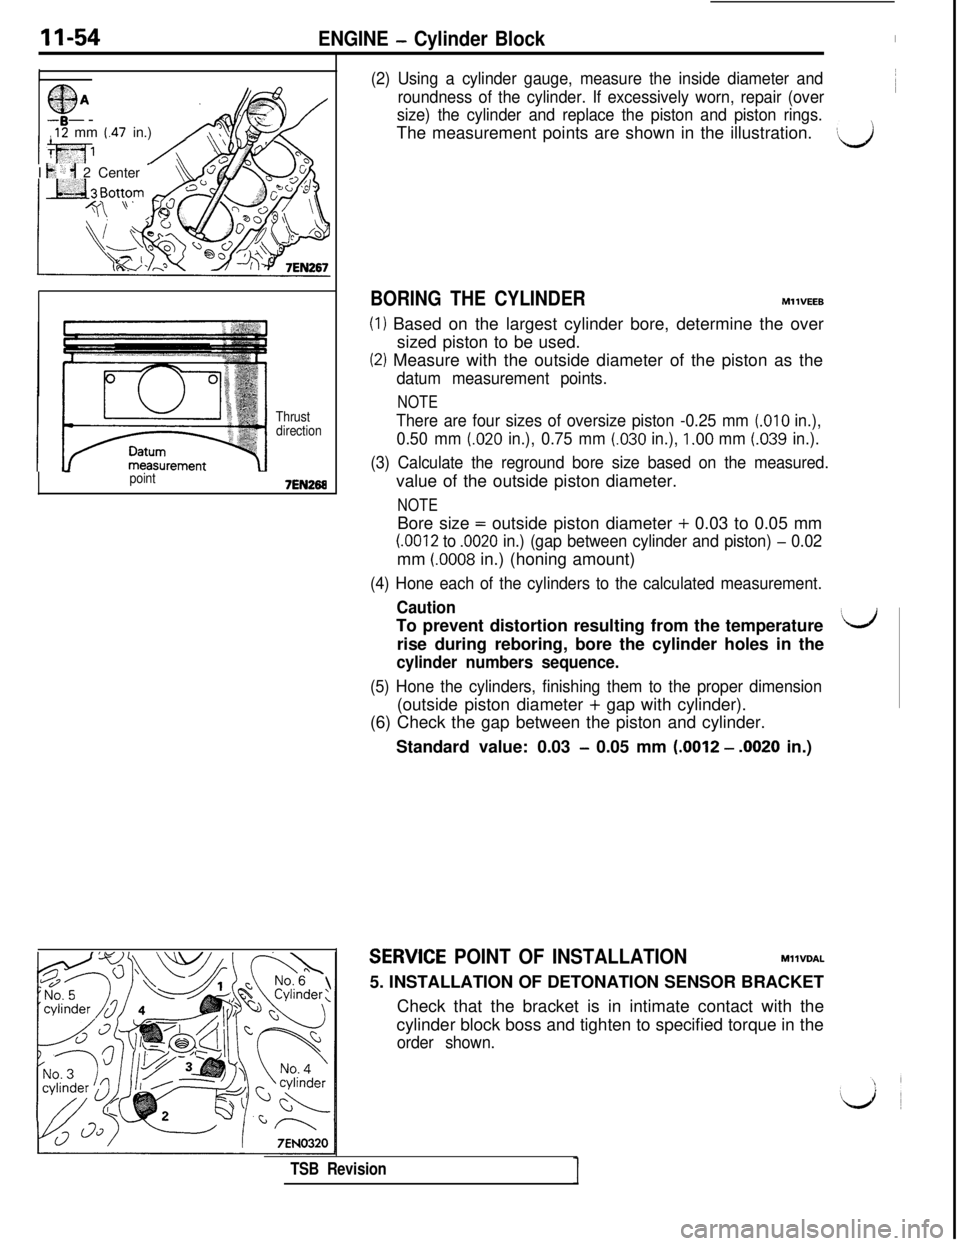
(2) Using a cylinder gauge, measure the inside diameter and
roundness of the cylinder. If excessively worn, repair (over~
size) the cylinder and replace the piston and piston rings.The measurement points are shown in the illustration.
)d
BORING THE CYLINDERMllVEEB
(1) Based on the largest cylinder bore, determine the over
sized piston to be used.
(2) Measure with the outside diameter of the piston as the
datum measurement points.
NOTE
There are four sizes of oversize piston -0.25 mm (.OlO in.),
0.50 mm
(.020 in.), 0.75 mm (.030 in.), 1.00 mm (.039 in.).
(3) Calculate the reground bore size based on the measured.value of the outside piston diameter.
NOTEBore size = outside piston diameter + 0.03 to 0.05 mm
(.0012 to .0020 in.) (gap between cylinder and piston) - 0.02mm (0008 in.) (honing amount)
(4) Hone each of the cylinders to the calculated measurement.
CautionTo prevent distortion resulting from the temperature‘drise during reboring, bore the cylinder holes in the
cylinder numbers sequence.
(5) Hone the cylinders, finishing them to the proper dimension(outside piston diameter + gap with cylinder).
(6) Check the gap between the piston and cylinder.
Standard value: 0.03
- 0.05 mm (.0012 - .0020 in.)
SERWCE POINT OF INSTALLATIONMllVDAL
5. INSTALLATION OF DETONATION SENSOR BRACKET
Check that the bracket is in intimate contact with the
cylinder block boss and tighten to specified torque in the
order shown.
TSB Revision
Page 120 of 1146
13-14FUEL SYSTEM - Troubleshooting
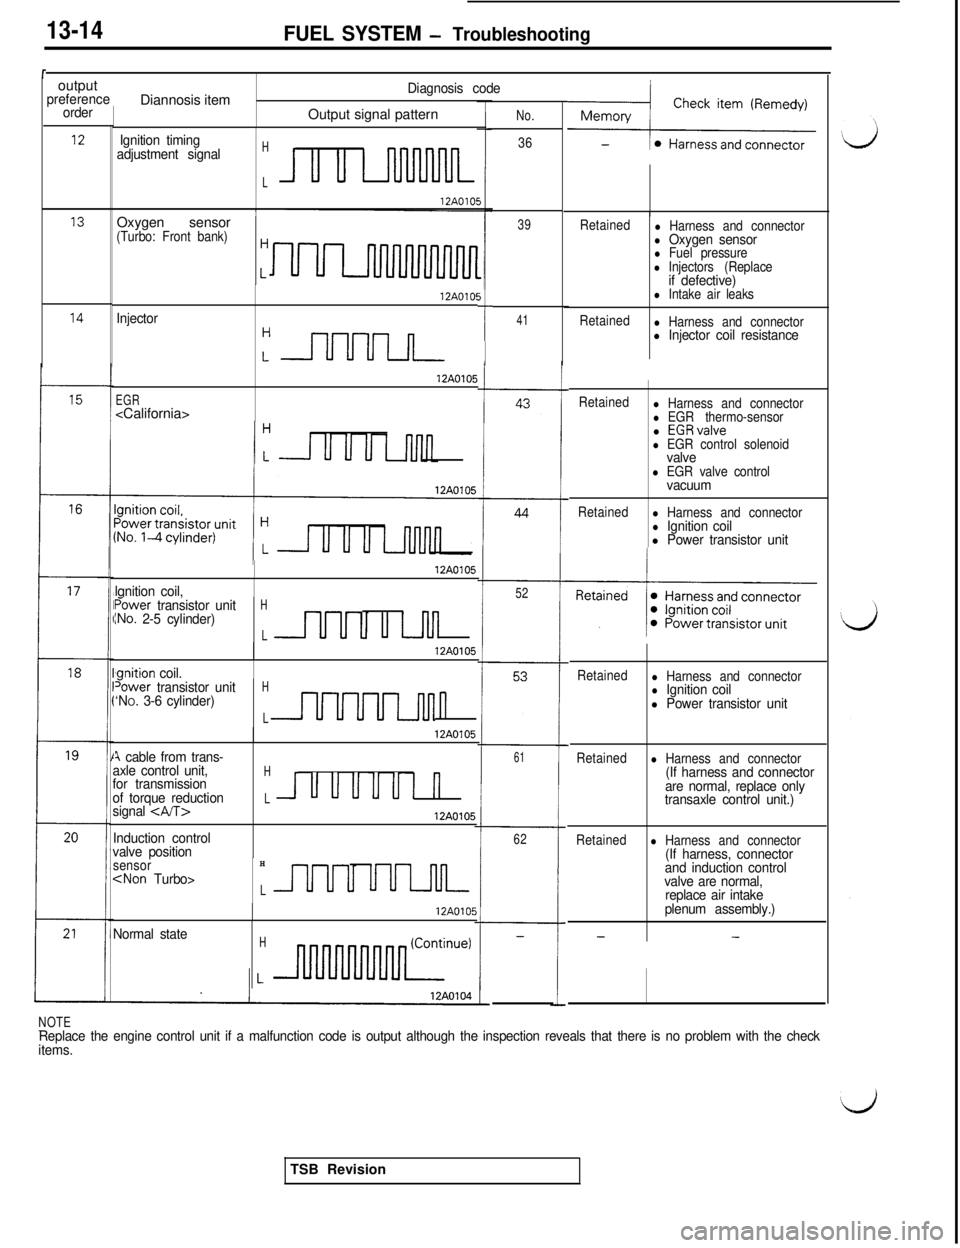
routput
preference
order
7Diannosis item
Diagnosis code
IOutput signal patternNo.
36
39
121 Ignition timing
adjustment signalH
L
13Oxygen sensor ’(Turbo: Front bank)HRetainedl Harness and connectorl Oxygen sensorl Fuel pressurel Injectors (Replaceif defective)l Intake air leaks
Retained
l Harness and connectorl Injector coil resistance
5
I--
Injector12AOlO!
:nnnn
EGR
12A0105
14
41
Retainedl Harness and connectorl EGR thermo-sensorl EGRvalvel EGR control solenoidvalvel EGR valve controlvacuum
Retainedl Harness and connectorl Ignition coill Power transistor unit
16
lqnition coil,
12A0105
52power transistor unitINO. 2-5 cylinder)H
Lu Lnll
‘qnition coil.
12AO105
18Retainedl Harness and connectorl Ignition coill Power transistor unit
Retainedl Harness and connector(If harness and connector
are normal, replace only
transaxle control unit.)
Retainedl Harness and connector(If harness, connector
and induction control
valve are normal,
replace air intake
plenum assembly.)
--
Tower transistor unitH‘NO. 3-6 cylinder)
Ln
12A0105
A cable from trans-
axle control unit,Hfor transmission
of torque reductionLUUUUUI n
signal 12A0105
Induction control
valve position
61
62
sensorH
12A0105
Normal stateH-
NOTE-Replace the engine control unit if a malfunction code is output although the inspection reveals that there is no problem with the check
items.TSB Revision
Page 170 of 1146
13-64FUEL SYSTEM - 0
n-vehicle Inspection of MPI Components
7FUO670
Apply sealant
7FUO67’SENSOR INSPECTION
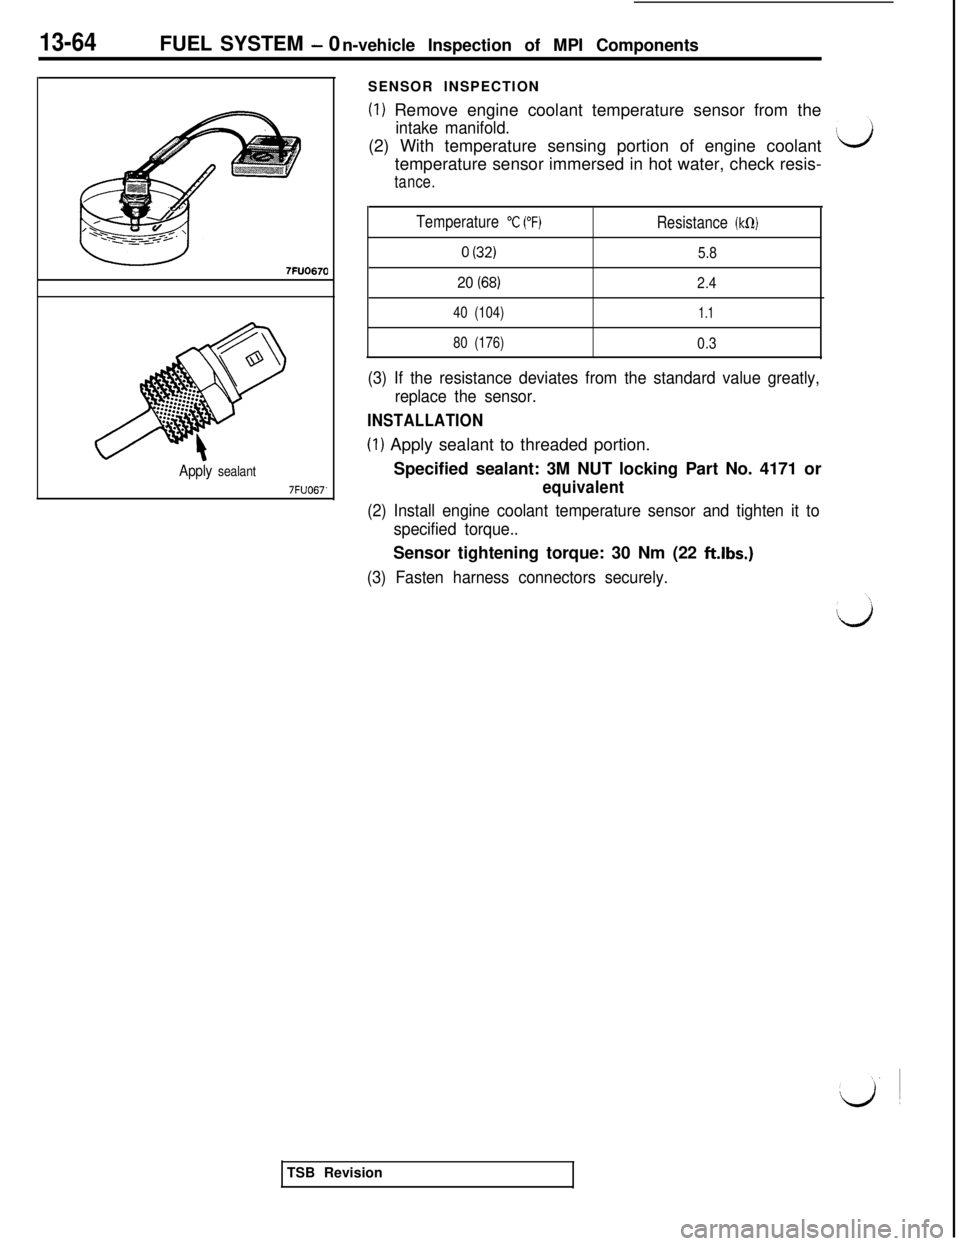
(1) Remove engine coolant temperature sensor from the
intake manifold.(2) With temperature sensing portion of engine coolant
temperature sensor immersed in hot water, check resis-
tance.
Temperature
“C (“F)Resistance (kCI)
0 (32)5.8
20 (68)2.4
40 (104)1.1
80 (176)0.3
(3) If the resistance deviates from the standard value greatly,
replace the sensor.
INSTALLATION
(1) Apply sealant to threaded portion.
Specified sealant: 3M NUT locking Part No. 4171 or
equivalent
(2) Install engine coolant temperature sensor and tighten it to
specified torque..Sensor tightening torque: 30 Nm (22
ft.lbs.)
(3) Fasten harness connectors securely.TSB Revision
Page 173 of 1146
FUEL SYSTEM - On-vehicle Inspection of MPI Components13-67
(sensor side, front view7FU048t7FUO67:
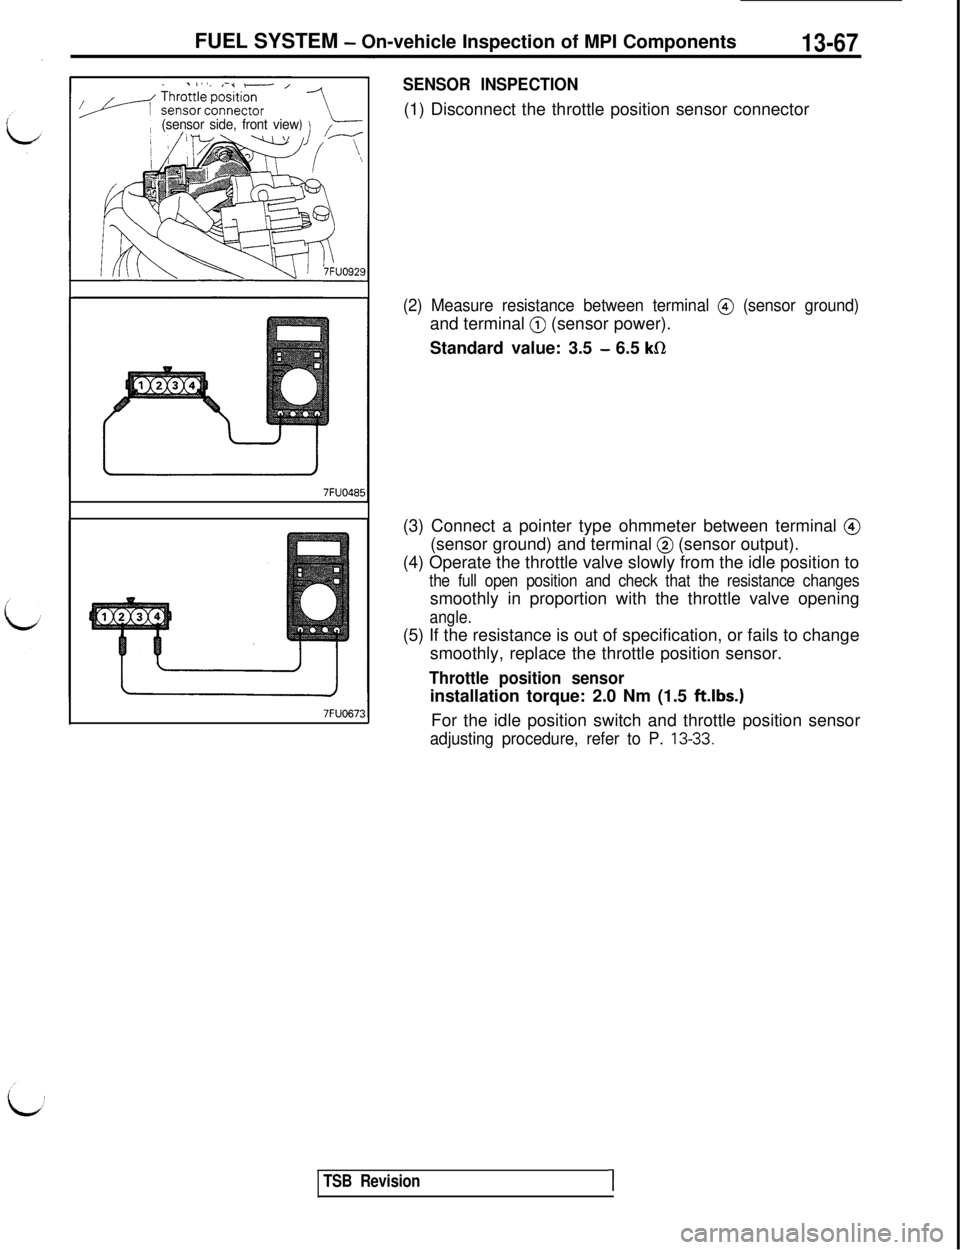
SENSOR INSPECTION(1) Disconnect the throttle position sensor connector
(2) Measure resistance between terminal @ (sensor ground)and terminal
@ (sensor power).
Standard value: 3.5
- 6.5 kR(3) Connect a pointer type ohmmeter between terminal
@(sensor ground) and terminal
@ (sensor output).
(4) Operate the throttle valve slowly from the idle position to
the full open position and check that the resistance changessmoothly in proportion with the throttle valve opening
angle.(5) If the resistance is out of specification, or fails to change
smoothly, replace the throttle position sensor.
Throttle position sensorinstallation torque: 2.0 Nm (1.5
ft.lbs.)For the idle position switch and throttle position sensor
adjusting procedure, refer to P. 13-33.
TSB Revision1
Page 206 of 1146
13-100FUEL SYSTEM - 0
n-vehicleInspection of MPI Components
SENSOR INSPECTION
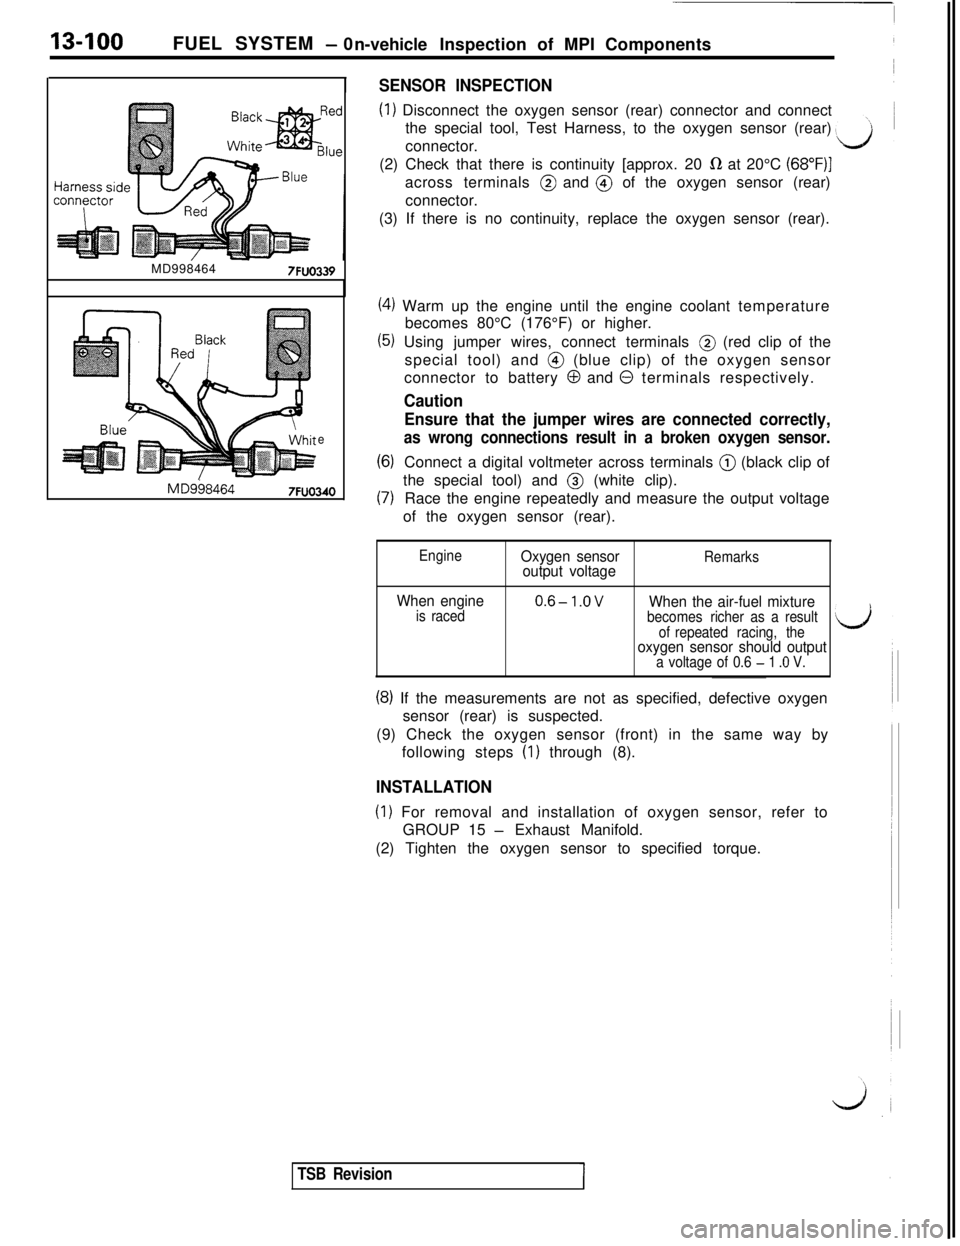
(1) Disconnect the oxygen sensor (rear) connector and connect
the special tool, Test Harness, to the oxygen sensor (rear)
connector.
MD998464
7FUO339
e
MD9584647FUO340(2) Check that there is continuity [approx. 20
R at 20°C (68”F)Iacross terminals @ and @ of the oxygen sensor (rear)
connector.
(3) If there is no continuity, replace the oxygen sensor (rear).
(4) Warm up the engine until the engine coolant temperature
becomes 80°C (176°F) or higher.
(5) Using jumper wires, connect terminals @ (red clip of the
special tool) and @ (blue clip) of the oxygen sensor
connector to battery
0 and 0 terminals respectively.
Caution
Ensure that the jumper wires are connected correctly,
as wrong connections result in a broken oxygen sensor.
(6)Connect a digital voltmeter across terminals @ (black clip of
(7)the special tool) and @ (white clip).
Race the engine repeatedly and measure the output voltage
of the oxygen sensor (rear).
EngineOxygen sensor
output voltageRemarks
When engineis raced0.6-l.OVWhen the air-fuel mixturebecomes richer as a result
of repeated racing, the
oxygen sensor should outputa voltage of 0.6 - 1 .O V.
(8) If the measurements are not as specified, defective oxygen
sensor (rear) is suspected.
(9) Check the oxygen sensor (front) in the same way by
following steps
(I) through (8).
INSTALLATION
(1) For removal and installation of oxygen sensor, refer to
GROUP 15
- Exhaust Manifold.
(2) Tighten the oxygen sensor to specified torque.
TSB Revision