MITSUBISHI 380 2005 Workshop Manual
380 2005
MITSUBISHI
MITSUBISHI
https://www.carmanualsonline.info/img/19/57086/w960_57086-0.png
MITSUBISHI 380 2005 Workshop Manual
Trending: heater, rear view mirror, check engine light, parking brake, CD player, mileage, Light bulb
Page 1101 of 1500

DOOR
BODY42-34
CIRCUIT BREAKER (INCORPORATED IN THE
POWER WINDOW MOTOR) INSPECTION
M1429001000284
1. Pull the power window switch to the UP position to fully
close the door window glass, and keep pulling the switch for
an additional ten seconds.
2. Release the power window switch from the UP position and
immediately press it to the DOWN position. The condition of
the circuit breaker is good if the door window glass starts to
move downwards within about 60 seconds.
POWER WINDOW CHECKM1429004400214
1. Operate the power window switch of each door to verify that
the power windows operate properly. If they don't, then
troubleshoot as described in GROUP 54B, SWS Diagnosis
P.54B-57.
2. Turn ON the power window lock switch of the power window
main switch. Then operate the passenger's door and rear
door power window sub-switches to ensure that they do not
operate. If they do, replace the power window main switch
(Refer to P.42-39).
CENTRAL DOOR LOCKING SYSTEM
INSPECTION
M1427001100144
Check the following. Troubleshoot if operations malfunction
(Refer to GROUP 54B, SWS Diagnosis P.54B-57).
Insert the key into the driver's key cylinder and turn once to
the unlock side to unlock the driver's door and fuel lid door.
Turn the key once again to the unlock side to unlock all
doors and fuel lid door.
All doors and fuel lid door can be locked using the door lock
switch built into the front power window (main or sub )
switch.
Page 1102 of 1500
DOOR
BODY42-35
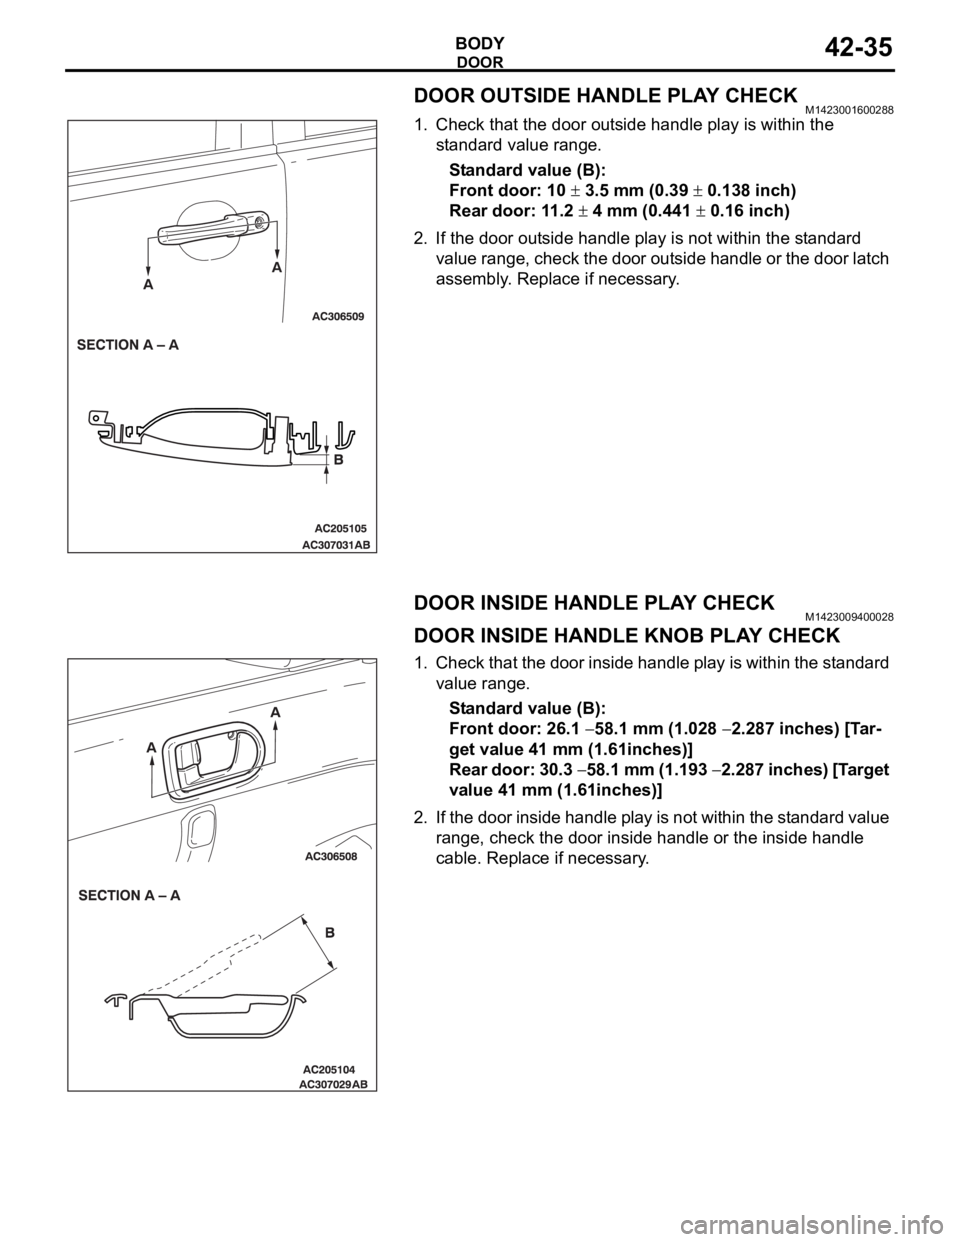
DOOR OUTSIDE HANDLE PLAY CHECKM1423001600288
1. Check that the door outside handle play is within the
standard value range.
Standard value (B):
Front door: 10
3.5 mm (0.39 0.138 inch)
Rear door: 11.2
4 mm (0.441 0.16 inch)
2. If the door outside handle play is not within the standard
value range, check the door outside handle or the door latch
assembly. Replace if necessary.
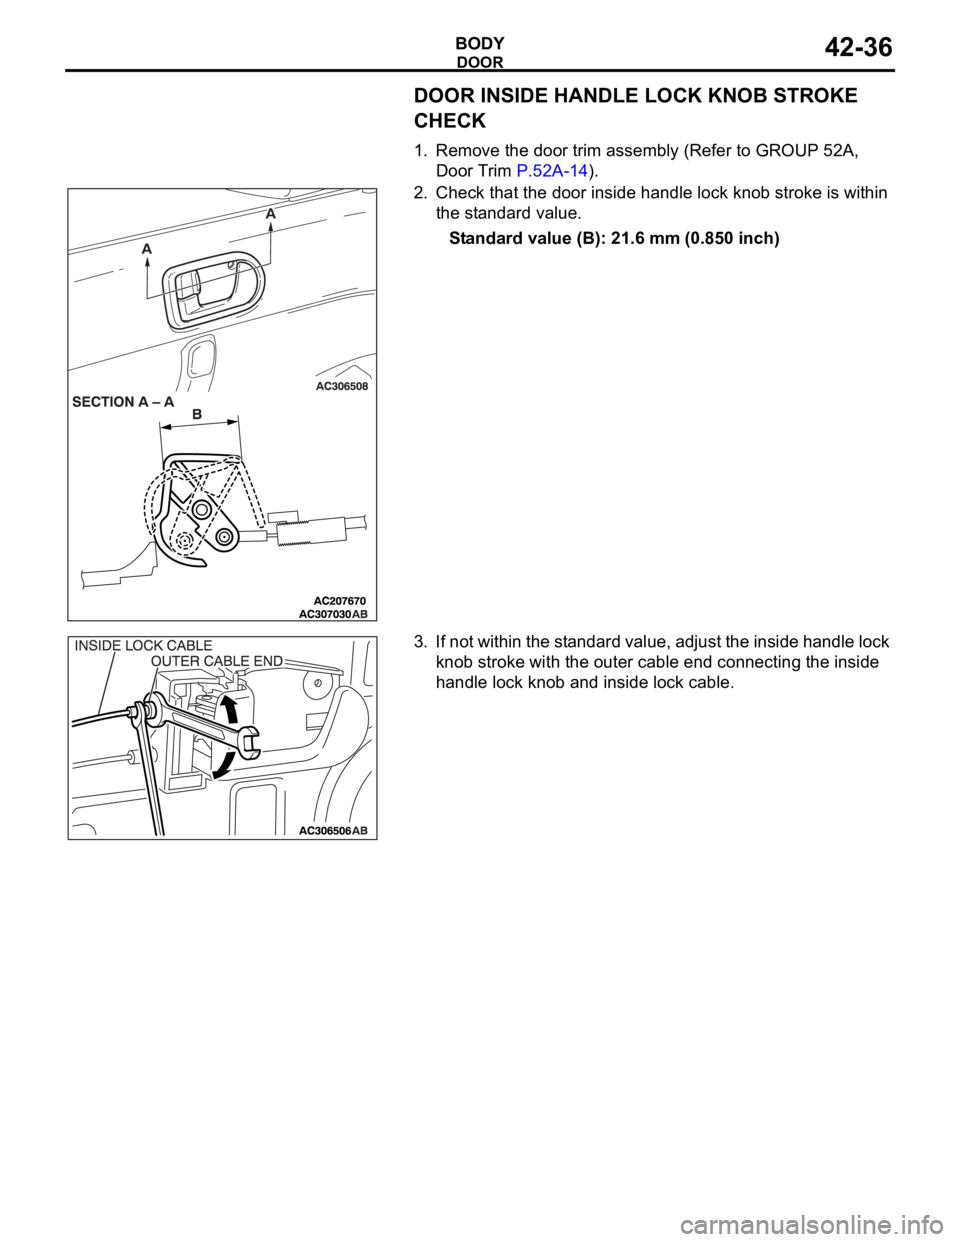
DOOR INSIDE HANDLE PLAY CHECKM1423009400028
DOOR INSIDE HANDLE KNOB PLAY CHECK
1. Check that the door inside handle play is within the standard
value range.
Standard value (B):
Front door: 26.1
58.1 mm (1.028 2.287 inches) [Tar-
get value 41 mm (1.61inches)]
Rear door: 30.3
58.1 mm (1.193 2.287 inches) [Target
value 41 mm (1.61inches)]
2. If the door inside handle play is not within the standard value
range, check the door inside handle or the inside handle
cable. Replace if necessary.
Page 1103 of 1500
DOOR
BODY42-36
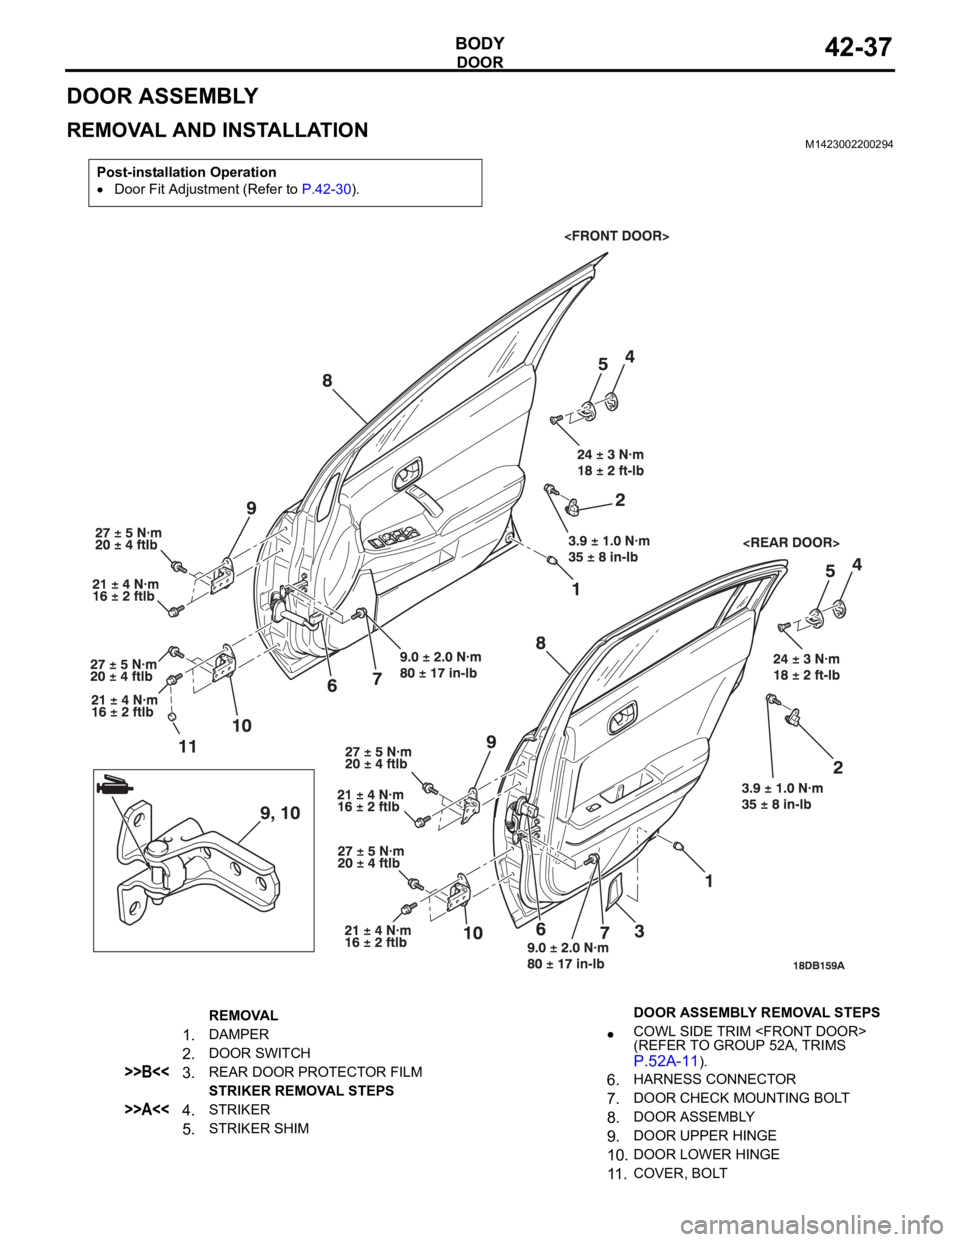
DOOR INSIDE HANDLE LOCK KNOB STROKE
CHECK
1. Remove the door trim assembly (Refer to GROUP 52A,
Door Trim P.52A-14).
2. Check that the door inside handle lock knob stroke is within
the standard value.
Standard value (B): 21.6 mm (0.850 inch)
3. If not within the standard value, adjust the inside handle lock
knob stroke with the outer cable end connecting the inside
handle lock knob and inside lock cable.
Page 1104 of 1500
DOOR
BODY42-37
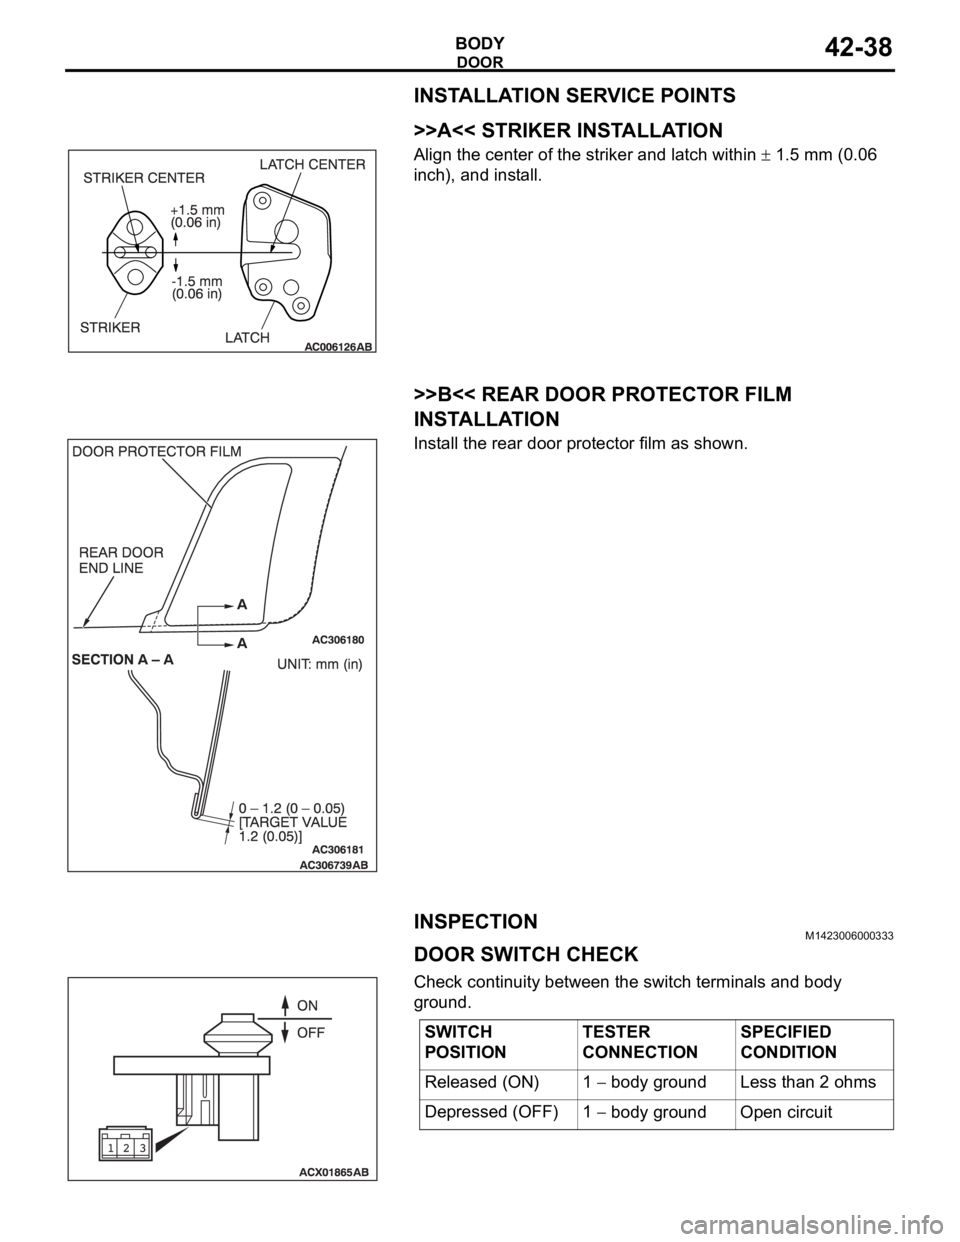
DOOR ASSEMBLY
REMOVAL AND INSTALLATIONM1423002200294
Post-installation Operation
Door Fit Adjustment (Refer to P.42-30).
REMOVAL
1.DAMPER
2.DOOR SWITCH
>>B<<3.REAR DOOR PROTECTOR FILM
STRIKER REMOVAL STEPS
>>A<<4.STRIKER
5.STRIKER SHIMDOOR ASSEMBLY REMOVAL STEPS
COWL SIDE TRIM
(REFER TO GROUP 52A, TRIMS
P.52A-11).
6.HARNESS CONNECTOR
7.DOOR CHECK MOUNTING BOLT
8.DOOR ASSEMBLY
9.DOOR UPPER HINGE
10.DOOR LOWER HINGE
11 .COVER, BOLT
Page 1105 of 1500
DOOR
BODY42-38
INSTALLATION SERVICE POINTS
.
>>A<< STRIKER INSTALLATION
Align the center of the striker and latch within 1.5 mm (0.06
inch), and install.
.
>>B<< REAR DOOR PROTECTOR FILM
INSTALLATION
Install the rear door protector film as shown.
INSPECTIONM1423006000333
DOOR SWITCH CHECK
Check continuity between the switch terminals and body
ground.
SWITCH
POSITIONTESTER
CONNECTIONSPECIFIED
CONDITION
Released (ON) 1
body ground Less than 2 ohms
Depressed (OFF) 1
body ground Open circuit
Page 1106 of 1500
DOOR
BODY42-39
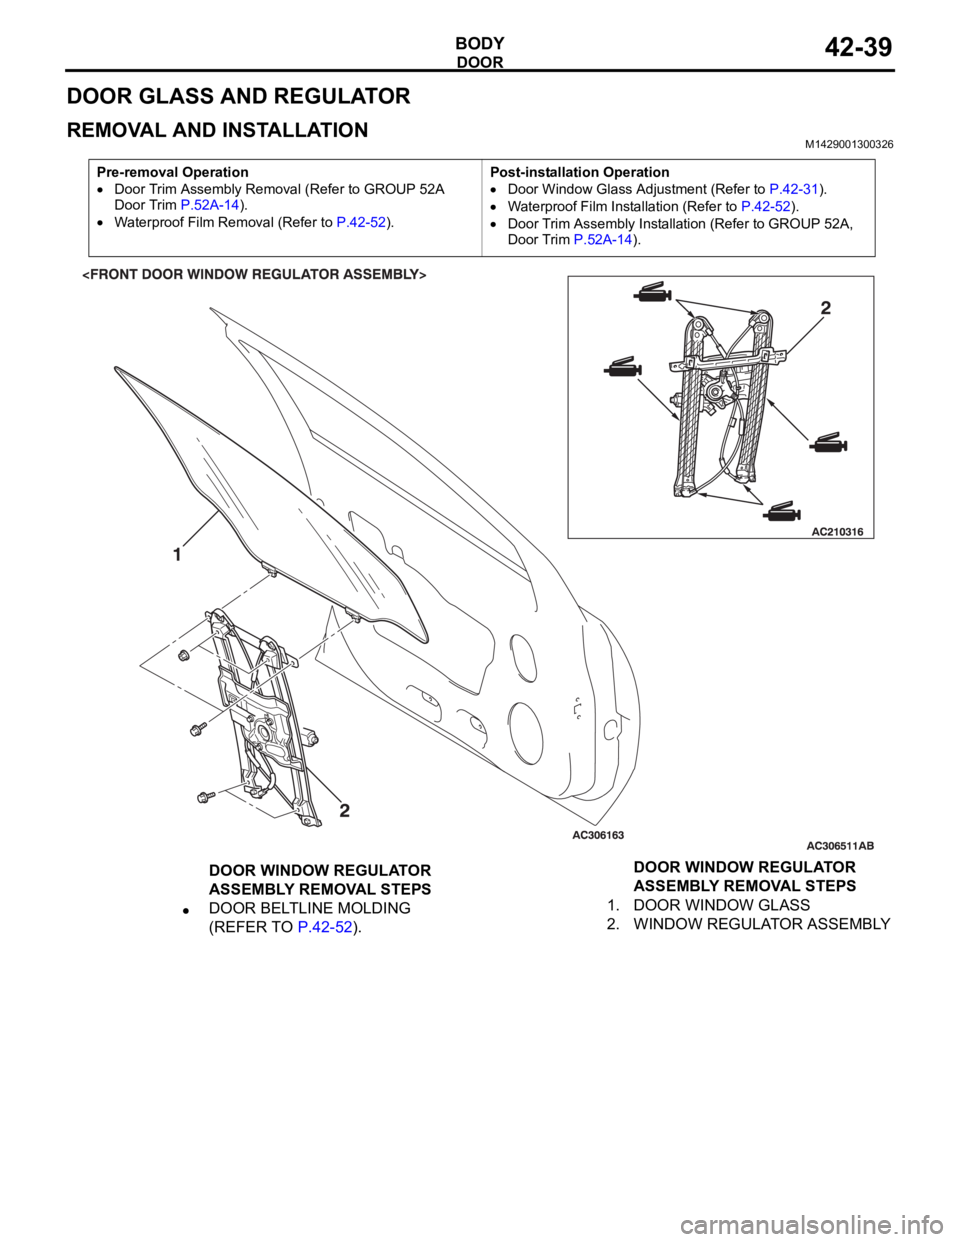
DOOR GLASS AND REGULATOR
REMOVAL AND INSTALLATIONM1429001300326
Pre-removal Operation
Door Trim Assembly Removal (Refer to GROUP 52A
Door Trim P.52A-14).
Waterproof Film Removal (Refer to P.42-52).Post-installation Operation
Door Window Glass Adjustment (Refer to P.42-31).
Waterproof Film Installation (Refer to P.42-52).
Door Trim Assembly Installation (Refer to GROUP 52A,
Door Trim P.52A-14).
DOOR WINDOW REGULATOR
ASSEMBLY REMOVAL STEPS
DOOR BELTLINE MOLDING
(REFER TO P.42-52).1. DOOR WINDOW GLASS
2. WINDOW REGULATOR ASSEMBLYDOOR WINDOW REGULATOR
ASSEMBLY REMOVAL STEPS
Page 1107 of 1500
DOOR
BODY42-40
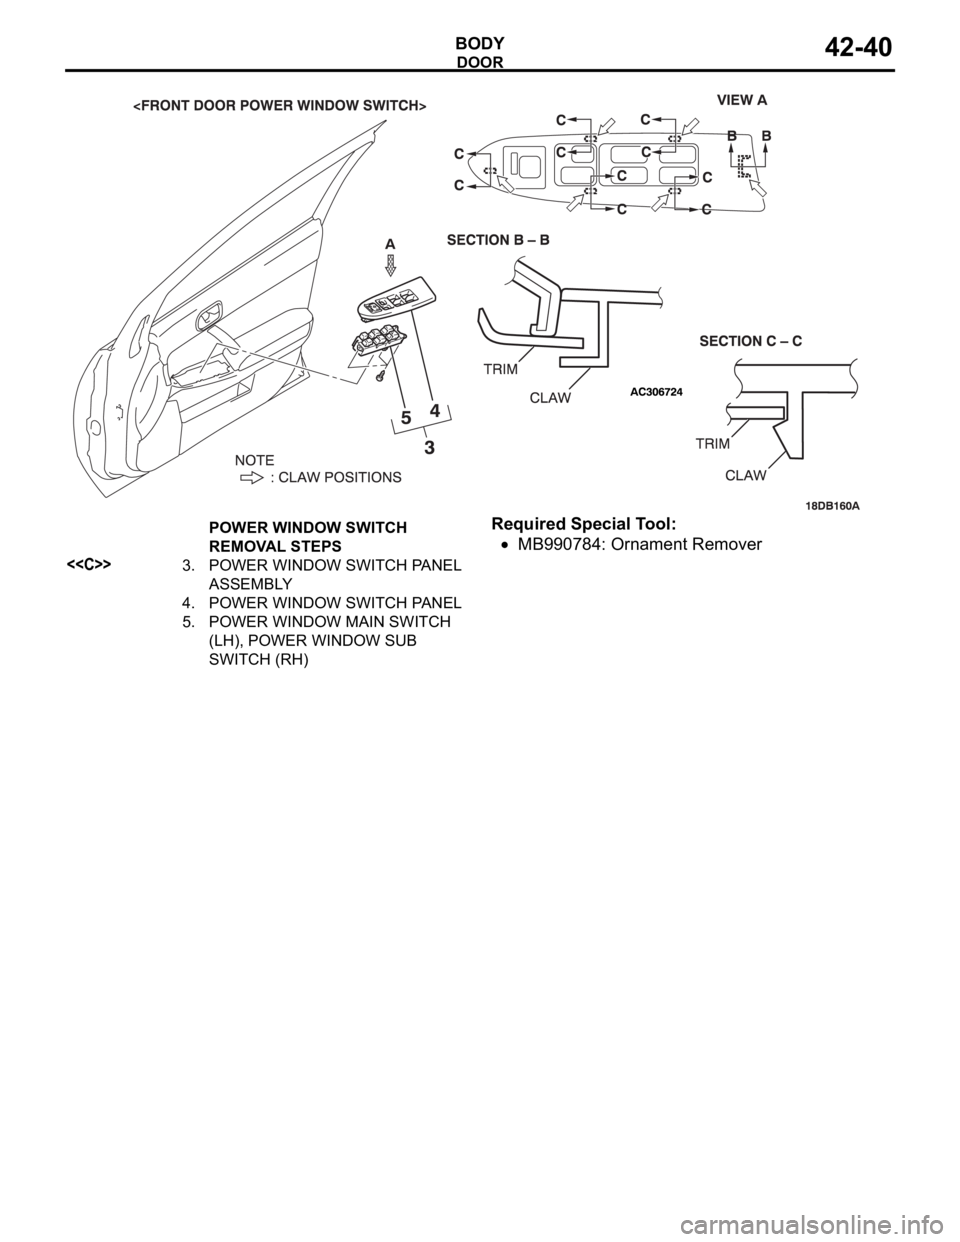
Required Special Tool:
MB990784: Ornament Remover
POWER WINDOW SWITCH
REMOVAL STEPS
<>3. POWER WINDOW SWITCH PANEL
ASSEMBLY
4. POWER WINDOW SWITCH PANEL
5. POWER WINDOW MAIN SWITCH
(LH), POWER WINDOW SUB
SWITCH (RH)
Page 1108 of 1500
Page 1109 of 1500
Page 1110 of 1500
DOOR
BODY42-43
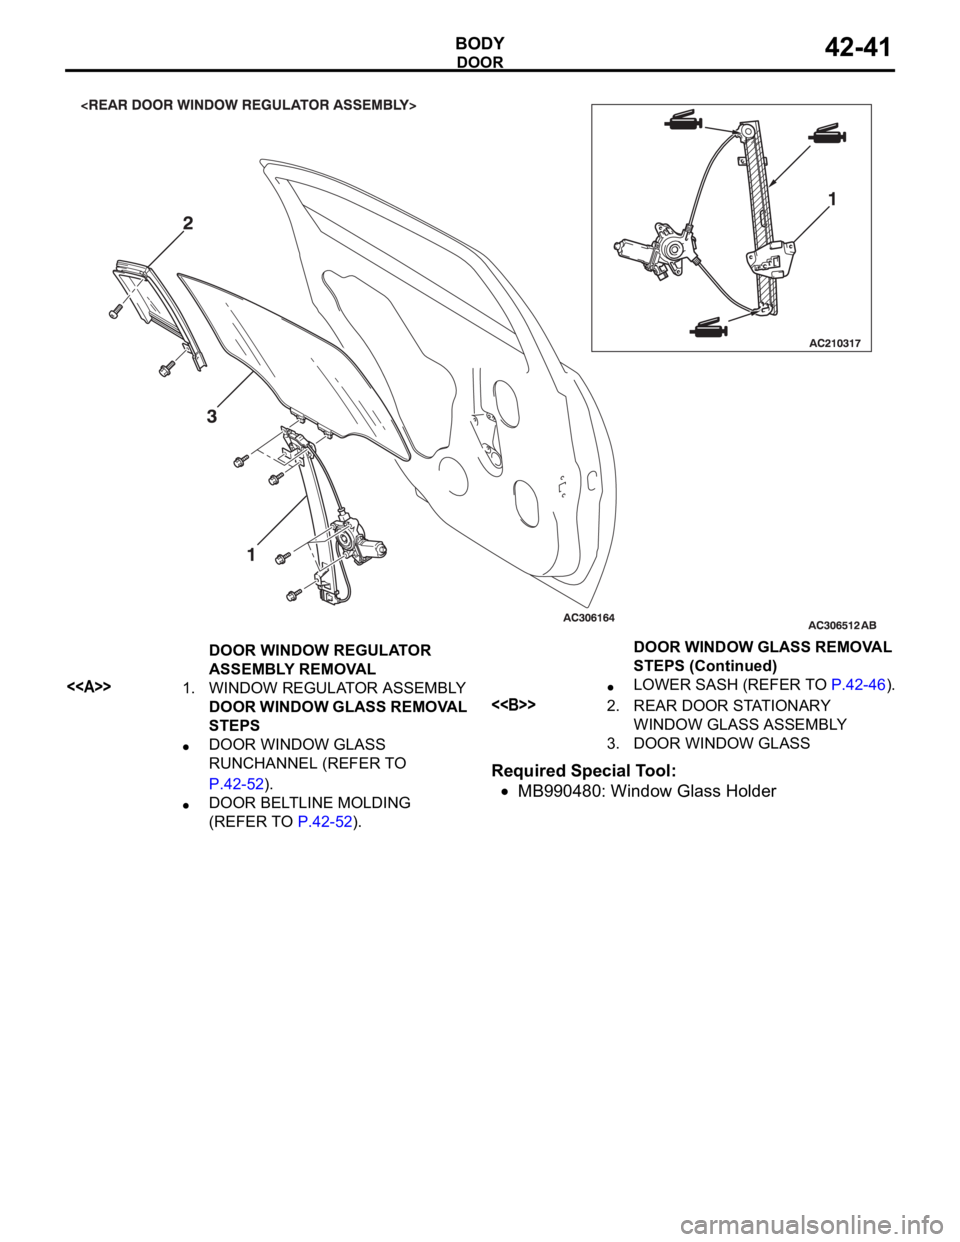
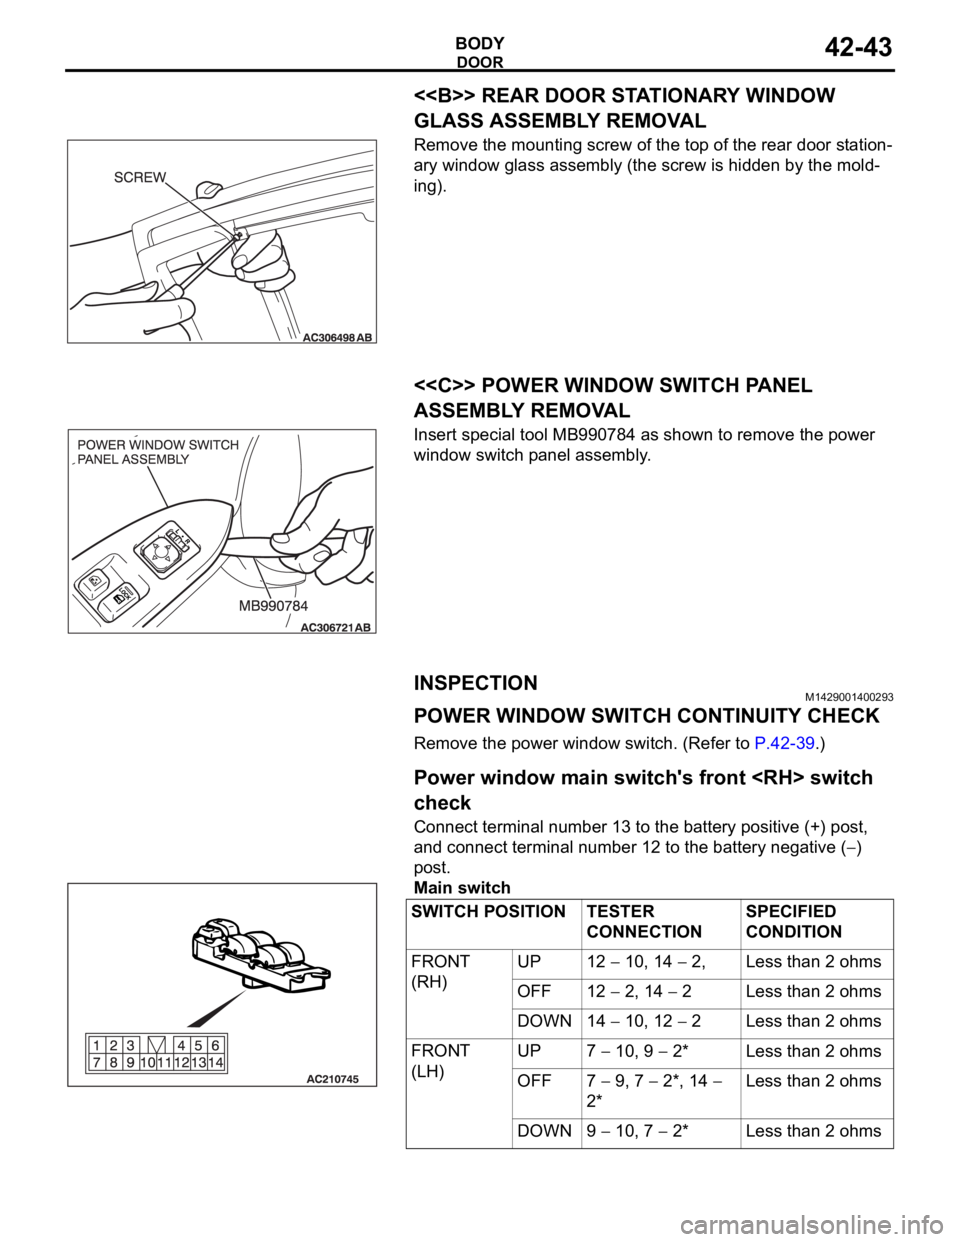
<> REAR DOOR STATIONARY WINDOW
GLASS ASSEMBLY REMOVAL
Remove the mounting screw of the top of the rear door station-
ary window glass assembly (the screw is hidden by the mold-
ing).
.
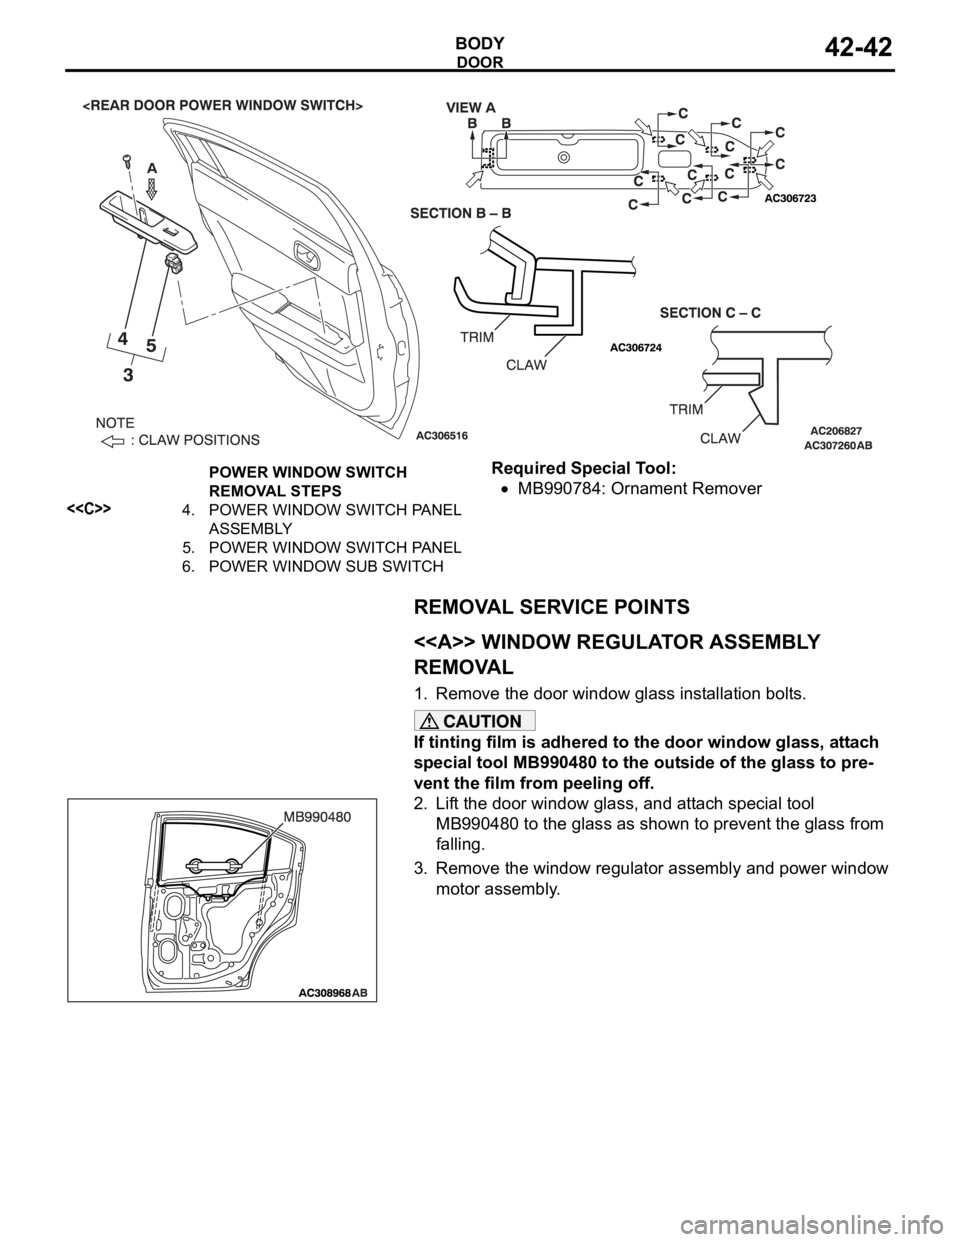
<> POWER WINDOW SWITCH PANEL
ASSEMBLY REMOVAL
Insert special tool MB990784 as shown to remove the power
window switch panel assembly.
INSPECTIONM1429001400293
POWER WINDOW SWITCH CONTINUITY CHECK
Remove the power window switch. (Refer to P.42-39.).
Power window main switch's front switch
check
Connect terminal number 13 to the battery positive (+) post,
and connect terminal number 12 to the battery negative (
)
post.
Main switch
SWITCH POSITION TESTER
CONNECTIONSPECIFIED
CONDITION
FRONT
(RH)UP 12
10, 14 2, Less than 2 ohms
OFF 12
2, 14 2 Less than 2 ohms
DOWN 14
10, 12 2 Less than 2 ohms
FRONT
(LH)UP 7
10, 9 2* Less than 2 ohms
OFF 7
9, 7 2*, 14
2*Less than 2 ohms
DOWN 9
10, 7 2* Less than 2 ohms
Trending: warning lights, checking oil, automatic transmission, Start system, manual transmission, gas type, driver seat adjustment

