MITSUBISHI 380 2005 Workshop Manual
Manufacturer: MITSUBISHI, Model Year: 2005, Model line: 380, Model: MITSUBISHI 380 2005Pages: 1500, PDF Size: 47.87 MB
Page 1111 of 1500
DOOR
BODY42-44
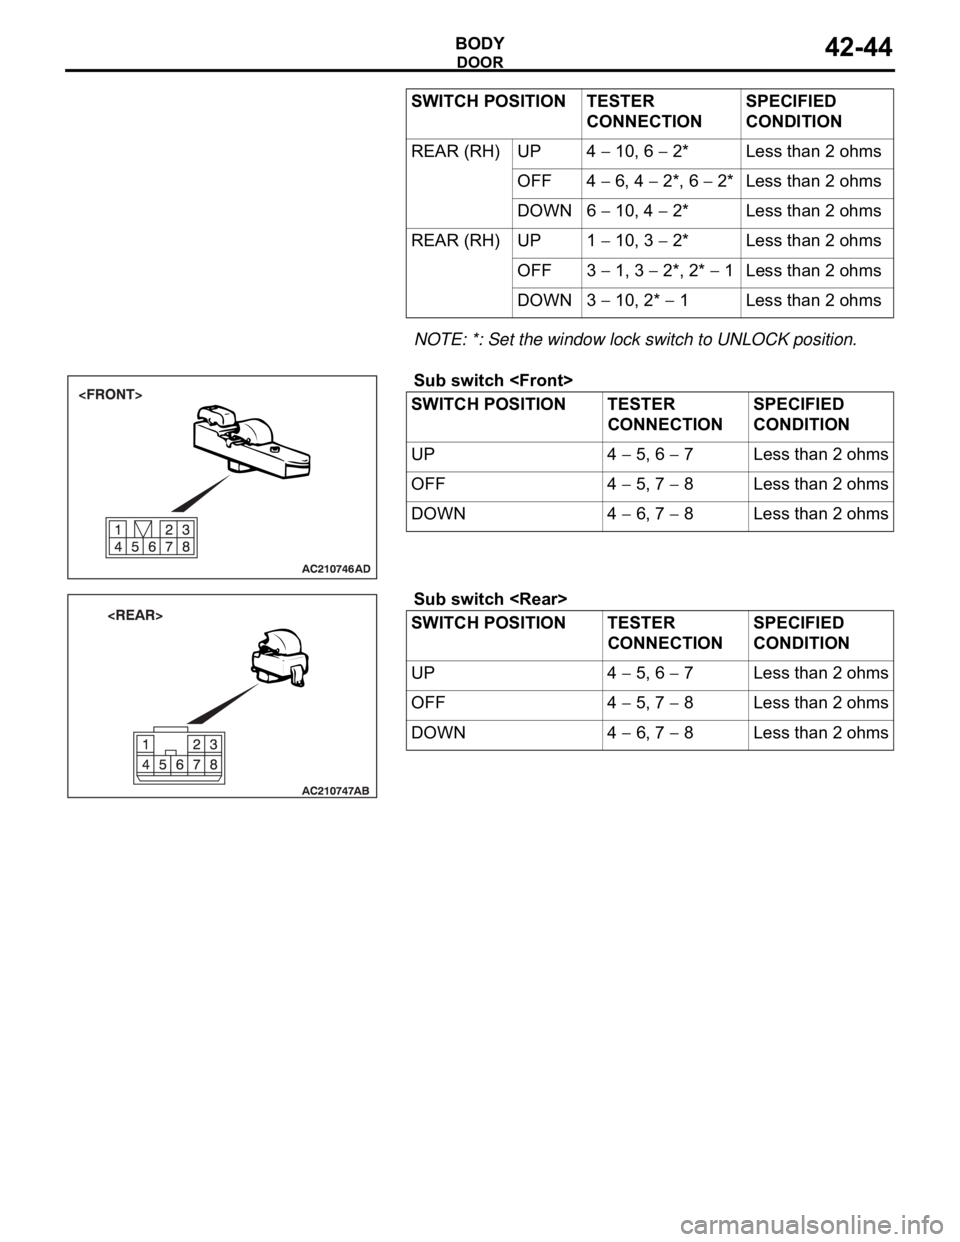
NOTE: *: Set the window lock switch to UNLOCK position.
.Sub switch
Sub switch
10, 6 2* Less than 2 ohms
OFF 4
6, 4 2*, 6 2* Less than 2 ohms
DOWN 6
10, 4 2* Less than 2 ohms
REAR (RH) UP 1
10, 3 2* Less than 2 ohms
OFF 3
1, 3 2*, 2* 1 Less than 2 ohms
DOWN 3
10, 2* 1 Less than 2 ohms
SWITCH POSITION TESTER
CONNECTIONSPECIFIED
CONDITION
UP 4
5, 6 7 Less than 2 ohms
OFF 4
5, 7 8 Less than 2 ohms
DOWN 4
6, 7 8 Less than 2 ohms
SWITCH POSITION TESTER
CONNECTIONSPECIFIED
CONDITION
UP 4
5, 6 7 Less than 2 ohms
OFF 4
5, 7 8 Less than 2 ohms
DOWN 4
6, 7 8 Less than 2 ohms SWITCH POSITION TESTER
CONNECTIONSPECIFIED
CONDITION
Page 1112 of 1500
DOOR
BODY42-45
DOOR WINDOW REGULATOR CHECK
.
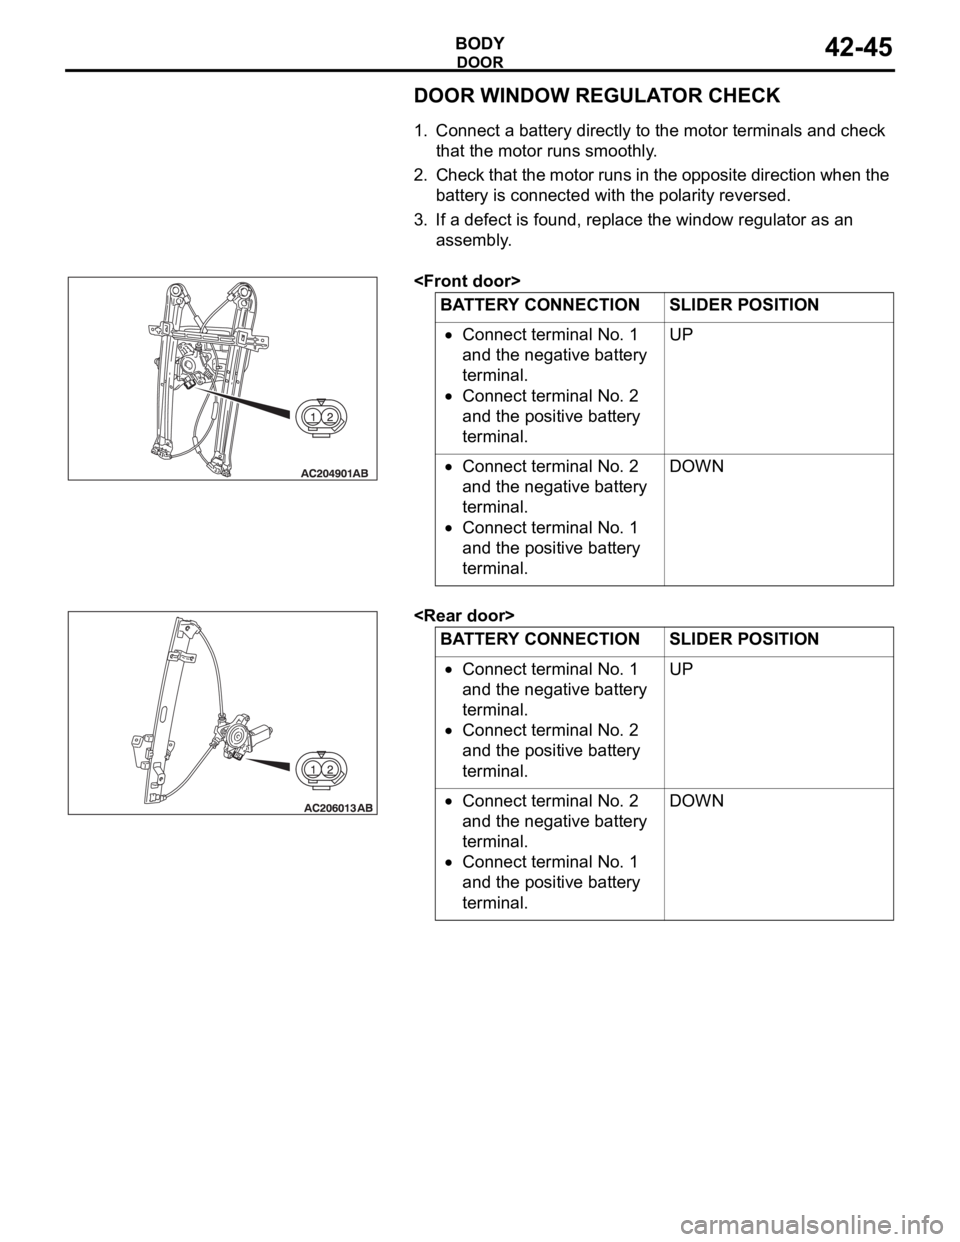
1. Connect a battery directly to the motor terminals and check
that the motor runs smoothly.
2. Check that the motor runs in the opposite direction when the
battery is connected with the polarity reversed.
3. If a defect is found, replace the window regulator as an
assembly.
.
.
Connect terminal No. 1
and the negative battery
terminal.
Connect terminal No. 2
and the positive battery
terminal.UP
Connect terminal No. 2
and the negative battery
terminal.
Connect terminal No. 1
and the positive battery
terminal.DOWN
BATTERY CONNECTION SLIDER POSITION
Connect terminal No. 1
and the negative battery
terminal.
Connect terminal No. 2
and the positive battery
terminal.UP
Connect terminal No. 2
and the negative battery
terminal.
Connect terminal No. 1
and the positive battery
terminal.DOWN
Page 1113 of 1500
DOOR
BODY42-46
DOOR HANDLE AND LATCH
REMOVAL AND INSTALLATIONM1423004600340
Pre-removal Operation
Door Trim Assembly Removal (Refer to GROUP 52A
Door Trim P.52A-14).Post-installation OperationDoor Inside Handle Play Check (Refer to P.42-35).
Door Outside Handle Play Check (Refer to P.42-35).
Door Trim Assembly Installation (Refer to GROUP 52A,
Door Trim P.52A-14).
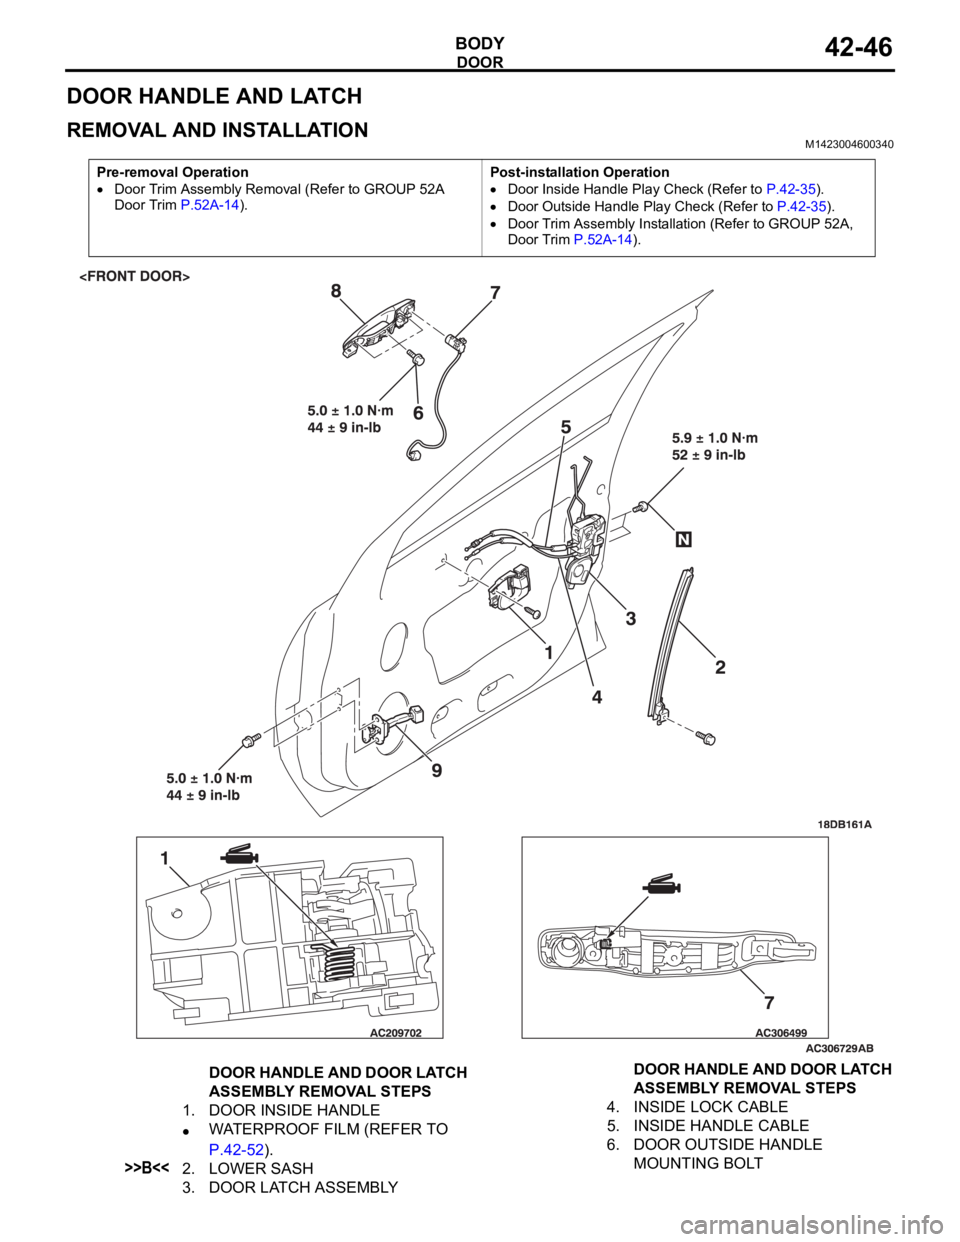
DOOR HANDLE AND DOOR LATCH
ASSEMBLY REMOVAL STEPS
1. DOOR INSIDE HANDLE
WATERPROOF FILM (REFER TO
P.42-52).
>>B<<2. LOWER SASH
3. DOOR LATCH ASSEMBLY4. INSIDE LOCK CABLE
5. INSIDE HANDLE CABLE
6. DOOR OUTSIDE HANDLE
MOUNTING BOLT DOOR HANDLE AND DOOR LATCH
ASSEMBLY REMOVAL STEPS
Page 1114 of 1500
DOOR
BODY42-47
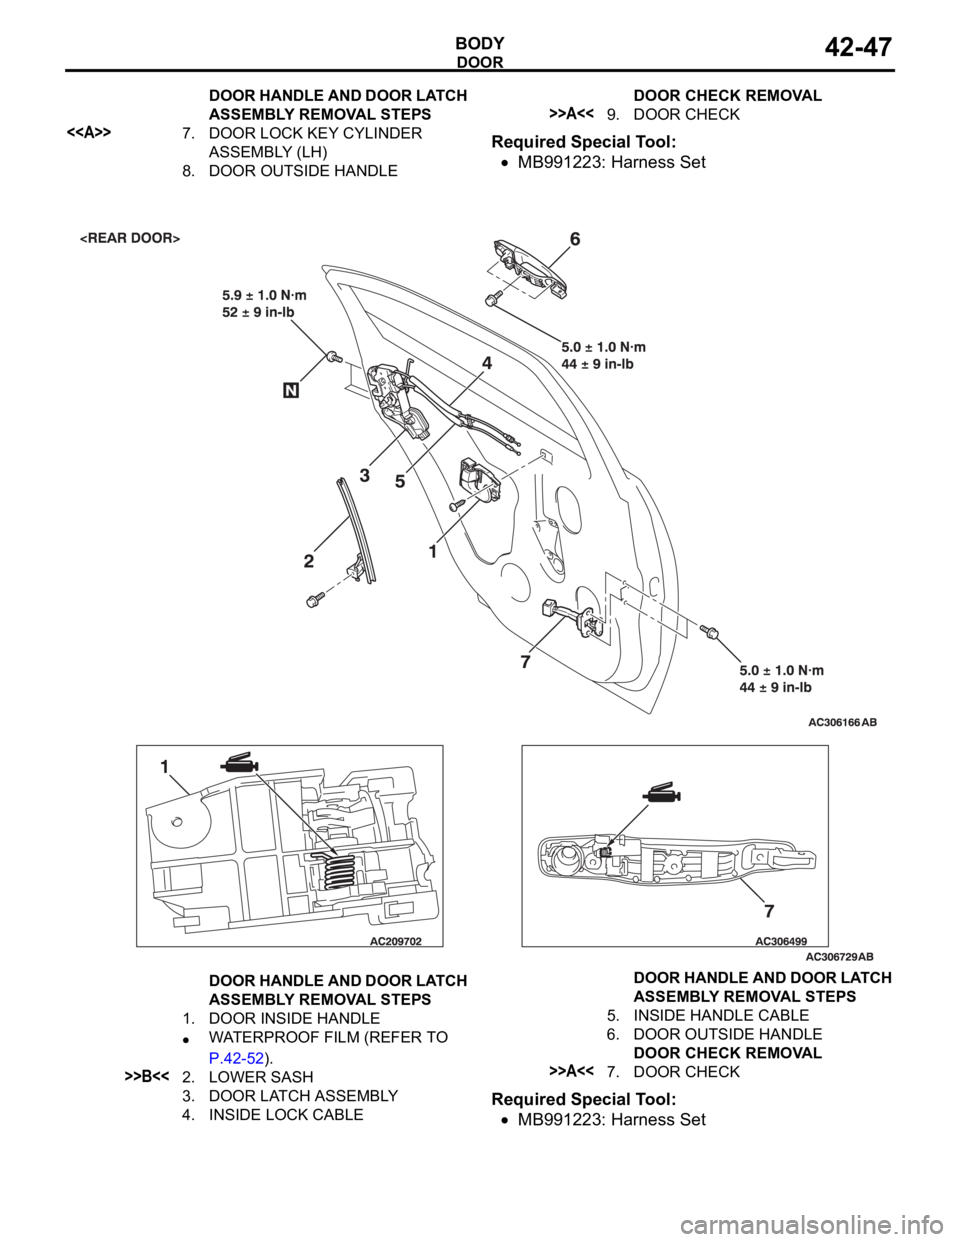
Required Special Tool:
MB991223: Harness Set
Required Special Tool:
MB991223: Harness Set
<>7. DOOR LOCK KEY CYLINDER
ASSEMBLY (LH)
8. DOOR OUTSIDE HANDLEDOOR HANDLE AND DOOR LATCH
ASSEMBLY REMOVAL STEPS DOOR CHECK REMOVAL
>>A<<9. DOOR CHECK
DOOR HANDLE AND DOOR LATCH
ASSEMBLY REMOVAL STEPS
1. DOOR INSIDE HANDLE
WATERPROOF FILM (REFER TO
P.42-52).
>>B<<2. LOWER SASH
3. DOOR LATCH ASSEMBLY
4. INSIDE LOCK CABLE5. INSIDE HANDLE CABLE
6. DOOR OUTSIDE HANDLE
DOOR CHECK REMOVAL>>A<<7. DOOR CHECKDOOR HANDLE AND DOOR LATCH
ASSEMBLY REMOVAL STEPS
Page 1115 of 1500
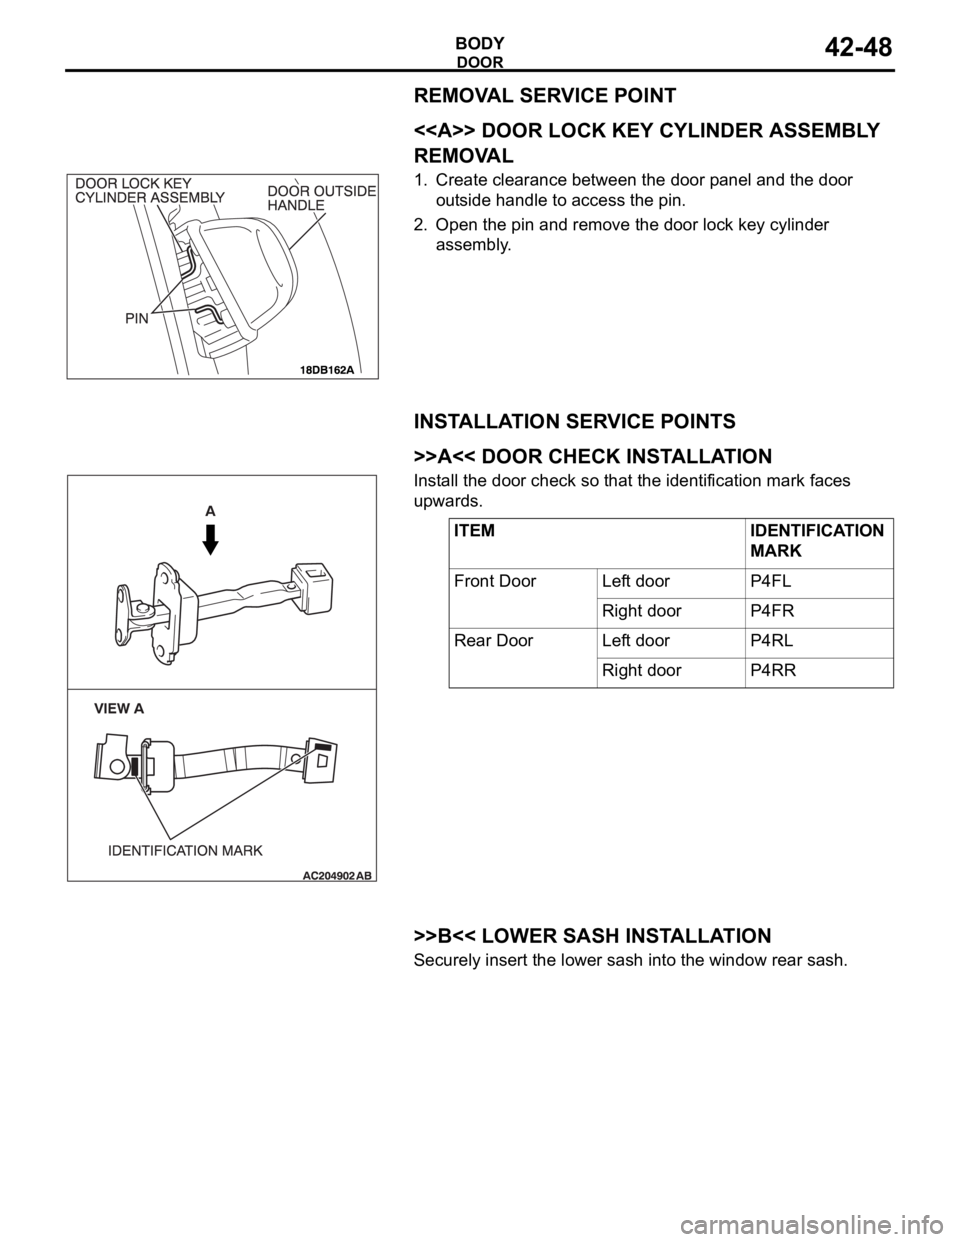
Page 1116 of 1500
DOOR
BODY42-49
INSPECTIONM1423004700411
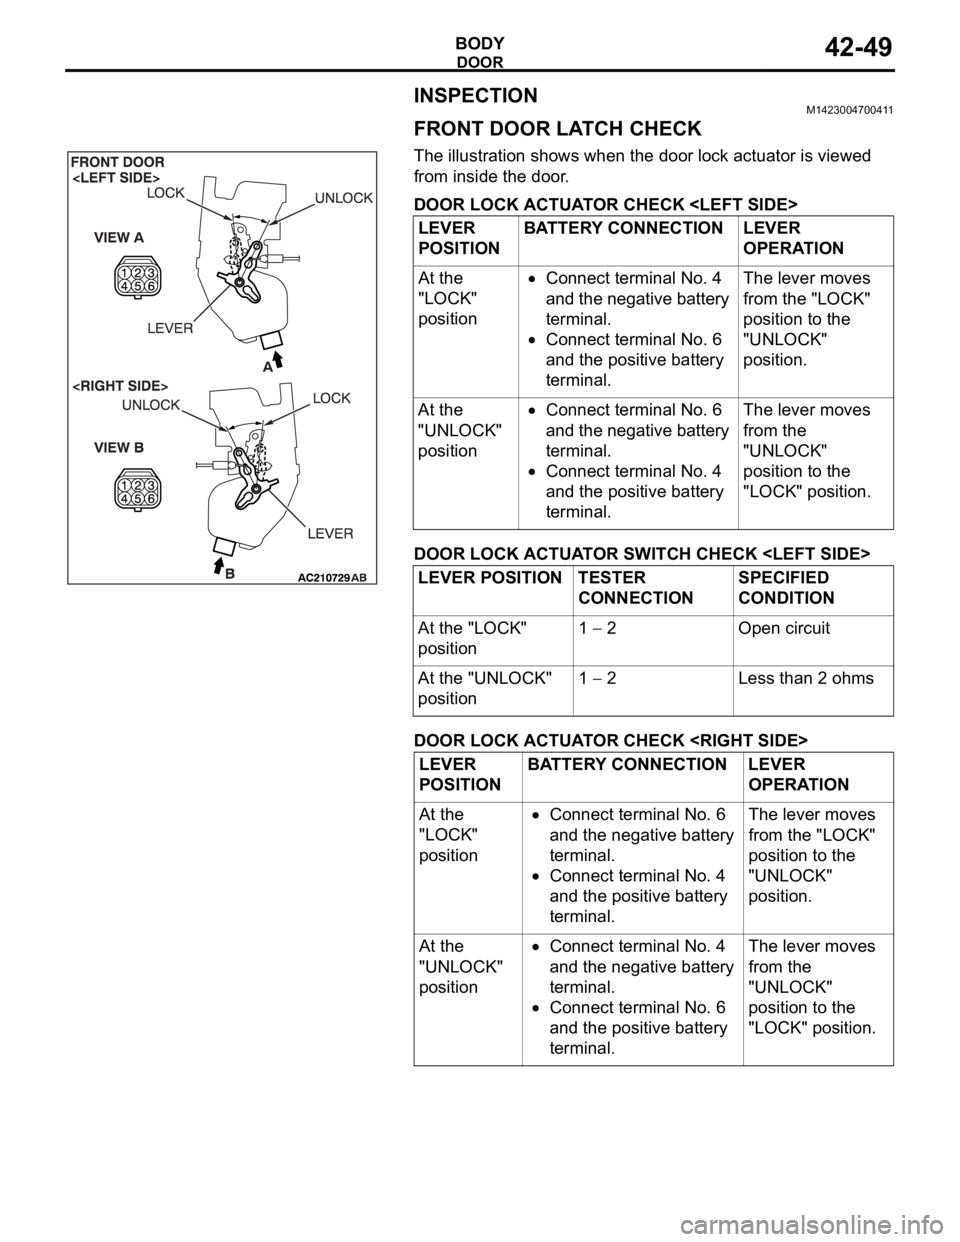
FRONT DOOR LATCH CHECK
The illustration shows when the door lock actuator is viewed
from inside the door.
DOOR LOCK ACTUATOR CHECK
DOOR LOCK ACTUATOR SWITCH CHECK
DOOR LOCK ACTUATOR CHECK
POSITIONBATTERY CONNECTION LEVER
OPERATION
At the
"LOCK"
position
Connect terminal No. 4
and the negative battery
terminal.
Connect terminal No. 6
and the positive battery
terminal.The lever moves
from the "LOCK"
position to the
"UNLOCK"
position.
At the
"UNLOCK"
position
Connect terminal No. 6
and the negative battery
terminal.
Connect terminal No. 4
and the positive battery
terminal.The lever moves
from the
"UNLOCK"
position to the
"LOCK" position.
LEVER POSITION TESTER
CONNECTIONSPECIFIED
CONDITION
At the "LOCK"
position1
2 Open circuit
At the "UNLOCK"
position1
2 Less than 2 ohms
LEVER
POSITIONBATTERY CONNECTION LEVER
OPERATION
At the
"LOCK"
position
Connect terminal No. 6
and the negative battery
terminal.
Connect terminal No. 4
and the positive battery
terminal.The lever moves
from the "LOCK"
position to the
"UNLOCK"
position.
At the
"UNLOCK"
position
Connect terminal No. 4
and the negative battery
terminal.
Connect terminal No. 6
and the positive battery
terminal.The lever moves
from the
"UNLOCK"
position to the
"LOCK" position.
Page 1117 of 1500
DOOR
BODY42-50
DOOR LOCK ACTUATOR SWITCH CHECK
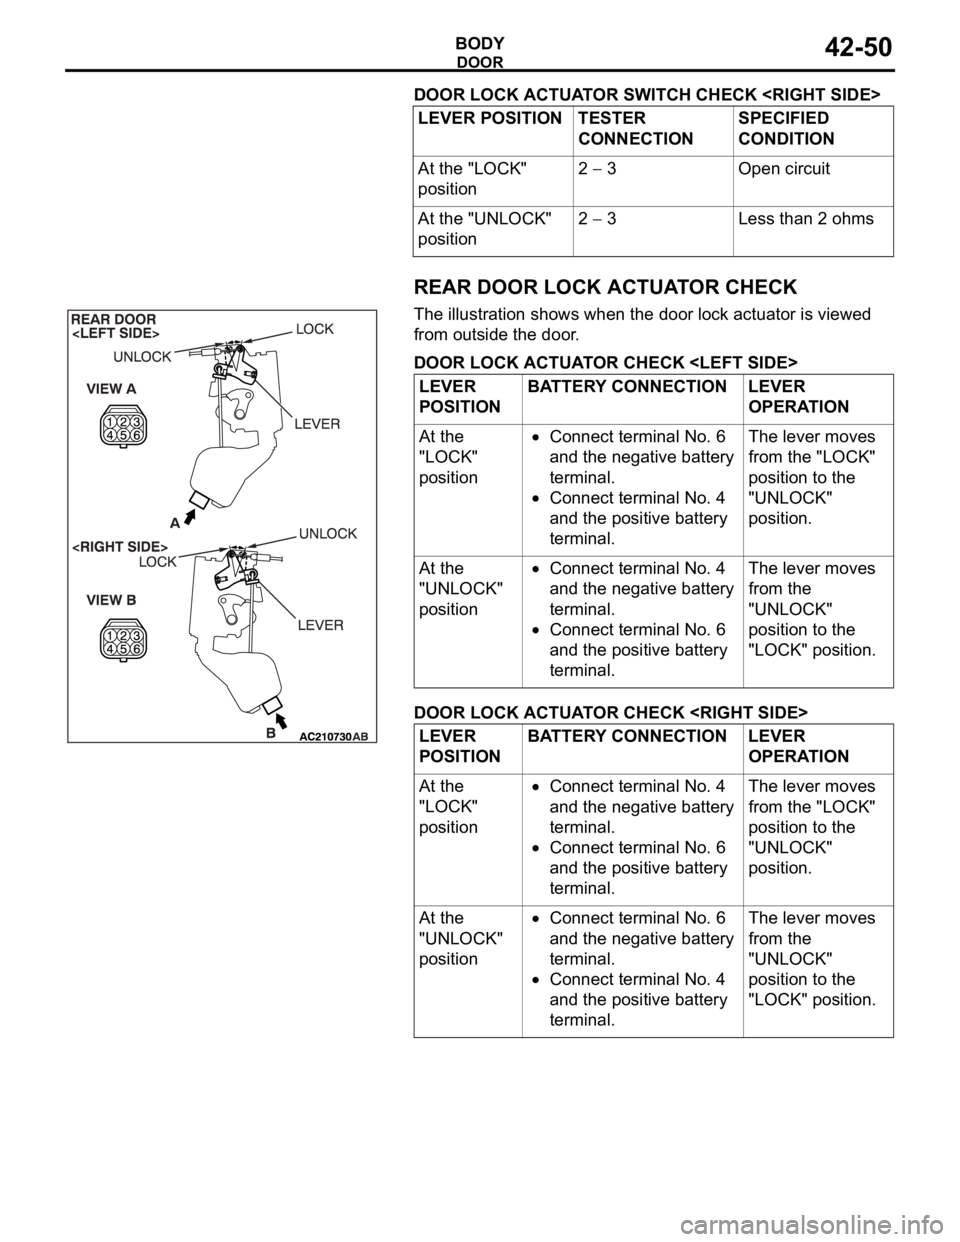
REAR DOOR LOCK ACTUATOR CHECK
The illustration shows when the door lock actuator is viewed
from outside the door.
DOOR LOCK ACTUATOR CHECK
DOOR LOCK ACTUATOR CHECK
CONNECTIONSPECIFIED
CONDITION
At the "LOCK"
position2
3 Open circuit
At the "UNLOCK"
position2
3 Less than 2 ohms
LEVER
POSITIONBATTERY CONNECTION LEVER
OPERATION
At the
"LOCK"
position
Connect terminal No. 6
and the negative battery
terminal.
Connect terminal No. 4
and the positive battery
terminal.The lever moves
from the "LOCK"
position to the
"UNLOCK"
position.
At the
"UNLOCK"
position
Connect terminal No. 4
and the negative battery
terminal.
Connect terminal No. 6
and the positive battery
terminal.The lever moves
from the
"UNLOCK"
position to the
"LOCK" position.
LEVER
POSITIONBATTERY CONNECTION LEVER
OPERATION
At the
"LOCK"
position
Connect terminal No. 4
and the negative battery
terminal.
Connect terminal No. 6
and the positive battery
terminal.The lever moves
from the "LOCK"
position to the
"UNLOCK"
position.
At the
"UNLOCK"
position
Connect terminal No. 6
and the negative battery
terminal.
Connect terminal No. 4
and the positive battery
terminal.The lever moves
from the
"UNLOCK"
position to the
"LOCK" position.
Page 1118 of 1500
DOOR
BODY42-51
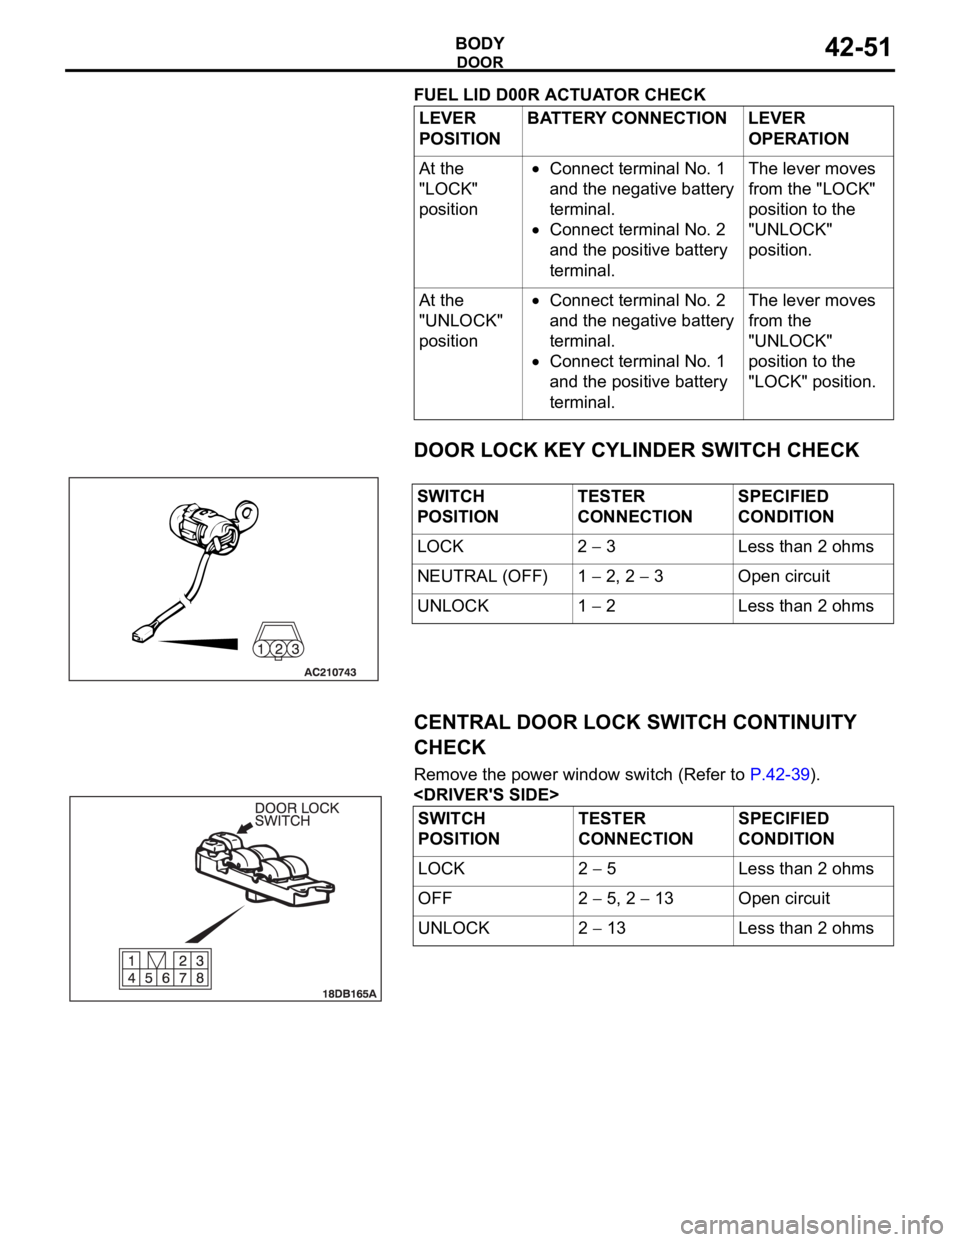
FUEL LID D00R ACTUATOR CHECK
DOOR LOCK KEY CYLINDER SWITCH CHECK
CENTRAL DOOR LOCK SWITCH CONTINUITY
CHECK
Remove the power window switch (Refer to P.42-39).
POSITIONBATTERY CONNECTION LEVER
OPERATION
At the
"LOCK"
position
Connect terminal No. 1
and the negative battery
terminal.
Connect terminal No. 2
and the positive battery
terminal.The lever moves
from the "LOCK"
position to the
"UNLOCK"
position.
At the
"UNLOCK"
position
Connect terminal No. 2
and the negative battery
terminal.
Connect terminal No. 1
and the positive battery
terminal.The lever moves
from the
"UNLOCK"
position to the
"LOCK" position.
SWITCH
POSITIONTESTER
CONNECTIONSPECIFIED
CONDITION
LOCK 2
3 Less than 2 ohms
NEUTRAL (OFF) 1
2, 2 3 Open circuit
UNLOCK 1
2 Less than 2 ohms
SWITCH
POSITIONTESTER
CONNECTIONSPECIFIED
CONDITION
LOCK 2
5 Less than 2 ohms
OFF 2
5, 2 13 Open circuit
UNLOCK 2
13 Less than 2 ohms
Page 1119 of 1500
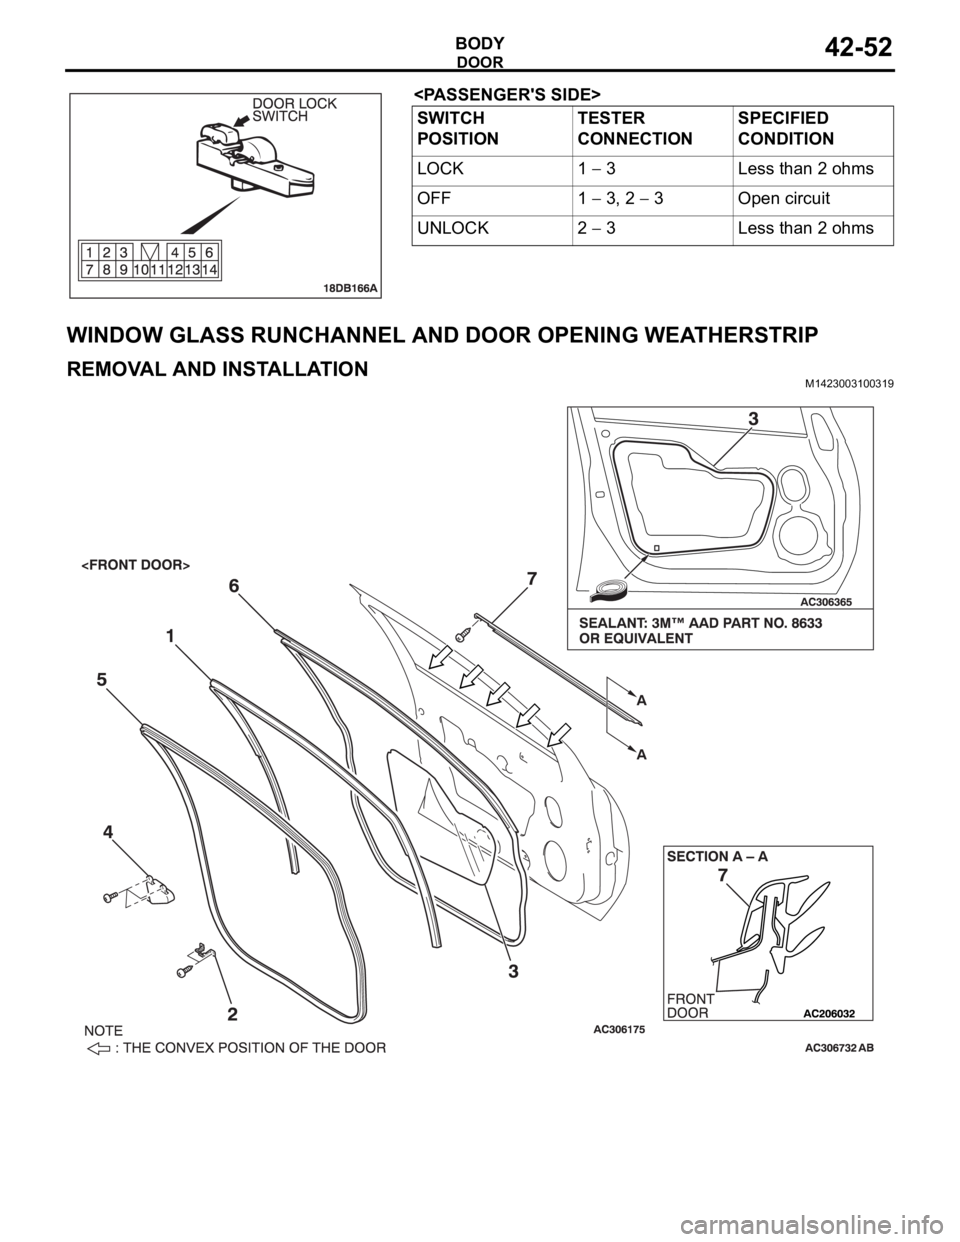
DOOR
BODY42-52
WINDOW GLASS RUNCHANNEL AND DOOR OPENING WEATHERSTRIP
REMOVAL AND INSTALLATIONM1423003100319
SWITCH
POSITIONTESTER
CONNECTIONSPECIFIED
CONDITION
LOCK 1
3 Less than 2 ohms
OFF 1
3, 2 3 Open circuit
UNLOCK 2
3 Less than 2 ohms
Page 1120 of 1500

DOOR
BODY42-53
REMOVAL
>>D<<1. DOOR WINDOW GLASS
RUNCHANNEL
WATERPROOF FILM AND DOOR
PANEL CORE REMOVAL STEPS
DOOR TRIM ASSEMBLY (REFER
TO GROUP 52A, DOOR TRIM
P.52A-14).
DOOR INSIDE HANDLE (REFER TO
P.42-46).
2. DOOR ARMREST BRACKET
>>A<<3. WATERPROOF FILM
4. DOOR PANEL CORE
DOOR OPENING INNER
WEATHERSTRIP REMOVAL
STEPS
FRONT SCUFF PLATE (REFER TO
GROUP 52A, TRIMS P.52A-11).
>>C<<5. DOOR OPENING INNER
WEATHERSTRIP (BODY SIDE)DOOR OPENING OUTER
WEATHERSTRIP REMOVAL
STEPS
DOOR CHECK MOUNTING BOLT
(BODY SIDE) (REFER TO P.42-37).
>>B<<6. DOOR OPENING OUTER
WEATHERSTRIP
DOOR BELTLINE MOLDING
REMOVAL STEPS
DOOR TRIM ASSEMBLY (REFER
TO GROUP 52A, DOOR TRIM
P.52A-14).
REMOTE CONTROLLED MIRROR
ASSEMBLY (REFER TO GROUP 51,
DOOR MIRROR P.51-28).
7. DOOR BELTLINE MOLDING