MITSUBISHI 380 2005 Workshop Manual
Manufacturer: MITSUBISHI, Model Year: 2005, Model line: 380, Model: MITSUBISHI 380 2005Pages: 1500, PDF Size: 47.87 MB
Page 1091 of 1500
DOOR
BODY42-24
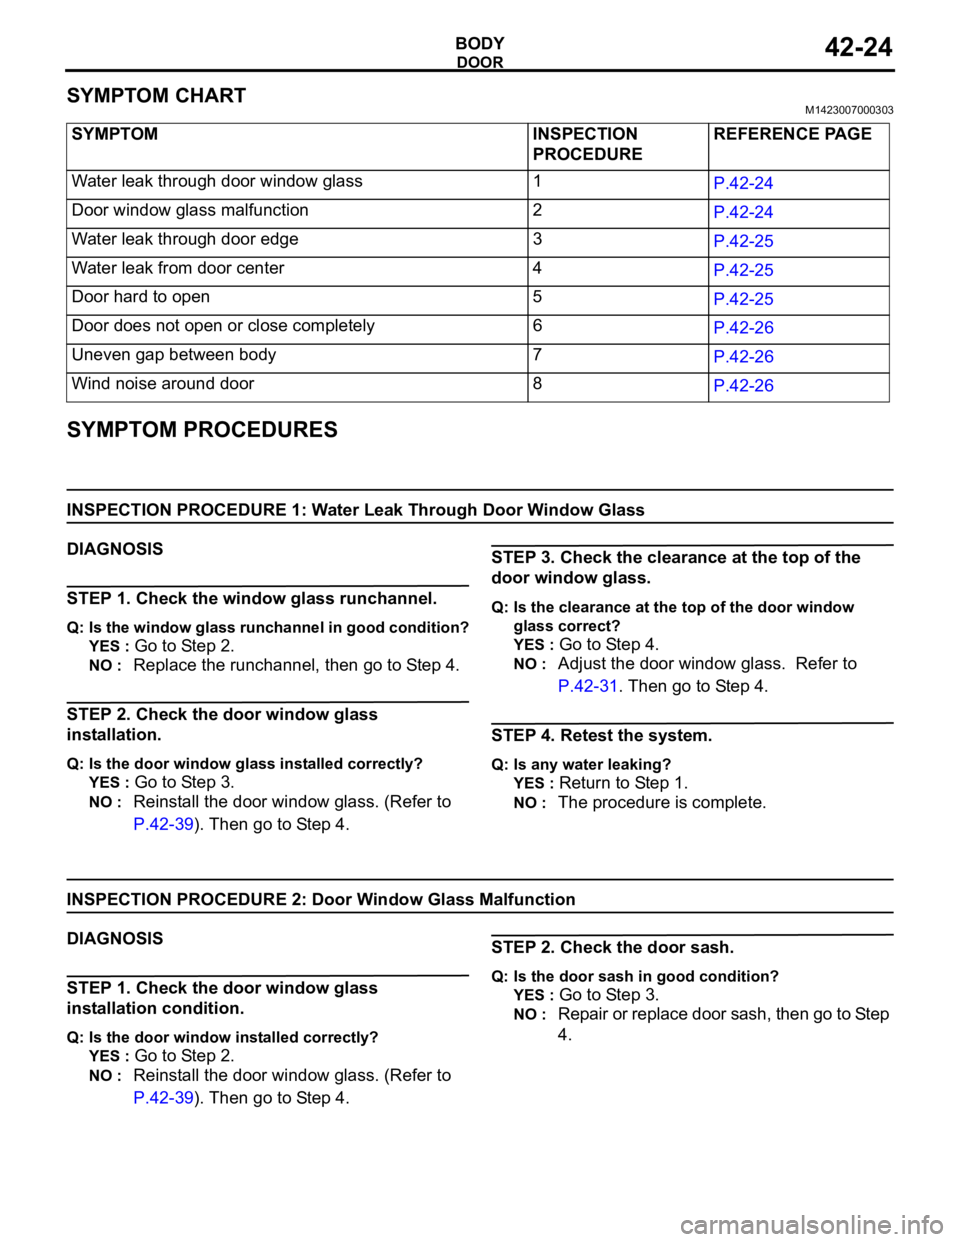
SYMPTOM CHARTM1423007000303
SYMPTOM PROCEDURES
INSPECTION PROCEDURE 1: Water Leak Through Door Window Glass
DIAGNOSIS
STEP 1. Check the window glass runchannel.
Q: Is the window glass runchannel in good condition?
YES :
Go to Step 2.
NO : Replace the runchannel, then go to Step 4.
STEP 2. Check the door window glass
installation.
Q: Is the door window glass installed correctly?
YES :
Go to Step 3.
NO : Reinstall the door window glass. (Refer to
P.42-39). Then go to Step 4.
STEP 3. Check the clearance at the top of the
door window glass.
Q: Is the clearance at the top of the door window
glass correct?
YES :
Go to Step 4.
NO : Adjust the door window glass. Refer to
P.42-31. Then go to Step 4.
STEP 4. Retest the system.
Q: Is any water leaking?
YES :
Return to Step 1.
NO : The procedure is complete.
INSPECTION PROCEDURE 2: Door Window Glass Malfunction
DIAGNOSIS
STEP 1. Check the door window glass
installation condition.
Q: Is the door window installed correctly?
YES :
Go to Step 2.
NO : Reinstall the door window glass. (Refer to
P.42-39). Then go to Step 4.
STEP 2. Check the door sash.
Q: Is the door sash in good condition?
YES :
Go to Step 3.
NO : Repair or replace door sash, then go to Step
4. SYMPTOM INSPECTION
PROCEDUREREFERENCE PAGE
Water leak through door window glass 1
P.42-24
Door window glass malfunction 2
P.42-24
Water leak through door edge 3
P.42-25
Water leak from door center 4
P.42-25
Door hard to open 5
P.42-25
Door does not open or close completely 6
P.42-26
Uneven gap between body 7
P.42-26
Wind noise around door 8
P.42-26
Page 1092 of 1500
DOOR
BODY42-25
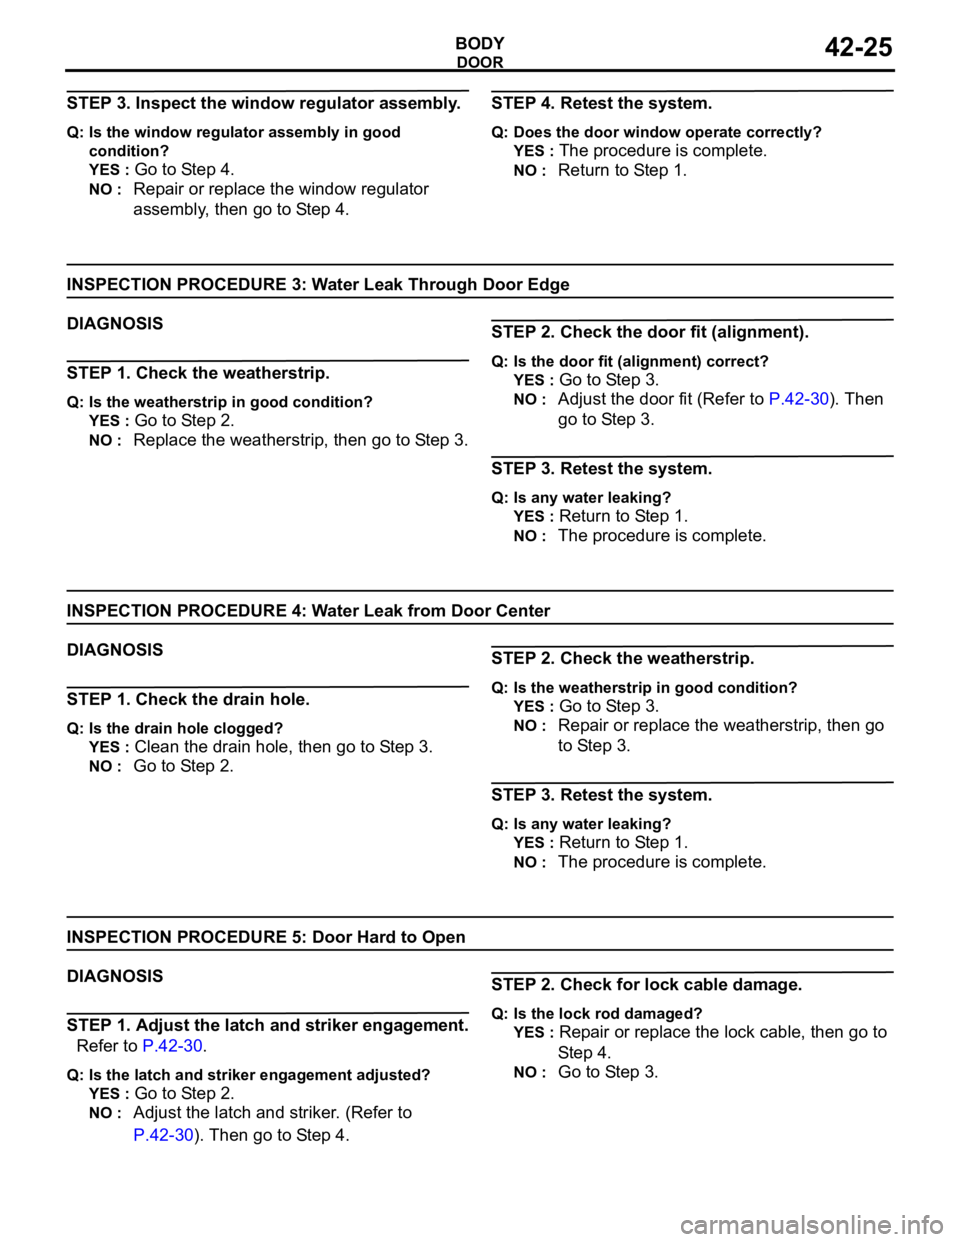
STEP 3. Inspect the window regulator assembly.
Q: Is the window regulator assembly in good
condition?
YES :
Go to Step 4.
NO : Repair or replace the window regulator
assembly, then go to Step 4.
STEP 4. Retest the system.
Q: Does the door window operate correctly?
YES :
The procedure is complete.
NO : Return to Step 1.
INSPECTION PROCEDURE 3: Water Leak Through Door Edge
DIAGNOSIS
STEP 1. Check the weatherstrip.
Q: Is the weatherstrip in good condition?
YES :
Go to Step 2.
NO : Replace the weatherstrip, then go to Step 3.
STEP 2. Check the door fit (alignment).
Q: Is the door fit (alignment) correct?
YES :
Go to Step 3.
NO : Adjust the door fit (Refer to P.42-30). Then
go to Step 3.
STEP 3. Retest the system.
Q: Is any water leaking?
YES :
Return to Step 1.
NO : The procedure is complete.
INSPECTION PROCEDURE 4: Water Leak from Door Center
DIAGNOSIS
STEP 1. Check the drain hole.
Q: Is the drain hole clogged?
YES :
Clean the drain hole, then go to Step 3.
NO : Go to Step 2.
STEP 2. Check the weatherstrip.
Q: Is the weatherstrip in good condition?
YES :
Go to Step 3.
NO : Repair or replace the weatherstrip, then go
to Step 3.
STEP 3. Retest the system.
Q: Is any water leaking?
YES :
Return to Step 1.
NO : The procedure is complete.
INSPECTION PROCEDURE 5: Door Hard to Open
DIAGNOSIS
STEP 1. Adjust the latch and striker engagement.
Refer to P.42-30.
Q: Is the latch and striker engagement adjusted?
YES :
Go to Step 2.
NO : Adjust the latch and striker. (Refer to
P.42-30). Then go to Step 4.
STEP 2. Check for lock cable damage.
Q: Is the lock rod damaged?
YES :
Repair or replace the lock cable, then go to
St e p 4.
NO : Go to Step 3.
Page 1093 of 1500
DOOR
BODY42-26
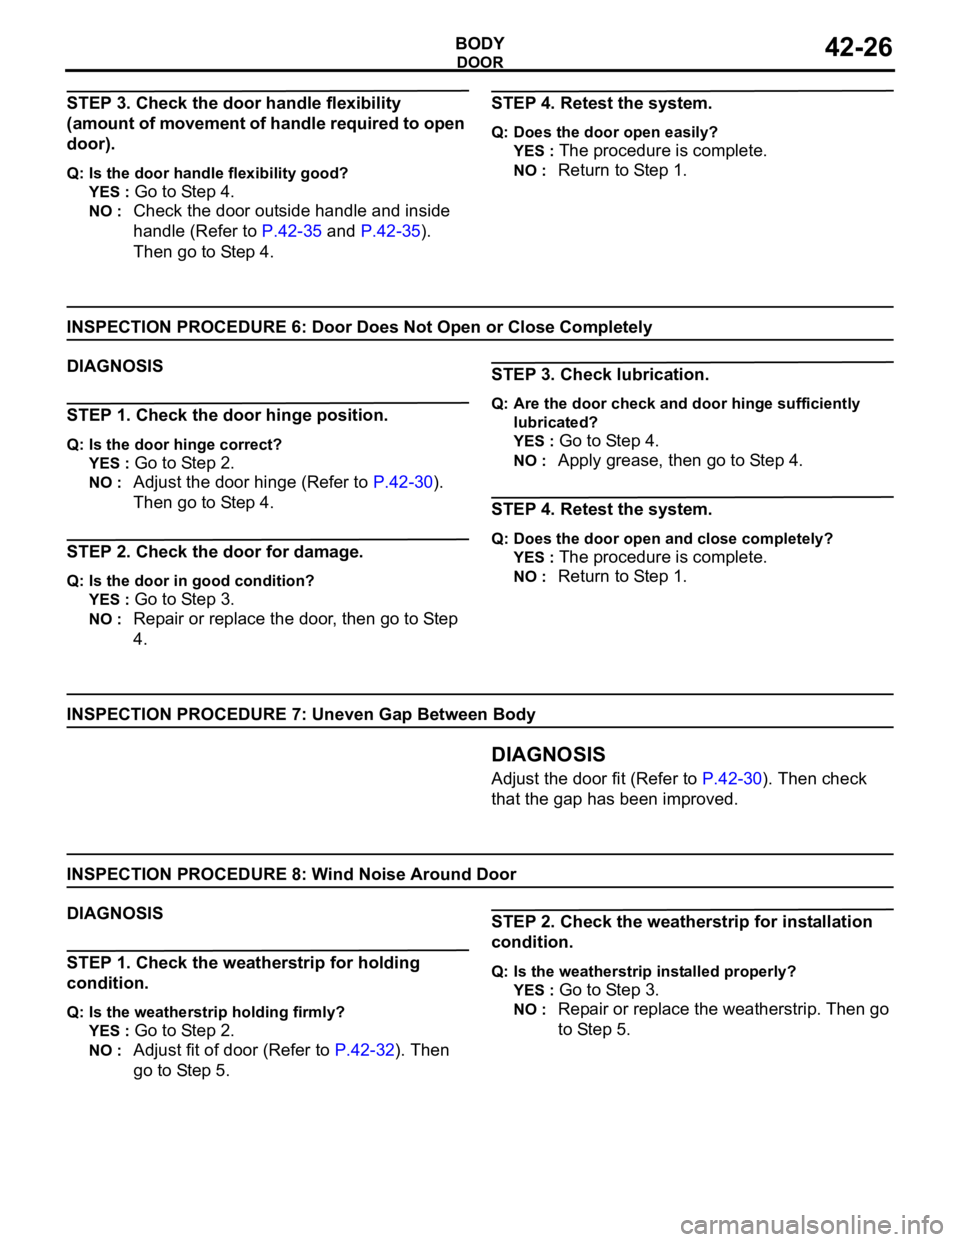
STEP 3. Check the door handle flexibility
(amount of movement of handle required to open
door).
Q: Is the door handle flexibility good?
YES :
Go to Step 4.
NO : Check the door outside handle and inside
handle (Refer to P.42-35 and P.42-35).
Then go to Step 4.
STEP 4. Retest the system.
Q: Does the door open easily?
YES :
The procedure is complete.
NO : Return to Step 1.
INSPECTION PROCEDURE 6: Door Does Not Open or Close Completely
DIAGNOSIS
STEP 1. Check the door hinge position.
Q: Is the door hinge correct?
YES :
Go to Step 2.
NO : Adjust the door hinge (Refer to P.42-30).
Then go to Step 4.
STEP 2. Check the door for damage.
Q: Is the door in good condition?
YES :
Go to Step 3.
NO : Repair or replace the door, then go to Step
4.
STEP 3. Check lubrication.
Q: Are the door check and door hinge sufficiently
lubricated?
YES :
Go to Step 4.
NO : Apply grease, then go to Step 4.
STEP 4. Retest the system.
Q: Does the door open and close completely?
YES :
The procedure is complete.
NO : Return to Step 1.
INSPECTION PROCEDURE 7: Uneven Gap Between Body
.DIAGNOSIS
Adjust the door fit (Refer to P.42-30). Then check
that the gap has been improved.
INSPECTION PROCEDURE 8: Wind Noise Around Door
DIAGNOSIS
STEP 1. Check the weatherstrip for holding
condition.
Q: Is the weatherstrip holding firmly?
YES :
Go to Step 2.
NO : Adjust fit of door (Refer to P.42-32). Then
go to Step 5.
STEP 2. Check the weatherstrip for installation
condition.
Q: Is the weatherstrip installed properly?
YES :
Go to Step 3.
NO : Repair or replace the weatherstrip. Then go
to Step 5.
Page 1094 of 1500
DOOR
BODY42-27
STEP 3. Check the clearance.
Q: Are the door glass and door weatherstrip holder
installed properly?
YES :
Go to Step 4.
NO : Adjust the door glass and the weatherstrip
holder (Refer to P.42-32). Then go to Step
5.
STEP 4. Check the door for deformation.
Q: Is the door deformed?
YES :
Replace the door. then go to Step 5.
NO : Go to Step 5.
STEP 5. Retest the system.
Q: Has the wind noise been improved?
YES :
Return to Step 1.
NO : This diagnosis complete.
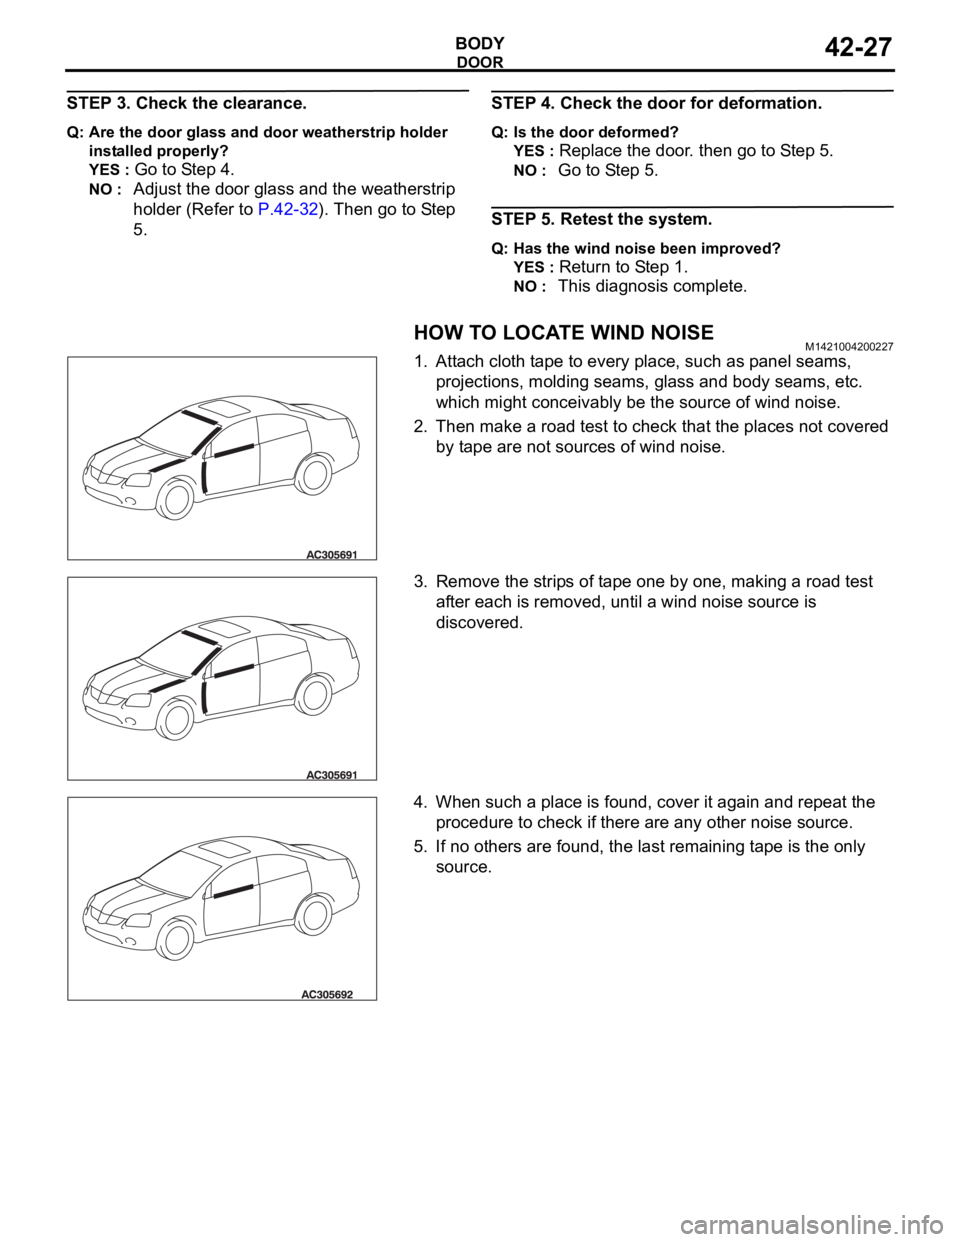
HOW TO LOCATE WIND NOISEM1421004200227
1. Attach cloth tape to every place, such as panel seams,
projections, molding seams, glass and body seams, etc.
which might conceivably be the source of wind noise.
2. Then make a road test to check that the places not covered
by tape are not sources of wind noise.
3. Remove the strips of tape one by one, making a road test
after each is removed, until a wind noise source is
discovered.
4. When such a place is found, cover it again and repeat the
procedure to check if there are any other noise source.
5. If no others are found, the last remaining tape is the only
source.
Page 1095 of 1500
DOOR
BODY42-28
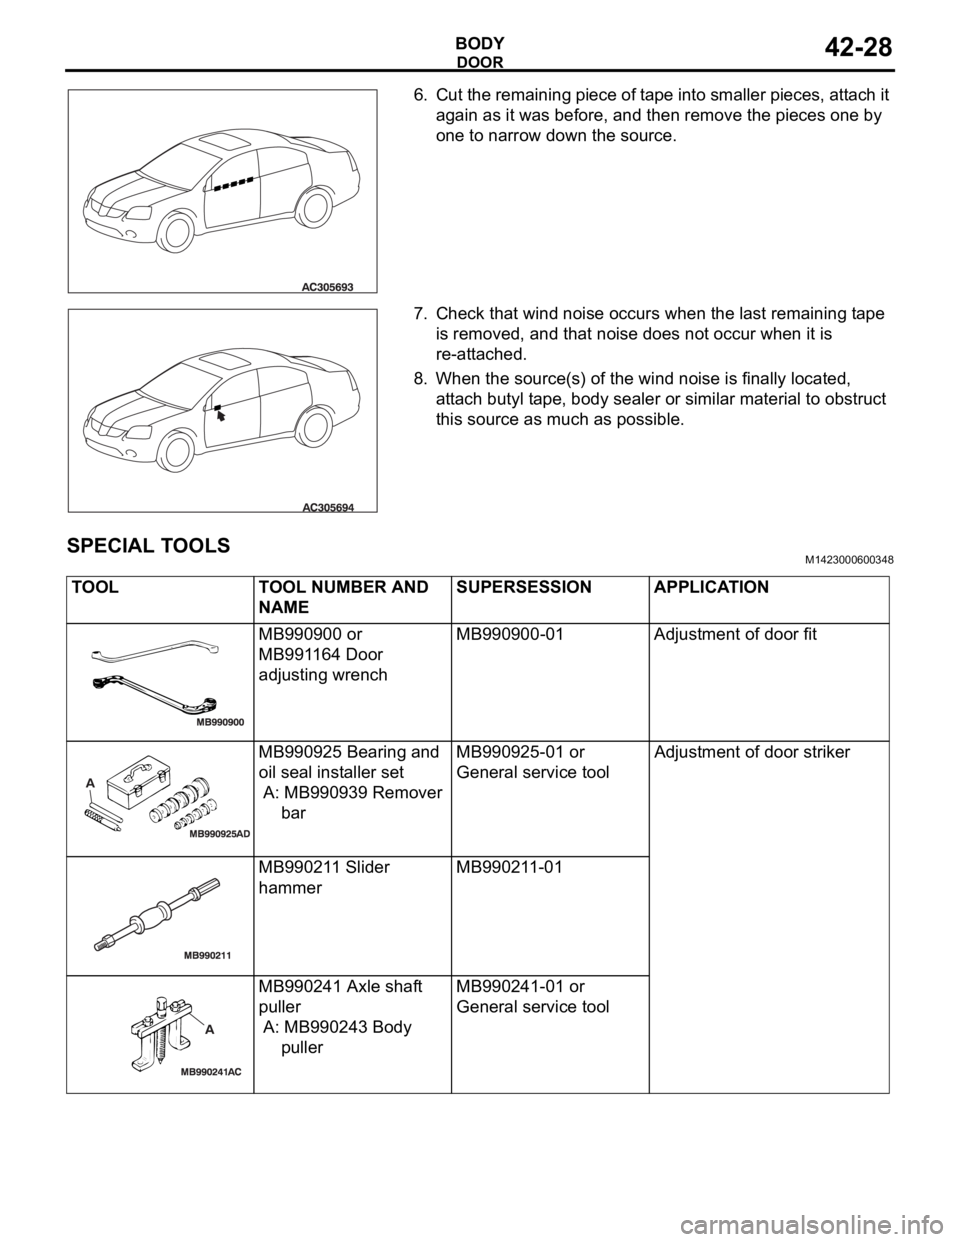
6. Cut the remaining piece of tape into smaller pieces, attach it
again as it was before, and then remove the pieces one by
one to narrow down the source.
7. Check that wind noise occurs when the last remaining tape
is removed, and that noise does not occur when it is
re-attached.
8. When the source(s) of the wind noise is finally located,
attach butyl tape, body sealer or similar material to obstruct
this source as much as possible.
SPECIAL TOOLSM1423000600348
TOOL TOOL NUMBER AND
NAMESUPERSESSION APPLICATION
MB990900 or
MB991164 Door
adjusting wrenchMB990900-01 Adjustment of door fit
MB990925 Bearing and
oil seal installer set
A: MB990939 Remover
barMB990925-01 or
General service toolAdjustment of door striker
MB990211 Slider
hammerMB990211-01
MB990241 Axle shaft
puller
A: MB990243 Body
pullerMB990241-01 or
General service tool
Page 1096 of 1500

DOOR
BODY42-29
MB990480 Glass holder General service tool Removal of power window
regulator assembly
MB991223 Harness set
A: MB991219 Test
harness
B: MB991220 LED
harness
C: MB991221 LED
harness adapter
D: MB991222 ProbeGeneral service tools Measurement of terminal
voltage
A: Connector pin contact
pressure inspection
B: Power circuit inspection
C: Power circuit inspection
D: Commercial tester
connection
MB990784 Ornament
removerGeneral service tool Removal of power window
switch panel assembly TOOL TOOL NUMBER AND
NAMESUPERSESSION APPLICATION
Page 1097 of 1500
DOOR
BODY42-30
ON-VEHICLE SERVICE
DOOR FIT ADJUSTMENTM1423001100380
Required Special Tools:
MB990211: Slide Hammer
MB990243: Body Puller
MB990900 or MB991164: Door adjusting Wrench
MB990939: Brass Bar
Attach protection tape to the fender and door edges
where the hinge is installed.
Do not rotate special tool MB991164 with a torque of
over 98 N
m (72 ft-lb).
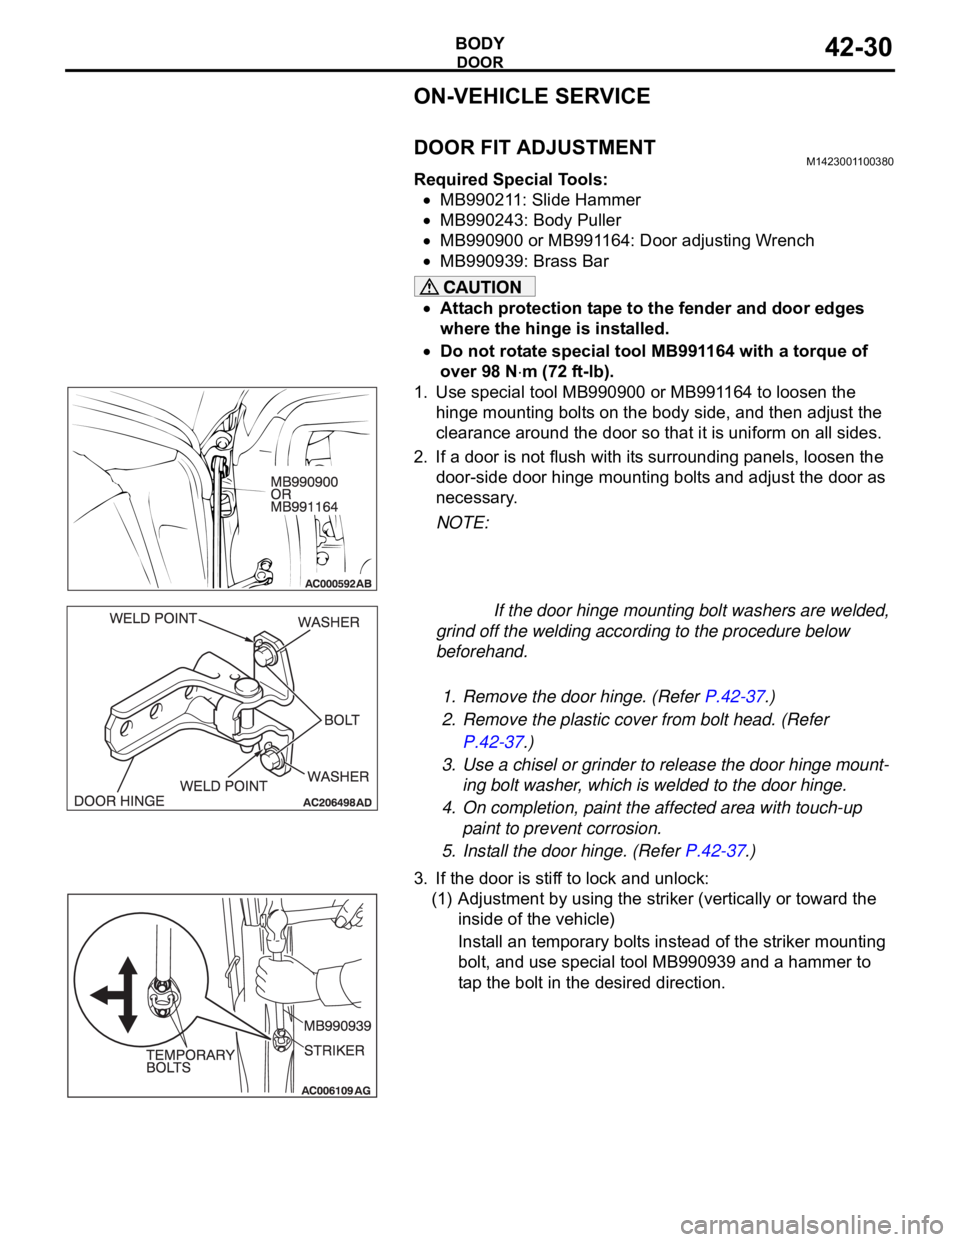
1. Use special tool MB990900 or MB991164 to loosen the
hinge mounting bolts on the body side, and then adjust the
clearance around the door so that it is uniform on all sides.
2. If a door is not flush with its surrounding panels, loosen the
door-side door hinge mounting bolts and adjust the door as
necessary.
NOTE:
If the door hinge mounting bolt washers are welded,
grind off the welding according to the procedure below
beforehand.
.
1. Remove the door hinge. (Refer P.42-37.)
2. Remove the plastic cover from bolt head. (Refer
P.42-37.)
3. Use a chisel or grinder to release the door hinge mount-
ing bolt washer, which is welded to the door hinge.
4. On completion, paint the affected area with touch-up
paint to prevent corrosion.
5. Install the door hinge. (Refer P.42-37.)
3. If the door is stiff to lock and unlock:
(1) Adjustment by using the striker (vertically or toward the
inside of the vehicle)
Install an temporary bolts instead of the striker mounting
bolt, and use special tool MB990939 and a hammer to
tap the bolt in the desired direction.
Page 1098 of 1500
DOOR
BODY42-31
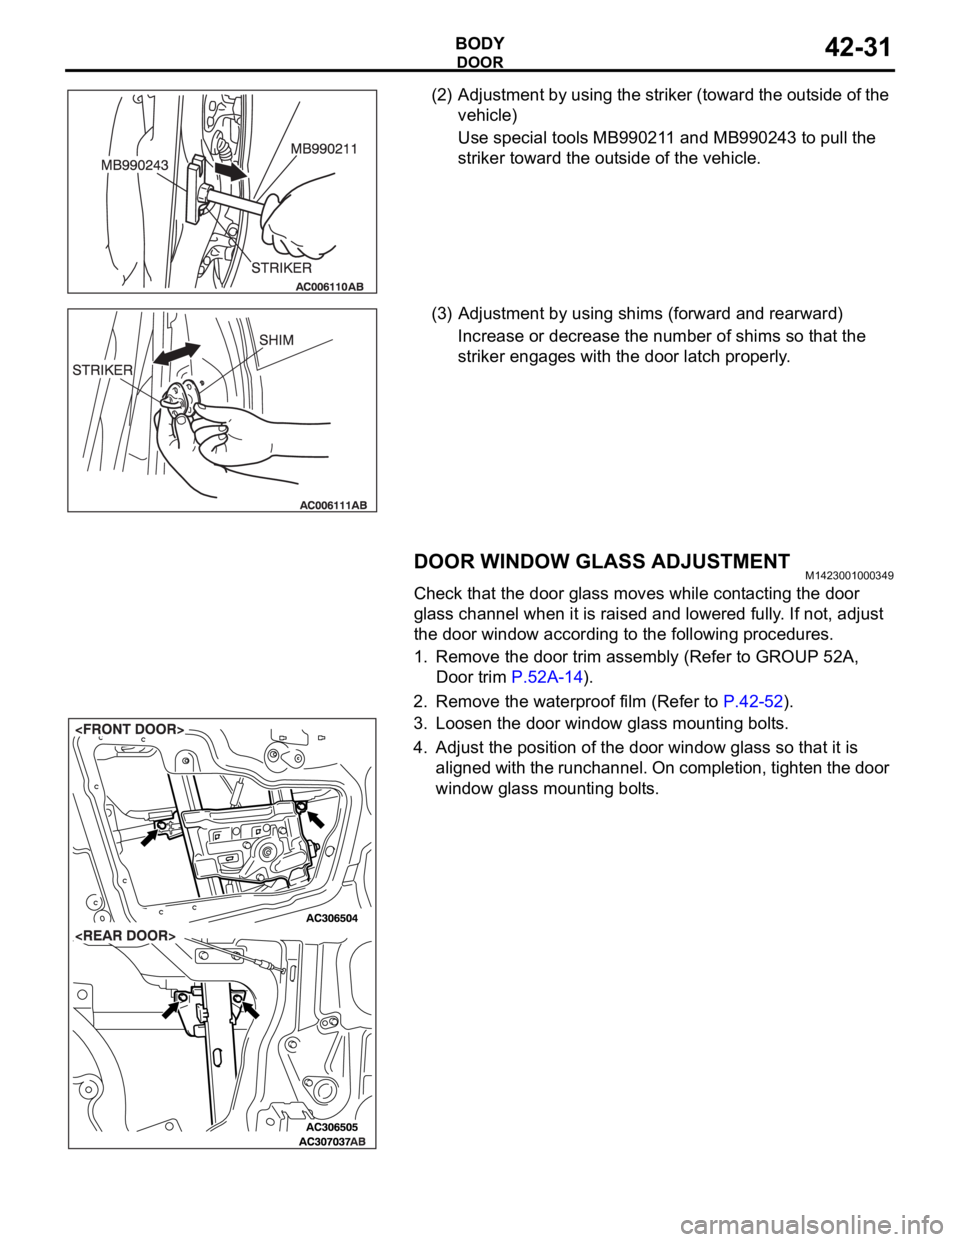
(2) Adjustment by using the striker (toward the outside of the
vehicle)
Use special tools MB990211 and MB990243 to pull the
striker toward the outside of the vehicle.
(3) Adjustment by using shims (forward and rearward)
Increase or decrease the number of shims so that the
striker engages with the door latch properly.
DOOR WINDOW GLASS ADJUSTMENTM1423001000349
Check that the door glass moves while contacting the door
glass channel when it is raised and lowered fully. If not, adjust
the door window according to the following procedures.
1. Remove the door trim assembly (Refer to GROUP 52A,
Door trim P.52A-14).
2. Remove the waterproof film (Refer to P.42-52).
3. Loosen the door window glass mounting bolts.
4. Adjust the position of the door window glass so that it is
aligned with the runchannel. On completion, tighten the door
window glass mounting bolts.
Page 1099 of 1500
DOOR
BODY42-32
GLASS SLIDING MECHANISM CHECK AND
ADJUSTMENT
M1429000900109
If the window glass automatically starts moving downwards at
the wrong time while it is being raised, carry out the following
adjustment or replacement procedures.
1. Remove the door trim assembly (Refer to GROUP 52A,
Door trim P.52A-14).
2. Remove the waterproof film (Refer to P.42-52).
Insert a cushion or similar object to prevent damage to the
glass if it should fall.
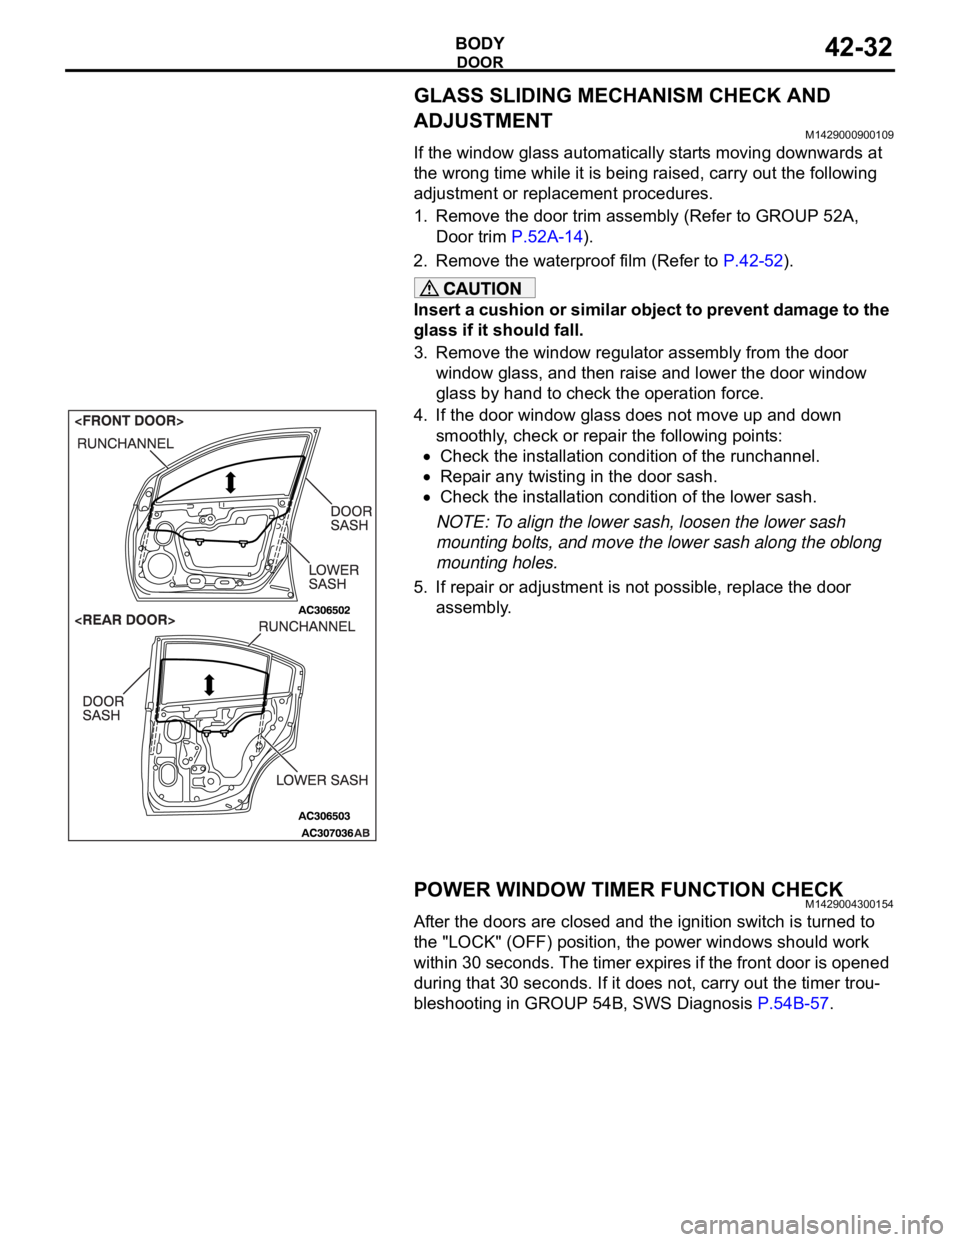
3. Remove the window regulator assembly from the door
window glass, and then raise and lower the door window
glass by hand to check the operation force.
4. If the door window glass does not move up and down
smoothly, check or repair the following points:
Check the installation condition of the runchannel.
Repair any twisting in the door sash.
Check the installation condition of the lower sash.
NOTE: To align the lower sash, loosen the lower sash
mounting bolts, and move the lower sash along the oblong
mounting holes.
5. If repair or adjustment is not possible, replace the door
assembly.
POWER WINDOW TIMER FUNCTION CHECKM1429004300154
After the doors are closed and the ignition switch is turned to
the "LOCK" (OFF) position, the power windows should work
within 30 seconds. The timer expires if the front door is opened
during that 30 seconds. If it does not, carry out the timer trou-
bleshooting in GROUP 54B, SWS Diagnosis P.54B-57.
Page 1100 of 1500
DOOR
BODY42-33
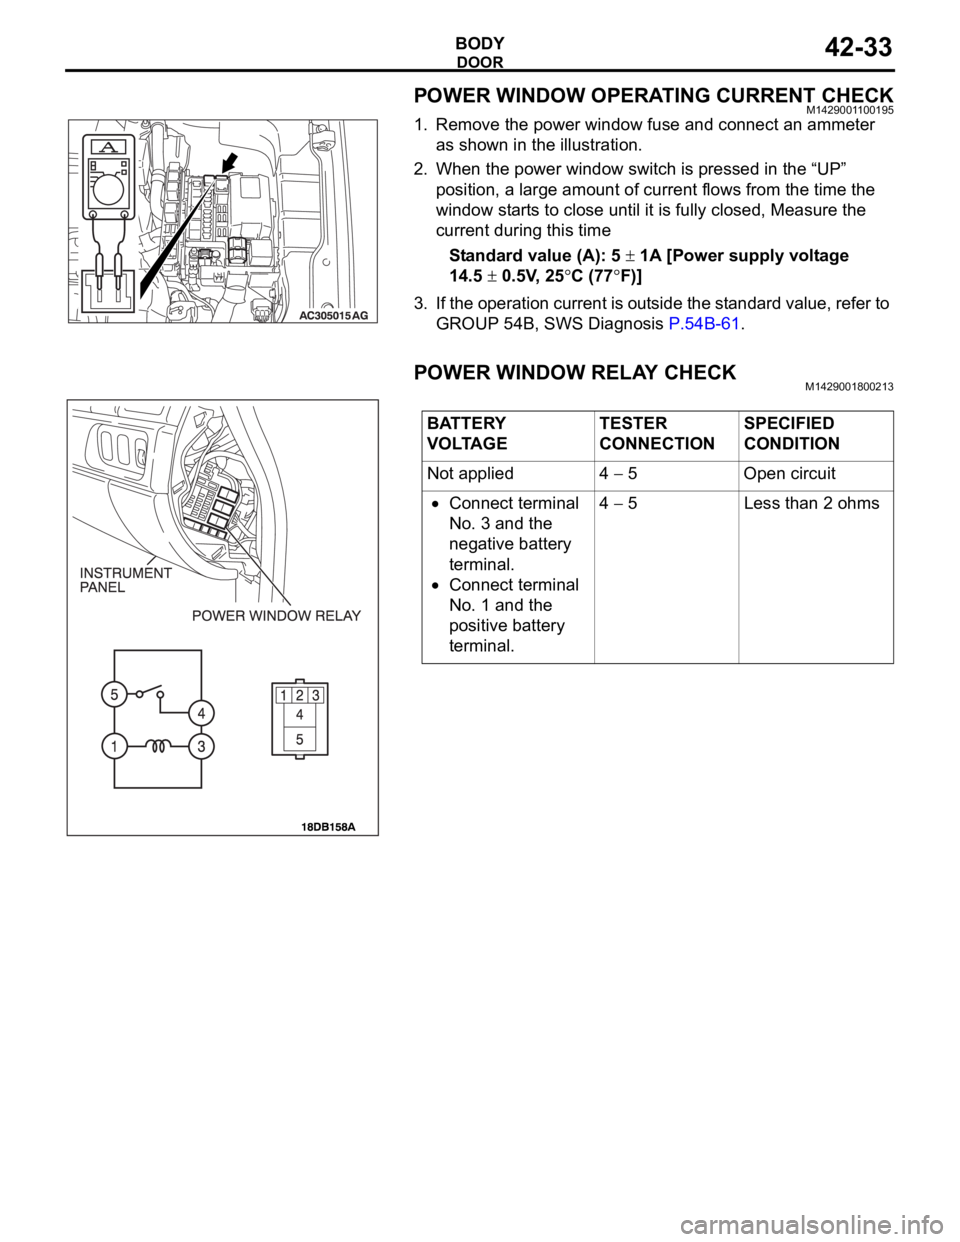
POWER WINDOW OPERATING CURRENT CHECKM1429001100195
1. Remove the power window fuse and connect an ammeter
as shown in the illustration.
2. When the power window switch is pressed in the “UP”
position, a large amount of current flows from the time the
window starts to close until it is fully closed, Measure the
current during this time
Standard value (A): 5
1A [Power supply voltage
14.5
0.5V, 25C (77F)]
3. If the operation current is outside the standard value, refer to
GROUP 54B, SWS Diagnosis P.54B-61.
POWER WINDOW RELAY CHECKM1429001800213
BATTERY
VOLTAGETESTER
CONNECTIONSPECIFIED
CONDITION
Not applied 4
5 Open circuit
Connect terminal
No. 3 and the
negative battery
terminal.
Connect terminal
No. 1 and the
positive battery
terminal.4
5 Less than 2 ohms