torque MITSUBISHI ECLIPSE 1991 Service Manual
[x] Cancel search | Manufacturer: MITSUBISHI, Model Year: 1991, Model line: ECLIPSE, Model: MITSUBISHI ECLIPSE 1991Pages: 1216, PDF Size: 67.42 MB
Page 1015 of 1216
AUTOMATIC TRANSAXLE - Differential21-321
. MD99881 2
MD998822
TFY0040
I166630
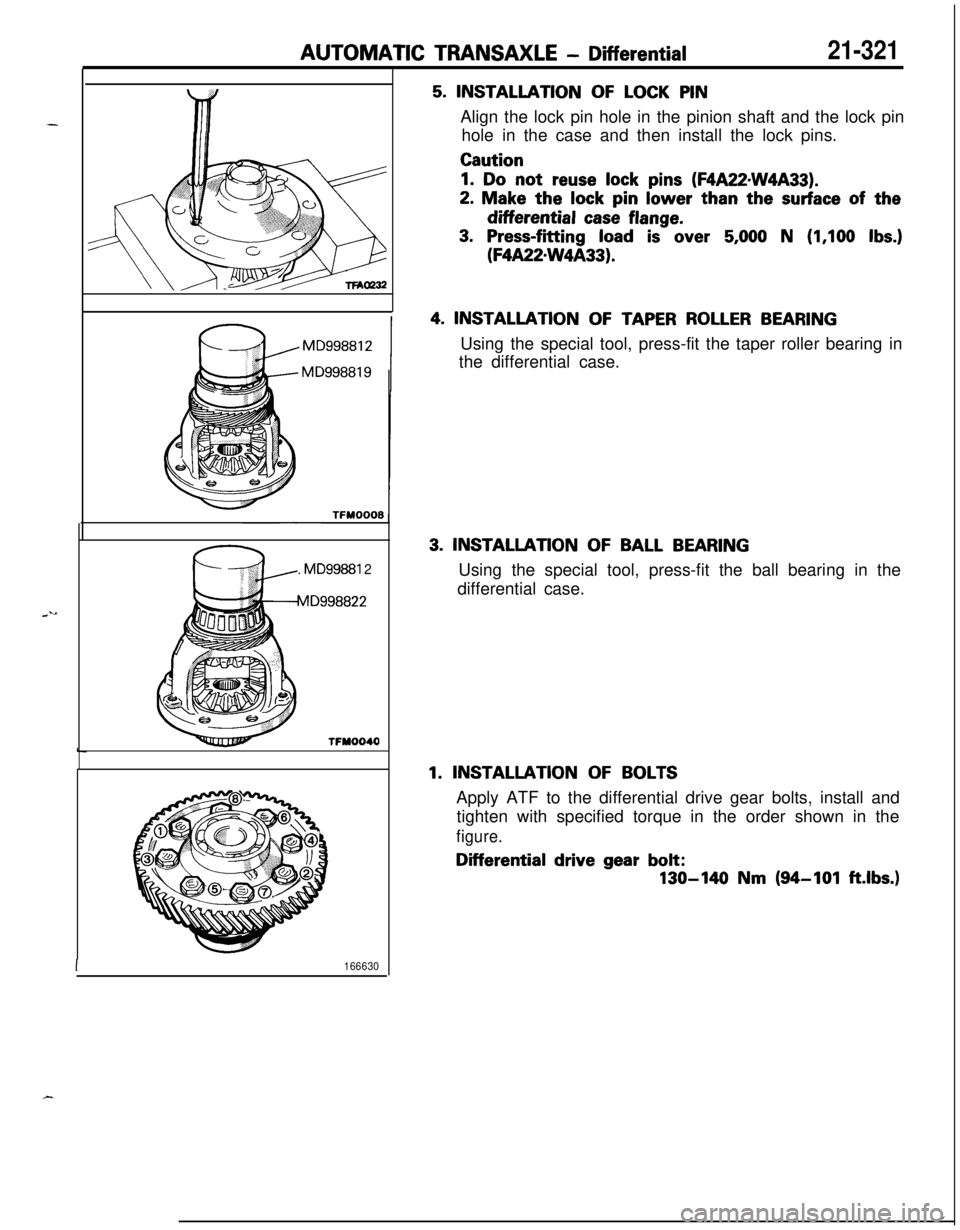
5. INSTALLATION OF LOCK PINAlign the lock pin hole in the pinion shaft and the lock pin
hole in the case and then install the lock pins.Caution
1. Do not reuse lock pins (F4A22wW4A33).
2. Make the lock pin lower than the surface of thedifferential
case flange.
3. Press-fitting load is over 5,000 N (1,100 Ibs.)
(F4A22sW4A33).
4. INSTALLATION OF TAPER ROLLER BEARINGUsing the special tool, press-fit the taper roller bearing in
the differential case.
3. INSTALLATION OF BALL BEARINGUsing the special tool, press-fit the ball bearing in the
differential case.
1. INSTALLATION OF BOLTSApply ATF to the differential drive gear bolts, install and
tighten with specified torque in the order shown in the
figure.Differential drive gear bolt:
130-140 Nm (94-101 ft.lbs.)
r
Page 1019 of 1216
AUTOMATIC TRANSAXLE - Valve Bodv2646
38
I24
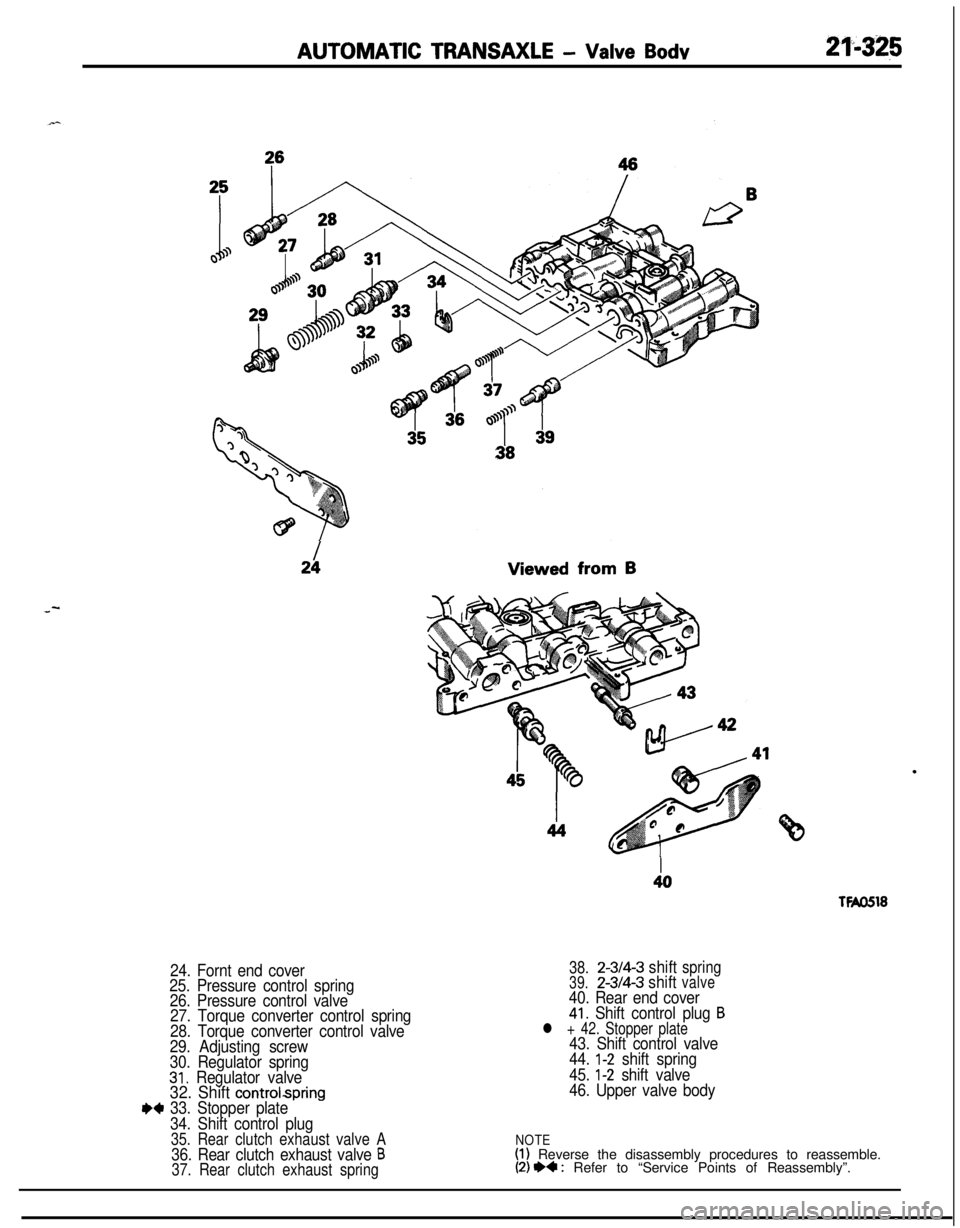
24. Fornt end cover
25. Pressure control spring
26. Pressure control valve
27. Torque converter control spring
28. Torque converter control valve
29. Adjusting screw
30. Regulator spring
31. Regulator valve32. Shift controlspring++ 33. Stopper plate
34. Shift control plug
35. Rear clutch exhaust valve A36. Rear clutch exhaust valve B37. Rear clutch exhaust springViewed from
B
.
I40
TFA0518
38.2-314-3shiftspring39.2-3/4-3shiftvalve40. Rear end cover41. Shift control plug Bl + 42. Stopper plate43. Shift control valve
44. l-2 shift spring
45.
l-2 shift valve
46. Upper valve body
NOTE(1) Reverse the disassembly procedures to reassemble.(2) I)4 : Refer to “Service Points of Reassembly”.
Page 1024 of 1216
21-330AUTOMATIC TRANSAXLE - Center Differential
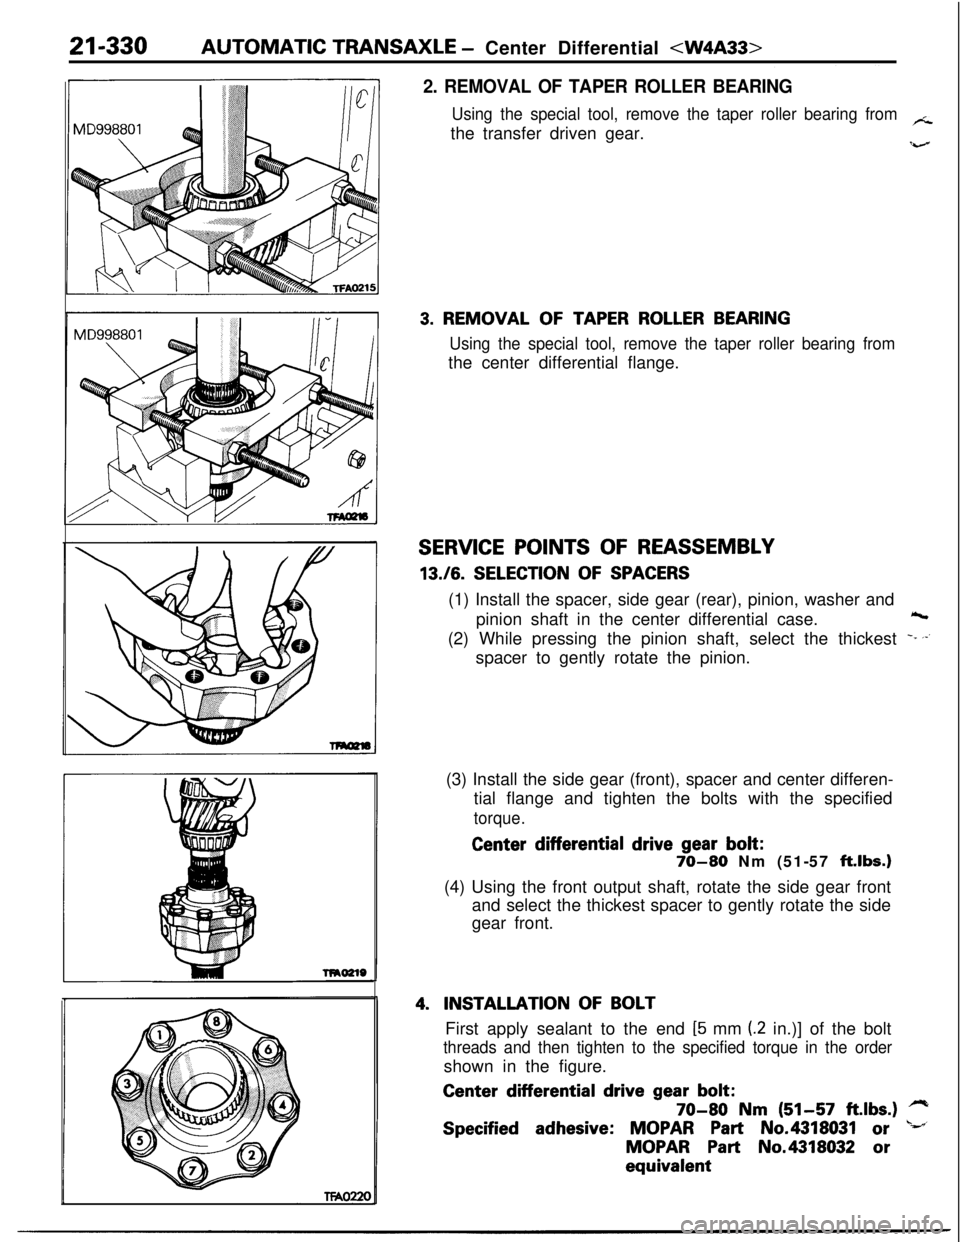
2. REMOVAL OF TAPER ROLLER BEARING
Using the special tool, remove the taper roller bearing from/icthe transfer driven gear.
‘;-
3. REMOVAL OF TAPER ROLLER BEARING
Using the special tool, remove the taper roller bearing fromthe center differential flange.
SERVICE POINTS OF REASSEMBLY
13.16. SELECTION OF SPACERS(1) Install the spacer, side gear (rear), pinion, washer and
pinion shaft in the center differential case.
rs,(2) While pressing the pinion shaft, select the thickest
-m ,-’spacer to gently rotate the pinion.
(3) Install the side gear (front), spacer and center differen-
tial flange and tighten the bolts with the specified
torque.Center differential
drive gear bolt:
70-80 Nm (51-57 ft.lbs.)(4) Using the front output shaft, rotate the side gear front
and select the thickest spacer to gently rotate the side
gear front.
4.INSTALLATION OF BOLTFirst apply sealant to the end
[5 mm (2 in.)] of the bolt
threads and then tighten to the specified torque in the ordershown in the figure.Center differential
drive gear bolt:
70-80 Nm (51-57 ft.lbs.) *
Specified adhesive: MOPAR Part No.4318031 or +’MOPAR
Part No.4318032 orequivalent
Page 1028 of 1216
21-334AUTOMATIC TRANSAXLE - Transfer Assemblv
2210050
-TifAO315
SERVICE POINTS OF REASSEMBLYWmnAE
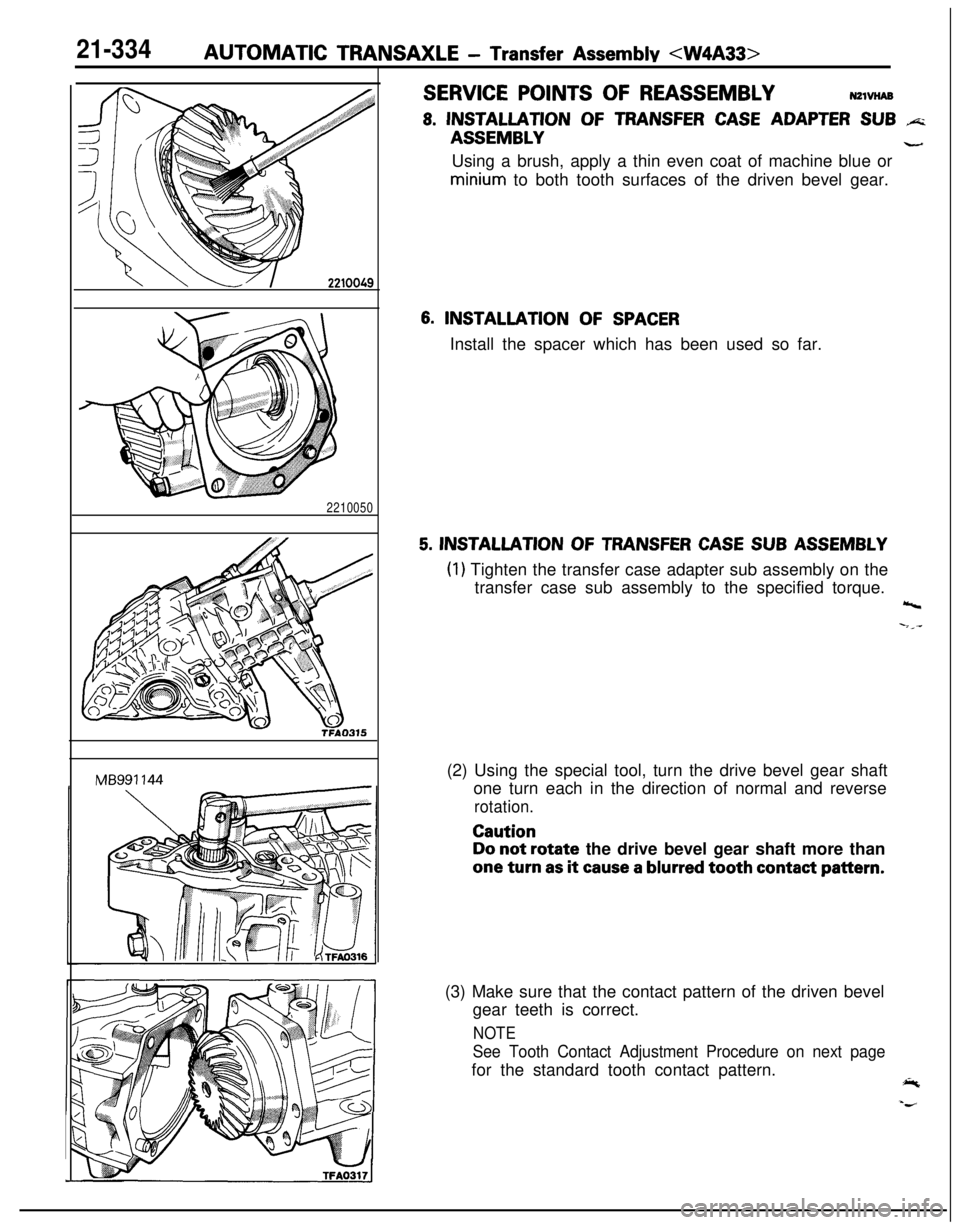
8. INSTALLATION OF TRANSFER CASE ADAPTER SUB +=GASSEMBLY
-Using a brush, apply a thin even coat of machine blue orminium to both tooth surfaces of the driven bevel gear.
6. INSTALLATION OF SPACERInstall the spacer which has been used so far.
5. INSTALLATION OF TRANSFER CASE SUB ASSEMBLY
(1) Tighten the transfer case adapter sub assembly on the
transfer case sub assembly to the specified torque.
\
-;--.(2) Using the special tool, turn the drive bevel gear shaft
one turn each in the direction of normal and reverse
rotation.Caution
Do not rotate the drive bevel gear shaft more thanone turn
as it cause a blurred tooth contact pattern.
MB991144(3) Make sure that the contact pattern of the driven bevel
gear teeth is correct.
NOTE
See Tooth Contact Adjustment Procedure on next pagefor the standard tooth contact pattern.
4
-am--
Page 1033 of 1216
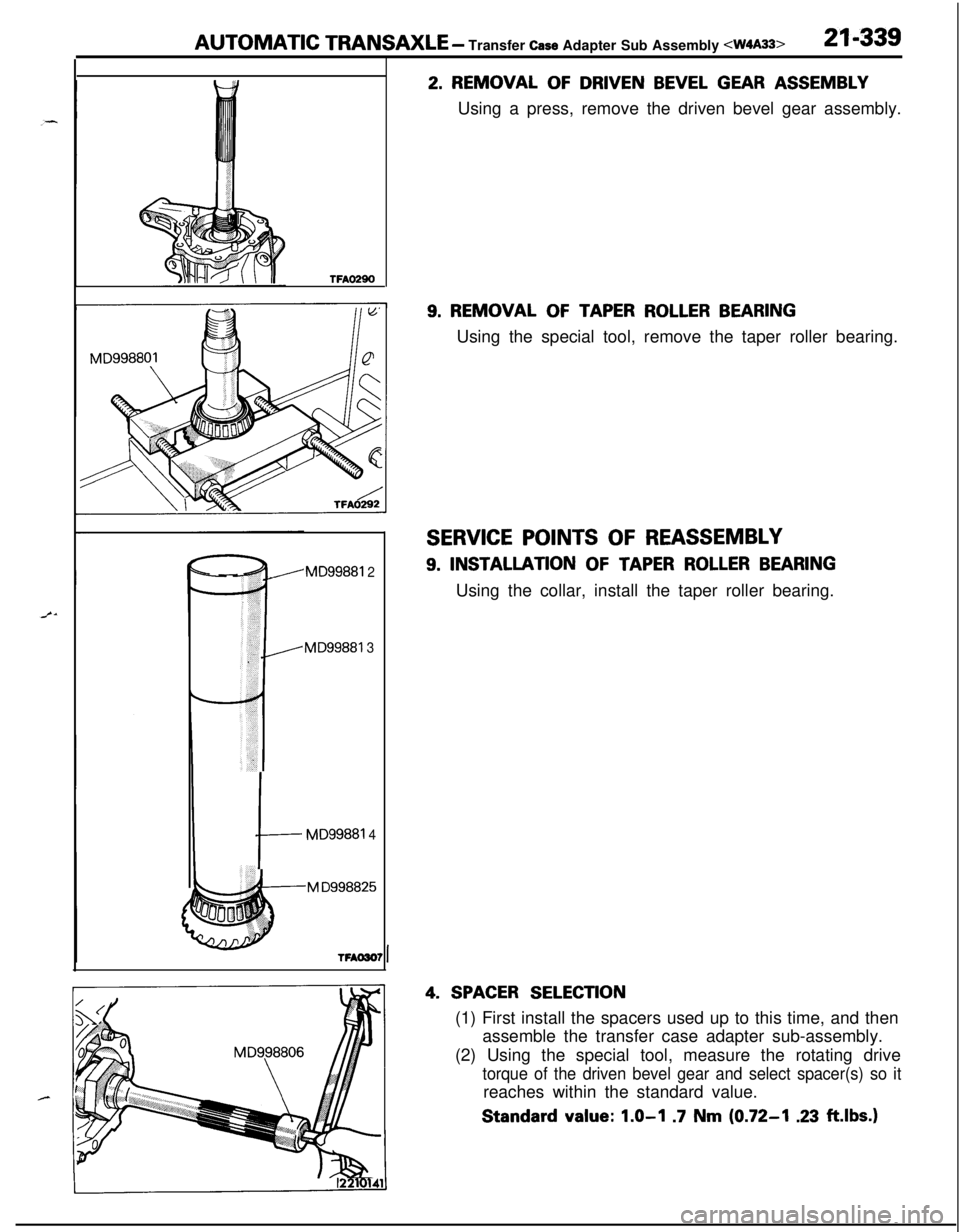
AUTOMATIC TRANSAXLE - Transfer Case Adapter Sub Assembly
TFAO290
MD99881 2
MD99881 3
M D998825
I
MD99881 4
2. REMOVAL OF DRIVEN BEVEL GEAR ASSEMBLY
Using a press, remove the driven bevel gear assembly.
9. REMOVAL OF TAPER ROLLER BEARINGUsing the special tool, remove the taper roller bearing.
SERVICE POINTS OF REASSEMBLY
9. INSTALLATION OF TAPER ROLLER BEARINGUsing the collar, install the taper roller bearing.
4. SPACER SELECTION(1) First install the spacers used up to this time, and then
assemble the transfer case adapter sub-assembly.
(2) Using the special tool, measure the rotating drive
torque of the driven bevel gear and select spacer(s) so itreaches within the standard value.Standard
value: 1.0-l .7 Nm (0.72-I .23 ft.lbs.)
Page 1034 of 1216
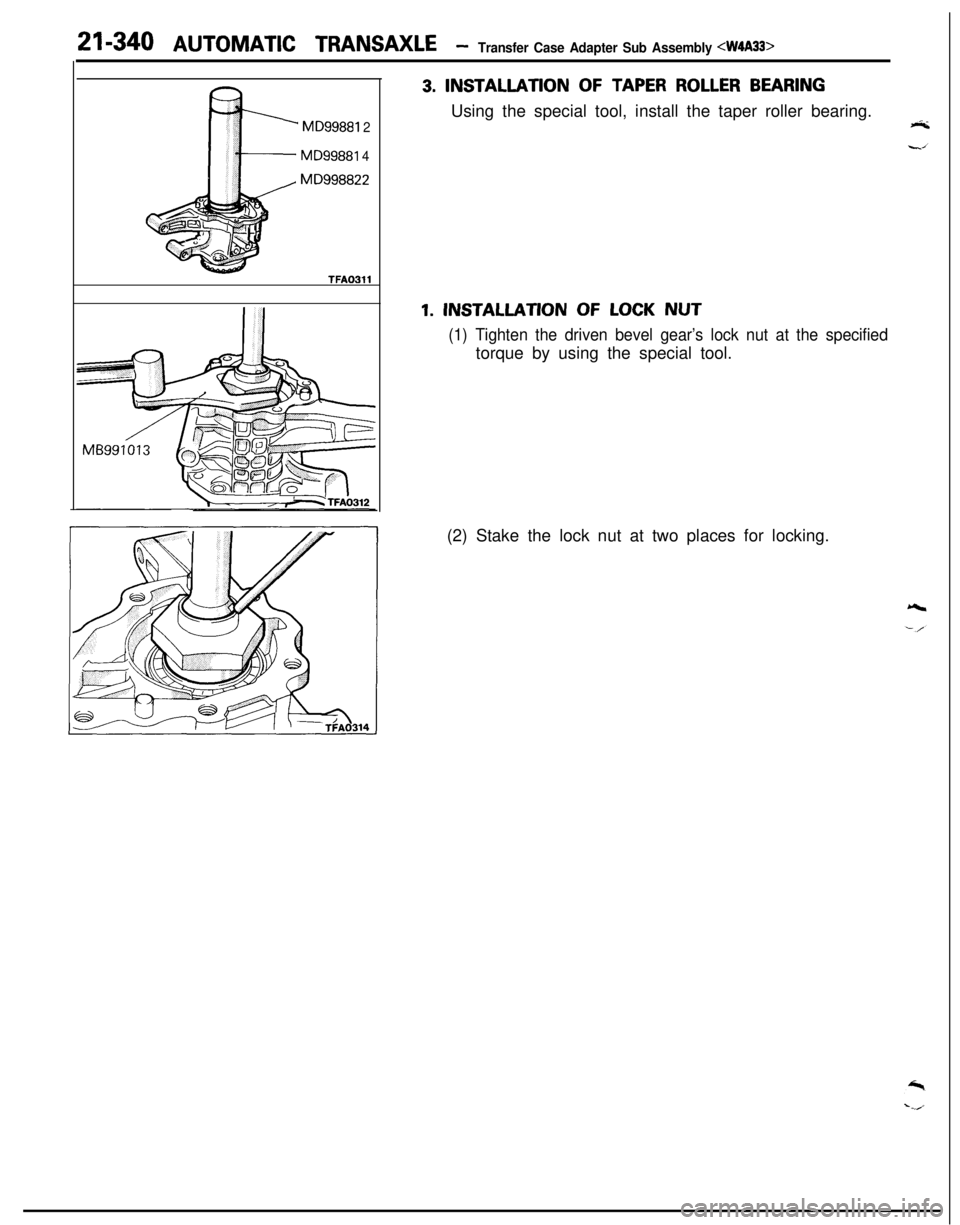
21-340 AUTOMATIC TRANSAXLE -Transfer Case Adapter Sub Assembly
MD99881 2
MD99881 4
MD998822
TFAO311
3. INSTALLATION OF TAPER ROLLER BEARINGUsing the special tool, install the taper roller bearing.
1. INSTALLATION OF LOCK NUT
(1) Tighten the driven bevel gear’s lock nut at the specifiedtorque by using the special tool.
(2) Stake the lock nut at two places for locking.
Page 1037 of 1216
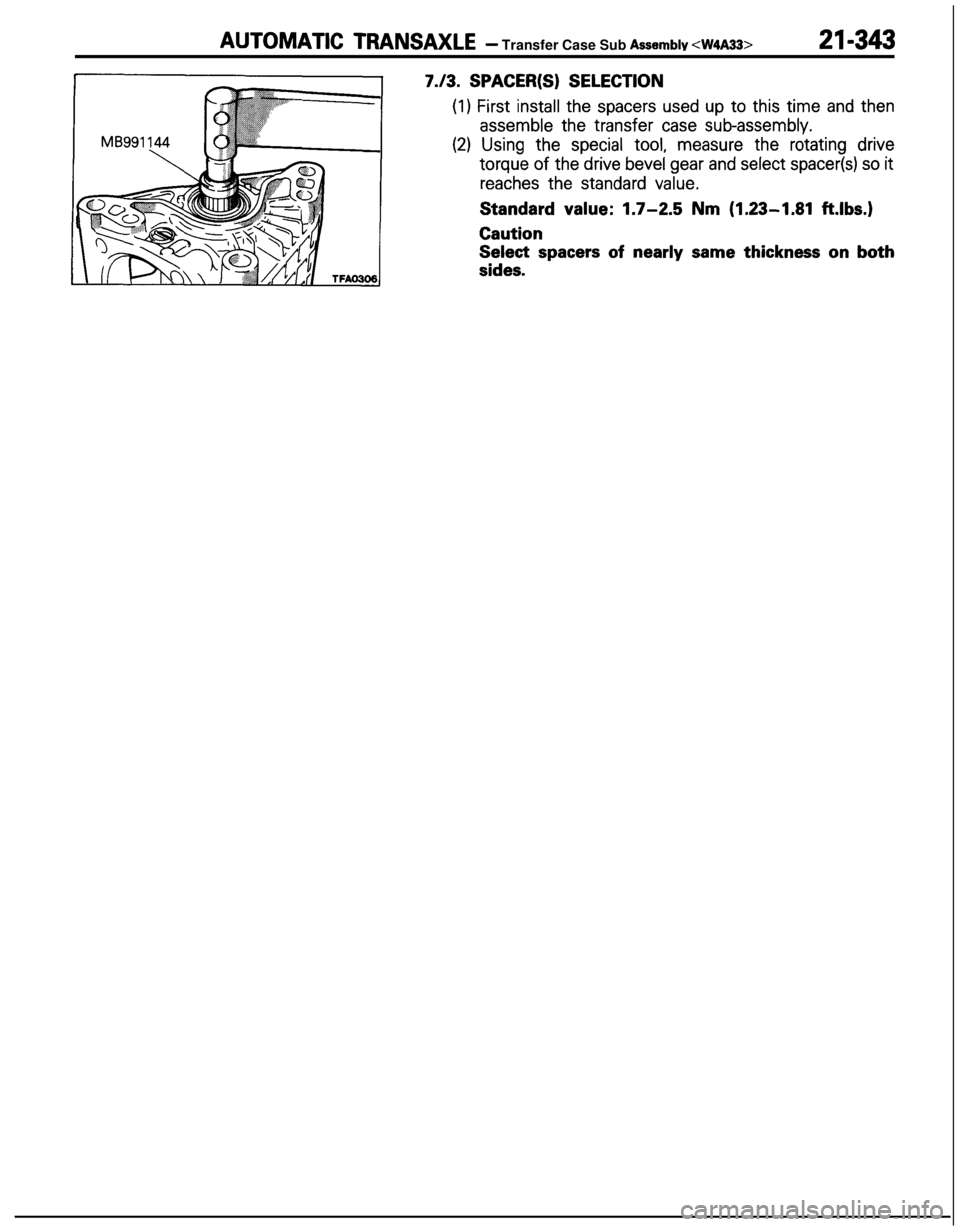
AUTOMATIC TRANSAXLE- Transfer Case Sub Assembly
7.13. SPACER(S) SELECTION
(1) First install the spacers used up to this time and then
assemble the transfer case subassembly.
(2) Using the special tool, measure the rotating drive
torque of the drive bevel gear and select spacer(s) so it
reaches the standard value.Standard value:
1.7-2.5 Nm (1.23-1.81 ft.lbs.)CautionSelect
spacers of nearly same thickness on both
sides.
Page 1039 of 1216
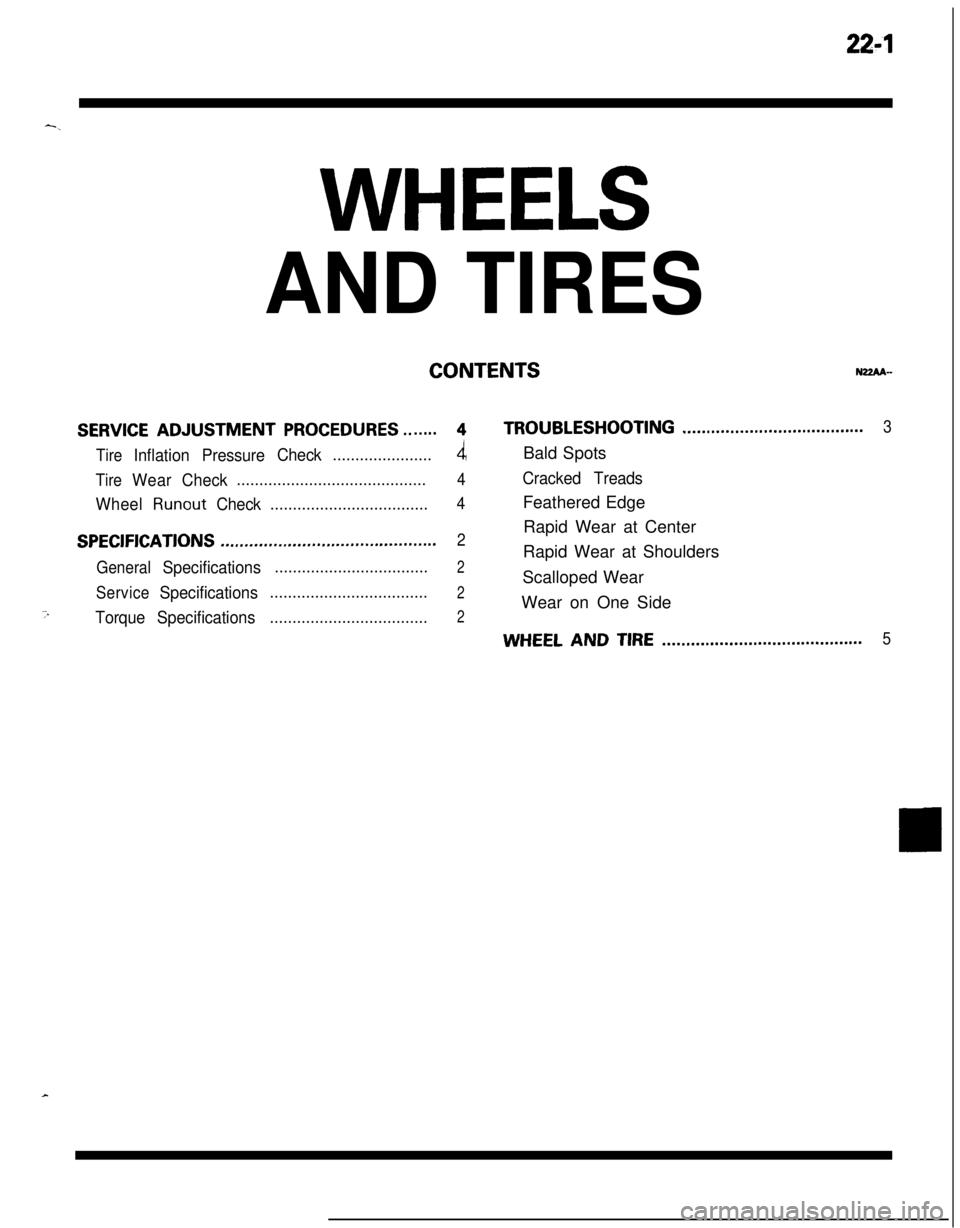
22-l-.
WHEELS
AND TIRES
CONTENTSNZZAA-
SERVICE ADJUSTMENT PROCEDURES.......4TROUBLESHOOTING......................................3
Tire
InflationPressureCheck......................4Bald Spots
TireWearCheck..........................................4Cracked Treads
Wheel
RunoutCheck...................................4Feathered Edge
SPECIFICATIONSRapid Wear at Center.............................................2
General
Specifications..................................2Rapid Wear at Shoulders
ServiceSpecificationsScalloped Wear...................................2Wear on One Side
7TorqueSpecifications...................................2
WHEEL AND TIRE..........................................5
Page 1040 of 1216
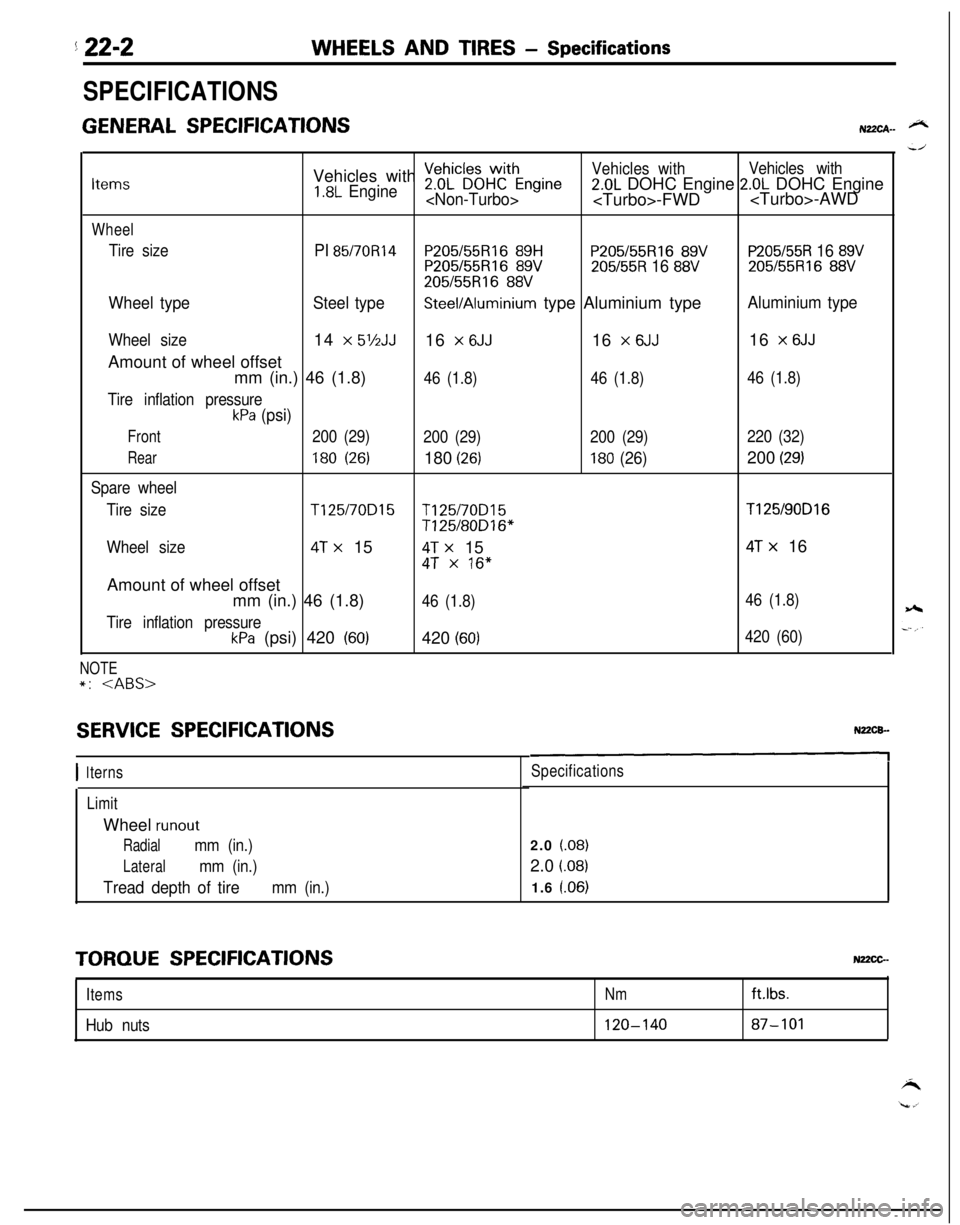
5 22-2WHEELS AND TIRES - Specifications
SPECIFICATIONS
GENERAL SPECIFICATIONSN22CA- @NVehicles with
~eDhL”~~HWCthEngineVehicles withVehicles withItems1.8L Engine2.0L DOHC Engine 2.0L DOHC Engine
Wheel
Tire sizePI 85/70R14P205155Rl6 89HP205/55R16 89VP205/55R 16 89VP205155R16 89V205/55R 16 88V205/55R16 88V
205/55R16 88V
Wheel typeSteel typeSteel/Aluminium type Aluminium typeAluminium type
Wheel size14 x 5’/2JJ16 x 6JJ16 x 6JJ16 x 6JJAmount of wheel offset
mm (in.) 46 (1.8)
46 (1.8)46 (1.8)46 (1.8)
Tire inflation pressure
kPa (psi)
Front200 (29)
200 (29)200 (29)220 (32)
Rear180 (26)180 (26)180 (26)200 (29)
Spare wheel
Tire size
T125/70D15T125/70D15T125/90D16
T125/80D16*
Wheel size
4T x 154T x 154T x 16
4T x 16”Amount of wheel offset
mm (in.) 46 (1.8)
46 (1.8)46 (1.8)
Tire inflation pressure
kPa (psi) 420 (60)420 (60)420 (60)
NOTE*:
SERVICE SPECIFICATIONS
I 1terns
LimitWheel
runout
Radialmm (in.)
Lateralmm (in.)
Tread depth of tiremm (in.)
Specifications2.0
(.08)2.0
i.08)1.6 l.06)
TORQUE SPECIFICATIONSNz2cG-
ItemsNm
Hub nuts120-140ftlbs.87-101
Page 1045 of 1216
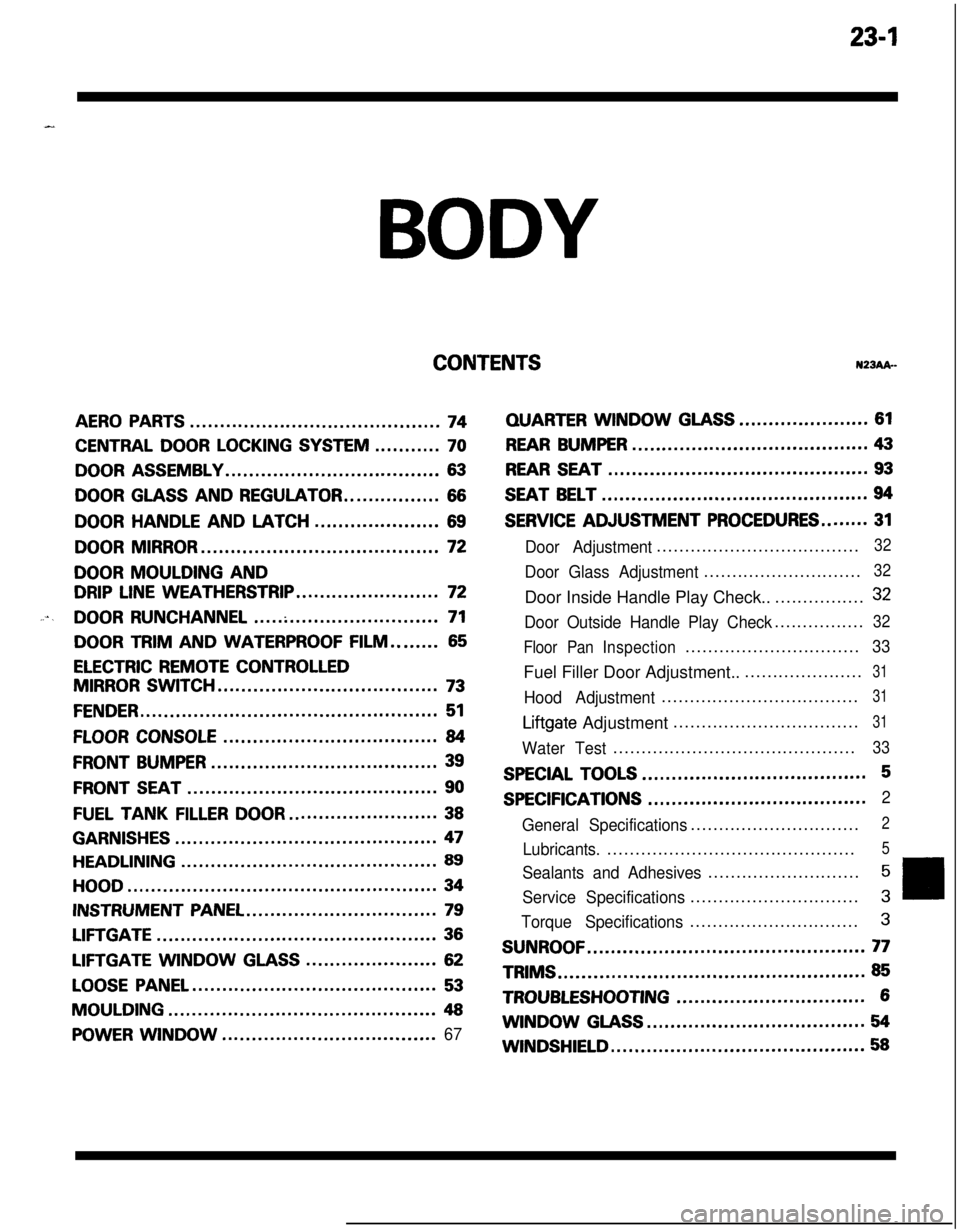
23-lBODY
CONTENTSN23Ak-
AERO PARTS..........................................74
CENTRAL DOOR LOCKING SYSTEM...........70
DOOR ASSEMBLY....................................63
DOOR GLASS AND REGULATOR................66
DOORHANDLEANDLATCH.....................69
DOOR MIRROR........................................72
DOOR MOULDING AND
DRIP LINE WEATHERSTRIP........................72
....DOOR RUNCHANNEL...............................71
DOOR TRIM AND WATERPROOF FILM........65
ELECTRIC REMOTE CONTROLLED
MIRROR SWITCH.....................................73
FENDER..................................................51
FLOOR CONSOLE....................................84
FRONT BUMPER......................................39
FRONT SEAT..........................................90
FUEL TANKFILLERDOOR.........................38
GARNISHES............................................47
HEADLINING...........................................89
HOOD....................................................34
INSTRUMENT PANEL................................79
LIFTGATE...............................................36
LIFTGATE WINDOWGLASS......................62
LOOSE PANEL.........................................53
MOULDING.............................................48
POWER WINDOW....................................67
QUARTERWINDOWGLASS......................61
REAR BUMPER........................................43
REAR SEAT............................................93
SEAT BELT.............................................94
SERVICE ADJUSTMENT PROCEDURES........31
Door Adjustment....................................32
Door Glass Adjustment............................32Door Inside Handle Play Check..................
32
Door Outside Handle Play Check................32
Floor PanInspection...............................
33Fuel Filler Door Adjustment.......................
31
Hood Adjustment...................................31
Liftgate Adjustment.................................31
Water Test...........................................33
SPECIAL TOOLS......................................5
SPECIFICATIONS.....................................2
General Specifications..............................
2
Lubricants.............................................5
Sealants and Adhesives...........................5
Service Specifications..............................3
Torque Specifications..............................3
SUNROOF...............................................77TRIMS
....................................................85
TROUBLESHOOTING................................6WINDOW
GLASS.....................................54
WINDSHIELD...........................................58