MITSUBISHI ENDEAVOR 2004 Service Repair Manual
ENDEAVOR 2004
MITSUBISHI
MITSUBISHI
https://www.carmanualsonline.info/img/19/57105/w960_57105-0.png
MITSUBISHI ENDEAVOR 2004 Service Repair Manual
Trending: fuse box, sport mode, light, heater, audio, Oxygen O2 sensor, belt
Page 1371 of 3870
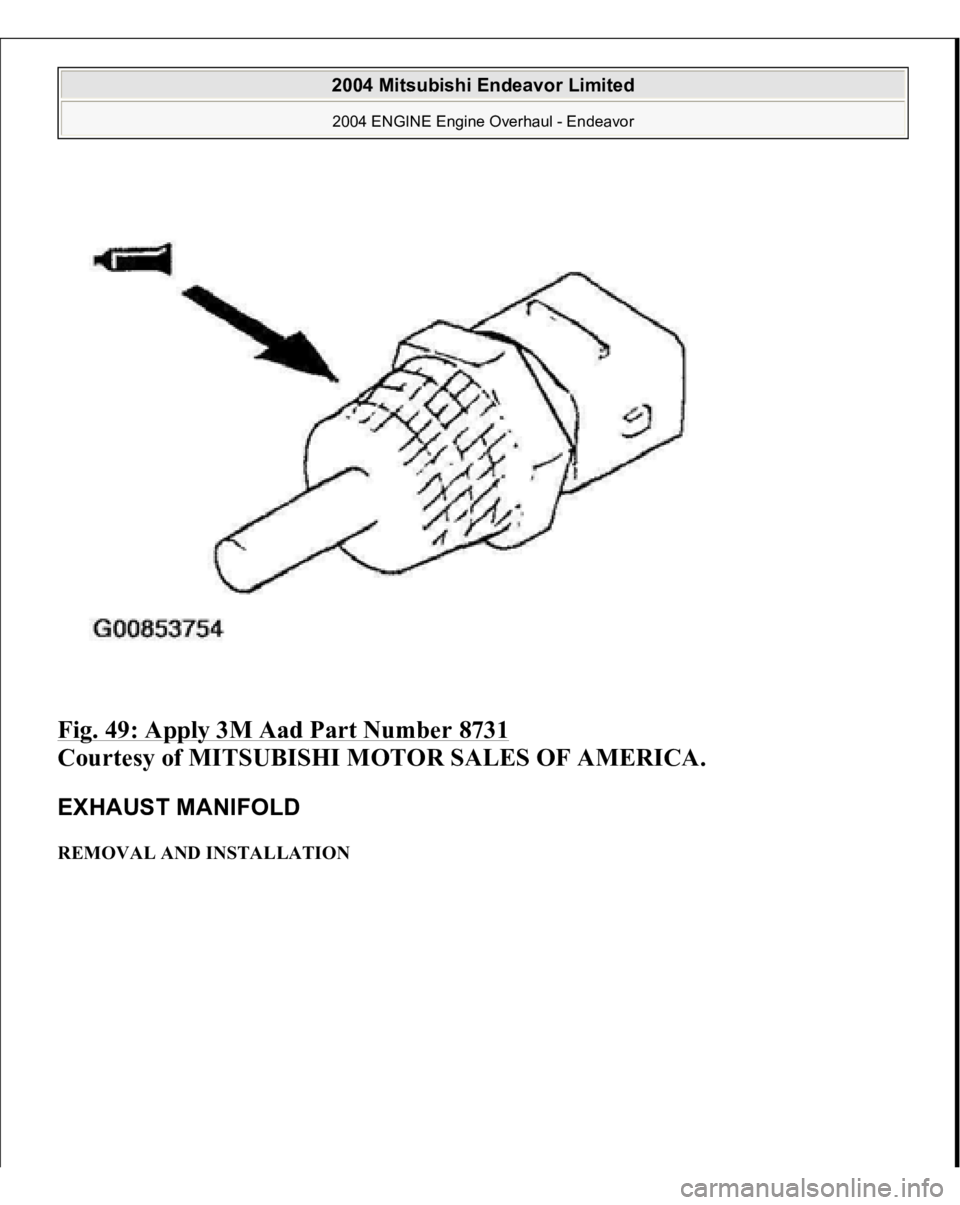
Fig. 49: Apply 3M Aad Part Number 8731
Courtesy of MITSUBISHI MOTOR SALES OF AMERICA.
EXHAUST MANIFOLD REMOVAL AND INSTALLATION
2004 Mitsubishi Endeavor Limited 2004 ENGINE Engine Overhaul - Endeavor
Page 1372 of 3870
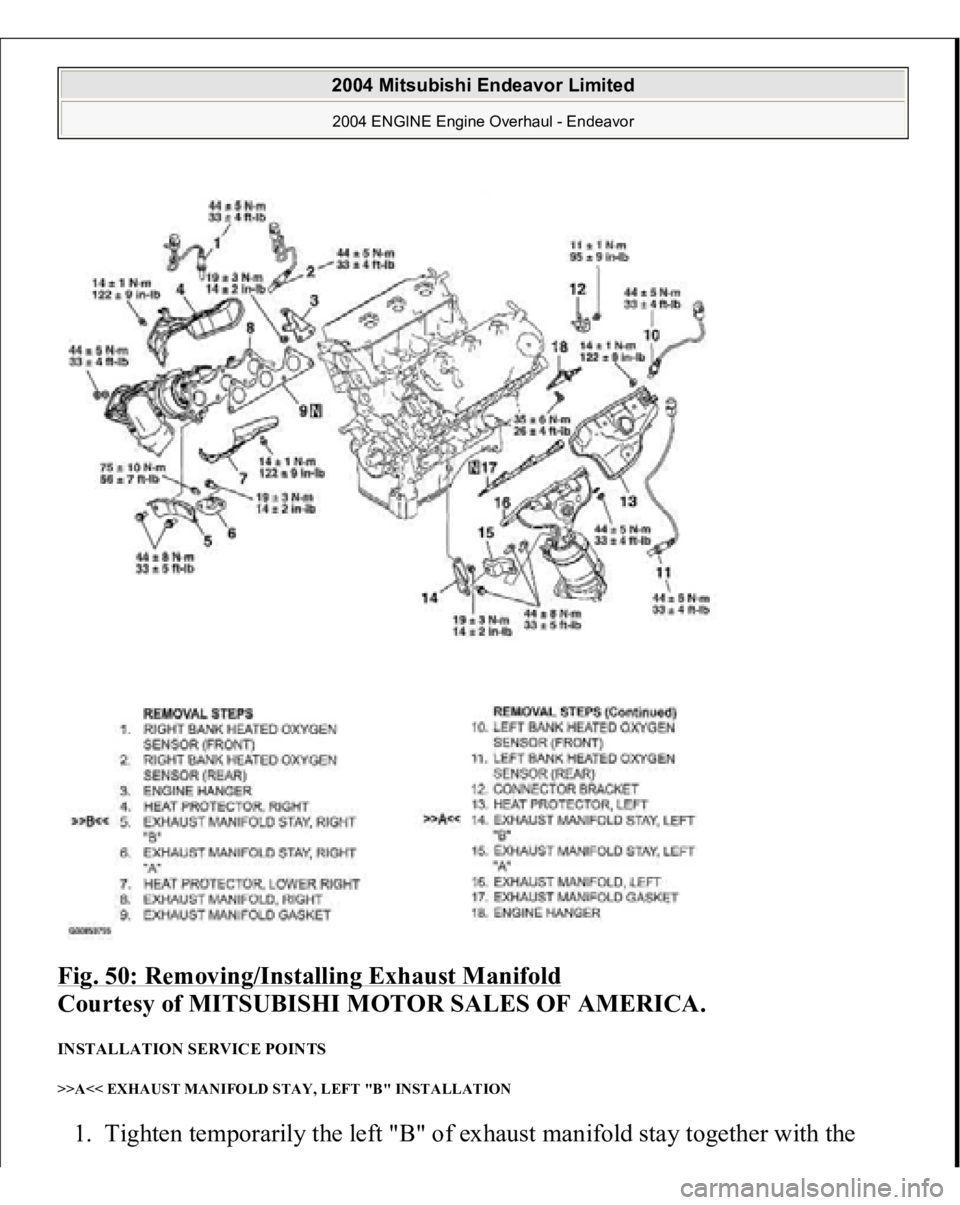
Fig. 50: Removing/Installing Exhaust Manifold
Courtesy of MITSUBISHI MOTOR SALES OF AMERICA.
INSTALLATION SERVICE POINTS >>A<< EXHAUST MANIFOLD STAY, LEFT "B" INSTALLATION 1. Ti
ghten tem
poraril
y the left "B" of exhaust manifold sta
y to
gether with the
2004 Mitsubishi Endeavor Limited 2004 ENGINE Engine Overhaul - Endeavor
Page 1373 of 3870
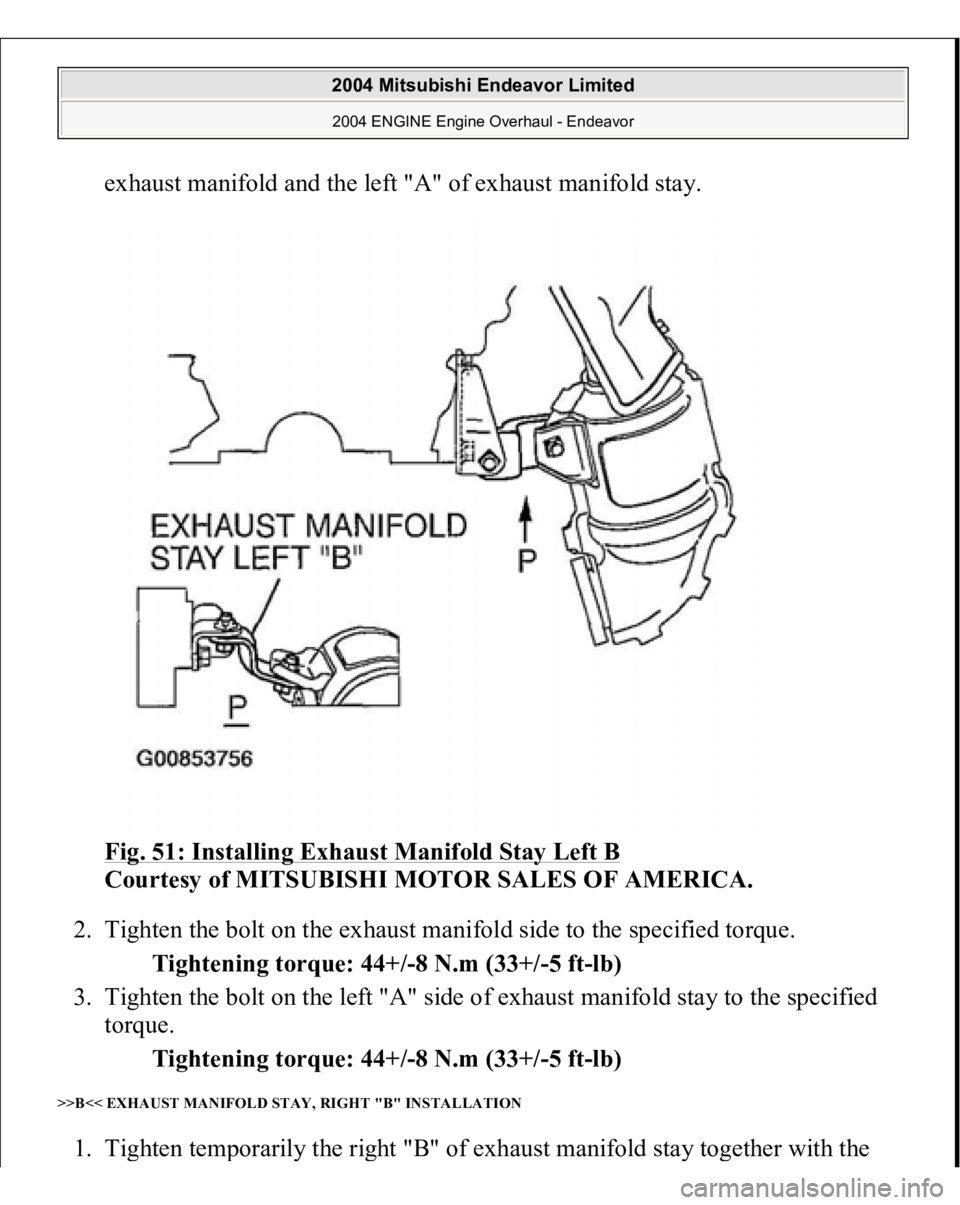
exhaust manifold and the left "A" of exhaust manifold stay.
Fig. 51: Installing Exhaust Manifold Stay Left B
Courtesy of MITSUBISHI MOTOR SALES OF AMERICA.
2. Tighten the bolt on the exhaust manifold side to the specified torque.
Tightening torque: 44+/-8 N.m (33+/-5 ft-lb)
3. Tighten the bolt on the left "A" side of exhaust manifold stay to the specified
torque.
Tightening torque: 44+/-8 N.m (33+/-5 ft-lb)
>>B<< EXHAUST MANIFOLD STAY, RIGHT "B" INSTALLATION 1. Ti
ghten tem
poraril
y the ri
ght "B" of exhaust manifold sta
y to
gether with the
2004 Mitsubishi Endeavor Limited 2004 ENGINE Engine Overhaul - Endeavor
Page 1374 of 3870
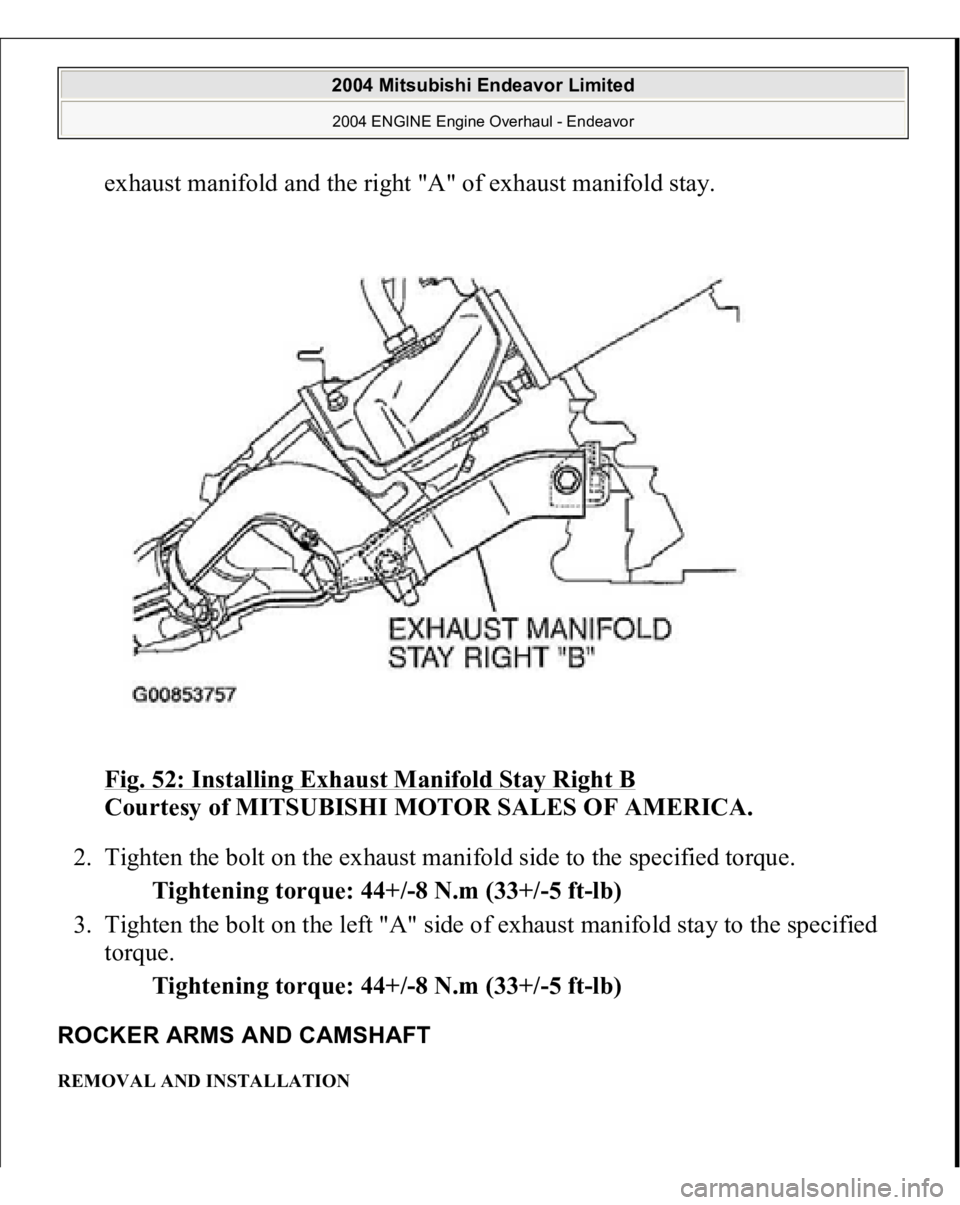
exhaust manifold and the right "A" of exhaust manifold stay.
Fig. 52: Installing Exhaust Manifold Stay Right B
Courtesy of MITSUBISHI MOTOR SALES OF AMERICA.
2. Tighten the bolt on the exhaust manifold side to the specified torque.
Tightening torque: 44+/-8 N.m (33+/-5 ft-lb)
3. Tighten the bolt on the left "A" side of exhaust manifold stay to the specified
torque.
Tightening torque: 44+/-8 N.m (33+/-5 ft-lb)
ROCKER ARMS AND CAMSHAFT REMOVAL AND INSTALLATION
2004 Mitsubishi Endeavor Limited 2004 ENGINE Engine Overhaul - Endeavor
Page 1375 of 3870
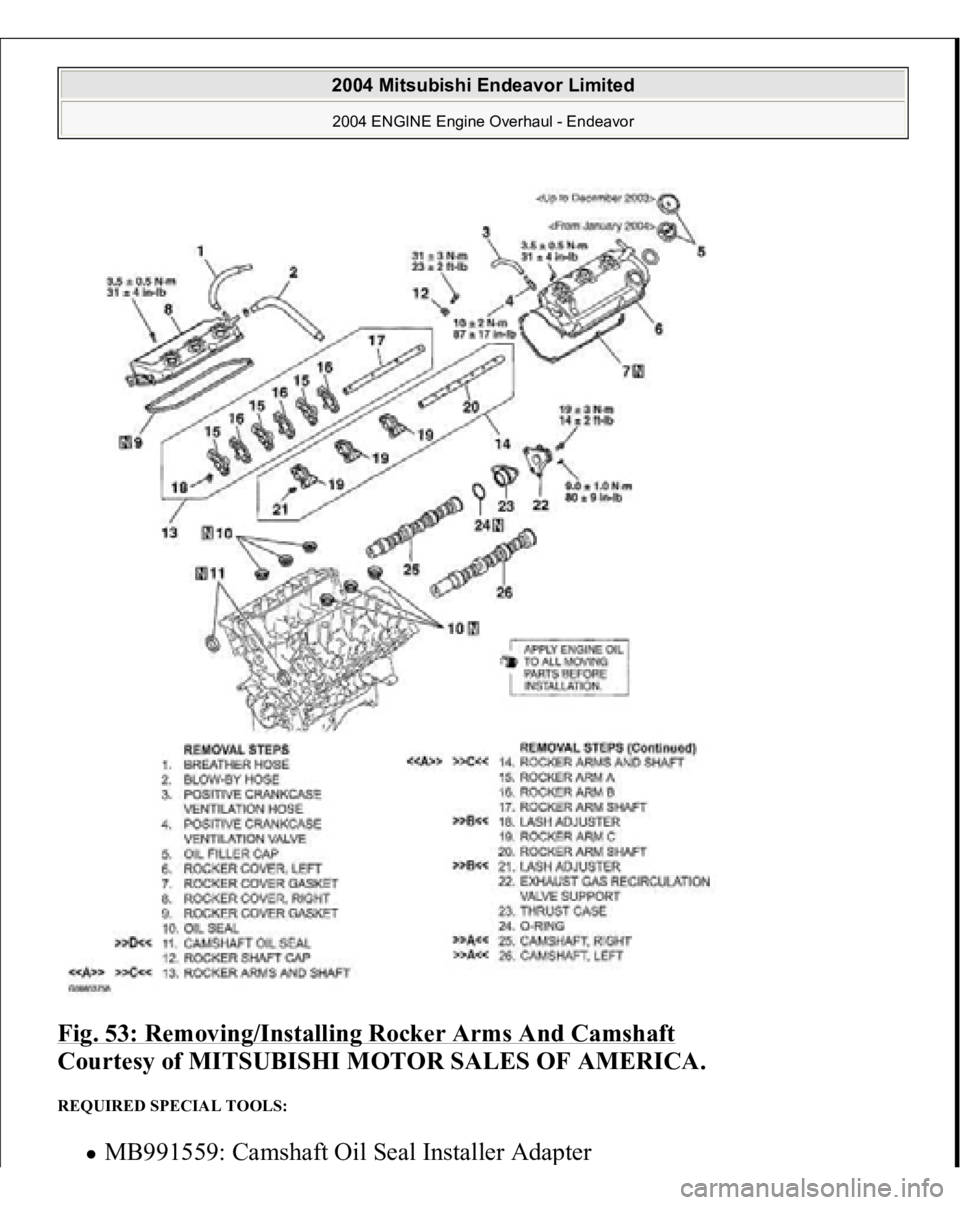
Fig. 53: Removing/Installing Rocker Arms And Camshaft
Courtesy of MITSUBISHI MOTOR SALES OF AMERICA.
REQUIRED SPECIAL TOOLS:
MB991559: Camshaft Oil Seal Installer Ada
pter
2004 Mitsubishi Endeavor Limited 2004 ENGINE Engine Overhaul - Endeavor
Page 1376 of 3870
MD998442: Air Bleed Wire MD998443: Lash Adjuster Holder MD998713: Camshaft Oil Seal Installer
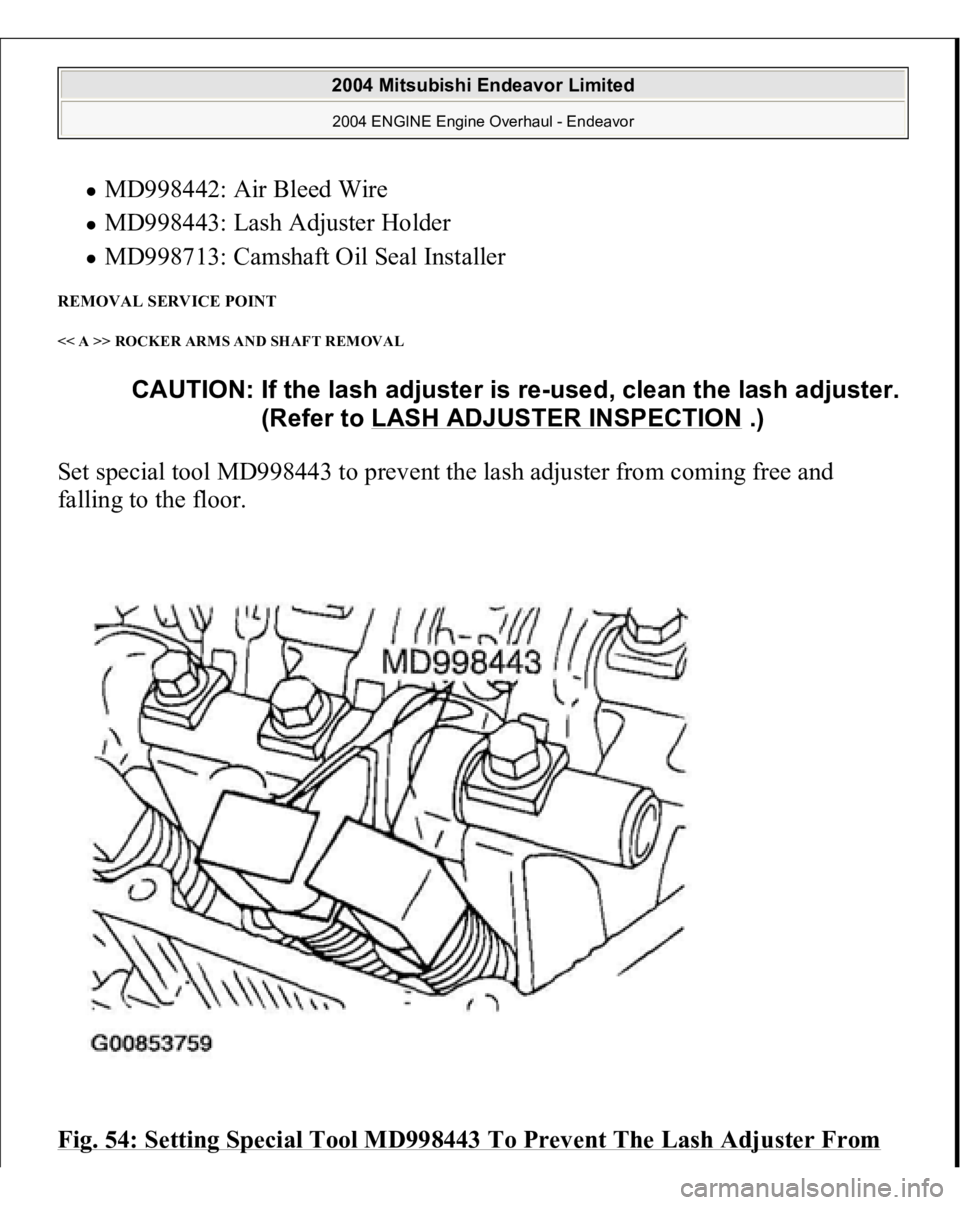
REMOVAL SERVICE POINT << A >> ROCKER ARMS AND SHAFT REMOVAL Set special tool MD998443 to prevent the lash adjuster from coming free and
falling to the floor.
Fig. 54: Setting Special Tool MD998443 To Prevent The Lash Adjuster From
CAUTION: If the lash adjuster is re-used, clean the lash ad
juster.
(Refer to LASH ADJUSTER INSPECTION
.)
2004 Mitsubishi Endeavor Limited 2004 ENGINE Engine Overhaul - Endeavor
Page 1377 of 3870
Coming Free
Courtesy of MITSUBISHI MOTOR SALES OF AMERICA.
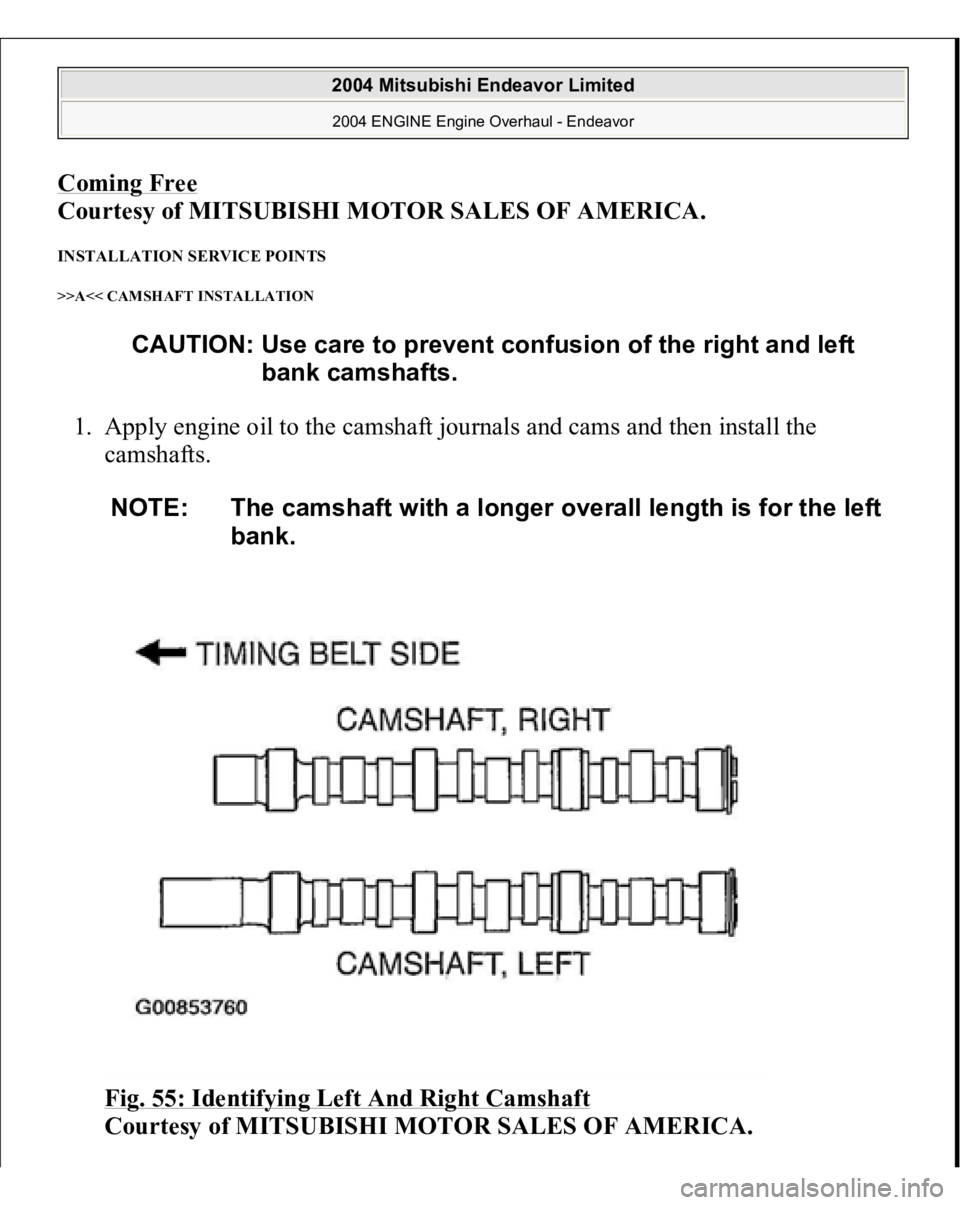
INSTALLATION SERVICE POINTS >>A<< CAMSHAFT INSTALLATION 1. Apply engine oil to the camshaft journals and cams and then install the
camshafts.
Fig. 55: Identifying Left And Right Camshaft
Courtesy of MITSUBISHI MOTOR SALES OF AMERICA.
CAUTION: Use care to prevent confusion of the right and left
bank camshafts.
NOTE: The camshaft with a longer overall length is for the left
bank.
2004 Mitsubishi Endeavor Limited 2004 ENGINE Engine Overhaul - Endeavor
Page 1378 of 3870
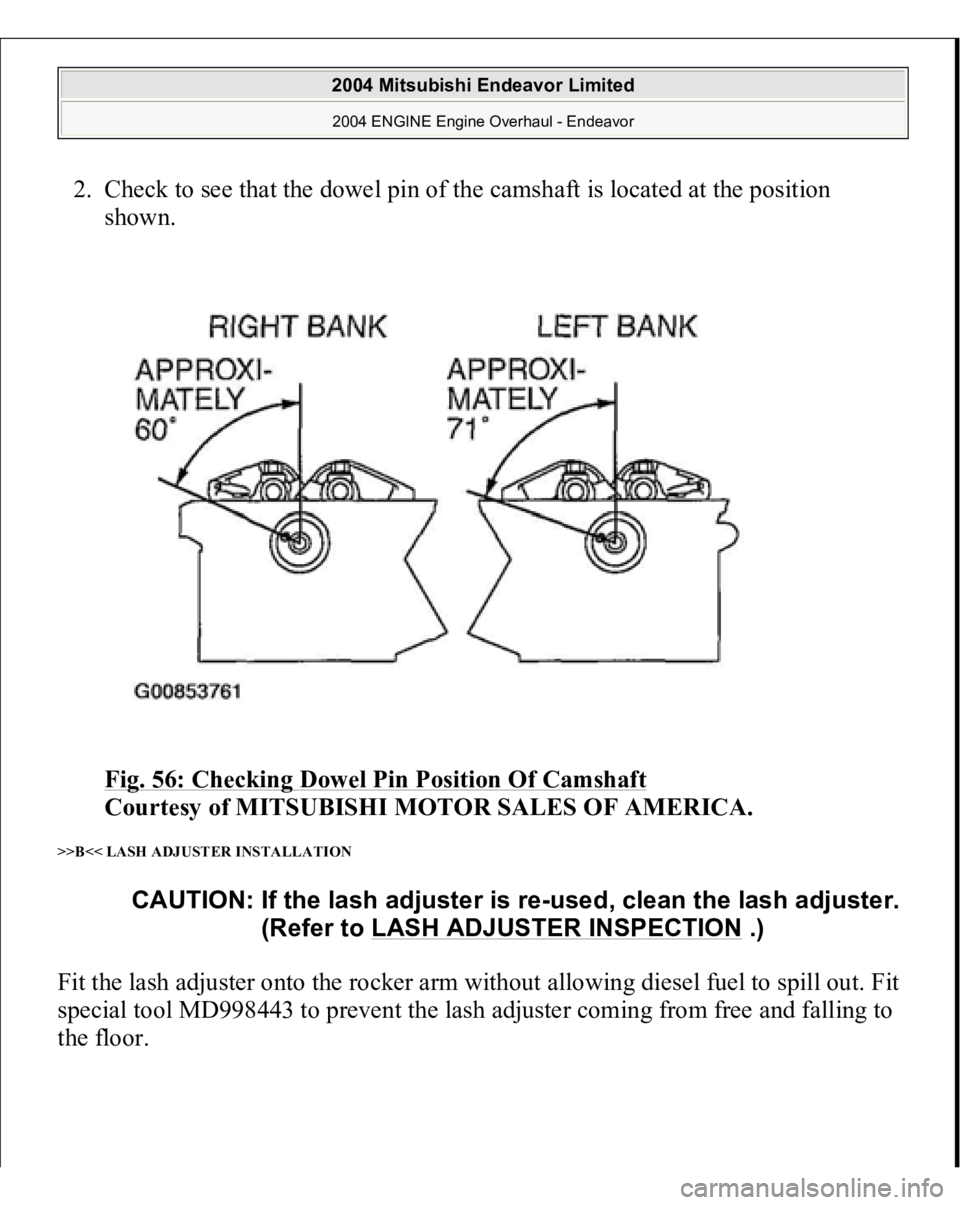
2. Check to see that the dowel pin of the camshaft is located at the position
shown.
Fig. 56: Checking Dowel Pin Position Of Camshaft
Courtesy of MITSUBISHI MOTOR SALES OF AMERICA.
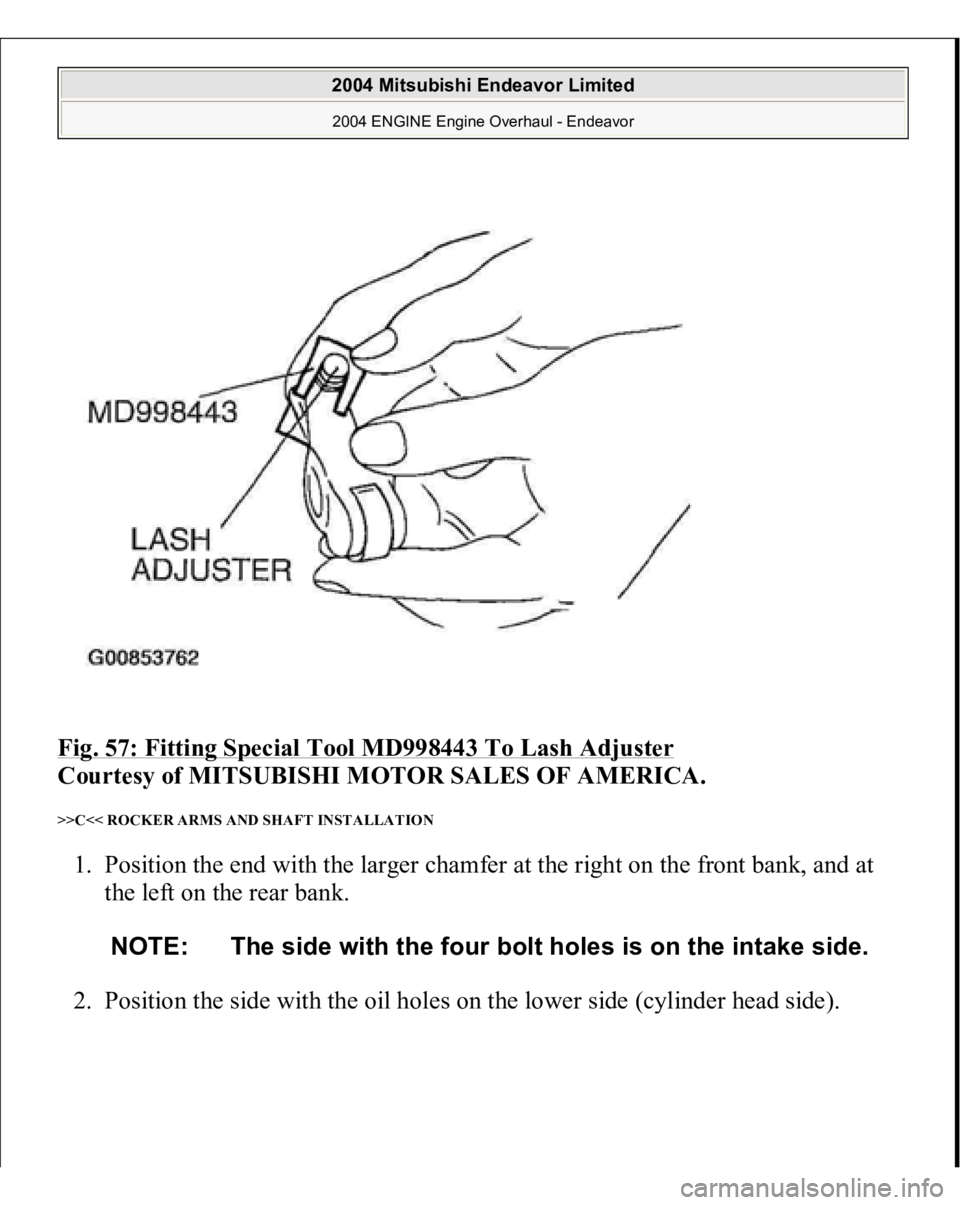
>>B<< LASH ADJUSTER INSTALLATION Fit the lash adjuster onto the rocker arm without allowing diesel fuel to spill out. Fit
special tool MD998443 to prevent the lash adjuster coming from free and falling to
the floor.
CAUTION: If the lash adjuster is re-used, clean the lash adjuster.
(Refer to LASH ADJUSTER INSPECTION
.)
2004 Mitsubishi Endeavor Limited 2004 ENGINE Engine Overhaul - Endeavor
Page 1379 of 3870
Fig. 57: Fitting Special Tool MD998443 To Lash Adjuster
Courtesy of MITSUBISHI MOTOR SALES OF AMERICA.
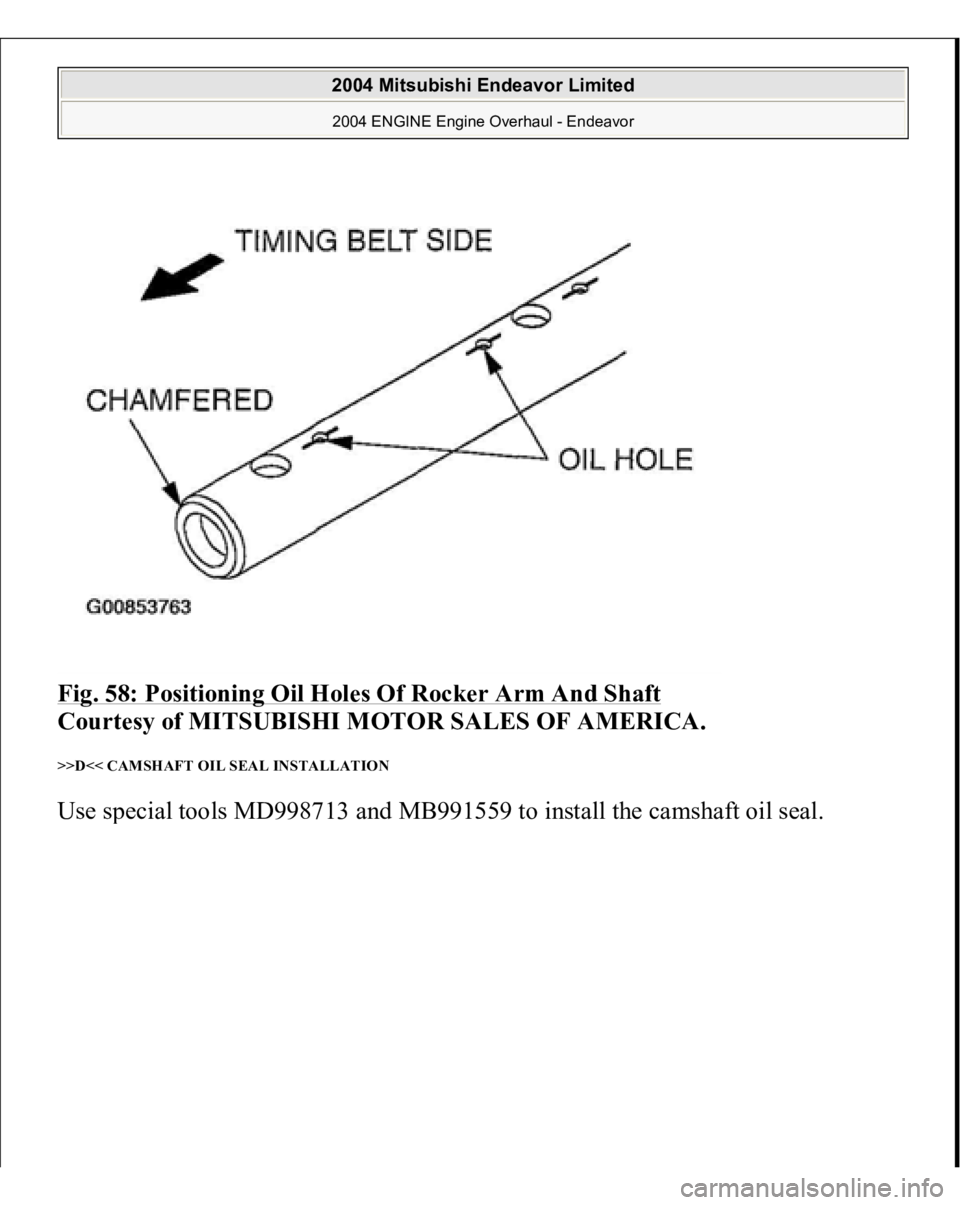
>>C<< ROCKER ARMS AND SHAFT INSTALLATION 1. Position the end with the larger chamfer at the right on the front bank, and at
the left on the rear bank.
2. Position the side with the oil holes on the lower side
(cylinder head side
).
NOTE: The side with the four bolt holes is on the intake side.
2004 Mitsubishi Endeavor Limited 2004 ENGINE Engine Overhaul - Endeavor
Page 1380 of 3870
Fig. 58: Positioning Oil Holes Of Rocker Arm And Shaft
Courtesy of MITSUBISHI MOTOR SALES OF AMERICA.
>>D<< CAMSHAFT OIL SEAL INSTALLATION Use s
pecial tools MD998713 and MB991559 to install the camshaft oil seal.
2004 Mitsubishi Endeavor Limited 2004 ENGINE Engine Overhaul - Endeavor
Trending: battery output, automatic transmission fluid, radiator cap, Figure 37, Speakers, Speaker, park assist
