MITSUBISHI ENDEAVOR 2004 Service Repair Manual
ENDEAVOR 2004
MITSUBISHI
MITSUBISHI
https://www.carmanualsonline.info/img/19/57105/w960_57105-0.png
MITSUBISHI ENDEAVOR 2004 Service Repair Manual
Trending: check engine light, water pump, Battery terminal positive, Speaker, key battery, Ac pressure sensor, wheel sensor
Page 1571 of 3870
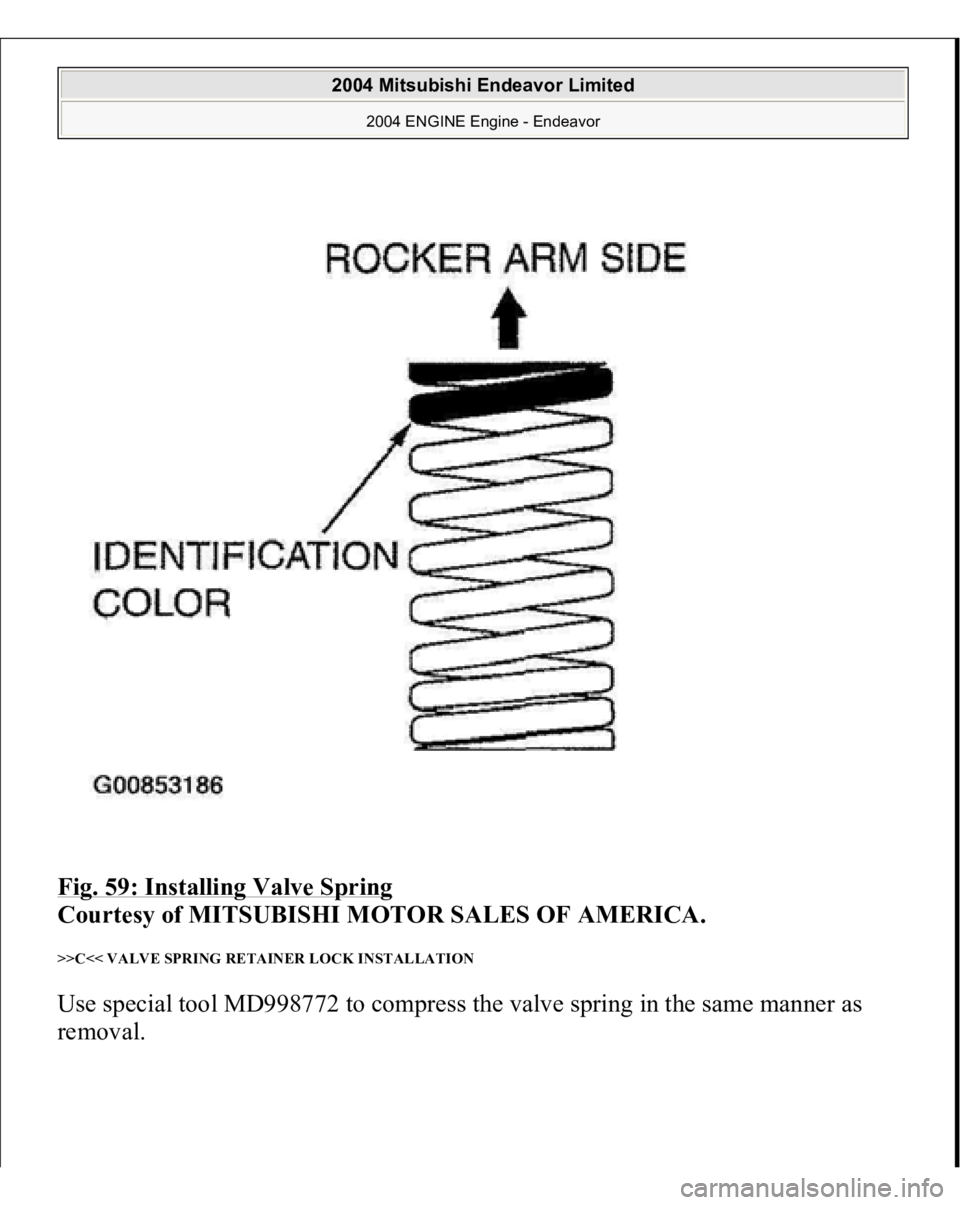
Fig. 59: Installing Valve Spring
Courtesy of MITSUBISHI MOTOR SALES OF AMERICA.
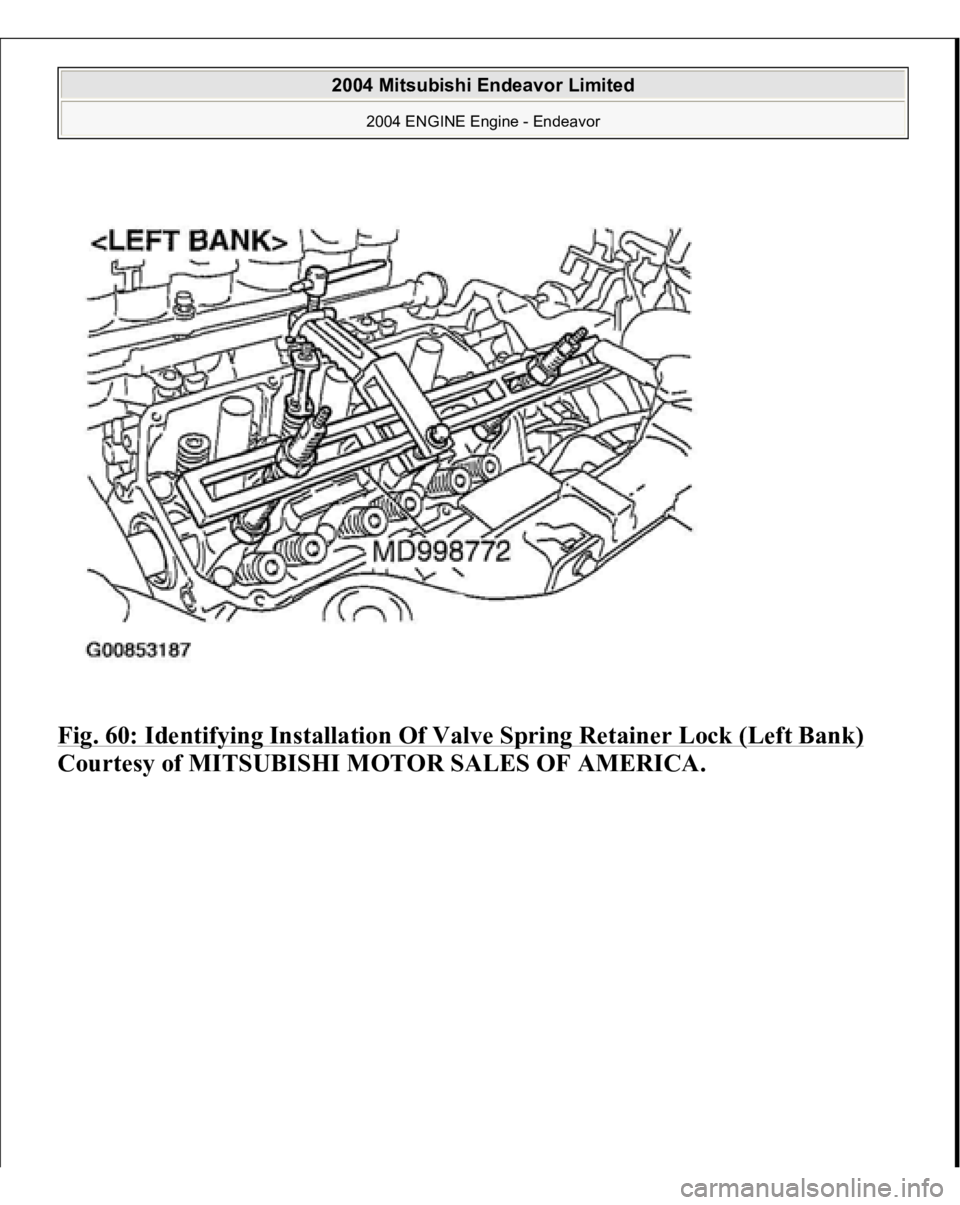
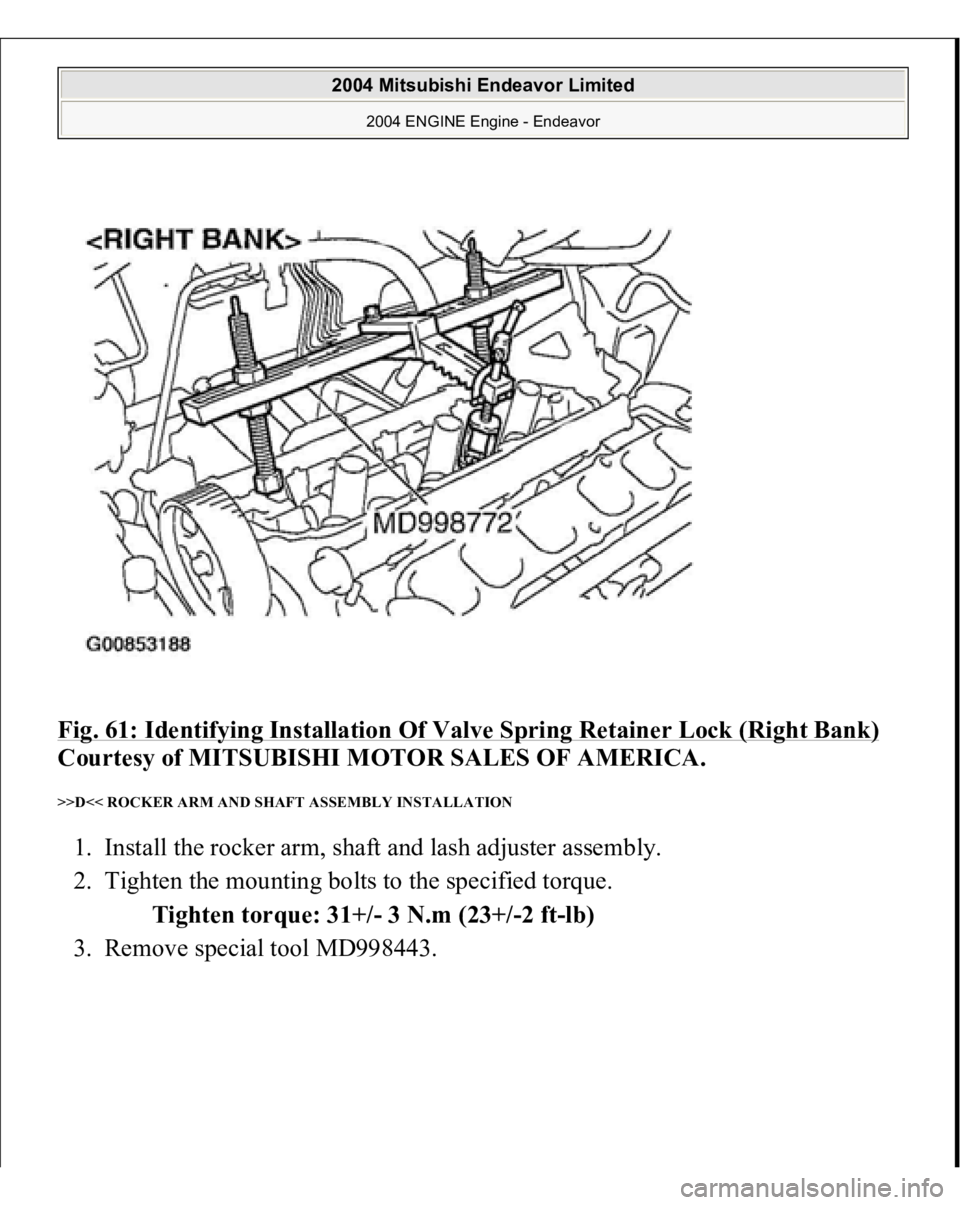
>>C<< VALVE SPRING RETAINER LOCK INSTALLATION Use special tool MD998772 to compress the valve spring in the same manner as
removal.
2004 Mitsubishi Endeavor Limited
2004 ENGINE Engine - Endeavor
Page 1572 of 3870
Fig. 60: Identifying Installation Of Valve Spring Retainer Lock (Left Bank)
Courtesy of MITSUBISHI MOTOR SALES OF AMERICA.
2004 Mitsubishi Endeavor Limited
2004 ENGINE Engine - Endeavor
Page 1573 of 3870
Fig. 61: Identifying Installation Of Valve Spring Retainer Lock (Right Bank)
Courtesy of MITSUBISHI MOTOR SALES OF AMERICA.
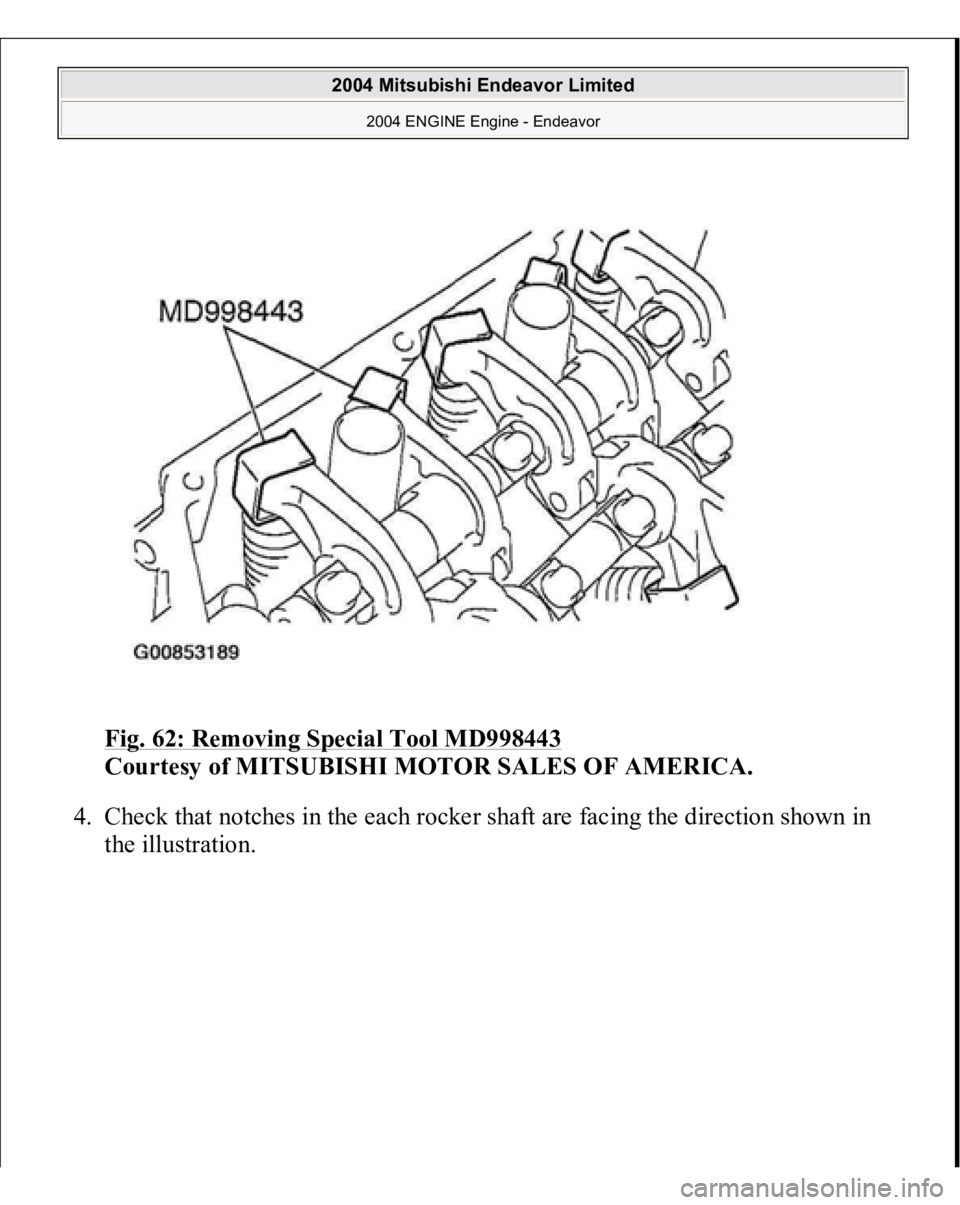
>>D<< ROCKER ARM AND SHAFT ASSEMBLY INSTALLATION 1. Install the rocker arm, shaft and lash adjuster assembly.
2. Tighten the mounting bolts to the specified torque.
Tighten torque: 31+/- 3 N.m (23+/-2 ft-lb)
3. Remove s
pecial tool MD998443.
2004 Mitsubishi Endeavor Limited
2004 ENGINE Engine - Endeavor
Page 1574 of 3870
Fig. 62: Removing Special Tool MD998443
Courtesy of MITSUBISHI MOTOR SALES OF AMERICA.
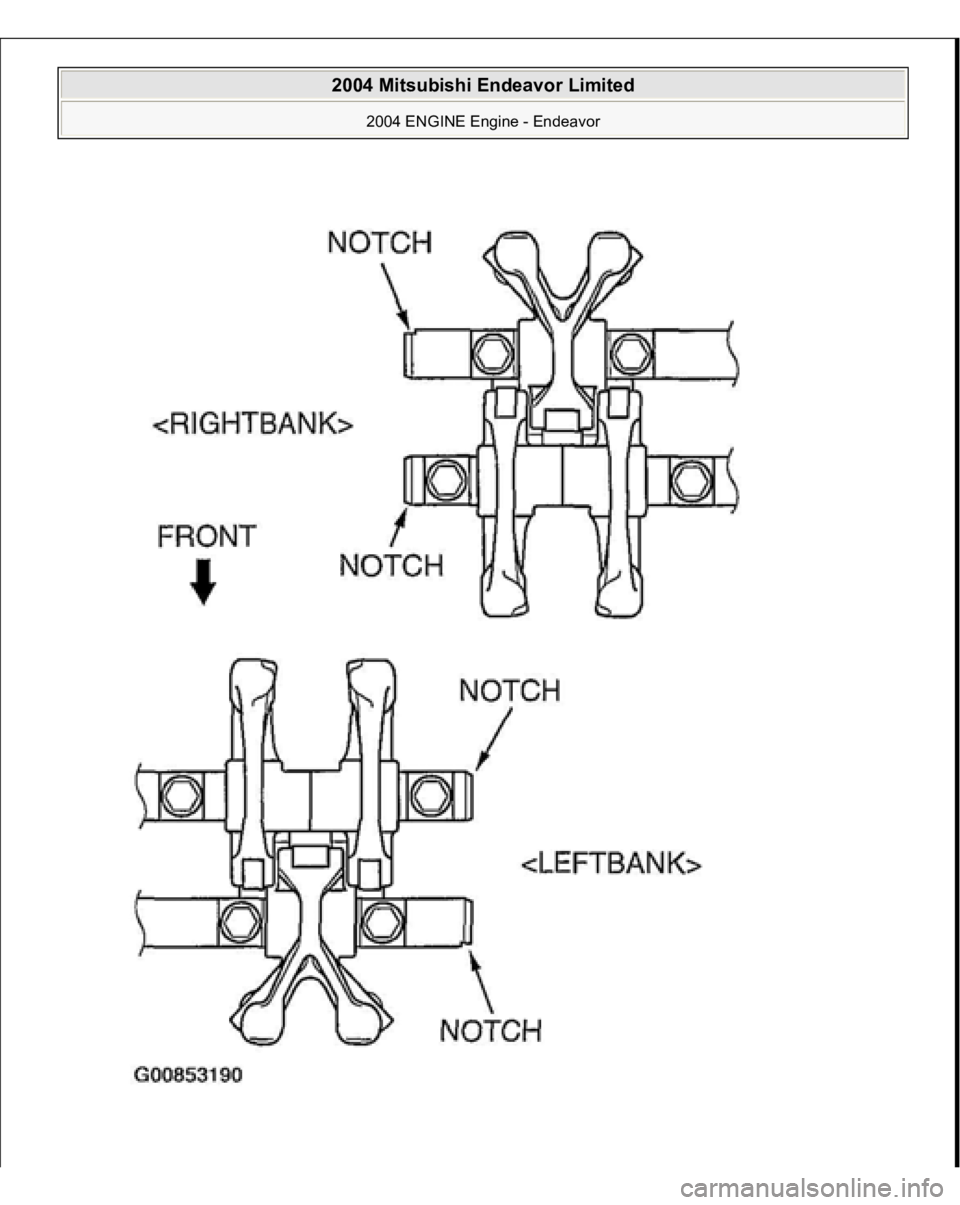
4. Check that notches in the each rocker shaft are facing the direction shown in
the illustration.
2004 Mitsubishi Endeavor Limited
2004 ENGINE Engine - Endeavor
Page 1575 of 3870
2004 Mitsubishi Endeavor Limited
2004 ENGINE Engine - Endeavor
Page 1576 of 3870
Fig. 63: Checking Notches In Each Rocker Shaft Are Facing Directio
n
Courtesy of MITSUBISHI MOTOR SALES OF AMERICA.
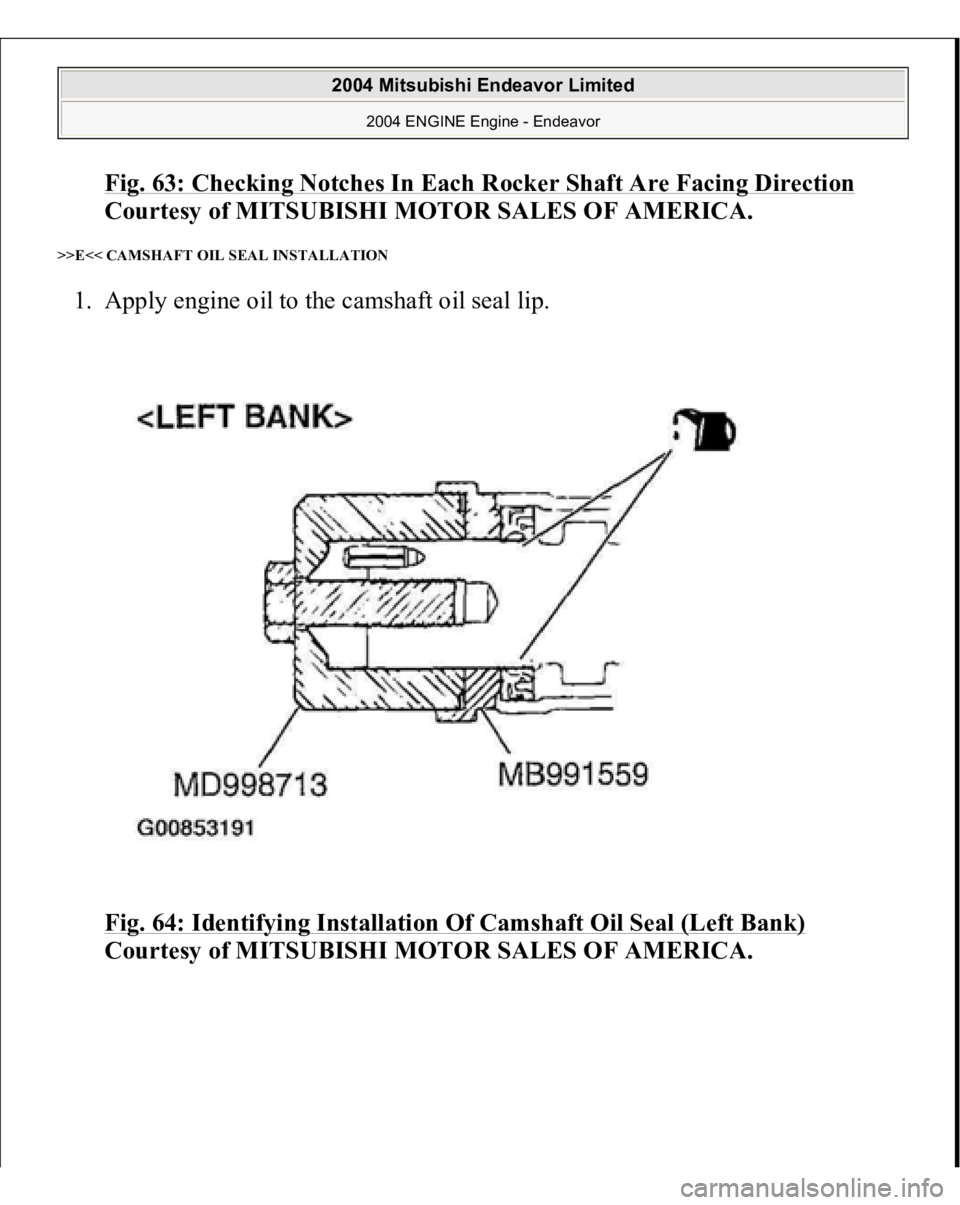
>>E<< CAMSHAFT OIL SEAL INSTALLATION 1. Apply engine oil to the camshaft oil seal lip.
Fig. 64: Identifying Installation Of Camshaft Oil Seal (Left Bank)
Courtesy of MITSUBISHI MOTOR SALES OF AMERICA.
2004 Mitsubishi Endeavor Limited
2004 ENGINE Engine - Endeavor
Page 1577 of 3870
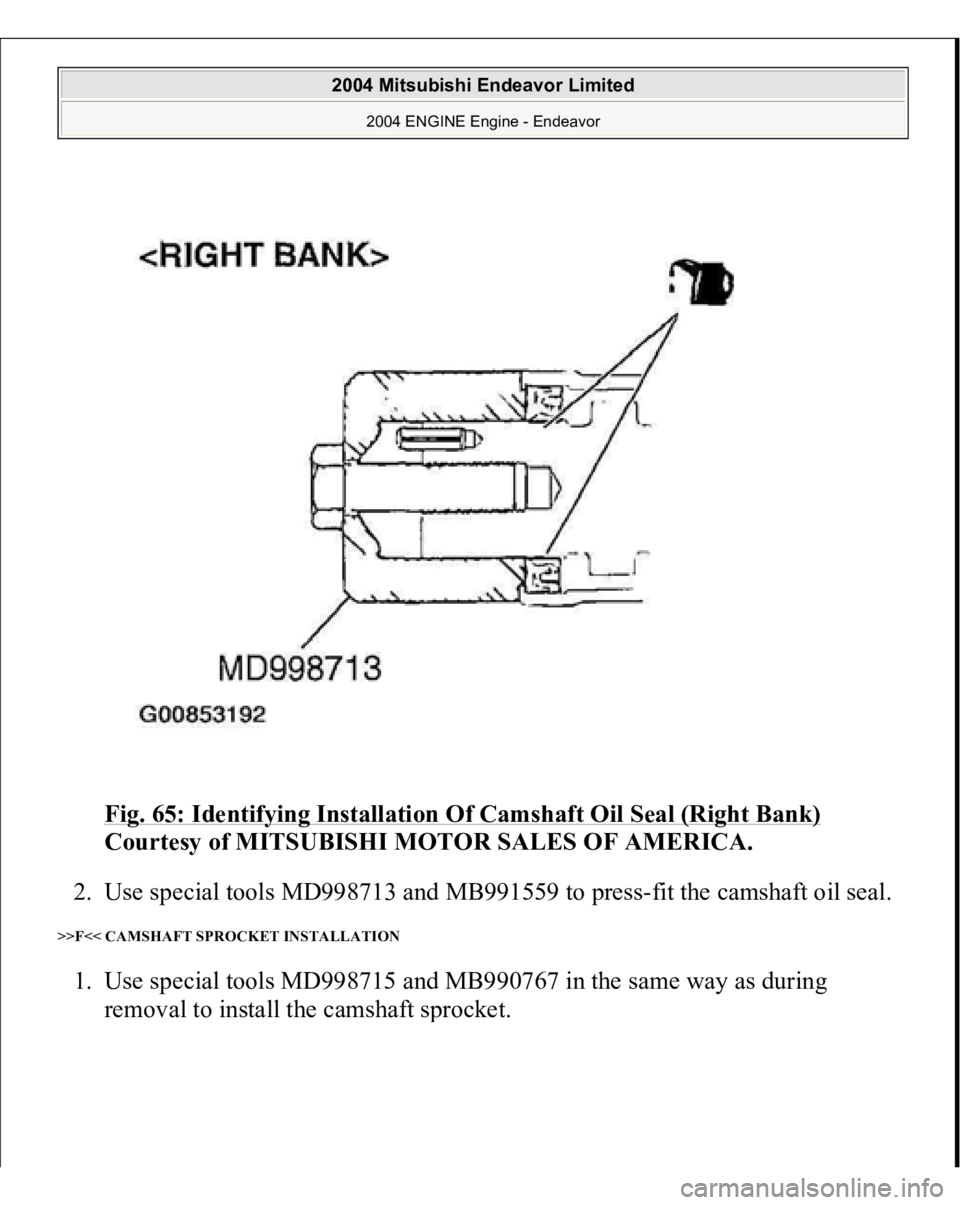
Fig. 65: Identifying Installation Of Camshaft Oil Seal (Right Bank)
Courtesy of MITSUBISHI MOTOR SALES OF AMERICA.
2. Use special tools MD998713 and MB991559 to press-fit the camshaft oil seal.
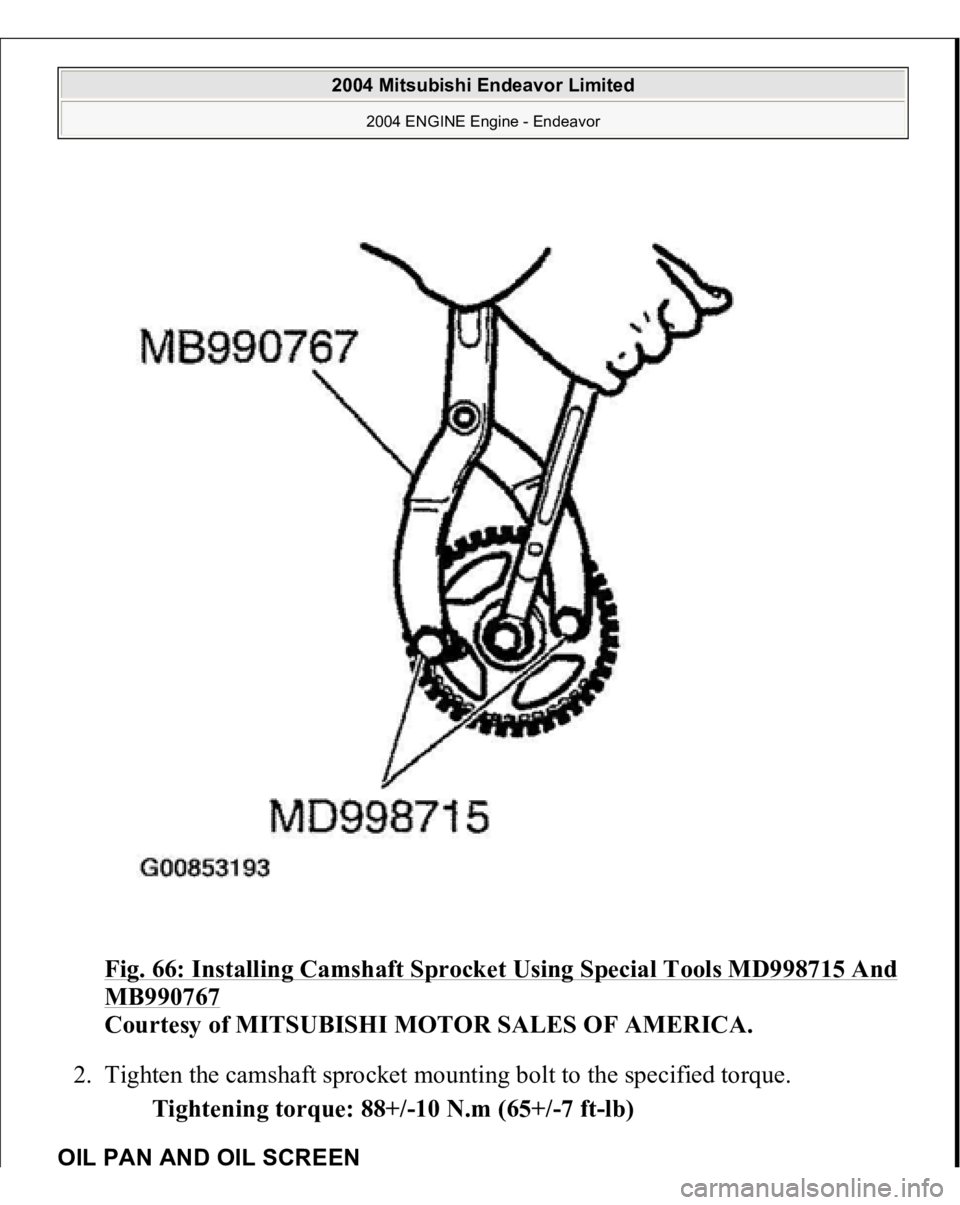
>>F<< CAMSHAFT SPROCKET INSTALLATION 1. Use special tools MD998715 and MB990767 in the same way as during
removal to install the camshaft s
procket.
2004 Mitsubishi Endeavor Limited
2004 ENGINE Engine - Endeavor
Page 1578 of 3870
Fig. 66: Installing Camshaft Sprocket Using Special Tools MD998715 And MB990767
Courtesy of MITSUBISHI MOTOR SALES OF AMERICA.
2. Tighten the camshaft sprocket mounting bolt to the specified torque.
Tightening torque: 88+/-10 N.m (65+/-7 ft-lb)
OIL PAN AND OIL SCREEN
2004 Mitsubishi Endeavor Limited
2004 ENGINE Engine - Endeavor
Page 1579 of 3870
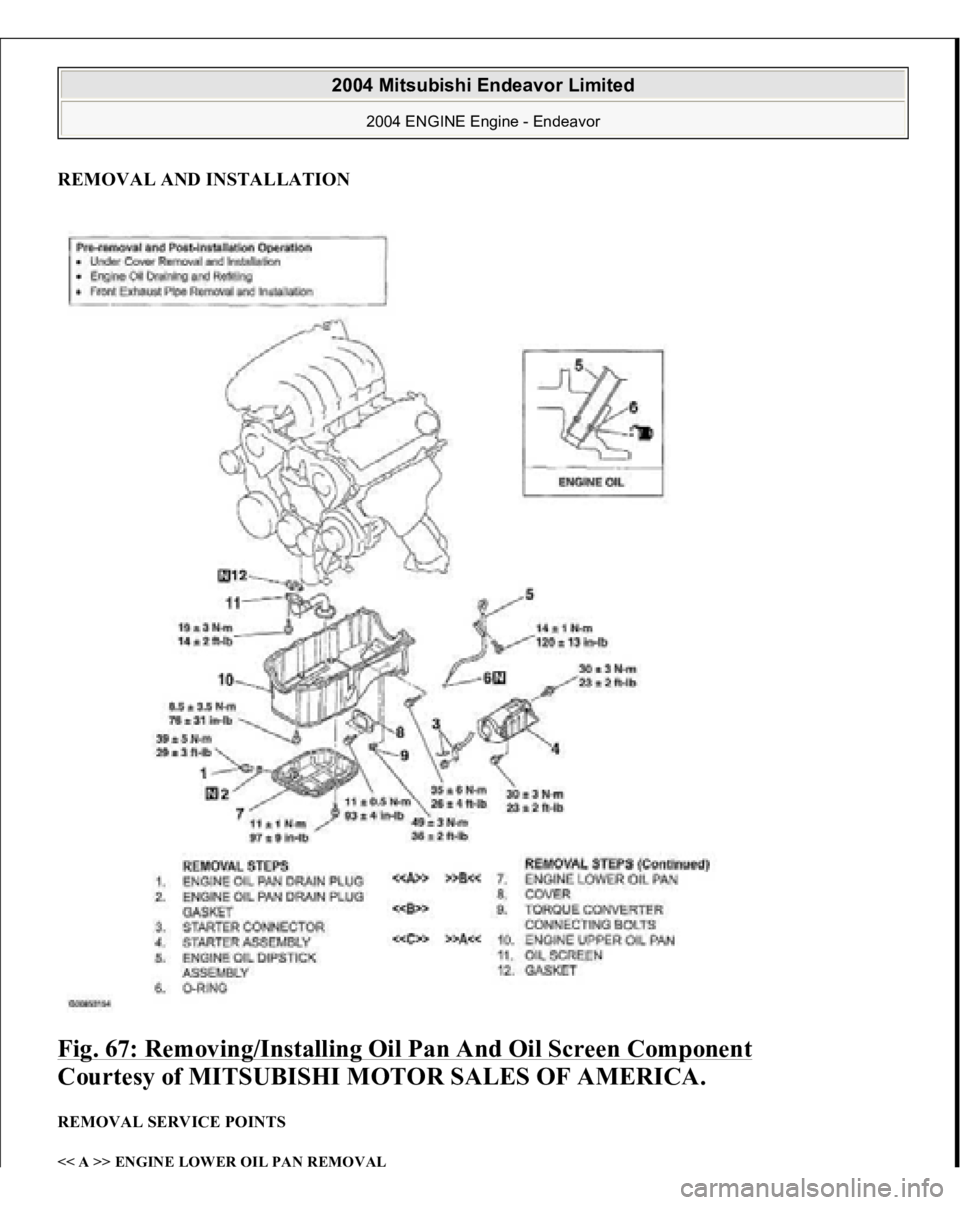
REMOVAL AND INSTALLATIONFig. 67: Removing/Installing Oil Pan And Oil Screen Component
Courtesy of MITSUBISHI MOTOR SALES OF AMERICA.
REMOVAL SERVICE POINTS << A >> ENGINE LOWER OIL PAN REMOVAL
2004 Mitsubishi Endeavor Limited
2004 ENGINE Engine - Endeavor
Page 1580 of 3870
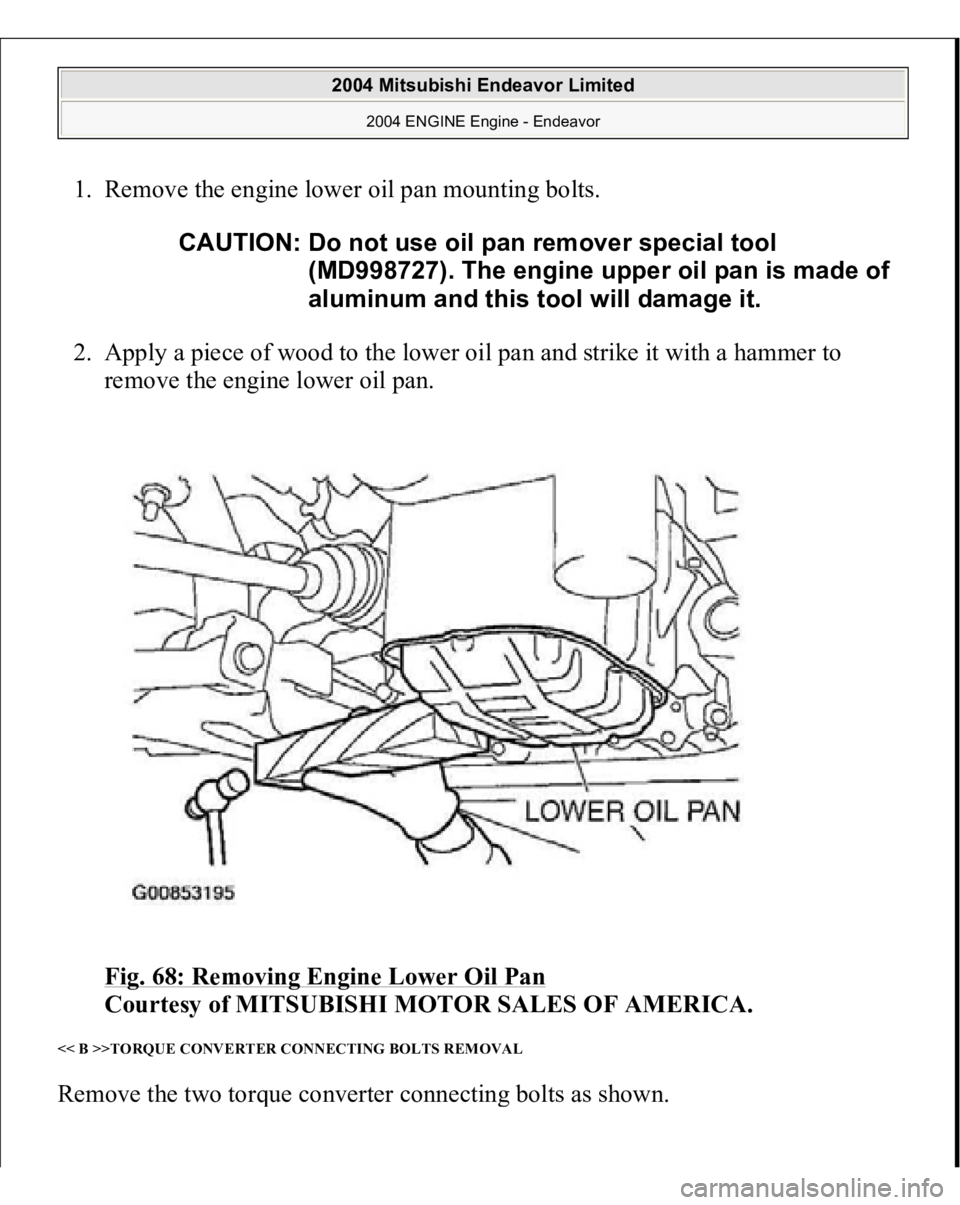
1. Remove the engine lower oil pan mounting bolts.
2. Apply a piece of wood to the lower oil pan and strike it with a hammer to
remove the engine lower oil pan.
Fig. 68: Removing Engine Lower Oil Pan
Courtesy of MITSUBISHI MOTOR SALES OF AMERICA.
<< B >>TORQUE CONVERTER CONNECTING BOLTS REMOVAL Remove the two tor
que converter connectin
g bolts as shown.
CAUTION: Do not use oil pan remover special tool
(MD998727). The engine upper oil pan is made of
aluminum and this tool will damage it.
2004 Mitsubishi Endeavor Limited
2004 ENGINE Engine - Endeavor
Trending: COMMUNICATION ERROR, heater, Change cooling, tailgate, rear entertainment, oil change, Amplifier
