MITSUBISHI ENDEAVOR 2004 Service Repair Manual
ENDEAVOR 2004
MITSUBISHI
MITSUBISHI
https://www.carmanualsonline.info/img/19/57105/w960_57105-0.png
MITSUBISHI ENDEAVOR 2004 Service Repair Manual
Trending: Dash warning lights, keyless, remote control, hood release, oil, Transmission fluid, jack
Page 1891 of 3870
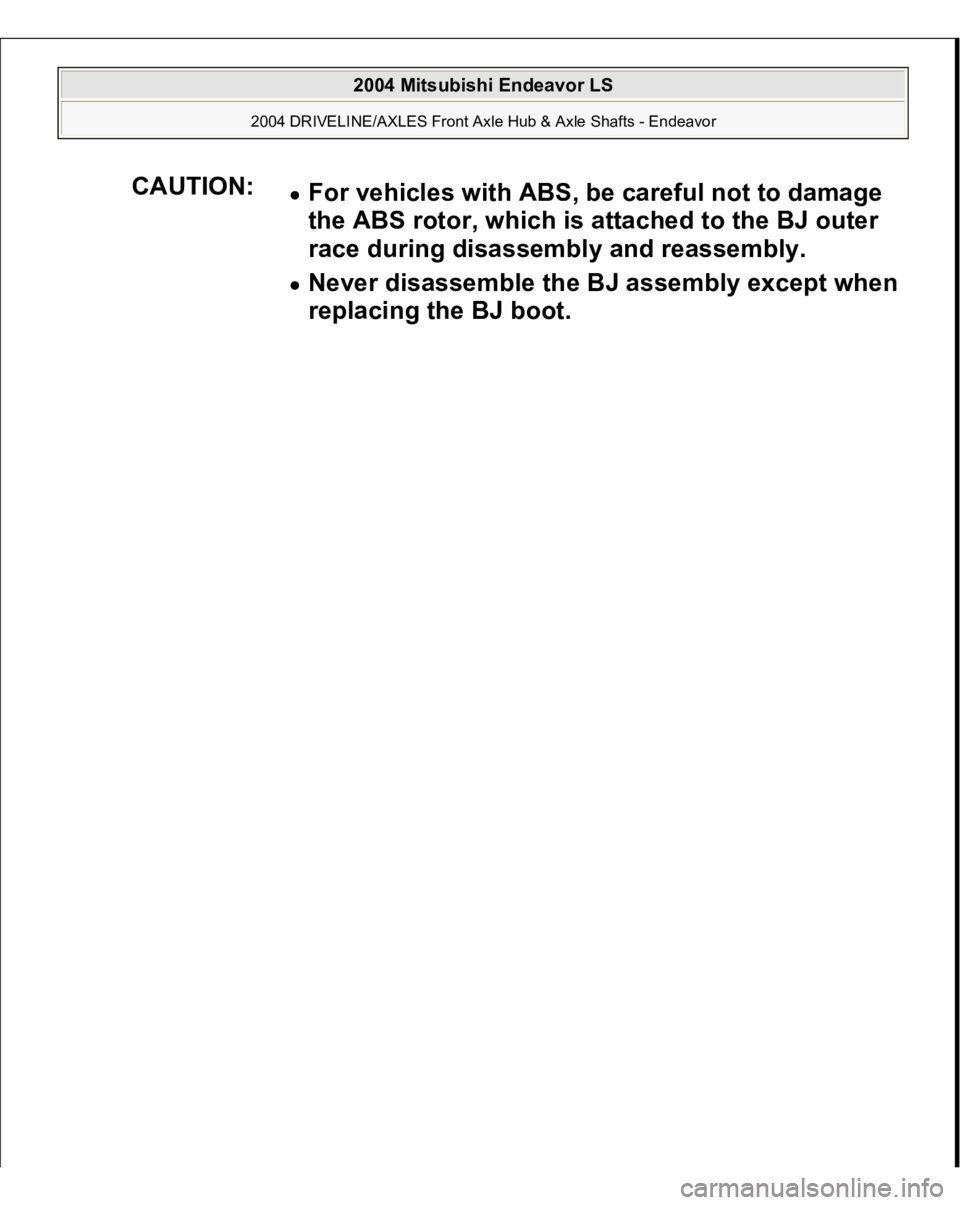
CAUTION:
For vehicles with ABS, be careful not to damage
the ABS rotor, which is attached to the BJ outer
race during disassembly and reassembly. Never disassemble the BJ assembly except when
replacing the BJ boot.
2004 Mitsubishi Endeavor LS
2004 DRIVELINE/AXLES Front Axle Hub & Axle Shafts - Endeavor
Page 1892 of 3870
2004 Mitsubishi Endeavor LS
2004 DRIVELINE/AXLES Front Axle Hub & Axle Shafts - Endeavor
Page 1893 of 3870
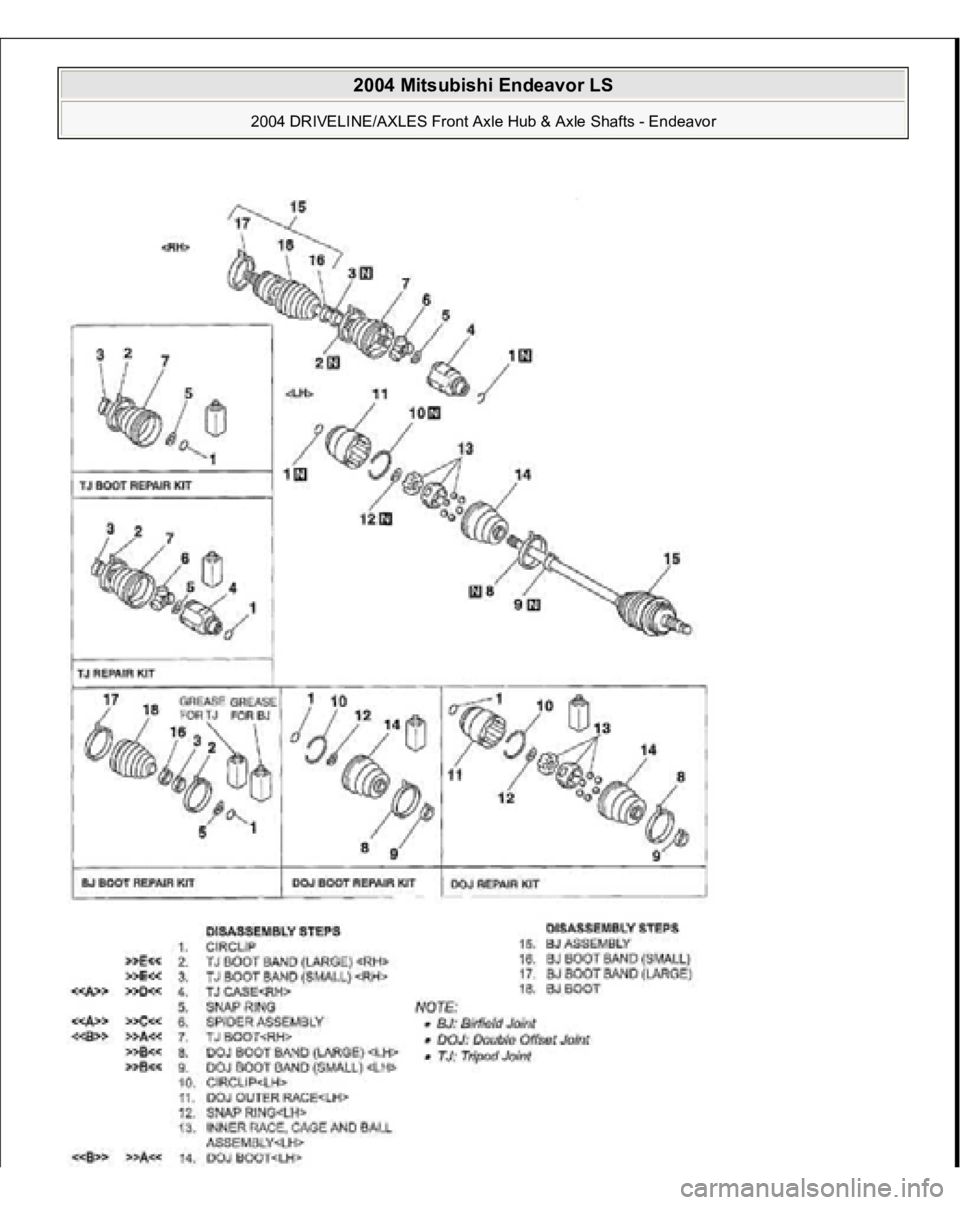
Fig. 38: Disassembling BJ Drive Shaft (AWD)
Courtesy of MITSUBISHI MOTOR SALES OF AMERICA.
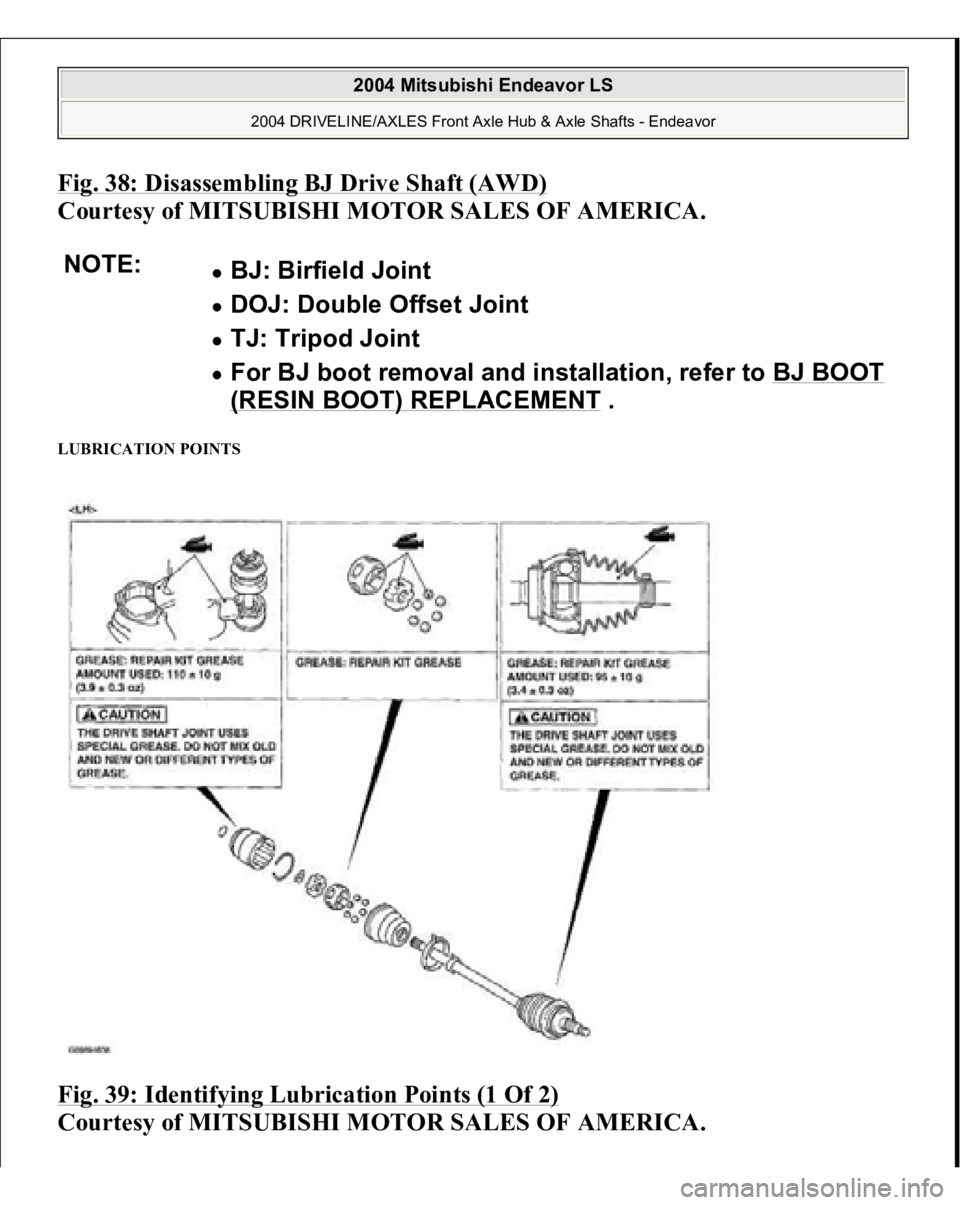
LUBRICATION POINTS Fig. 39: Identifying Lubrication Points (1 Of 2)
Courtesy of MITSUBISHI MOTOR SALES OF AMERICA.
NOTE:
BJ: Birfield Joint DOJ: Double Offset Joint TJ: Tripod Joint For BJ boot removal and installation, refer to BJ BOOT (RESIN BOOT) REPLACEMENT
.
2004 Mitsubishi Endeavor LS
2004 DRIVELINE/AXLES Front Axle Hub & Axle Shafts - Endeavor
Page 1894 of 3870
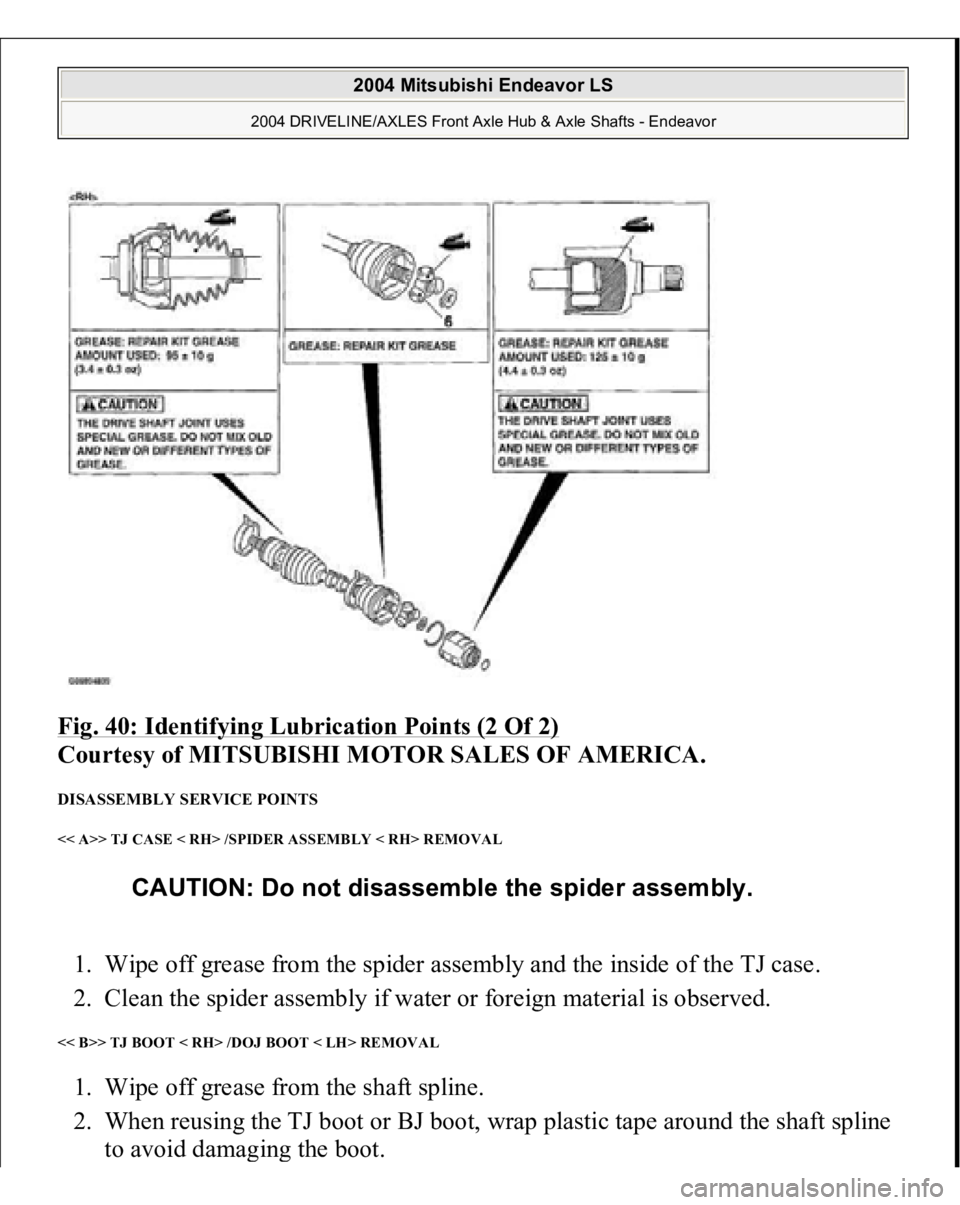
Fig. 40: Identifying Lubrication Points (2 Of 2)
Courtesy of MITSUBISHI MOTOR SALES OF AMERICA.
DISASSEMBLY SERVICE POINTS << A>> TJ CASE < RH> /SPIDER ASSEMBLY < RH> REMOVAL 1. Wipe off grease from the spider assembly and the inside of the TJ case.
2. Clean the spider assembly if water or foreign material is observed. << B>> TJ BOOT < RH> /DOJ BOOT < LH> REMOVAL 1. Wipe off grease from the shaft spline.
2. When reusing the TJ boot or BJ boot, wrap plastic tape around the shaft spline
to avoid dama
ging the boot.
CAUTION: Do not disassemble the spider assembly.
2004 Mitsubishi Endeavor LS
2004 DRIVELINE/AXLES Front Axle Hub & Axle Shafts - Endeavor
Page 1895 of 3870
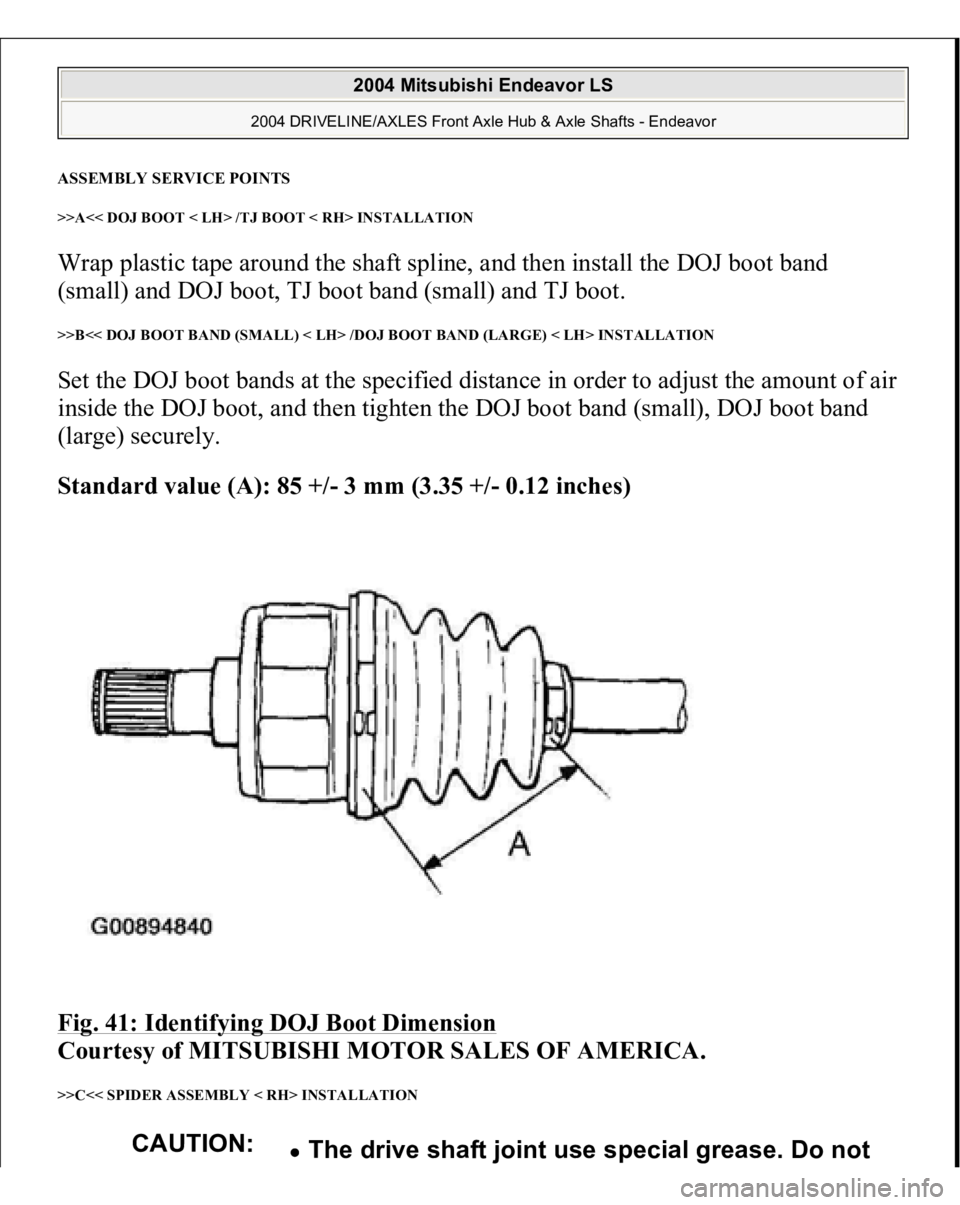
ASSEMBLY SERVICE POINTS >>A<< DOJ BOOT < LH> /TJ BOOT < RH> INSTALLATION Wrap plastic tape around the shaft spline, and then install the DOJ boot band
(small) and DOJ boot, TJ boot band (small) and TJ boot. >>B<< DOJ BOOT BAND (SMALL) < LH> /DOJ BOOT BAND (LARGE) < LH> INSTALLATION Set the DOJ boot bands at the specified distance in order to adjust the amount of air
inside the DOJ boot, and then tighten the DOJ boot band (small), DOJ boot band
(large) securely.
Standard value (A): 85 +/- 3 mm (3.35 +/- 0.12 inches)
Fig. 41: Identifying DOJ Boot Dimension
Courtesy of MITSUBISHI MOTOR SALES OF AMERICA.
>>C<< SPIDER ASSEMBLY < RH> INSTALLATION
CAUTION:
The drive shaft joint use special grease. Do not
2004 Mitsubishi Endeavor LS
2004 DRIVELINE/AXLES Front Axle Hub & Axle Shafts - Endeavor
Page 1896 of 3870
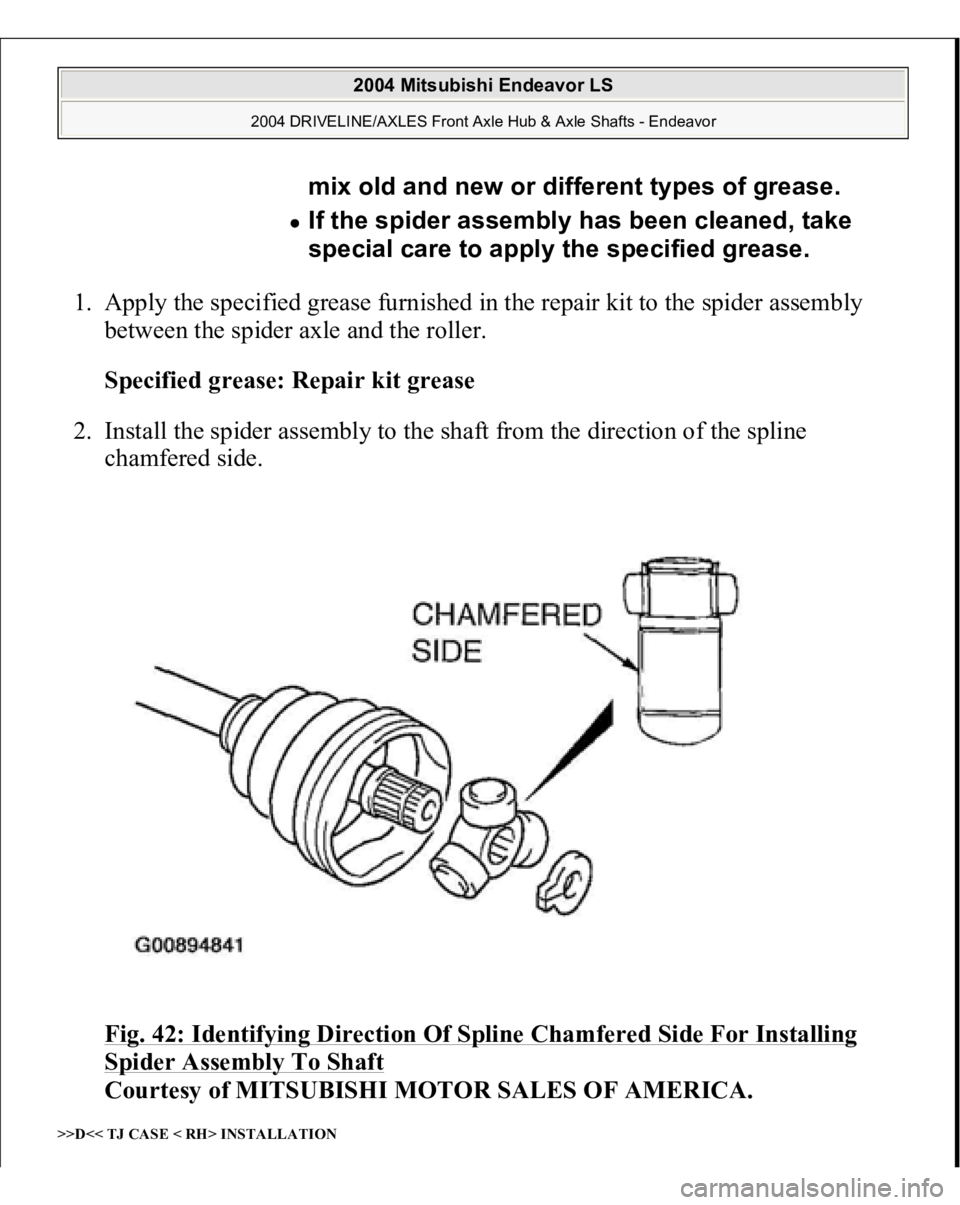
1. Apply the specified grease furnished in the repair kit to the spider assembly
between the spider axle and the roller.
Specified grease: Repair kit grease
2. Install the spider assembly to the shaft from the direction of the spline
chamfered side.
Fig. 42: Identifying Direction Of Spline Chamfered Side For Installing
Spider Assembly To Shaft
Courtesy of MITSUBISHI MOTOR SALES OF AMERICA.
>>D<< TJ CASE < RH> INSTALLATION
mix old and new or different types of grease. If the spider assembly has been cleaned, take
special care to apply the specified grease.
2004 Mitsubishi Endeavor LS
2004 DRIVELINE/AXLES Front Axle Hub & Axle Shafts - Endeavor
Page 1897 of 3870
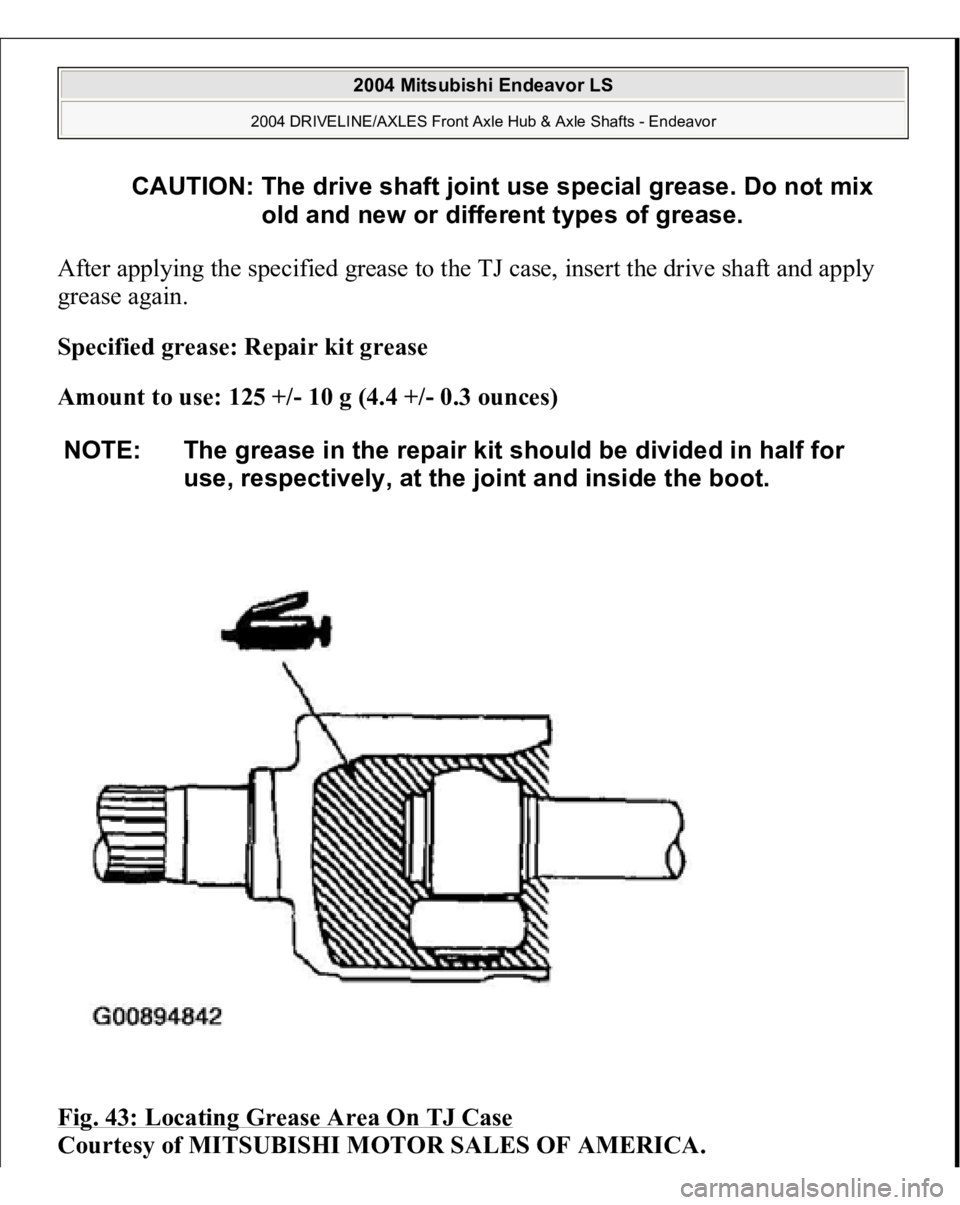
After applying the specified grease to the TJ case, insert the drive shaft and apply
grease again.
Specified grease: Repair kit grease
Amount to use: 125 +/- 10 g (4.4 +/- 0.3 ounces)
Fig. 43: Locating Grease Area On TJ Case
Courtesy of MITSUBISHI MOTOR SALES OF AMERICA.
CAUTION: The drive shaft joint use special grease. Do not mix
old and new or different types of grease.
NOTE: The grease in the repair kit should be divided in half for
use, respectively, at the joint and inside the boot.
2004 Mitsubishi Endeavor LS
2004 DRIVELINE/AXLES Front Axle Hub & Axle Shafts - Endeavor
Page 1898 of 3870
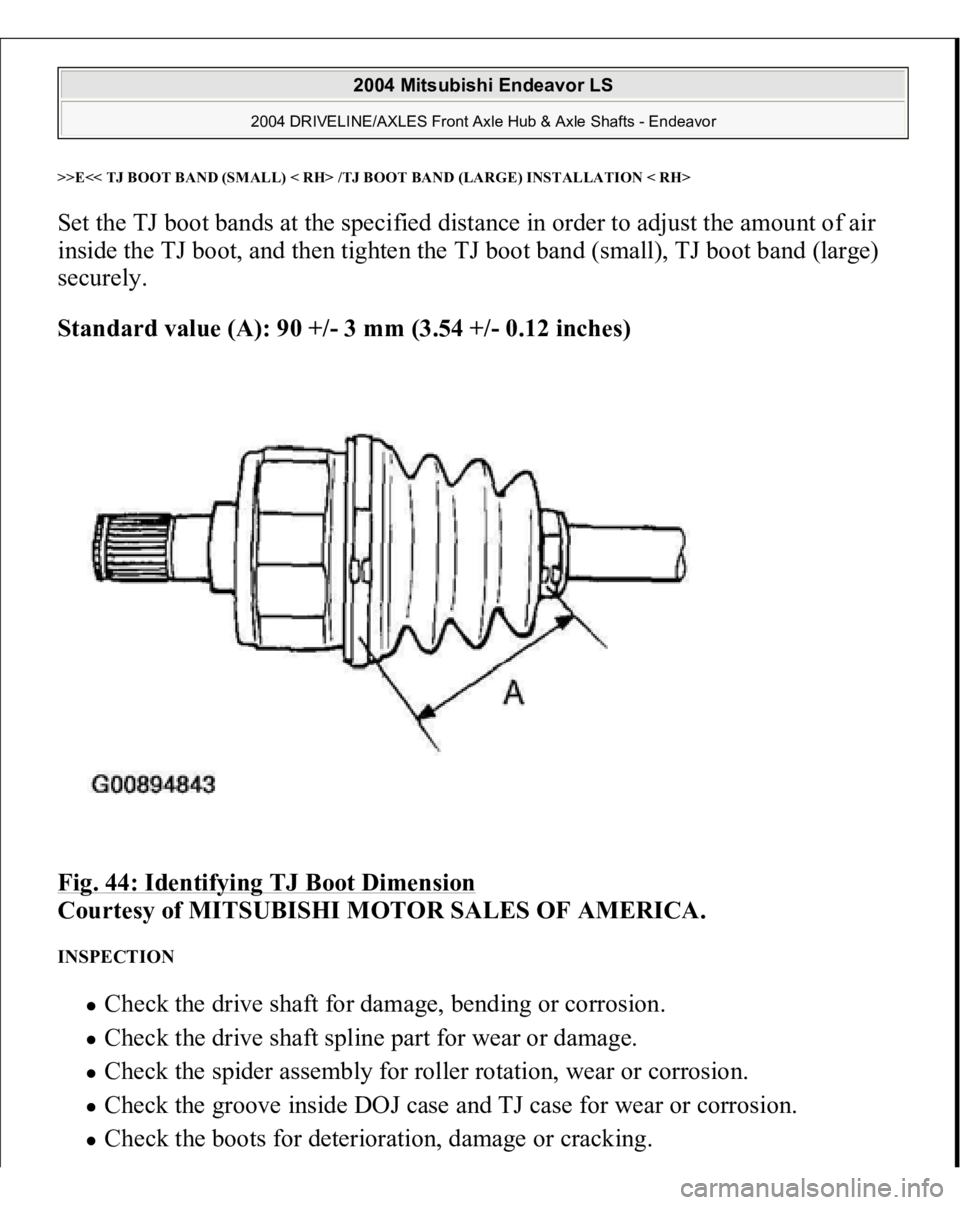
>>E<< TJ BOOT BAND (SMALL) < RH> /TJ BOOT BAND (LARGE) INSTALLATION < RH>Set the TJ boot bands at the specified distance in order to adjust the amount of air
inside the TJ boot, and then tighten the TJ boot band (small), TJ boot band (large)
securely.
Standard value (A): 90 +/- 3 mm (3.54 +/- 0.12 inches)
Fig. 44: Identifying TJ Boot Dimension
Courtesy of MITSUBISHI MOTOR SALES OF AMERICA.
INSPECTION
Check the drive shaft for damage, bending or corrosion. Check the drive shaft spline part for wear or damage. Check the spider assembly for roller rotation, wear or corrosion. Check the groove inside DOJ case and TJ case for wear or corrosion. Check the boots for deterioration, dama
ge or crackin
g.
2004 Mitsubishi Endeavor LS
2004 DRIVELINE/AXLES Front Axle Hub & Axle Shafts - Endeavor
Page 1899 of 3870
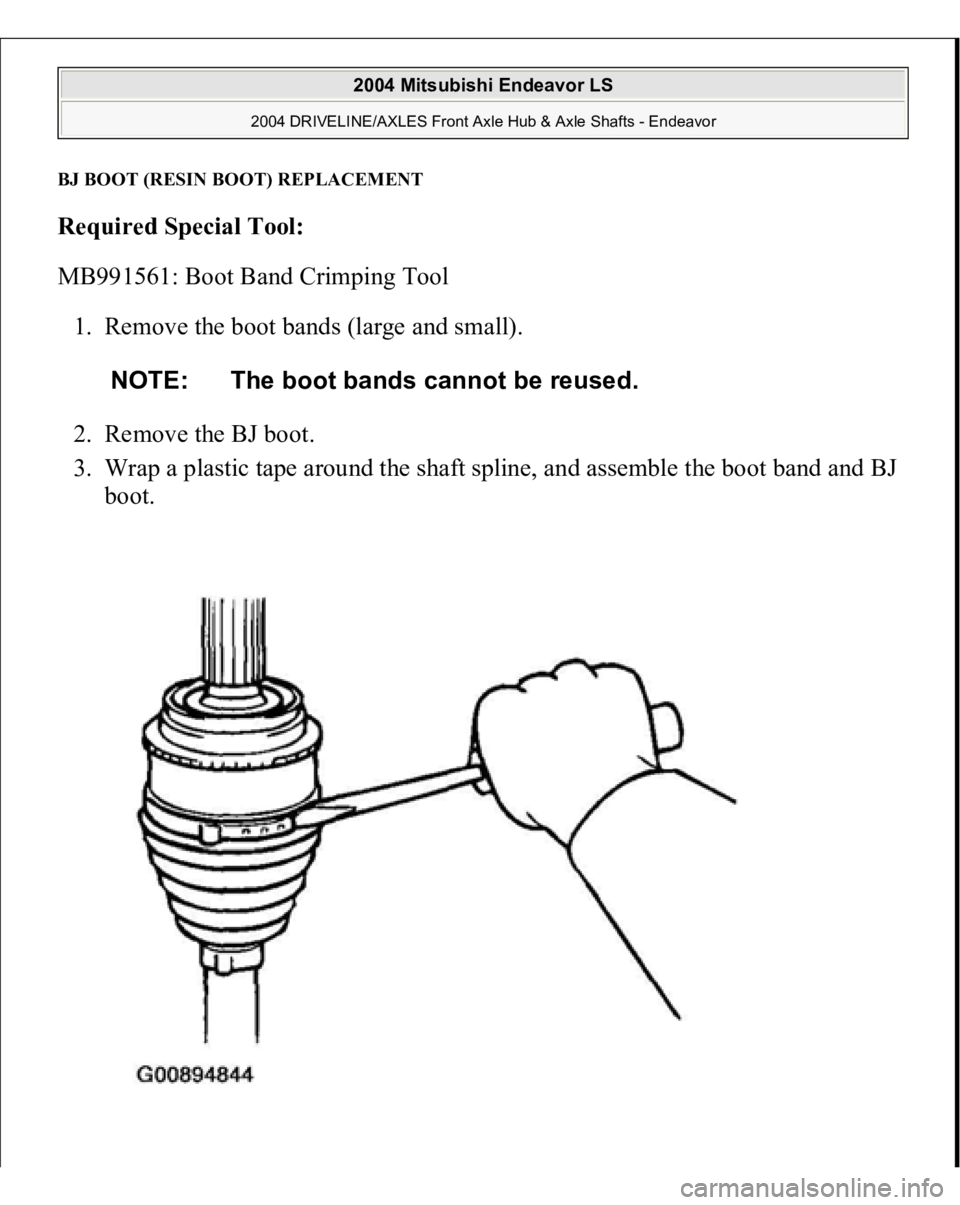
BJ BOOT (RESIN BOOT) REPLACEMENTRequired Special Tool:
MB991561: Boot Band Crimping Tool
1. Remove the boot bands (large and small).
2. Remove the BJ boot.
3. Wrap a plastic tape around the shaft spline, and assemble the boot band and BJ
boot.
NOTE: The boot bands cannot be reused.
2004 Mitsubishi Endeavor LS
2004 DRIVELINE/AXLES Front Axle Hub & Axle Shafts - Endeavor
Page 1900 of 3870
Fig. 45: Removing Boot Band
s
Courtesy of MITSUBISHI MOTOR SALES OF AMERICA.
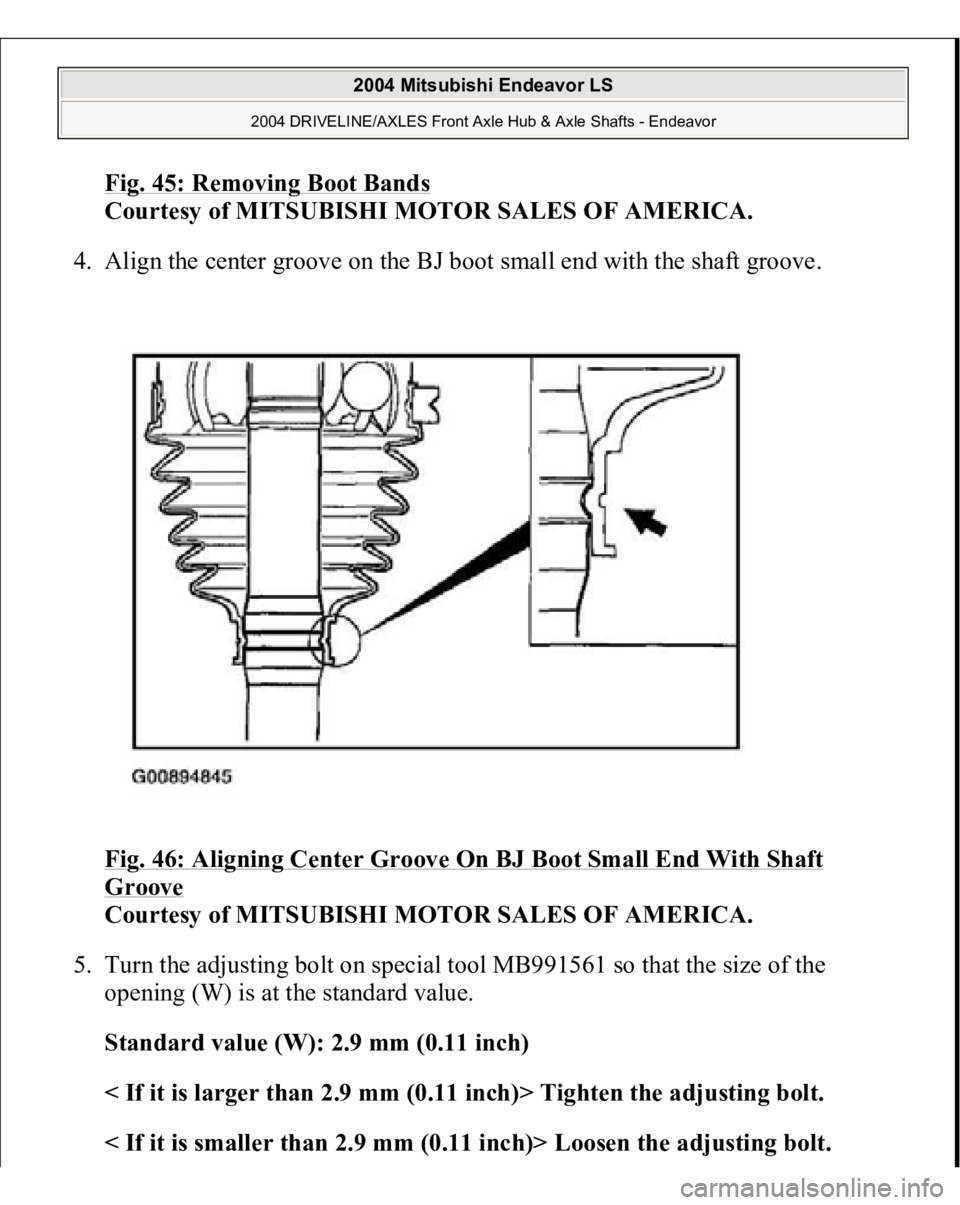
4. Align the center groove on the BJ boot small end with the shaft groove.
Fig. 46: Aligning Center Groove On BJ Boot Small End With Shaft
Groove
Courtesy of MITSUBISHI MOTOR SALES OF AMERICA.
5. Turn the adjusting bolt on special tool MB991561 so that the size of the
opening (W) is at the standard value.
Standard value (W): 2.9 mm (0.11 inch)
< If it is larger than 2.9 mm (0.11 inch)> Tighten the adjusting bolt.
< If it is smaller than 2.9 mm (0.11 inch)> Loosen the adjusting bolt.
2004 Mitsubishi Endeavor LS
2004 DRIVELINE/AXLES Front Axle Hub & Axle Shafts - Endeavor
Trending: Intake, warning light, width, maintenance schedule, can bus, sws diagnosis, Seat
