MITSUBISHI ENDEAVOR 2004 Service Repair Manual
ENDEAVOR 2004
MITSUBISHI
MITSUBISHI
https://www.carmanualsonline.info/img/19/57105/w960_57105-0.png
MITSUBISHI ENDEAVOR 2004 Service Repair Manual
Trending: COMMUNICATION ERROR, run flat, sunroof jam, Oil filter, Figure 37, diagnosis, Compressor
Page 2771 of 3870
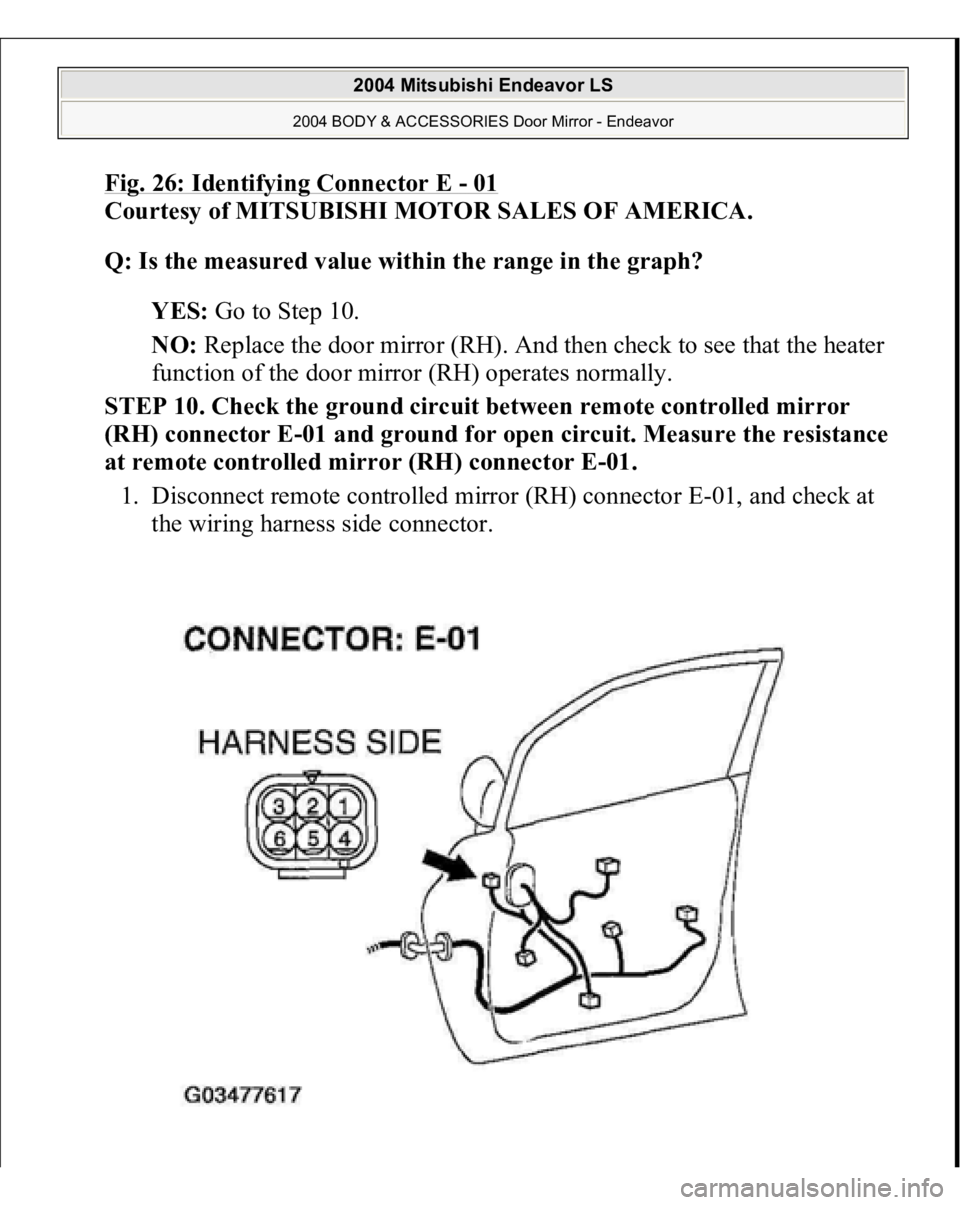
Fig. 26: Identifying Connector E
-01
Courtesy of MITSUBISHI MOTOR SALES OF AMERICA.
Q: Is the measured value within the range in the graph?
YES: Go to Step 10.
NO: Replace the door mirror (RH). And then check to see that the heater
function of the door mirror (RH) operates normally.
STEP 10. Check the ground circuit between remote controlled mirror
(RH) connector E-01 and ground for open circuit. Measure the resistance
at remote controlled mirror (RH) connector E-01.
1. Disconnect remote controlled mirror (RH) connector E-01, and check at
the wiring harness side connector.
2004 Mitsubishi Endeavor LS
2004 BODY & ACCESSORIES Door Mirror - Endeavor
Page 2772 of 3870
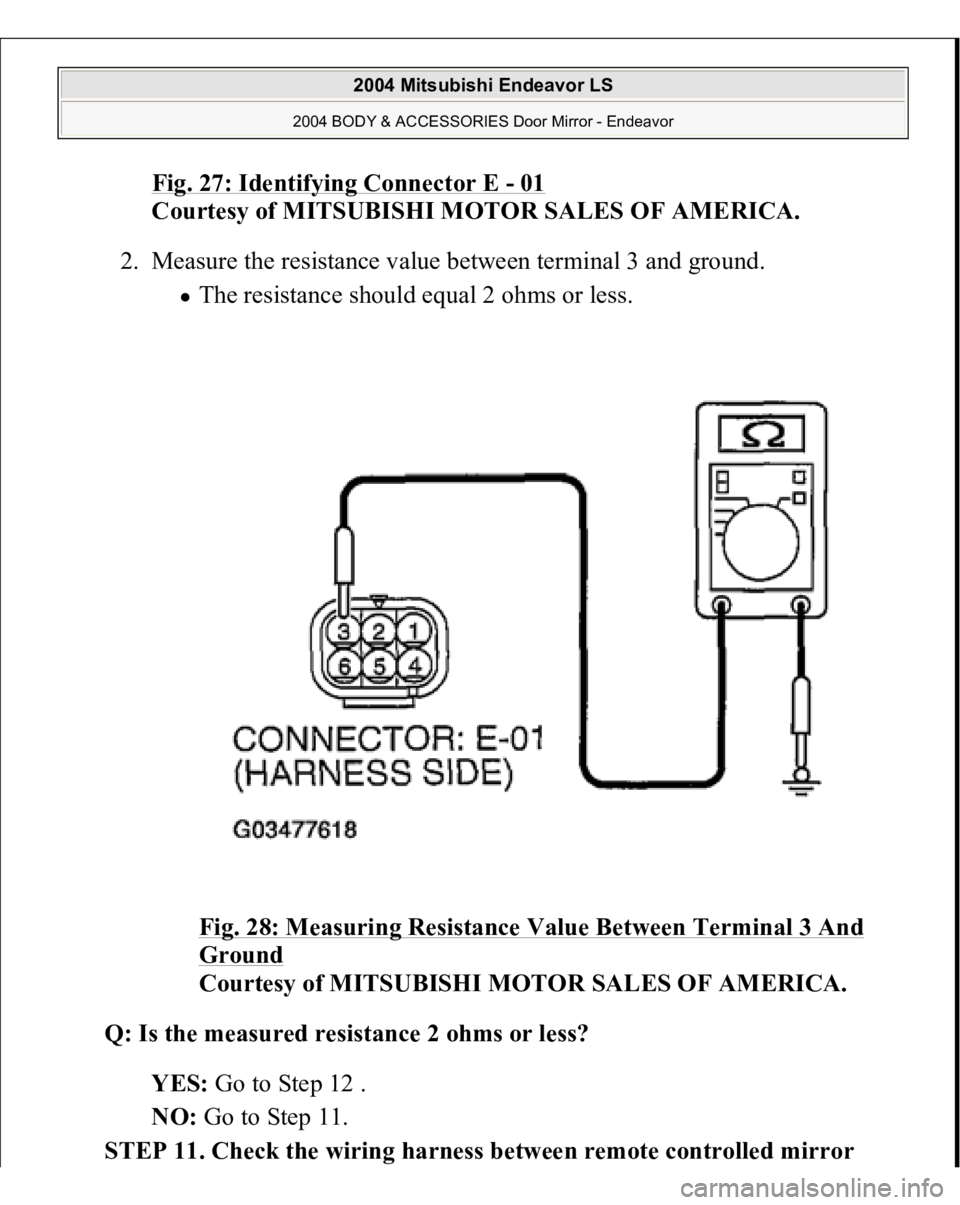
Fig. 27: Identifying Connector E
-01
Courtesy of MITSUBISHI MOTOR SALES OF AMERICA.
2. Measure the resistance value between terminal 3 and ground.
The resistance should equal 2 ohms or less.
Fig. 28: Measuring Resistance Value Between Terminal 3 And Ground
Courtesy of MITSUBISHI MOTOR SALES OF AMERICA.
Q: Is the measured resistance 2 ohms or less?
YES: Go to Step 12 .
NO: Go to Step 11.
STEP 11. Check the wiring harness between remote controlled mirror
2004 Mitsubishi Endeavor LS
2004 BODY & ACCESSORIES Door Mirror - Endeavor
Page 2773 of 3870
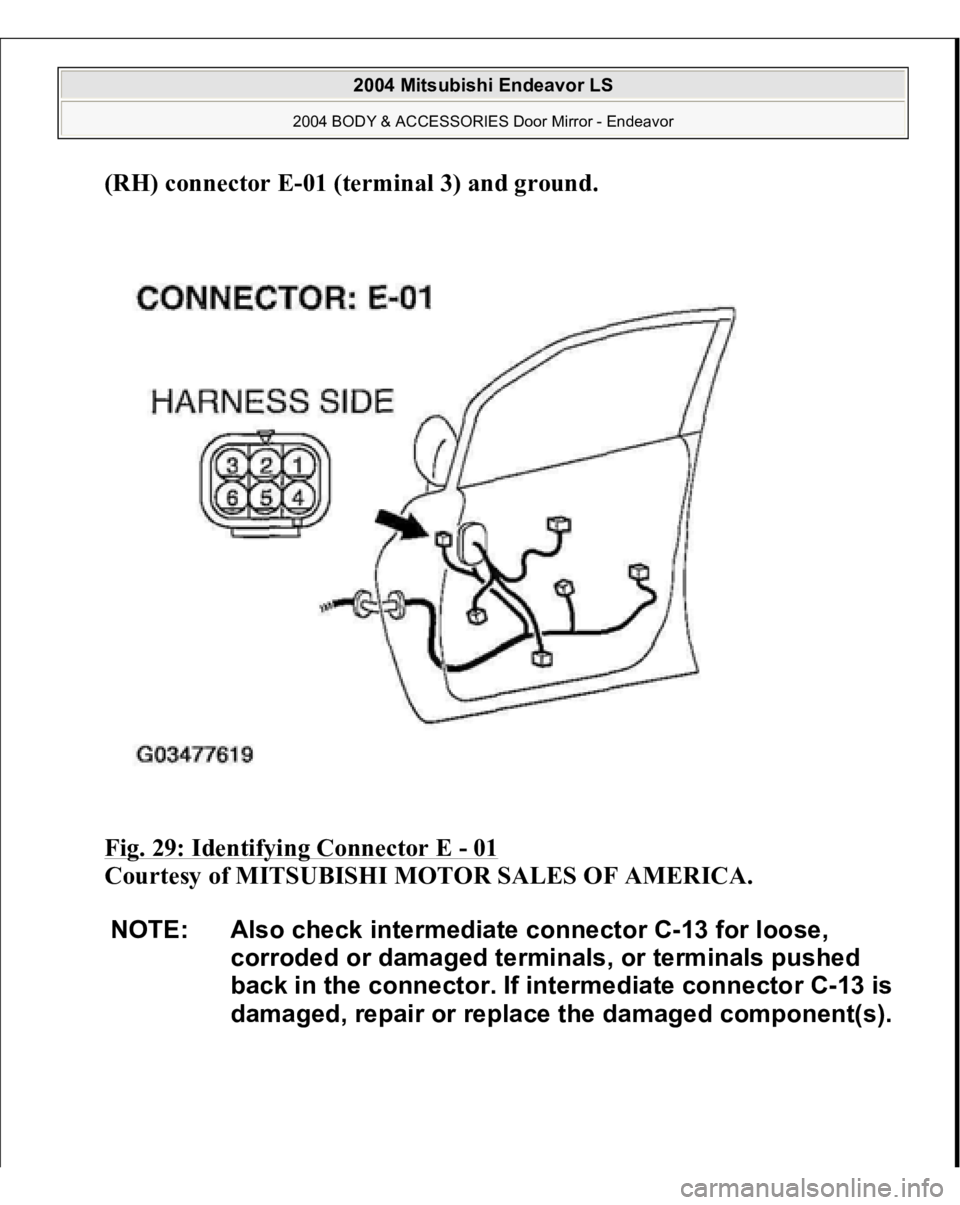
(RH) connector E-01 (terminal 3) and ground
.
Fig. 29: Identifying Connector E
- 01
Courtesy of MITSUBISHI MOTOR SALES OF AMERICA.
NOTE: Also check intermediate connector C-13 for loose,
corroded or damaged terminals, or terminals pushed
back in the connector. If intermediate connector C-13 is
damaged, repair or replace the damaged component(s).
2004 Mitsubishi Endeavor LS
2004 BODY & ACCESSORIES Door Mirror - Endeavor
Page 2774 of 3870
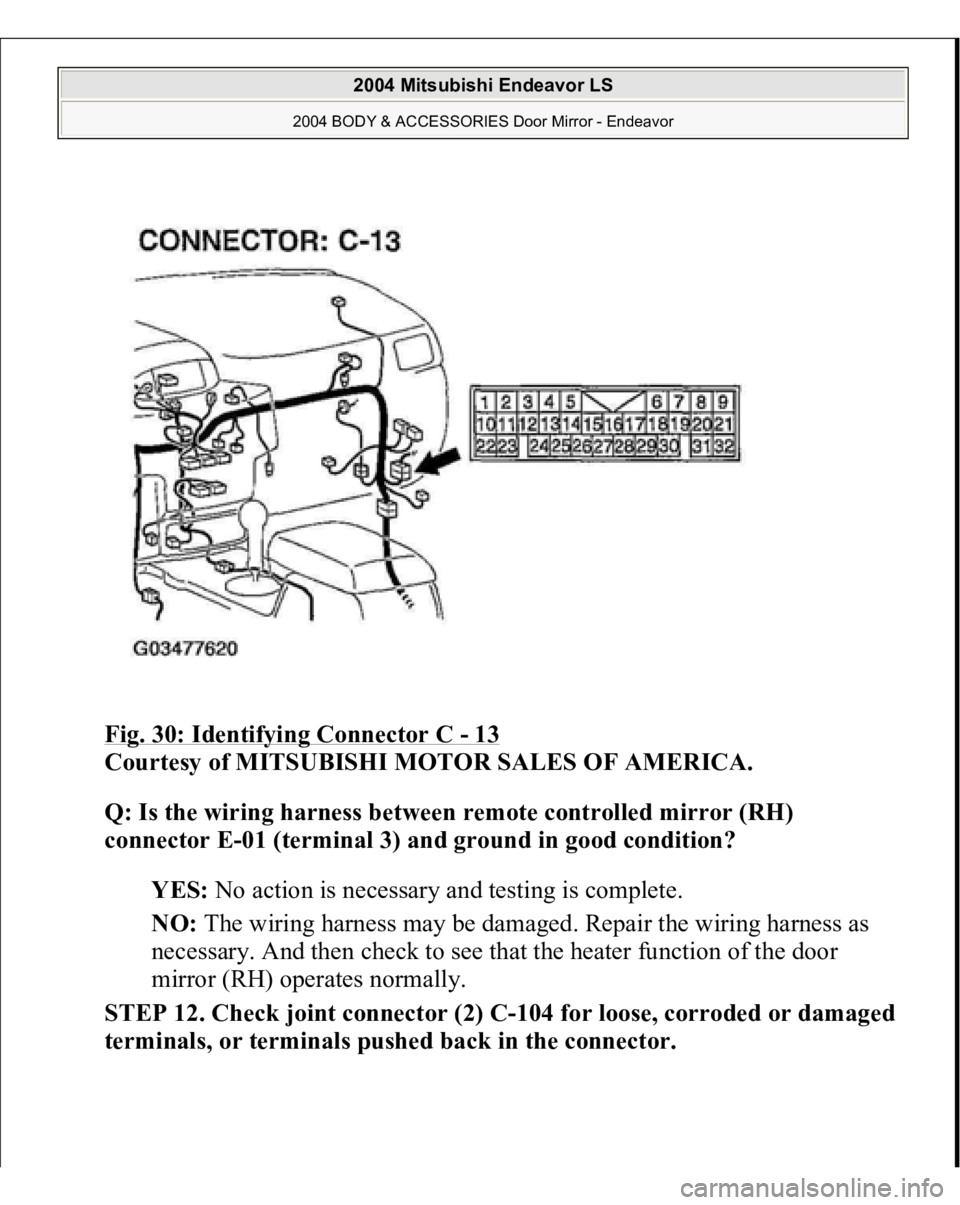
Fig. 30: Identifying Connector C
- 13
Courtesy of MITSUBISHI MOTOR SALES OF AMERICA.
Q: Is the wiring harness between remote controlled mirror (RH)
connector E-01 (terminal 3) and ground in good condition?
YES: No action is necessary and testing is complete.
NO: The wiring harness may be damaged. Repair the wiring harness as
necessary. And then check to see that the heater function of the door
mirror (RH) operates normally.
STEP 12. Check joint connector (2) C-104 for loose, corroded or damaged
terminals, or terminals pushed back in the connector.
2004 Mitsubishi Endeavor LS
2004 BODY & ACCESSORIES Door Mirror - Endeavor
Page 2775 of 3870
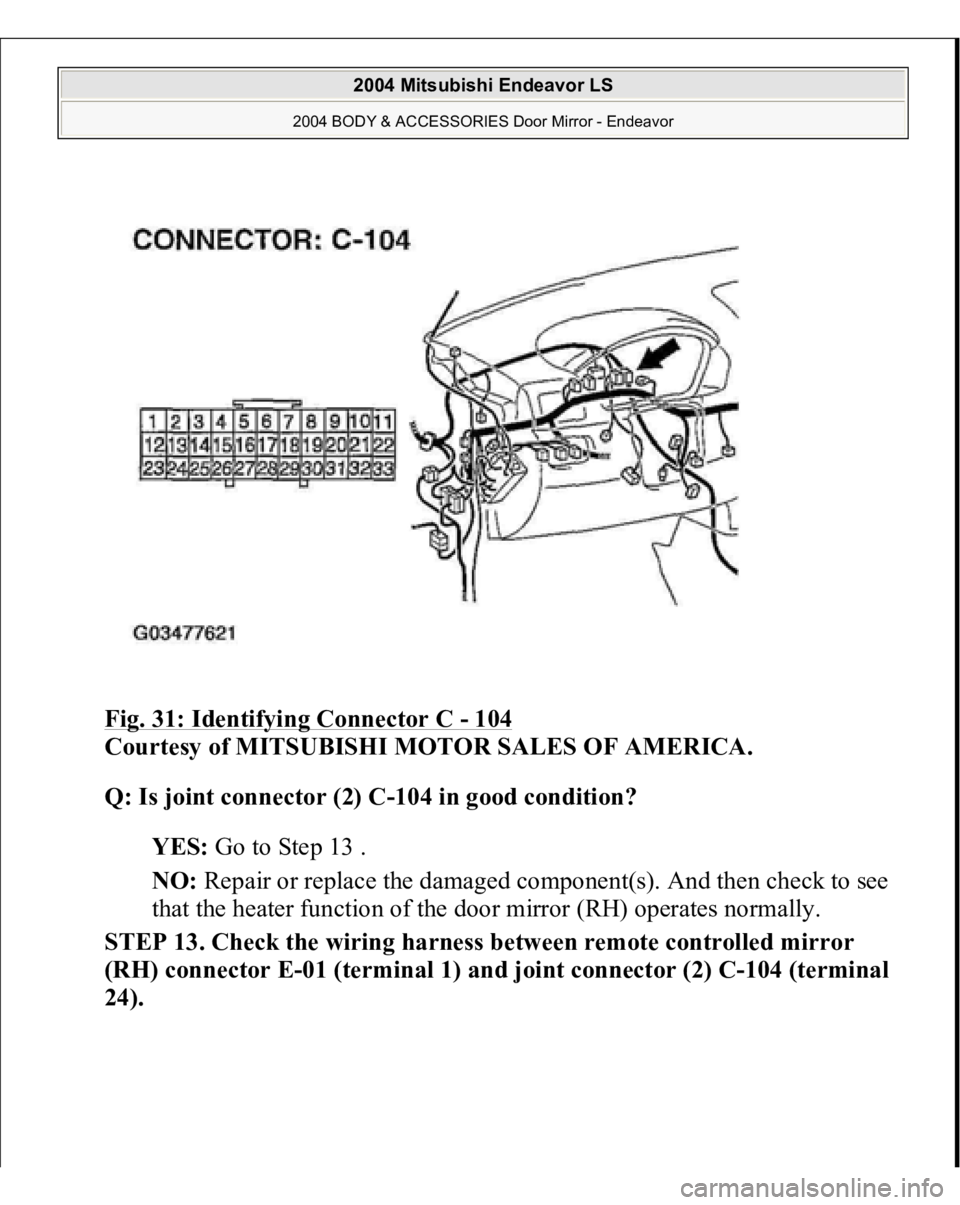
Fig. 31: Identifying Connector C
- 104
Courtesy of MITSUBISHI MOTOR SALES OF AMERICA.
Q: Is joint connector (2) C-104 in good condition?
YES: Go to Step 13 .
NO: Repair or replace the damaged component(s). And then check to see
that the heater function of the door mirror (RH) operates normally.
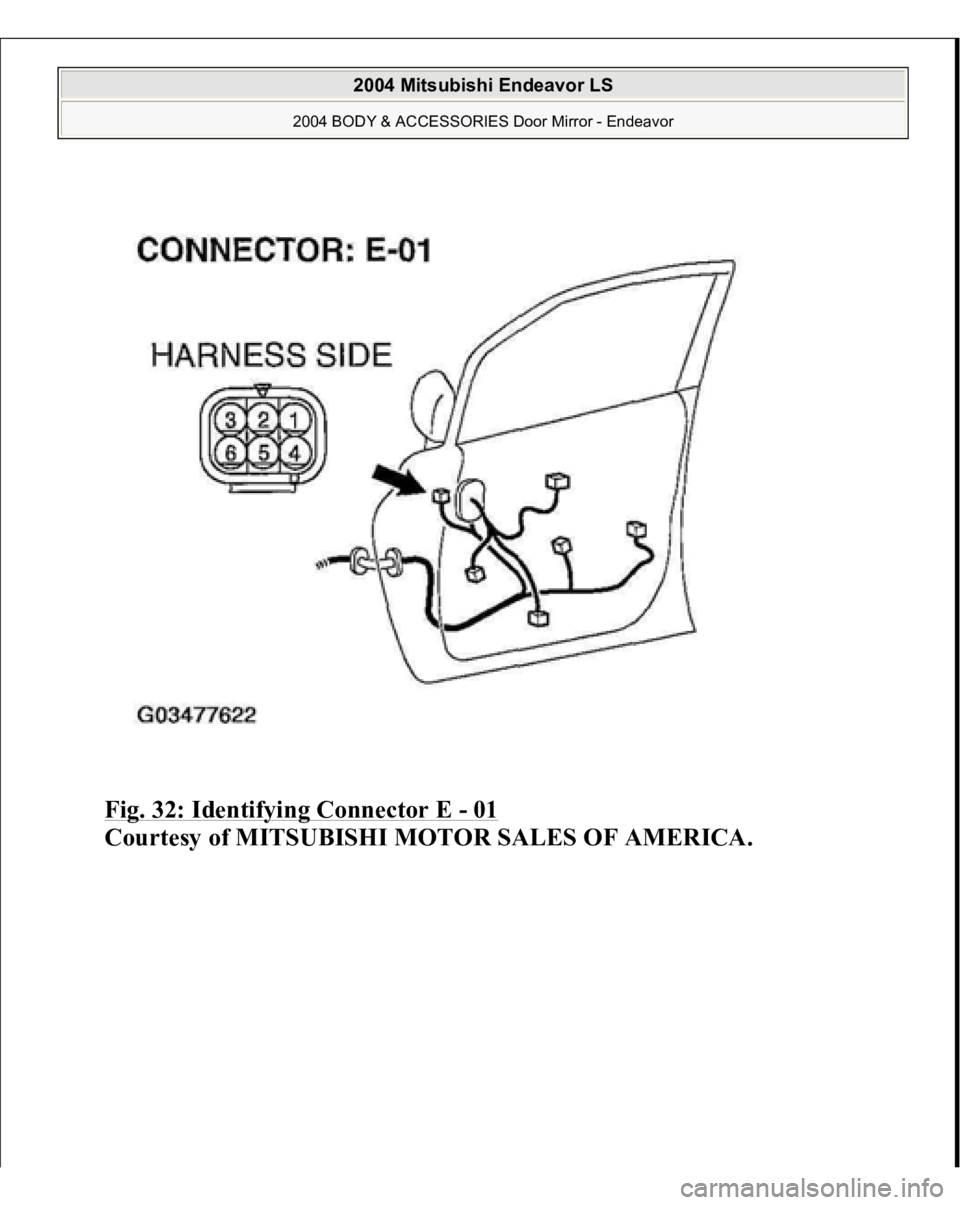
STEP 13. Check the wiring harness between remote controlled mirror
(RH) connector E-01 (terminal 1) and joint connector (2) C-104 (terminal
24).
2004 Mitsubishi Endeavor LS
2004 BODY & ACCESSORIES Door Mirror - Endeavor
Page 2776 of 3870
Fig. 32: Identifying Connector E
- 01
Courtesy of MITSUBISHI MOTOR SALES OF AMERICA.
2004 Mitsubishi Endeavor LS
2004 BODY & ACCESSORIES Door Mirror - Endeavor
Page 2777 of 3870
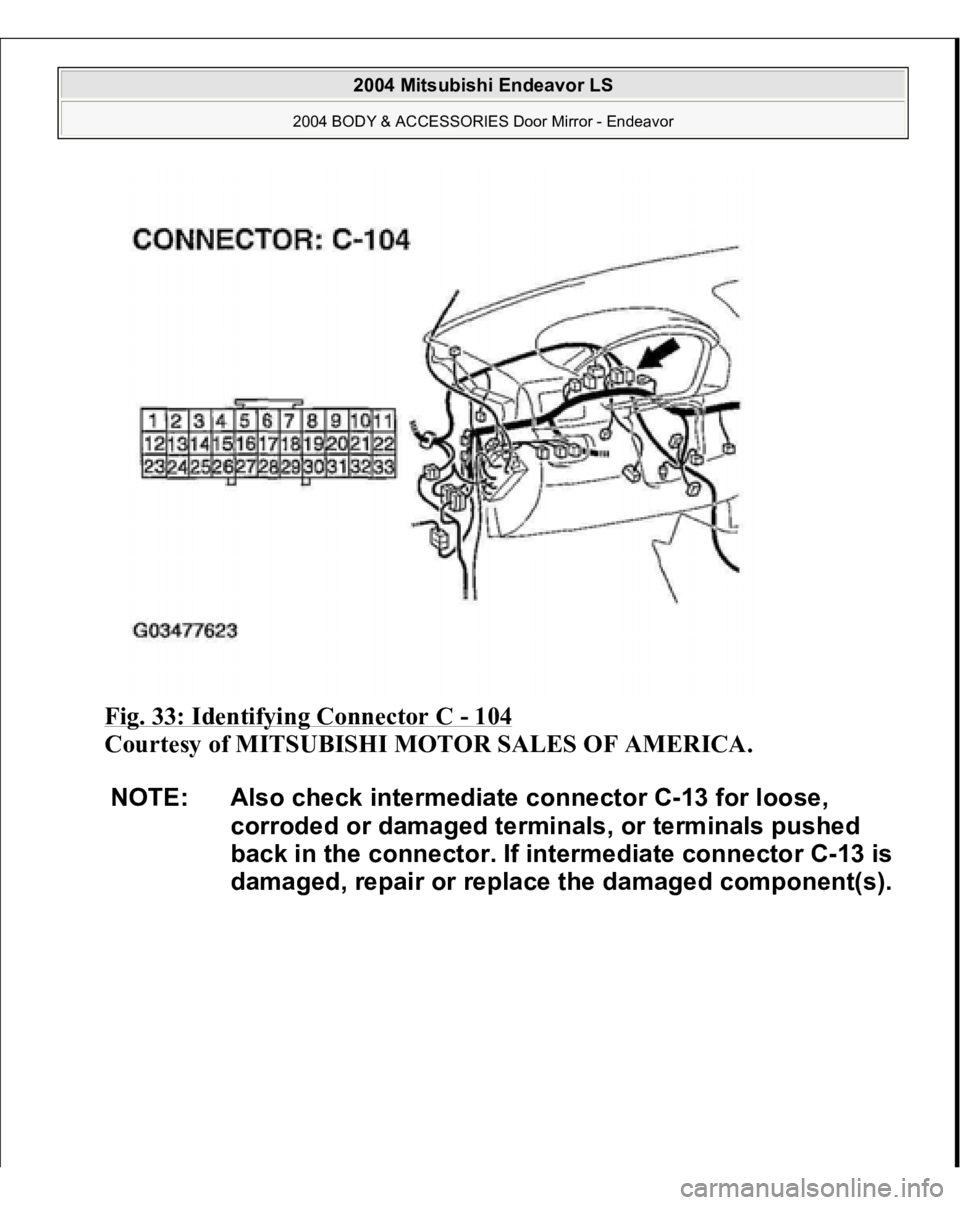
Fig. 33: Identifying Connector C
- 104
Courtesy of MITSUBISHI MOTOR SALES OF AMERICA.
NOTE: Also check intermediate connector C-13 for loose,
corroded or damaged terminals, or terminals pushed
back in the connector. If intermediate connector C-13 is
damaged, repair or replace the damaged component(s).
2004 Mitsubishi Endeavor LS
2004 BODY & ACCESSORIES Door Mirror - Endeavor
Page 2778 of 3870
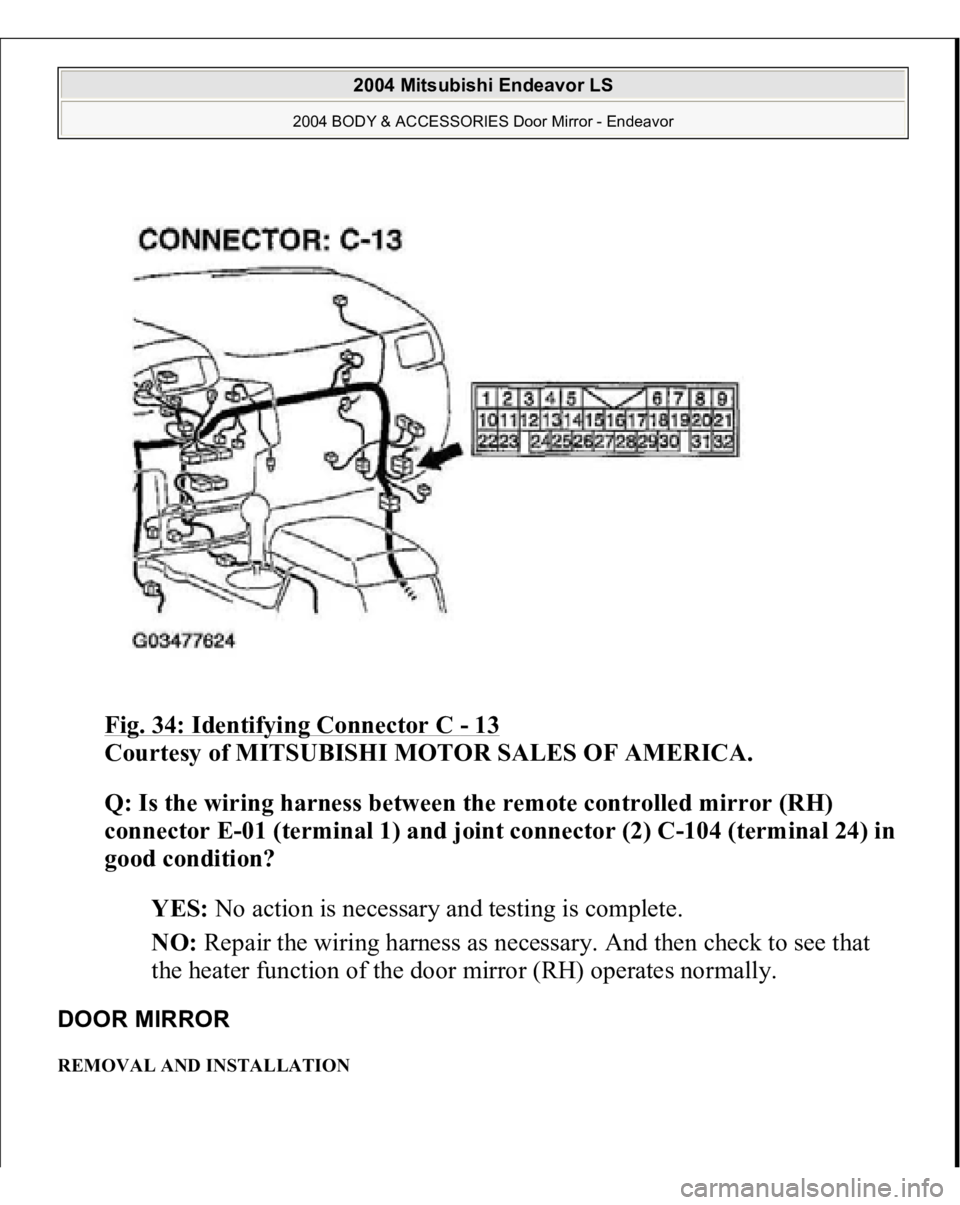
Fig. 34: Identifying Connector C
- 13
Courtesy of MITSUBISHI MOTOR SALES OF AMERICA.
Q: Is the wiring harness between the remote controlled mirror (RH)
connector E-01 (terminal 1) and joint connector (2) C-104 (terminal 24) in
good condition?
YES: No action is necessary and testing is complete.
NO: Repair the wiring harness as necessary. And then check to see that
the heater function of the door mirror (RH) operates normally.
DOOR MIRROR REMOVAL AND INSTALLATION
2004 Mitsubishi Endeavor LS
2004 BODY & ACCESSORIES Door Mirror - Endeavor
Page 2779 of 3870
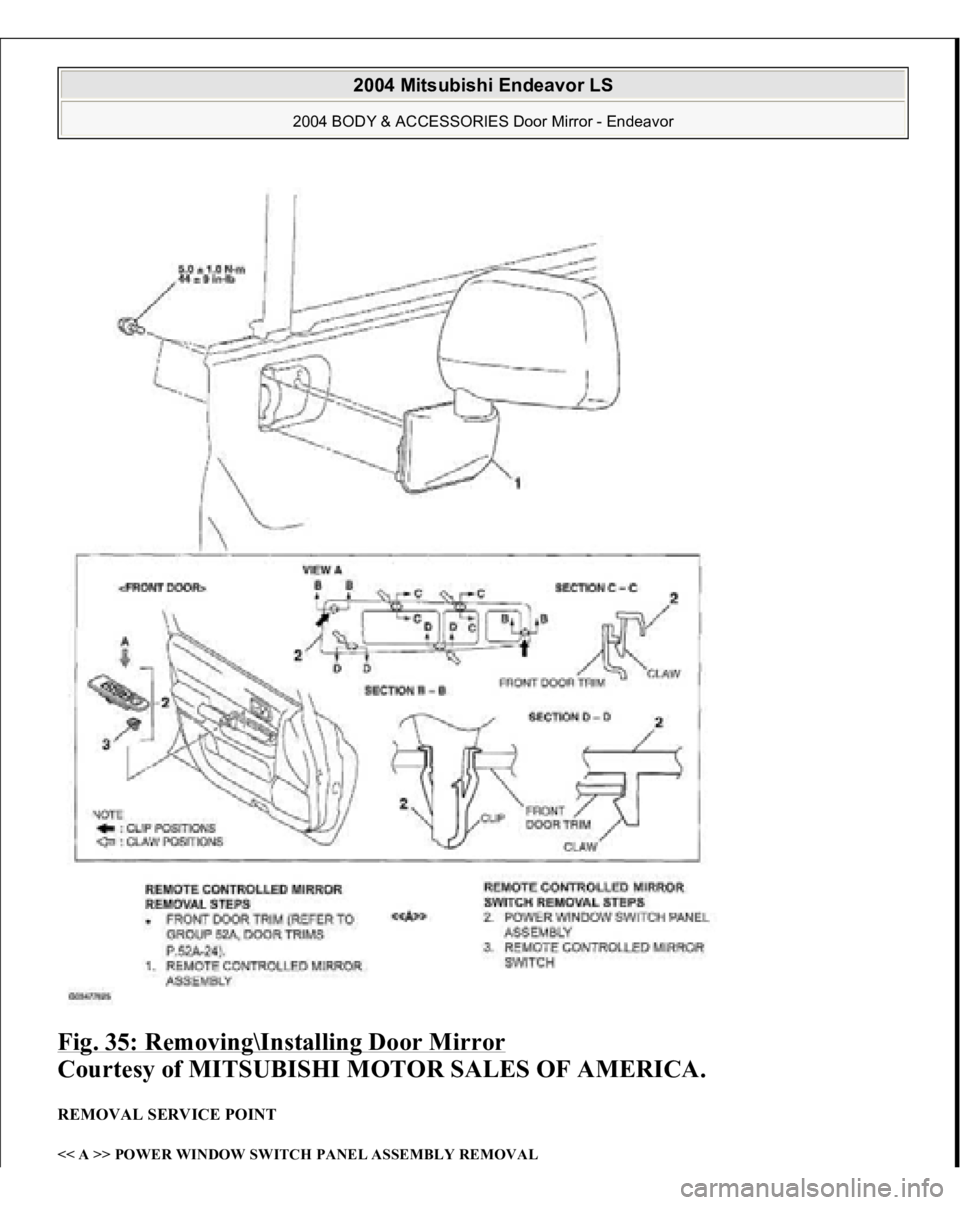
Fig. 35: Removing\Installing Door Mirror
Courtesy of MITSUBISHI MOTOR SALES OF AMERICA.
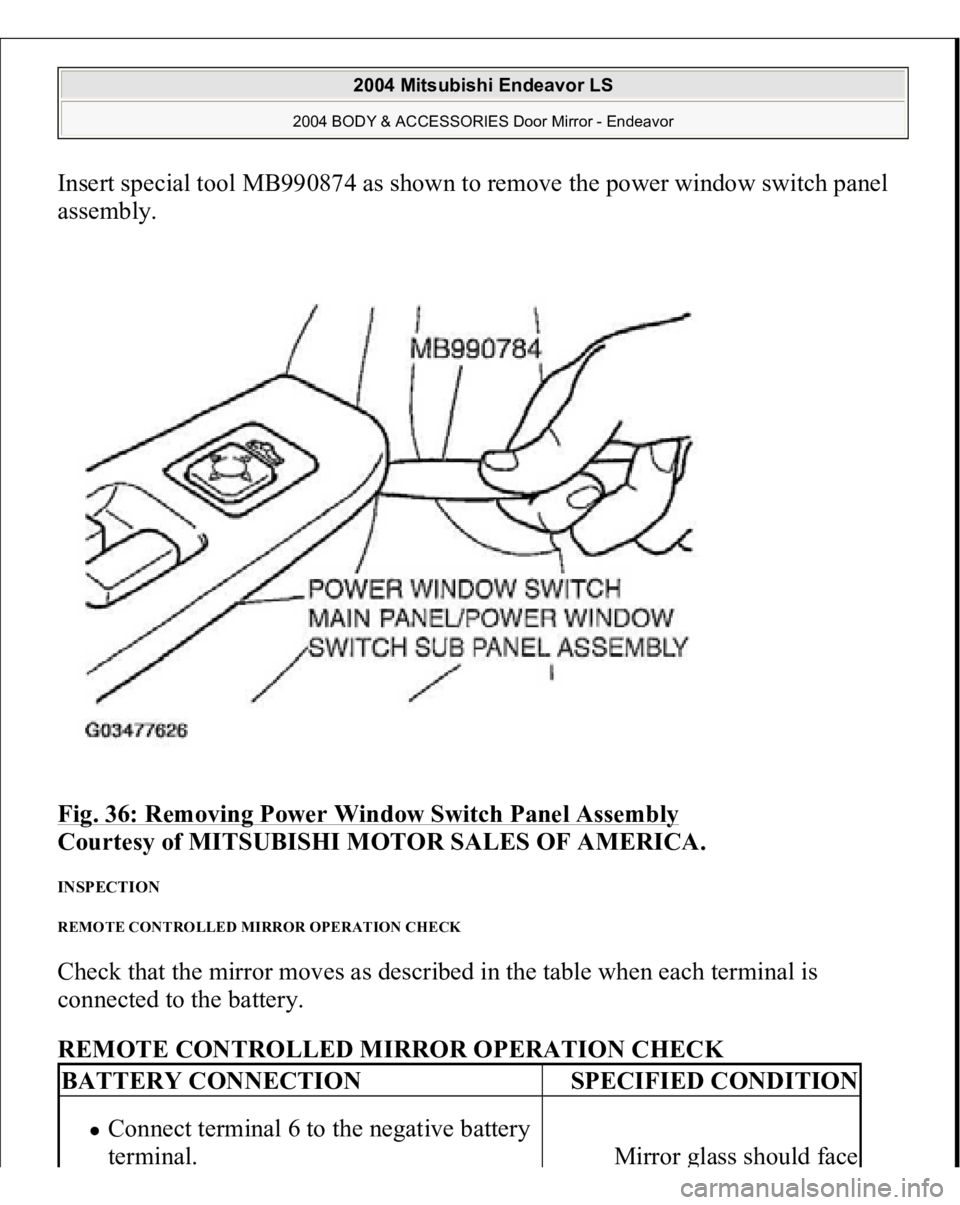
REMOVAL SERVICE POINT << A >> POWER WINDOW SWITCH PANEL ASSEMBLY REMOVAL
2004 Mitsubishi Endeavor LS
2004 BODY & ACCESSORIES Door Mirror - Endeavor
Page 2780 of 3870
Insert special tool MB990874 as shown to remove the power window switch panel
assembly.
Fig. 36: Removing Power Window Switch Panel Assembly
Courtesy of MITSUBISHI MOTOR SALES OF AMERICA.
INSPECTION REMOTE CONTROLLED MIRROR OPERATION CHECK Check that the mirror moves as described in the table when each terminal is
connected to the battery.
REMOTE CONTROLLED MIRROR OPERATION CHECK BATTERY CONNECTION
SPECIFIED CONDITION
Connect terminal 6 to the negative battery
terminal.
Mirror
glass should face
2004 Mitsubishi Endeavor LS
2004 BODY & ACCESSORIES Door Mirror - Endeavor
Trending: engine oil, recommended oil, air suspension, control module, Amplifier, power steering fluid, rocker cover
