MITSUBISHI GALANT 1989 Service Repair Manual
Manufacturer: MITSUBISHI, Model Year: 1989, Model line: GALANT, Model: MITSUBISHI GALANT 1989Pages: 1273, PDF Size: 37.62 MB
Page 1191 of 1273
35-70SERVICE BRAKES- Service Adjustment Procedures
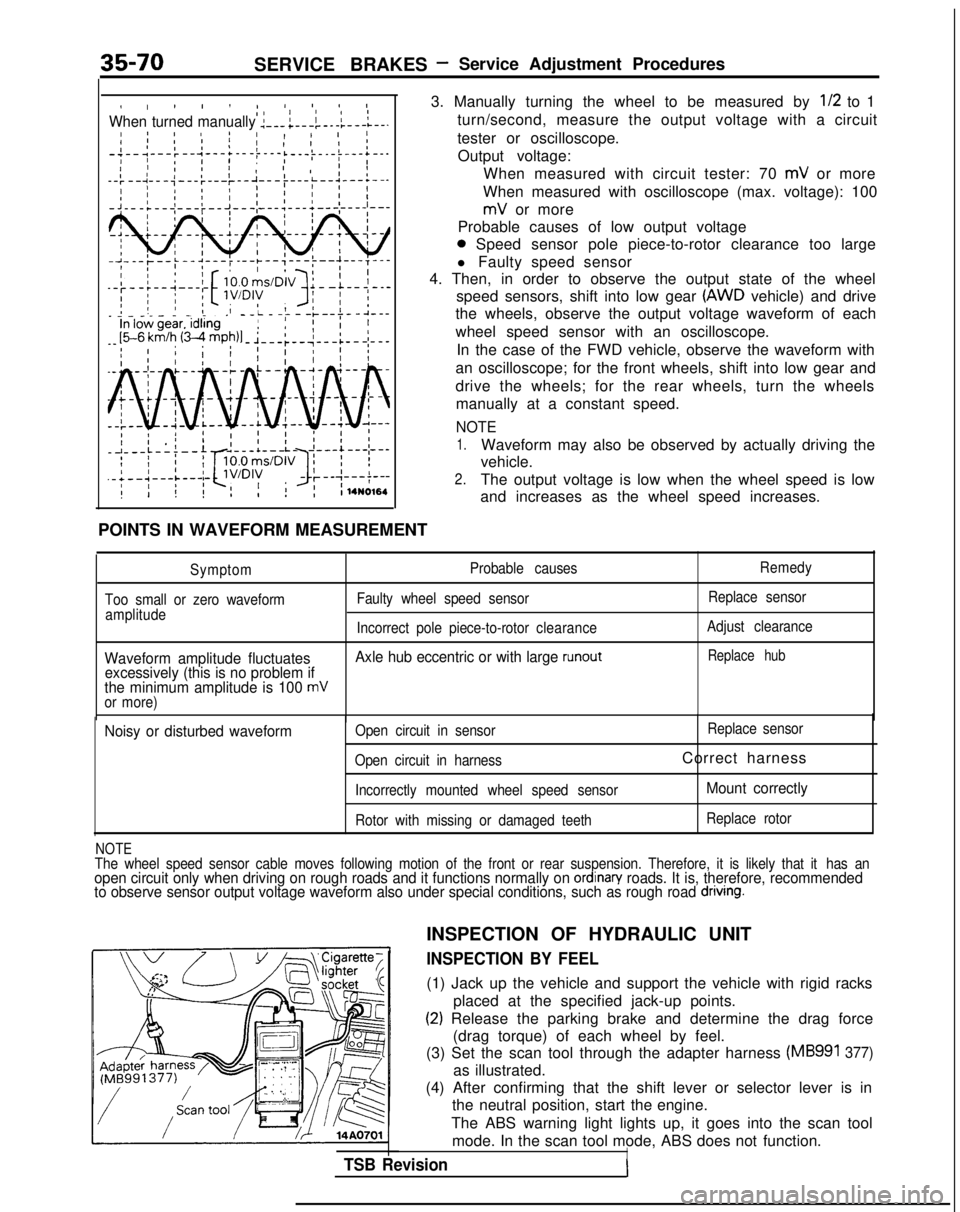
I, ! I ! I4 IO II IIWhen turned manually :---;---i-.-l---L--.I 8 ! IaI 1 11 1 II ’I 1’ I I I;-;--1---:--‘---+---t---i ’I IL---)-.-i---+--.II ’ I I 1 , 1 ,I
--:--~---;---:---~--~--
POINTS IN WAVEFORM MEASUREMENT
3. Manually turning the wheel to be measured by
l/2 to 1
turn/second, measure the output voltage with a circuit
tester or oscilloscope. Output voltage: When measured with circuit tester: 70
mV or more
When measured with oscilloscope (max. voltage): 100
mV or more
Probable causes of low output voltage
0 Speed sensor pole piece-to-rotor clearance too large
l Faulty speed sensor
4. Then, in order to observe the output state of the wheel
speed sensors, shift into low gear
(AWD vehicle) and drive
the wheels, observe the output voltage waveform of each
wheel speed sensor with an oscilloscope.
In the case of the FWD vehicle, observe the waveform with
an oscilloscope; for the front wheels, shift into low gear and
drive the wheels; for the rear wheels, turn the wheels manually at a constant speed.
NOTE
1.Waveform may also be observed by actually driving the
vehicle.
2.The output voltage is low when the wheel speed is low
and increases as the wheel speed increases.
Symptom
Too small or zero waveform amplitude Probable causes
Faulty wheel speed sensor Remedy
Replace sensor
Incorrect pole piece-to-rotor clearanceAdjust clearance
Waveform amplitude fluctuates Axle hub eccentric or with large runoutReplace hub
excessively (this is no problem if
the minimum amplitude is 100 mVor more)
Noisy or disturbed waveformOpen circuit in sensor Replace
sensor
Open circuit in harness
Correct harness
Incorrectly mounted wheel speed sensorMount correctly
Rotor with missing or damaged teeth Replace rotor
NOTEThe wheel speed sensor cable moves following motion of the front or rear\
suspension. Therefore, it is likely that it
has anopen circuit only when driving on rough roads and it functions normally \
on ordinan/ roads. It is, therefore, recommended
to observe sensor output voltage waveform also under special conditions,\
such as rough road dnvlng.
TSB Revision
INSPECTION OF HYDRAULIC UNIT
INSPECTION BY FEEL
(1) Jack up the vehicle and support the vehicle with rigid racks
placed at the specified jack-up points.
(2) Release the parking brake and determine the drag force(drag torque) of each wheel by feel.
(3) Set the scan tool through the adapter harness
(MB991 377)
as illustrated.
(4) After confirming that the shift lever or selector lever is in the neutral position, start the engine.
The ABS warning light lights up, it goes into the scan tool mode. In the scan tool mode, ABS does not function.
I
Page 1192 of 1273
SERVICE BRAKES - Service Adjustment Procedures35-71
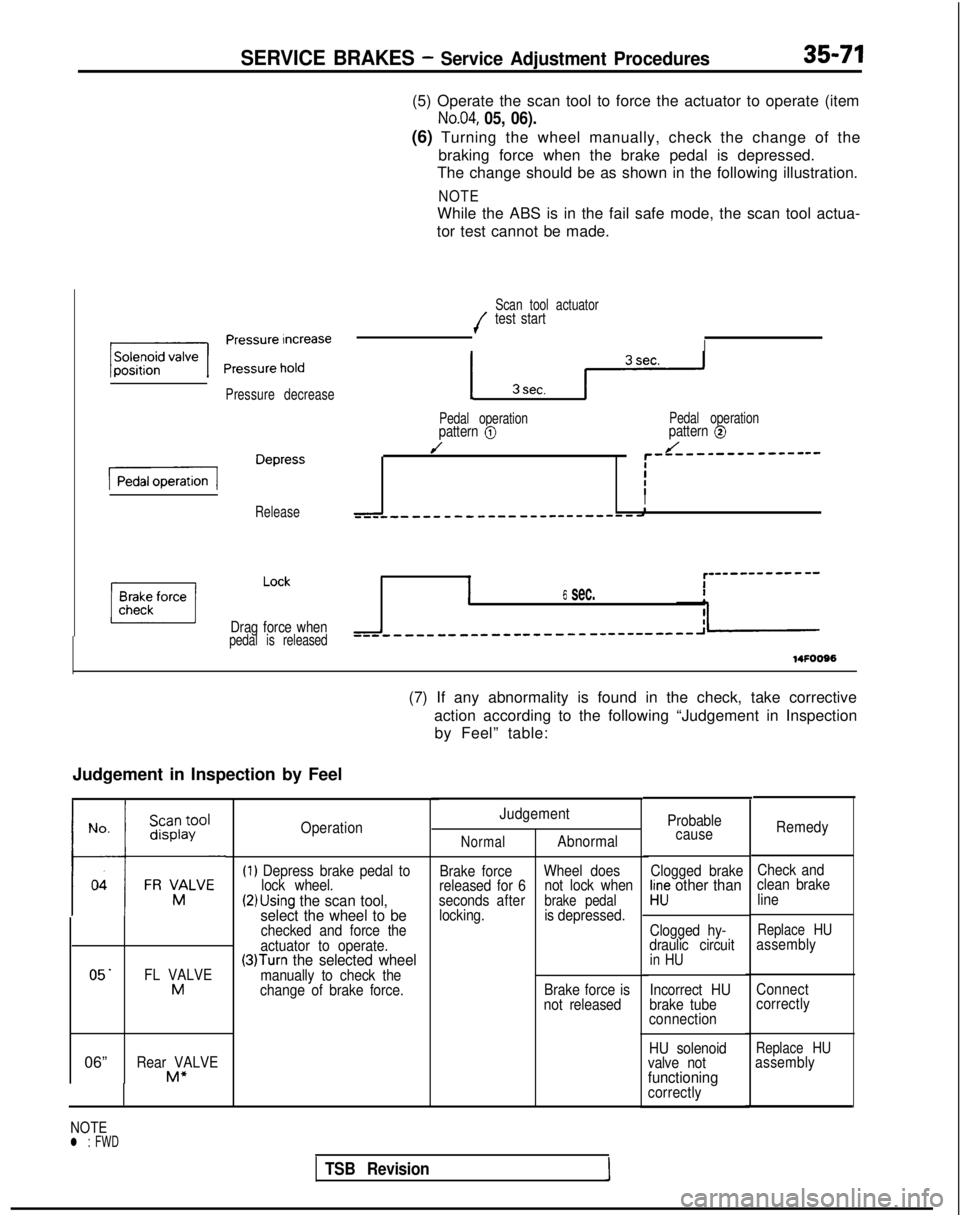
(5) Operate the scan tool to force the actuator to operate (item
No.04, 05, 06).
(6) Turning the wheel manually, check the change of thebraking force when the brake pedal is depressed.
The change should be as shown in the following illustration.
NOTE
While the ABS is in the fail safe mode, the scan tool actua-
tor test cannot be made.
Pressure decrease
-Pedaloperation Depress
Release
Drag force whenpedal is released Scan tool actuator
/test start
I
1 3sec. y
Pedal operation
Pedal operationpattern @pattern @
//r”-“““““----
I
I
I
I--m-e- e-m- --------_---------d
16 sec.
14FOOS6
(7) If any abnormality is found in the check, take corrective
action according to the following “Judgement in Inspectionby Feel” table:
Judgement in Inspection by Feel 05'
FL VALVEM
06”Rear VALVEM”
Operation
(1) Depress brake pedal to
lock wheel.
(2)Using the scan tool,
select the wheel to be
checked and force the
actuator to operate.
(3)Turn the selected wheelmanually to check the
change of brake force. Judgement
Normal
Brake force
released for 6
seconds after
locking. Abnormal
Wheel does not lock when
brake pedalis depressed.
Brake force is
not released Probable
cause
Clogged brake /JII
other than
Clogged hy-
draulic circuit
in HU
Incorrect HU
brake tube
connection
HU solenoid
valve not
functioningcorrectly Remedy
Check and
clean brake
line
Replace HUassembly
Connect
correctly
Replace HUassembly
NOTEl : FWD
TSB Revision
Page 1193 of 1273
35-72SERVICE BRAKES - Service Adjustment Procedures
14AO701 1
INSPECTION BY USING BRAKE FORCE TESTER
NOTE
(1) The brake force tester roller and tire must be dry during thetest.
(2) When testing the front brakes, apply the parking brake and when testing the rear brakes, apply chocks to the front
wheels to lock them.
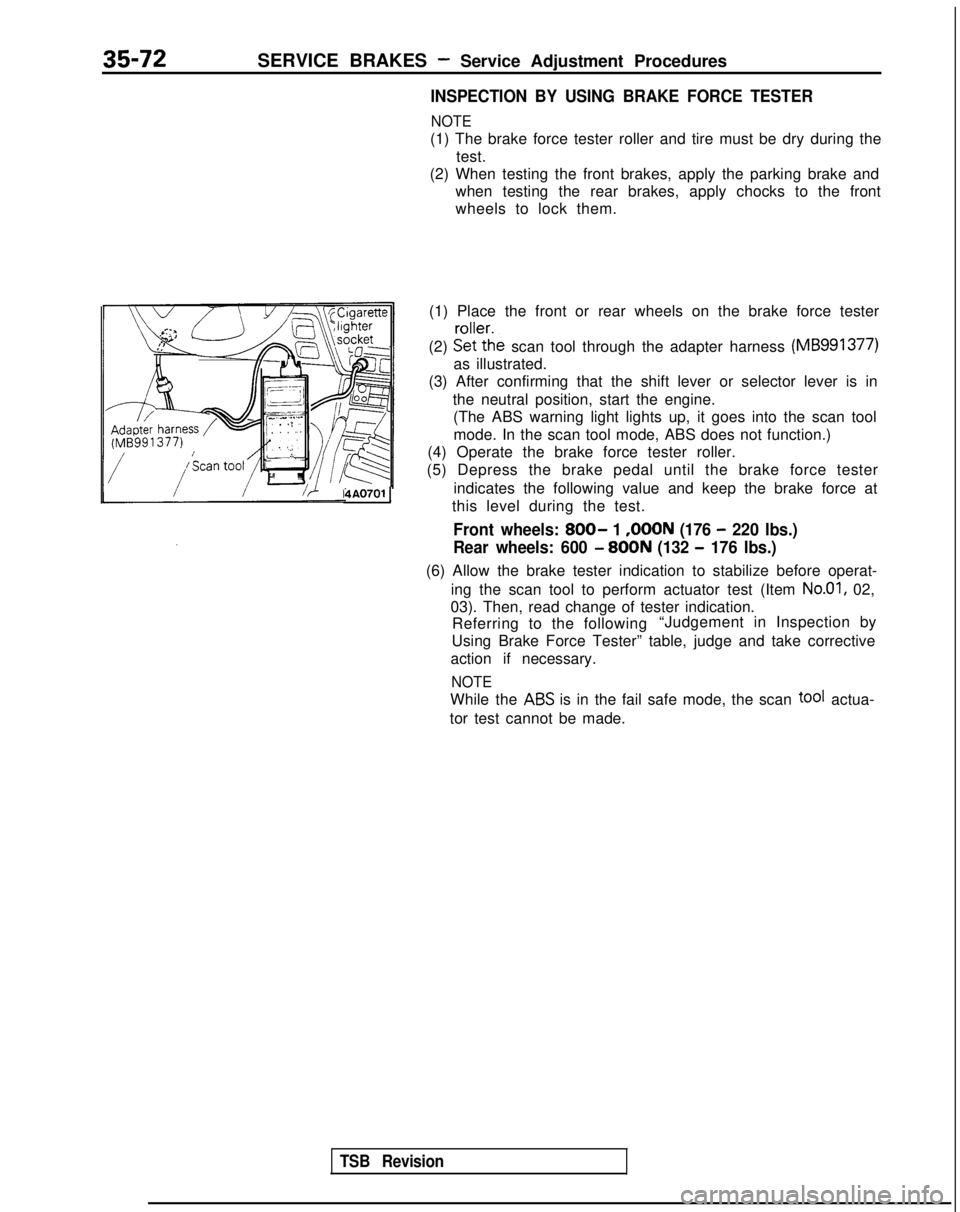
(1) Place the front or rear wheels on the brake force tester
(2) &(%:he
scan tool through the adapter harness (MB991377)
as illustrated.
(3) After confirming that the shift lever or selector lever is in
the neutral position, start the engine.(The ABS warning light lights up, it goes into the scan tool
mode. In the scan tool mode, ABS does not function.)
(4) Operate the brake force tester roller.
(5) Depress the brake pedal until the brake force tester
indicates the following value and keep the brake force at
this level during the test.
Front wheels: 800- 1 ,OOON (176 - 220 Ibs.)
Rear wheels: 600
- 800N (132 - 176 Ibs.)
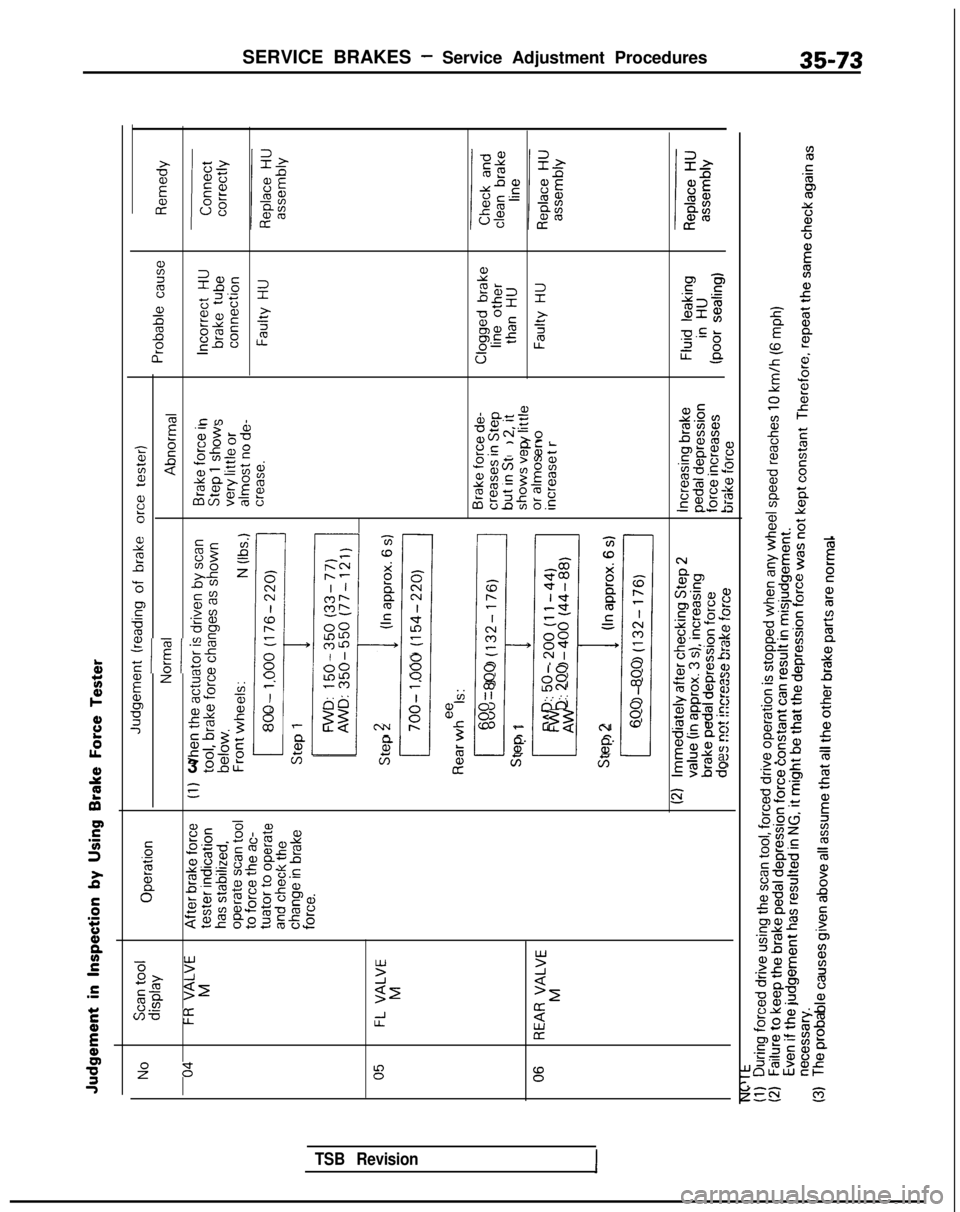
(6) Allow the brake tester indication to stabilize before operat-
ing the scan tool to perform actuator test (Item
No.01, 02,
03). Then, read change of tester indication. Referring to the following “Judgement in Inspection by
Using Brake Force Tester” table, judge and take corrective
action if necessary.
NOTE
While the ABS is in the fail safe mode, the scan tOOf actua-
tor test cannot be made.
TSB Revision
Page 1194 of 1273
SERVICE BRAKES - Service Adjustment Procedures35-73
%
5$252
t; 2 ‘E2Eeiii,zP
D=rs .z&Q3zai?
2alg
r”u5
x8-zc :%a, 56sa)x$CLo- 0Pg&8 u-$I.- IL”3II -0EE
= cm 1d, a+-$5
E‘E&S-0 2’-..c;.= cg
~CJ-Jc“;Ock$gjTi02.E g&Irnh? I
al=cJ)vt;;g%i=,-o@jf$g
22a, - .-Pz;w
%
e=c f/J-zz
2;$ pzsz&CDCD,EiT .hl
$$5b-;: -z2I 1hEErfs G80
c*m-cv8 IbIgh b5.5 a, c
Pamis -ot>v)c)b0‘C a,mg; 5zIx-0 5:$%scs b-’
s-00,brnfiz8%v c cj
;Jbs gP-Jma’- 0r2.3, cI 1m Iv
m *L
;i;a,
N FL!
9f = gJ i
‘;$2E8LC9,aa .L”-m co$a ii .z
x QclcoO(lJa
8~~a, 0ijfi2ijijrzi”tal a-z cs-F.$ zi
-$3 hl g 8 i - 2,2 NfE-z mu’-7tQ)lr-3+acacQ)--0 cE8-CO52Gci&Ie8aam,
39nu$ii3zE=% a
19.56
2
5
0°C5 aJS&Z;;@u- c ma,
5&$i.-
fi;a,s$jman+b
GAL*% KS 02c? cn0.c
8n--C3$@~c”a,-&z;ezpp’a’gj+a-,om,oaS28,0akZ2
5Y2
9=-YdCmCJQ$3$2'50.59co-0 EJLL2
it2
2$gfs
TSB Revision l-
z
5 E
E
92
$8
i!‘L
54
a, .ijrzc .‘a+Yi
,rEs E
ma
c
‘g sg
f# v)$
&g +g
gg gn
BZh2“aa 2,v,‘--0 a
c6,”b.ov+J 5t;;EG 0$25 2
S$ g$8+ tQ
*AZ
xg $2
TiLs5
,u r’-.E”ooc3 2Z’E z8 2.E%=
Z%-B
Egz g
gBE-iii
mE.g;s .1CT,s;G g
:pxz .w Q)9“a$ Ezg.2 aox ;szji,oS&.8,,,-gE.E5jralQ~~aval&%i ES,
ii.G
9
%
:
E”4
E
g ;ii $
E al” ‘.
f 02
3 z0 b- L
Page 1195 of 1273
SERVICE BRAKES- Service Adjustment Procedures
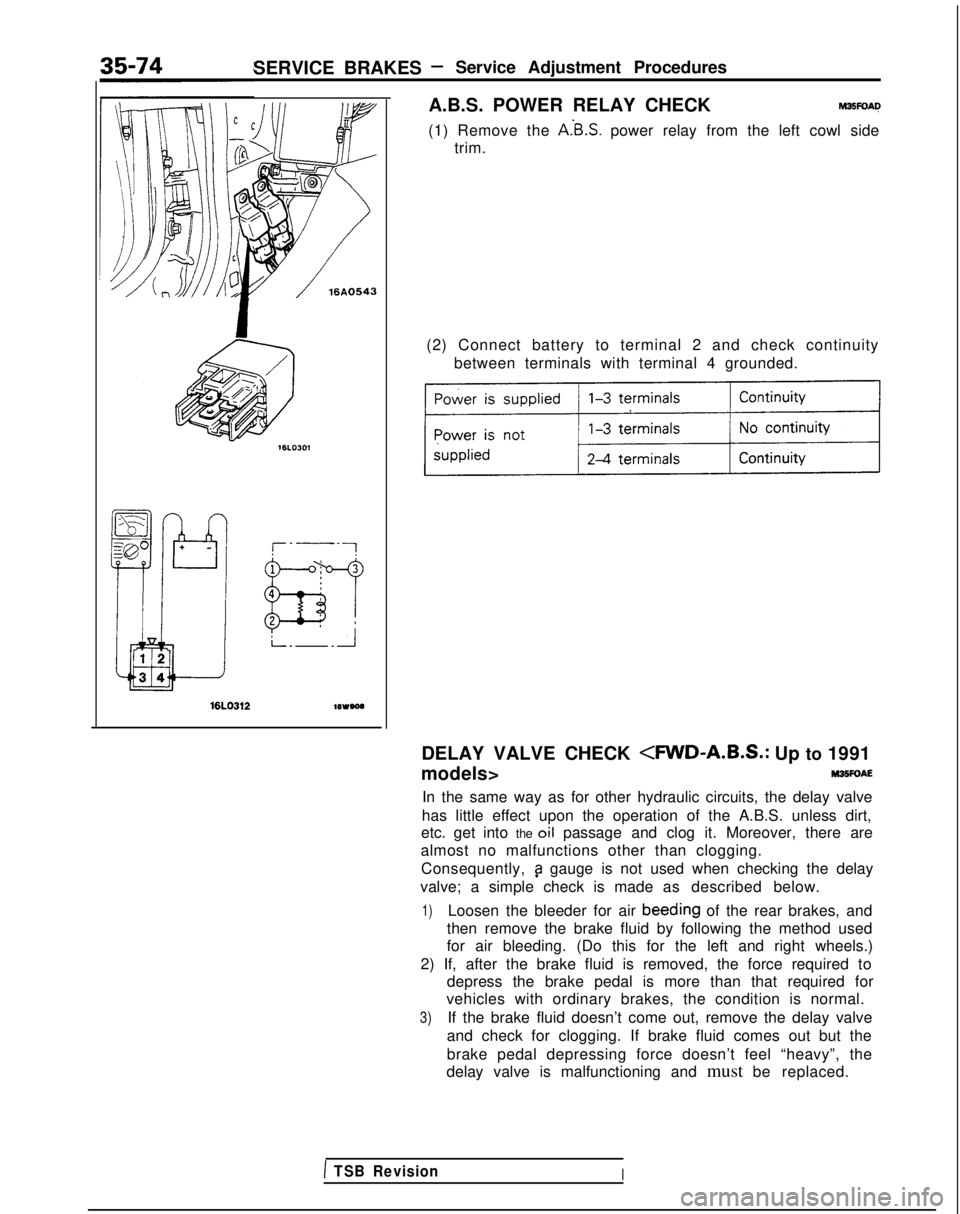
A.B.S. POWER RELAY CHECK
M3EFOAQ
(1) Remove the A.‘B.S. power relay from the left cowl side
trim.
16LO312wveoa
(2) Connect battery to terminal 2 and check continuity
between terminals with terminal 4 grounded.
DELAY VALVE CHECK
M35FOAE
In the same way as for other hydraulic circuits, the delay valve
has little effect upon the operation of the A.B.S. unless dirt,
etc. get into the oil passage and clog it. Moreover, there are
almost no malfunctions other than clogging.
Consequently,
9 gauge is not used when checking the delay
valve; a simple check is made as described below.
1)Loosen the bleeder for air beeding
of the rear brakes, and
then remove the brake fluid by following the method used
for air bleeding. (Do this for the left and right wheels.)
2) If, after the brake fluid is removed, the force required to depress the brake pedal is more than that required for
vehicles with ordinary brakes, the condition is normal.
3)If the brake fluid doesn’t come out, remove the delay valve
and check for clogging. If brake fluid comes out but the
brake pedal depressing force doesn’t feel “heavy”, the
delay valve is malfunctioning and must be replaced.
1 TSB RevisionI
Page 1196 of 1273
SERVICE BRAKES -Service Adjustment Procedures35-75
14AO197
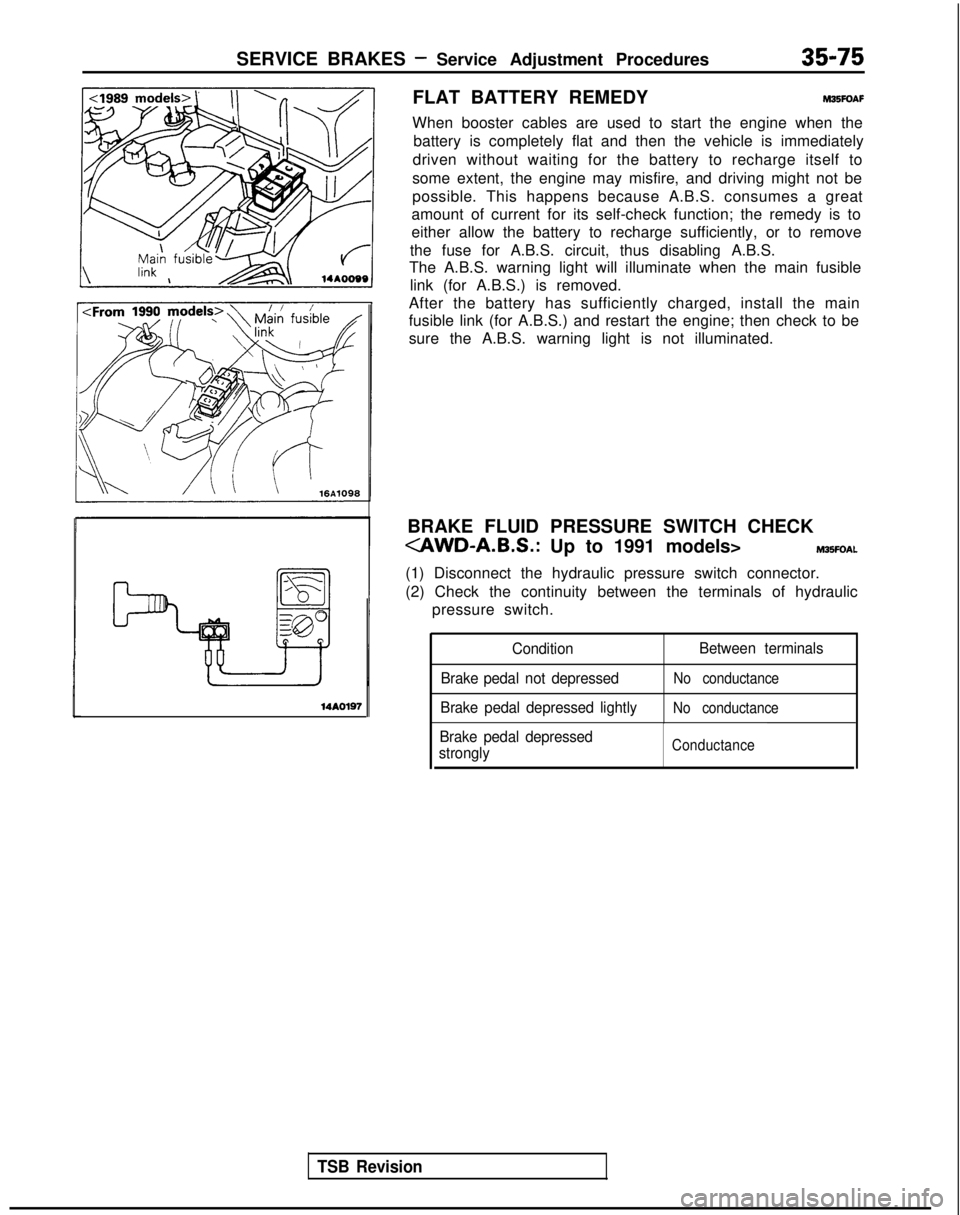
FLAT BATTERY REMEDYM35FOAF
When booster cables are used to start the engine when the
battery is completely flat and then the vehicle is immediately
driven without waiting for the battery to recharge itself to
some extent, the engine may misfire, and driving might not be
possible. This happens because A.B.S. consumes a great
amount of current for its self-check function; the remedy is to
either allow the battery to recharge sufficiently, or to remove
the fuse for A.B.S. circuit, thus disabling A.B.S.
The A.B.S. warning light will illuminate when the main fusible
link (for A.B.S.) is removed.
After the battery has sufficiently charged, install the main
fusible link (for A.B.S.) and restart the engine; then check to be
sure the A.B.S. warning light is not illuminated.
TSB Revision
BRAKE FLUID PRESSURE SWITCH CHECK
(1) Disconnect the hydraulic pressure switch connector.
(2) Check the continuity between the terminals of hydraulic pressure switch.
Condition Between terminals
Brake pedal not depressed
No conductance
Brake pedal depressed lightlyNo conductance
Brake pedal depressed
stronglyConductance
Page 1197 of 1273
35-76SERVICE BRAKES - Brake Pedal
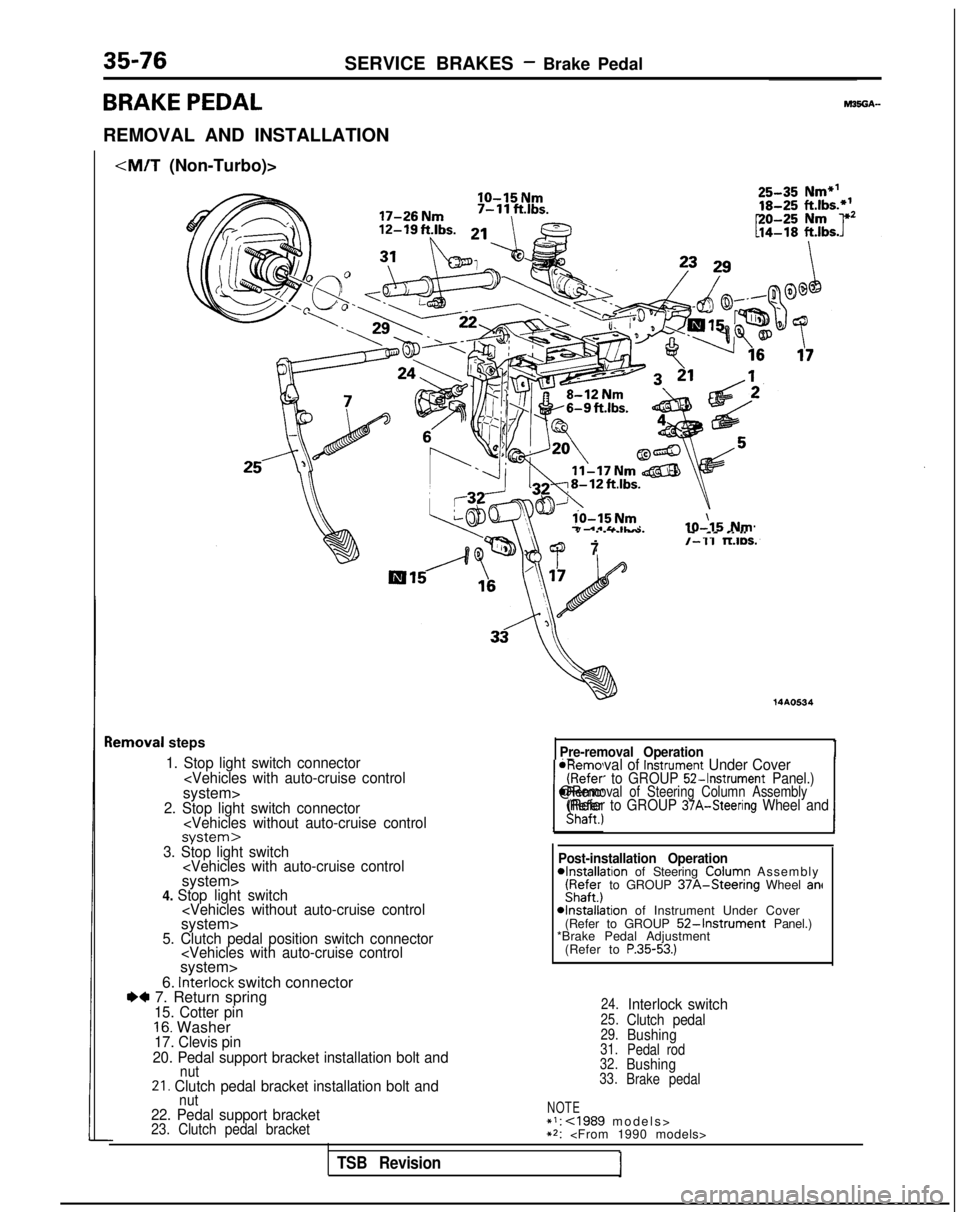
BRAKE PEDAL
REMOVAL AND INSTALLATION
IO-15 Nm
lo-15 Nm7 .*&&IL-IO-\15 Nm
lemoval
steps
1. Stop light switch connector
7/-11 TLIDS.
14AO534
Pre-removal Operation
*Removal of Instrument Under Cover(Refer to GROUP 52-Instrument Panel.)
IShaft., 1
@Removal of Steering Column Assembly(Refer to GROUP 37A-Steering Wheel and
-I---.3. Stop light switch
6. interlock switch connectorI)* 7. Return spring15. Cotter pin16. Washer17. Clevis pin
20. Pedal support bracket installation bolt and
nut21. Clutch pedal bracket installation bolt and Post-installation Operation
4nstallation of Steering ColuFn Assembl
y
iyafe;j to GROUP 37A-Steenng Wheel ant
4nstallation of Instrument Under Cover
(Refer to GROUP 52-Instrument Panel.)
*Brake Pedal Adjustment
(Refer to
P.35-53.)
24.Interlock switch25.Clutch pedal29.Bushing31. Pedal rod
32.Bushing33. Brake pedal
nut22. Pedal support bracketNOTE*I: cl989 models
>
23. Clutch pedal bracket**:
TSB Revision
Page 1198 of 1273
SERVICE BRAKES - Brake Pedal35-77
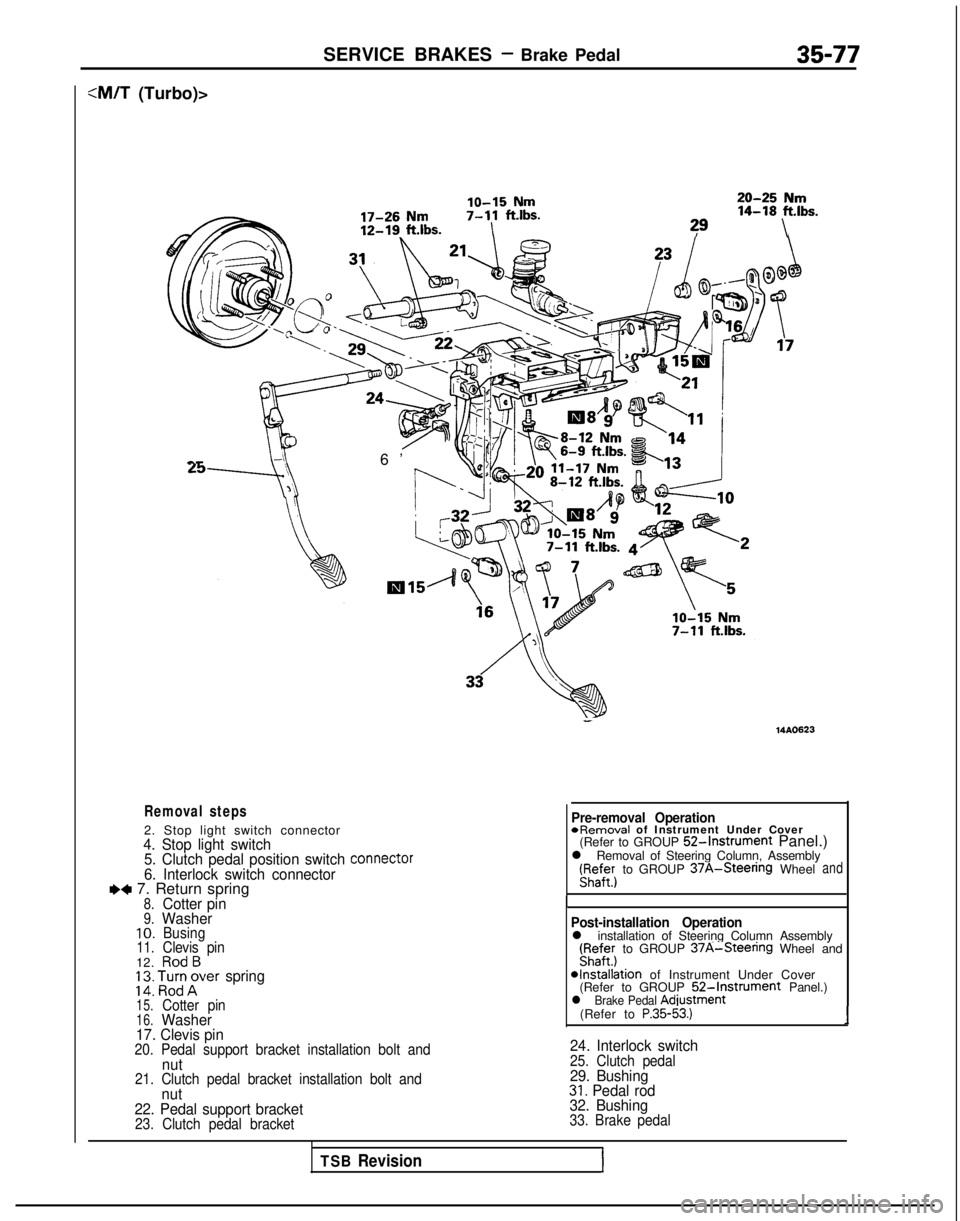
:M/T (Turbo)>
lo-15 Nm20-25 Nm
17-26 Nm7-11
ftlbs. 14-18
ft.lbs.
12-19. ft.lbs.I?9\ a-
6’
Removal steps
2. Stop light switch connector4. Stop light switch
5. Clutch pedal position switch connector
6. Interlock switch connectorI)+ 7. Return spring8.Cotter pin9.Washer10.Busing11.Clevis pin12.RodB; 2: ‘,l%;rer spring
15.Cotter pin16.Washer
17. Clevis pin
20. Pedal support bracket installation bolt andnut21. Clutch pedal bracket installation bolt andnut
22. Pedal support bracket
23. Clutch pedal bracket
- 14AO623
Pre-removal Operation
*Removal
of Instrument Under Cover
(Refer to GROUP
52-Instrument Panel.)
l Removal of Steering Column, Assembly r;affer)
to GROUP
37A-Steenng Wheeland
I
Post-installation Operationl installation of Steering Column Assembly(Fyaffer) to GROUP 37A-Steenng Wheel and
*Installation of Instrument Under Cover
(Refer to GROUP 52-Instrument Panel.)l Brake Pedal Adiustment
(Refer to P.35-53.)1
24. Interlock switch25. Clutch pedal29. Bushing31. Pedal rod
32. Bushing
33. Brake pedal
TSB RevisionI
Page 1199 of 1273
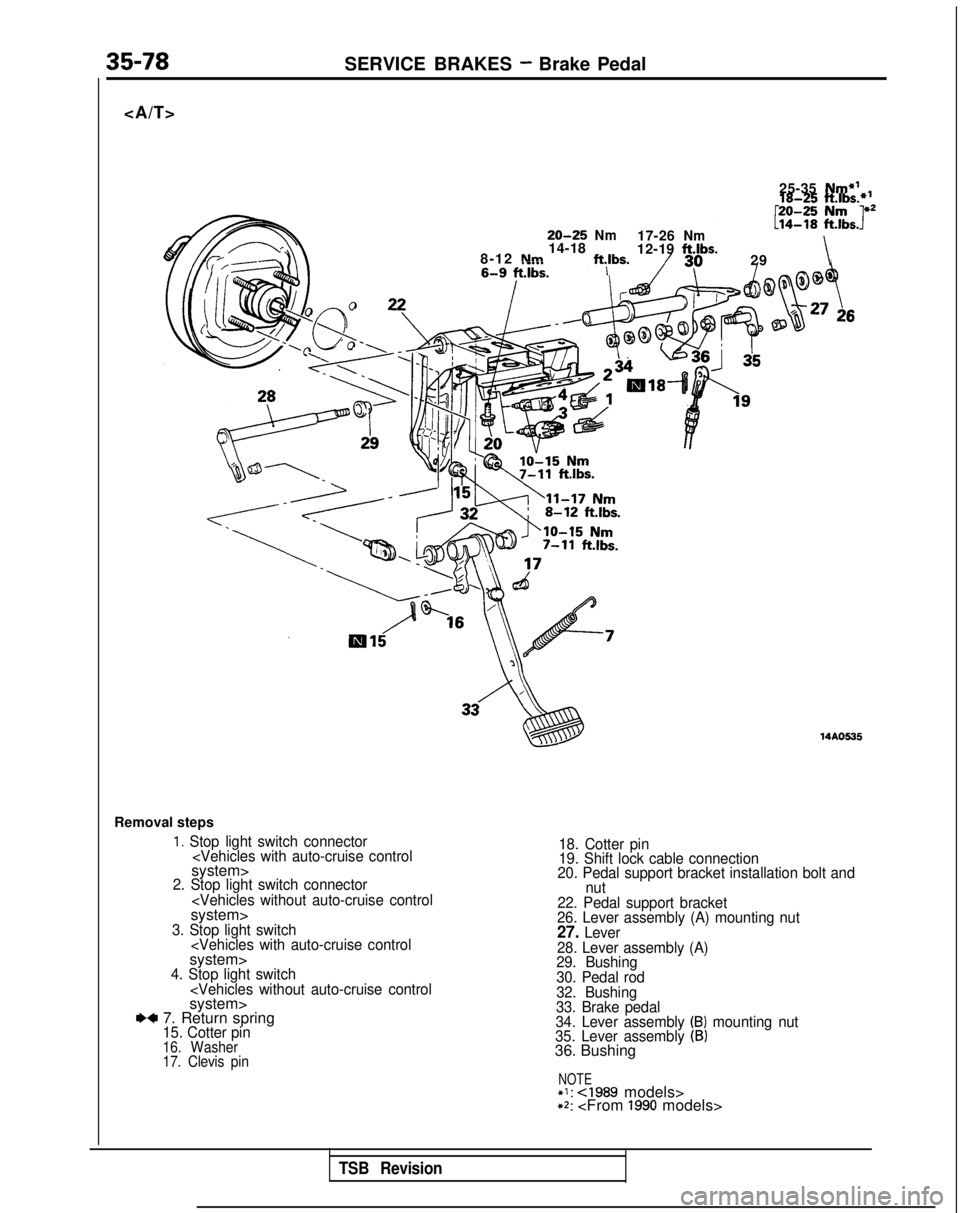
Page 1200 of 1273
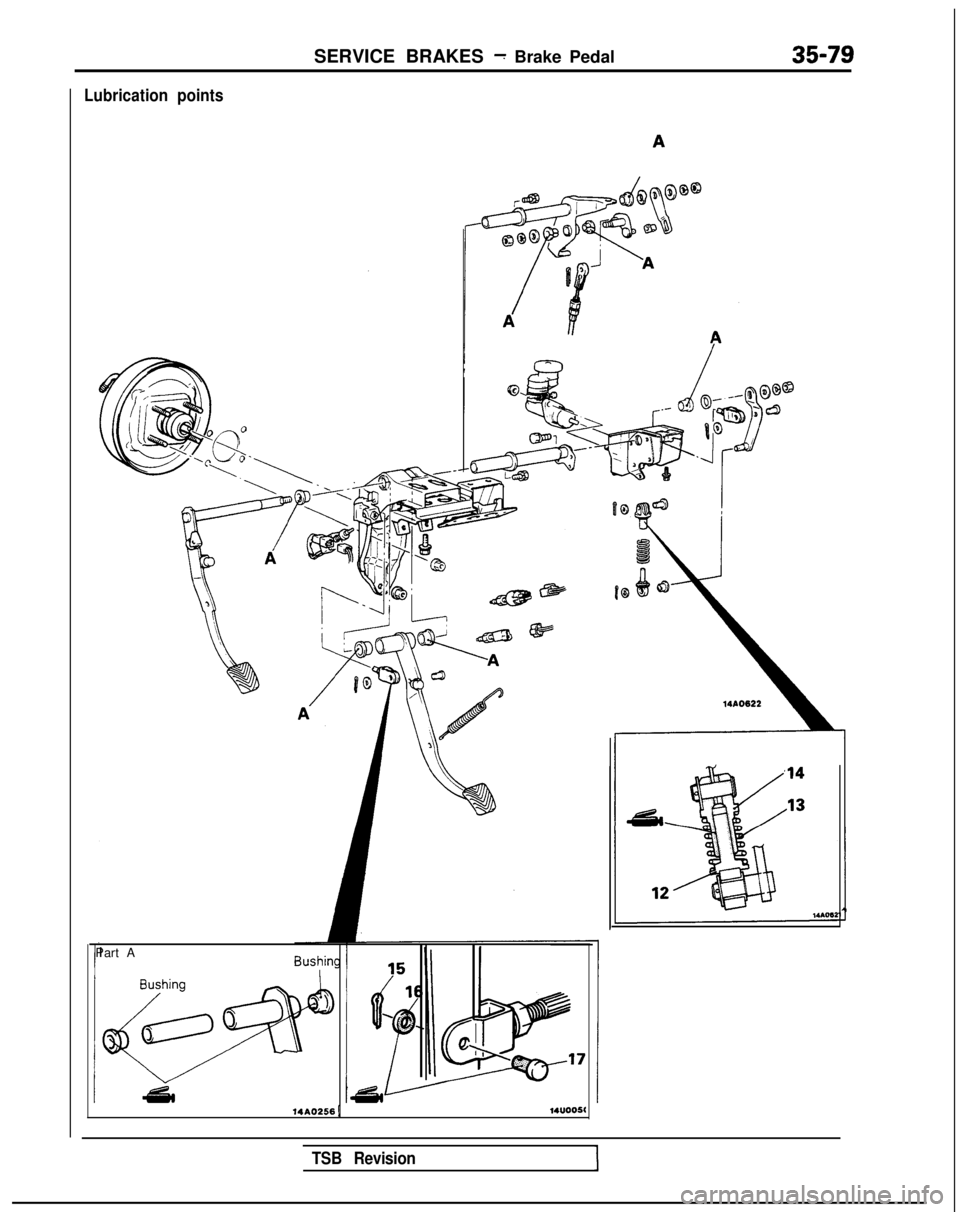
SERVICE BRAKES - Brake Pedal35-79
Lubrication points
Part A
14AO256 114UOO5l
TSB Revision