MITSUBISHI GALANT 1989 Service Repair Manual
Manufacturer: MITSUBISHI, Model Year: 1989, Model line: GALANT, Model: MITSUBISHI GALANT 1989Pages: 1273, PDF Size: 37.62 MB
Page 921 of 1273

NOTES
Page 922 of 1273
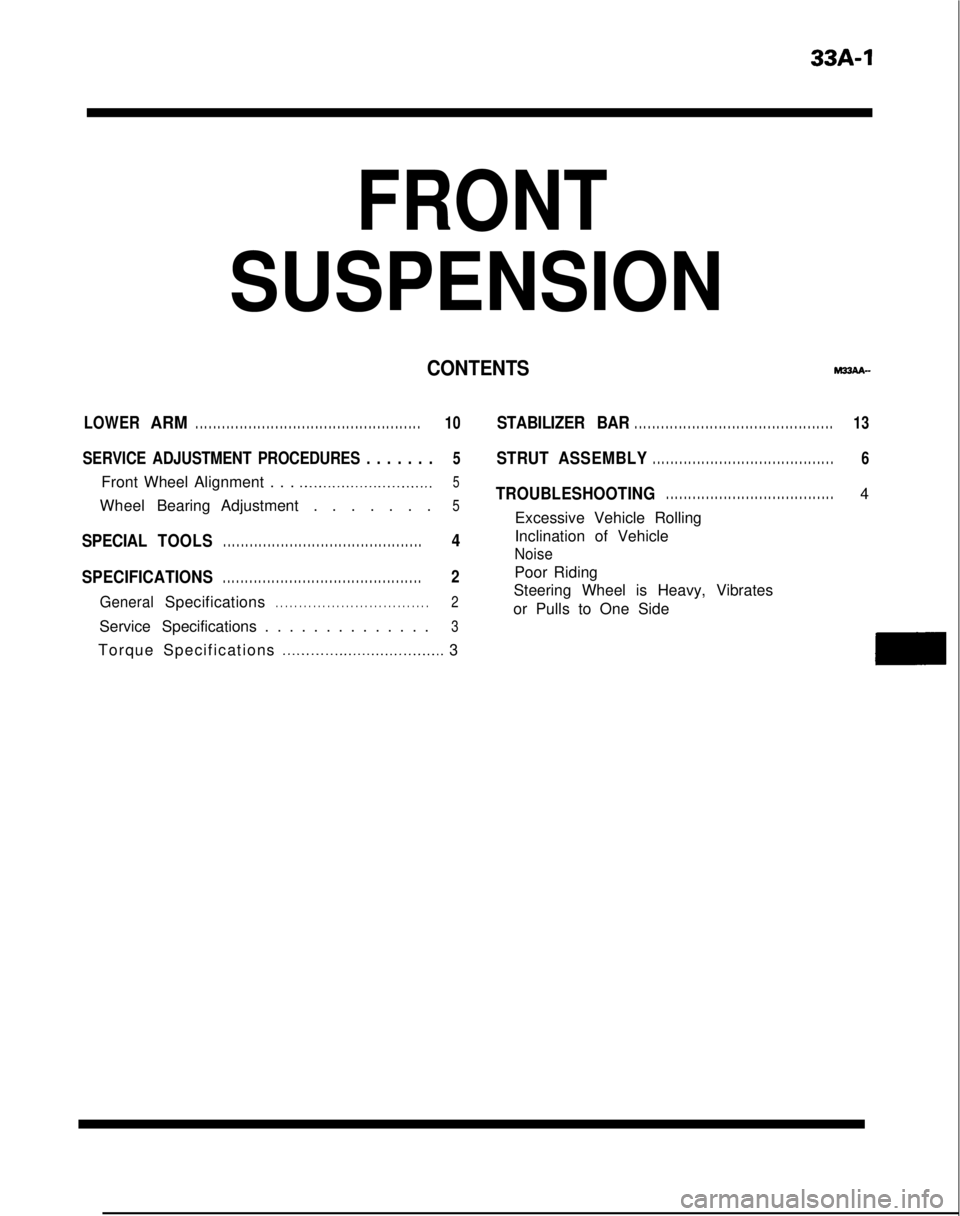
33A-1
FRONT
SUSPENSION
CONTENTSMx(AA-
LOWERARM. . . . . . . . . . . . . . . . . . . . . . . . . . . . . . . . . . . . \
. . . . . . . . . . . . . . .10
SERVICE ADJUSTMENT PROCEDURES . . . . . . .5
Front Wheel Alignment . . . .._..__._...______..__.......5
WheelBearing Adjustment . . . . . . .5
SPECIAL TOOLS. . . . . . . . . . . . . . . . . . . . . . . . . . . . . . . . . . . . \
. . . . . . . . .4
SPECIFICATIONS
. . . . . . . . . . . . . . . . . . . . . . . . . . . . . . . . . . . . \
. . . . . . . . .2
GeneralSpecifications2. . . . . . . . . . . . . . . . . . . . . . . . . . . . . . . . .
Service Specifications . . . . . . . . . . . . . .3
Torque Specifications .._...._.__.....___..............,. 3
STABILIZER BAR. . . . . . . . . . . . . . . . . . . . . . . . . . . . . . . . . . . . \
. . . . . . . . .13
STRUT ASSEMBLY. . . . . . . . . . . . . . . . . . . . . . . . . . . . . . . . . . . . \
. . . . .6
4TROUBLESHOOTING. . . . . . . . . . . . . . . . . . . . . . . . . . . . . . . . . . . . \
. .
Excessive Vehicle Rolling
Inclination of Vehicle
Noise
Poor Riding
Steering Wheel is Heavy, Vibrates
or Pulls to One Side
Page 923 of 1273
33A-2FRONT SUSPENSION - Specifications
SPECIFICATIONS
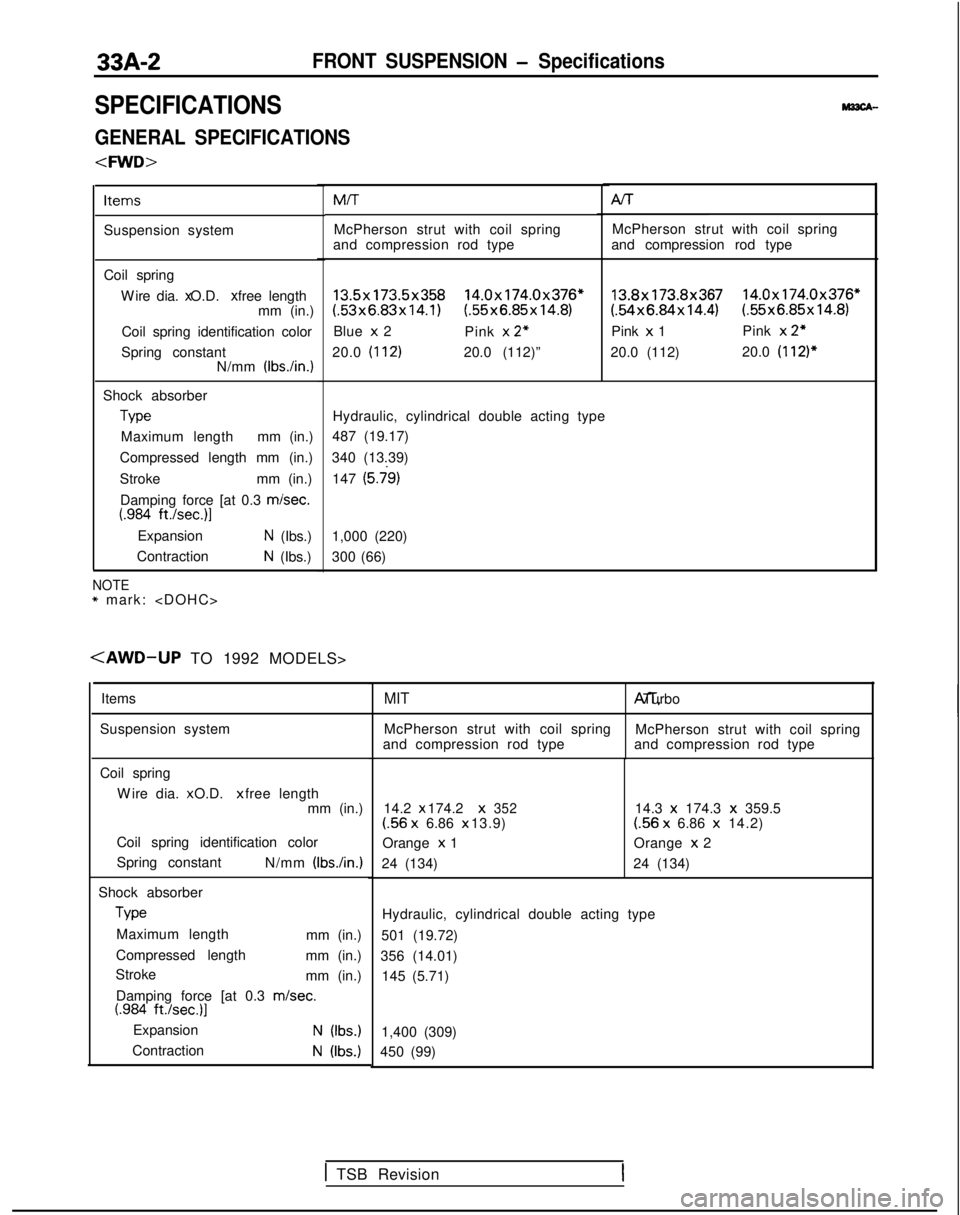
GENERAL SPECIFICATIONS
Items
Suspension system
Coil springW
ire dia. x O.D. x free length
mm (in.)
Coil spring identification color
Spring constant N/mm (IbsAn.)
Shock absorber Type
Maximum length mm (in.)
Compressed length mm (in.)
Stroke mm (in.)
Damping force [at 0.3 misec.
t.984 ft./sec.)l
ExpansionN (Ibs.)
Contraction
N (Ibs.) MIT Al-r
McPherson strut with coil spring McPherson strut with coil spring
and compression rod type and compression rod type
13.5x173.5x358 14.0x174.0x376*(.53x6.83x14.1) (55x6.85x14.8)
Blue x 2
Pink x
2”
20.0 (112)20.0 (112)”
13.8x173.8x367 14.0x174.0x376*(54x6.84x14.4) (.55x6.85x14.8)
Pink x 1 Pink x
2”
20.0 (112) 20.0 (112)*
Hydraulic, cylindrical double acting type
487 (19.17)
340 (13.39) 147
(5.j9)
1,000 (220)
300 (66)
NOTE* mark:
Items
Suspension system
Coil spring W
ire dia. x O.D. x free length
mm (in.)
Coil spring identification color
Spring constant N/mm
(Ibs./in.)
Shock absorberType
Maximum length mm (in.)
Compressed length mm (in.)
Stroke mm (in.)
Damping force [at 0.3
m/set.t.984 ft./set.)]
ExpansionN (Ibs.)
ContractionN (Ibs.)
MIT A/T, Turbo
McPherson strut with coil spring McPherson strut with coil spring
and compression rod type and compression rod type
14.2 x 174.2 x
352(56
x
6.86 x 13.9)
Orange x
1
24 (134) 14.3 x
174.3 x
359.5(56 x
6.86 x
14.2)
Orange x
2
24 (134)
Hydraulic, cylindrical double acting type
501 (19.72)
356 (14.01) 145 (5.71)
1,400 (309)
450 (99)
1 TSB Revision
Page 924 of 1273
FRONT SUSPENSION - Specifications33A-3
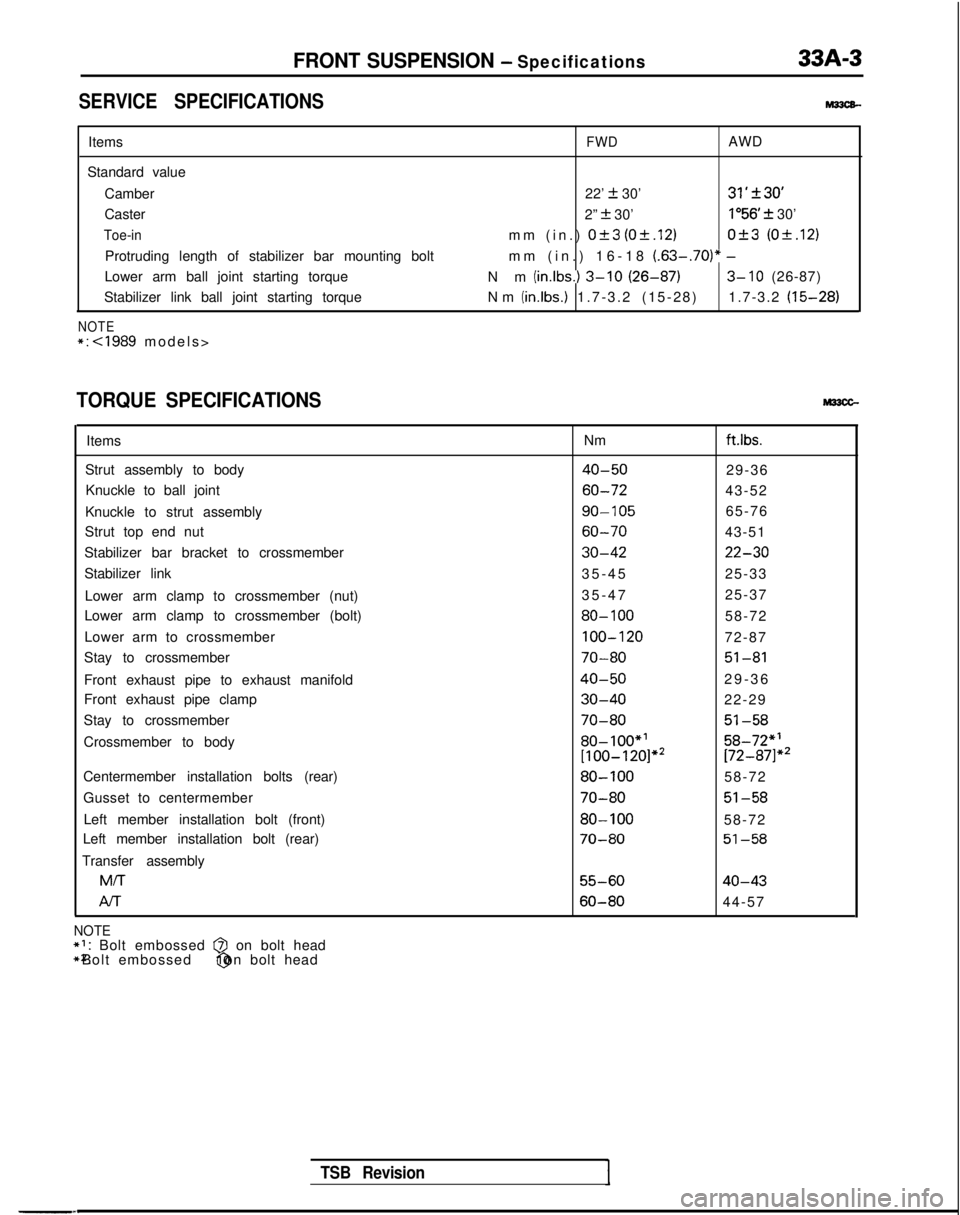
SERVICE SPECIFICATIONSM33cB-
Items
Standard value Camber
Caster
Toe-in
Protruding length of stabilizer bar mounting bolt
Lower arm ball joint starting torque
Stabilizer link ball joint starting torque
NOTE*:
FWDAWD
22’
k 30’31’f30’
2” + 30’lo56 f 30’
mm (in.)
Ok3 (Of.12)0+3 (0+.12)
mm (in.) 16-18 (.63-.70)* -
Nm (in.lbs.1 3-10 (26-87)3- 10 (26-87)
Nm (in.lbs.)
1.7-3.2 (15-28) 1.7-3.2
(15-28)
TORQUE SPECIFICATIONS
Items
Strut assembly to body Knuckle to ball joint
Knuckle to strut assembly
Strut top end nut
Stabilizer bar bracket to crossmember
Stabilizer link
Lower arm clamp to crossmember (nut)
Lower arm clamp to crossmember (bolt)
Lower arm to crossmember
Stay to crossmember
Front exhaust pipe to exhaust manifold
Front exhaust pipe clamp
Stay to crossmember
Crossmember to body
Centermember installation bolts (rear)
Gusset to centermember Left member installation bolt (front)
Left member installation bolt (rear)
Transfer assembly M/T
Al-r Nmft.lbs.
40-5029-36
60-7243-52
go-10565-76
60-7043-51
30-4222-30
35-4
5
25-33
35-47 25-37
80- 10058-72
100-12072-87
70-8051-81
40-5029-3
6
30-4022-29
70-8051-58
80-loo*’58-72”’[100-120]*2[72-871”’
80-10058-72
70-8051-58
80-10058-72
70-8051-58
55-6040-43
60-8044-57
TSB Revision
NOTE*I: Bolt embossed @I on bolt head
*2: Bolt embossed @ on bolt head
Page 925 of 1273
33A-4FRONT SUSPENSION -Special Tools/Troubleshooting
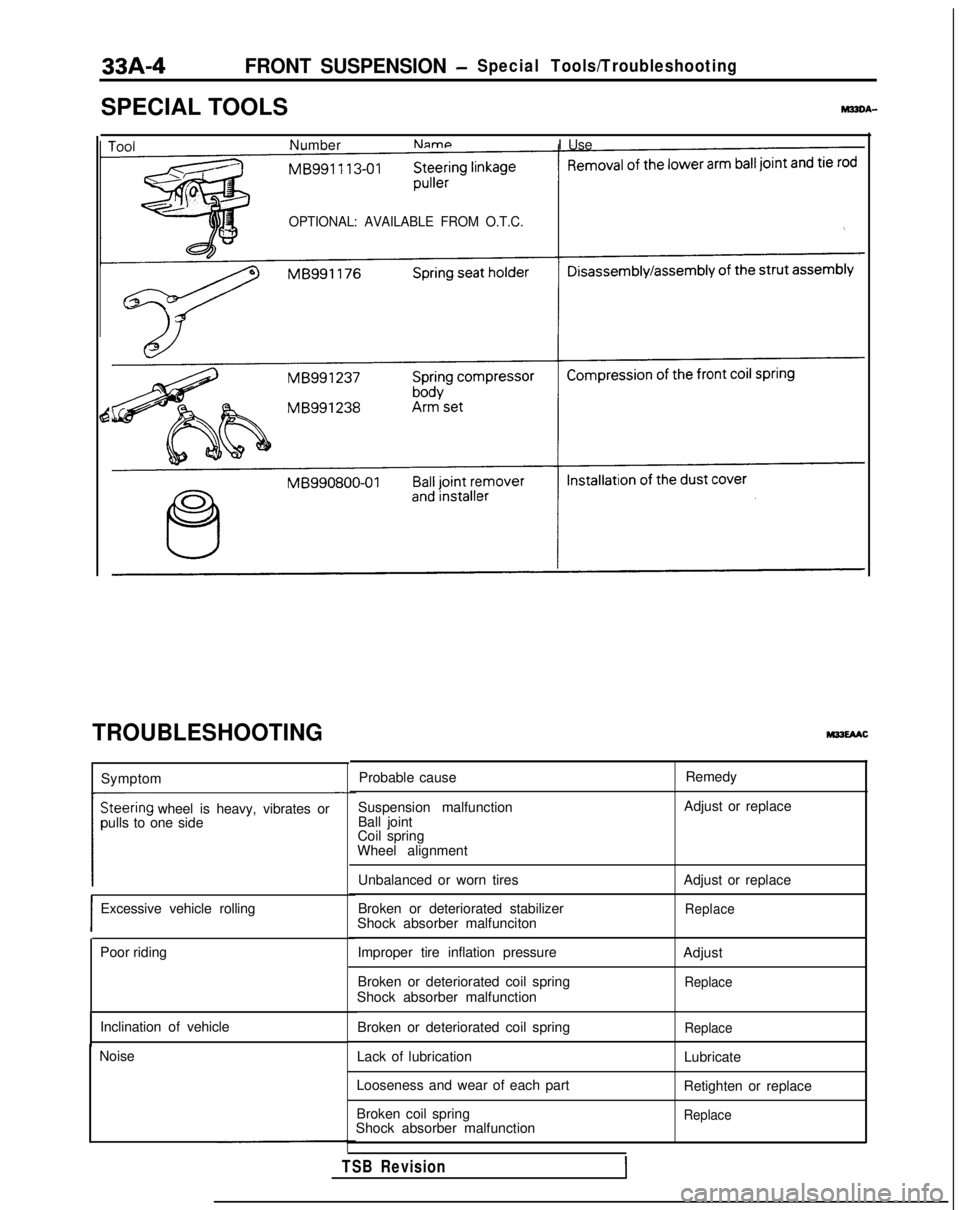
SPECIAL TOOLS
Number
NameI Use
OPTIONAL: AVAILABLE FROM O.T.C.
6
TROUBLESHOOTING
Symptom-
wheel is heavy, vibrates or
pulls to one side
-
I
Excessive vehicle rolling
Poor riding
Inclination of vehicle
Noise Probable cause
Suspension malfunction
Ball joint
Coil spring
Wheel alignment
Unbalanced or worn tires
Broken or deteriorated stabilizer
Shock absorber malfunciton Remedy
Adjust or replace
Adjust or replaceReplace
Improper tire inflation pressure
Broken or deteriorated coil spring
Shock absorber malfunction Adjust
Replace
Broken or deteriorated coil spring
Lack of lubrication
Looseness and wear of each part
Broken coil spring
Shock absorber malfunctionReplace
Lubricate
Retighten or replace
Replace
TSB Revision
Page 926 of 1273
FRONT SUSPENSION - Service Adiustment Procedures33A-5
eI
-a,
-
\ ~,I 1, 1
FY
TSB Revision
SERVICE ADJUSTMENT PROCEDURES
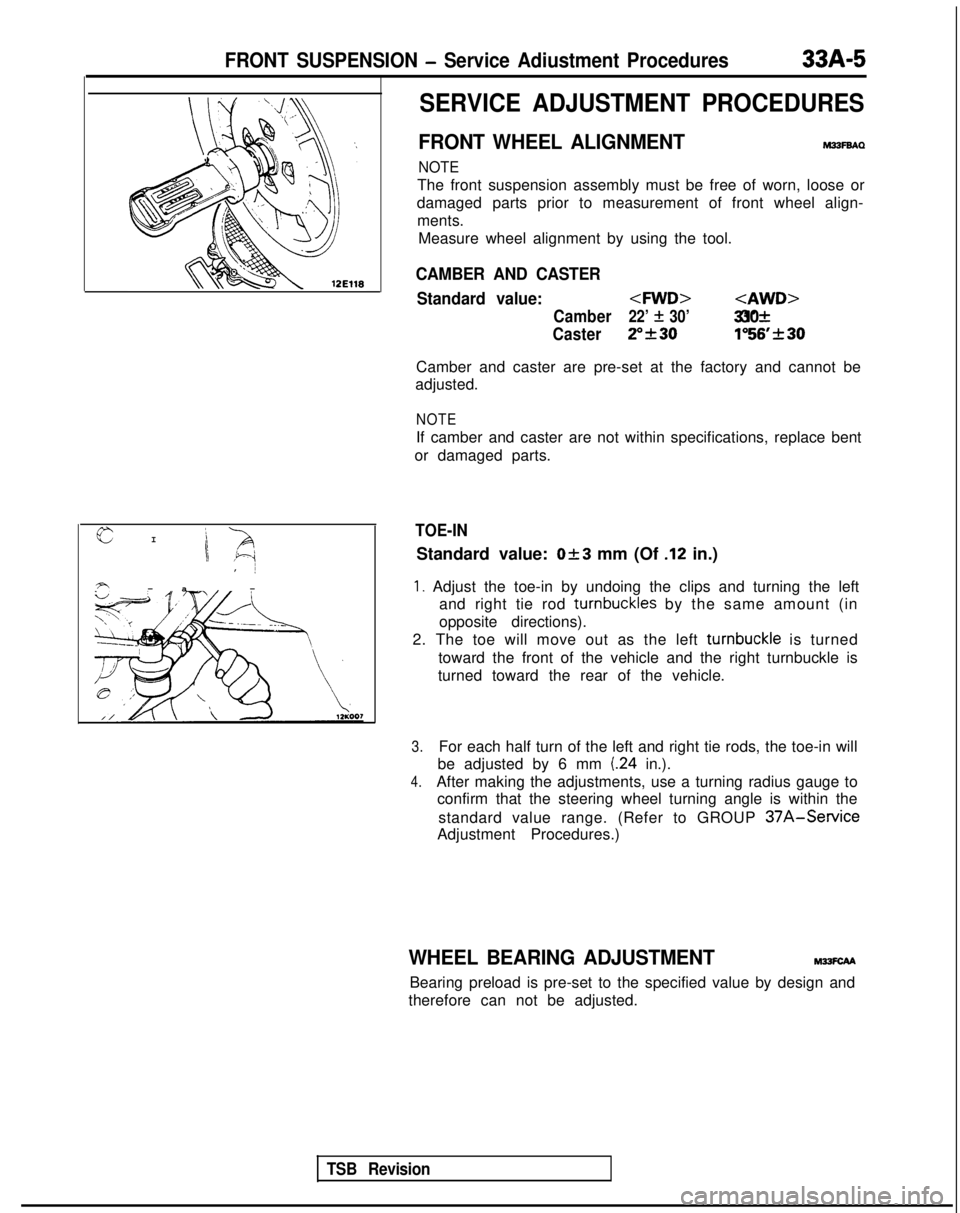
FRONT WHEEL ALIGNMENTM33FBAQ
NOTE
The front suspension assembly must be free of worn, loose or
damaged parts prior to measurement of front wheel align- ments. Measure wheel alignment by using the tool.
CAMBER AND CASTER
Standard value:
Camber22’ f 30’ 31’& 30
Caster2”f301”56’rtr30
Camber and caster are pre-set at the factory and cannot be
adjusted.
NOTE
If camber and caster are not within specifications, replace bent
or damaged parts.
TOE-IN
Standard value: Ok3 mm (Of .12 in.)
1. Adjust the toe-in by undoing the clips and turning the left and right tie rod turnbuckles
by the same amount (in
opposite directions).
2. The toe will move out as the left turnbuckle
is turned
toward the front of the vehicle and the right turnbuckle is
turned toward the rear of the vehicle.
3.For each half turn of the left and right tie rods, the toe-in will
be adjusted by 6 mm
(24 in.).
4.After making the adjustments, use a turning radius gauge to confirm that the steering wheel turning angle is within the
standard value range. (Refer to GROUP
37A-Service
Adjustment Procedures.)
WHEEL BEARING ADJUSTMENTM?SCAA
Bearing preload is pre-set to the specified value by design and
therefore can not be adjusted.
Page 927 of 1273
33A-6FRONT SUSPENSION - Strut Assembly
STRUT ASSEMBLY
REMOVAL AND INSTALLATION-
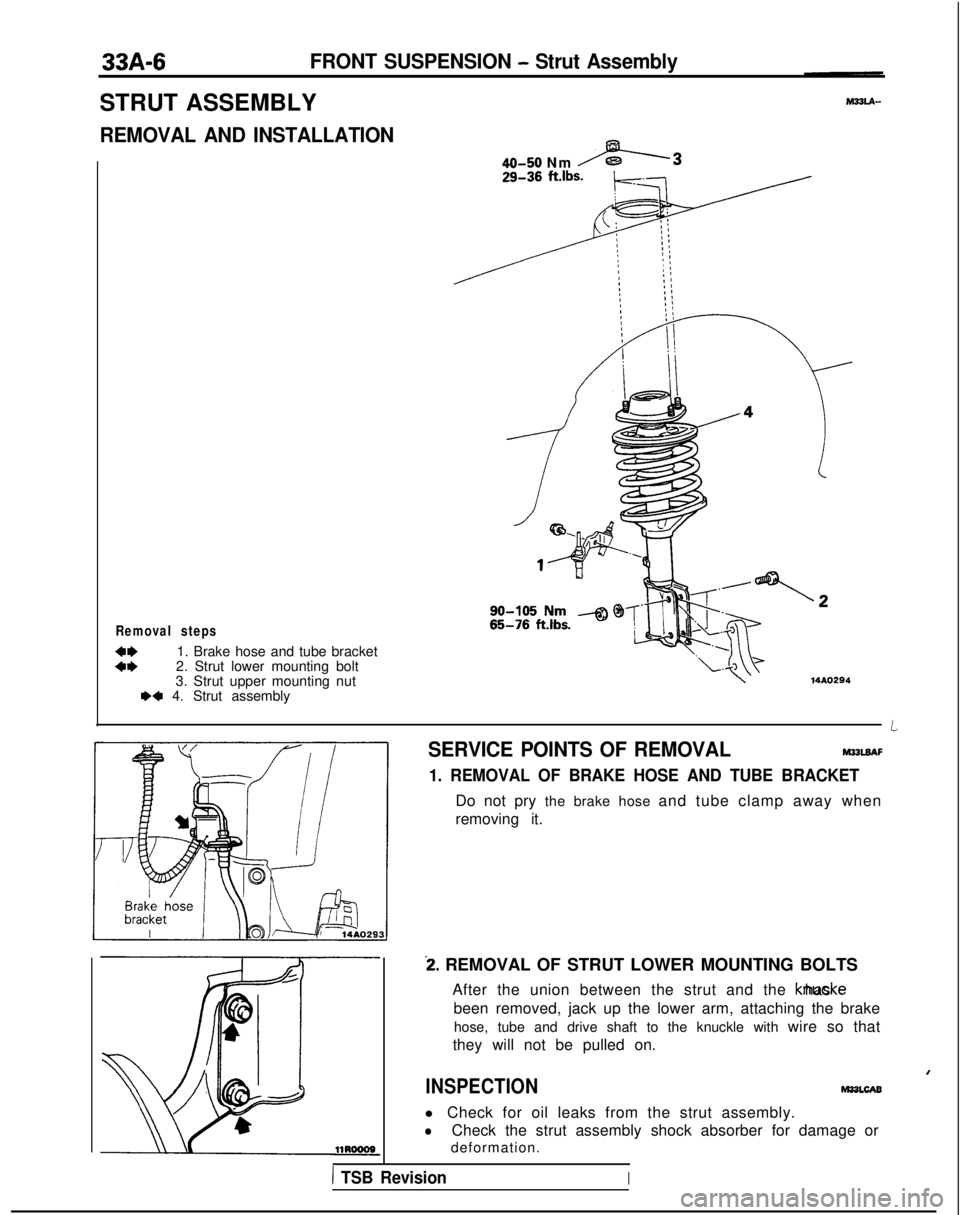
Removal steps
::1. Brake hose and tube bracket
2. Strut lower mounting bolt
3. Strut upper mounting nut
WI 4. Strut assembly
40-50 Nm -3
14AO294
SERVICE POINTS OF REMOVALM32UAF
1. REMOVAL OF BRAKE HOSE AND TUBE BRACKET
Do not pry the brake hose and tube clamp away when
removing it.
i. REMOVAL OF STRUT LOWER MOUNTING BOLTS
After the union between the strut and the knucke has
been removed, jack up the lower arm, attaching the brake hose, tube and drive shaft to the knuckle with wire so that
they will not be pulled on.
I
INSPECTIONMasLcAB
l Check for oil leaks from the strut assembly.
lCheck the strut assembly shock absorber for damage or
deformation.
1 TSB RevisionI
Page 928 of 1273
FRONT SUSPENSION - Strut Assembly33A-7
/Strut
insulator
Front 12A0003SERVICE POINTS OF INSTALLATIONM33lDAG
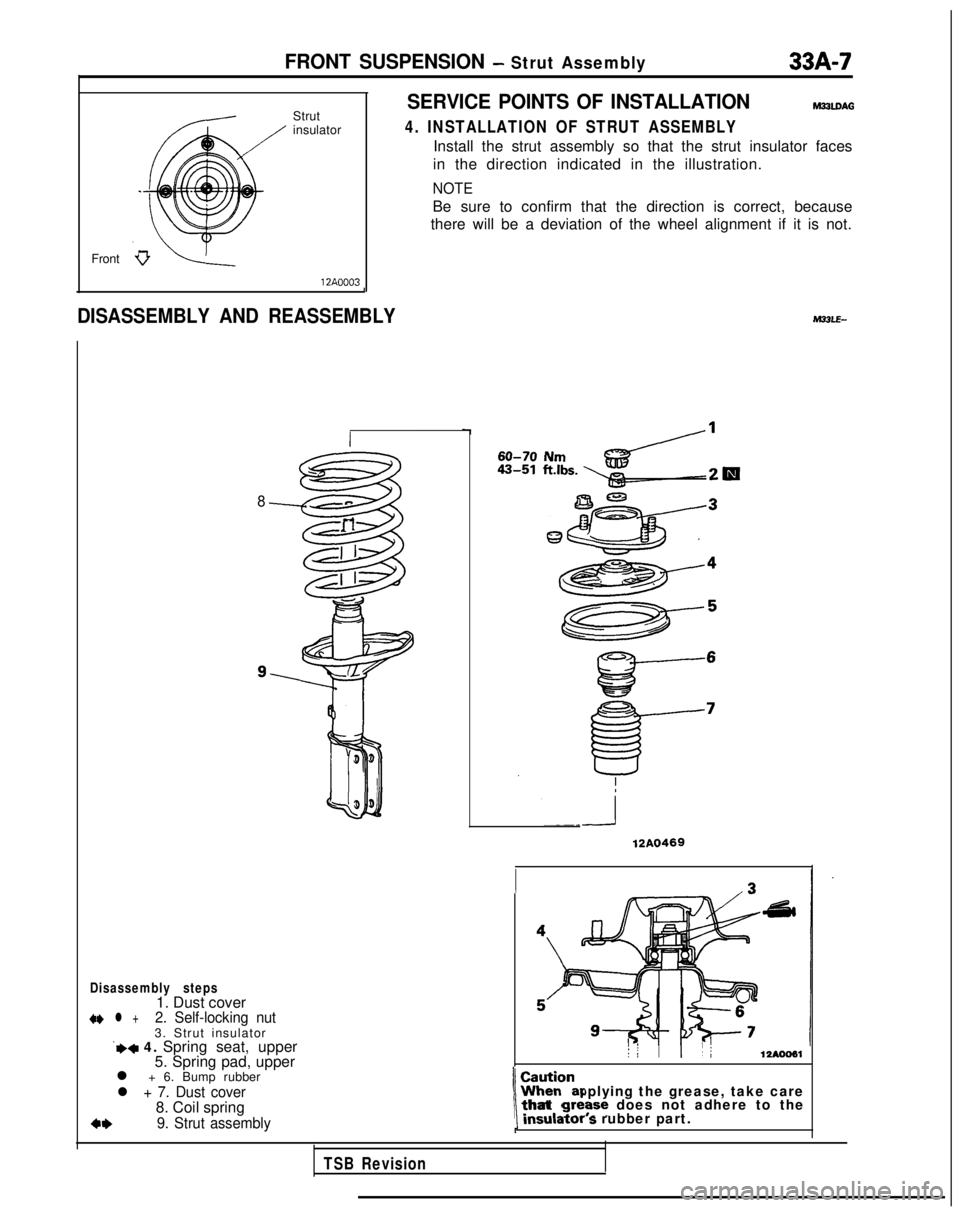
4. INSTALLATION OF STRUT ASSEMBLY
Install the strut assembly so that the strut insulator faces
in the direction indicated in the illustration.
NOTE
Be sure to confirm that the direction is correct, because
there will be a deviation of the wheel alignment if it is not.
J
DISASSEMBLY AND REASSEMBLY
8
Disassembly steps1. Dust cover+I) l +2. Self-locking nut3. Strut insulator‘+* 4. Spring seat, upper
5. Spring pad, upper
l + 6. Bump rubber
l + 7. Dust cover8. Coil spring
+*9. Strut assembly
60-70 Nm
12A0469
: :: II12AOO61
When applying the grease, take care
1 ~~~~~~r s rubber part.\that gre?se does not adhere to the
TSB Revision
Page 929 of 1273
FRONT SUSPENSION - Strut Assembly
12AO31912L0254
Strut insulator bearing
1 ZAOOBO
7
SERVICE POINTS OF DISASSEMBLYhl33LFAl
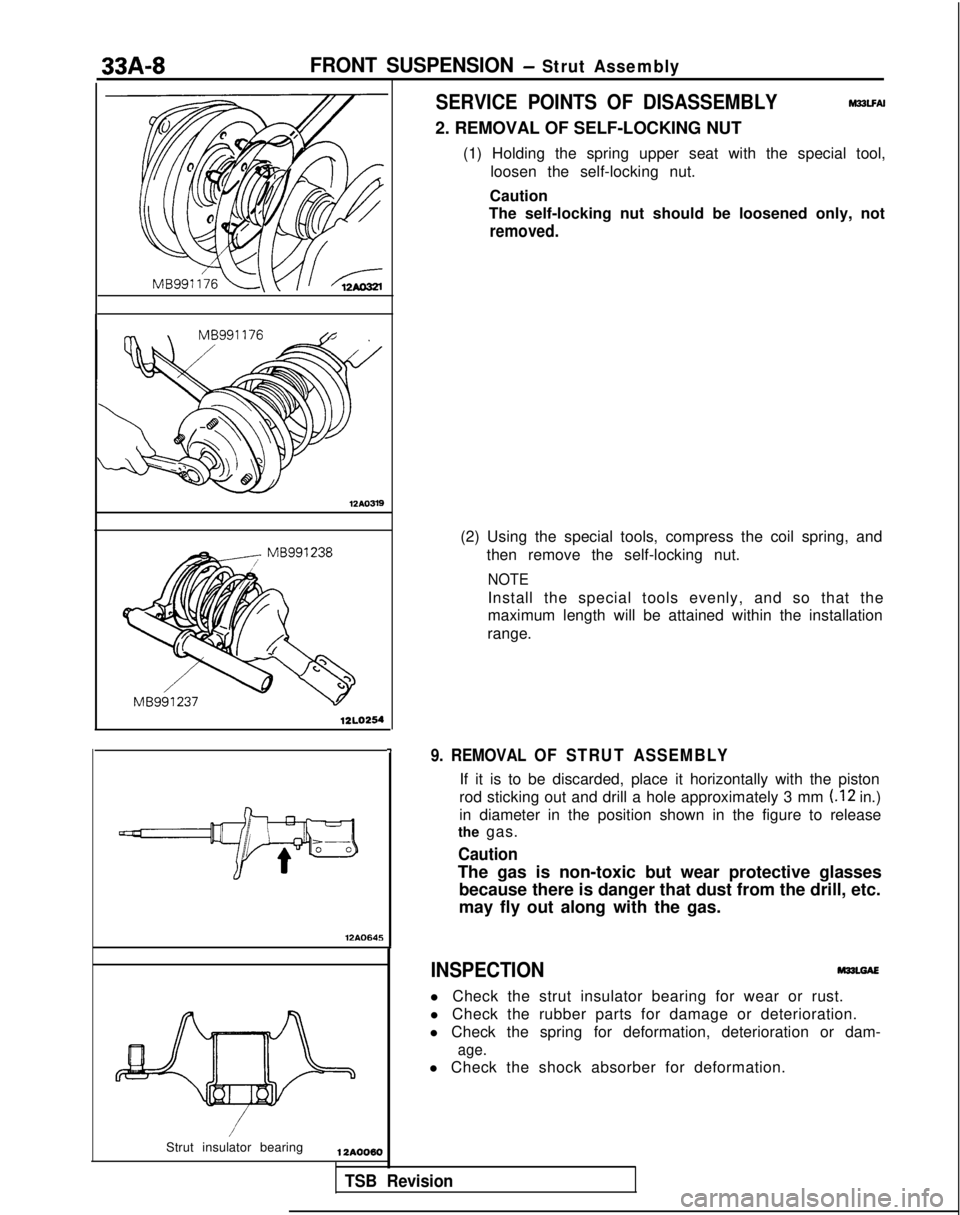
2. REMOVAL OF SELF-LOCKING NUT (1) Holding the spring upper seat with the special tool,loosen the self-locking nut.
Caution
The self-locking nut should be loosened only, not
removed.
(2) Using the special tools, compress the coil spring, and
then remove the self-locking nut.
NOTE
Install the special tools evenly, and so that the
maximum length will be attained within the installation
range.
9. REMOVAL OF STRUT ASSEMBLY
If it is to be discarded, place it horizontally with the piston
rod sticking out and drill a hole approximately 3 mm
(.12 in.)
in diameter in the position shown in the figure to release
the gas.
Caution
The gas is non-toxic but wear protective glasses
because there is danger that dust from the drill, etc.
may fly out along with the gas.
INSPECTIONM33LGAE
l Check the strut insulator bearing for wear or rust.
l Check the rubber parts for damage or deterioration.
l Check the spring for deformation, deterioration or dam-
age.
l Check the shock absorber for deformation.
TSB Revision
Page 930 of 1273
FRONT SUSPENSION - Strut Assembly33A-9
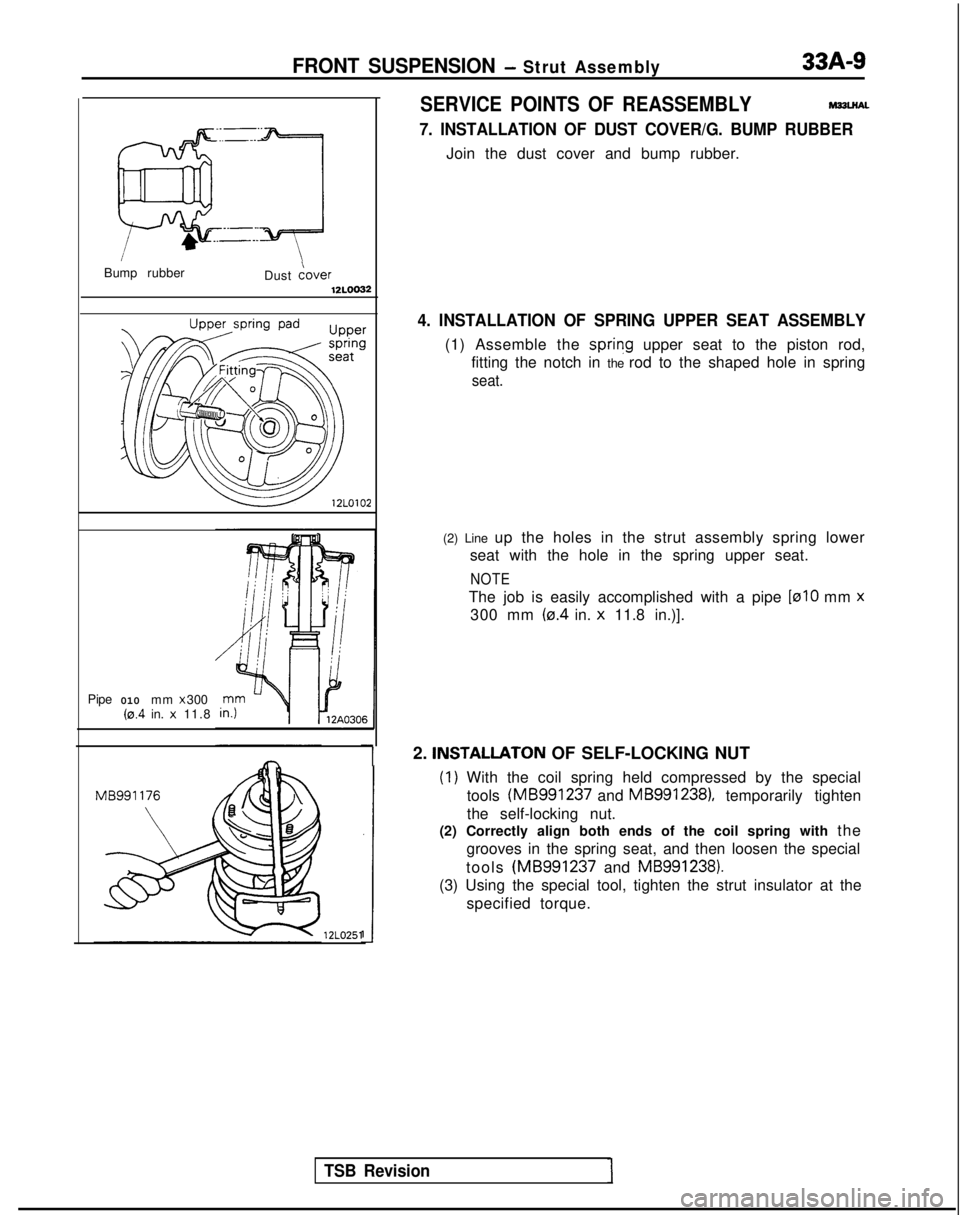
Bump rubberDust iover12LOo22
Pipe010 mm x 300(0.4 in. x 11.8
TSB Revision
12L0251
SERVICE POINTS OF REASSEMBLYM33u?AL
7. INSTALLATION OF DUST COVER/G. BUMP RUBBER
Join the dust cover and bump rubber.
4. INSTALLATION OF SPRING UPPER SEAT ASSEMBLY
(1) Assemble the sprivg upper seat to the piston rod,
fitting the notch in the rod to the shaped hole in spring
seat.
(2) Line up the holes in the strut assembly spring lower seat with the hole in the spring upper seat.
NOTE
The job is easily accomplished with a pipe [alO
mm x
300 mm
(0.4 in. x 11.8 in.)].
I2. INSTALLATON OF SELF-LOCKING NUT
(1) With the coil spring held compressed by the special
tools (MB991237
and
MB991238), temporarily tighten
the self-locking nut.
(2) Correctly align both ends of the coil spring with the
grooves in the spring seat, and then loosen the special
tools (MB991237
and
MB991238).
(3) Using the special tool, tighten the strut insulator at the
specified torque.