relay MITSUBISHI LANCER 2005 Owner's Manual
[x] Cancel search | Manufacturer: MITSUBISHI, Model Year: 2005, Model line: LANCER, Model: MITSUBISHI LANCER 2005Pages: 788, PDF Size: 45.98 MB
Page 375 of 788
DOOR MIRROR
EXTERIOR51-37
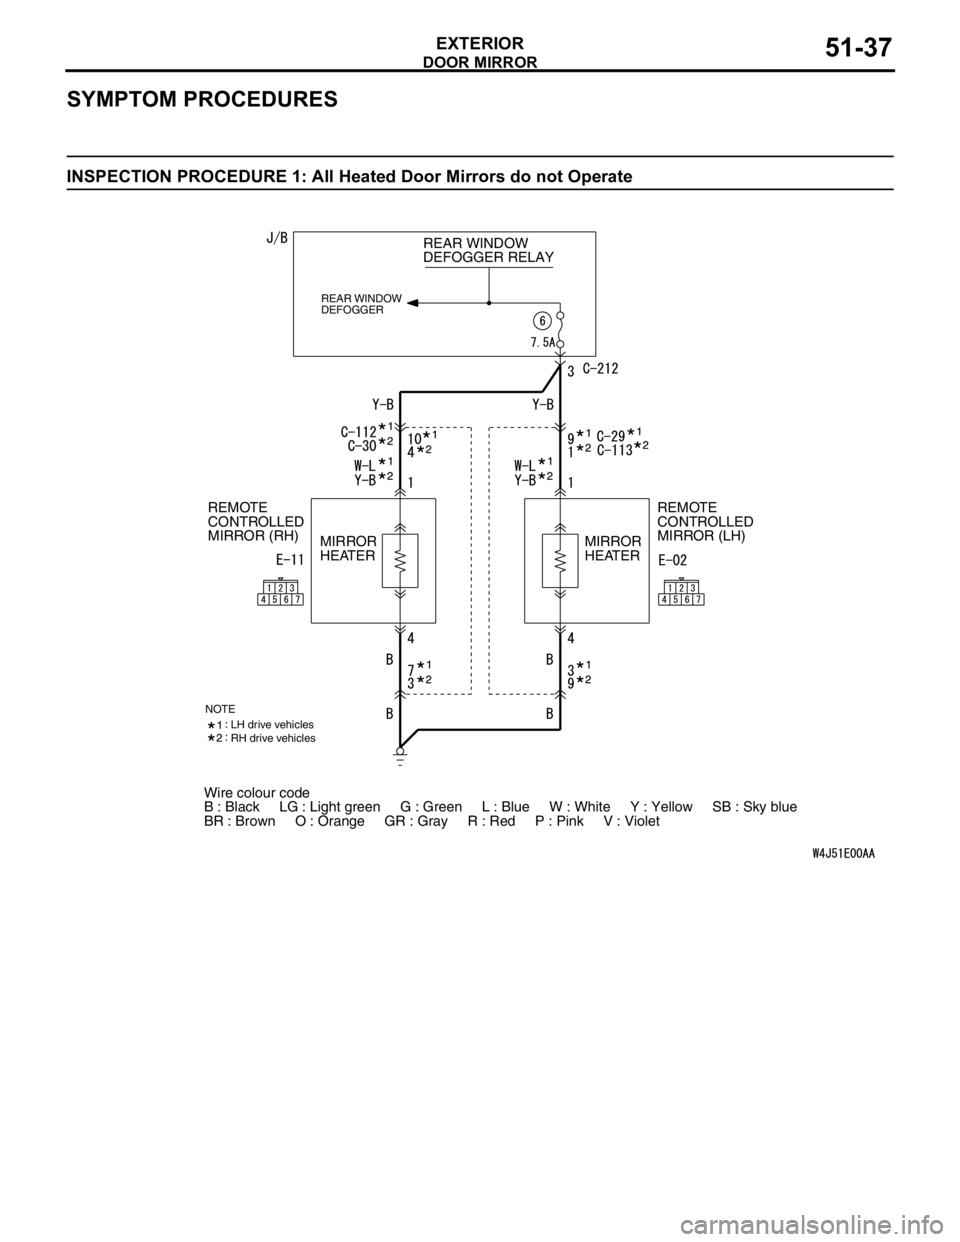
SYMPTOM PROCEDURES
INSPECTION PROCEDURE 1: All Heated Door Mirrors do not Operate
Wire colour code
B : Black LG : Light green G : Green L : Blue W : White Y : Yellow SB : Sky blue
BR : Brown O : Orange GR : Gray R : Red P : Pink V : Violet REAR WINDOW
DEFOGGER RELAY
REAR WINDOW
DEFOGGER
REMOTE
CONTROLLED
MIRROR (LH) REMOTE
CONTROLLED
MIRROR (RH)
MIRROR
HEATERMIRROR
HEATER
NOTELH drive vehicles
RH drive vehicles
Page 376 of 788
DOOR MIRROR
EXTERIOR51-38
COMMENTS ON TROUBLE SYMPTOM
The heated door mirrors should works for
approximately 11 minutes when the rear defogger
switch is turned on. If the mirror heater does not work
for the specified period, the defogger relay circuit
(heated door mirror power supply circuit) may be
defective.
Possible causes
•Damaged harness wires and connectors
DIAGNOSIS PROCEDURE
STEP 1. Check the rear window defogger.
Check that the rear window defogger system should
work normally.
Q: Is the check result normal?
YES :
Go to Step 2.
NO : Troubleshoot the rear window defogger
(Refer to GROUP 55,
TroubleshootingP.55-42).
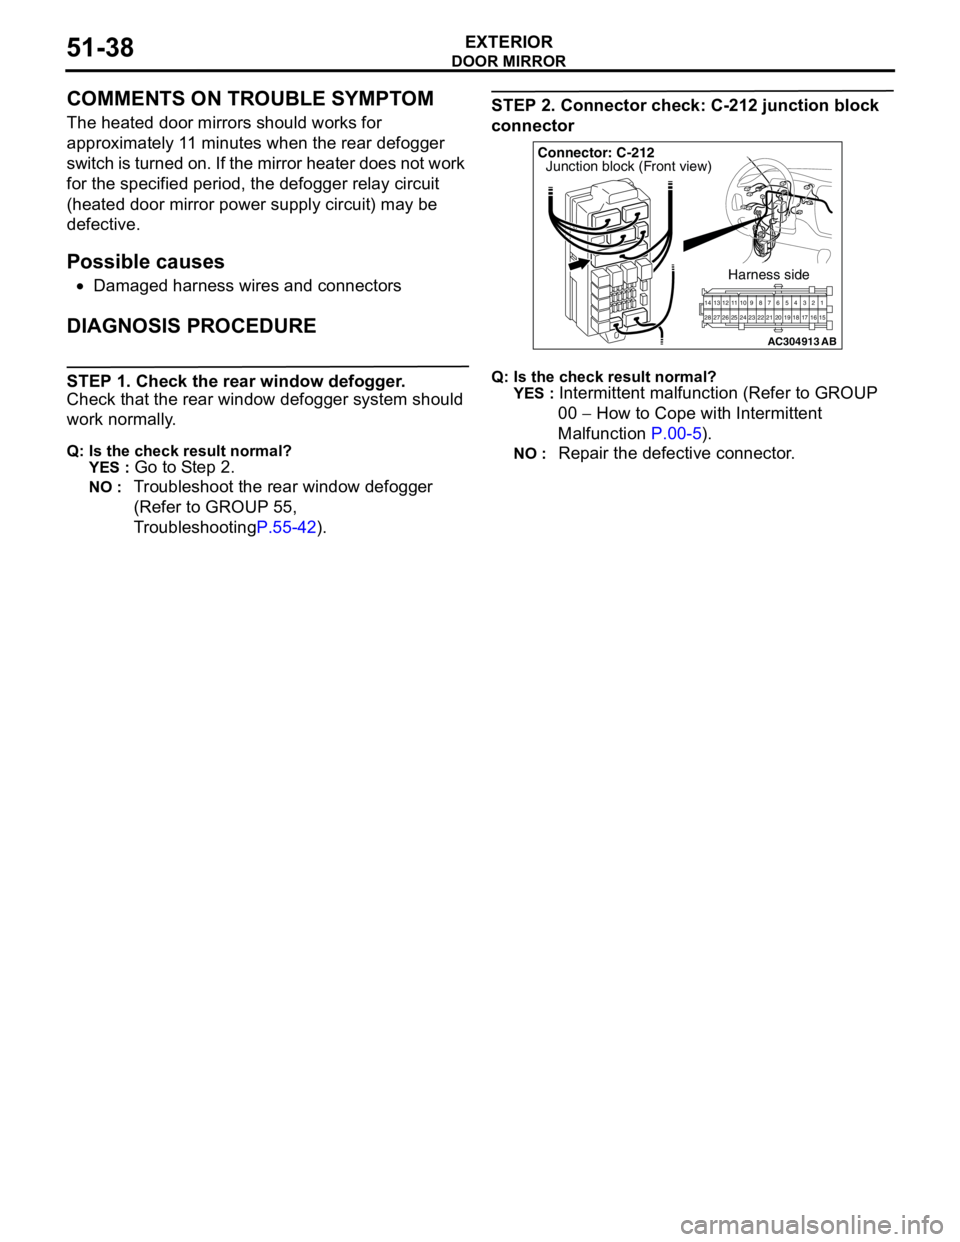
STEP 2. Connector check: C-212 junction block
connector
Q: Is the check result normal?
YES :
Intermittent malfunction (Refer to GROUP
00 − How to Cope with Intermittent
Malfunction P.00-5).
NO : Repair the defective connector.
AC304913
21716151718 201912345 623 222425282627981011141213
Connector: C-212
Harness side
AB
Junction block (Front view)
Page 377 of 788
DOOR MIRROR
EXTERIOR51-39
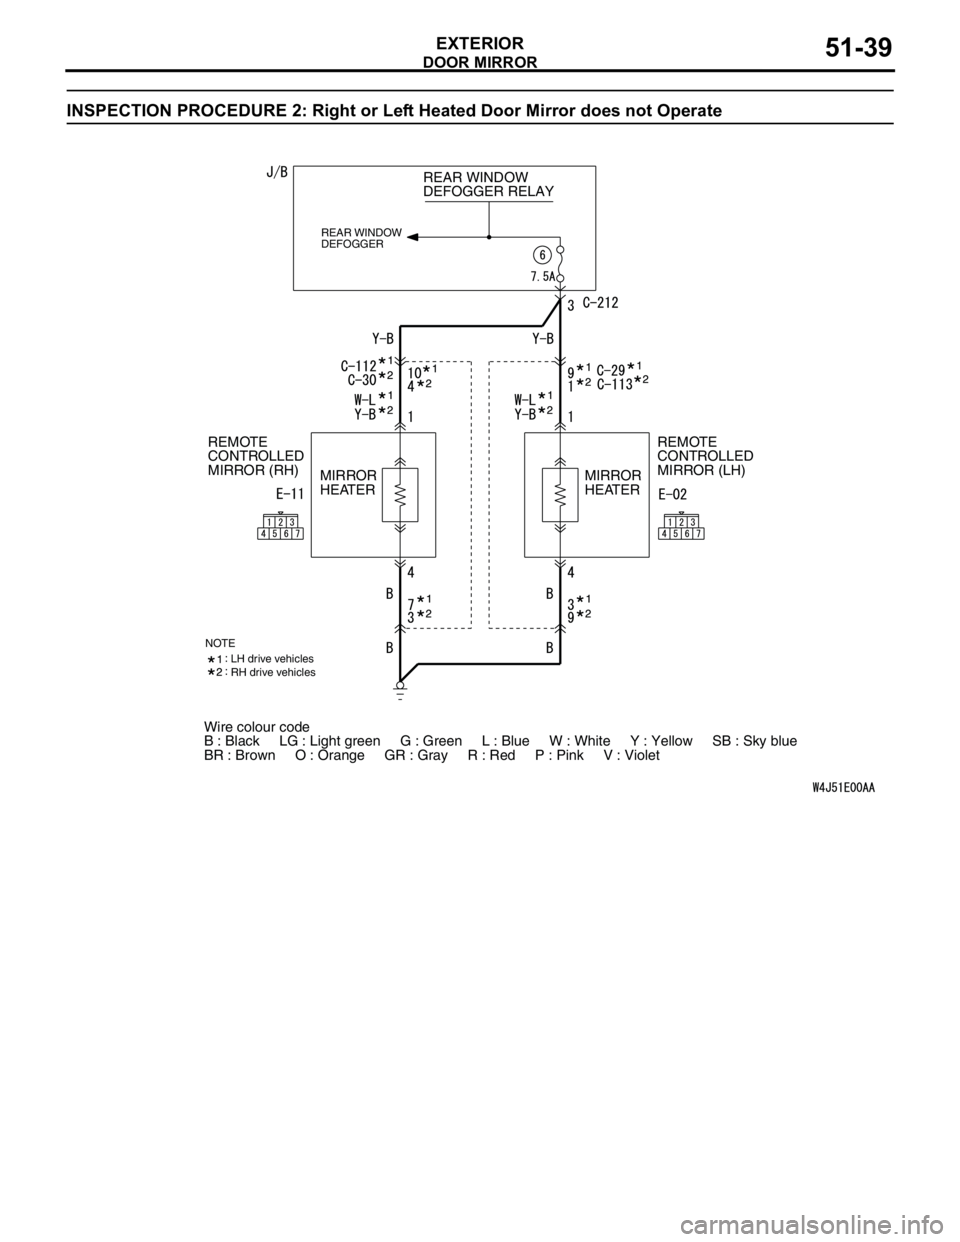
INSPECTION PROCEDURE 2: Right or Left Heated Door Mirror does not Operate
Wire colour code
B : Black LG : Light green G : Green L : Blue W : White Y : Yellow SB : Sky blue
BR : Brown O : Orange GR : Gray R : Red P : Pink V : Violet REAR WINDOW
DEFOGGER RELAY
REAR WINDOW
DEFOGGER
REMOTE
CONTROLLED
MIRROR (LH) REMOTE
CONTROLLED
MIRROR (RH)
MIRROR
HEATERMIRROR
HEATER
NOTELH drive vehicles
RH drive vehicles
Page 391 of 788
54A-3
REAR COMBINATION
LAMP . . . . . . . . . . . . . . . . . . . . .
54A-79
TROUBLESHOOTING . . . . . . . . . .
54A-79
SPECIAL TOOL . . . . . . . . . . . . . . .54A-79
REAR COMBINATION LAMP . . . .54A-79
REMOVAL AND INSTALLATION . . . . . 54A-79
HIGH-MOUNTED
STOP LAMP. . . . . . . . . . . . . . . .
54A-80
ON-VEHICLE SERVICE. . . . . . . . .
54A-80
HIGH-MOUNTED STOP LAMP BULB
REPLACEMENT
HIGH-MOUNTED STOP LAMP . . .54A-81
REMOVAL AND INSTALLATION . . . . . 54A-81
LICENCE PLATE LAMP . . . . . .54A-84
REMOVAL AND INSTALLATION .
54A-84
HAZARD WARNING LAMP
SWITCH . . . . . . . . . . . . . . . . . . .
54A-85
TROUBLESHOOTING . . . . . . . . . .
54A-85
SPECIAL TOOL . . . . . . . . . . . . . . .54A-85
HAZARD WARNING LAMP SWITCH54A-86
REMOVAL AND INSTALLATION . . . . . 54A-86
INSPECTION . . . . . . . . . . . . . . . . . . . . . 54A-86
COLUMN SWITCH. . . . . . . . . . .54A-87
SPECIAL TOOL . . . . . . . . . . . . . . .
54A-87
COLUMN SWITCH. . . . . . . . . . . . .54A-87
REMOVAL AND INSTALLATION . . . . . 54A-87
INSPECTION . . . . . . . . . . . . . . . . . . . . . 54A-88
HORN . . . . . . . . . . . . . . . . . . . . 54A-89
REMOVAL AND INSTALLATION . . . . . . 54A-89
HORN RELAY CONTINUITY CHECK . . 54A-89
CLOCK . . . . . . . . . . . . . . . . . . . 54A-90
SPECIAL TOOL . . . . . . . . . . . . . . .
54A-90
CLOCK . . . . . . . . . . . . . . . . . . . . . .54A-90
REMOVAL AND INSTALLATION . . . . . . 54A-90
CIGARETTE LIGHTER . . . . . . 54A-91
INSPECTION . . . . . . . . . . . . . . . . . . . . . 54A-91
RHEOSTAT . . . . . . . . . . . . . . . 54A-91
REMOVAL AND INSTALLATION . . . . . . 54A-91
INSPECTION . . . . . . . . . . . . . . . . . . . . . 54A-92
SPEAKER. . . . . . . . . . . . . . . . . 54A-93
REMOVAL AND INSTALLATION . . . . . . 54A-93
ANTENNA . . . . . . . . . . . . . . . . 54A-94
REMOVAL AND INSTALLATION . . . . . . 54A-94
REAR WINDOW
DEFOGGER . . . . . . . . . . . . . . .
54A-95
GENERAL INFORMATION . . . . . .
54A-95
TROUBLESHOOTING . . . . . . . . . .54A-95
ON-VEHICLE SERVICE . . . . . . . . .54A-96
PRINTED HEATER LINES CHECK . . . . 54A-96
REAR WINDOW DEFOGGER
SWITCH . . . . . . . . . . . . . . . . . . . . .
54A-96
REMOVAL AND INSTALLATION . . . . . . 54A-96
INSPECTION . . . . . . . . . . . . . . . . . . . . . 54A-96
Page 400 of 788
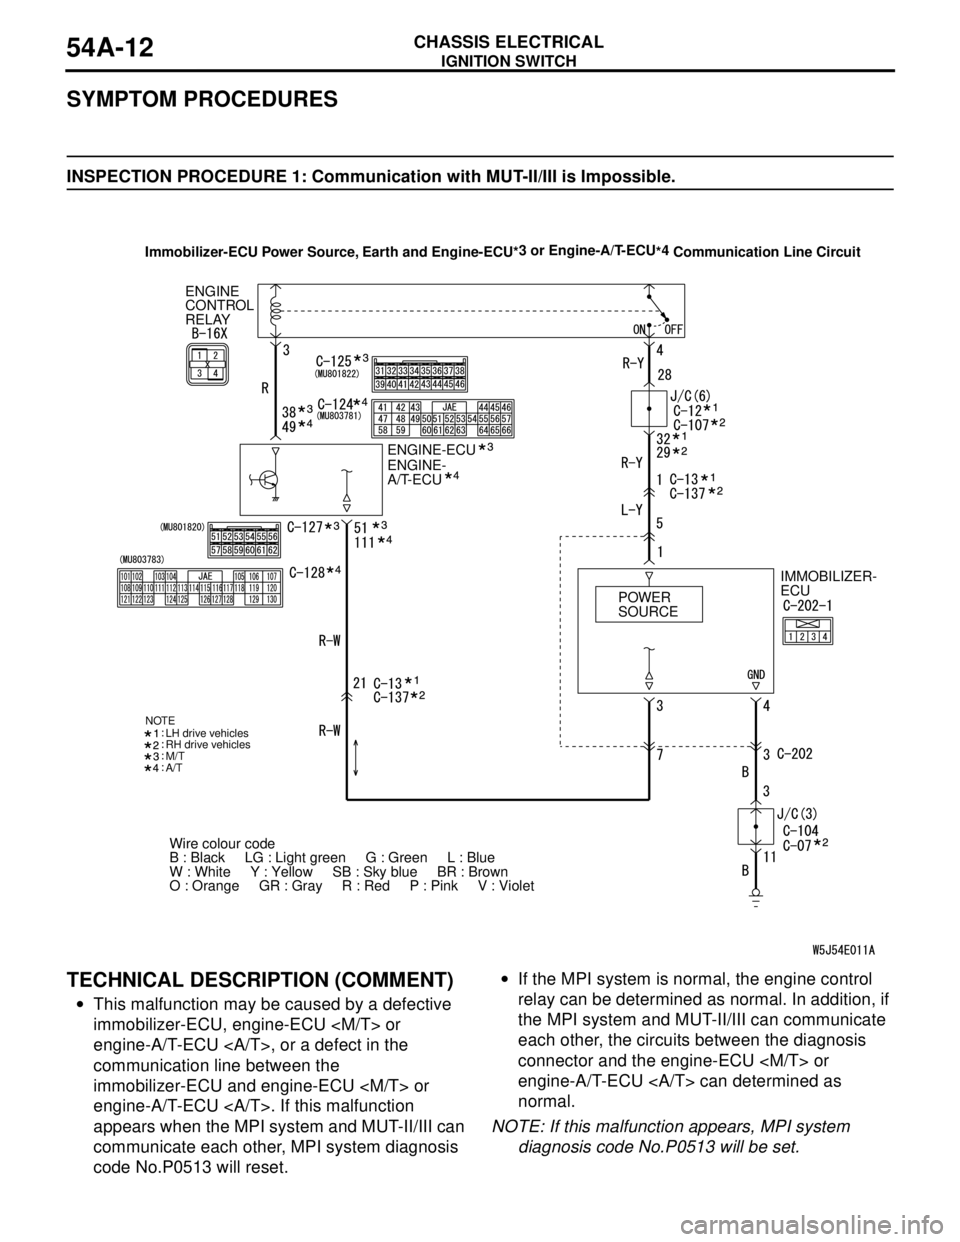
IGNITION SWITCH
CHASSIS ELECTRICAL54A-12
SYMPTOM PROCEDURES
INSPECTION PROCEDURE 1: Communication with MUT-II/III is Impossible.
TECHNICAL DESCRIPTION (COMMENT)
•This malfunction may be caused by a defective
immobilizer-ECU, engine-ECU
engine-A/T-ECU , or a defect in the
communication line between the
immobilizer-ECU and engine-ECU
engine-A/T-ECU . If this malfunction
appears when the MPI system and MUT-II/III can
communicate each other, MPI system diagnosis
code No.P0513 will reset.•If the MPI system is normal, the engine control
relay can be determined as normal. In addition, if
the MPI system and MUT-II/III can communicate
each other, the circuits between the diagnosis
connector and the engine-ECU
engine-A/T-ECU can determined as
normal.
NOTE: If this malfunction appears, MPI system
diagnosis code No.P0513 will be set.
ENGINE-ECU ENGINE
CONTROL
RELAY
ENGINE-
A/T-ECU
IMMOBILIZER-
ECU
Wire colour code
B : Black LG : Light green G : Green L : Blue
W : White Y : Yellow SB : Sky blue BR : Brown
O : Orange GR : Gray R : Red P : Pink V : Violet POWER
SOURCE
M/T
A/T NOTE
LH drive vehicles
RH drive vehicles
Immobilizer-ECU Power Source, Earth and Engine-ECU*3 or Engine-A/T-ECU
*4
Communication Line Circuit
Page 401 of 788
IGNITION SWITCH
CHASSIS ELECTRICAL54A-13
TROUBLESHOOTING HINTS
•Malfunction of the immobilizer-ECU.
•Malfunction of the engine-ECU
engine-A/T-ECU .
•The wiring harness or connectors may have
loose, corroded, or damaged terminals, or
terminals pushed back in the connector.
DIAGNOSIS PROCEDURE
STEP 1. Check if MUT-II/III can communicate with
the MPI system and if an MPI system diagnosis
code other than P0513 is set.
Q: Can MUT-II/III communicate with the MPI system?
Is an MPI system diagnosis code other than P0513
set?
YES :
Go to Step 2.
NO : Refer to GROUP 13A, MPI Diagnosis
P.13A-15, GROUP 13B, MPI Diagnosis
P.13B-15.
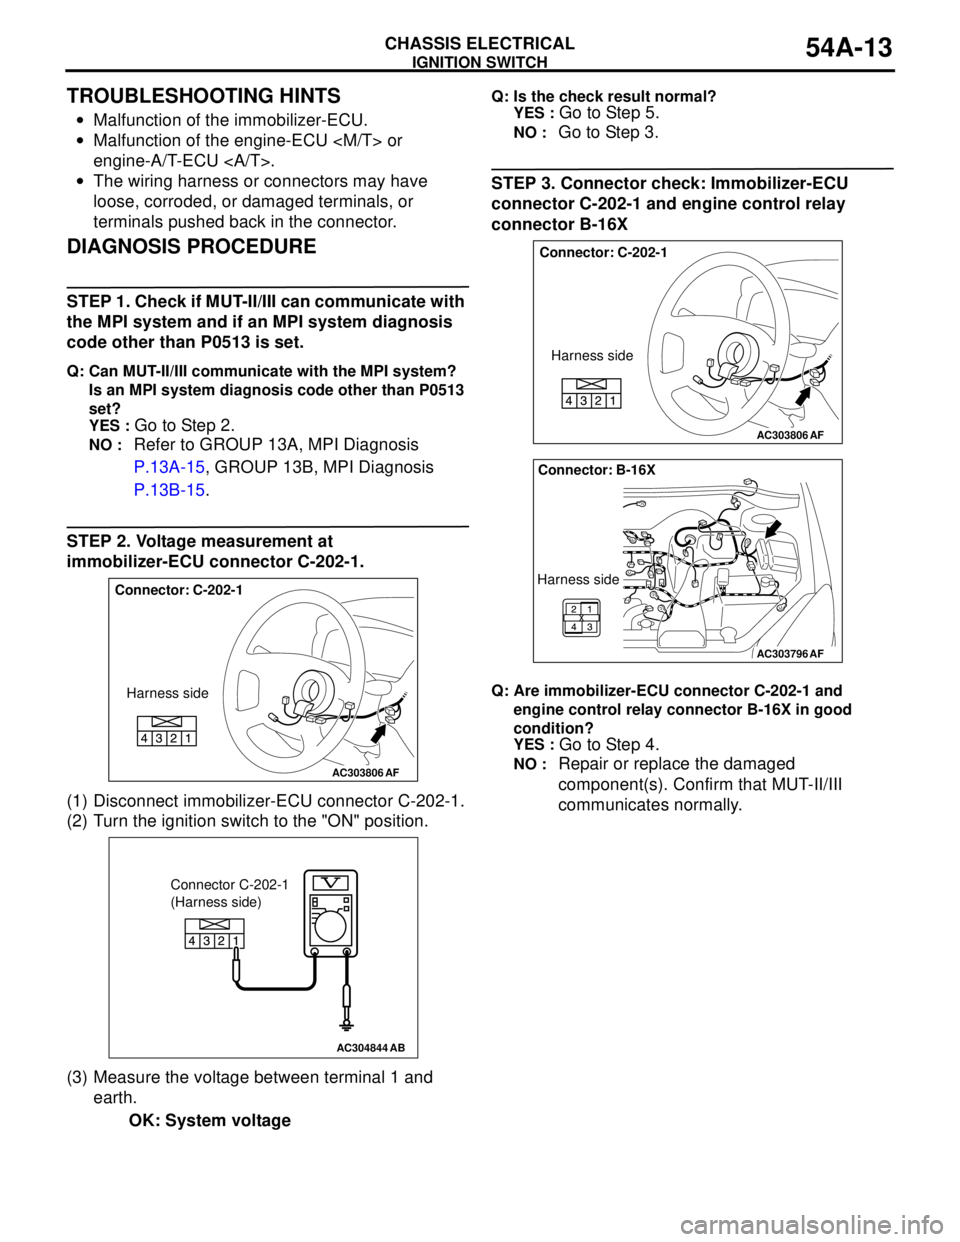
STEP 2. Voltage measurement at
immobilizer-ECU connector C-202-1.
(1) Disconnect immobilizer-ECU connector C-202-1.
(2) Turn the ignition switch to the "ON" position.
(3) Measure the voltage between terminal 1 and
earth.
OK: System voltage
Q: Is the check result normal?
YES :
Go to Step 5.
NO : Go to Step 3.
STEP 3. Connector check: Immobilizer-ECU
connector C-202-1 and engine control relay
connector B-16X
Q: Are immobilizer-ECU connector C-202-1 and
engine control relay connector B-16X in good
condition?
YES :
Go to Step 4.
NO : Repair or replace the damaged
component(s). Confirm that MUT-II/III
communicates normally.AC303806
Connector: C-202-1
Harness side
AF
AC304844AB
Connector C-202-1
(Harness side)
AC303806
Connector: C-202-1
Harness side
AF
AC303796
Connector: B-16X
Harness side
AF
Page 402 of 788
IGNITION SWITCH
CHASSIS ELECTRICAL54A-14
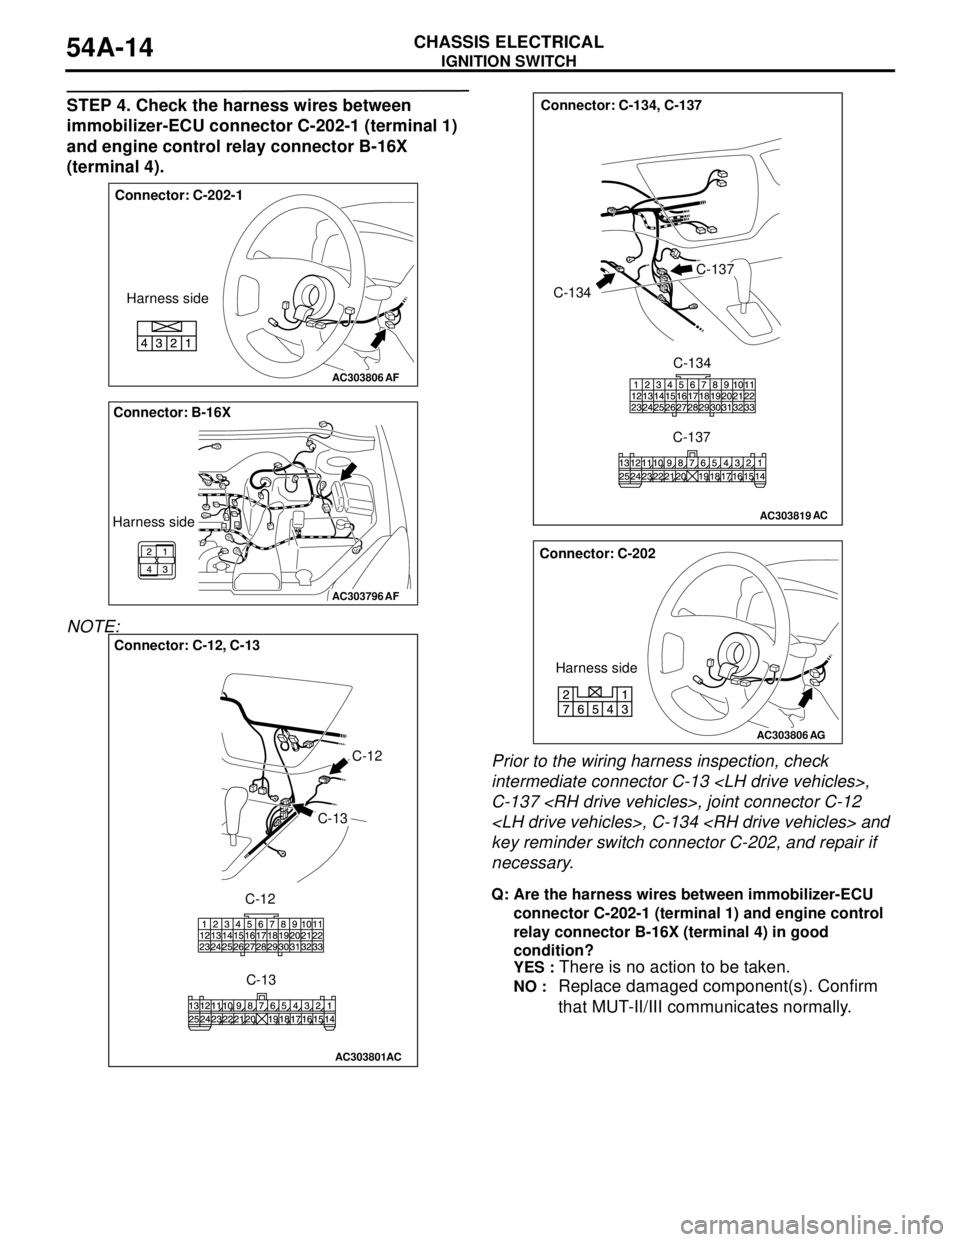
STEP 4. Check the harness wires between
immobilizer-ECU connector C-202-1 (terminal 1)
and engine control relay connector B-16X
(terminal 4).
NOTE:
Prior to the wiring harness inspection, check
intermediate connector C-13
C-137
key reminder switch connector C-202, and repair if
necessary.
Q: Are the harness wires between immobilizer-ECU
connector C-202-1 (terminal 1) and engine control
relay connector B-16X (terminal 4) in good
condition?
YES :
There is no action to be taken.
NO : Replace damaged component(s). Confirm
that MUT-II/III communicates normally.
AC303806
Connector: C-202-1
Harness side
AF
AC303796
Connector: B-16X
Harness side
AF
AC303801
Connector: C-12, C-13
C-12
C-13
C-12
C-13
AC
AC303819
Connector: C-134, C-137
C-134
C-137
C-134
C-137
AC
AC303806
Connector: C-202
Harness side
AG
Page 414 of 788
IGNITION SWITCH
CHASSIS ELECTRICAL54A-26
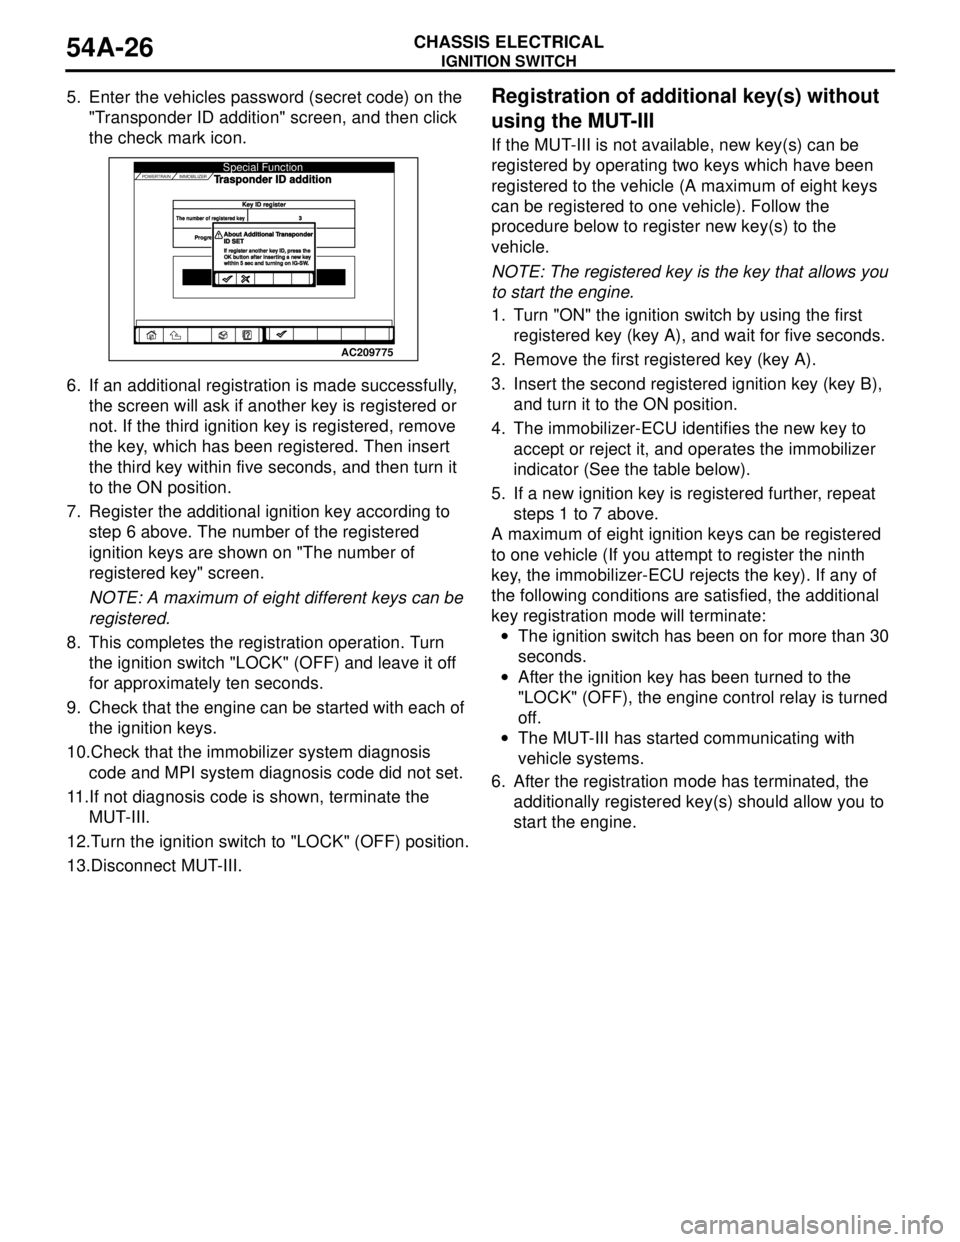
5. Enter the vehicles password (secret code) on the
"Transponder ID addition" screen, and then click
the check mark icon.
6. If an additional registration is made successfully,
the screen will ask if another key is registered or
not. If the third ignition key is registered, remove
the key, which has been registered. Then insert
the third key within five seconds, and then turn it
to the ON position.
7. Register the additional ignition key according to
step 6 above. The number of the registered
ignition keys are shown on "The number of
registered key" screen.
NOTE: A maximum of eight different keys can be
registered.
8. This completes the registration operation. Turn
the ignition switch "LOCK" (OFF) and leave it off
for approximately ten seconds.
9. Check that the engine can be started with each of
the ignition keys.
10.Check that the immobilizer system diagnosis
code and MPI system diagnosis code did not set.
11.If not diagnosis code is shown, terminate the
MUT-III.
12.Turn the ignition switch to "LOCK" (OFF) position.
13.Disconnect MUT-III.Registration of additional key(s) without
using the MUT-III
If the MUT-III is not available, new key(s) can be
registered by operating two keys which have been
registered to the vehicle (A maximum of eight keys
can be registered to one vehicle). Follow the
procedure below to register new key(s) to the
vehicle.
NOTE: The registered key is the key that allows you
to start the engine.
1. Turn "ON" the ignition switch by using the first
registered key (key A), and wait for five seconds.
2. Remove the first registered key (key A).
3. Insert the second registered ignition key (key B),
and turn it to the ON position.
4. The immobilizer-ECU identifies the new key to
accept or reject it, and operates the immobilizer
indicator (See the table below).
5. If a new ignition key is registered further, repeat
steps 1 to 7 above.
A maximum of eight ignition keys can be registered
to one vehicle (If you attempt to register the ninth
key, the immobilizer-ECU rejects the key). If any of
the following conditions are satisfied, the additional
key registration mode will terminate:
•The ignition switch has been on for more than 30
seconds.
•After the ignition key has been turned to the
"LOCK" (OFF), the engine control relay is turned
off.
•The MUT-III has started communicating with
vehicle systems.
6. After the registration mode has terminated, the
additionally registered key(s) should allow you to
start the engine.
AC207301
AC209775POWERTRAIN IMMOBILIZER
Key ID registerey ID registerThe number of registered keyThe number of registered key3
Progre
Progre
Special FunctionTrasponder ID addition
About Additional TAbout Additional TransponderransponderID SETID SETIf register another key ID, press theIf register another key ID, press theOK button after inserting a new keyOK button after inserting a new keywithin 5 sec and turning on IG-SWwithin 5 sec and turning on IG-SW.
Page 425 of 788
COMBINATION METER ASSEMBLY
CHASSIS ELECTRICAL54A-37
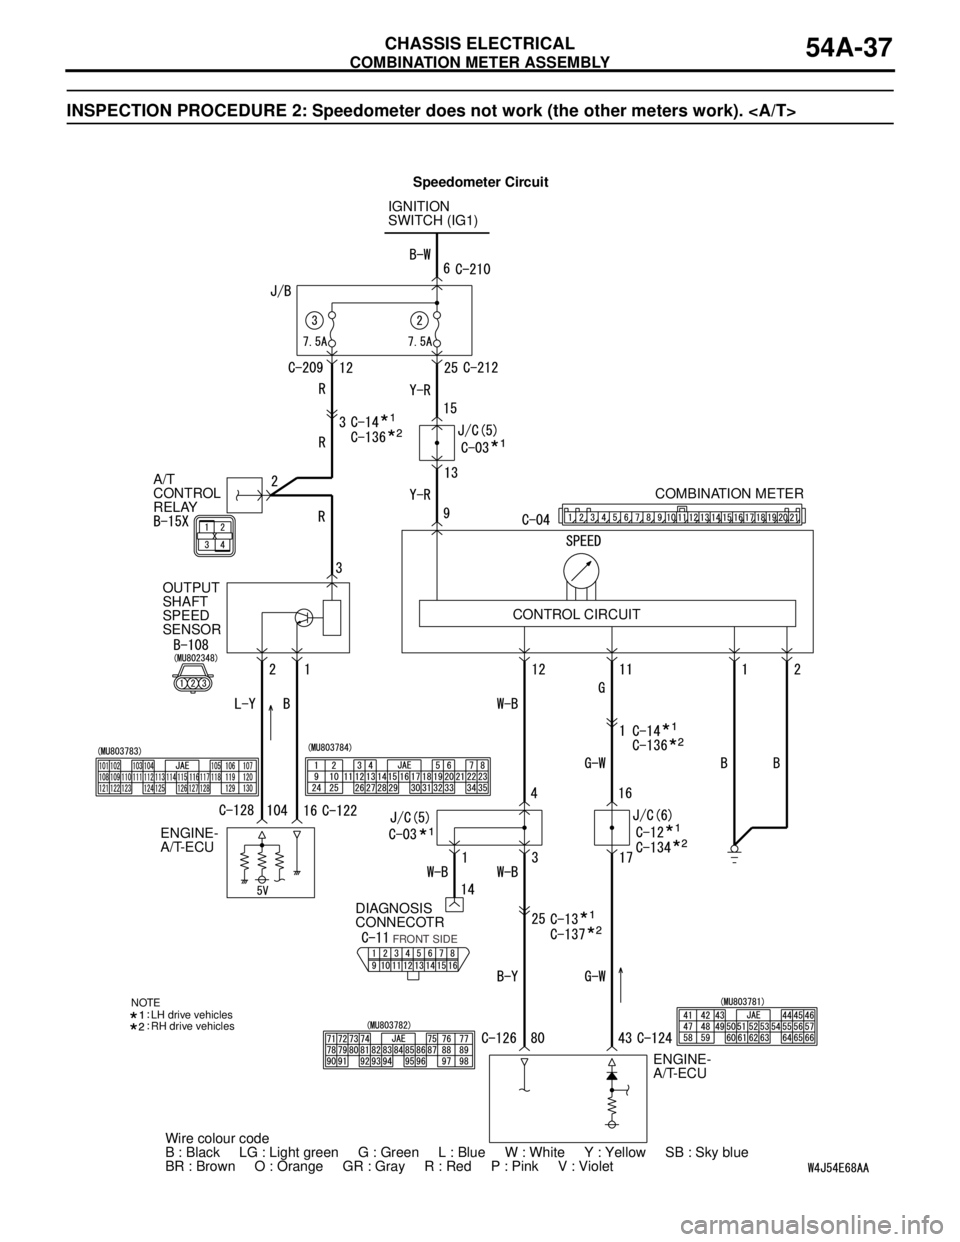
INSPECTION PROCEDURE 2: Speedometer does not work (the other meters work).
IGNITION
SWITCH (IG1)
A/T
CONTROL
RELAY
OUTPUT
SHAFT
SPEED
SENSOR
DIAGNOSIS
CONNECOTR
ENGINE-
A/T-ECUCOMBINATION METER
ENGINE-
A/T-ECU
Wire colour code
B : Black LG : Light green G : Green L : Blue W : White Y : Yellow SB : Sky blue
BR : Brown O : Orange GR : Gray R : Red P : Pink V : Violet
FRONT SIDE
NOTE
LH drive vehicles
RH drive vehicles
CONTROL CIRCUIT
Speedometer Circuit
Page 442 of 788
COMBINATION METER ASSEMBLY
CHASSIS ELECTRICAL54A-54
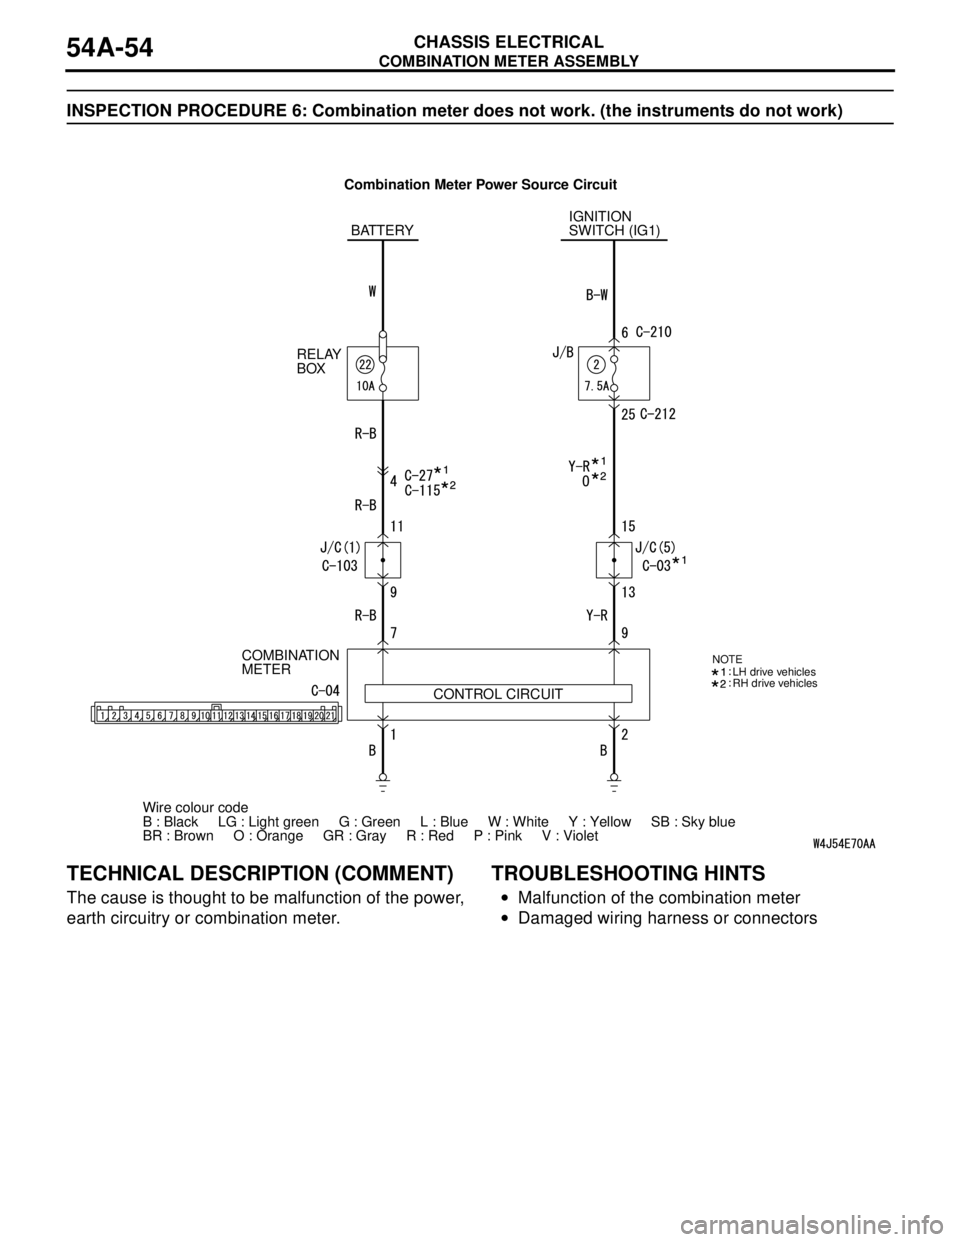
INSPECTION PROCEDURE 6: Combination meter does not work. (the instruments do not work)
TECHNICAL DESCRIPTION (COMMENT)
The cause is thought to be malfunction of the power,
earth circuitry or combination meter.
TROUBLESHOOTING HINTS
•Malfunction of the combination meter
•Damaged wiring harness or connectors
Wire colour code
B : Black LG : Light green G : Green L : Blue W : White Y : Yellow SB : Sky blue
BR : Brown O : Orange GR : Gray R : Red P : Pink V : Violet IGNITION
SWITCH (IG1)
COMBINATION
METER
CONTROL CIRCUIT BATTERY
RELAY
BOX
NOTELH drive vehicles
RH drive vehicles
Combination Meter Power Source Circuit