relay MITSUBISHI LANCER 2005 Repair Manual
[x] Cancel search | Manufacturer: MITSUBISHI, Model Year: 2005, Model line: LANCER, Model: MITSUBISHI LANCER 2005Pages: 788, PDF Size: 45.98 MB
Page 527 of 788
TROUBLESHOOTING
HEATER, AIR CONDITIONER AND VENTILATION55-43
COMMENTS ON TROUBLE SYMPTOM
If the rear window defogger does not operate when
the rear window defogger switch is turned on, the
rear window defogger relay system may be
defective.
TROUBLESHOOTING HINTS
•Malfunction of the rear window defogger relay
•Malfunction of the rear window defogger
•Damaged the wiring harness or connectors
•Malfunction of the manual air conditioner control
panel (A/C-ECU) or the heater control unit
DIAGNOSIS
STEP 1. Check the A/C and outside/inside air
selection damper control motor operation.
Q: Do the A/C and outside/inside air selection damper
control motor work normally?
YES :
Go to Step 2.
NO
"Malfunction of the A/C-ECU Power Supply
system
NO
"Malfunction of the A/C-ECU Power Supply
system
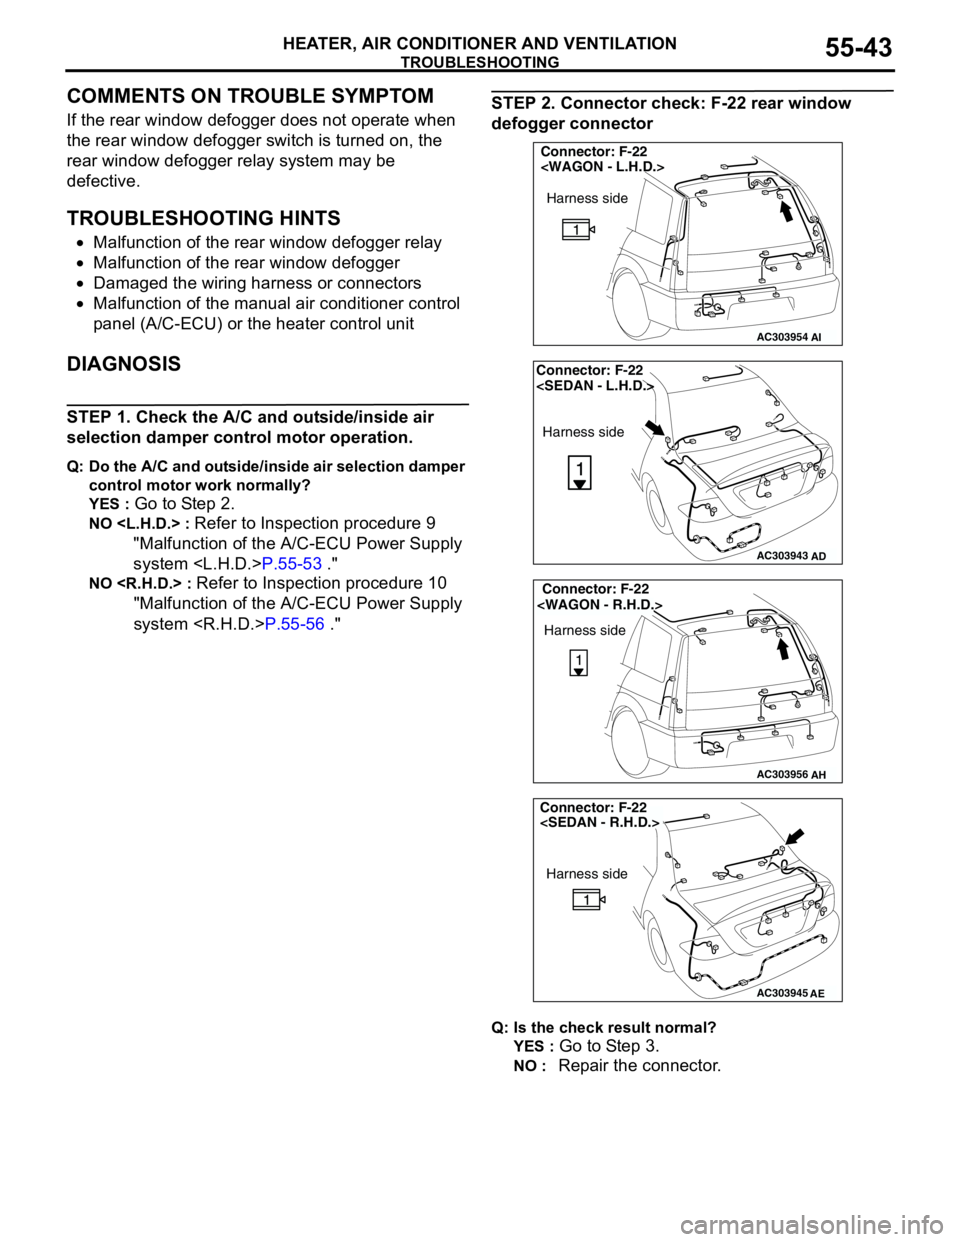
STEP 2. Connector check: F-22 rear window
defogger connector
Q: Is the check result normal?
YES :
Go to Step 3.
NO : Repair the connector.
AC303954
Connector: F-22
AI
Harness side
AC303943
Connector: F-22
Harness side
AD
AC303956
Connector: F-22
Harness side
AH
AC303945
Harness side
AE
Connector: F-22
Page 529 of 788
TROUBLESHOOTING
HEATER, AIR CONDITIONER AND VENTILATION55-45
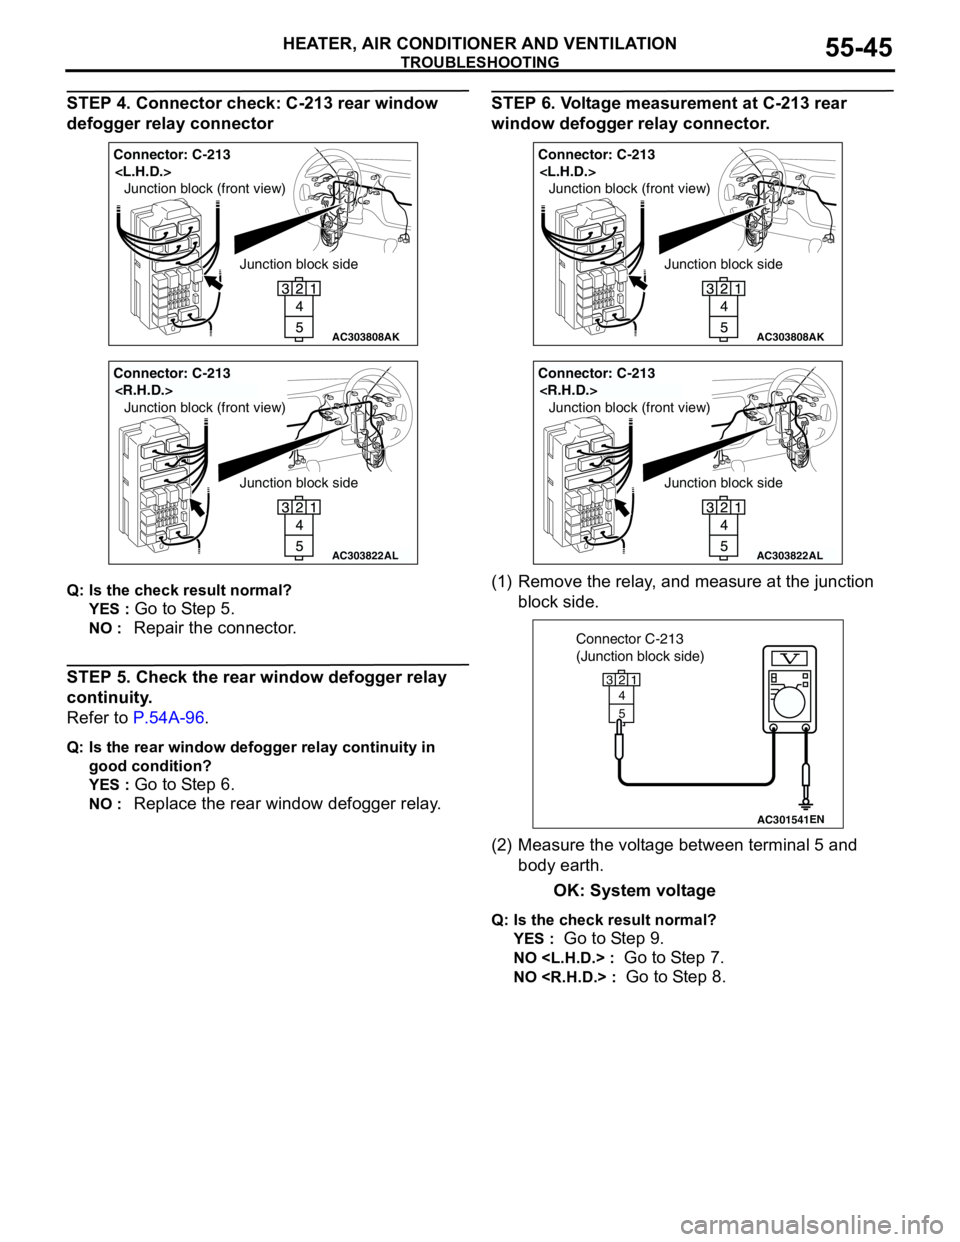
STEP 4. Connector check: C-213 rear window
defogger relay connector
Q: Is the check result normal?
YES :
Go to Step 5.
NO : Repair the connector.
STEP 5. Check the rear window defogger relay
continuity.
Refer to P.54A-96.
Q: Is the rear window defogger relay continuity in
good condition?
YES :
Go to Step 6.
NO : Replace the rear window defogger relay.
STEP 6. Voltage measurement at C-213 rear
window defogger relay connector.
(1) Remove the relay, and measure at the junction
block side.
(2) Measure the voltage between terminal 5 and
body earth.
OK: System voltage
Q: Is the check result normal?
YES :
Go to Step 9.
NO
NO
AC303808
Junction block side Junction block (front view)
Connector: C-213
AK
AC303822
Junction block side Junction block (front view)
Connector: C-213
AL
AC303808
Junction block side Junction block (front view)
Connector: C-213
AK
AC303822
Junction block side Junction block (front view)
Connector: C-213
AL
AC301541EN
Connector C-213
(Junction block side)
3
4
5
12
Page 530 of 788
TROUBLESHOOTING
HEATER, AIR CONDITIONER AND VENTILATION55-46
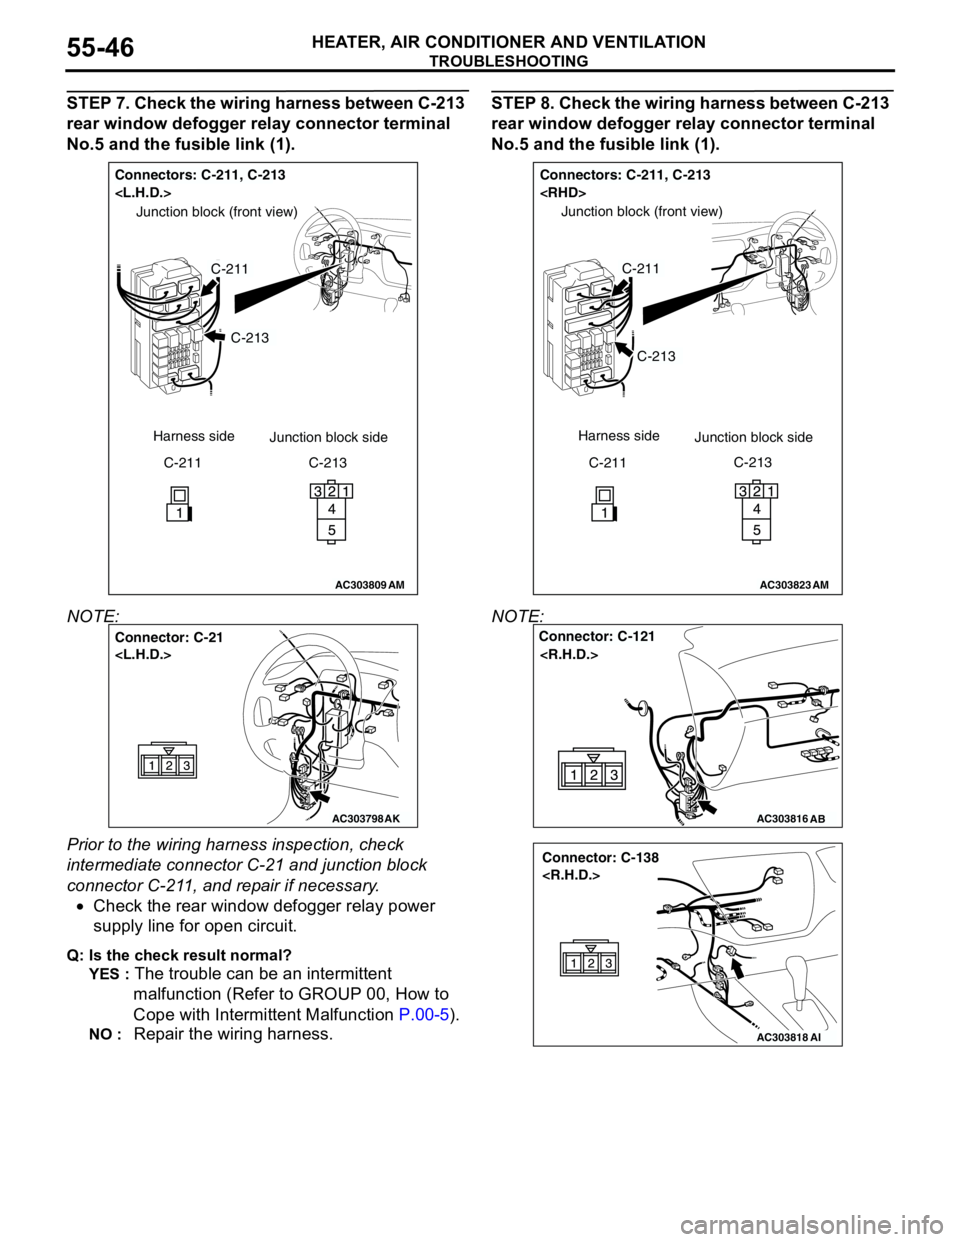
STEP 7. Check the wiring harness between C-213
rear window defogger relay connector terminal
No.5 and the fusible link (1).
NOTE:
Prior to the wiring harness inspection, check
intermediate connector C-21 and junction block
connector C-211, and repair if necessary.
•Check the rear window defogger relay power
supply line for open circuit.
Q: Is the check result normal?
YES :
The trouble can be an intermittent
malfunction (Refer to GROUP 00, How to
Cope with Intermittent Malfunction P.00-5).
NO : Repair the wiring harness.
STEP 8. Check the wiring harness between C-213
rear window defogger relay connector terminal
No.5 and the fusible link (1).
NOTE:
AC303809
Connectors: C-211, C-213
AM
C-213
C-211
Junction block (front view)
C-211 Harness side
Junction block side
C-213
AC303798
Connector: C-21
AK
AC303823
Connectors: C-211, C-213
AM
C-213
C-211
Junction block (front view)
C-211 Harness side
Junction block side
C-213
AC303816
Connector: C-121
AB
AC303818
Connector: C-138
AI
Page 531 of 788
TROUBLESHOOTING
HEATER, AIR CONDITIONER AND VENTILATION55-47
Prior to the wiring harness inspection, check
intermediate connector C-121 and C-138 and
junction block connector C-211, and repair if
necessary.
•Check the rear window defogger relay power
supply line for open circuit.
Q: Is the check result normal?
YES :
The trouble can be an intermittent
malfunction (Refer to GROUP 00, How to
Cope with Intermittent Malfunction P.00-5).
NO : Repair the wiring harness.
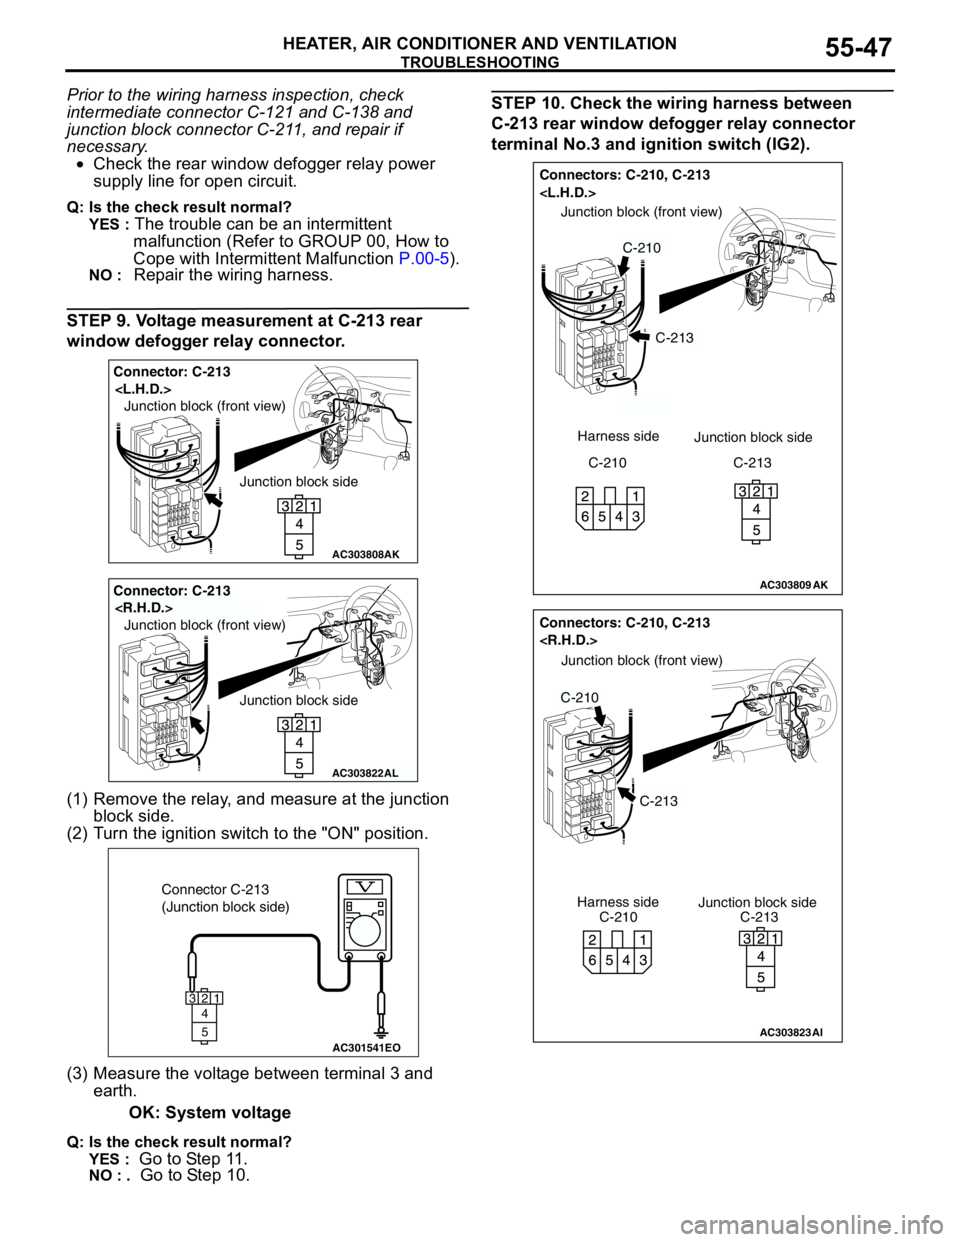
STEP 9. Voltage measurement at C-213 rear
window defogger relay connector.
(1) Remove the relay, and measure at the junction
block side.
(2) Turn the ignition switch to the "ON" position.
(3) Measure the voltage between terminal 3 and
earth.
OK: System voltage
Q: Is the check result normal?
YES :
Go to Step 11.
NO : . Go to Step 10.
STEP 10. Check the wiring harness between
C-213 rear window defogger relay connector
terminal No.3 and ignition switch (IG2).
AC303808
Junction block side Junction block (front view)
Connector: C-213
AK
AC303822
Junction block side Junction block (front view)
Connector: C-213
AL
AC301541EO
Connector C-213
(Junction block side)
3
4
5
12
AC303809
Connectors: C-210, C-213
AK
C-213
C-210
Junction block (front view)
C-210 Harness side
Junction block side
C-213
AC303823
Junction block side Junction block (front view)
Connectors: C-210, C-213
C-210C-213 Harness side
C-213
C-210
AI
Page 532 of 788
TROUBLESHOOTING
HEATER, AIR CONDITIONER AND VENTILATION55-48
NOTE: Prior to the wiring harness inspection, check
junction block connector C-210, and repair if
necessary.
•Check the rear window defogger relay power
supply line for open circuit.
Q: Is the check result normal?
YES :
The trouble can be an intermittent
malfunction (Refer to GROUP 00, How to
Cope with Intermittent Malfunction P.00-5).
NO : Repair the wiring harness.
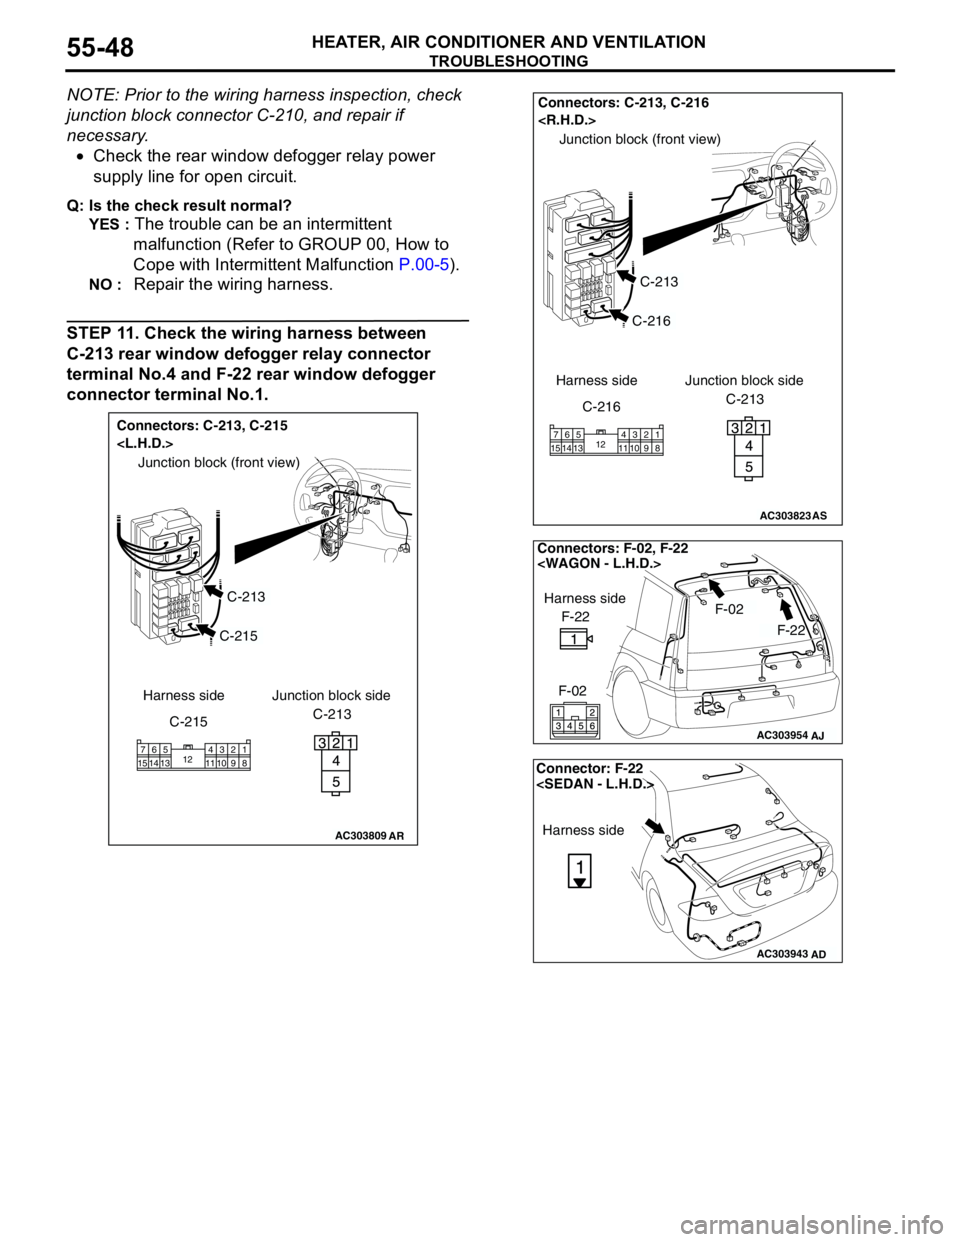
STEP 11. Check the wiring harness between
C-213 rear window defogger relay connector
terminal No.4 and F-22 rear window defogger
connector terminal No.1.
AC303809
Connectors: C-213, C-215
AR
C-213
Junction block (front view)
C-215
C-215 Harness side
7
155 614 132
9 124310 111
8
Junction block side
C-213
AC303823
Connectors: C-213, C-216
AS
C-213
Junction block (front view)
C-216
C-216 Harness side
7
155 614 132
9 124310 111
8
Junction block side
C-213
AC303954
Connectors: F-02, F-22
AJ
F-22
F-02
F-02 Harness side
F-22
AC303943
Connector: F-22
Harness side
AD
Page 533 of 788
TROUBLESHOOTING
HEATER, AIR CONDITIONER AND VENTILATION55-49
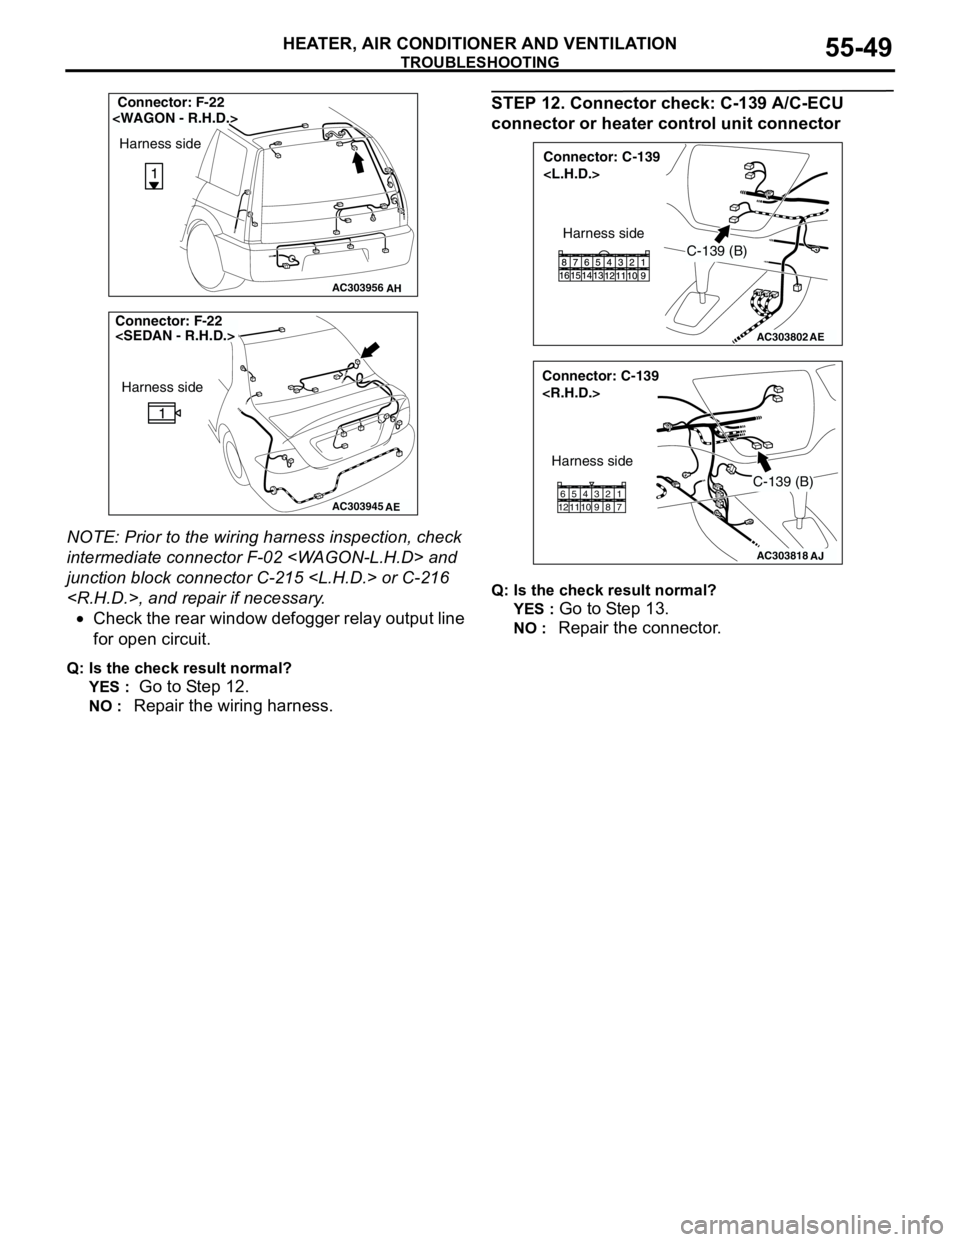
NOTE: Prior to the wiring harness inspection, check
intermediate connector F-02
junction block connector C-215
•Check the rear window defogger relay output line
for open circuit.
Q: Is the check result normal?
YES :
Go to Step 12.
NO : Repair the wiring harness.
STEP 12. Connector check: C-139 A/C-ECU
connector or heater control unit connector
Q: Is the check result normal?
YES :
Go to Step 13.
NO : Repair the connector.
AC303956
Connector: F-22
Harness side
AH
AC303945
Harness side
AE
Connector: F-22
Connector: C-139
AE
C-139 (B)
Harness side
AC303818
Connector: C-139
AJ
Harness side
C-139 (B)
11 12657 8 9 103 421
Page 534 of 788
TROUBLESHOOTING
HEATER, AIR CONDITIONER AND VENTILATION55-50
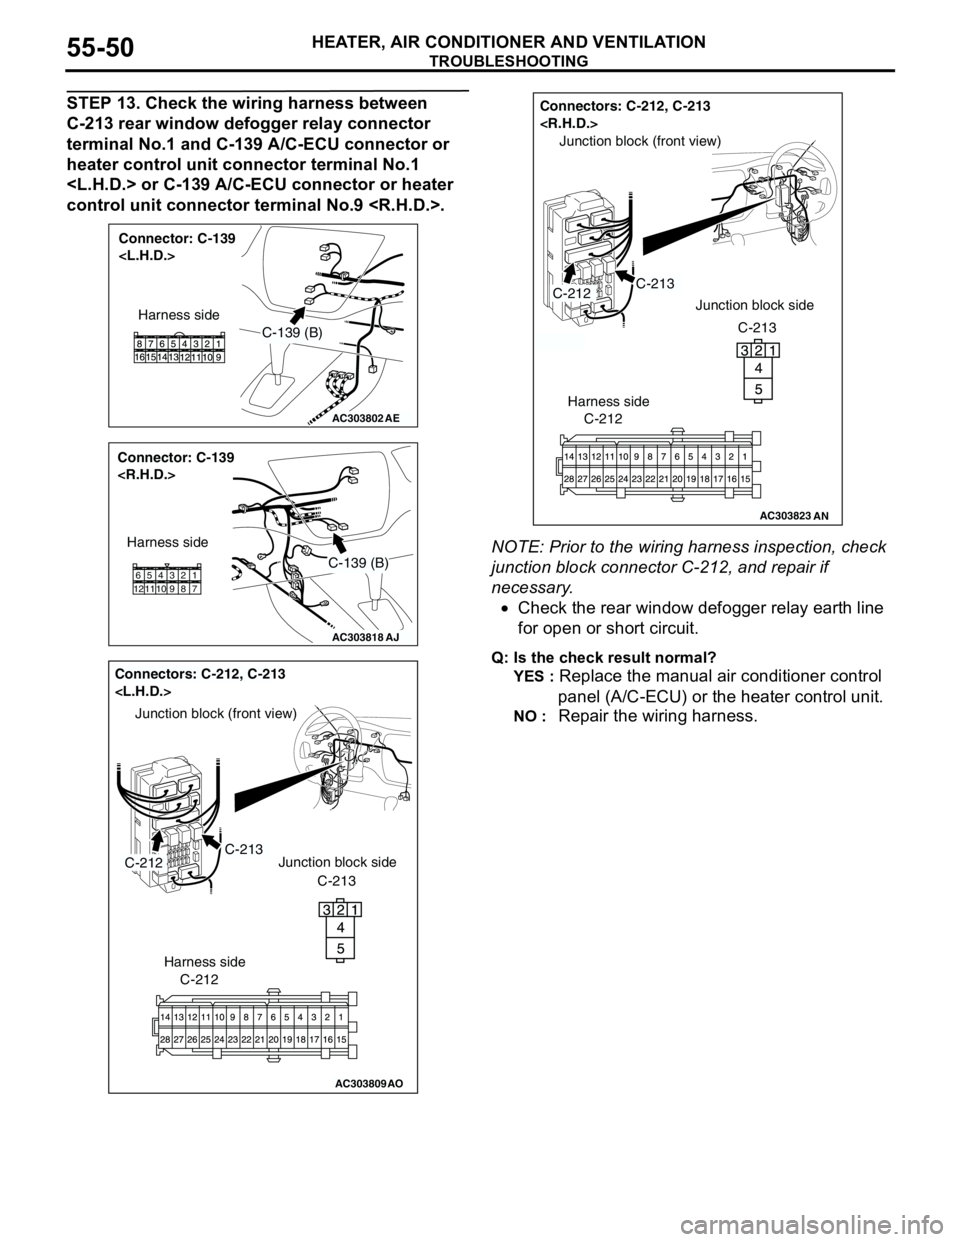
STEP 13. Check the wiring harness between
C-213 rear window defogger relay connector
terminal No.1 and C-139 A/C-ECU connector or
heater control unit connector terminal No.1
control unit connector terminal No.9
NOTE: Prior to the wiring harness inspection, check
junction block connector C-212, and repair if
necessary.
•Check the rear window defogger relay earth line
for open or short circuit.
Q: Is the check result normal?
YES :
Replace the manual air conditioner control
panel (A/C-ECU) or the heater control unit.
NO : Repair the wiring harness.
AC303802
Connector: C-139
AE
C-139 (B)
Harness side
AC303818
Connector: C-139
AJ
Harness side
C-139 (B)
11 12657 8 9 103 421
AC303809
Junction block (front view)
Connectors: C-212, C-213
C-212C-213
AO
C-212
Harness side
Junction block side
C-213
AC303823
Connectors: C-212, C-213
AN
Junction block (front view)
C-213C-212Junction block side
C-213
C-212
Harness side
Page 543 of 788
TROUBLESHOOTING
HEATER, AIR CONDITIONER AND VENTILATION55-59
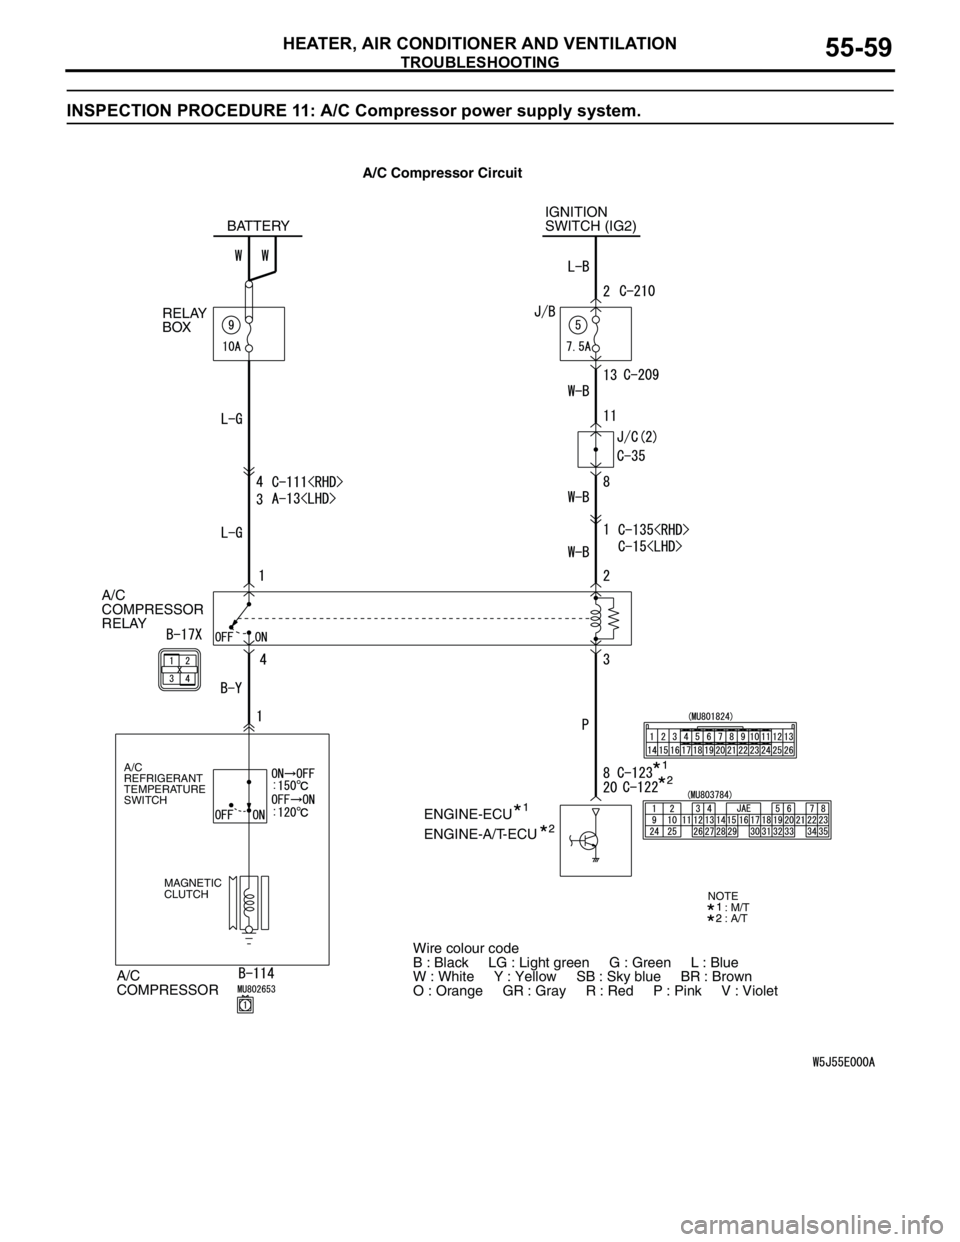
INSPECTION PROCEDURE 11: A/C Compressor power supply system.
A/C
COMPRESSOR
RELAY
A/C
COMPRESSOR
A/C
REFRIGERANT
TEMPERATURE
SWITCH
MAGNETIC
CLUTCH
IGNITION
SWITCH (IG2)
ENGINE-ECU BATTERY
RELAY
BOX
ENGINE-A/T-ECU
Wire colour code
B : Black LG : Light green G : Green L : Blue
W : White Y : Yellow SB : Sky blue BR : Brown
O : Orange GR : Gray R : Red P : Pink V : Violet
: M/T
: A/TNOTE
A/C Compressor Circuit
Page 544 of 788
TROUBLESHOOTING
HEATER, AIR CONDITIONER AND VENTILATION55-60
COMMENTS ON TROUBLE SYMPTOM
If the power is not supplied to the A/C compressor,
the A/C compressor circuit system may be
defective..
TROUBLESHOOTING HINTS
•Malfunction of the A/C compressor relay
•Damaged the wiring harness or connectors
DIAGNOSIS
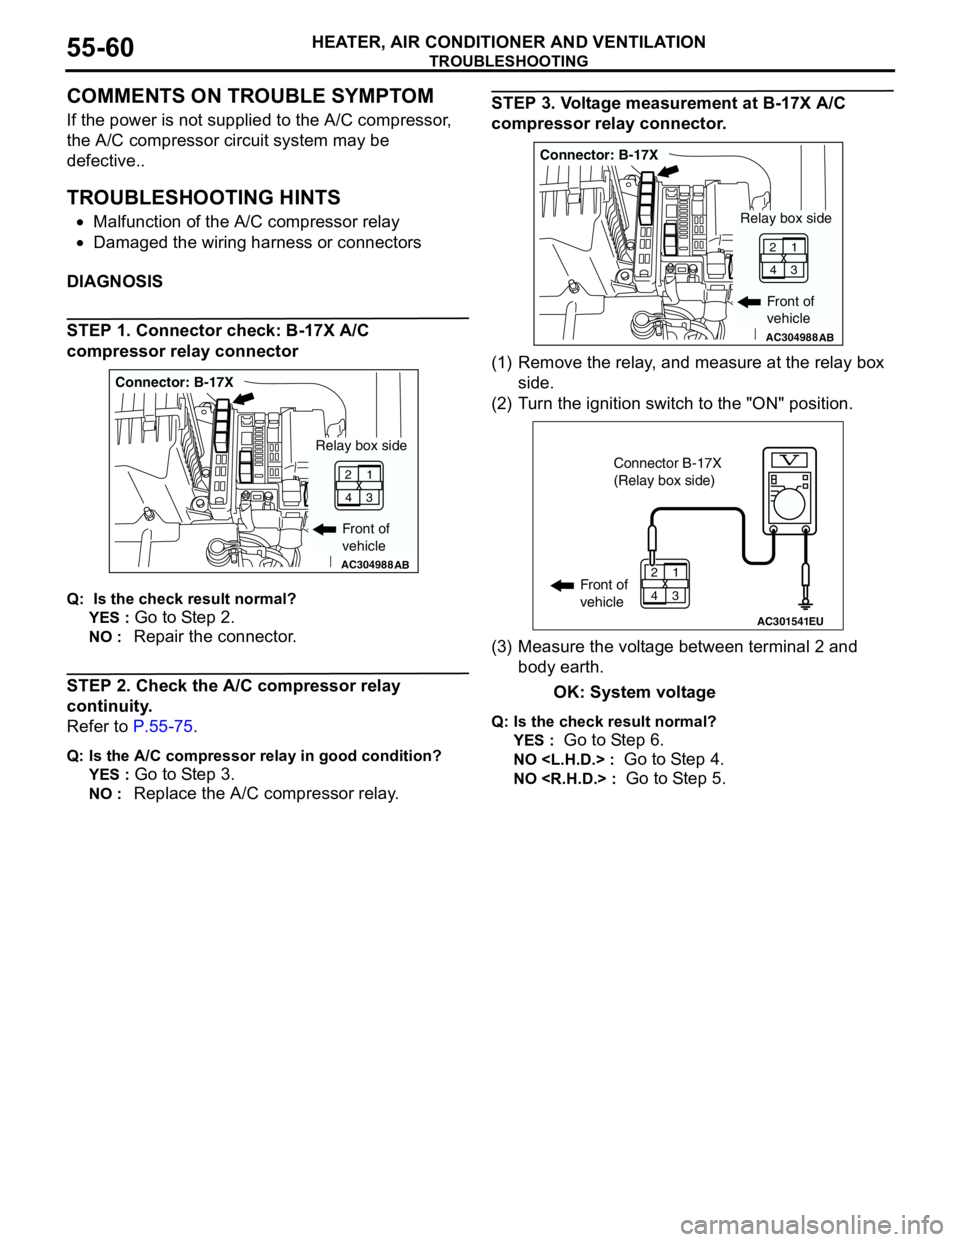
STEP 1. Connector check: B-17X A/C
compressor relay connector
Q: Is the check result normal?
YES :
Go to Step 2.
NO : Repair the connector.
STEP 2. Check the A/C compressor relay
continuity.
Refer to P.55-75.
Q: Is the A/C compressor relay in good condition?
YES :
Go to Step 3.
NO : Replace the A/C compressor relay.
STEP 3. Voltage measurement at B-17X A/C
compressor relay connector.
(1) Remove the relay, and measure at the relay box
side.
(2) Turn the ignition switch to the "ON" position.
(3) Measure the voltage between terminal 2 and
body earth.
OK: System voltage
Q: Is the check result normal?
YES :
Go to Step 6.
NO
NO
AC304988AB
Connector: B-17X
Front of
vehicle
1
3 2
4
Relay box side
AC304988AB
Connector: B-17X
Front of
vehicle
1
3 2
4
Relay box side
AC301541EU
Connector B-17X
(Relay box side)
Front of
vehicle1
3 2
4
Page 545 of 788
TROUBLESHOOTING
HEATER, AIR CONDITIONER AND VENTILATION55-61
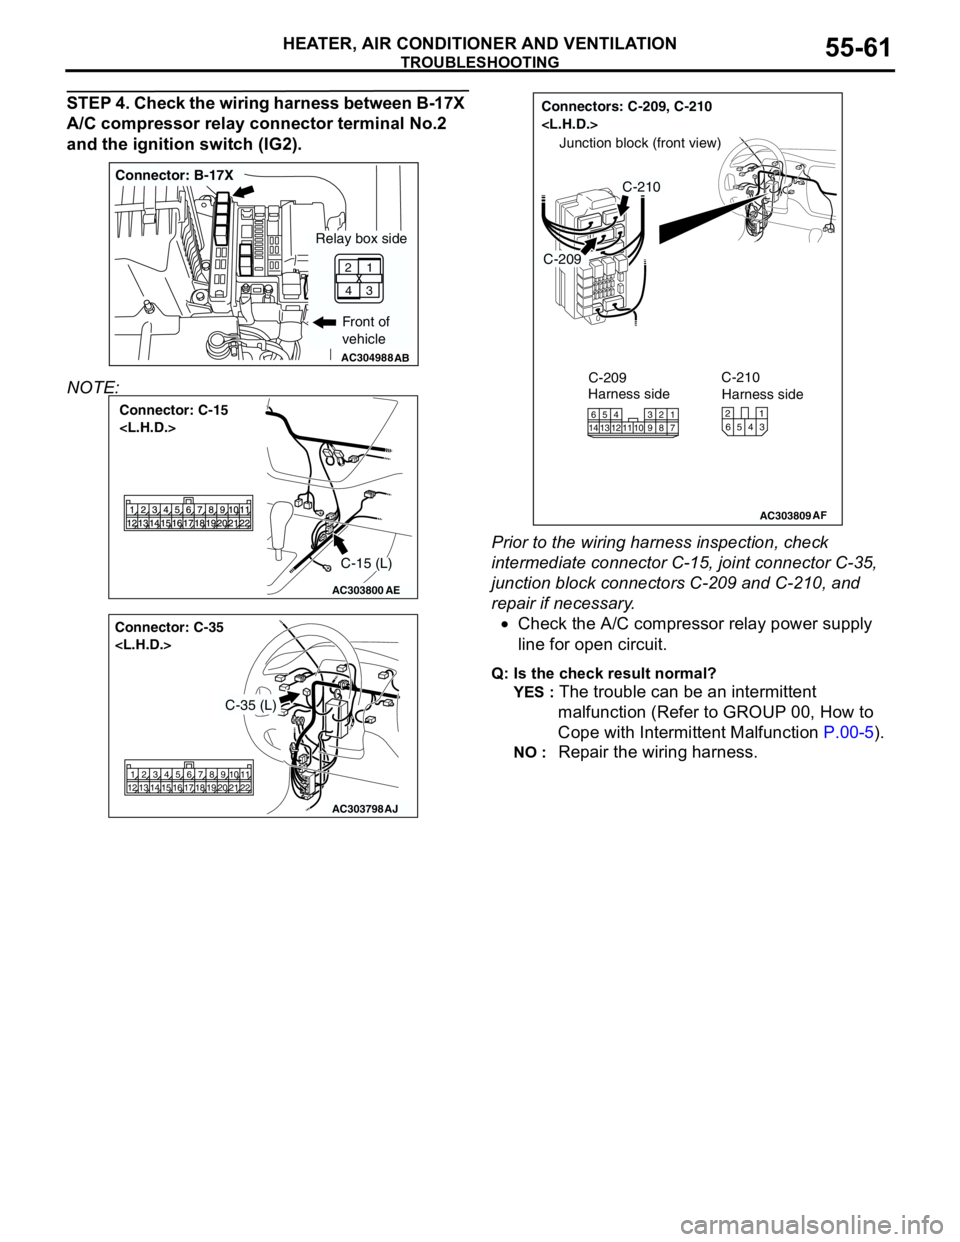
STEP 4. Check the wiring harness between B-17X
A/C compressor relay connector terminal No.2
and the ignition switch (IG2).
NOTE:
Prior to the wiring harness inspection, check
intermediate connector C-15, joint connector C-35,
junction block connectors C-209 and C-210, and
repair if necessary.
•Check the A/C compressor relay power supply
line for open circuit.
Q: Is the check result normal?
YES :
The trouble can be an intermittent
malfunction (Refer to GROUP 00, How to
Cope with Intermittent Malfunction P.00-5).
NO : Repair the wiring harness.
AC304988AB
Connector: B-17X
Front of
vehicle
1
3 2
4
Relay box side
AC303800
Connector: C-15
AE
C-15 (L)
AC303798
Connector: C-35
AJ
2 1313 12 1421 105 4616 15 17789
19 18 2011
22
C-35 (L)
AC303809
Connectors: C-209, C-210
AF
C-209
C-210
Junction block (front view)
C-209
Harness side
1016
145
12134117 238 9
C-210
Harness side
4 65321