MITSUBISHI LANCER 2005 Manual Online
Manufacturer: MITSUBISHI, Model Year: 2005, Model line: LANCER, Model: MITSUBISHI LANCER 2005Pages: 788, PDF Size: 45.98 MB
Page 81 of 788
CHARGING SYSTEM
ENGINE ELECTRICAL16-17
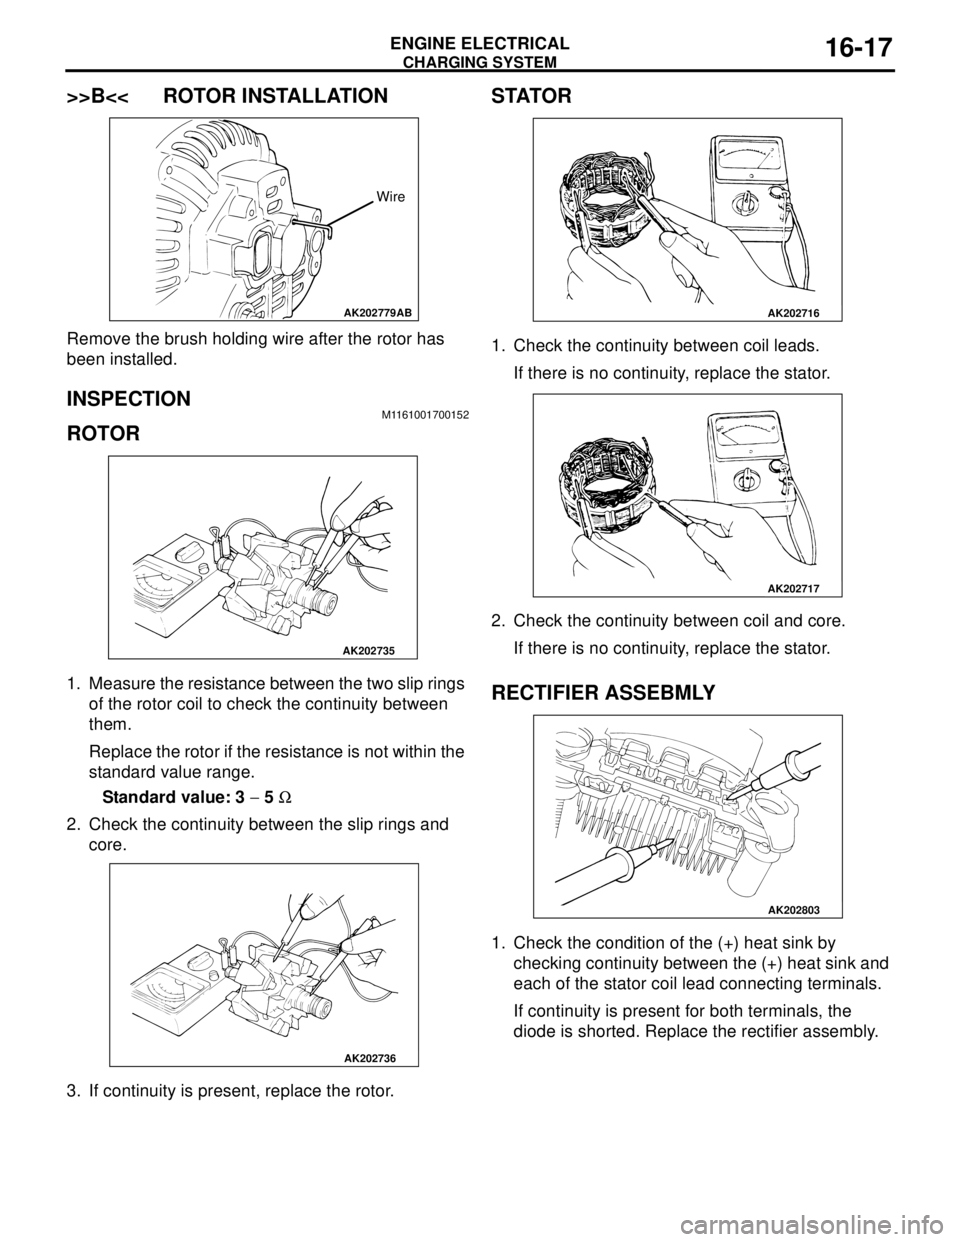
>>B<< ROTOR INSTALLATION
Remove the brush holding wire after the rotor has
been installed.
INSPECTION M1161001700152
ROTOR
1. Measure the resistance between the two slip rings
of the rotor coil to check the continuity between
them.
Replace the rotor if the resistance is not within the
standard value range.
Standard value: 3 − 5 Ω
2. Check the continuity between the slip rings and
core.
3. If continuity is present, replace the rotor.
STATOR
1. Check the continuity between coil leads.
If there is no continuity, replace the stator.
2. Check the continuity between coil and core.
If there is no continuity, replace the stator.
RECTIFIER ASSEBMLY
1. Check the condition of the (+) heat sink by
checking continuity between the (+) heat sink and
each of the stator coil lead connecting terminals.
If continuity is present for both terminals, the
diode is shorted. Replace the rectifier assembly.
AK202779
Wire
AB
AK202735
AK202736
AK202716
AK202717
AK202803
Page 82 of 788
CHARGING SYSTEM
ENGINE ELECTRICAL16-18
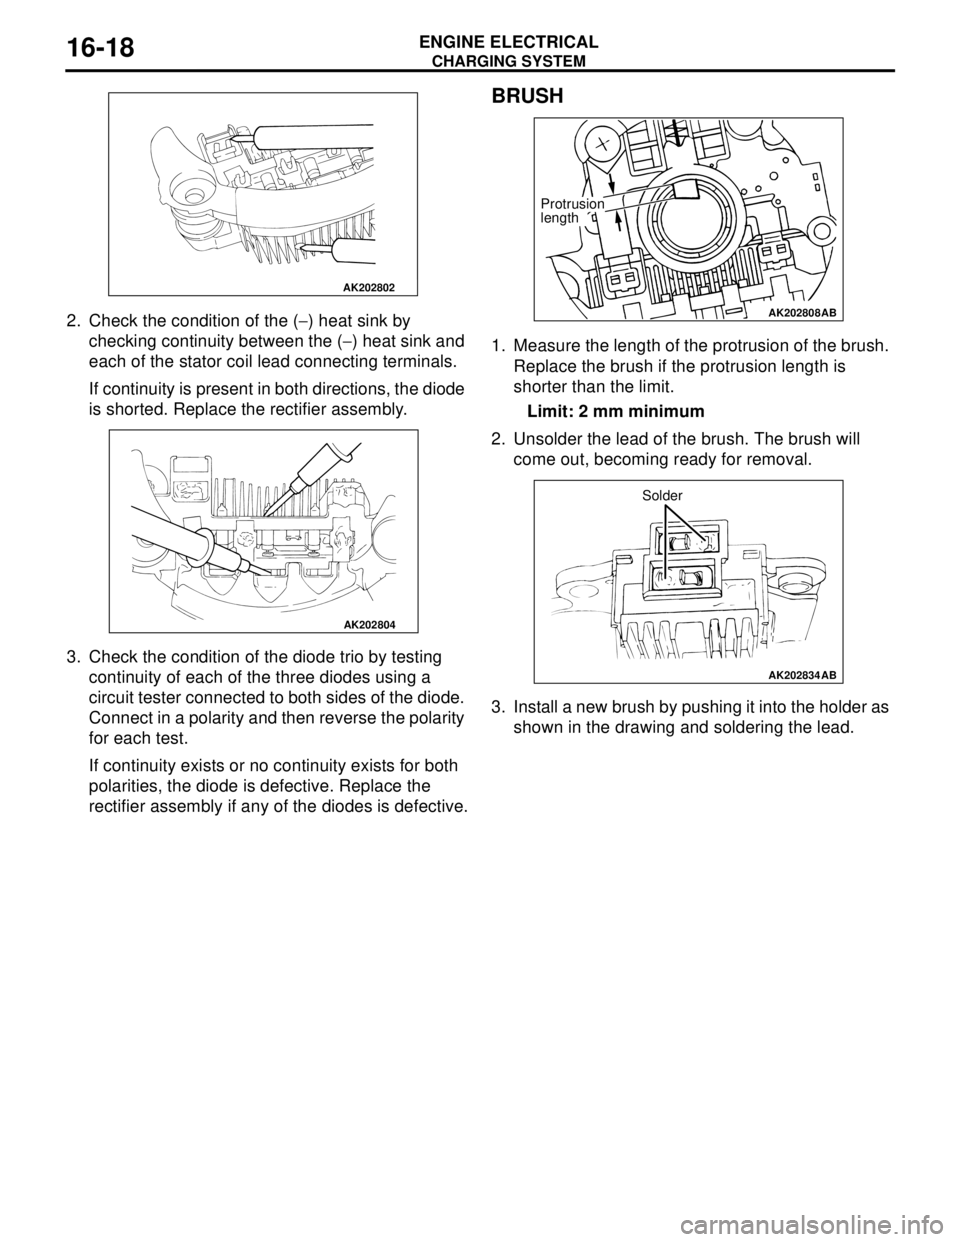
2. Check the condition of the (−) heat sink by
checking continuity between the (−) heat sink and
each of the stator coil lead connecting terminals.
If continuity is present in both directions, the diode
is shorted. Replace the rectifier assembly.
3. Check the condition of the diode trio by testing
continuity of each of the three diodes using a
circuit tester connected to both sides of the diode.
Connect in a polarity and then reverse the polarity
for each test.
If continuity exists or no continuity exists for both
polarities, the diode is defective. Replace the
rectifier assembly if any of the diodes is defective.
BRUSH
1. Measure the length of the protrusion of the brush.
Replace the brush if the protrusion length is
shorter than the limit.
Limit: 2 mm minimum
2. Unsolder the lead of the brush. The brush will
come out, becoming ready for removal.
3. Install a new brush by pushing it into the holder as
shown in the drawing and soldering the lead.
AK202802
AK202804
AK202808
Protrusion
length
AB
AK202834
Solder
AB
Page 83 of 788
STARTING SYSTEM
ENGINE ELECTRICAL16-19
STARTING SYSTEM
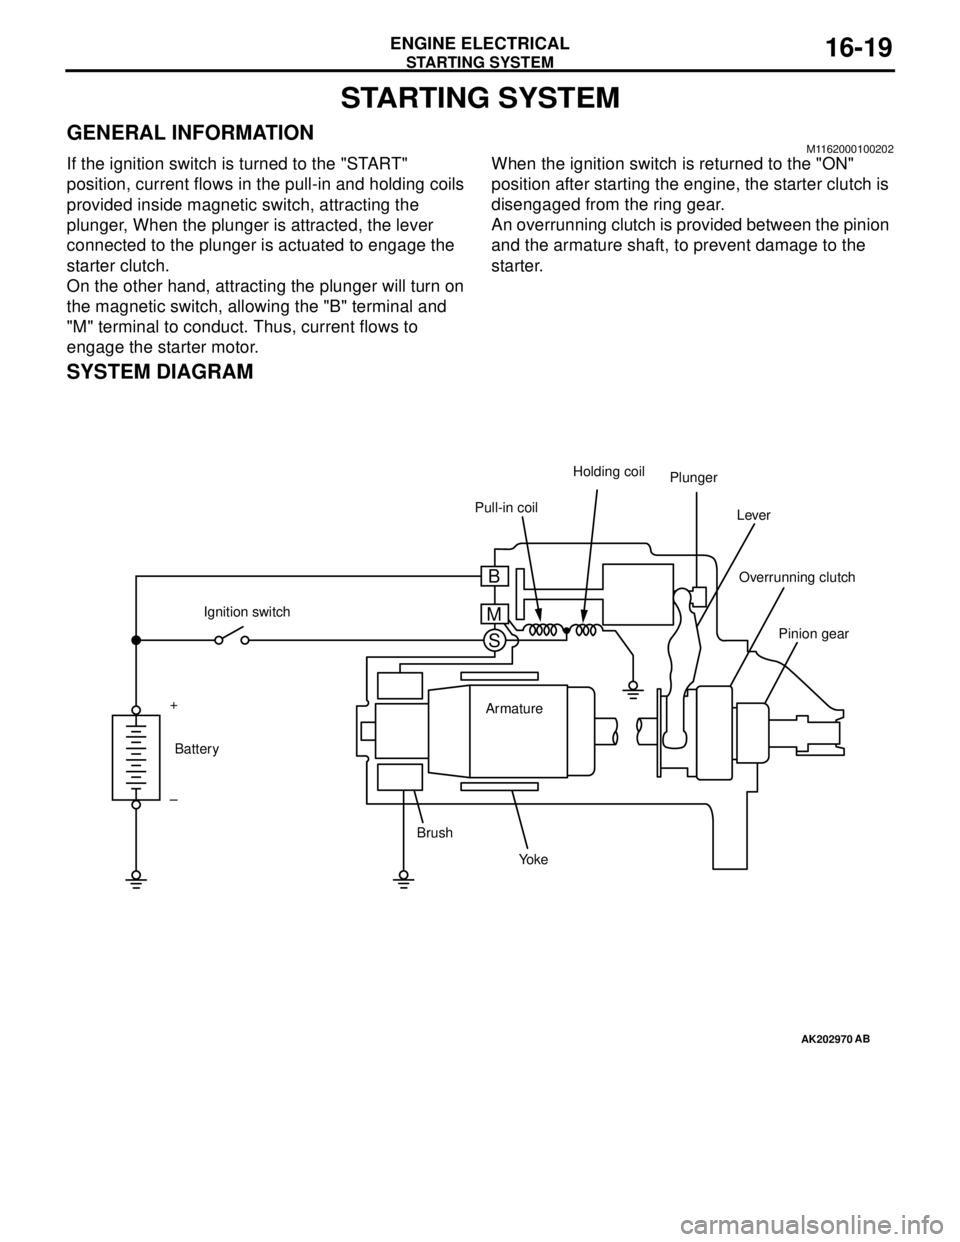
GENERAL INFORMATIONM1162000100202
If the ignition switch is turned to the "START"
position, current flows in the pull-in and holding coils
provided inside magnetic switch, attracting the
plunger, When the plunger is attracted, the lever
connected to the plunger is actuated to engage the
starter clutch.
On the other hand, attracting the plunger will turn on
the magnetic switch, allowing the "B" terminal and
"M" terminal to conduct. Thus, current flows to
engage the starter motor.When the ignition switch is returned to the "ON"
position after starting the engine, the starter clutch is
disengaged from the ring gear.
An overrunning clutch is provided between the pinion
and the armature shaft, to prevent damage to the
starter.
SYSTEM DIAGRAM
AK202970
Pull-in coilHolding coil
Plunger
Lever
Pinion gear Overrunning clutch
Yo k e BrushArmature Ignition switch
Battery +
–
AB
B
M
S
Page 84 of 788

STARTING SYSTEM
ENGINE ELECTRICAL16-20
STARTER MOTOR SPECIFICATIONS
SERVICE SPECIFICATIONS
M1162000300068
Item 4G1 4G6
Type Reduction drive with planetary
gearReduction drive with planetary gear
Rated output kW/V 1.2/12 1.4/12
Number of pinion teeth 8 8
Item Standard value Limit
Pinion gap mm 0.5 − 2.0
−
Commutator run-out mm
−0.05
Commutator diameter mm 29.4 28.8
Undercut depth mm 0.5 0.2
Page 85 of 788

STARTING SYSTEM
ENGINE ELECTRICAL16-21
STARTER MOTOR ASSEMBLY
REMOVAL AND INSTALLATION <4G1>M1162001000628
REMOVAL SERVICE POINT
<> SHIFT CABLE AND SHIFT CABLE
BRACKET ASSEMBLY
Remove the shift cable bracket installation bolt with
the shift cable installed on the shift cable bracket,
and remove the shift cable and shift cable bracket
assembly from the transmission.
<> SHIFT CABLE CONNECTION
REMOVAL
Disengage the transmission, and remove the shift
cable assembly from the transmission.
<
Remove the starter assembly from above the
vehicle.
Pre-removal and Post-installation Operation
•Air Cleaner Assembly Removal and Installation (Refer to
GROUP 15 P.15-3).
•Battery and Battery Tray Removal and Installation
AC303962AB
1
1 2
3
56
7
4
30 ± 3 N·m18 ± 3 N·m
12 ± 2 N·m
Removal steps
1. Shift cable connection
<>2. shift cable and shift cable bracket
assembly
<>3. Shift cable connection 4. Starter connector and terminal
5. Harness bracket
6. Harness bracket <
Page 86 of 788
STARTING SYSTEM
ENGINE ELECTRICAL16-22
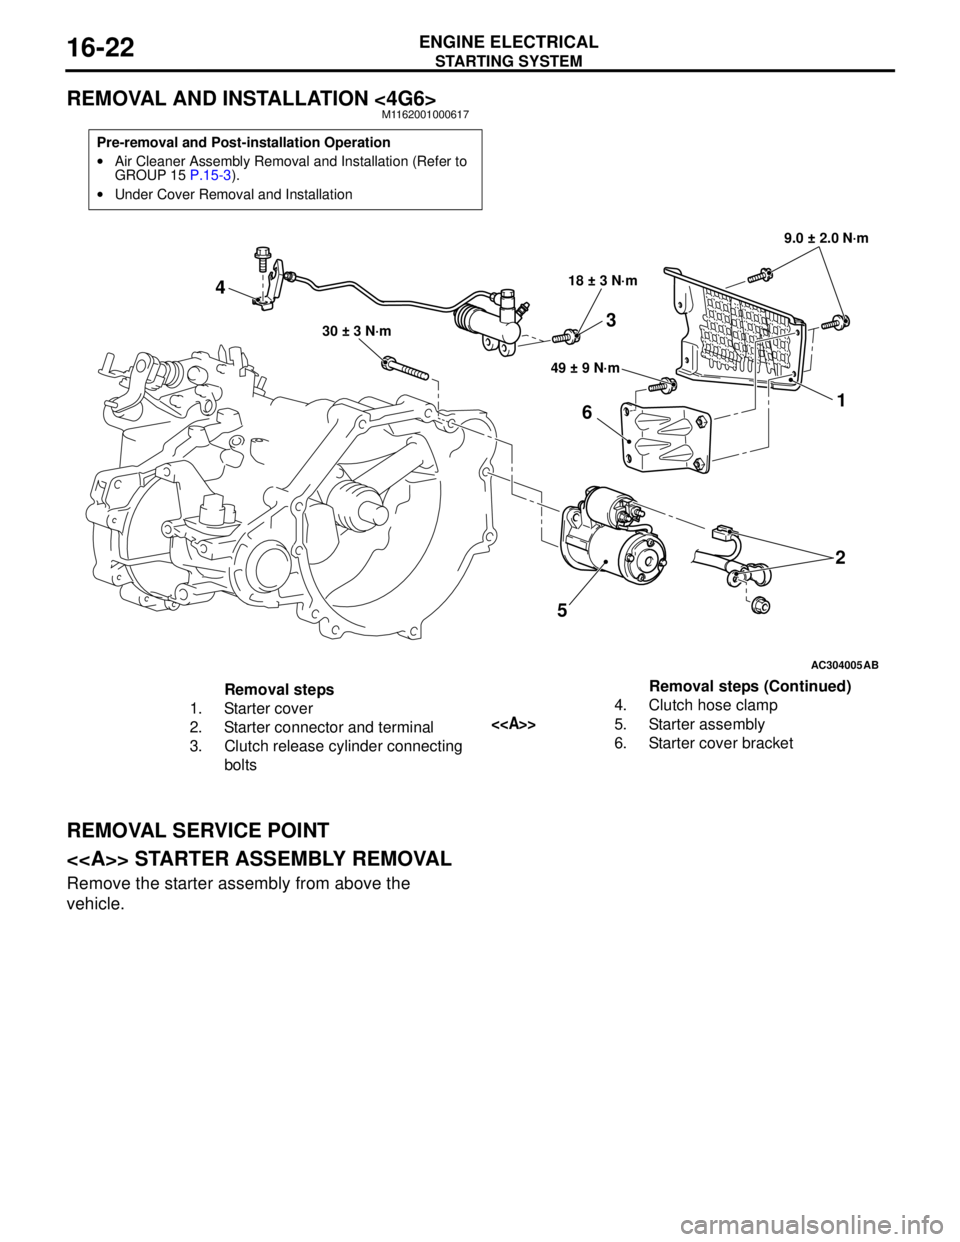
REMOVAL AND INSTALLATION <4G6>M1162001000617
REMOVAL SERVICE POINT
<> STARTER ASSEMBLY REMOVAL
Remove the starter assembly from above the
vehicle.
Pre-removal and Post-installation Operation
•Air Cleaner Assembly Removal and Installation (Refer to
GROUP 15 P.15-3).
•Under Cover Removal and Installation
AC304005
521
6
49 ± 9 N·m 18 ± 3 N·m9.0 ± 2.0 N·m
30 ± 3 N·m
AB
4
3
Removal steps
1. Starter cover
2. Starter connector and terminal
3. Clutch release cylinder connecting
bolts4. Clutch hose clamp
<>5. Starter assembly
6. Starter cover bracketRemoval steps (Continued)
Page 87 of 788
STARTING SYSTEM
ENGINE ELECTRICAL16-23
STARTER MOTOR ASSEMBLY INSPECTIONM1162001100205
PINION GAP ADJUSTMENT
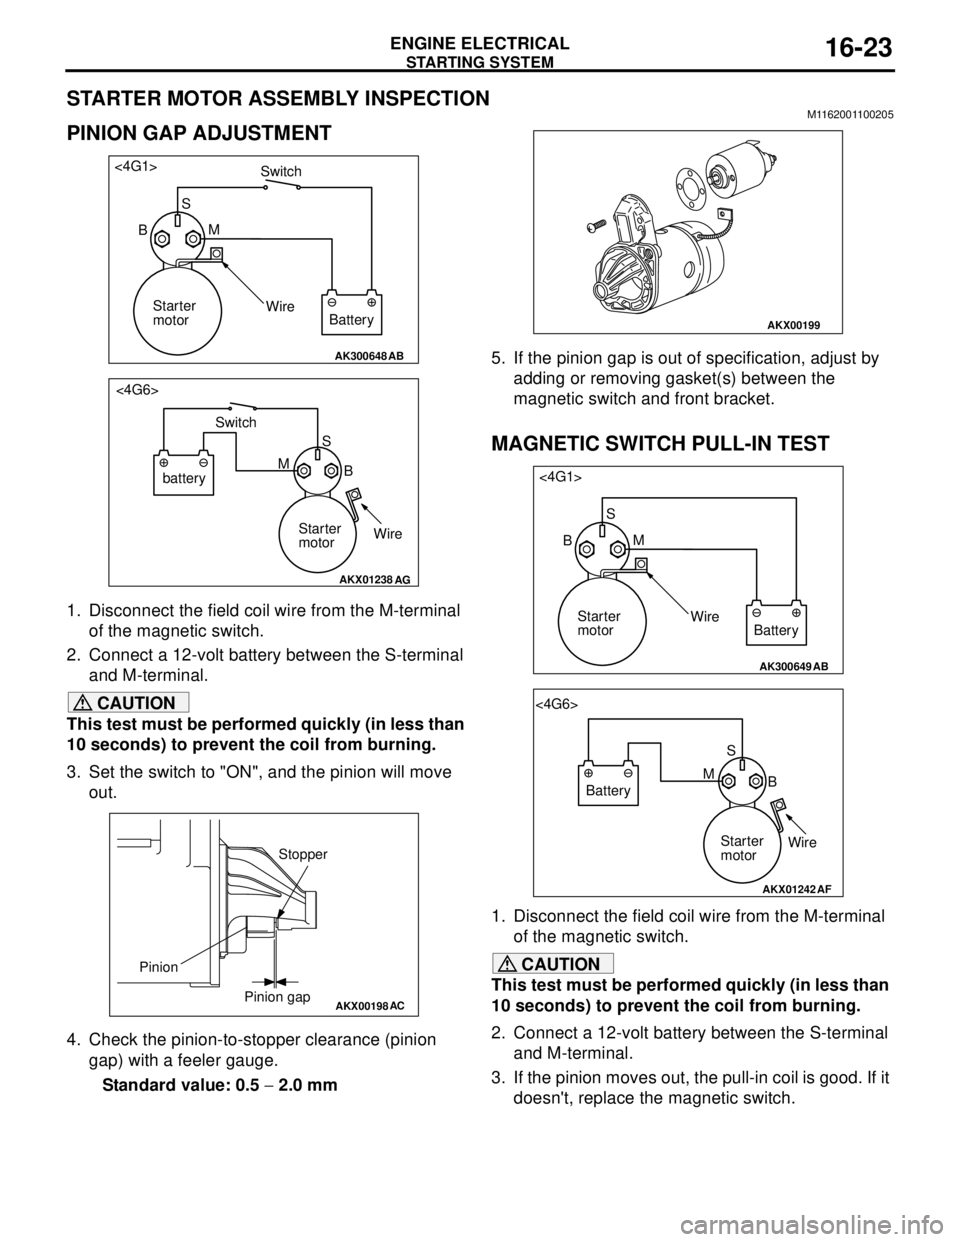
1. Disconnect the field coil wire from the M-terminal
of the magnetic switch.
2. Connect a 12-volt battery between the S-terminal
and M-terminal.
CAUTION
This test must be performed quickly (in less than
10 seconds) to prevent the coil from burning.
3. Set the switch to "ON", and the pinion will move
out.
4. Check the pinion-to-stopper clearance (pinion
gap) with a feeler gauge.
Standard value: 0.5 − 2.0 mm5. If the pinion gap is out of specification, adjust by
adding or removing gasket(s) between the
magnetic switch and front bracket.
MAGNETIC SWITCH PULL-IN TEST
1. Disconnect the field coil wire from the M-terminal
of the magnetic switch.
CAUTION
This test must be performed quickly (in less than
10 seconds) to prevent the coil from burning.
2. Connect a 12-volt battery between the S-terminal
and M-terminal.
3. If the pinion moves out, the pull-in coil is good. If it
doesn't, replace the magnetic switch.
AK300648AB
<4G1>
Switch
S
M
Wire
Battery Starter
motor B
AKX01238
<4G6>
B MS
batterySwitch
Starter
motorWire
AG
AKX00198
Stopper
Pinion gap Pinion
AC
AKX00199
AK300649AB
<4G1>
S
M
Wire
Battery Starter
motor B
AKX01242
<4G6>
S
B M
Battery
Starter
motorWire
AF
Page 88 of 788
STARTING SYSTEM
ENGINE ELECTRICAL16-24
MAGNETIC SWITCH HOLD-IN TEST
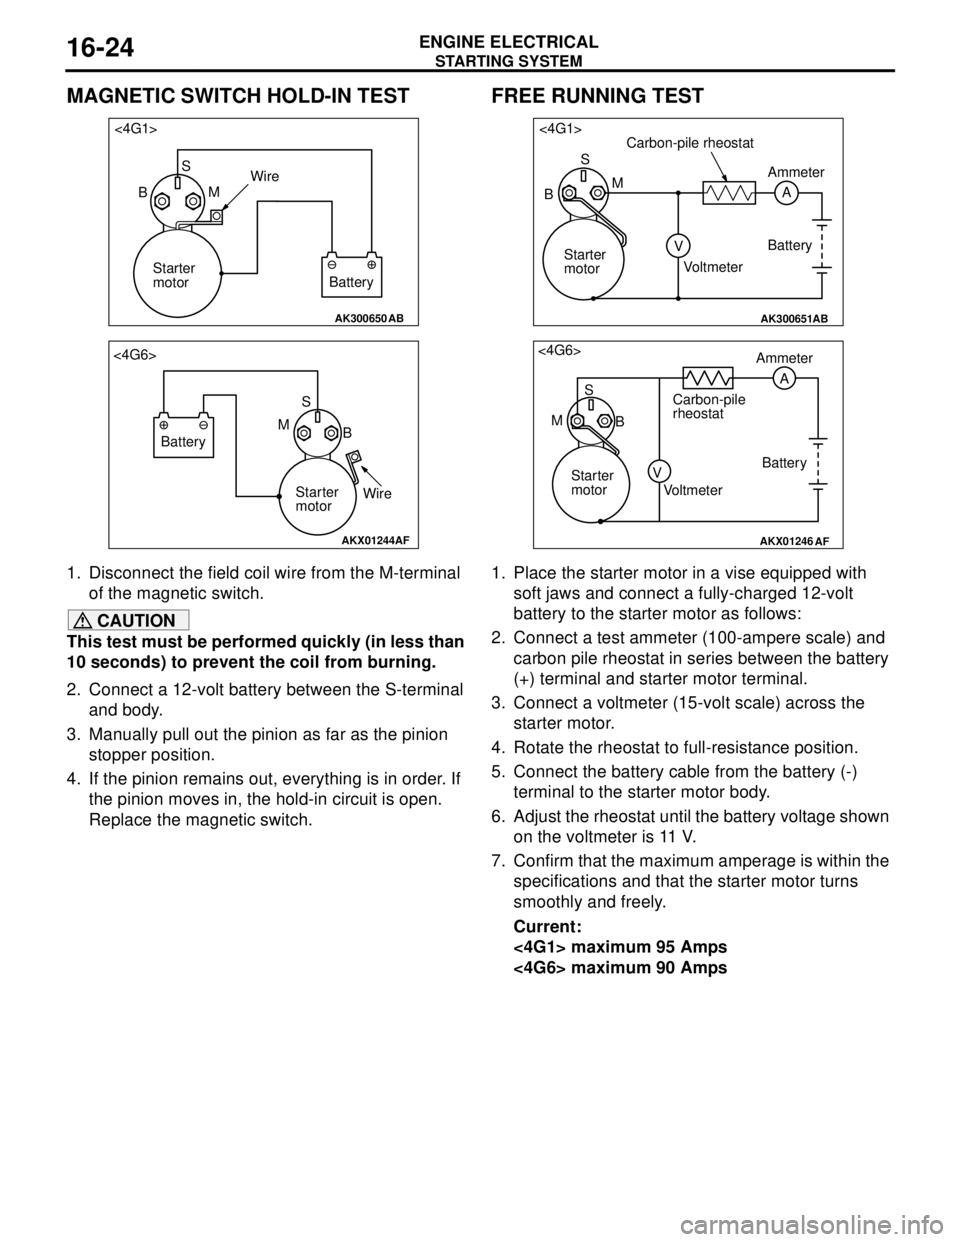
1. Disconnect the field coil wire from the M-terminal
of the magnetic switch.
CAUTION
This test must be performed quickly (in less than
10 seconds) to prevent the coil from burning.
2. Connect a 12-volt battery between the S-terminal
and body.
3. Manually pull out the pinion as far as the pinion
stopper position.
4. If the pinion remains out, everything is in order. If
the pinion moves in, the hold-in circuit is open.
Replace the magnetic switch.
FREE RUNNING TEST
1. Place the starter motor in a vise equipped with
soft jaws and connect a fully-charged 12-volt
battery to the starter motor as follows:
2. Connect a test ammeter (100-ampere scale) and
carbon pile rheostat in series between the battery
(+) terminal and starter motor terminal.
3. Connect a voltmeter (15-volt scale) across the
starter motor.
4. Rotate the rheostat to full-resistance position.
5. Connect the battery cable from the battery (-)
terminal to the starter motor body.
6. Adjust the rheostat until the battery voltage shown
on the voltmeter is 11 V.
7. Confirm that the maximum amperage is within the
specifications and that the starter motor turns
smoothly and freely.
Current:
<4G1> maximum 95 Amps
<4G6> maximum 90 Amps
AK300650AB
<4G1>
S
BMWire
Battery Starter
motor
AKX01244
<4G6>
S
B M
Battery
Starter
motorWire
AF
AK300651AB
<4G1>
S
A M
V BCarbon-pile rheostat
Battery
VoltmeterAmmeter
Starter
motor
AKX01246
<4G6>
S
M
BAmmeter
Carbon-pile
rheostat
Battery
Starter
motor
Voltmeter
AF
A
V
Page 89 of 788
STARTING SYSTEM
ENGINE ELECTRICAL16-25
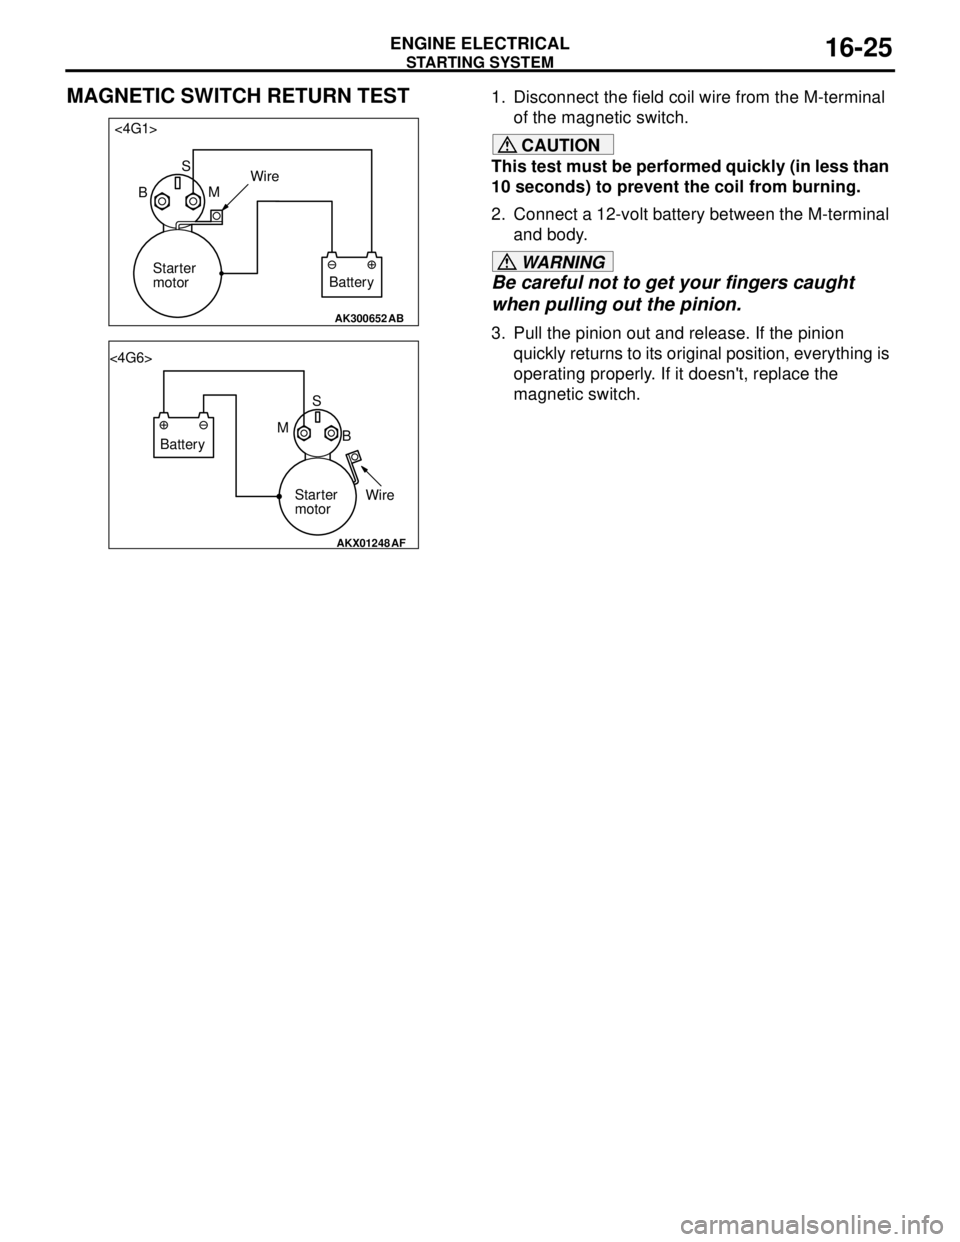
MAGNETIC SWITCH RETURN TEST1. Disconnect the field coil wire from the M-terminal
of the magnetic switch.
CAUTION
This test must be performed quickly (in less than
10 seconds) to prevent the coil from burning.
2. Connect a 12-volt battery between the M-terminal
and body.
WARNING
Be careful not to get your fingers caught
when pulling out the pinion.
3. Pull the pinion out and release. If the pinion
quickly returns to its original position, everything is
operating properly. If it doesn't, replace the
magnetic switch.
AK300652AB
<4G1>
S
BMWire
Battery Starter
motor
AKX01248
<4G6>
S
B M
Battery
Starter
motorWire
AF
Page 90 of 788
STARTING SYSTEM
ENGINE ELECTRICAL16-26
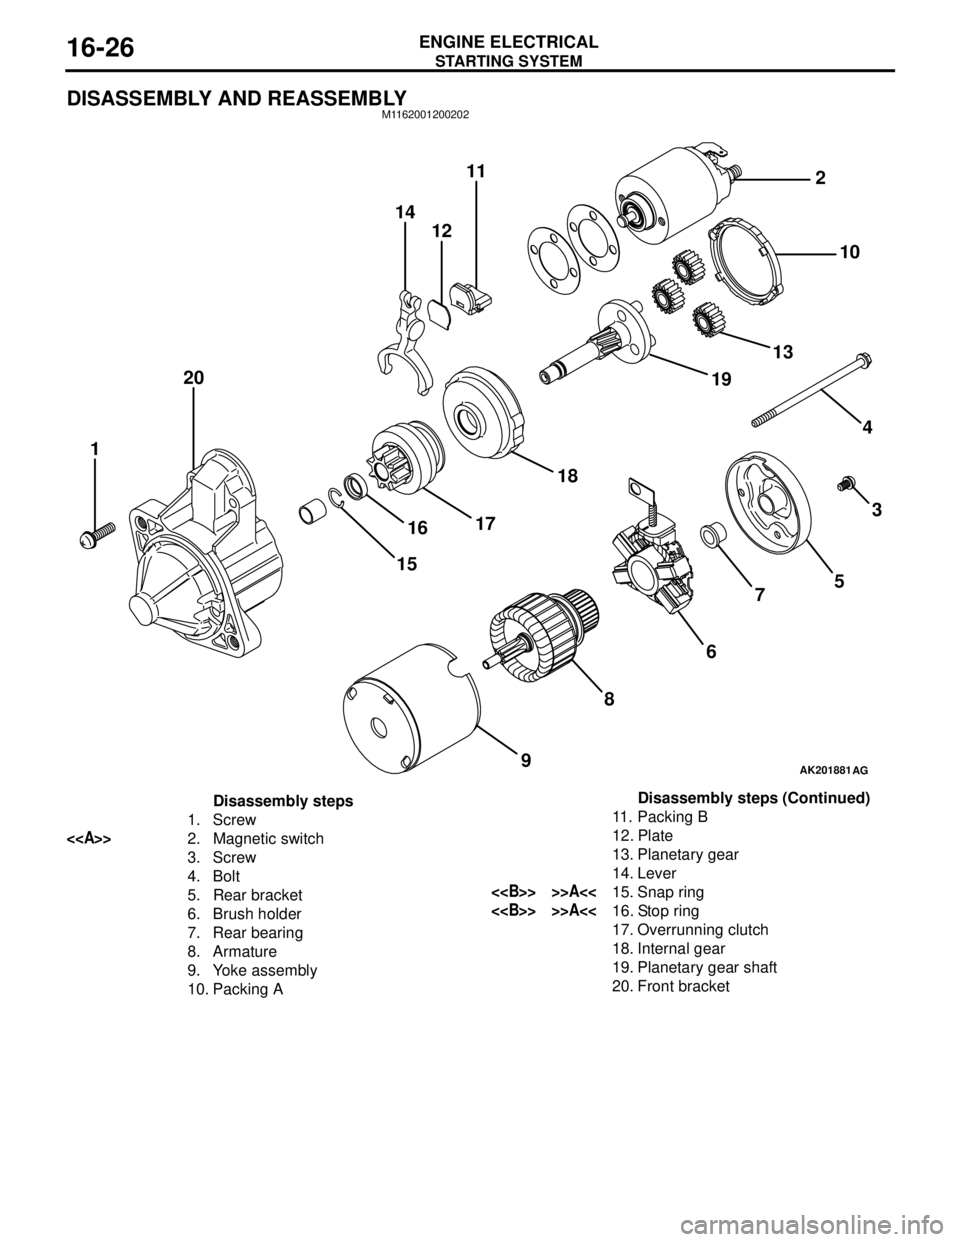
DISASSEMBLY AND REASSEMBLYM1162001200202
AK201881
14
1211
20
1
15161718191310 2
4
3
5
7
6
8
9
AG
Disassembly steps
1. Screw
<>2. Magnetic switch
3. Screw
4. Bolt
5. Rear bracket
6. Brush holder
7. Rear bearing
8. Armature
9. Yoke assembly
10. Packing A11. Packing B
12. Plate
13. Planetary gear
14. Lever
<> >>A<<15. Snap ring
<> >>A<<16. Stop ring
17. Overrunning clutch
18. Internal gear
19. Planetary gear shaft
20. Front bracketDisassembly steps (Continued)