52a MITSUBISHI LANCER 2005 Workshop Manual
[x] Cancel search | Manufacturer: MITSUBISHI, Model Year: 2005, Model line: LANCER, Model: MITSUBISHI LANCER 2005Pages: 788, PDF Size: 45.98 MB
Page 89 of 788
STARTING SYSTEM
ENGINE ELECTRICAL16-25
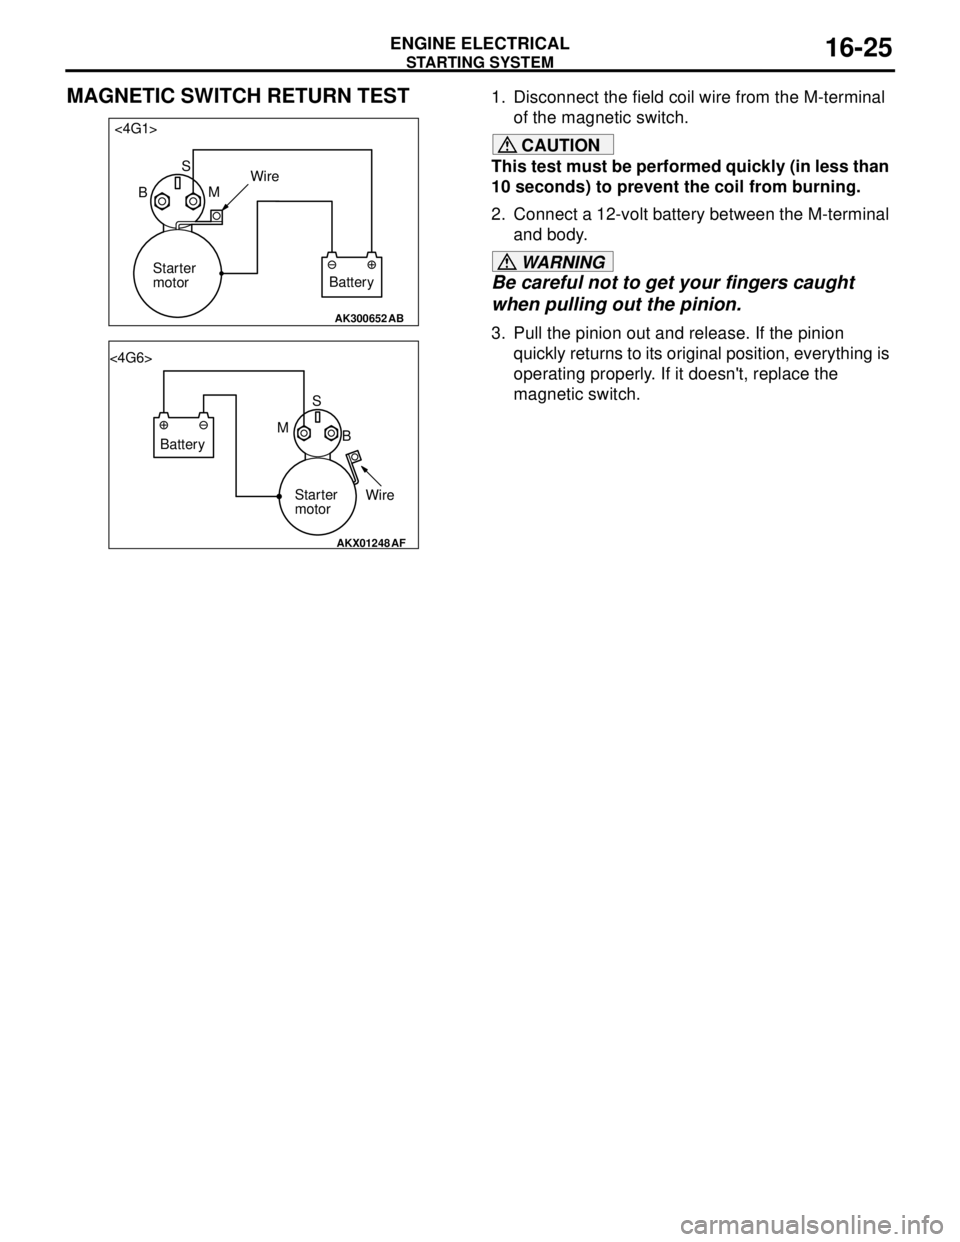
MAGNETIC SWITCH RETURN TEST1. Disconnect the field coil wire from the M-terminal
of the magnetic switch.
CAUTION
This test must be performed quickly (in less than
10 seconds) to prevent the coil from burning.
2. Connect a 12-volt battery between the M-terminal
and body.
WARNING
Be careful not to get your fingers caught
when pulling out the pinion.
3. Pull the pinion out and release. If the pinion
quickly returns to its original position, everything is
operating properly. If it doesn't, replace the
magnetic switch.
AK300652AB
<4G1>
S
BMWire
Battery Starter
motor
AKX01248
<4G6>
S
B M
Battery
Starter
motorWire
AF
Page 227 of 788
LUBRICANTS
PARKING BRAKES36-3
LUBRICANTS
M1361000400293
ON-VEHICLE SERVICE
PARKING BRAKE LEVER STROKE
CHECK AND ADJUSTMENT
M1361000900339
1. Pull the parking brake lever with a force of
approximately 200 N and count the number of
notches.
Standard value: 5 − 7 notches
2. If the parking brake lever stroke is not the
standard value, adjust as described below.
(1) Remove the rear console assembly (Refer to
GROUP 52A, Rear Floor Console P.52A-8).
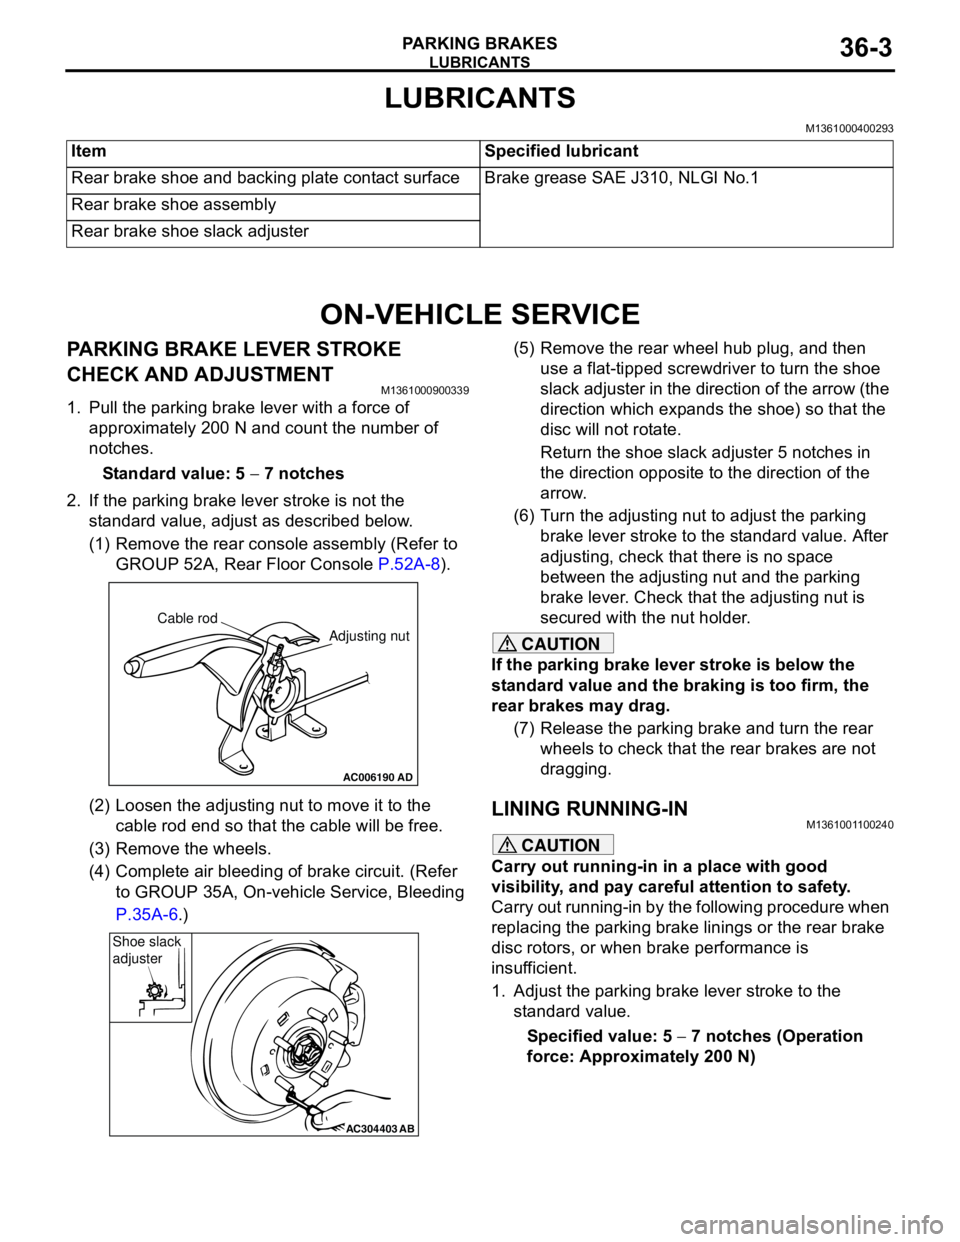
(2) Loosen the adjusting nut to move it to the
cable rod end so that the cable will be free.
(3) Remove the wheels.
(4) Complete air bleeding of brake circuit. (Refer
to GROUP 35A, On-vehicle Service, Bleeding
P.35A-6.)(5) Remove the rear wheel hub plug, and then
use a flat-tipped screwdriver to turn the shoe
slack adjuster in the direction of the arrow (the
direction which expands the shoe) so that the
disc will not rotate.
Return the shoe slack adjuster 5 notches in
the direction opposite to the direction of the
arrow.
(6) Turn the adjusting nut to adjust the parking
brake lever stroke to the standard value. After
adjusting, check that there is no space
between the adjusting nut and the parking
brake lever. Check that the adjusting nut is
secured with the nut holder.
CAUTION
If the parking brake lever stroke is below the
standard value and the braking is too firm, the
rear brakes may drag.
(7) Release the parking brake and turn the rear
wheels to check that the rear brakes are not
dragging.
LINING RUNNING-INM1361001100240
CAUTION
Carry out running-in in a place with good
visibility, and pay careful attention to safety.
Carry out running-in by the following procedure when
replacing the parking brake linings or the rear brake
disc rotors, or when brake performance is
insufficient.
1. Adjust the parking brake lever stroke to the
standard value.
Specified value: 5 − 7 notches (Operation
force: Approximately 200 N) Item Specified lubricant
Rear brake shoe and backing plate contact surface Brake grease SAE J310, NLGI No.1
Rear brake shoe assembly
Rear brake shoe slack adjuster
AC006190
Cable rod
Adjusting nut
AD
AC304403AB
Shoe slack
adjuster
Page 228 of 788
ON-VEHICLE SERVICE
PARKING BRAKES36-4
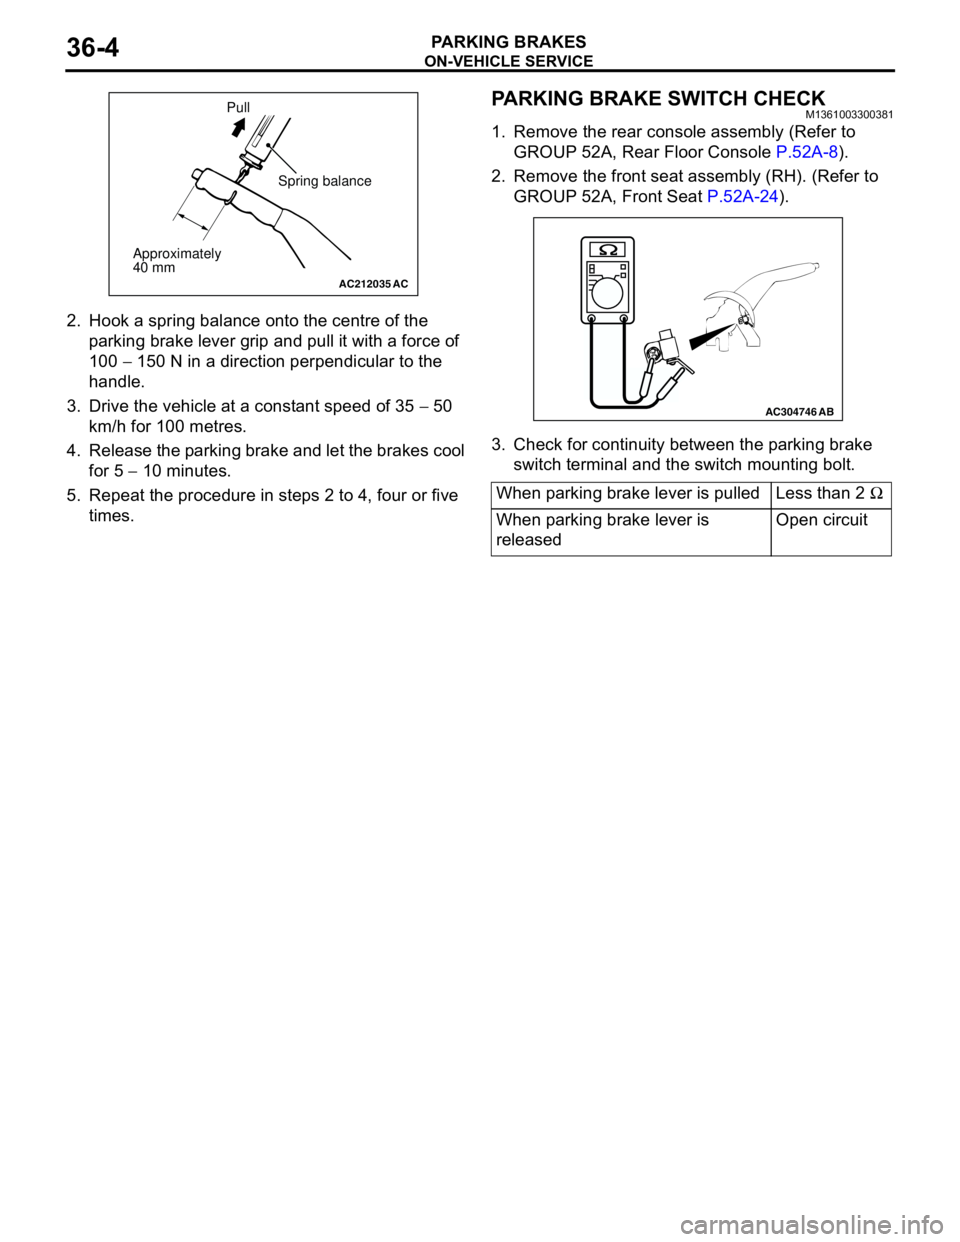
2. Hook a spring balance onto the centre of the
parking brake lever grip and pull it with a force of
100 − 150 N in a direction perpendicular to the
handle.
3. Drive the vehicle at a constant speed of 35 − 50
km/h for 100 metres.
4. Release the parking brake and let the brakes cool
for 5 − 10 minutes.
5. Repeat the procedure in steps 2 to 4, four or five
times.
PARKING BRAKE SWITCH CHECKM1361003300381
1. Remove the rear console assembly (Refer to
GROUP 52A, Rear Floor Console P.52A-8).
2. Remove the front seat assembly (RH). (Refer to
GROUP 52A, Front Seat P.52A-24).
3. Check for continuity between the parking brake
switch terminal and the switch mounting bolt.
AC212035AC
Spring balance
Approximately
40 mmPull
When parking brake lever is pulled Less than 2 Ω
When parking brake lever is
releasedOpen circuit
AC304746AB
Page 229 of 788
PARKING BRAKE LEVER
PARKING BRAKES36-5
PARKING BRAKE LEVER
REMOVAL AND INSTALLATIONM1361001300330
Pre-removal Operation
Rear Console Assembly and Rear Console Bracket Removal
(Refer to GROUP 52A, Rear Floor Console P.52A-8.)Post-installation Operation
•Parking Brake Lever Stroke Adjustment (Refer to P.36-3.)
•Rear Console Bracket and Rear Console Assembly
Installation (Refer to GROUP 52A, Rear Floor Console
P.52A-8.)
AC006199AB
4
5
21
3
A
AB
B
Ratchet pawlSection A - A
Section B - B
Ratchet pawl
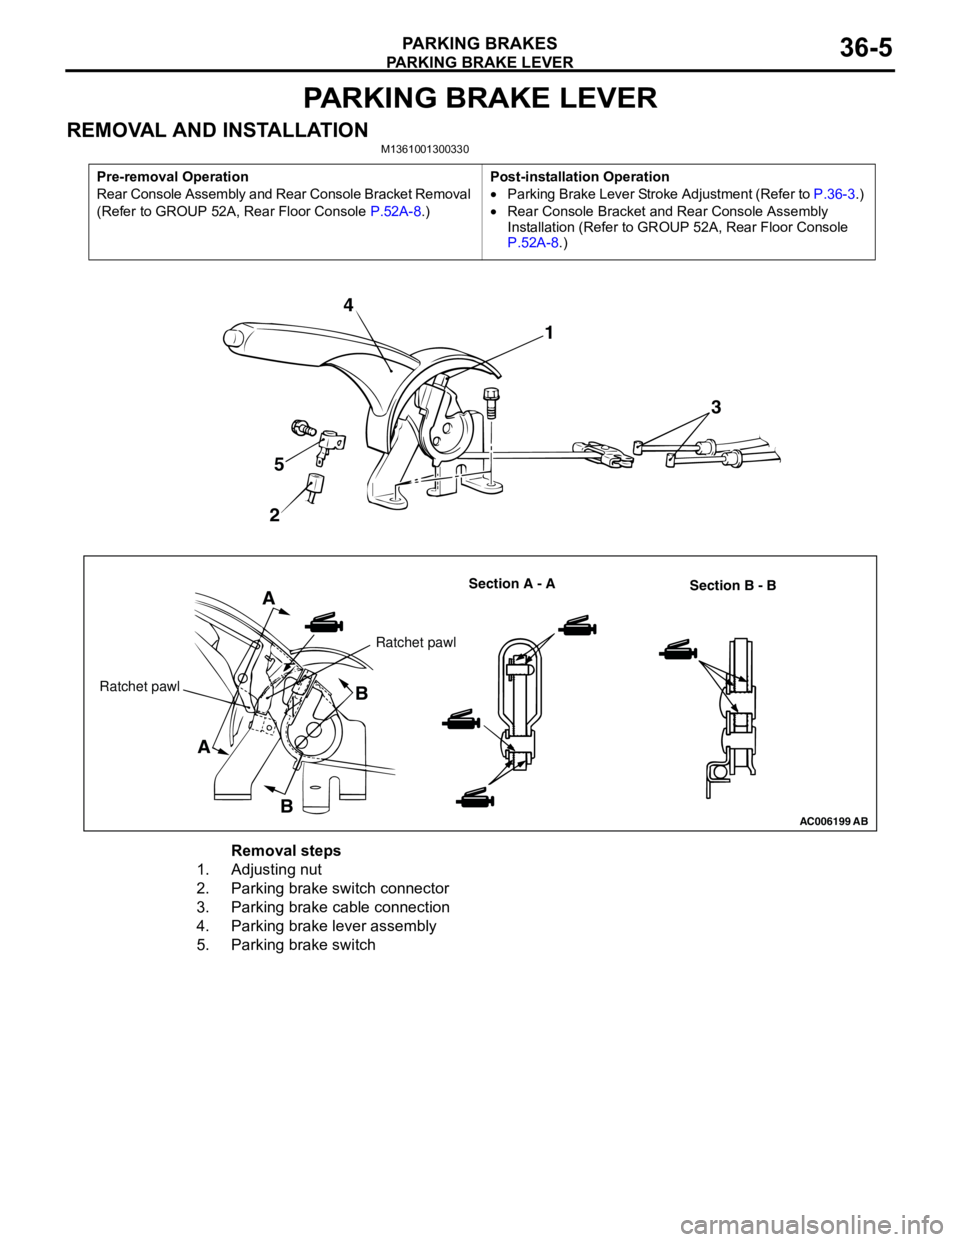
Removal steps
1. Adjusting nut
2. Parking brake switch connector
3. Parking brake cable connection
4. Parking brake lever assembly
5. Parking brake switch
Page 230 of 788
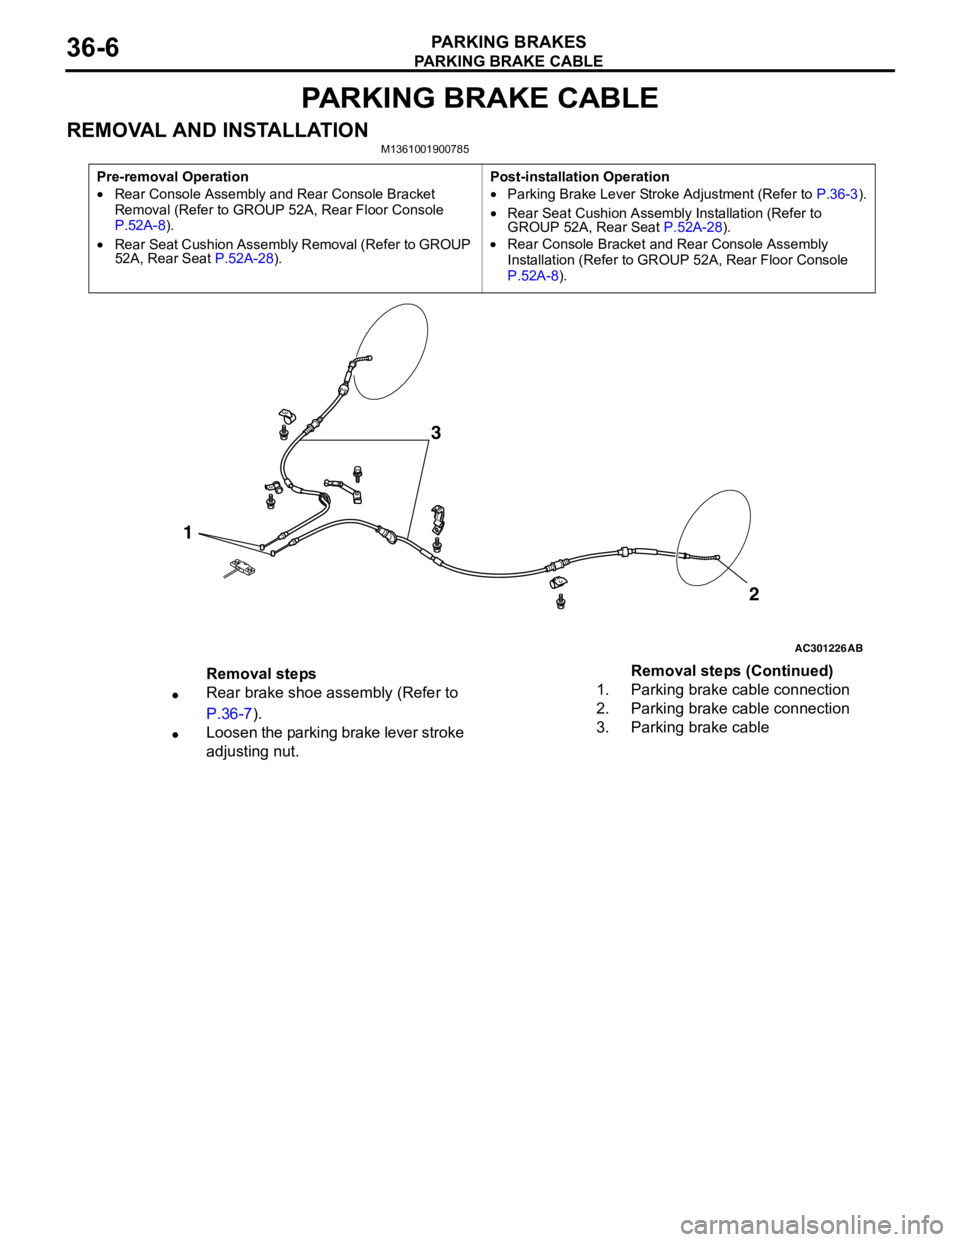
PARKING BRAKE CABLE
PARKING BRAKES36-6
PARKING BRAKE CABLE
REMOVAL AND INSTALLATIONM1361001900785
Pre-removal Operation
•Rear Console Assembly and Rear Console Bracket
Removal (Refer to GROUP 52A, Rear Floor Console
P.52A-8).
•Rear Seat Cushion Assembly Removal (Refer to GROUP
52A, Rear Seat P.52A-28).Post-installation Operation
•Parking Brake Lever Stroke Adjustment (Refer to P.36-3).
•Rear Seat Cushion Assembly Installation (Refer to
GROUP 52A, Rear Seat P.52A-28).
•Rear Console Bracket and Rear Console Assembly
Installation (Refer to GROUP 52A, Rear Floor Console
P.52A-8).
AC301226
1
AB
2
3
Removal steps
•Rear brake shoe assembly (Refer to
P.36-7).
•Loosen the parking brake lever stroke
adjusting nut.1. Parking brake cable connection
2. Parking brake cable connection
3. Parking brake cableRemoval steps (Continued)
Page 255 of 788
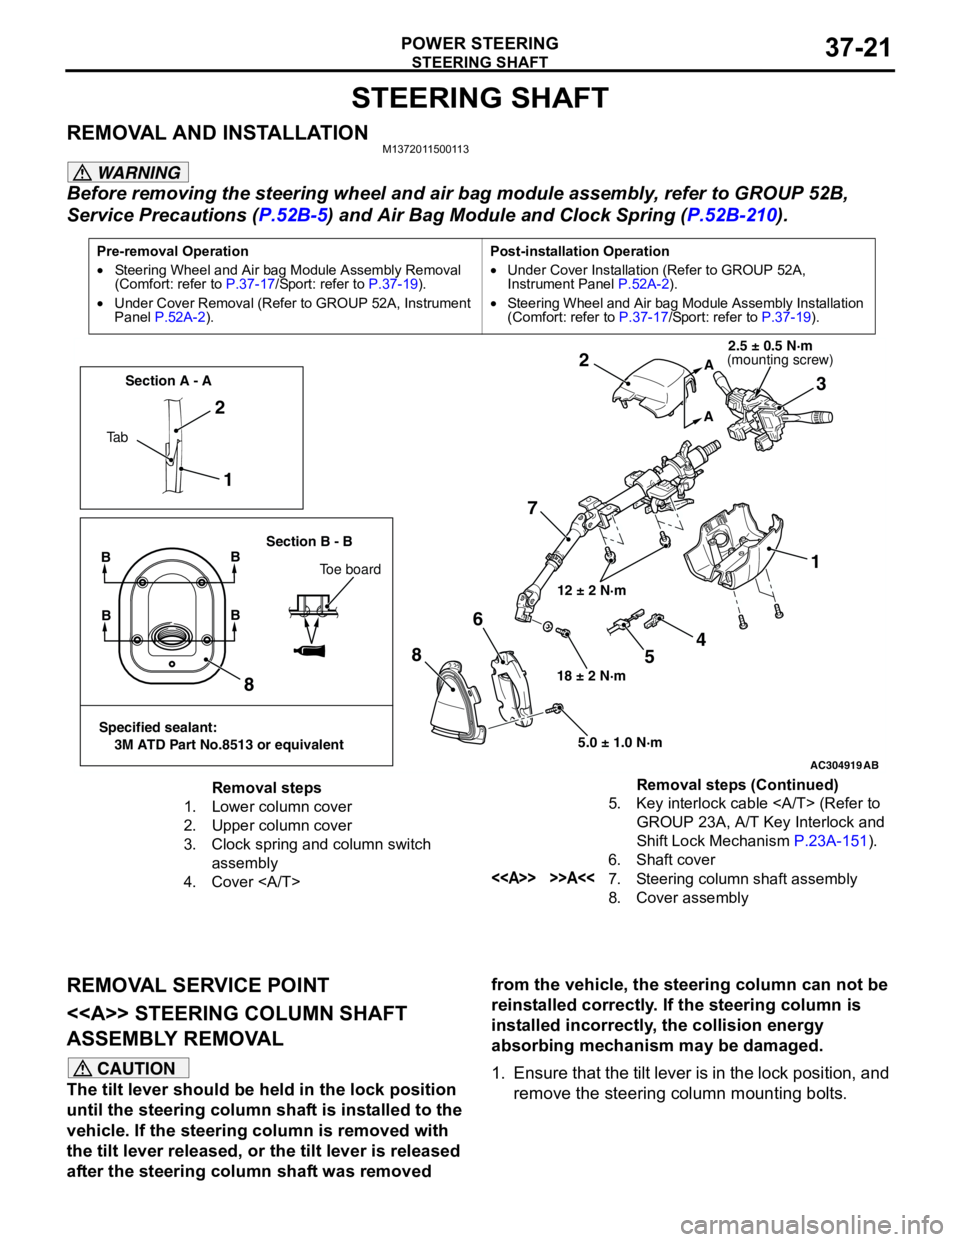
STEERING SHAFT
POWER STEERING37-21
STEERING SHAFT
REMOVAL AND INSTALLATIONM1372011500113
WARNING
Before removing the steering wheel and air bag module assembly, refer to GROUP 52B,
Service Precautions (P.52B-5) and Air Bag Module and Clock Spring (P.52B-210).
REMOVAL SERVICE POINT
<> STEERING COLUMN SHAFT
ASSEMBLY REMOVAL
CAUTION
The tilt lever should be held in the lock position
until the steering column shaft is installed to the
vehicle. If the steering column is removed with
the tilt lever released, or the tilt lever is released
after the steering column shaft was removed from the vehicle, the steering column can not be
reinstalled correctly. If the steering column is
installed incorrectly, the collision energy
absorbing mechanism may be damaged.
1. Ensure that the tilt lever is in the lock position, and
remove the steering column mounting bolts.
Pre-removal Operation
•Steering Wheel and Air bag Module Assembly Removal
(Comfort: refer to P.37-17/Sport: refer to P.37-19).
•Under Cover Removal (Refer to GROUP 52A, Instrument
Panel P.52A-2).Post-installation Operation
•Under Cover Installation (Refer to GROUP 52A,
Instrument Panel P.52A-2).
•Steering Wheel and Air bag Module Assembly Installation
(Comfort: refer to P.37-17/Sport: refer to P.37-19).
AC304919AB
12 ± 2 N·m
18 ± 2 N·m
5.0 ± 1.0 N·m
1 2
73 2
1
8
86
A
A
Ta bSection A - A
Section B - B
BB
Toe board
Specified sealant:
3M ATD Part No.8513 or equivalent
BB
4
5
(mounting screw)2.5 ± 0.5 N·m
Removal steps
1. Lower column cover
2. Upper column cover
3. Clock spring and column switch
assembly
4. Cover 5. Key interlock cable (Refer to
GROUP 23A, A/T Key Interlock and
Shift Lock Mechanism P.23A-151).
6. Shaft cover
<> >>A<<7. Steering column shaft assembly
8. Cover assemblyRemoval steps (Continued)
Page 286 of 788
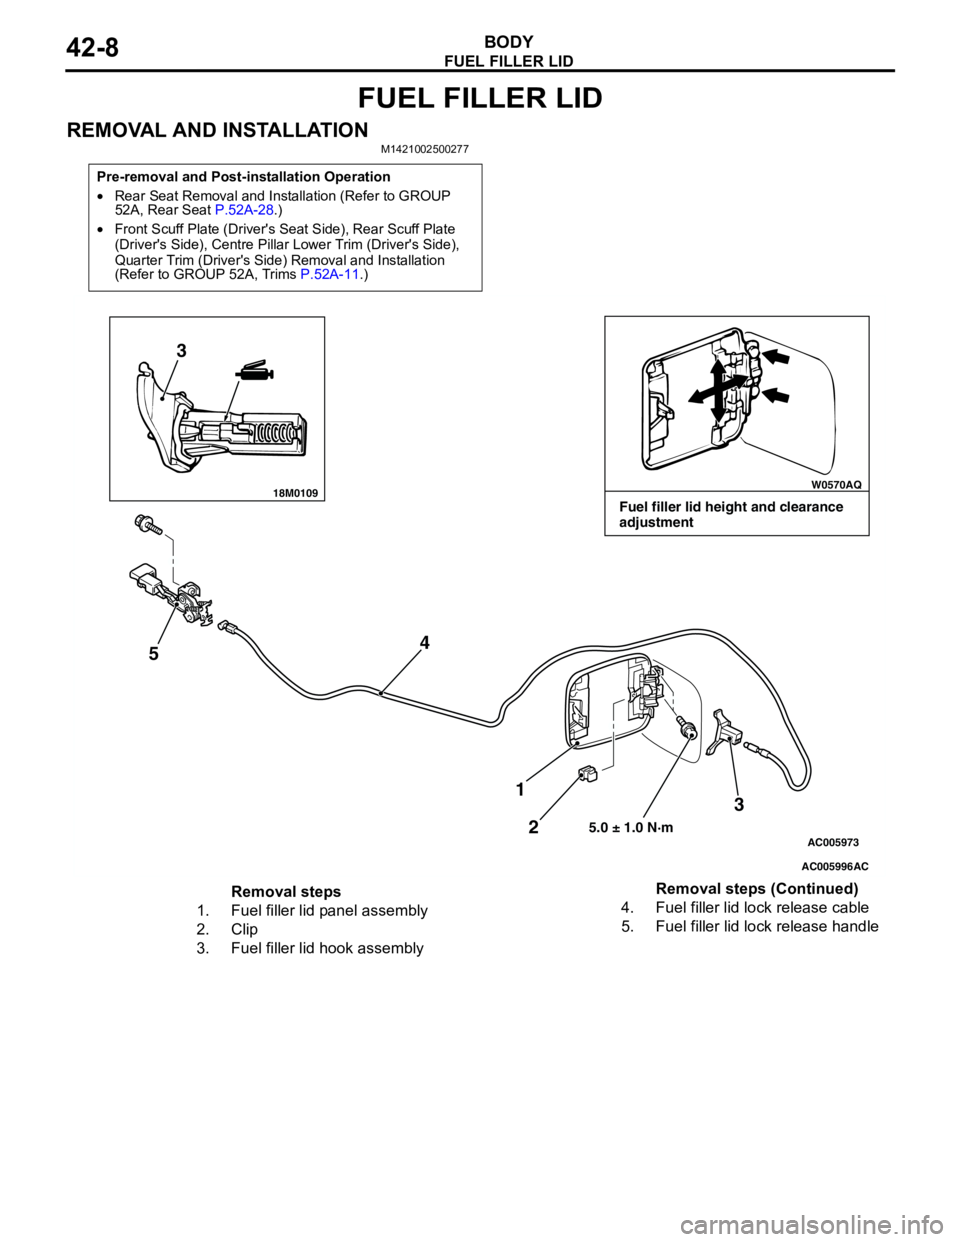
FUEL FILLER LID
BODY42-8
FUEL FILLER LID
REMOVAL AND INSTALLATIONM1421002500277
Pre-removal and Post-installation Operation
•Rear Seat Removal and Installation (Refer to GROUP
52A, Rear Seat P.52A-28.)
•Front Scuff Plate (Driver's Seat Side), Rear Scuff Plate
(Driver's Side), Centre Pillar Lower Trim (Driver's Side),
Quarter Trim (Driver's Side) Removal and Installation
(Refer to GROUP 52A, Trims P.52A-11.)
18M0109W0570AQ
AC005996
AC005973
3
54
3
2 1
5.0 ± 1.0 N·m
AC
Fuel filler lid height and clearance
adjustment
Removal steps
1. Fuel filler lid panel assembly
2. Clip
3. Fuel filler lid hook assembly4. Fuel filler lid lock release cable
5. Fuel filler lid lock release handleRemoval steps (Continued)
Page 290 of 788
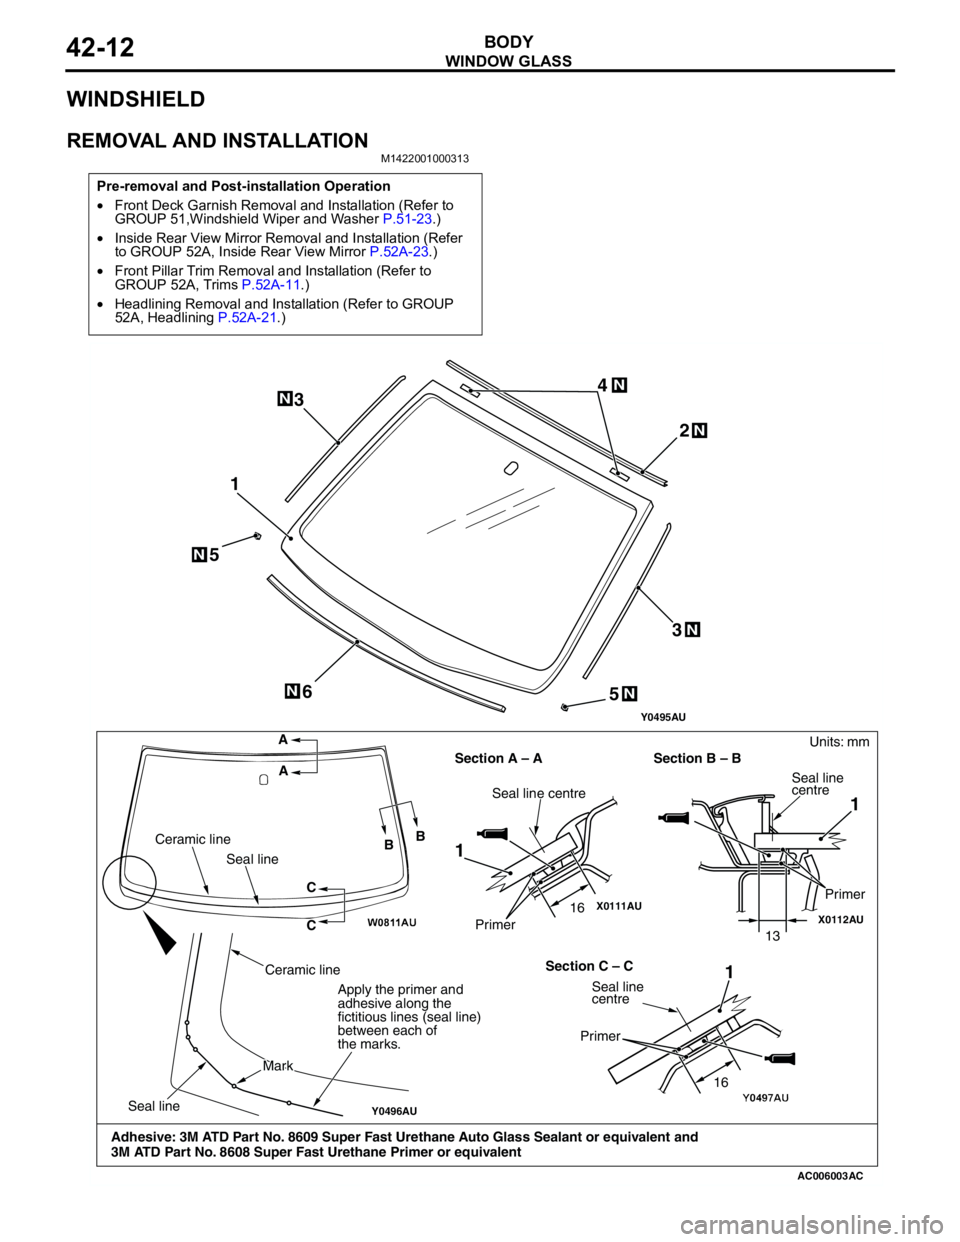
WINDOW GLASS
BODY42-12
WINDSHIELD
REMOVAL AND INSTALLATIONM1422001000313
Pre-removal and Post-installation Operation
•Front Deck Garnish Removal and Installation (Refer to
GROUP 51,Windshield Wiper and Washer P.51-23.)
•Inside Rear View Mirror Removal and Installation (Refer
to GROUP 52A, Inside Rear View Mirror P.52A-23.)
•Front Pillar Trim Removal and Installation (Refer to
GROUP 52A, Trims P.52A-11.)
•Headlining Removal and Installation (Refer to GROUP
52A, Headlining P.52A-21.)
AC006003
X0111AUX0112AU
Y0496AU
12
3 4
6
1 11 3
N
N
N
N
N
AC Y0495AU
A
A
BB
C
C Ceramic line
Seal line
Seal line
Ceramic line
MarkMark
Apply the primer and
adhesive along the
fictitious lines (seal line)
between each of
the marks.
Seal line centre
Primer Section A – A Section B – BSeal line
centre
Primer
Section C – C
Seal line
centre
Primer
5N
5N
Units: mm
Adhesive: 3M ATD Part No. 8609 Super Fast Urethane Auto Glass Sealant or equivalent and
3M ATD Part No. 8608 Super Fast Urethane Primer or equivalent
16
1613
Page 294 of 788
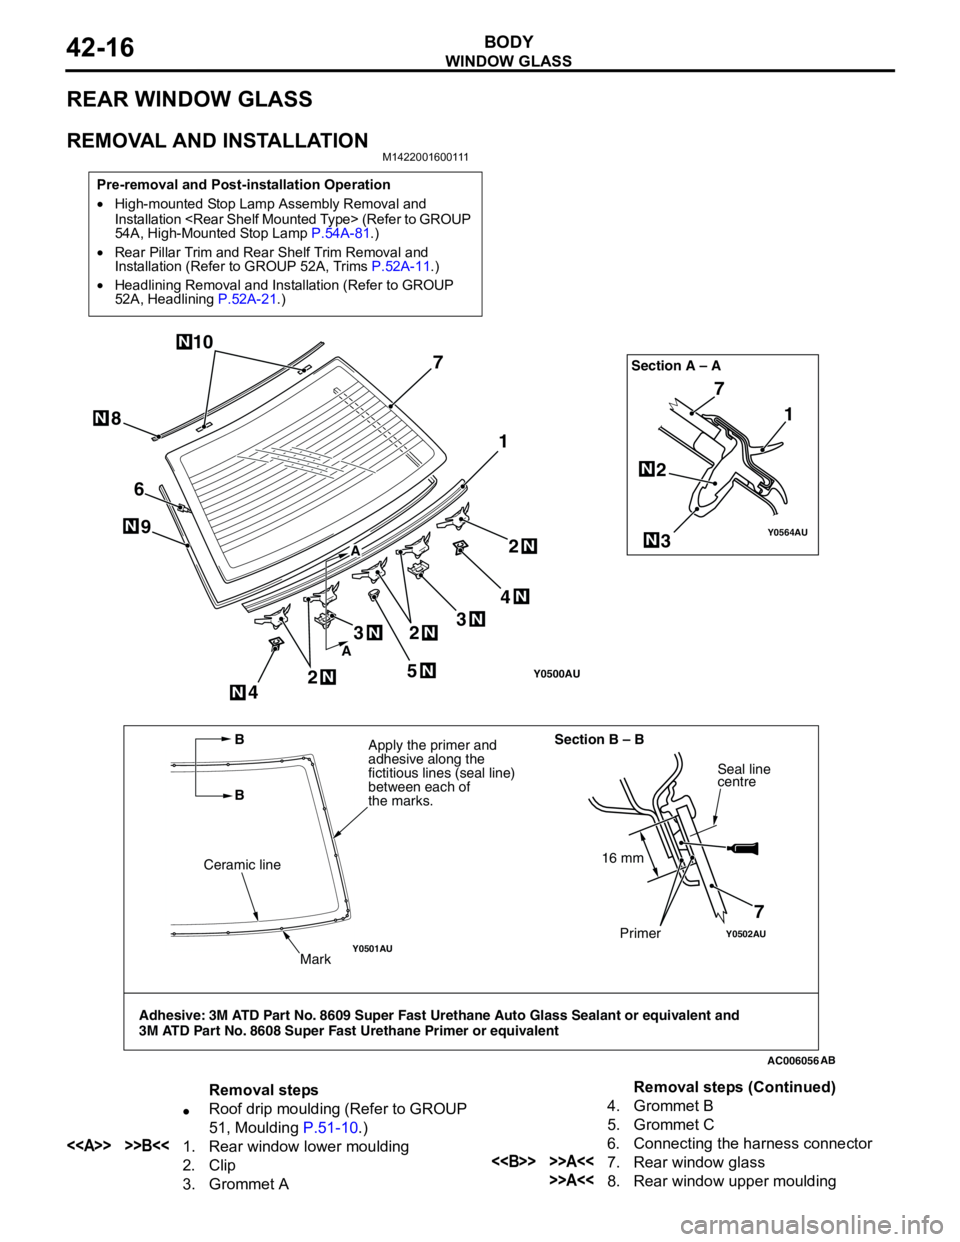
WINDOW GLASS
BODY42-16
REAR WINDOW GLASS
REMOVAL AND INSTALLATIONM1422001600111
Pre-removal and Post-installation Operation
•High-mounted Stop Lamp Assembly Removal and
Installation
54A, High-Mounted Stop Lamp P.54A-81.)
•Rear Pillar Trim and Rear Shelf Trim Removal and
Installation (Refer to GROUP 52A, Trims P.52A-11.)
•Headlining Removal and Installation (Refer to GROUP
52A, Headlining P.52A-21.)
Y0500AU
Y0502AUY0501AU
Y0564AU
AC006056
11 7
7
AB
6
25
4 9
7 3
N
2N
2N
N
4N
N
3N3N
NN
2N
Ceramic line
Mark
Apply the primer and
adhesive along the
fictitious lines (seal line)
between each of
the marks.Section A – A
Section B – B
Seal line
centre
Primer
8N
10N
Adhesive: 3M ATD Part No. 8609 Super Fast Urethane Auto Glass Sealant or equivalent and
3M ATD Part No. 8608 Super Fast Urethane Primer or equivalent
16 mm
A
A
B
B
Removal steps
•Roof drip moulding (Refer to GROUP
51, Moulding P.51-10.)
<> >>B<<1. Rear window lower moulding
2. Clip
3. Grommet A4. Grommet B
5. Grommet C
6. Connecting the harness connector<> >>A<<7. Rear window glass
>>A<<8. Rear window upper mouldingRemoval steps (Continued)
Page 297 of 788

WINDOW GLASS
BODY42-19
QUARTER WINDOW GLASS
REMOVAL AND INSTALLATIONM1422002500247
Pre-removal and Post-installation Operation
•Quarter Trim Upper Removal and Installation (Refer to
GROUP 52A, Trims P.52A-11).
AC304783
N
N
N
12
3
N3 4
AB
Y1509AU
Y1508AU
Y1507AU
Y1485AU
Y1535AU
AC304784
AAB B
DD
C
C
Mark
Apply the primer and adhesive
along the fictitious lines (seal line)
between each of the marks.
Adhesive: 3M ATD Part No. 8609 Super Fast Urethane Auto Glass Sealant or equivalent and
3M ATD Part No. 8608 Super Fast Urethane Primer or equivalent
1 11
Seal line centrePrimer Section A – A Section B – BSeal line
centre
Primer
Section C – C Section D – D
Seal line
centrePrimer
1Seal line
centre
Units: mm
Primer
16
161616
Ceramic line
AB
Removal steps
<> >>B<<1. Quarter window glass assembly
>>A<<2. Dual lock fastener
>>A<<3. Clip
>>A<<4. GasketRemoval steps (Continued)