ron MITSUBISHI LANCER 2006 Owners Manual
[x] Cancel search | Manufacturer: MITSUBISHI, Model Year: 2006, Model line: LANCER, Model: MITSUBISHI LANCER 2006Pages: 800, PDF Size: 45.03 MB
Page 302 of 800
DOOR
BODY42-30
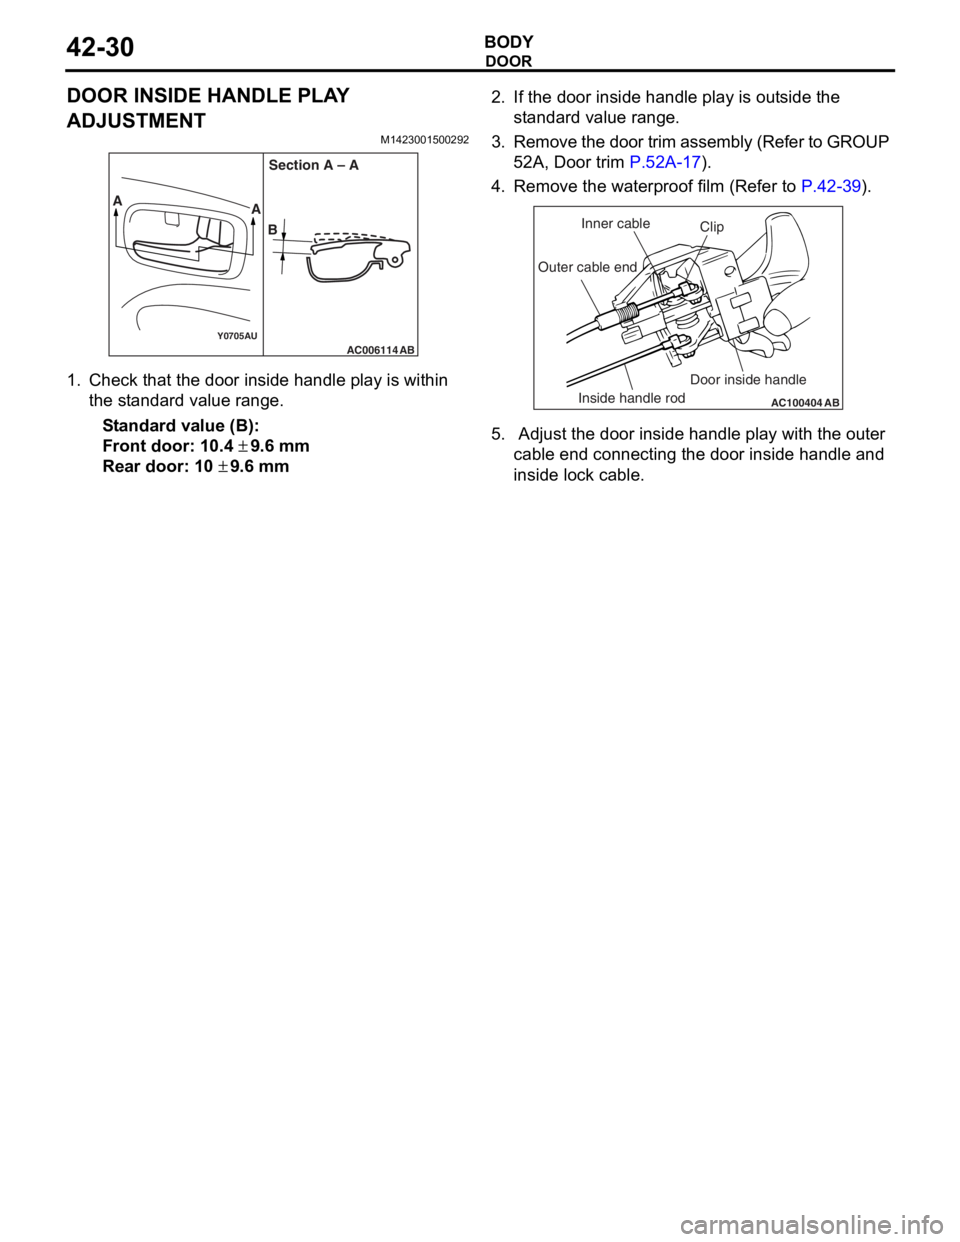
DOOR INSIDE HANDLE PLAY
ADJUSTMENT
M1423001500292
AC006114Y0705AUAB
AA
BSection A – A
1.
Check t hat the door insi de ha ndle play is within
th e st and ard va lue ra nge.
St andard va lue (B):
Fron t door: 10. 4 ± 9.6 mm
Rear door: 10 ± 9.6 mm
2.If the do or inside handle play is ou t s ide the
st a ndard valu e rang e.
3. Remo ve the d oor trim a ssembly (Refer to GROUP
5 2 A, Door trim
P.52A-17).
4.Remove the wate rproof film (Re f er to P.42-39).
AC100404
AB
Clip
Inner cable
Outer cable end
Inside handle rod Door inside handle
5.
Adjust the do or inside handle play wit h the o u ter
cable end conne cting the door inside han dle a nd
inside lo ck cable.
Page 303 of 800
DOOR
BODY42-31
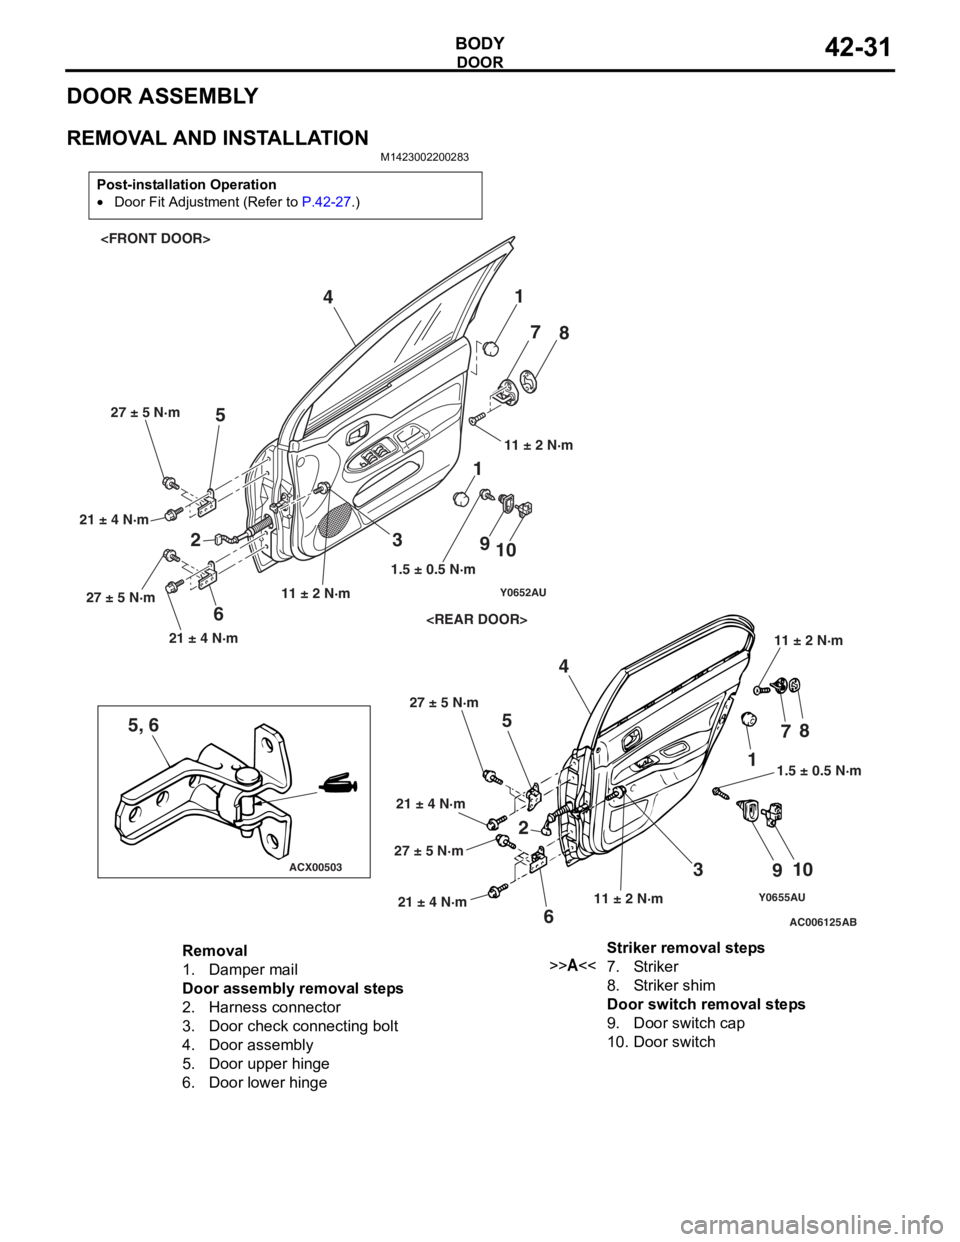
DOOR ASSEMBLY
REMOVAL AND INSTALLATION
M1423002200283
Post-installation Operation
•Door Fit Adjustment (Refer to P.42-27.)
Y0655AUAC006125
ACX00503
Y0652AU
5, 6
AB
1
2 3
4
5
6 7
8
9 10
1
23 4
5
6 7
8
9 10
11.5 ± 0.5 N·m
1.5 ± 0.5 N·m
11 ± 2 N·m 11 ± 2 N·m
11 ± 2 N·m
11 ± 2 N·m
21 ± 4 N·m 27 ± 5 N·m
21 ± 4 N·m
27 ± 5 N·m
21 ± 4 N·m
27 ± 5 N·m
21 ± 4 N·m
27 ± 5 N·m
Removal
1.Damper mail
Door assembly removal steps
2.Harness connector
3.Door check connecting bolt
4.Door assembly
5.Door upper hinge
6.Door lower hinge
Striker removal steps
>>A<<7.Striker
8.Striker shim
Door switch removal steps
9.Door switch cap
10.Door switch
Page 304 of 800
DOOR
BODY42-32
INSTALLATION SERVICE POINT
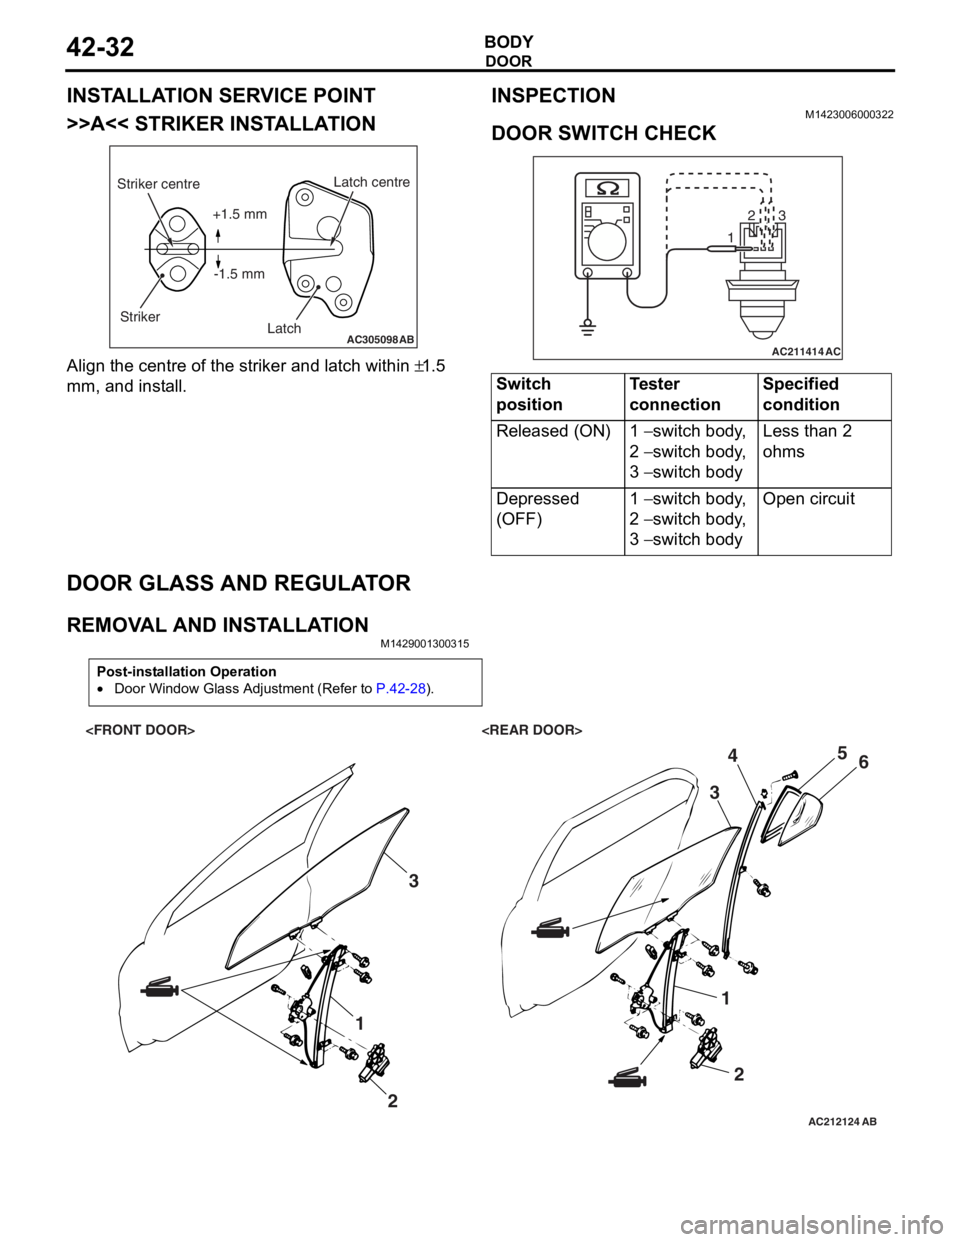
>>A<< STRIKER INSTALLATION
AC305098AB
Striker centreStriker Latch centre
Latch
+1.5 mm
-1.5 mm
Align the centre o f the striker and latch within ±1.5
mm,
and inst
all.
INSPECTION
M1423 0060 0032 2
DOOR SWITCH CHECK
AC211414
123
AC
Switch
positionTester
connectionSpecified
condition
Released (ON)1 − switch body,
2
− switch body,
3
− switch body
Less than 2
ohms
Depressed
(OFF)1 − switch body,
2
− switch body,
3
− switch body
Open circuit
DOOR GLASS AND REGULA T O R
REMOVA L AND INST ALLA TIONM14290013 0031 5
Post-installation Operation
•Door Window Glass Adjustment (Refer to P.42-28).
AC212124AB
1
23
12
3
4
5
6
Page 305 of 800
AC503181
NOTE
: Clip positions
: Claw positions
View A
BB
BB
C
C C
CC
C C
C
Section B - B
Door trim
Clip
Section C - C
AB
Door trim
Claw
7
77
7
A
AC503182
NOTE
: Clip positions
: Claw positions
E
E
EE
F
F F
F F
F F
F
Section E - E View D
Door trim
Clip
Section F - F
Door trim
Claw
D
7
7
7
AB
7
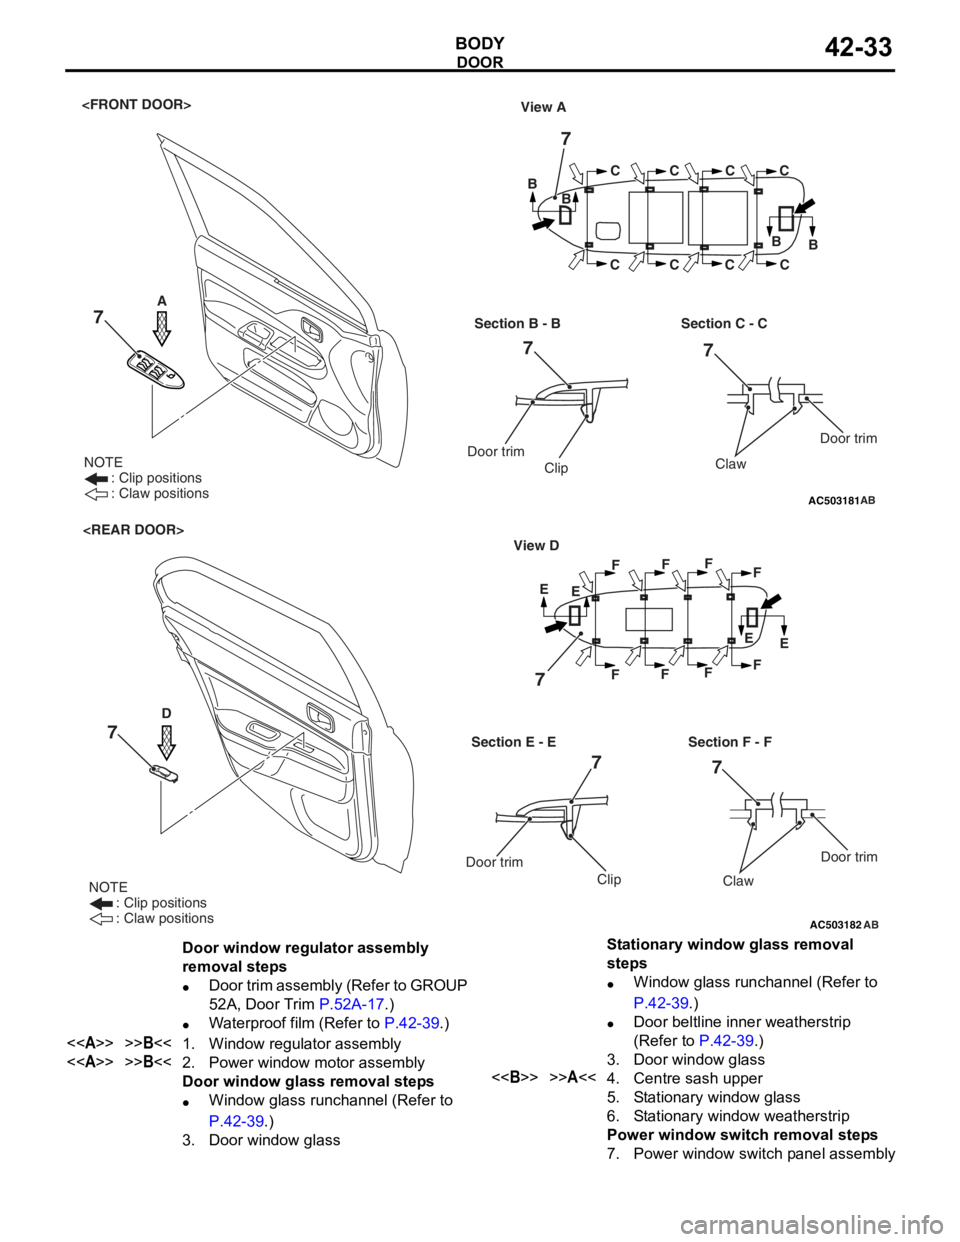
Door window regulator assembly
removal steps
•Door trim assembly (Refer to GROUP
52A, Door Trim
P.52A-17.)
•Waterproof film (Refer to P.42-39.)
<>>>B<<1.Window regulator assembly
<>>>B<<2.Power window motor assembly
Door window glass removal steps
•Window glass runchannel (Refer to
P.42-39.)
3.Door window glass
Stationary window glass removal
steps
•Window glass runchannel (Refer to
P.42-39.)
•Door beltline inner weatherstrip
(Refer to
P.42-39.)
3.Door window glass
<>>>A<<4.Centre sash upper
5.Stationary window glass
6.Stationary window weatherstrip
Power window switch removal steps
7.Power window switch panel assembly
DOOR
BO
D Y42-33
Page 306 of 800
Page 308 of 800
DOOR
BODY42-36
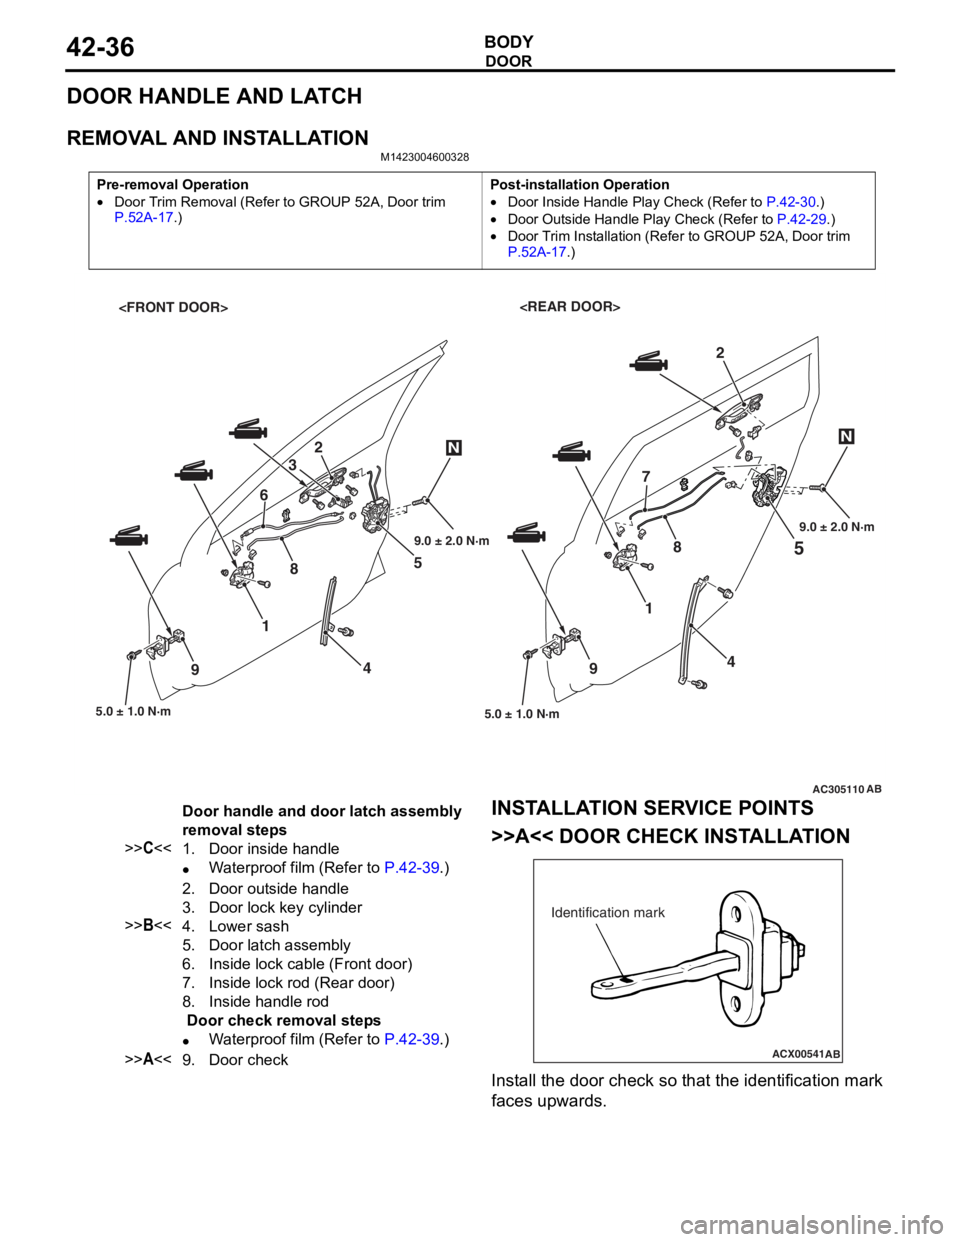
DOOR HANDLE AND LATCH
REMOVAL AND INSTALLATION
M1423004600328
Pre-removal Operation
•Door Trim Removal (Refer to GROUP 52A, Door trim P.52A-17.)
Post-installation Operation
•Door Inside Handle Play Check (Refer to P.42-30.)
•Door Outside Handle Play Check (Refer to P.42-29.)
•Door Trim Installation (Refer to GROUP 52A, Door trim
P.52A-17.)
AC305110
5
5.0 ± 1.0 N·m
1
4
9
2
AB
4 5
2
3
8 7
5.0 ± 1.0 N·m
1
6
9
NN
89.0 ± 2.0 N·m 9.0 ± 2.0 N·m
Door handle and door latch assembly
removal steps
>>C<<1.Door inside handle
•Waterproof film (Refer to P.42-39.)
2.Door outside handle
3.Door lock key cylinder
>>B<<4.Lower sash
5.Door latch assembly
6.Inside lock cable (Front door)
7.Inside lock rod (Rear door)
8.Inside handle rod
Door check removal steps
•Waterproof film (Refer to P.42-39.)
>>A<<9.Door check
INST
ALLA T ION SER VICE POINTS
>>A<< DOOR CHECK INST ALLA TION
ACX00541
Identification mark
AB
Install the d oor check so that th e ide n tification mark
faces upward
s .
Page 309 of 800
ItemIdentification
mark
Front DoorLeft door39L
Right door39R
Rear DoorLeft door40L
Right door40R
DOOR
BODY42-37
>>B<< LOWER SASH INSTALLATION
Securely insert the rear lower sash into the window
rear sash.
>>C<< DOOR INSIDE HANDLE
INSTALLATION
AC100404AB
Clip
Inner cable
Outer cable end
Inside handle rod Door inside handle
1.
In st all the inside lo ck cable to th e doo r inside
ha ndle as fo llo ws:
(1)I nst a ll the inne r cab l e en d in the in sid e lock
cab l e to the clip in th e door inside h andle .
(2)T urn the inside lock knob to the do or lock
positio n.
(3)I nst a ll the outer cable end to the door inside
hand le secure ly .
(4)I nst a ll the clip to the in ner cable .
2.In st all the inside han dle ro d to th e door inside
ha ndle .
3.In st all the do or inside handle to t he doo r .
INSPECTION
M14230047 0039 2
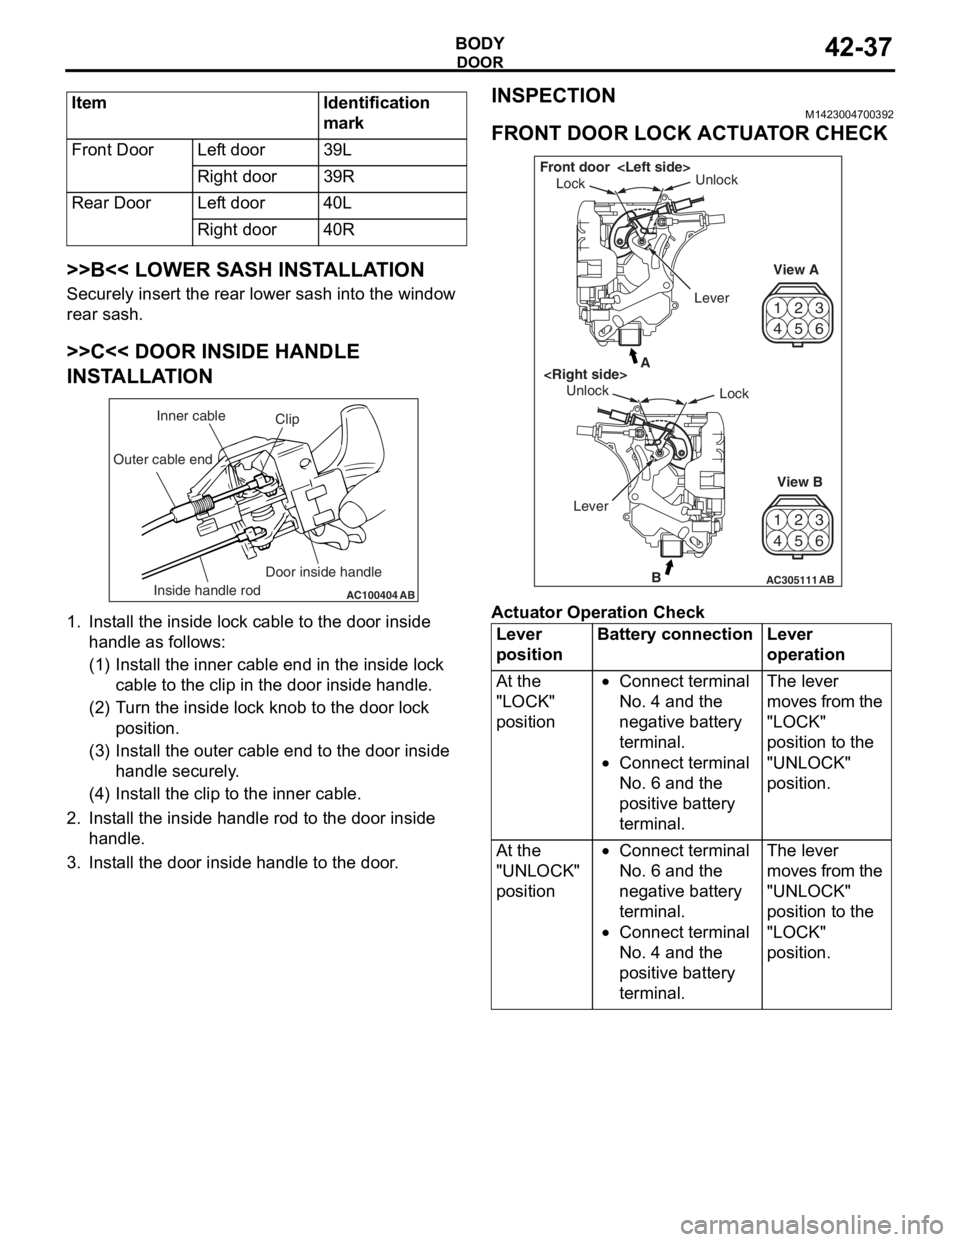
FRONT DOOR LOCK ACTUA T O R CHECK
42
53
6
1
4 2
53
6
1
AC305111B
A
AB
Lock
Unlock
View A
View B
Unlock
Lock
Front door
Lever
Ac tuator Op era t ion Check
Lever
positionBattery connectionLever
operation
At the
"LOCK"
position•Connect terminal
No. 4 and the
negative battery
terminal.
•Connect terminal
No. 6 and the
positive battery
terminal.
The lever
moves from the
"LOCK"
position to the
"UNLOCK"
position.
At the
"UNLOCK"
position•Connect terminal
No. 6 and the
negative battery
terminal.
•Connect terminal
No. 4 and the
positive battery
terminal.
The lever
moves from the
"UNLOCK"
position to the
"LOCK"
position.
Page 311 of 800
DOOR
BODY42-39
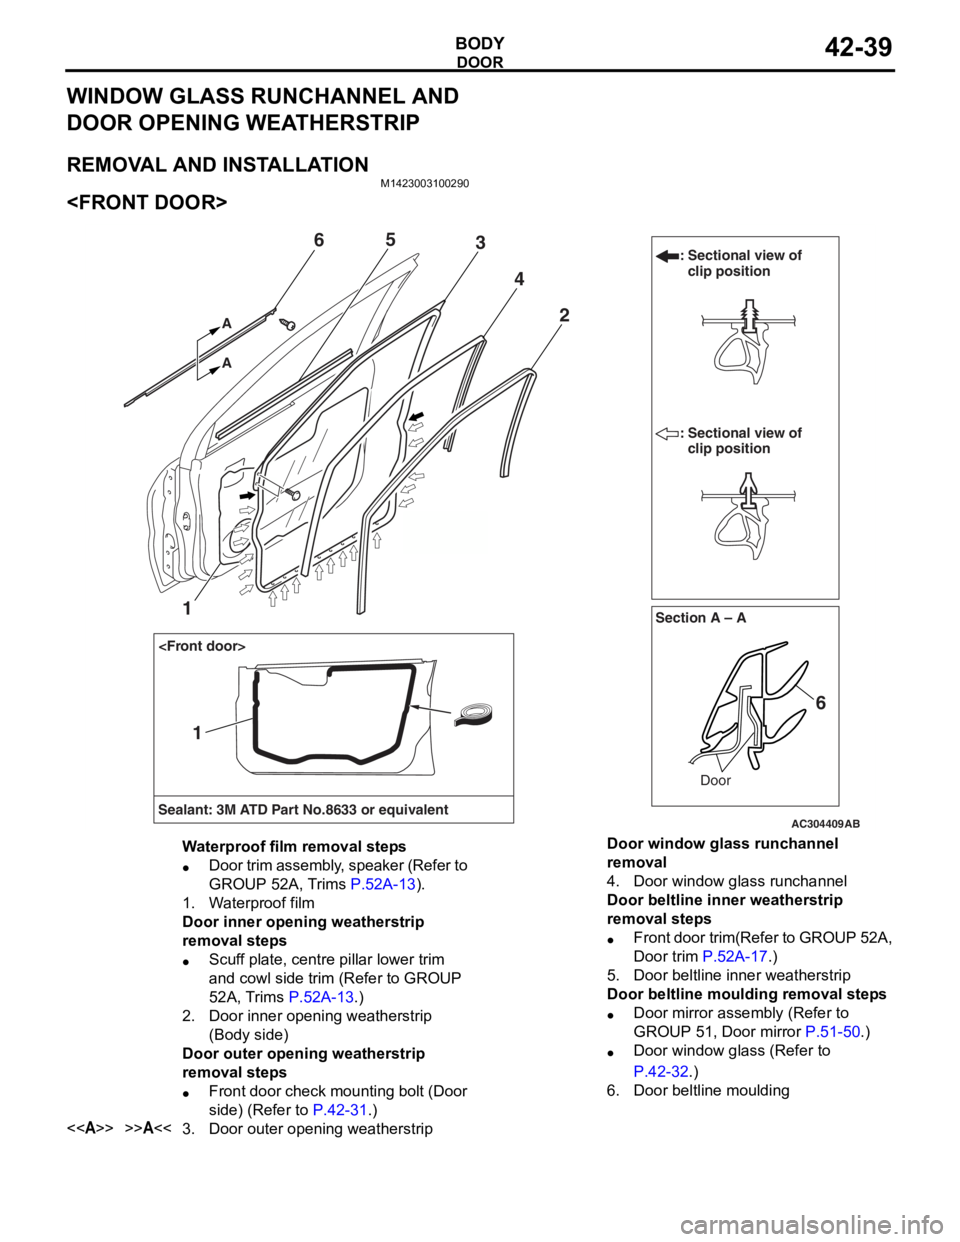
WINDOW GLASS RUNCHANNEL AND
DOOR OPENING WEATHERSTRIP
REMOVAL AND INSTALLATION
M1423003100290
AC304409AB
Section A – A
Sealant: 3M ATD Part No.8633 or equivalent Door
: Sectional view of
clip position
: Sectional view of clip position
6
2
1
4
365
A A
1
Waterproof film removal steps
•Door trim assembly, speaker (Refer to
GROUP 52A, Trims
P.52A-13).
1.Waterproof film
Door inner opening weatherstrip
removal steps
•Scuff plate, centre pillar lower trim
and cowl side trim (Refer to GROUP
52A, Trims
P.52A-13.)
2.Door inner opening weatherstrip
(Body side)
Door outer opening weatherstrip
removal steps
•Front door check mounting bolt (Door
side) (Refer to
P.42-31.)
<>>>A<<3.Door outer opening weatherstrip
Door window glass runchannel
removal
4.Door window glass runchannel
Door beltline inner weatherstrip
removal steps
•Front door trim(Refer to GROUP 52A,
Door trim
P.52A-17.)
5.Door beltline inner weatherstrip
Door beltline moulding removal steps
•Door mirror assembly (Refer to
GROUP 51, Door mirror
P.51-50.)
•Door window glass (Refer to
P.42-32.)
6.Door beltline moulding
Page 315 of 800
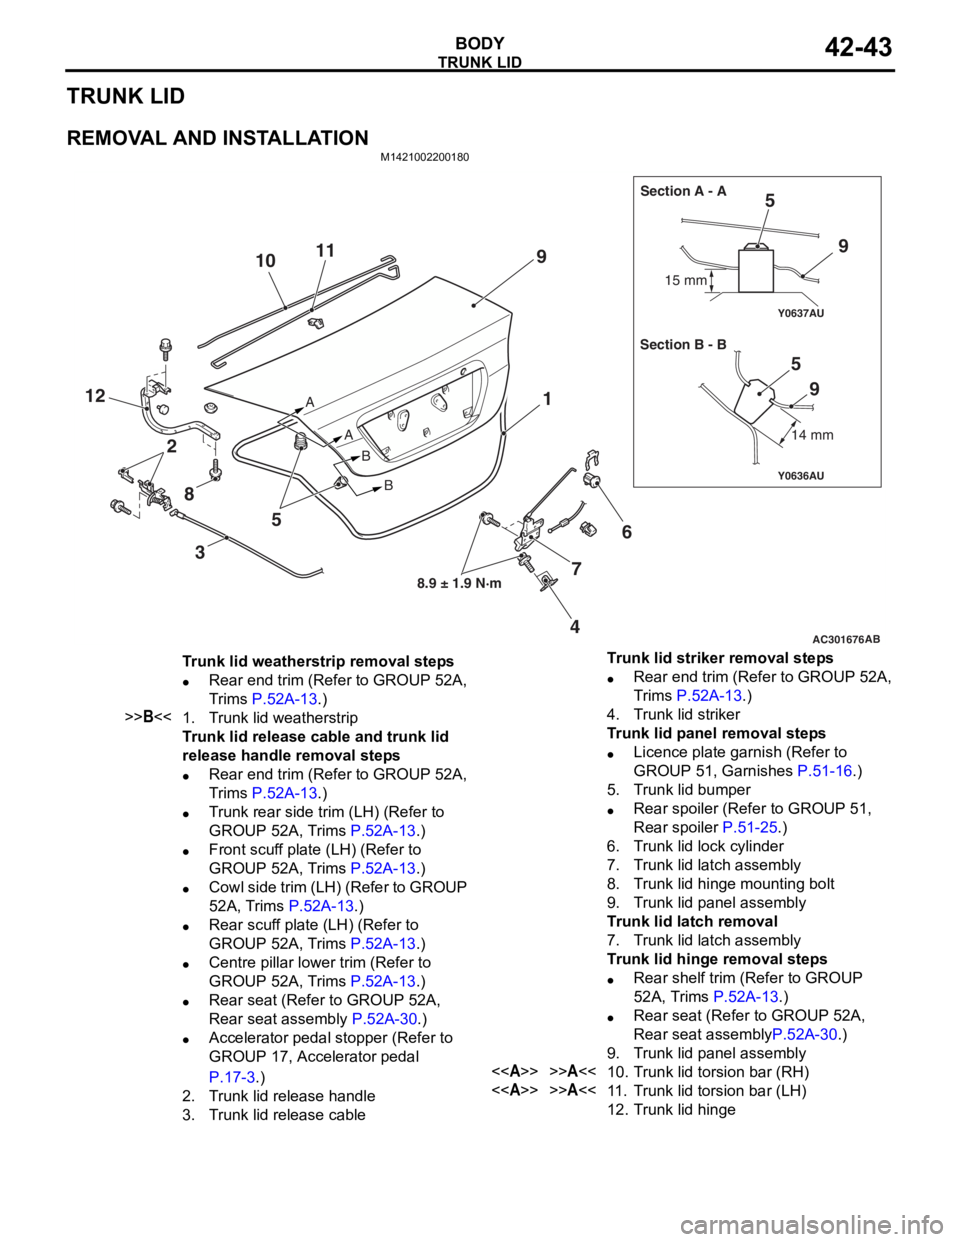
TRUNK LID
BODY42-43
TRUNK LID
REMOVAL AND INSTALLATION
M1421002200180
AC301676
Y0636AU
Y0637AU
AB
8.9 ± 1.9 N·m
A
AB
B 15 mm
14 mm
Section A - A
Section B - B
9
5
6
4
12
9
59
7
11
10
8 3 5 1
2
Trunk lid weatherstrip removal steps
•Rear end trim (Refer to GROUP 52A,
Trims
P.52A-13.)
>>B<<1.Trunk lid weatherstrip
Trunk lid release cable and trunk lid
release handle removal steps
•Rear end trim (Refer to GROUP 52A,
Trims
P.52A-13.)
•Trunk rear side trim (LH) (Refer to
GROUP 52A, Trims
P.52A-13.)
•Front scuff plate (LH) (Refer to
GROUP 52A, Trims
P.52A-13.)
•Cowl side trim (LH) (Refer to GROUP
52A, Trims
P.52A-13.)
•Rear scuff plate (LH) (Refer to
GROUP 52A, Trims
P.52A-13.)
•Centre pillar lower trim (Refer to
GROUP 52A, Trims
P.52A-13.)
•Rear seat (Refer to GROUP 52A,
Rear seat assembly
P.52A-30.)
•Accelerator pedal stopper (Refer to
GROUP 17, Accelerator pedal
P.17-3.)
2.Trunk lid release handle
3.Trunk lid release cable
Trunk lid striker removal steps
•Rear end trim (Refer to GROUP 52A,
Trims
P.52A-13.)
4.Trunk lid striker
Trunk lid panel removal steps
•Licence plate garnish (Refer to
GROUP 51, Garnishes
P.51-16.)
5.Trunk lid bumper
•Rear spoiler (Refer to GROUP 51,
Rear spoiler
P.51-25.)
6.Trunk lid lock cylinder
7.Trunk lid latch assembly
8.Trunk lid hinge mounting bolt
9.Trunk lid panel assembly
Trunk lid latch removal
7.Trunk lid latch assembly
Trunk lid hinge removal steps
•Rear shelf trim (Refer to GROUP
52A, Trims
P.52A-13.)
•Rear seat (Refer to GROUP 52A,
Rear seat assembly
P.52A-30.)
9.Trunk lid panel assembly
<>>>A<<10.Trunk lid torsion bar (RH)
<>>>A<<11 .Trunk lid torsion bar (LH)
12.Trunk lid hinge
Page 330 of 800
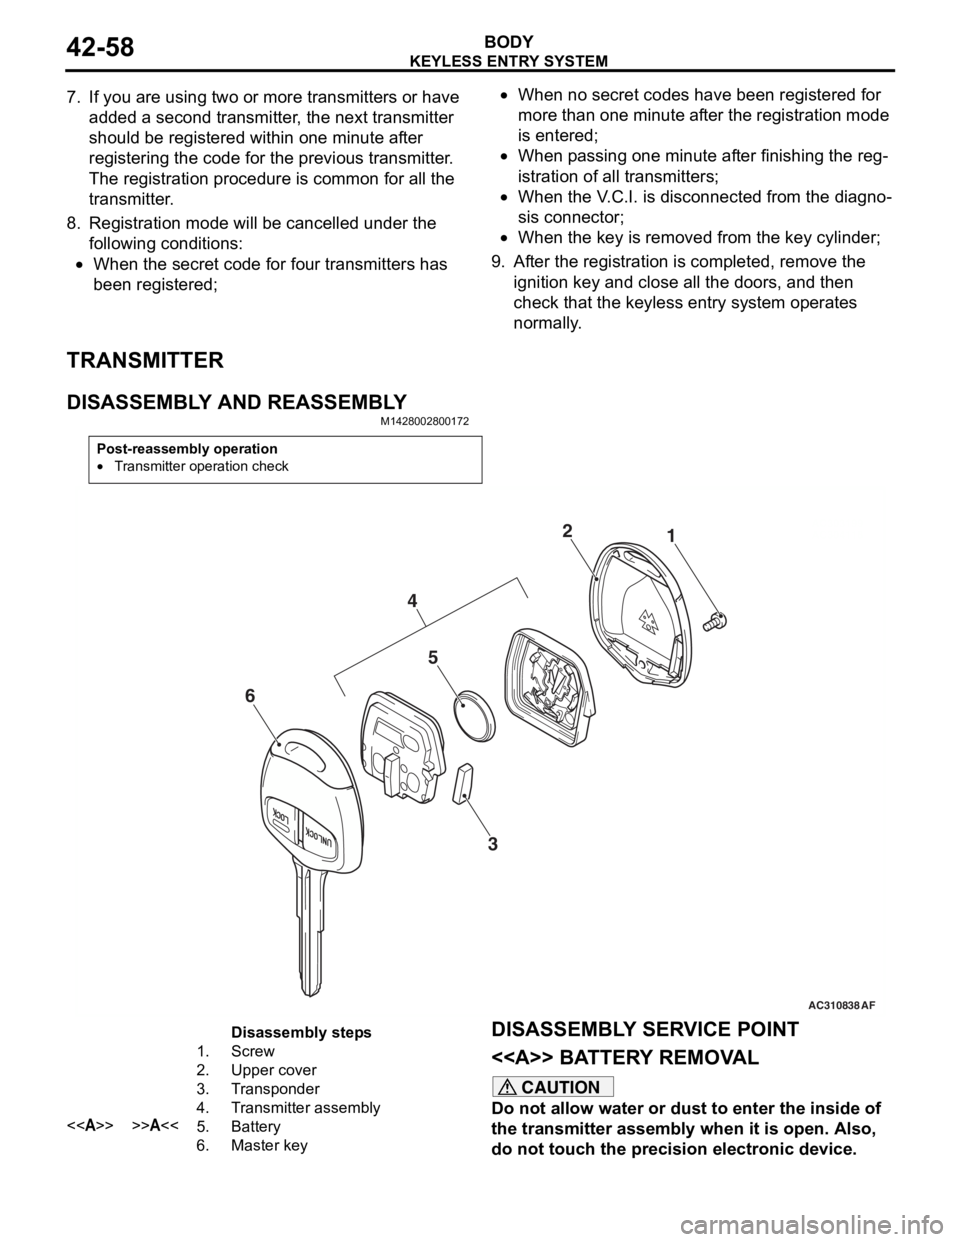
KEYLESS ENTRY SYSTEM
BODY42-58
7. If you are using two or more transmitters or have added a second transmitter, the next transmitter
should be registered within one minute after
registering the code for the previous transmitter.
The registration procedure is common for all the
transmitter.
8. Registration mode will be cancelled under the following conditions:
•When the secret code for four transmitters has
been registered;
•When no secret codes have been registered for
more than one minute after the registration mode
is entered;
•When passing one minute after finishing the reg-
istration of all transmitters;
•When the V.C.I. is disconnected from the diagno-
sis connector;
•When the key is removed from the key cylinder;
9. After the registration is completed, remove the ignition key and close all the doors, and then
check that the keyless entry system operates
normally.
TRANSMITTER
DISASSEMBLY AND REASSEMBLY
M1428002800172
Post-reassembly operation
•Transmitter operation check
AC310838AC303199
AC3041181
2
AF
5
3
4
6
Disassembly steps
1.Screw
2.Upper cover
3.Transponder
4.Transmitter assembly
<>>>A<<5.Battery
6.Master key
DISASSEMBL Y SER V ICE POINT
<> BATTER Y REMOV A L
CAUTION
Do not allow water or dust to enter the inside of
the transmitter assembly when it is open. Also,
do not touch the precision electronic device.