ron MITSUBISHI LANCER 2006 Manual Online
[x] Cancel search | Manufacturer: MITSUBISHI, Model Year: 2006, Model line: LANCER, Model: MITSUBISHI LANCER 2006Pages: 800, PDF Size: 45.03 MB
Page 270 of 800
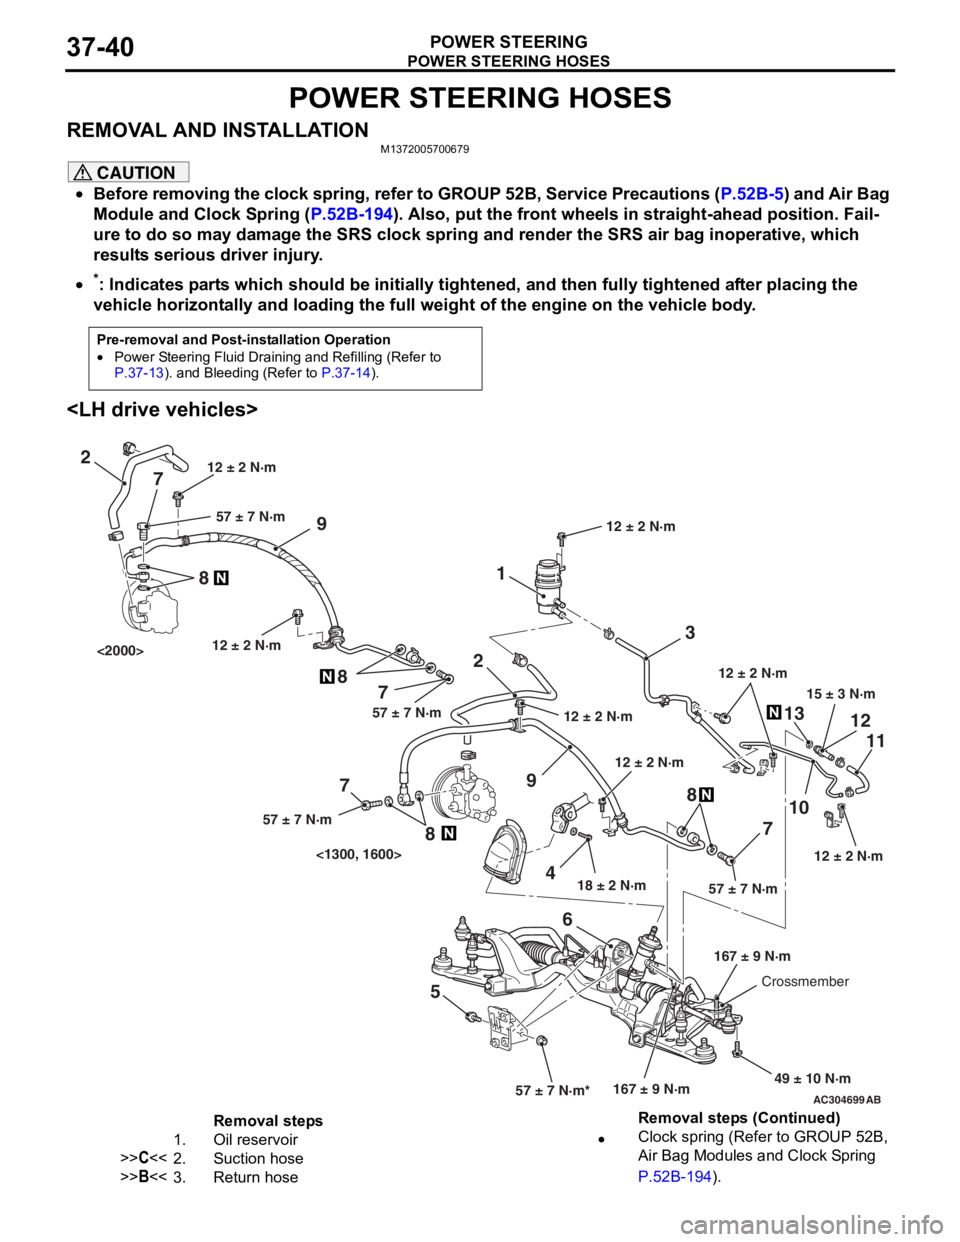
POWER STEERING HOSES
POWER STEERING37-40
POWER STEERING HOSES
REMOVAL AND INSTALLATIONM1372005700679
CAUTION
•Before removing the clock spring, refer to GROUP 52B, Service Precautions (P.52B-5) and Air Bag
Module and Clock Spring (P.52B-194). Also, put the front wheels in straight-ahead position. Fail-
ure to do so may damage the SRS clock spring and render the SRS air bag inoperative, which
results serious driver injury.
•
Pre-removal and Post-installation Operation
•Power Steering Fluid Draining and Refilling (Refer to P.37-13). and Bleeding (Refer to P.37-14).
*: Indicates parts which should be initially tightened, and then fully tightened after placing the
vehicle horizontally and loading the full weight of the engine on the vehicle body.
AC304699AB
15 ± 3 N·m
18 ± 2 N·m
167 ± 9 N·m
12 ± 2 N·m
49 ± 10 N·m
12 ± 2 N·m
57 ± 7 N·m*57 ± 7 N·m
3
1
2
9
1310
7 11
12
5 68
12 ± 2 N·m
12 ± 2 N·m
2
9
4
7
8
7
8
7
8
57 ± 7 N·m57 ± 7 N·m
57 ± 7 N·m
12 ± 2 N·m
167 ± 9 N·mCrossmember
12 ± 2 N·m
<1300, 1600>
<2000>
12 ± 2 N·m
Removal steps
1.Oil reservoir
>>C<<2.Suction hose
>>B<<3.Return hose
•Clock spring (Refer to GROUP 52B,
Air Bag Modules and Clock Spring
P.52B-194).
Removal steps (Continued)
Page 271 of 800
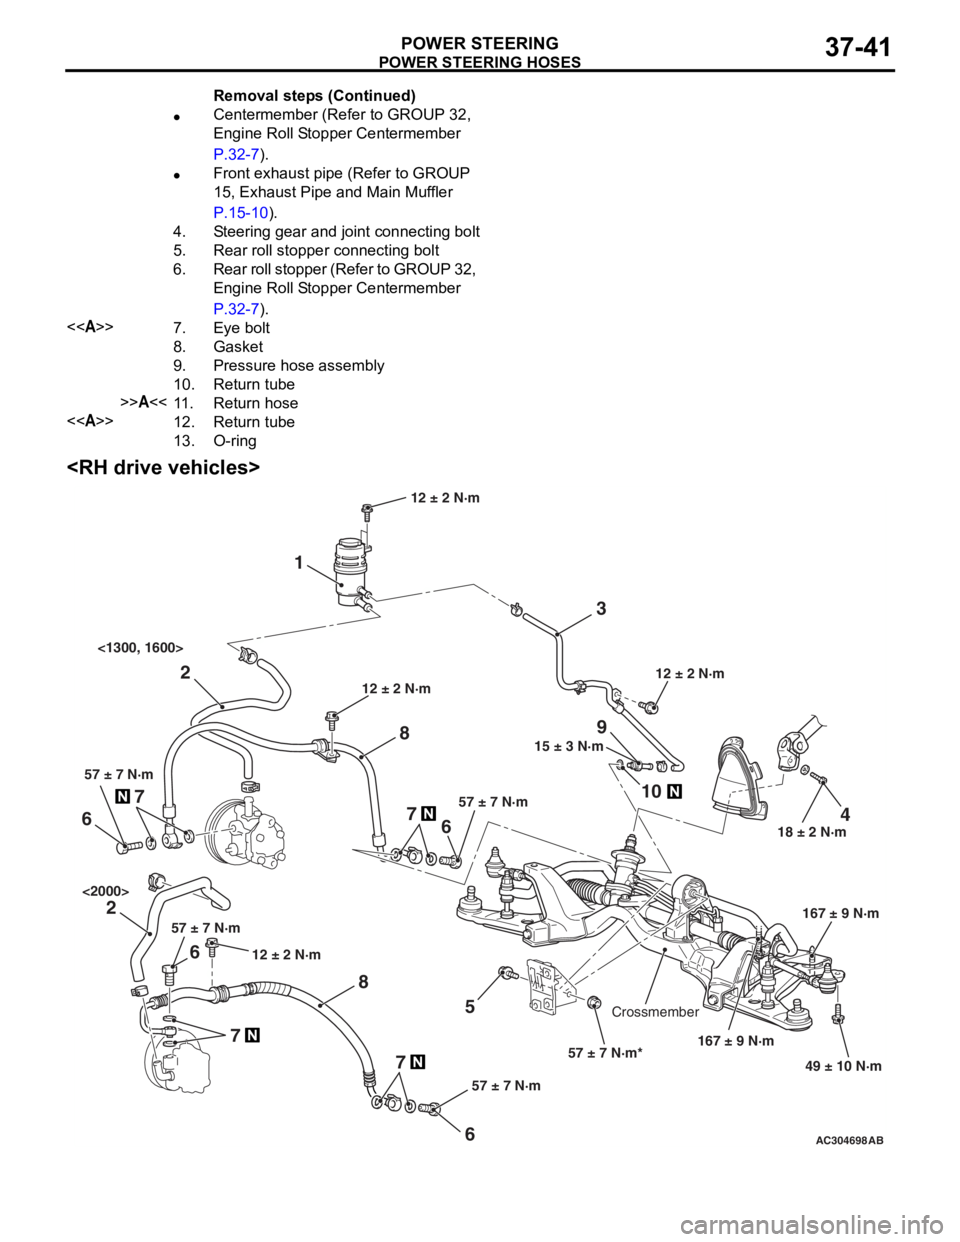
POWER STEERING HOSES
POWER STEERING37-41
AC304698AB
15 ± 3 N·m18 ± 2 N·m
167 ± 9 N·m
12 ± 2 N·m
49 ± 10 N·m
12 ± 2 N·m
57 ± 7 N·m*
3
1
2 9
10
7
5
6
2 4
8 857 ± 7 N·m
167 ± 9 N·m
Crossmember 12 ± 2 N·m
<1300, 1600>
<2000>
7
6
57 ± 7 N·m
7
6
57 ± 7 N·m
7
6
57 ± 7 N·m
12 ± 2 N·m
•Centerme mbe r (Refe r to GROUP 3 2 ,
En
gin e Ro ll S t op pe r Ce nt er m e m b er
P.32-7).
•Front exha ust pi pe (Re f e r to GROUP
15
, Exhau st Pipe a nd Ma in Muf f ler
P.15-10).
4.St e e r i ng gea r a nd jo int co nn ectin g b o lt
5.Rear ro ll stopp er con n e c ting b o lt
6.Rear r o ll s t op pe r (Re f er t o GRO U P 32 ,
En
gin e Ro ll S t op pe r Ce nt er m e m b er
P.32-7).
<>7.Eye bolt
8.Gask et
9.Pressure hose ass e mbly
10.Return tu be
>>A<<11.Return hose
<>12.Return t u be
13.O-rin g
Remo va l st ep s ( C o n t i n u e d )
Page 272 of 800
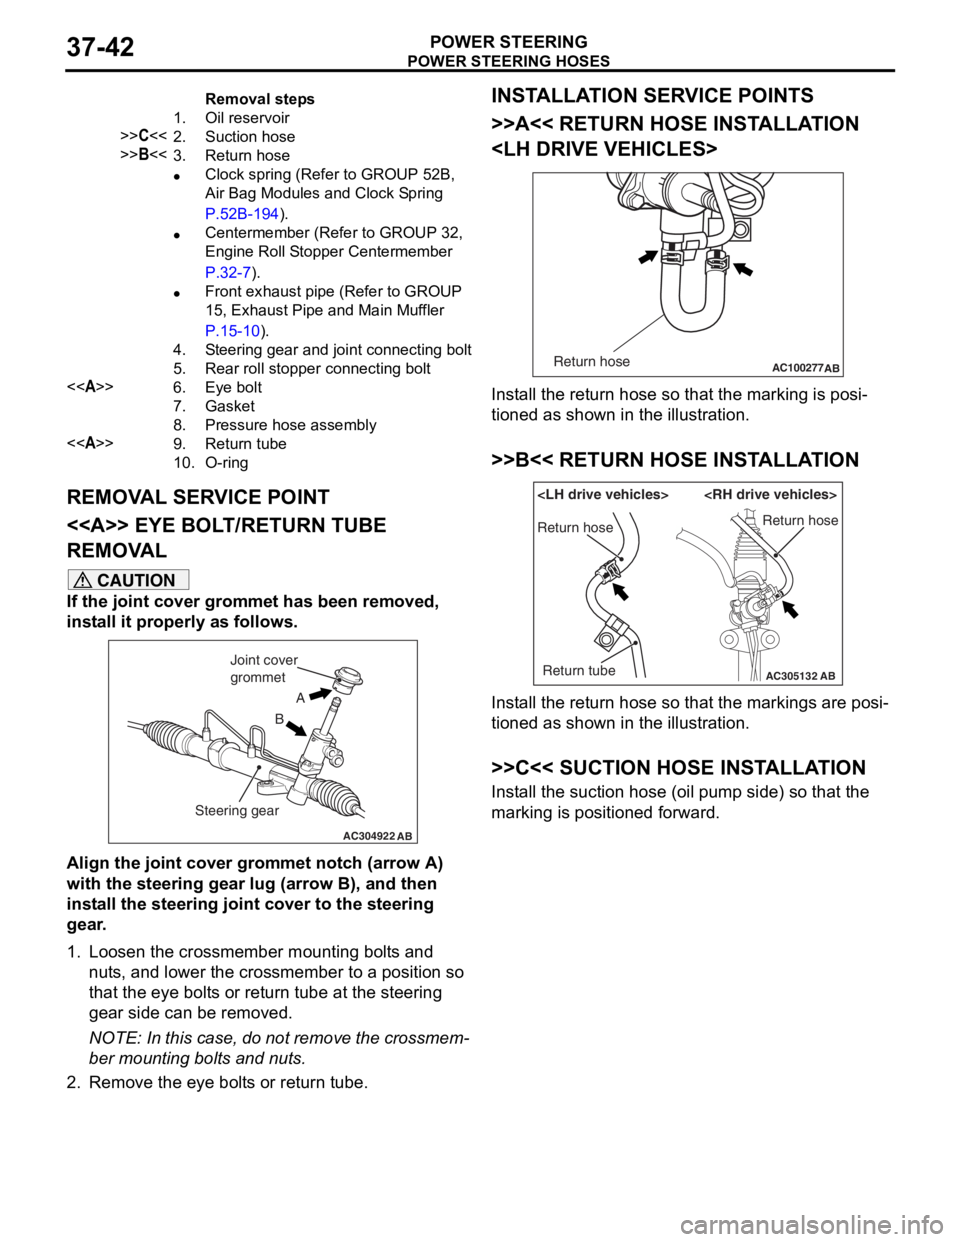
Removal steps
1.Oil reservoir
>>C<<2.Suction hose
>>B<<3.Return hose
•Clock spring (Refer to GROUP 52B,
Air Bag Modules and Clock Spring
P.52B-194).
•Centermember (Refer to GROUP 32,
Engine Roll Stopper Centermember
P.32-7).
•Front exhaust pipe (Refer to GROUP
15, Exhaust Pipe and Main Muffler
P.15-10).
4.Steering gear and joint connecting bolt
5.Rear roll stopper connecting bolt
<>6.Eye bolt
7.Gasket
8.Pressure hose assembly
<>9.Return tube
10.O-ring
POWE R STEERING HOSES
POWER S T E E RING37-42
REMOVA L SER V ICE POINT
<> EYE BOLT /RETURN TUBE
REMOV
A L
CAUTION
If the joint cover grommet has been removed,
install it properly as follows.
AC304922AB
A
B
Joint cover
grommet
Steering gear
Align the joint cover grommet notch (arrow A)
with the steering gear lug (arrow B), and then
install the steering joint cover to the steering
gear.
1. Loosen the crossmember mounting bolts and nuts, and lower the crossmember to a position so
that the eye bolts or return tube at the steering
gear side can be removed.
NOTE: In this case, do not remove the crossmem-
ber mounting bolts and nuts.
2. Remove the eye bolts or return tube.
INSTALLATION SERVICE POINTS
>>A<< RETURN HOSE INSTALLATION
AC100277 ABReturn hose
Install the return hose so that the marking is posi-
tioned as shown in the illustration.
>>B<< RETURN HOSE INSTALLATION
AC305132AB
Return hose
Return tubeReturn hose
Install the return hose so that the markings are posi-
tioned as shown in the illustration.
>>C<< SUCTION HOSE INSTALLATION
Install the suction hose (oil pump side) so that the
marking is positioned forward.
Page 278 of 800
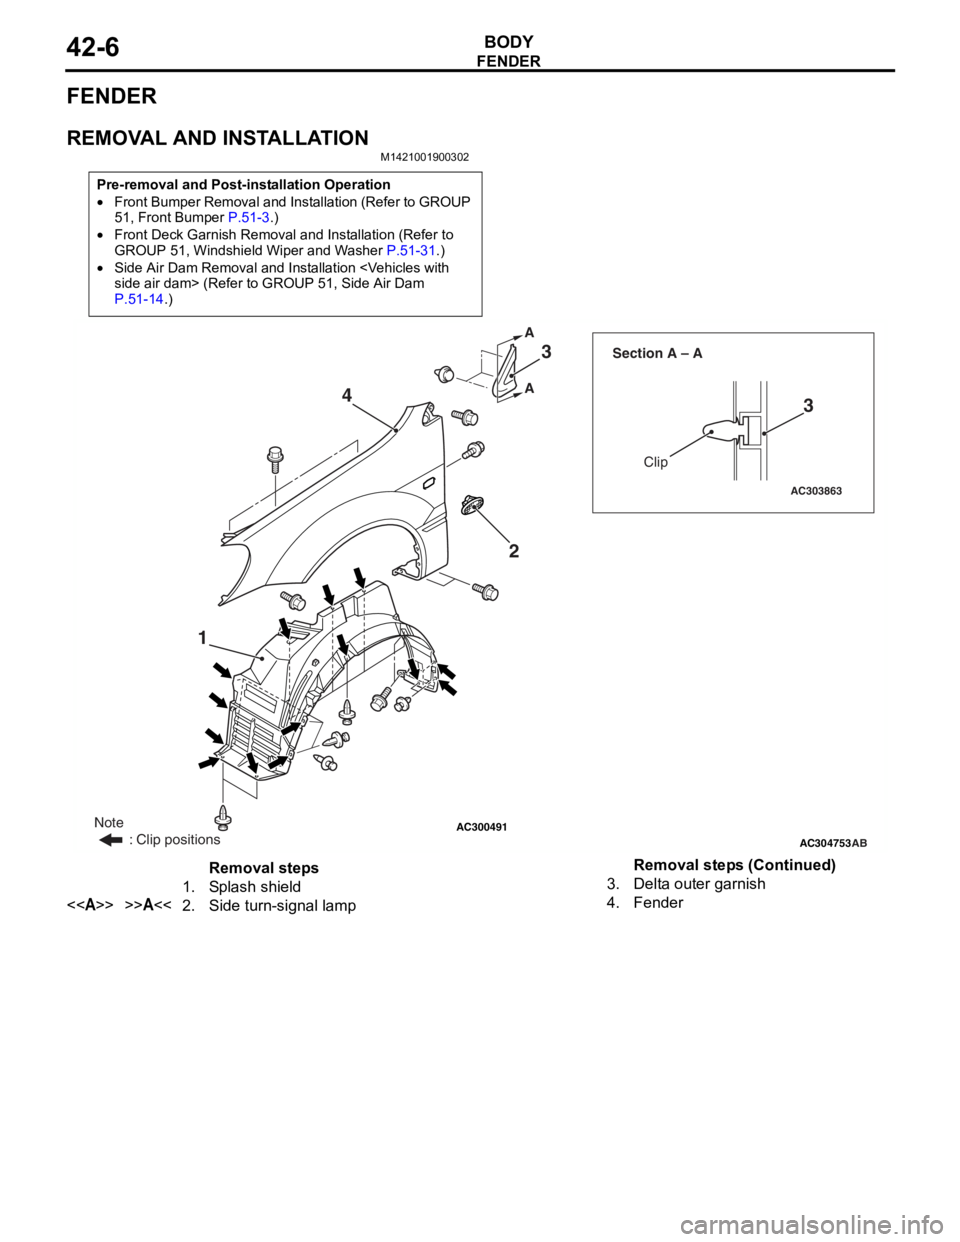
FENDER
BODY42-6
FENDER
REMOVAL AND INSTALLATION
M1421001900302
Pre-removal and Post-installation Operation
•Front Bumper Removal and Installation (Refer to GROUP
51, Front Bumper P.51-3.)
•Front Deck Garnish Removal and Installation (Refer to
GROUP 51, Windshield Wiper and Washer P.51-31.)
•Side Air Dam Removal and Installation
P.51-14.)
AC300491AC304753
AC303863
Clip
Section A – A
AB
A A
1
23
3
4
Note
: Clip positions
Removal steps
1.Splash shield
<>>>A<<2.Side turn-signal lamp
3.Delta outer garnish
4.Fender
Removal steps (Continued)
Page 279 of 800
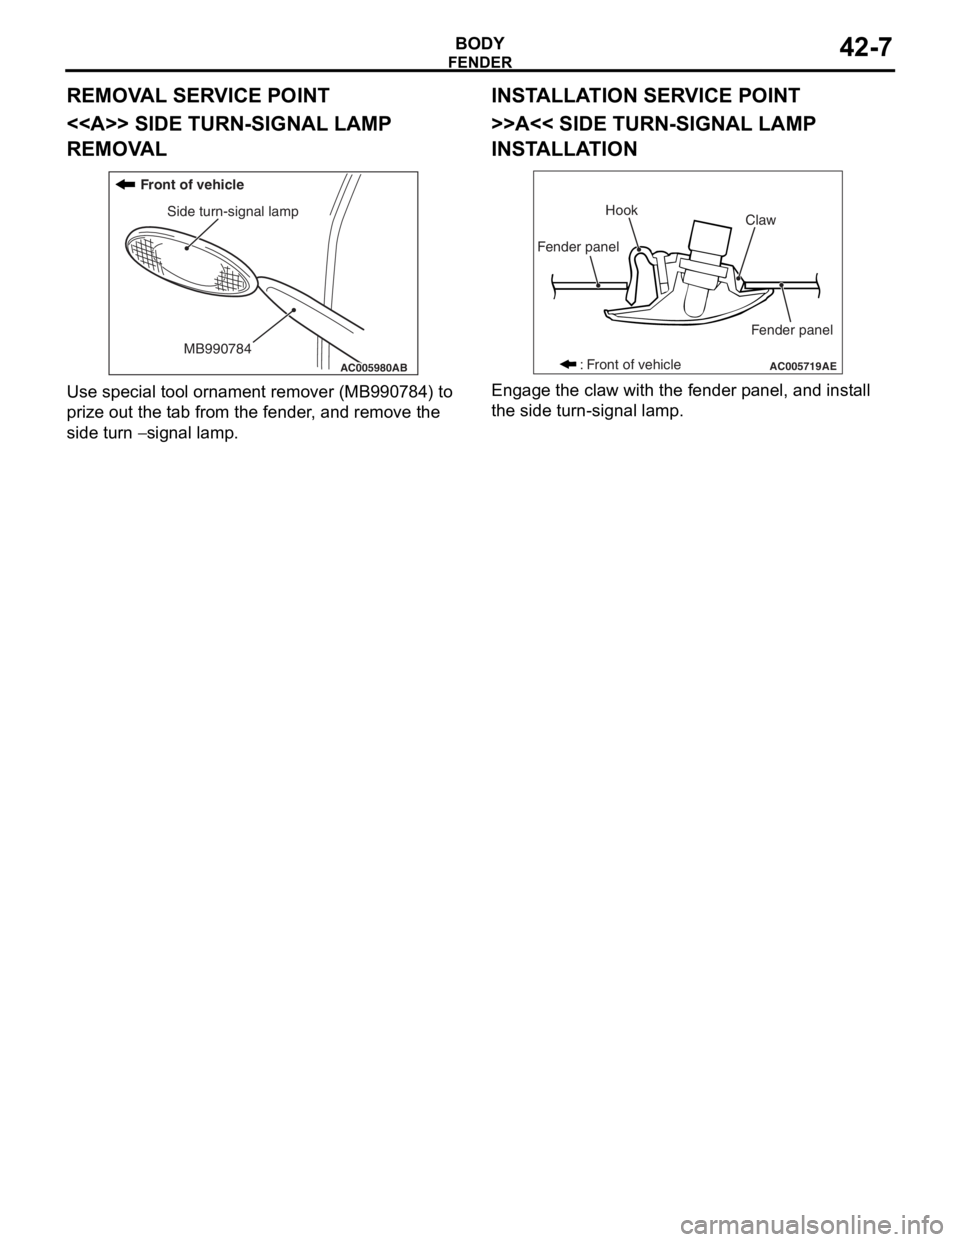
Page 280 of 800
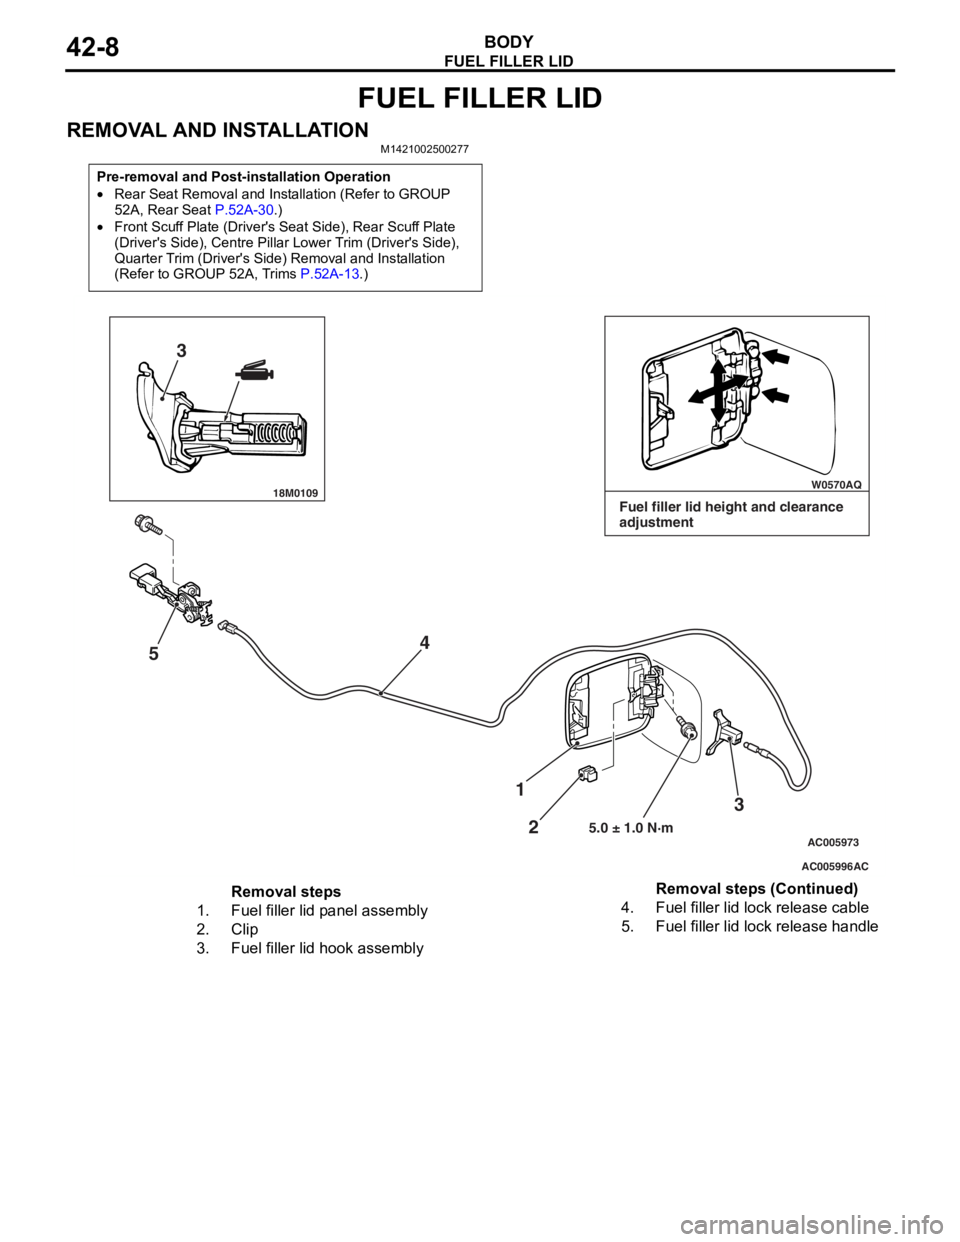
FUEL FILLER LID
BODY42-8
FUEL FILLER LID
REMOVAL AND INSTALLATIONM1421002500277
Pre-removal and Post-installation Operation
•Rear Seat Removal and Installation (Refer to GROUP
52A, Rear Seat
P.52A-30.)
•Front Scuff Plate (Driver's Seat Side), Rear Scuff Plate
(Driver's Side), Centre Pillar Lower Trim (Driver's Side),
Quarter Trim (Driver's Side) Removal and Installation
(Refer to GROUP 52A, Trims
P.52A-13.)
18M0109 W0570AQ
AC005996
AC005973
3
5 4
3
2
1
5.0 ± 1.0 N·m
AC
Fuel filler lid height and clearance
adjustment
Removal steps
1.Fuel filler lid panel assembly
2.Clip
3.Fuel filler lid hook assembly
4.Fuel filler lid lock release cable
5.Fuel filler lid lock release handle
Removal steps (Continued)
Page 284 of 800
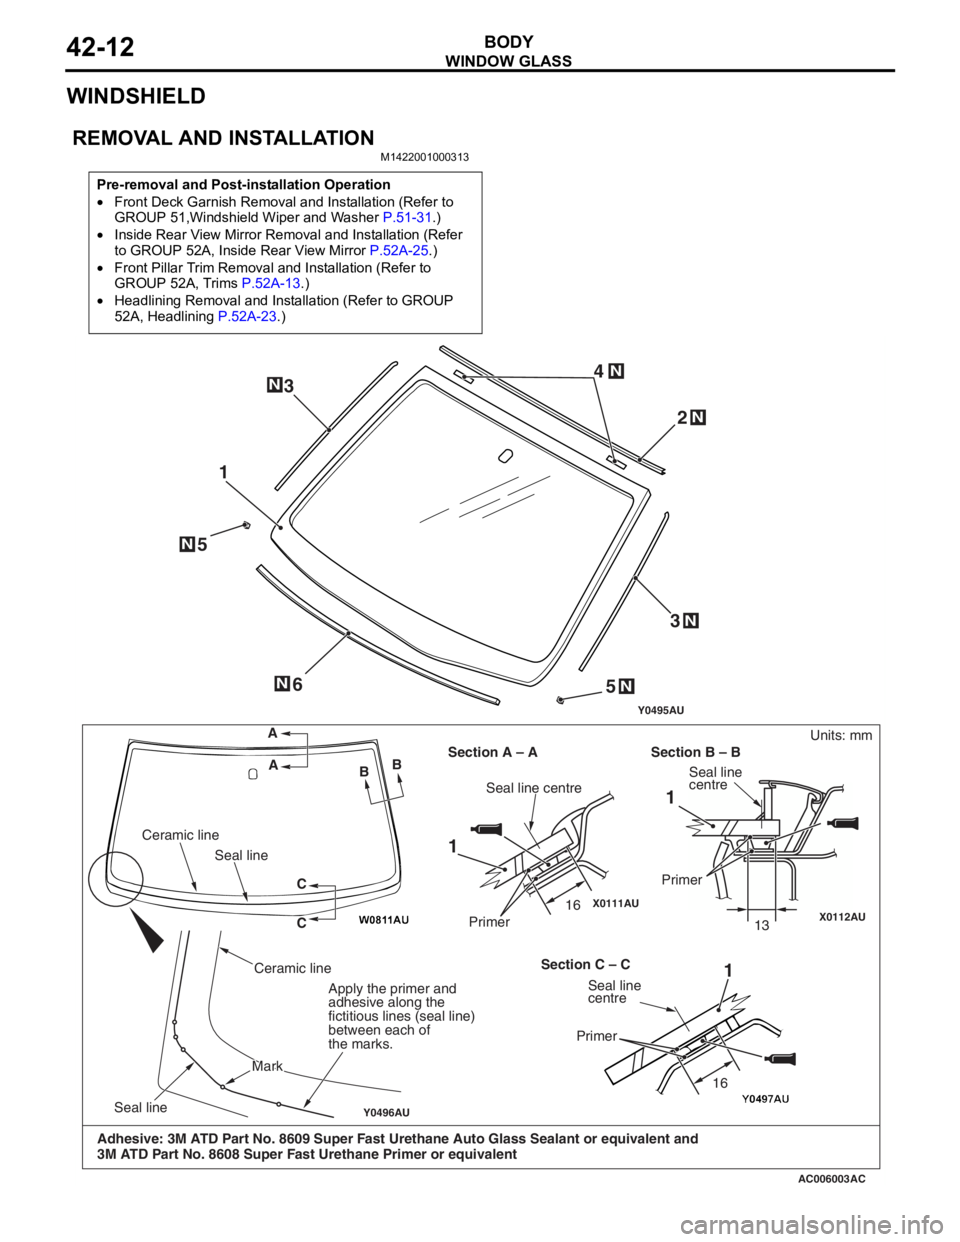
WINDOW GLASS
BODY42-12
WINDSHIELD
REMOVAL AND INSTALLATION
M1422001000313
Pre-removal and Post-installation Operation
•Front Deck Garnish Removal and Installation (Refer to
GROUP 51,Windshield Wiper and Washer P.51-31.)
•Inside Rear View Mirror Removal and Installation (Refer
to GROUP 52A, Inside Rear View Mirror P.52A-25.)
•Front Pillar Trim Removal and Installation (Refer to
GROUP 52A, Trims P.52A-13.)
•Headlining Removal and Installation (Refer to GROUP
52A, Headlining P.52A-23.)
AC006003
X0111AUX0112AU
Y0496AU
12
3
4
6 1
1
3
N
N
N
N
N
AC
Y0495AU
A
A BB
C C
Ceramic line
Seal line
Seal line
Ceramic line
MarkMark
Apply the primer and
adhesive along the
fictitious lines (seal line)
between each of
the marks.
Seal line centre
Primer
Section A – A Section B – B
Section C – C
Seal line
centre
Primer
5N
5N
Units: mm
Adhesive: 3M ATD Part No. 8609 Super Fast Urethane Auto Glass Sealant or equivalent and
3M ATD Part No. 8608 Super Fast Urethane Primer or equivalent
16 16
1
Seal line
centre
Primer
13
Page 297 of 800
AC304849AB
Dual lock fastener
Flange convex at the tailgate flange
DOOR
BO
D Y42-25
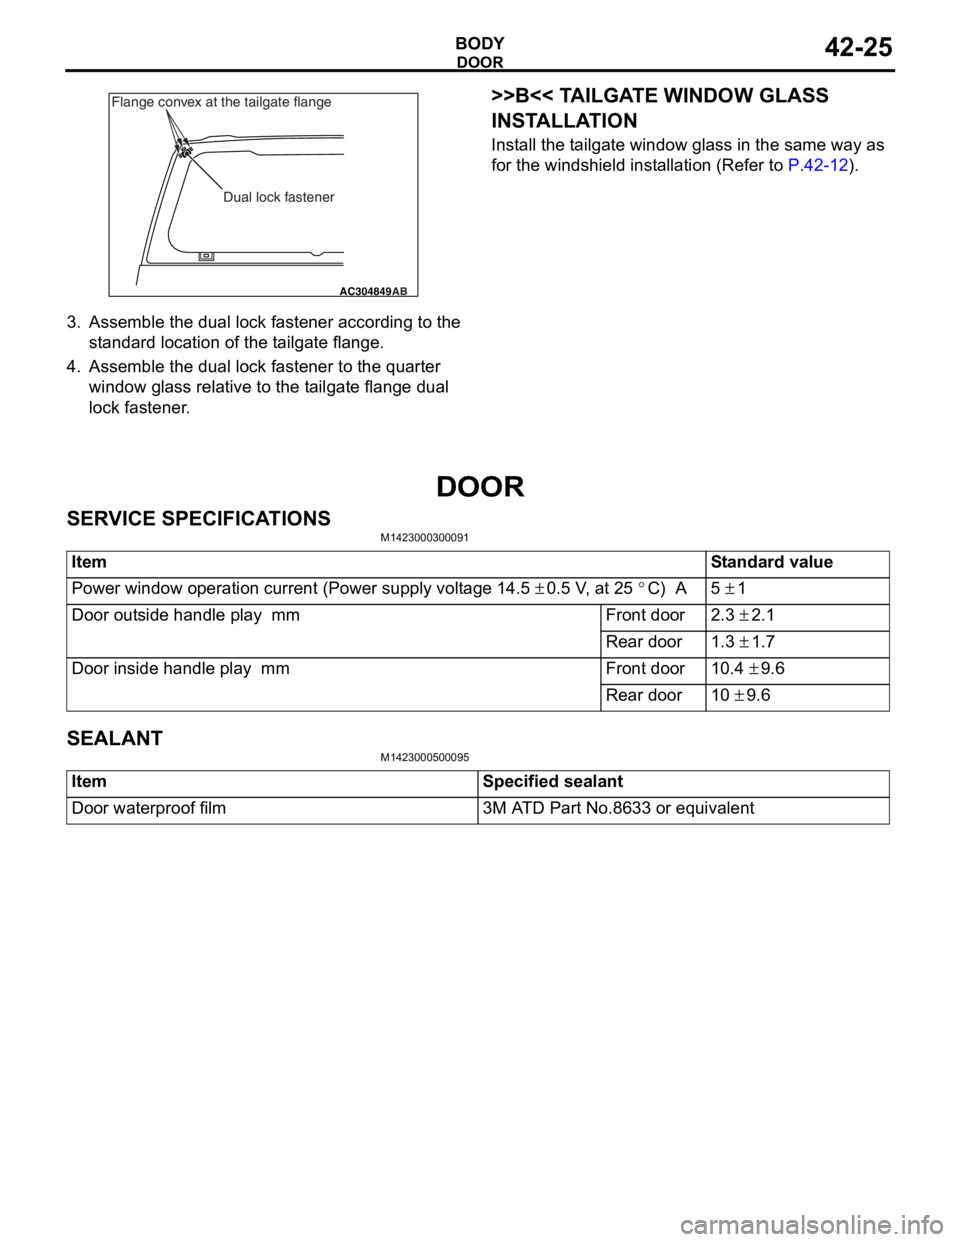
3.Assemble the dua l lo ck faste ner accord ing t o the
st a ndard loca tion of the t a ilgat e flan ge.
4.Assemble the dua l lo ck faste ner to t he qua rter
win dow gla ss relative to the t a ilgate flan ge dua l
lock fastener .
>>B<< TA ILGA TE WINDOW GLASS
INST
ALLA TION
Install the t a ilgat e window g l ass in the same wa y as
for the
windsh i eld inst a lla tion ( R ef er to
P.42-12).
DOOR
SER V ICE SPECIFICA T IONS
M14230003 0009 1
ItemStandard value
Power window operation current (Power supply voltage 14.5 ± 0.5 V, at 25 °C) A5 ± 1
Door outside handle play mmFront door2.3 ± 2.1
Rear door1.3 ± 1.7
Door inside handle play mmFront door10.4 ± 9.6
Rear door10 ± 9.6
SEALANT
M14230005 0009 5
ItemSpecified sealant
Door waterproof film3M ATD Part No.8633 or equivalent
Page 300 of 800
DOOR
BODY42-28
DOOR WINDOW GLASS ADJUSTMENT
M1423001000327
Check that the door glass moves while contacting
the door glass channel when it is raised and lowered
fully. If not, adjust the door window according to the
following procedures.
1. Remove the door trim assembly (Refer to GROUP 52A, Door trim
P.52A-17).
2. Remove the waterproof film (Refer to P.42-39).
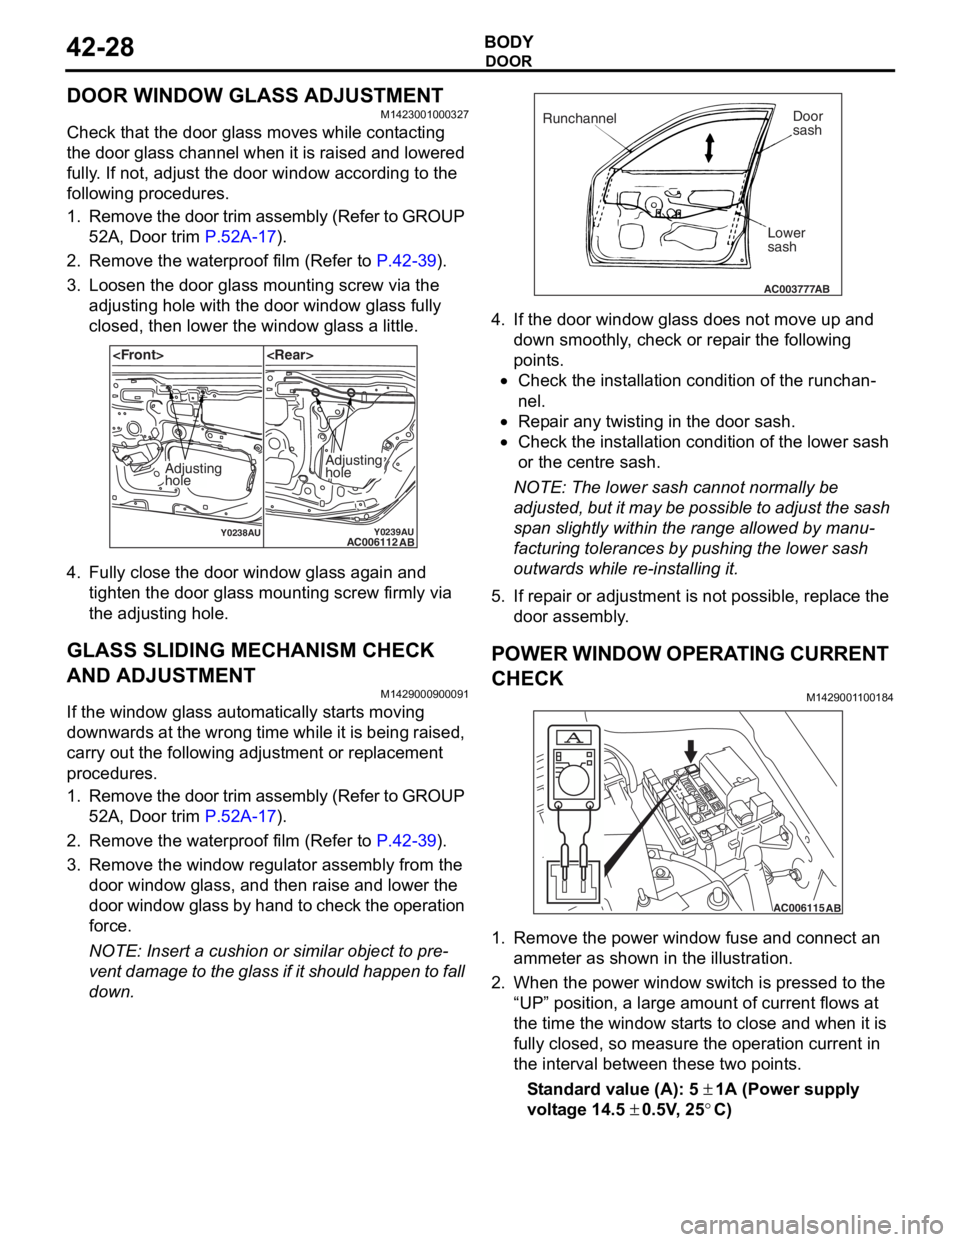
3. Loosen the door glass mounting screw via the adjusting hole with the door window glass fully
closed, then lower the window glass a little.
Y0238AUY0239AUAC006112 AB
Adjusting
holeAdjusting
hole
4.Fu lly close the doo r window g l ass aga in an d
tighten the do or gla s s moun ting scre w firmly via
th e adjusting ho le.
GLASS SLIDING MECHANISM CHECK
AND ADJUSTMENT
M14290009 0009 1
If the window glas s automatically st a r t s moving
downwards at the wron
g time while it is be ing raised ,
carry out th
e following adju s tment or re placeme n t
proce
dures.
1. Remo ve the do or trim assembly (Refer to GROUP
52 A, Door trim
P.52A-17).
2.Remove the water p roof film (Re f er to P.42-39).
3.Remove the win dow regulator a sse mbly from the
do or windo w glass, a nd the n raise and lower th e
door windo w glass b y han d t o che ck the op erat ion
fo rce.
NOTE: Insert a cushion or similar object t o pre-
vent da mage to the gla ss if it shou ld h app en t o f a ll
do
wn .
AC003777
Runchannel Door
sash
Lower
sash
AB
4. If the do or windo w g l ass do es no t move up and
d o wn smoothly , ch eck or rep a ir the followin g
po i n t s .
•Check the inst a lla tion condition of the runch a n-
nel.
•Repa ir a n y twisting in the do or sash.
•Check the inst allation condit i on of the lo we r sash
or th
e ce ntre sash.
NOTE: The lower sa sh canno t normally be
a
d
juste
d , bu t it ma y be po ssible to ad just th e sa sh
sp
an sligh t ly within the ran ge allowed b y manu
-
facturing tolerances by pu shing the lower sash
o
u twards wh ile r e -inst a lling it .
5.If rep a ir or a d justme nt is not po ssible , repla c e th e
d oor assembly .
POWER WINDOW OPERA T ING CURRENT
CHECK
M142900 1 1 0018 4
AC006115AB
1.Remove the po we r window fu se a nd co nnect an
a mme ter as sho w n in th e illustration .
2.Wh en the power win dow switch is presse d to the
“UP” position, a large amou nt of current flows at
th e time the window st a r t s to close and whe n it is
fu lly closed , so measure th e oper ation curren t in
th e int e rval between these two point s.
St andard va lue (A): 5 ± 1A (Power suppl y
volt
age
14.5
± 0 . 5V , 25°C)
Page 301 of 800
DOOR
BODY42-29
3. If the operation current is outside the standard value, refer to GROUP 54B, Troubleshooting
P.54B-15, refer to GROUP 54C, Troubleshooting
P.54C-4.
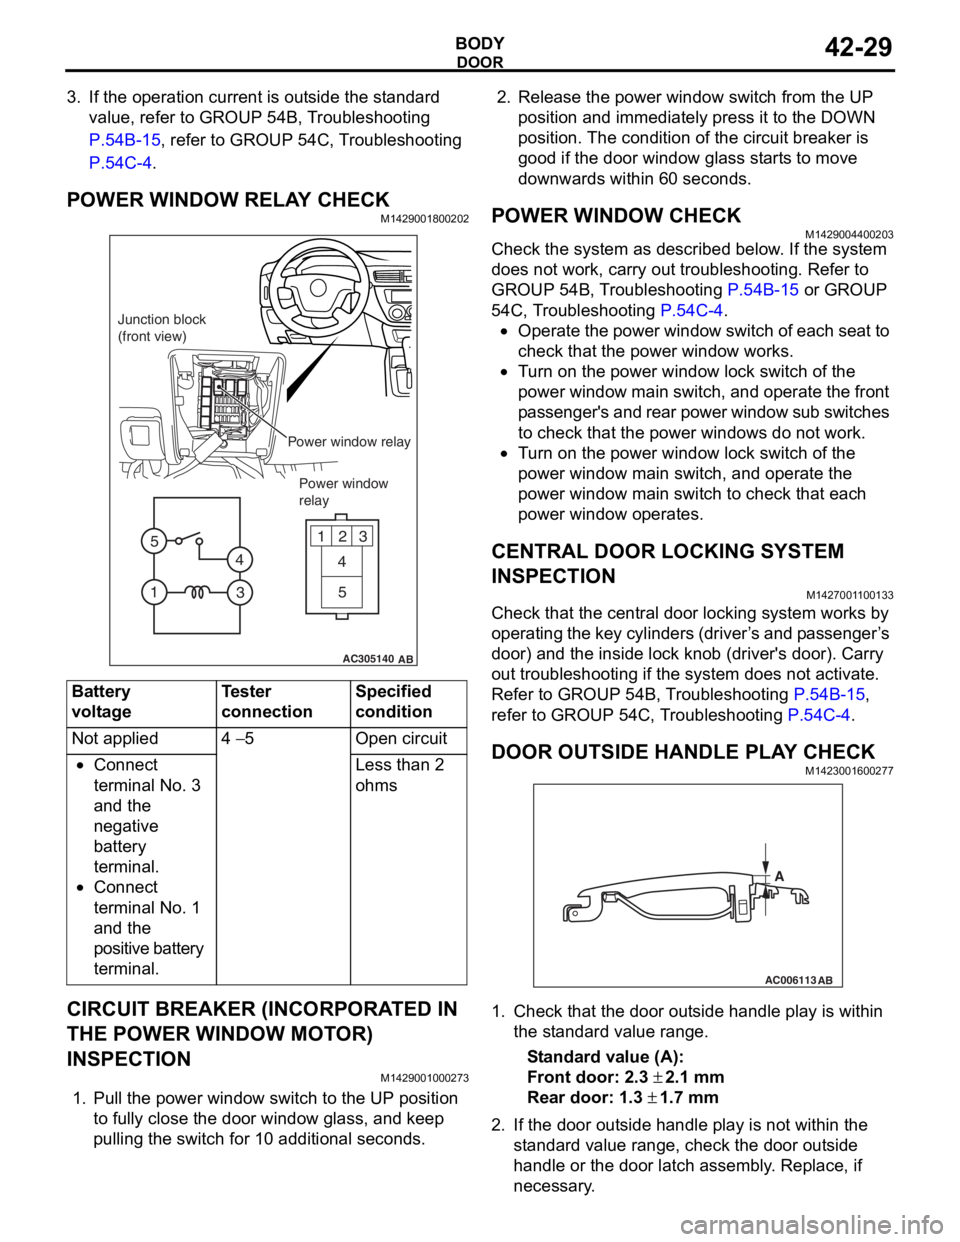
POWER WINDOW RELAY CHECKM1429001800202
AC305140
123
4
5
1 3
4
5
AB
Junction block
(front view)
Power window relayPower window
relay
Bat t ery
voltage
Teste r
co
nnectionSpecified
condition
Not applied4 − 5Ope n ci rcui t
•Connect
te
rmin al No. 3
an
d the
ne
gative
ba
ttery
te
rmin al.
•Connect
te
rmin al No. 1
an
d the
positive batt
e ry
te
rmin al.
Less than 2
ohms
CIRCUIT BREAKER (INCORPORA T ED IN
THE POW
E R W I NDOW MOT O R)
INSPECTION
M14290010 0027 3
1.Pull the p o wer windo w switch to th e UP position
to f u lly close the do or windo w g l ass, an d ke ep
pullin g the switch for 1 0 addition al secon d s.
2.Rele ase the power window switch from t he UP
position an d immediately pre ss it to t he DOW N
position. Th e con d ition of the circu i t brea ker is
goo d if t he doo r window g l ass st art s to mo ve
downward s with in 60 seconds.
POWER WI NDOW CHECKM14290044 0020 3
Check the system a s de scribed b e low . I f the system
does not work, car
r y out troublesh ootin g. Refer to
GROUP 54
B, T r ouble s hoo ting
P.54B-15 or GROUP
54C, T r oublesh ootin g P.54C-4.
•Operate the powe r wind ow switch of e a ch se at to
check that
the power window works.
•Tu rn o n the power wind ow lock switch of the
power wind
ow main swit ch, and ope rate the front
p
a ssenger's and rear power window su b switches
to check th
at the p o wer windo ws do n o t work.
•Tu rn o n the power wind ow lock switch of the
power
window main switch, and operate the
power
window main switch to check tha t each
power window
op erates.
CENTRAL DOOR LOCKING SYSTEM
INSPECTION
M142700 1 1 0013 3
Check that th e ce ntral door locking system wo rks by
op
er atin g th e key cylin de rs (d rive r ’ s an d p a sse n g e r ’ s
door) an
d the inside lock kno b (driver's door). Ca rry
out trou
bleshooting if the system does not activate.
Re
fer to GROUP 54B, T r ou bleshooting
P.54B-15,
refer to GROUP 54 C, T r o uble s hoo ting P.54C-4.
DOOR OUTSIDE HANDLE PL A Y CHECKM14230016 0027 7
AC006113
AB
A
1.Check t hat the door o u t s ide handle play is with in
th e st and ard va lue range.
St andard va lue (A):
Fron t door: 2.3 ± 2.1 m m
Rear door: 1.3 ± 1.7 mm
2. If the do or out side ha ndle play is not wit h in th e
st a ndard valu e rang e, ch eck the do or out side
h andle or the door latch assemb ly . Replace, if
ne c e ss a r y .