MITSUBISHI LANCER IX 2006 Service Manual
Manufacturer: MITSUBISHI, Model Year: 2006, Model line: LANCER IX, Model: MITSUBISHI LANCER IX 2006Pages: 800, PDF Size: 45.03 MB
Page 221 of 800
36-1
GROUP 36
PARKING BRAKES
CONTENTS
GENERAL INFORMATIO N . . . . . . . .36-2
SERVICE SPECIFICATIONS . . . . . . .36-2
LUBRICANTS . . . . . . . . . . . . . . . . . .36-3
ON-VEHICLE SERVICE . . . . . . . . . . .36-3
PARKING BRAKE LEVER STROKE
CHECK AND ADJUSTMENT . . . . . . . . . . . 36-3
LINING RUNNING-IN . . . . . . . . . . . . . . . . . 36-3
PARKING BRAKE SWITCH CHECK . . . . . 36-4
PARKING BRAKE LEVER . . . . . . . . .36-5
REMOVAL AND INSTALLATION . . . . . . . . 36-5
PARKING BRAKE CABLE . . . . . . . . .36-6
REMOVAL AND INSTALLATION . . . . . . . . 36-6
PARKING BRAKE LINING AND
DRUM . . . . . . . . . . . . . . . . . . . . . . . . .36-7
REMOVAL AND INSTALLATION . . . . . . . . 36-7
INSPECTION. . . . . . . . . . . . . . . . . . . . . . . . 36-9
Page 222 of 800
GENERAL INFORMATION
PARKING BRAKES36-2
GENERAL INFORMATION
M1361000100496
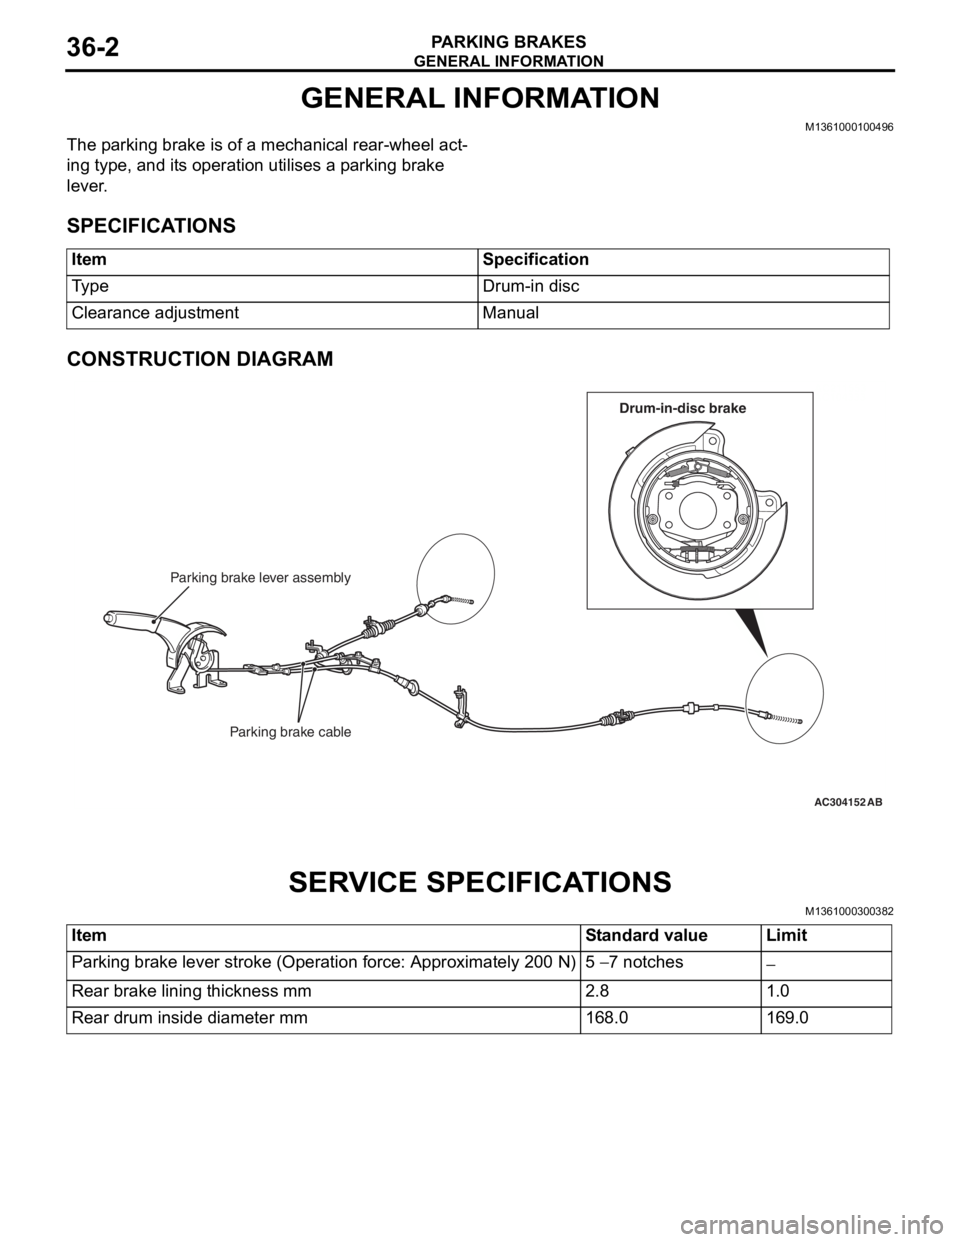
The parking brake is of a mechanical rear-wheel act-
ing type, and its operation utilises a parking brake
lever.
SPECIFICATIONS
ItemSpecification
Ty p eDrum-in disc
Clearance adjustmentManual
CONSTRUCTION DIAGRAM
AC211553
AC104333
AC304152
Parking brake lever assembly
Parking brake cable
AB
Drum-in-disc brake
SERV ICE SPECI F ICA T IONS
M13610003 0038 2
ItemStandard valueLimit
Parking brake lever stroke (Operation force: Approximately 200 N)5 − 7 notches−
Rear brake lining thickness mm2.81.0
Rear drum inside diameter mm168.0169.0
Page 223 of 800
LUBRICANTS
PARKING BRAKES36-3
LUBRICANTS
M1361000400293
ItemSpecified lubricant
Rear brake shoe and backing plate contact surfaceBrake grease SAE J310, NLGI No.1
Rear brake shoe assembly
Rear brake shoe slack adjuster
ON-VEHIC LE SER VI CE
PARKING BRAKE LE VER STROKE
CHECK AND ADJUSTMENT
M13610009 0033 9
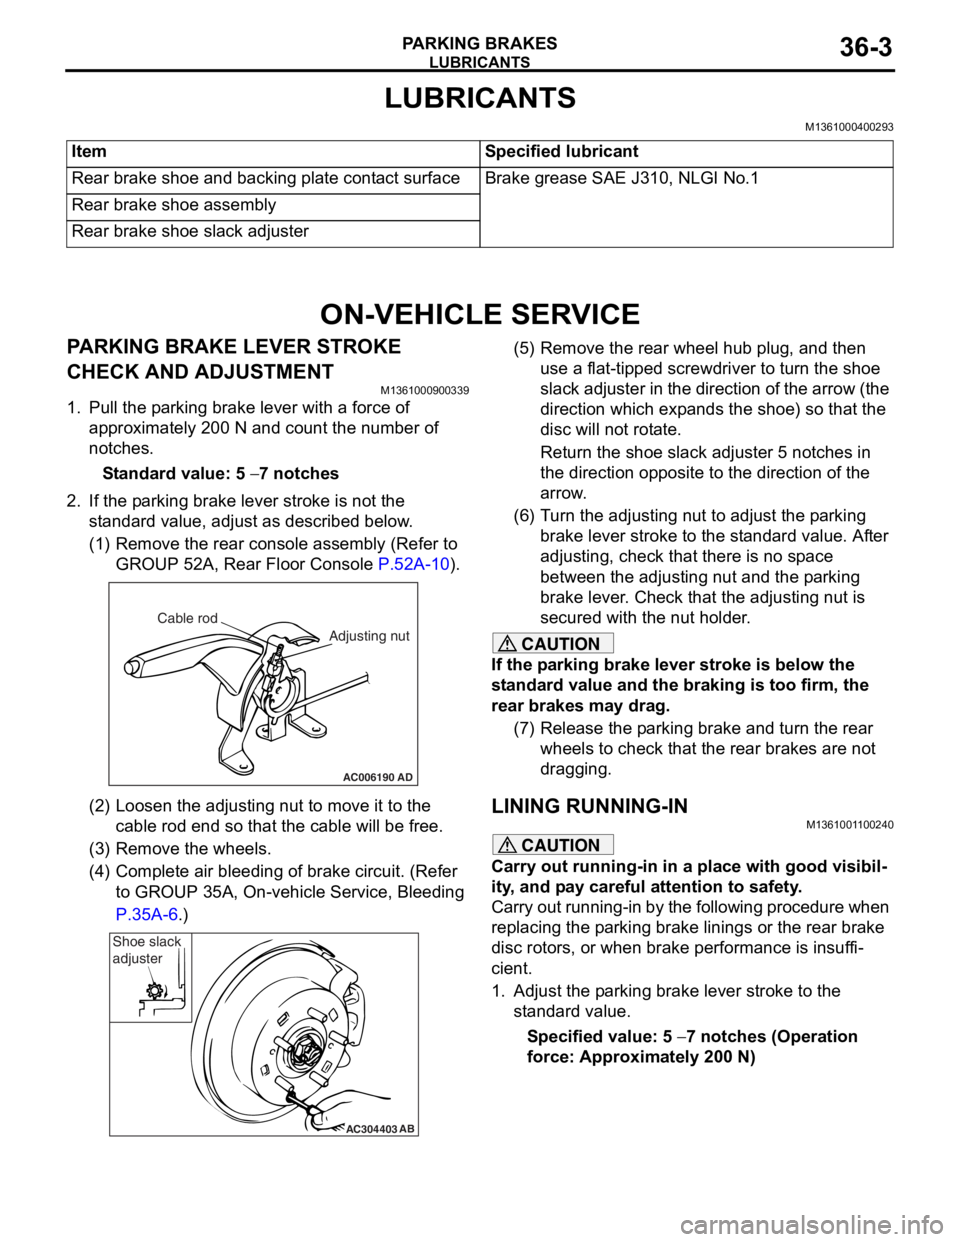
1.Pull the p a rkin g brake le ver wit h a force of
ap proxima t ely 200 N an d co unt the number of
no tche s.
St andard va lue: 5 − 7 notches
2.If the p a rking b r ake leve r stro ke is no t the
st a ndard valu e, adjust as de scribed below .
(1)R emove the rear console a sse mbly (Refer to
GROUP 5 2 A, Rear Floor Console
P.52A-10).
AC006190
Cable rod
Adjusting nut
AD
(2)Loosen th e adjusting nu t to move it to th e
cab l e rod end so tha t the cable will be fre e .
(3)R emove the wheels.
(4)C omplete a i r bleedin g of b r ake circuit. (Re f er
to GROUP 35A, On-ve h icle Service, Blee ding
P.35A-6.)
AC304403AB
Shoe slack
adjuster
(5
) R emove the rear whee l hub plug , and then
use a flat-tipped screwdriver to turn the shoe
slack ad juster in the direction of the arrow (the
dire ctio n which exp a nds the shoe) so that the
disc will no t rot a te.
Return the sh oe slack adjust e r 5 not ches in
the d
i rection opposite t o the d i rection of the
arrow
.
(6) T urn th e adjusting nut to adjust the p a rking
brake le ver stroke to the st anda rd value. Af ter
adjusting, check that there is n o sp ace
between the a d justing nut an d the p a rking
brake le ver . Che ck that th e adjusting nut is
secured with the nut ho lder .
CAUTION
If the parking brake lever stroke is below the
standard value and the braking is too firm, the
rear brakes may drag.
(7) Release the parking brake and turn the rear wheels to check that t he rear brakes are not
dragging.
LINING RUNNING-INM1361001100240
CAUTION
Carry out running-in in a place with good visibil-
ity, and pay careful attention to safety.
Carry out running-in by the following procedure when
replacing the parking brake linings or the rear brake
disc rotors, or when brake performance is insuffi
-
cient.
1. Adjust the parking brake lever stroke to the standard value.
Specified value: 5 − 7 notches (Operation
force: Approximately 200 N)
Page 224 of 800
AC212035AC
Spring balance
Approximately
40 mm Pull
ON-V
EHICLE SER VICE
PA R K ING B RAKES36-4
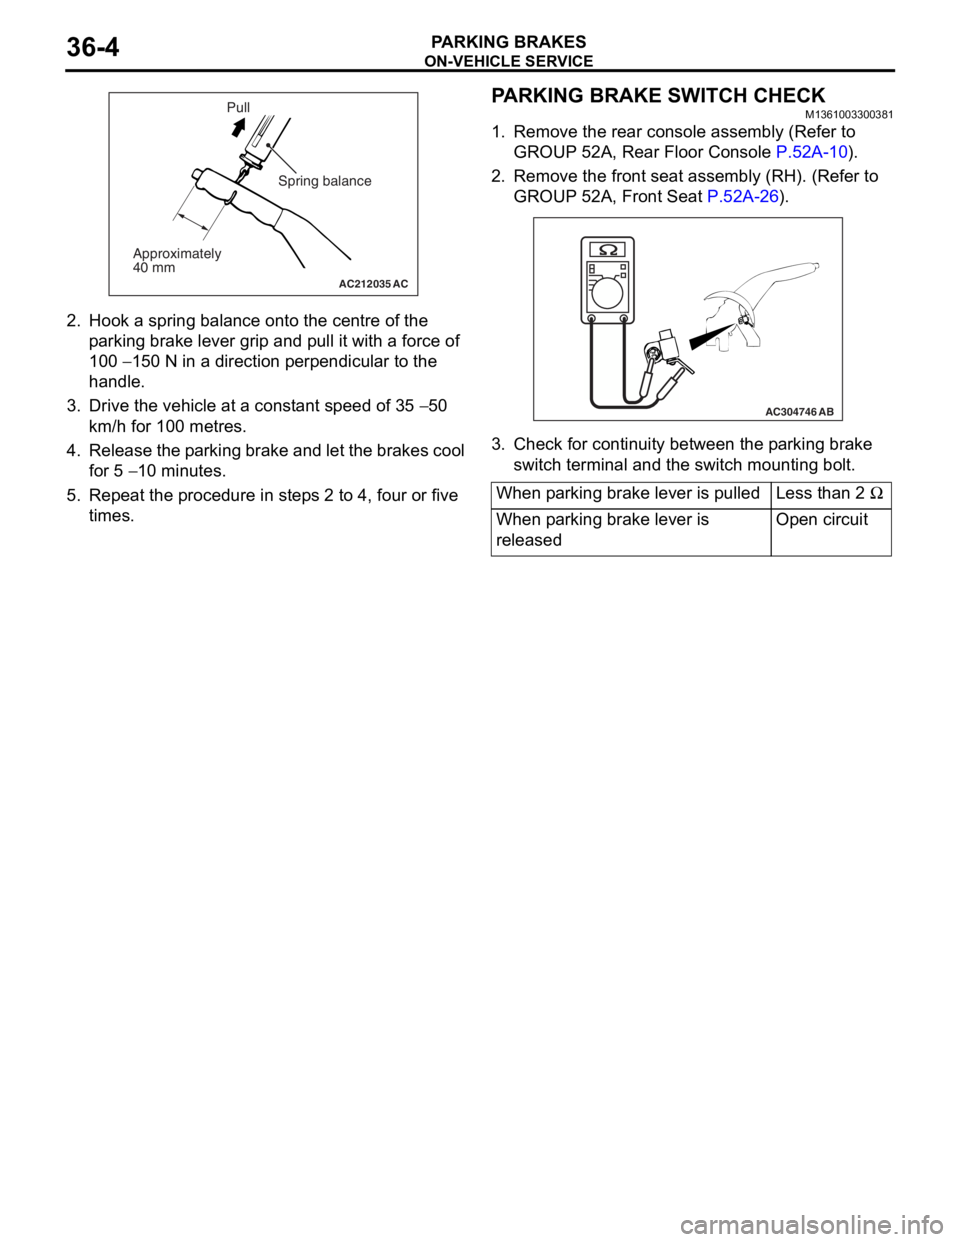
2.Hook a spring bala n ce onto th e ce ntre of the
p a rking brake lever grip and p u ll it with a force of
10 0
− 150 N in a directio n perpe ndicula r to the
ha
ndle .
3. Drive the veh i cle at a const ant speed o f 35 − 50
km/h
for 100
metre
s
.
4. Release the p a rking brake an d let th e bra k es cool
fo r 5
− 10 minutes.
5.Repe at the proce dure in ste p s 2 to 4, four or five
times.
PARKING BRAKE SW ITCH CHECK
M13610033 0038 1
1.Remove the rea r con s ole assembly (Re f er to
GROUP 52A, Rea r Floo r Co nsole
P.52A-10).
2.Remove the fro n t se at assembly (RH). (Re f er to
GROUP 52A, Fr ont Seat
P.5 2 A - 26).
AC304746AB
3.Check f o r co ntinu i ty between t he p a rking bra k e
switch terminal and th e swit ch mounting bo lt.
When parking brake lever is pulledLess than 2 Ω
When parking brake lever is
releasedOpen circuit
Page 225 of 800
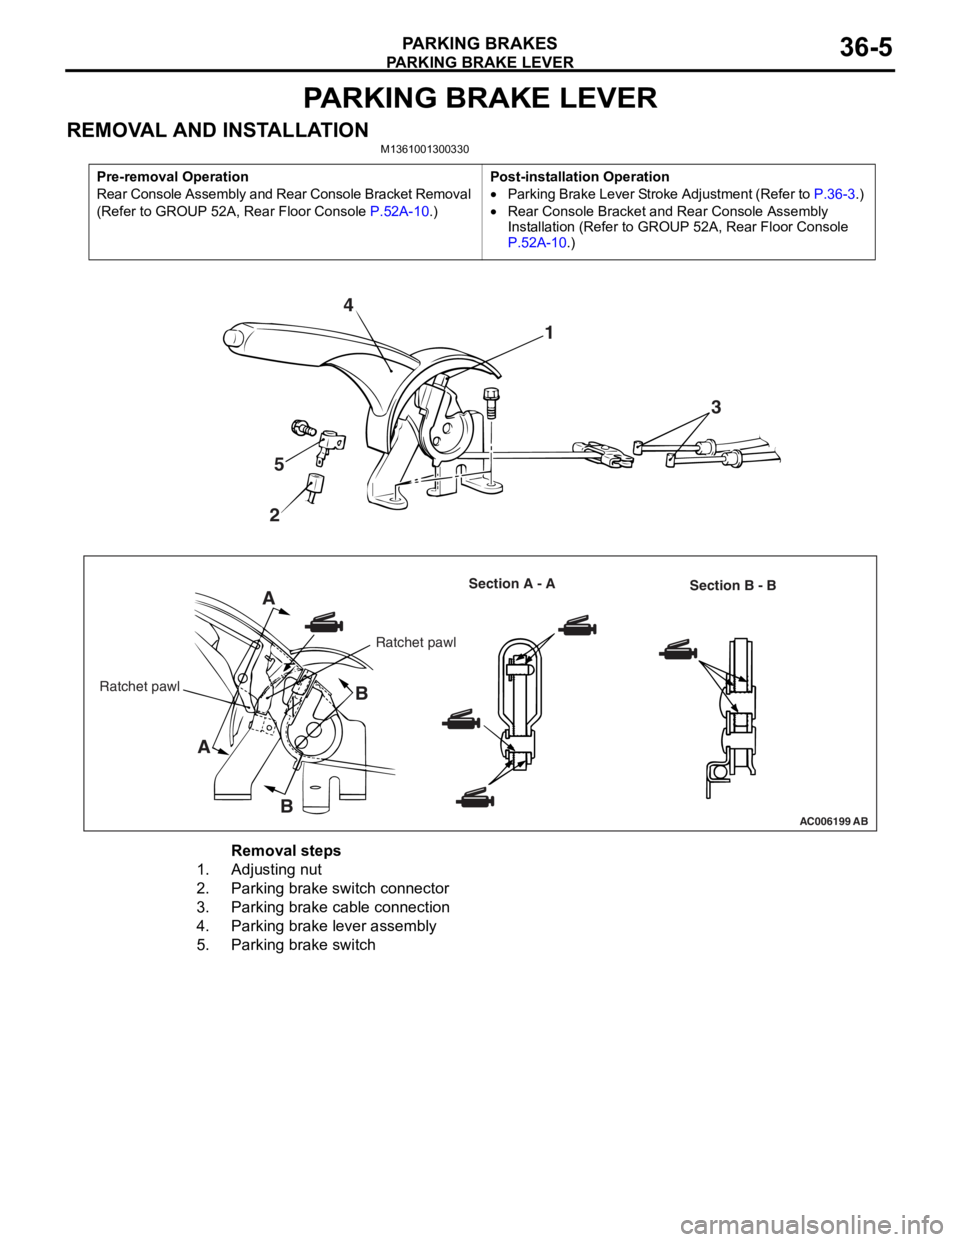
PARKING BRAKE LEVER
PARKING BRAKES36-5
PARKING BRAKE LEVER
REMOVAL AND INSTALLATIONM1361001300330
Pre-removal Operation
Rear Console Assembly and Rear Console Bracket Removal
(Refer to GROUP 52A, Rear Floor Console
P.52A-10.)
Post-installation Operation
•Parking Brake Lever Stroke Adjustment (Refer to P.36-3.)
•Rear Console Bracket and Rear Console Assembly
Installation (Refer to GROUP 52A, Rear Floor Console
P.52A-10.)
AC006199AB
4
5
2 1
3
A
A B
B
Ratchet pawl Section A - A
Section B - B
Ratchet pawl
Removal steps
1.Adjusting nut
2.Parking brake switch connector
3.Parking brake cable connection
4.Parking brake lever assembly
5.Parking brake switch
Page 226 of 800
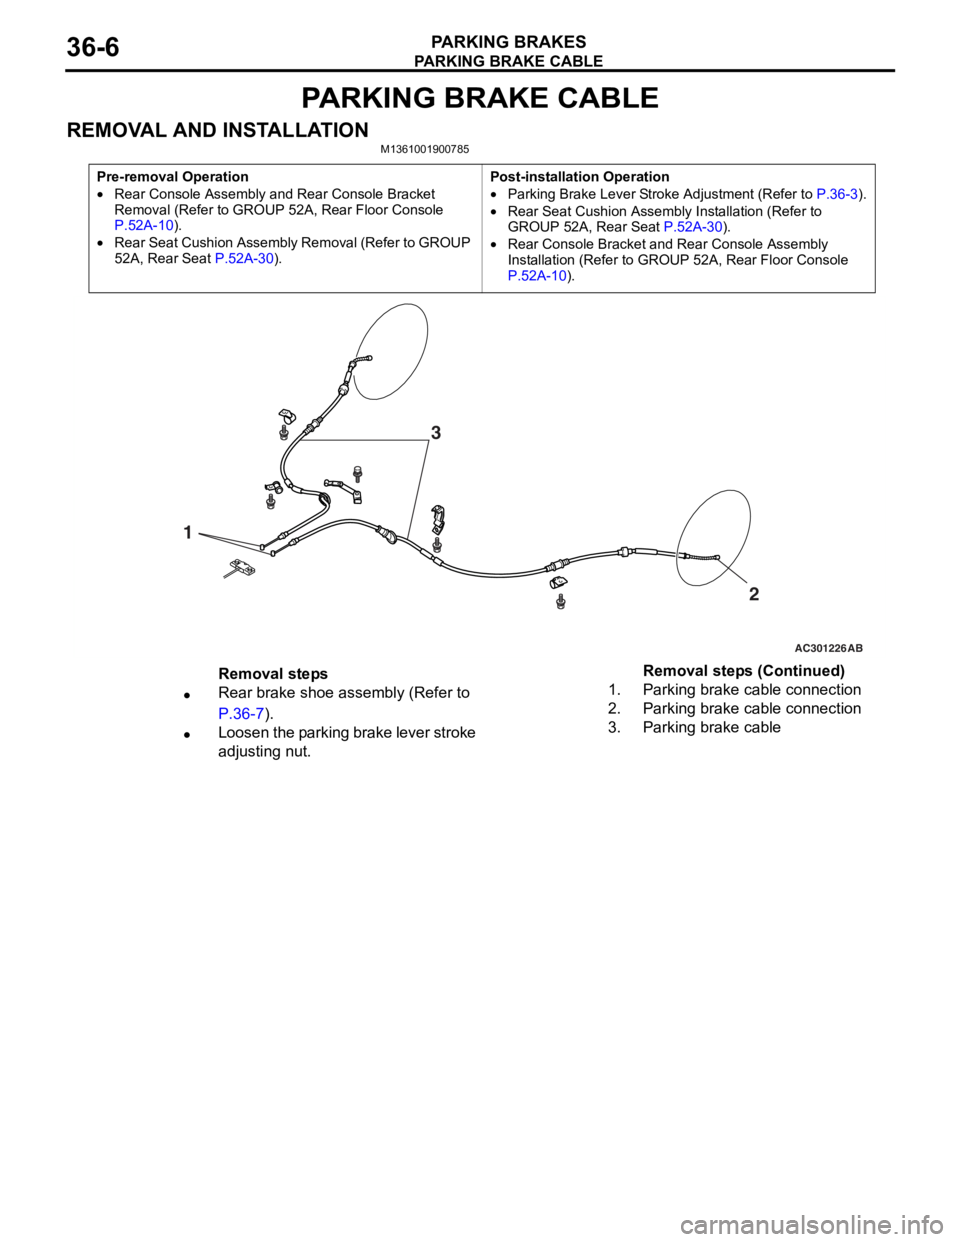
PARKING BRAKE CABLE
PARKING BRAKES36-6
PARKING BRAKE CABLE
REMOVAL AND INSTALLATIONM1361001900785
Pre-removal Operation
•Rear Console Assembly and Rear Console Bracket
Removal (Refer to GROUP 52A, Rear Floor Console
P.52A-10).
•Rear Seat Cushion Assembly Removal (Refer to GROUP
52A, Rear Seat
P.52A-30).
Post-installation Operation
•Parking Brake Lever Stroke Adjustment (Refer to P.36-3).
•Rear Seat Cushion Assembly Installation (Refer to
GROUP 52A, Rear Seat P.52A-30).
•Rear Console Bracket and Rear Console Assembly
Installation (Refer to GROUP 52A, Rear Floor Console
P.52A-10).
AC301226
1
AB
2
3
Removal steps
•Rear brake shoe assembly (Refer to
P.36-7).
•Loosen the parking brake lever stroke
adjusting nut.
1.Parking brake cable connection
2.Parking brake cable connection
3.Parking brake cable
Removal steps (Continued)
Page 227 of 800

PARKING BRAKE LINING AND DRUM
PARKING BRAKES36-7
PARKING BRAKE LINING AND DRUM
REMOVAL AND INSTALLATIONM1361002500296
Post-installation Operation
•Parking Brake Lever Stroke Check and Adjustment (Refer
to
P.36-3).
•Lining Running-in (Refer to P.36-3).
AC304238
19
60 ± 5 N·m63 ± 7 N·m
AB
13 4
15 5
3
8 9
7 2
1
6
10
11
12 17
18
14
16
20
N
15
14
20 8
Specified grease: Brake grease SAE J310, NLGI No.1
Removal steps
<> 1. Rear brake assembly
2. Rear brake disc
3.Rear hub assembly (Refer to
GROUP 27, Rear Hub Assembly
P.27-5).
>>D<<4.Shoe return spring
>>D<<5. Shoe return spring
6. Shoe guide plate
7. Shoe auto adjuster spring
>>C<<8. Shoe slack adjuster
9. Parking brake operating lever strut
10. Shoe to strut spring
11 . Shoe spring cup
12. Shoe hold-down spring
13. Rear brake pin
14. Rear brake primary shoe assembly
15. Rear brake secondary shoe
assembly
<>>>B<<16. Rear brake chamber retainer
>>A<<17. Rear brake washer
18. Parking brake operating lever
19. Parking brake cable clip
20. Rear brake backing plate
Removal steps (Continued)
Page 228 of 800
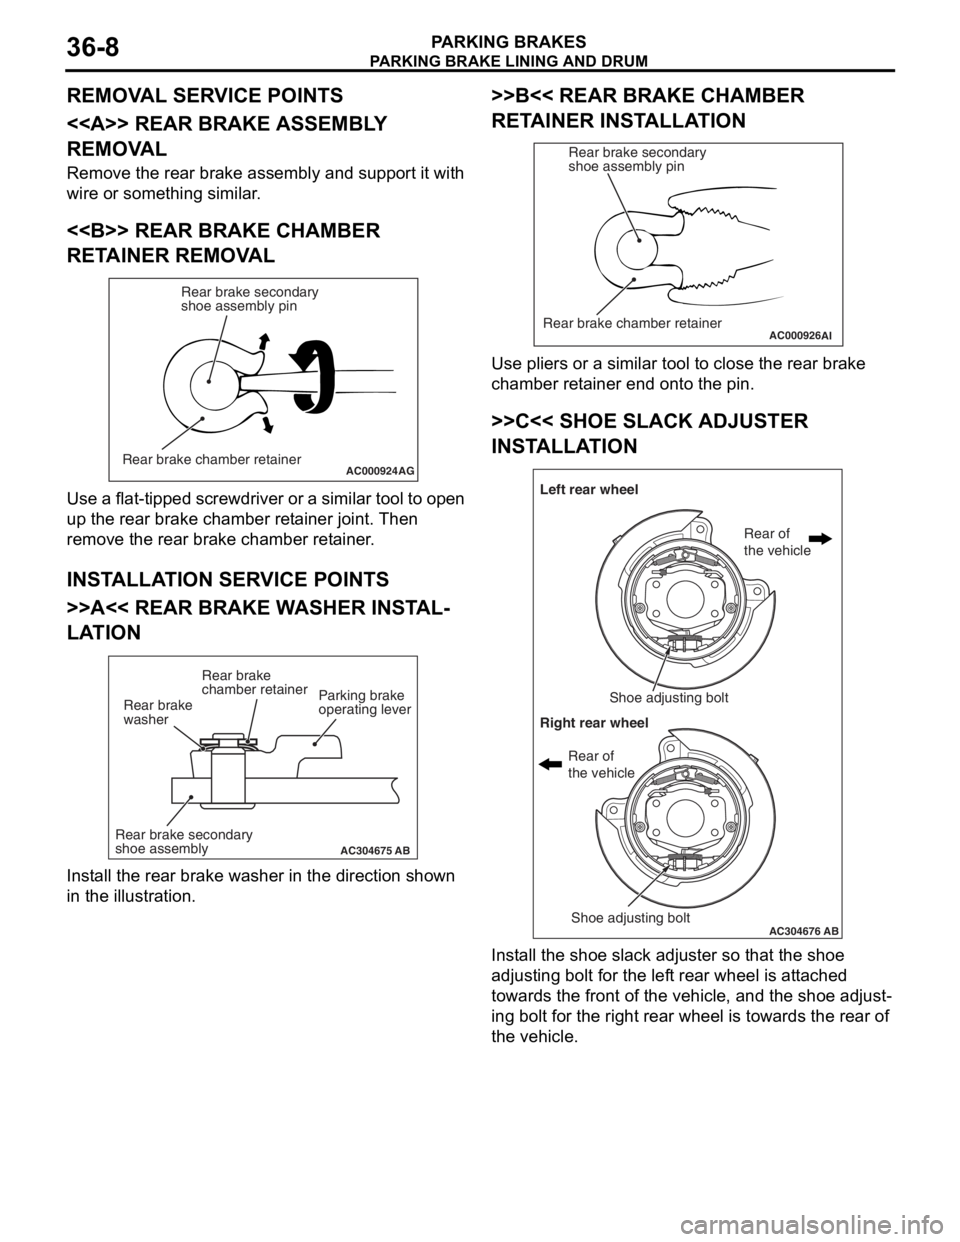
Page 229 of 800
PARKING BRAKE LINING AND DRUM
PARKING BRAKES36-9
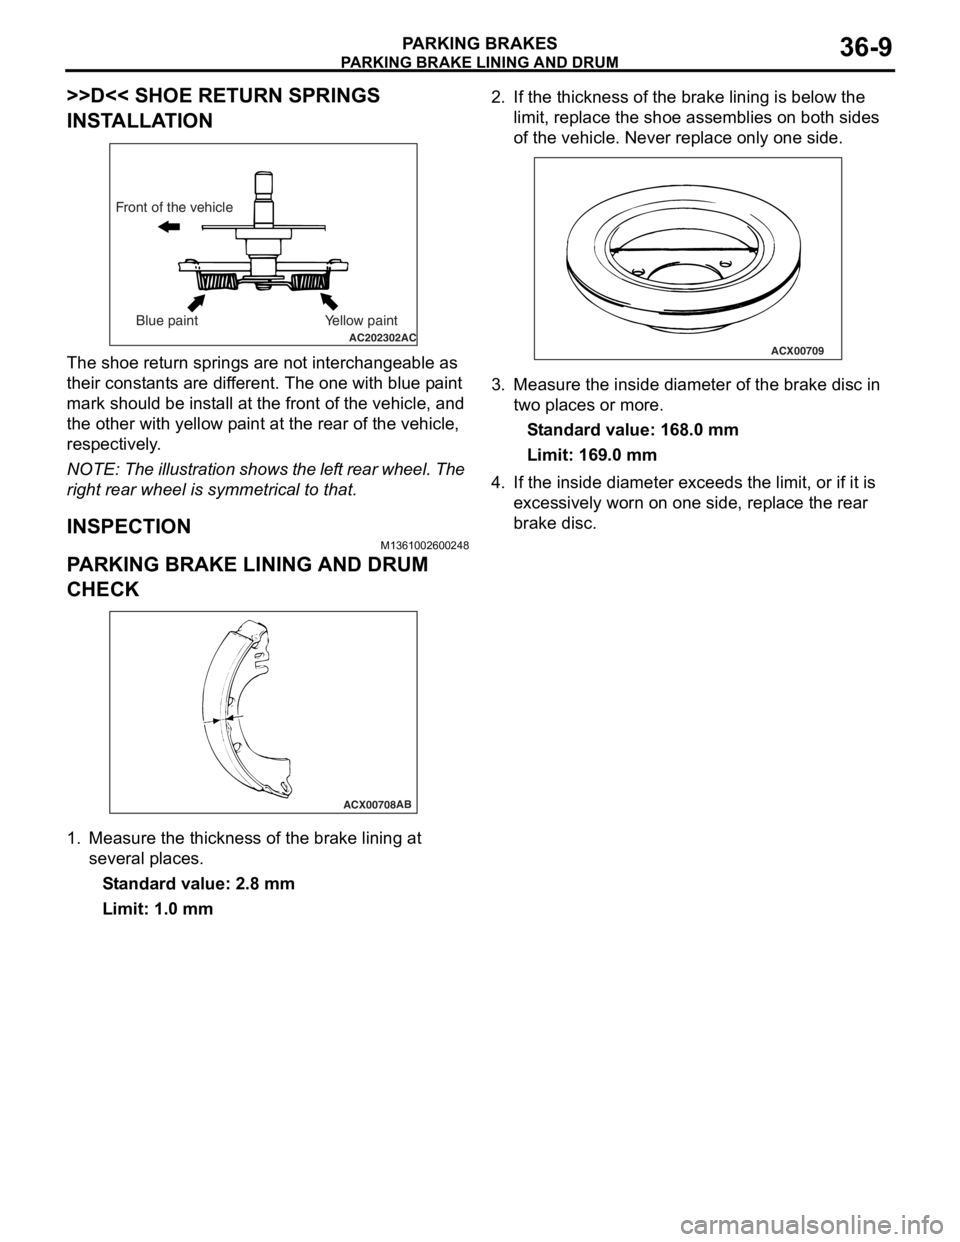
>>D<< SHOE RETURN SPRINGS
INSTALLATION
AC202302AC
Front of the vehicleBlue paint Yellow paint
The shoe ret u rn sp rings are n o t in tercha ngeab le as
their const
a nt s are d i f f e r ent. Th e one with blue p a in t
mark
should be inst a ll at t he fron t o f th e vehicle, and
the oth
e r with yellow p a int a t the re ar of th e ve hicle,
respectively
.
NOTE: The ill ustratio n sh ows th e lef t rear whee l. T he
right re
ar wheel is symme trical to that.
INSPECTION
M13610026 0024 8
PARKING BRAKE LI NING AND DRUM
CHECK
ACX00708AB
1.
Measure the thickne ss of the b r ake lining at
seve ral place s .
St andard va lue: 2.8 mm
Limit: 1.0 mm
2.If the thickness of t he brake linin g is belo w the
limit, rep l ace the shoe a s semblies on bo th sides
o f the vehicle. Ne ver re place only on e side.
ACX00709
3.Measure the inside d i ameter of the bra k e d i sc in
two p l aces o r more .
St andard va lue: 16 8.0 mm
Limit: 169.0 mm
4.If the inside diamete r exceeds the limit, or if it is
e xce ssively worn on one side, rep l ace the re ar
b r ake d i sc.
Page 230 of 800

NOTES