MITSUBISHI SPYDER 1990 Service Repair Manual
Manufacturer: MITSUBISHI, Model Year: 1990, Model line: SPYDER, Model: MITSUBISHI SPYDER 1990Pages: 2103, PDF Size: 68.98 MB
Page 1831 of 2103
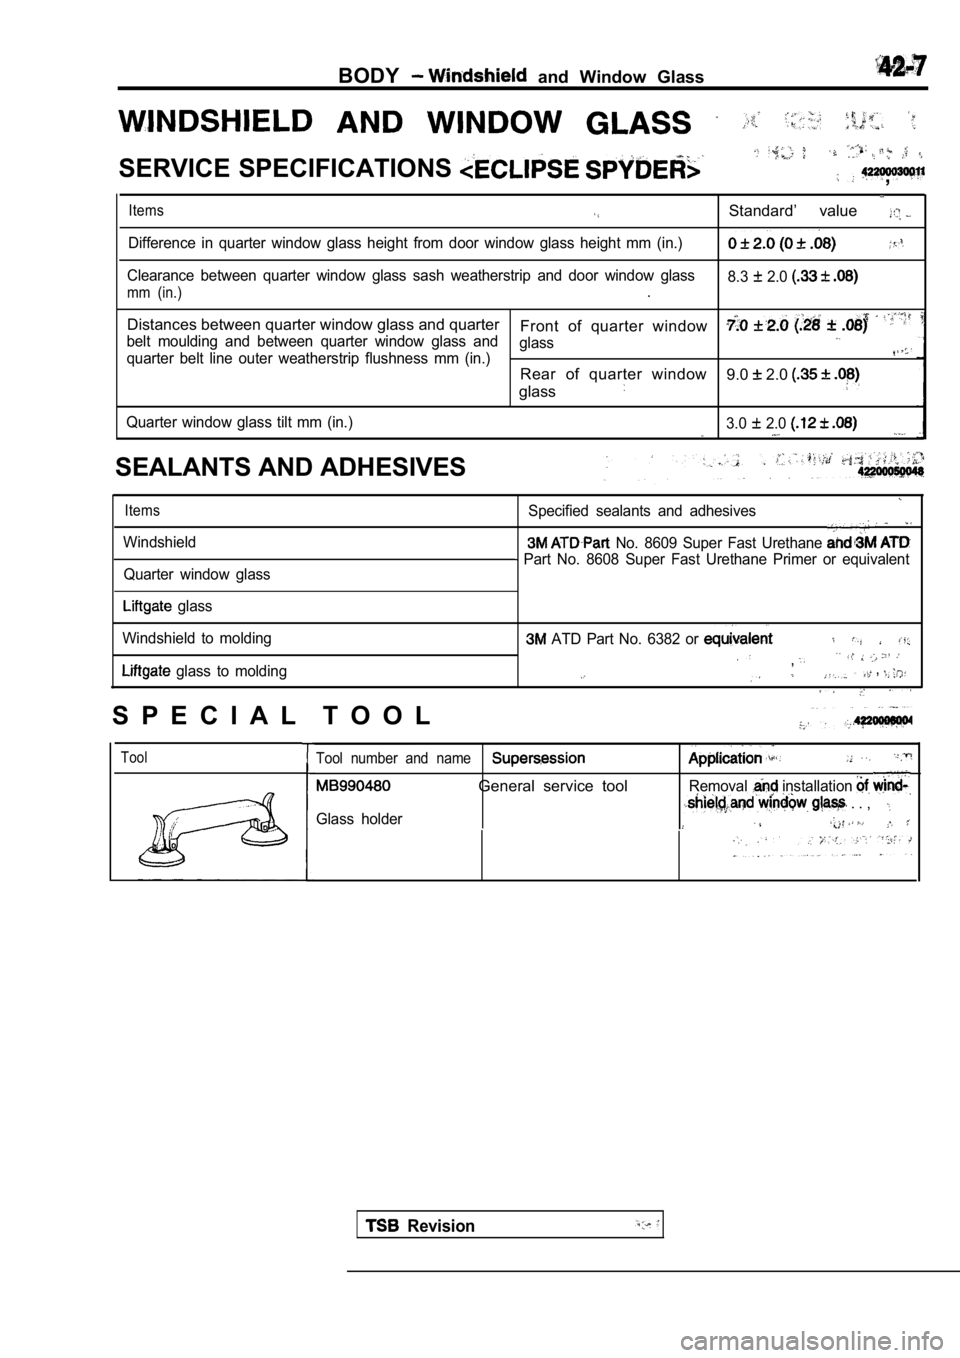
BODY and Window Glass
SERVICE SPECIFICATIONS ,
Items
Difference in quarter window glass height from door window glass height mm (in.)
Clearance between quarter window glass sash weather strip and door window glass
mm (in.).Standard’ value 8.3 2.0
Distances between quarter window glass and quarter
Front of quarter window
belt moulding and between quarter window glass and glass
quarter belt line outer weatherstrip flushness mm (in.)Rear of quarter window
glass9.0 2.0
Quarter window glass tilt mm (in.) 3.0 2.0
SEALANTS AND ADHESIVES
Items
Windshield
Quarter window glass
Specified sealants and adhesives
No. 8609 Super Fast Urethane
Part No. 8608 Super Fast Urethane Primer or equiva lent
glass
Windshield to molding
glass to molding
ATD Part No. 6382 or
,. . , . .
S P E C I A L T O O L
ToolTool number and name
General service toolRemoval installation
Glass holder . . ,
Revision
Page 1832 of 2103
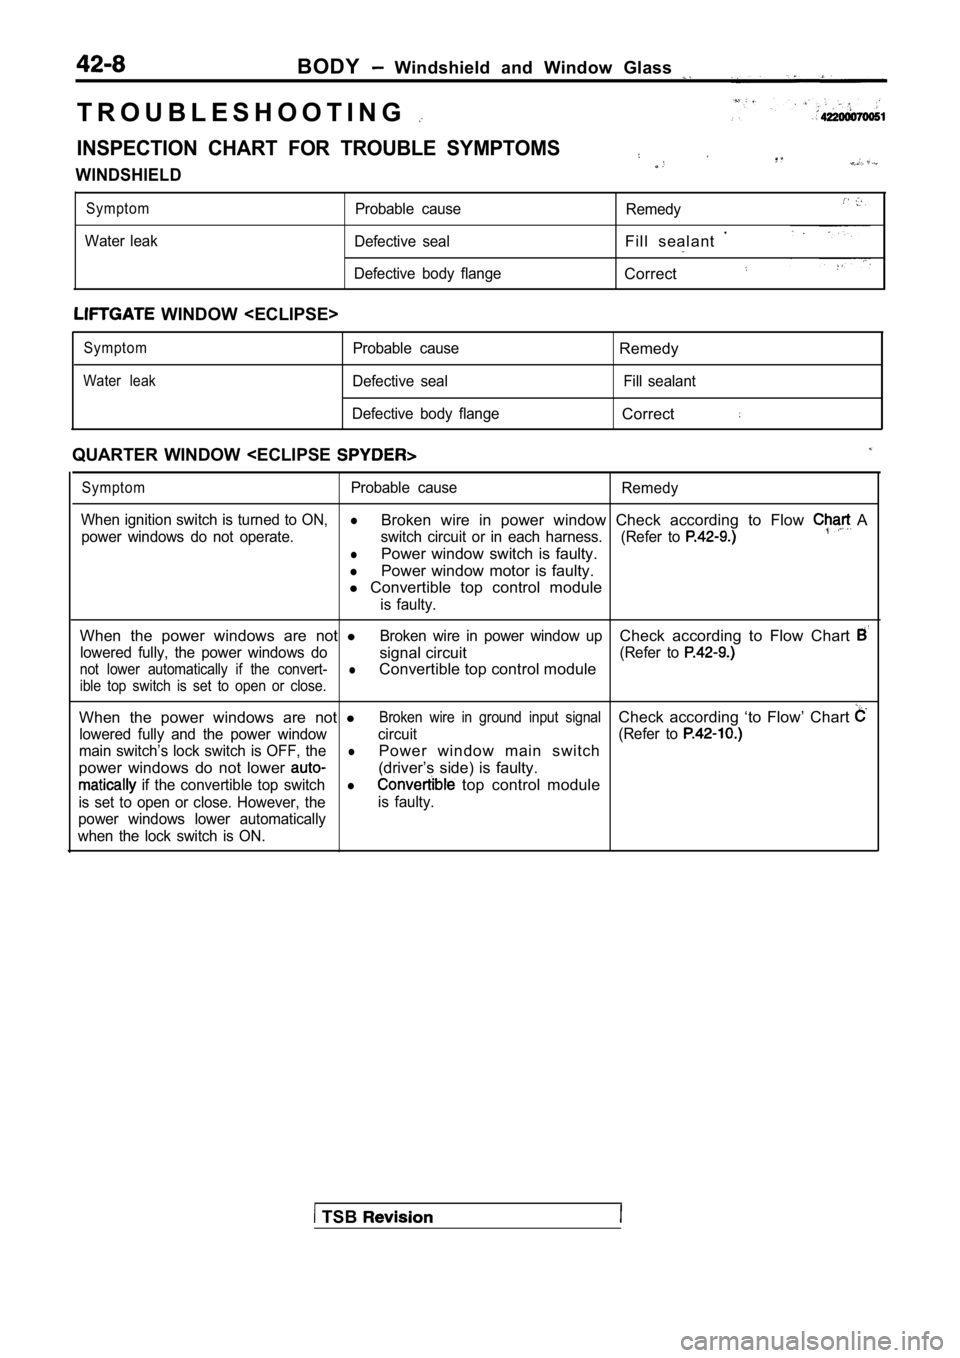
BODY Windshield and Window Glass
T R O U B L E S H O O T I N G
INSPECTION CHART FOR TROUBLE SYMPTOMS
WINDSHIELD
Symptom
Water leakProbable cause
Defective seal
Defective body flange RemedyF i l l s e a l a n t
Correct
WINDOW
Symptom
Water leakProbable causeRemedy
Defective seal Fill sealant
Defective body flange
Correct
QUARTER WINDOW
When ignition switch is turned to ON,
l
power windows do not operate.
Broken wire in power window Check according to Flow A
switch circuit or in each harness. (Refer to
lPower window switch is faulty.
lPower window motor is faulty.
l Convertible top control module
is faulty.
When the power windows are not lBroken wire in power window upCheck according to Flow Chart
lowered fully, the power windows dosignal circuit(Refer to
not lower automatically if the convert-lConvertible top control module
ible top switch is set to open or close.
When the power windows are not lBroken wire in ground input signalCheck according ‘to Flow’ Chart
lowered fully and the power window circuit (Refer to
main switch’s lock switch is OFF, thelPower window main switch
power windows do not lower
(driver’s side) is faulty.
if the convertible top switchl top control module
is set to open or close. However, the is faulty.
power windows lower automatically
when the lock switch is ON.
TSB
Page 1833 of 2103
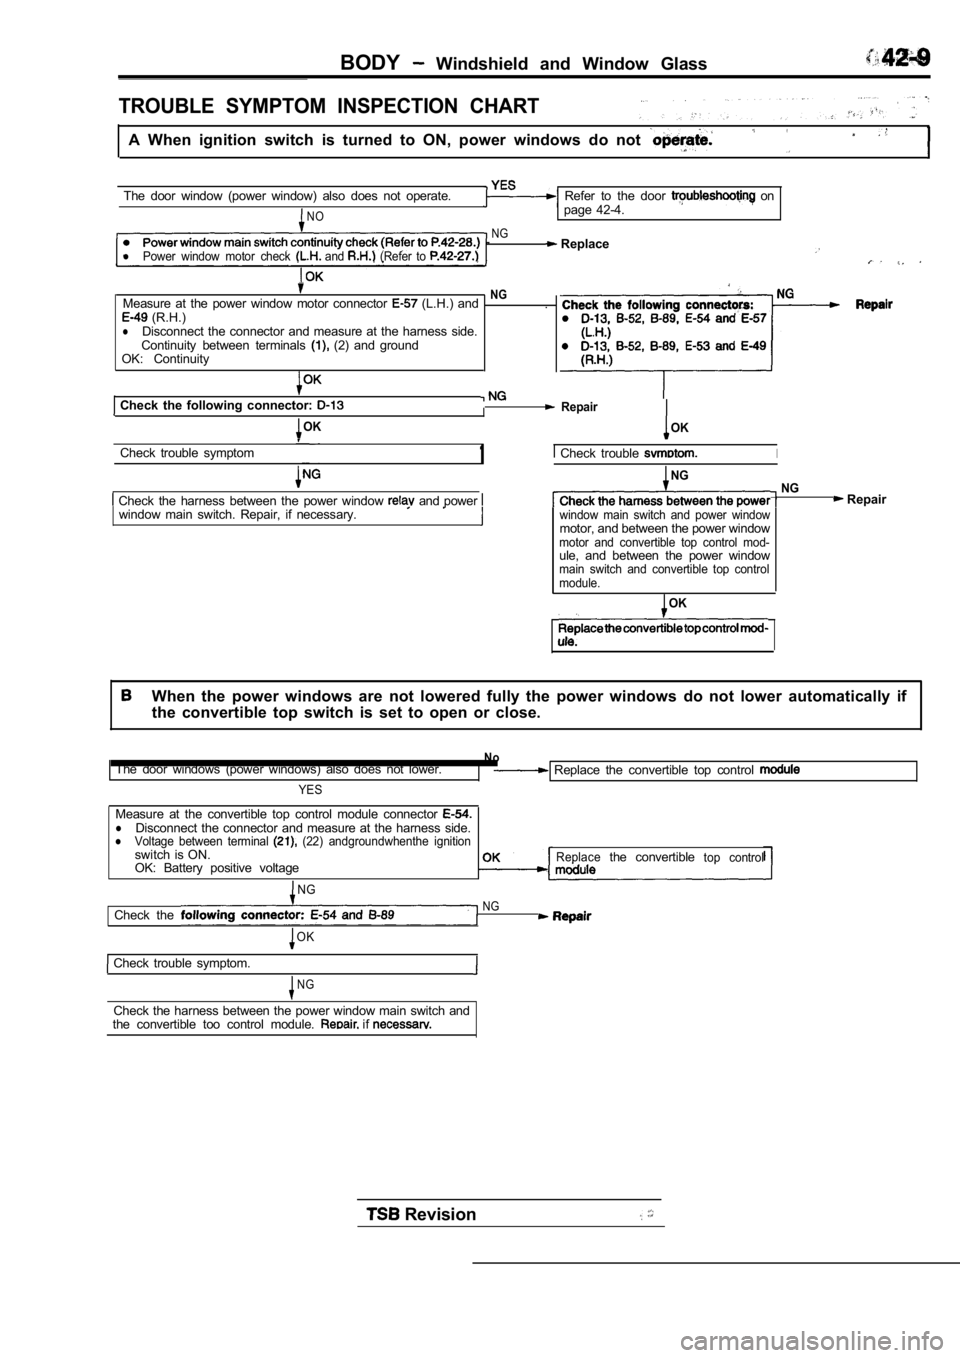
BODY Windshield and Window Glass
TROUBLE SYMPTOM INSPECTION CHART
A When ignition switch is turned to ON, power windows do not
The door window (power window) also does not operate. Refer to the door on
NOpage 42-4.
NG ReplacelPower window motor check and (Refer to
NGMeasure at the power window motor connector (L.H.) and
. (R.H.)lDisconnect the connector and measure at the harness side.
Continuity between terminals (2) and ground
OK: Continuity
Check the following connector:
OKI Repair
OK
Check the following connectors:
Check trouble symptom1
Check the harness between the power window and power window main switch. Repair, if necessary.
Check trouble I
NG NG
window main switch and power windowmotor, and between the power windowmotor and convertible top control mod-ule, and between the power windowmain switch and convertible top control
module.
Repair
OK
Revision
When the power windows are not lowered fully the po wer windows do not lower automatically if
the convertible top switch is set to open or close.
NoThe door windows (power windows) also does not lowe r.
YES
Replace the convertible top control
Measure at the convertible top control module connector lDisconnect the connector and measure at the harness side.lVoltage between terminal (22) andgroundwhenthe ignitionswitch is ON.
the convertiblecontrolOK: Battery positive voltageReplacetop
NG
Check the NG
OK
Check trouble symptom.
NG
Check the harness between the power window main swi tch and
the convertible too control module. if
Page 1834 of 2103
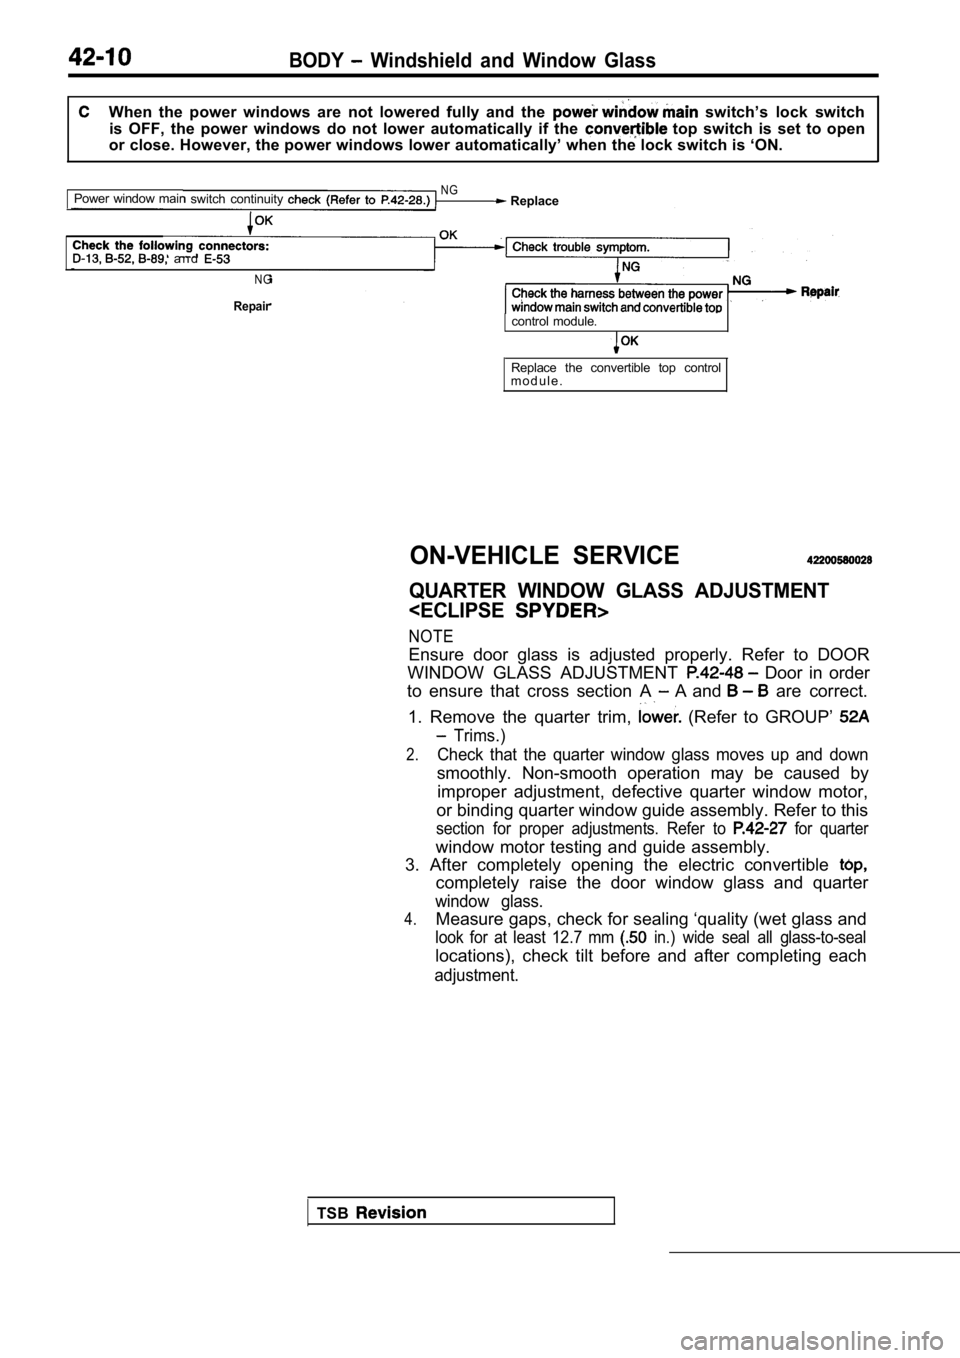
BODY Windshield and Window Glass
When the power windows are not lowered fully and the switch’s lock switch
is OFF, the power windows do not lower automaticall y if the
top switch is set to open
or close. However, the power windows lower automati cally’ when the lock switch is ‘ON.
Power window mair
switch continuity NG Replace
a n d
N G
Repaircontrol module.
Replace the convertible top control
m o d u l e .
ON-VEHICLE SERVICE
QUARTER WINDOW GLASS ADJUSTMENT
Ensure door glass is adjusted properly. Refer to DO OR
WINDOW GLASS ADJUSTMENT
Door in order
to ensure that cross section A
A and are correct.
1. Remove the quarter trim,
(Refer to GROUP’
Trims.)
2.Check that the quarter window glass moves up and do wn
smoothly. Non-smooth operation may be caused by
improper adjustment, defective quarter window motor ,
or binding quarter window guide assembly. Refer to this
section for proper adjustments. Refer to for quarter
window motor testing and guide assembly.
3. After completely opening the electric convertibl e
completely raise the door window glass and quarter
window glass.
4.Measure gaps, check for sealing ‘quality (wet glass and
look for at least 12.7 mm in.) wide seal all glass-to-seal
locations), check tilt before and after completing each
adjustment.
TSB
Page 1835 of 2103
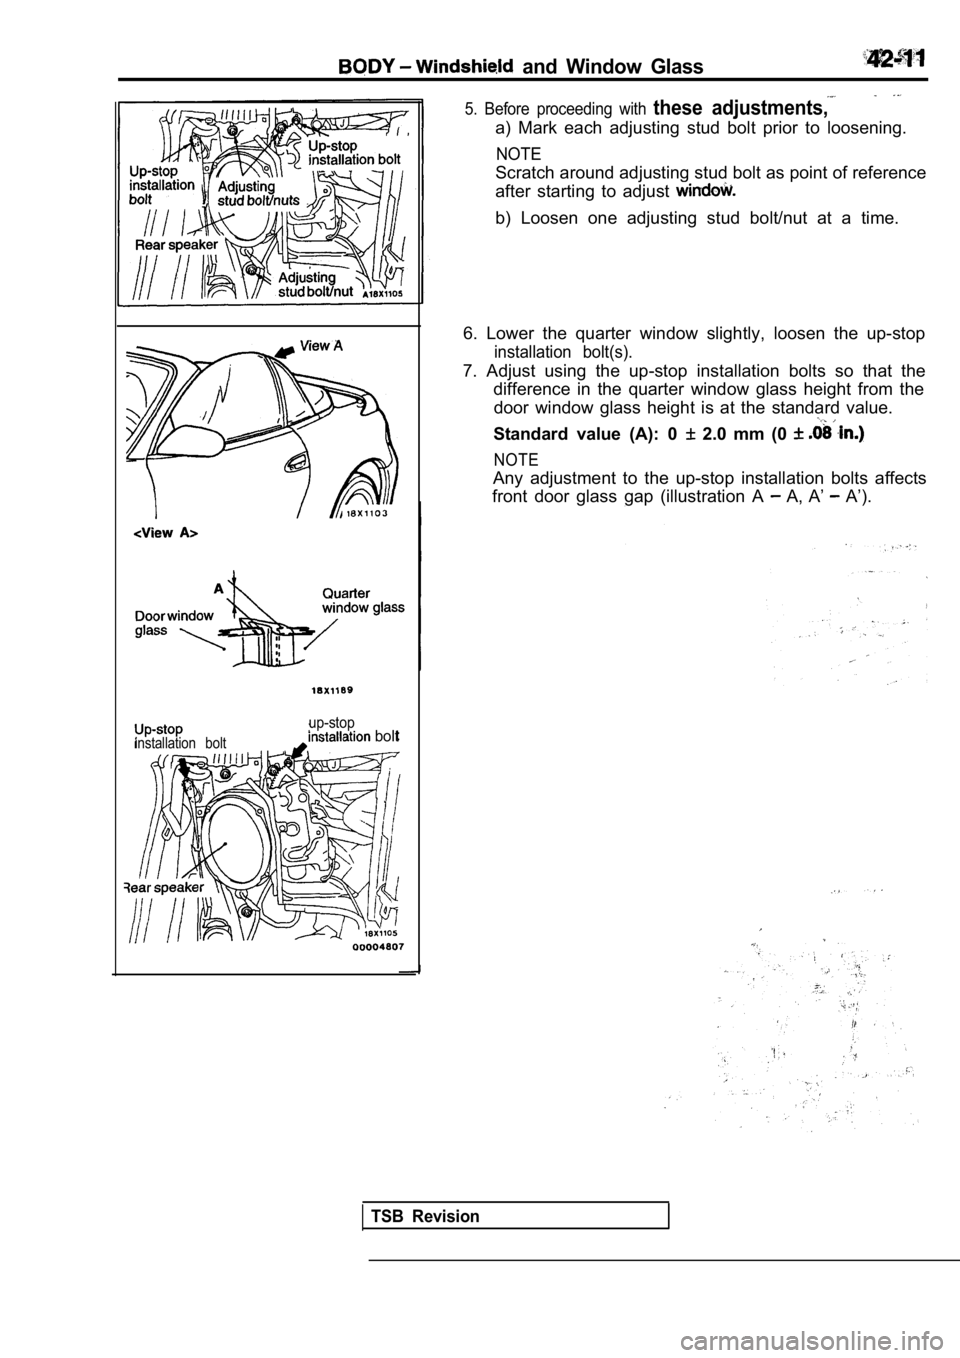
and Window Glass
installation bolt
up-stop bolt
5. Before proceeding with these adjustments,
a) Mark each adjusting stud bolt prior to loosening.
NOTE
Scratch around adjusting stud bolt as point of reference
after starting to adjust
b) Loosen one adjusting stud bolt/nut at a time.
6. Lower the quarter window slightly, loosen the up -stop
installation bolt(s).
7. Adjust using the up-stop installation bolts so that the
difference in the quarter window glass height from the
door window glass height is at the standard value.
Standard value (A): 0 2.0 mm (0
NOTE
Any adjustment to the up-stop installation bolts af fects
front door glass gap (illustration A
A, A’ A’).
TSB Revision
Page 1836 of 2103
BODY Windshield and Window Glass
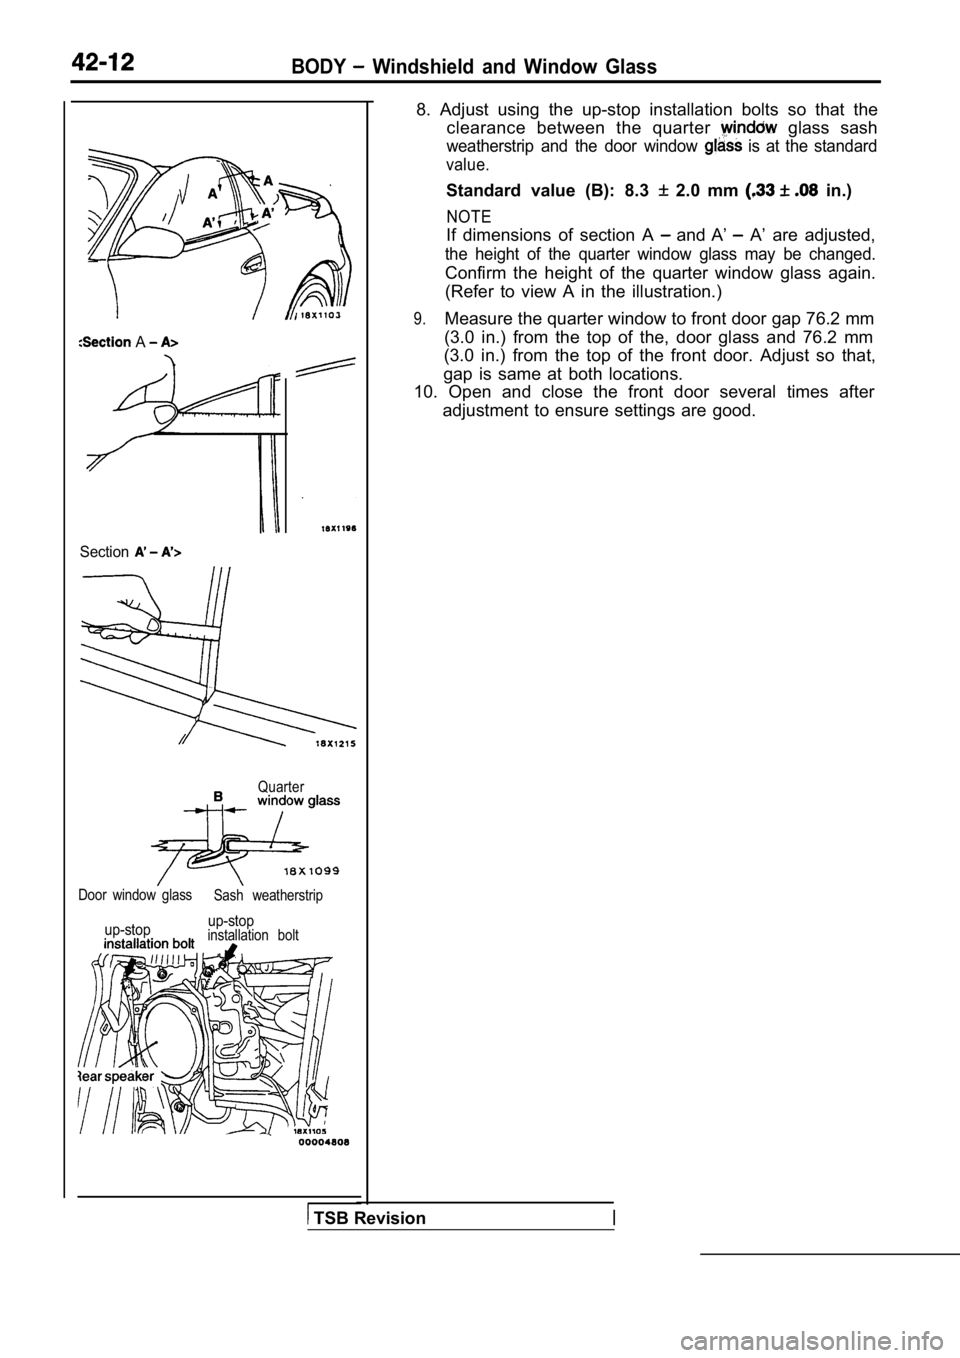
A
Section
Quarter
Door window glassSash weatherstrip
up-stopup-stopinstallation bolt
8. Adjust using the up-stop installation bolts so t
hat the
clearance between the quarter
glass sash
weatherstrip and the door window is at the standard
value.
Standard value (B): 8.3 2.0 mm in.)
NOTE
If dimensions of section A and A’ A’ are adjusted,
the height of the quarter window glass may be chang ed.
Confirm the height of the quarter window glass again.
(Refer to view A in the illustration.)
9.Measure the quarter window to front door gap 76.2 m m
(3.0 in.) from the top of the, door glass and 76.2 mm
(3.0 in.) from the top of the front door. Adjust so that,
gap is same at both locations.
10. Open and close the front door several times aft er
adjustment to ensure settings are good.
TSB Revision
Page 1837 of 2103
BODY Windshield Window
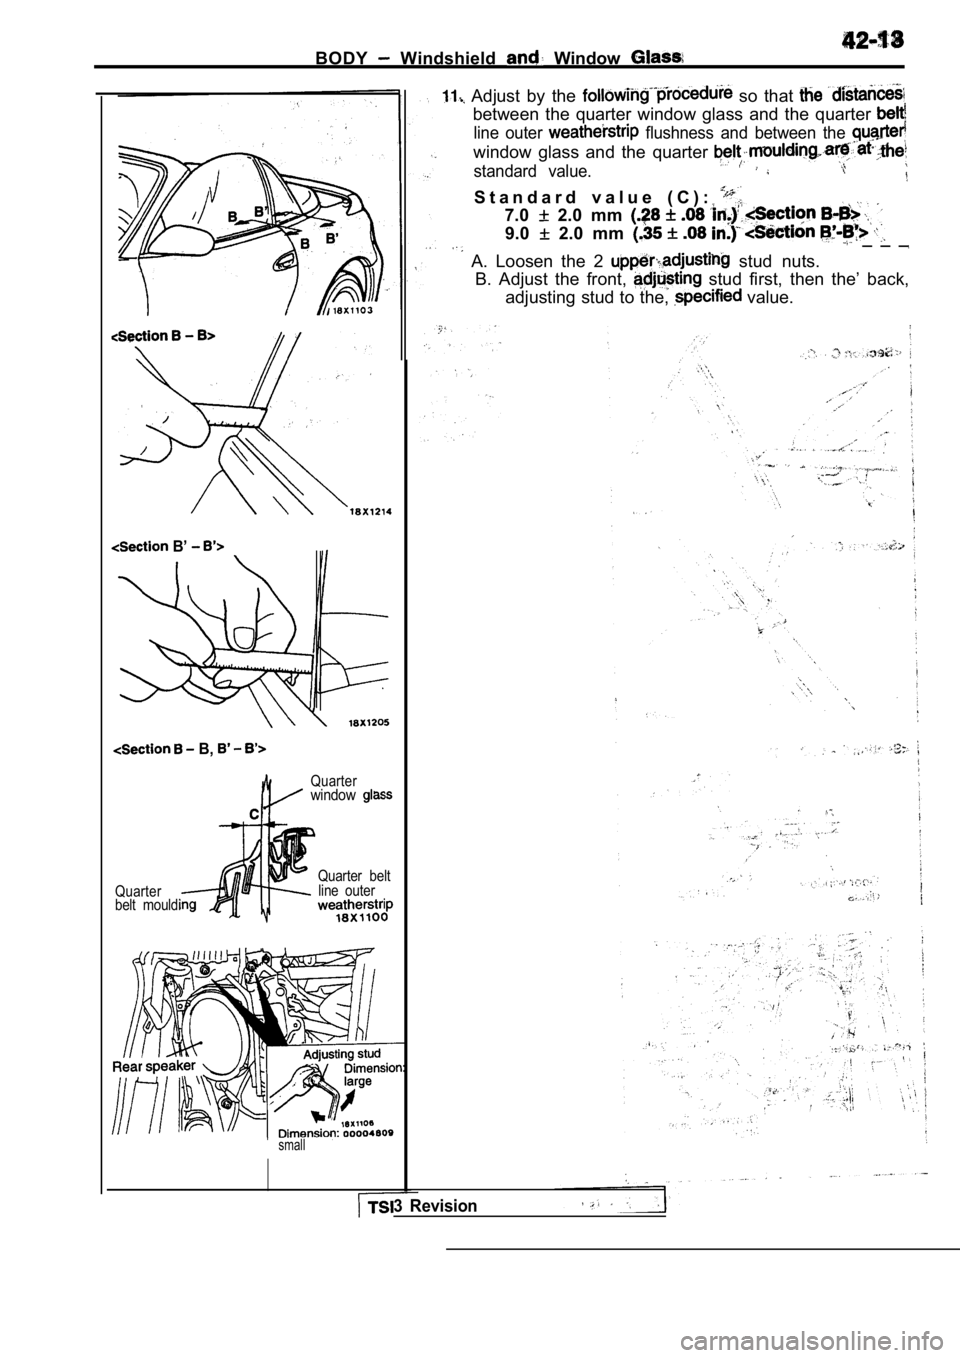
Adjust by the so that
between the quarter window glass and the quarter
line outer flushness and between the
window glass and the quarter
standard value.
B’
B,
Quarterwindow
Quarter
belt mouldiQuarter belt
line outer
small
S t a n d a r d v a l u e ( C ) :
7.0 2.0 mm
9.0 2.0 mm _ _ _
A. Loosen the 2 stud nuts.
B. Adjust the front, stud first, then the’ back,
adjusting stud to the,
value.
3 Revision
Page 1838 of 2103
42-14BODY Windshield and Window Glass
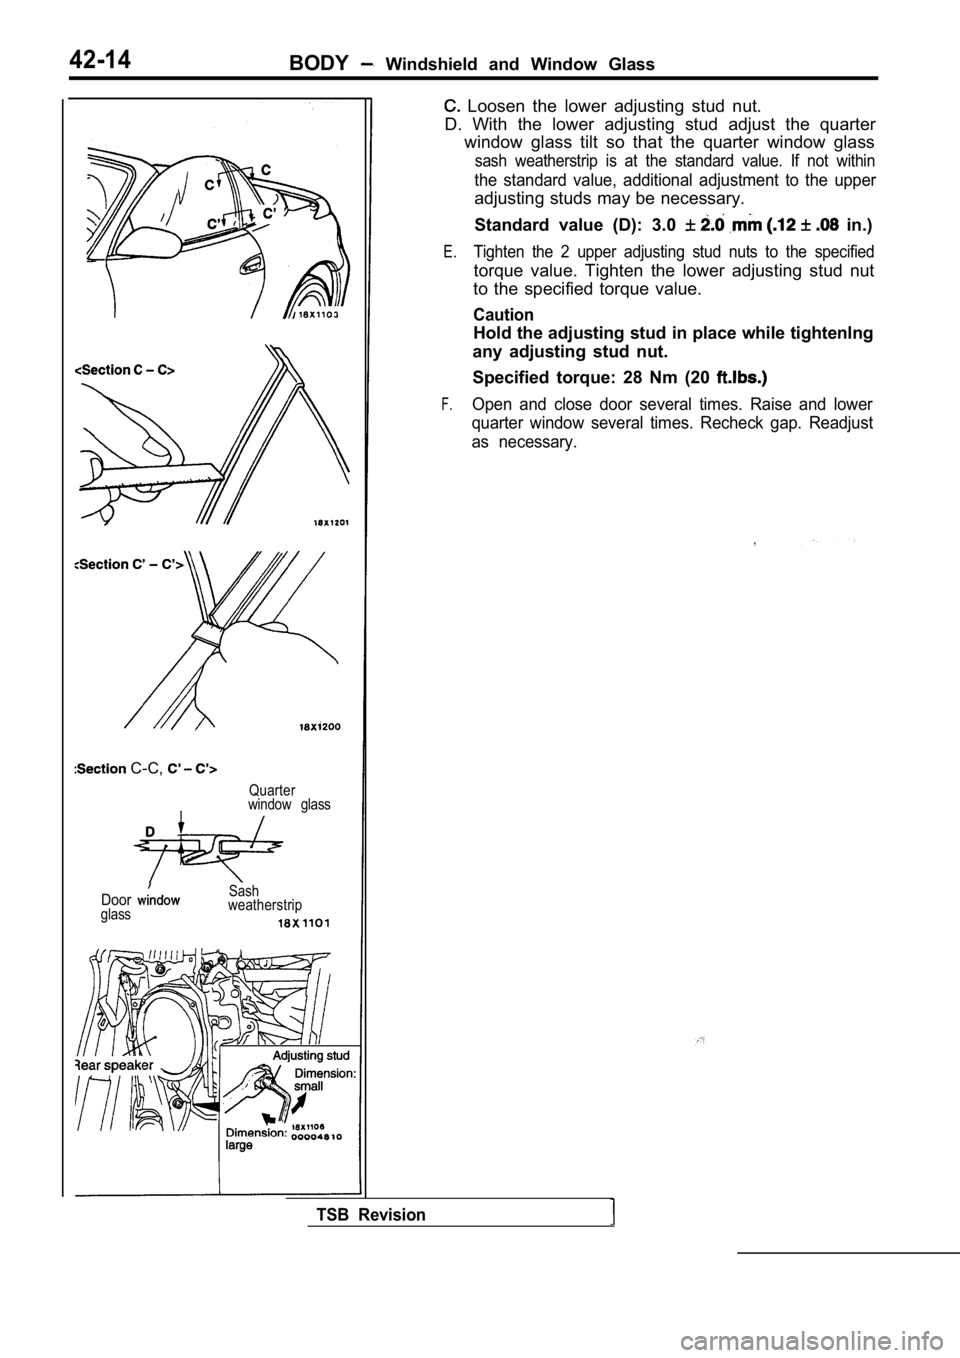
C-C,
Quarter
window glass
Doorglass Sash
weatherstrip
Loosen the lower adjusting stud nut.
D. With the lower adjusting stud adjust the quarter window glass tilt so that the quarter window glass
sash weatherstrip is at the standard value. If not within
the standard value, additional adjustment to the upper
adjusting studs may be necessary.
Standard value (D): 3.0
in.)
E.Tighten the 2 upper adjusting stud nuts to the spec ified
torque value. Tighten the lower adjusting stud nut
to the specified torque value.
Caution
Hold the adjusting stud in place while tightenlng
any adjusting stud nut.
Specified torque: 28 Nm (20
F.Open and close door several times. Raise and lower
quarter window several times. Recheck gap. Readjust
as necessary.
TSB Revision
Page 1839 of 2103
BODY Windshield and Window
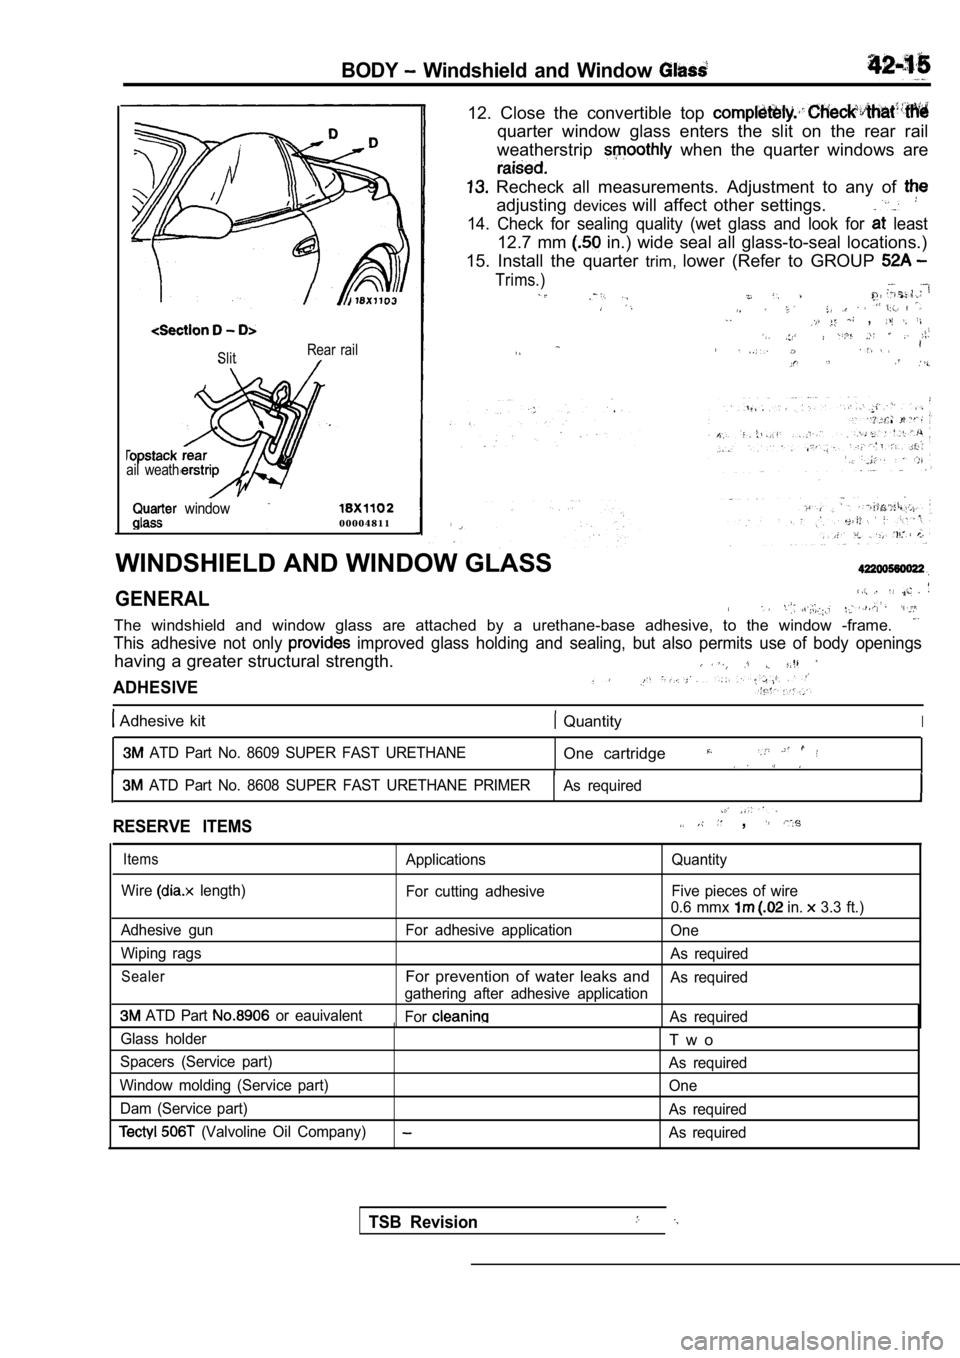
SlitRear rail
ail weath
window0 0 0 0 4 8 1 1 12. Close the convertible top
quarter window glass enters the slit on the rear ra
il
weatherstrip
when the quarter windows are
Recheck all measurements. Adjustment to any of
adjusting deviceswill affect other settings.
14. Check for sealing quality (wet glass and look f or least
12.7 mm in.) wide seal all glass-to-seal locations.)
15. Install the quarter trim,lower (Refer to GROUP
Trims.)
,
WINDSHIELD AND WINDOW GLASS
GENERAL. .
The windshield and window glass are attached by a urethane-base adhesive, to the window -frame.
This adhesive not only improved glass holding and sealing, but also permi ts use of body openings
having a greater structural strength.
ADHESIVE
Adhesive kit QuantityI
ATD Part No. 8609 SUPER FAST URETHANEOne cartridge
ATD Part No. 8608 SUPER FAST URETHANE PRIMER
As required
RESERVE ITEMS
Items
Wire length)
Adhesive gun
Wiping rags
Sealer
ATD Part or eauivalent
Glass holder
Spacers (Service part)
Window molding (Service part) Dam (Service part)
(Valvoline Oil Company)
,
Applications Quantity
For cutting adhesive Five pieces of wire
0.6 mmx
in. 3.3 ft.)
For adhesive application One
As required
For prevention of water leaks andAs required
gathering after adhesive application
For
As required
T w o
As required
One
As required
As required
TSB Revision
Page 1840 of 2103
BODY Windshield and Window Glass
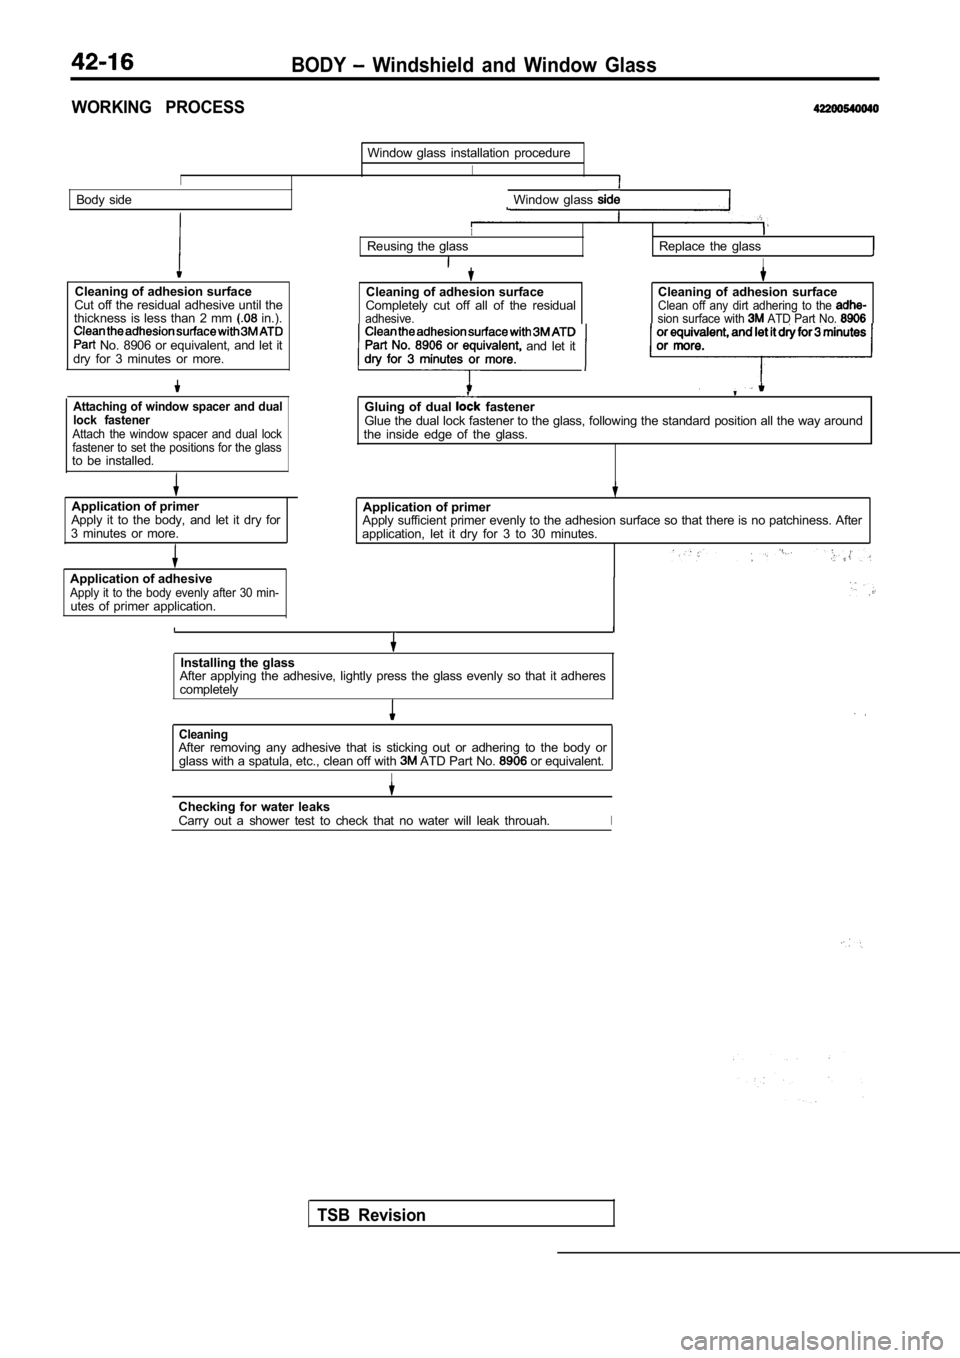
WORKING PROCESS
I
Window glass installation procedure
I
Body sideWindow glass
Cleaning of adhesion surface
Cut off the residual adhesive until the
thickness is less than 2 mm
in.).
No. 8906 or equivalent, and let it
dry for 3 minutes or more.
Attaching of window spacer and dual
lock fastener
Attach the window spacer and dual lock
fastener to set the positions for the glass
to be installed.
Application of primer Application of primer
Apply it to the body, and let it dry for
3 minutes or more. Apply sufficient primer evenly to the adhesion surf
ace so that there is no patchiness. After
application, let it dry for 3 to 30 minutes.
Application of adhesive
Apply it to the body evenly after 30 min-utes of primer application.
IReusing the glassReplace the glass
I
Cleaning of adhesion surface
Completely cut off all of the residual
adhesive.
Cleaning of adhesion surfaceClean off any dirt adhering to the sion surface with ATD Part No. or equivalent, and let it dry for 3 minutesPart No. 8906 or equivalent and let it
Gluing of dual fastenerGlue the dual lock fastener to the glass, following the standard position all the way around
the inside edge of the glass.
Installing the glass
After applying the adhesive, lightly press the glas s evenly so that it adheres
completely
TSB Revision
CleaningAfter removing any adhesive that is sticking out or adhering to the body or
glass with a spatula, etc., clean off with ATD Part No. or equivalent.
I
Checking for water leaks
Carry out a shower test to check that no water will leak throuah.I