MITSUBISHI SPYDER 1990 Service Repair Manual
Manufacturer: MITSUBISHI, Model Year: 1990, Model line: SPYDER, Model: MITSUBISHI SPYDER 1990Pages: 2103, PDF Size: 68.98 MB
Page 1841 of 2103
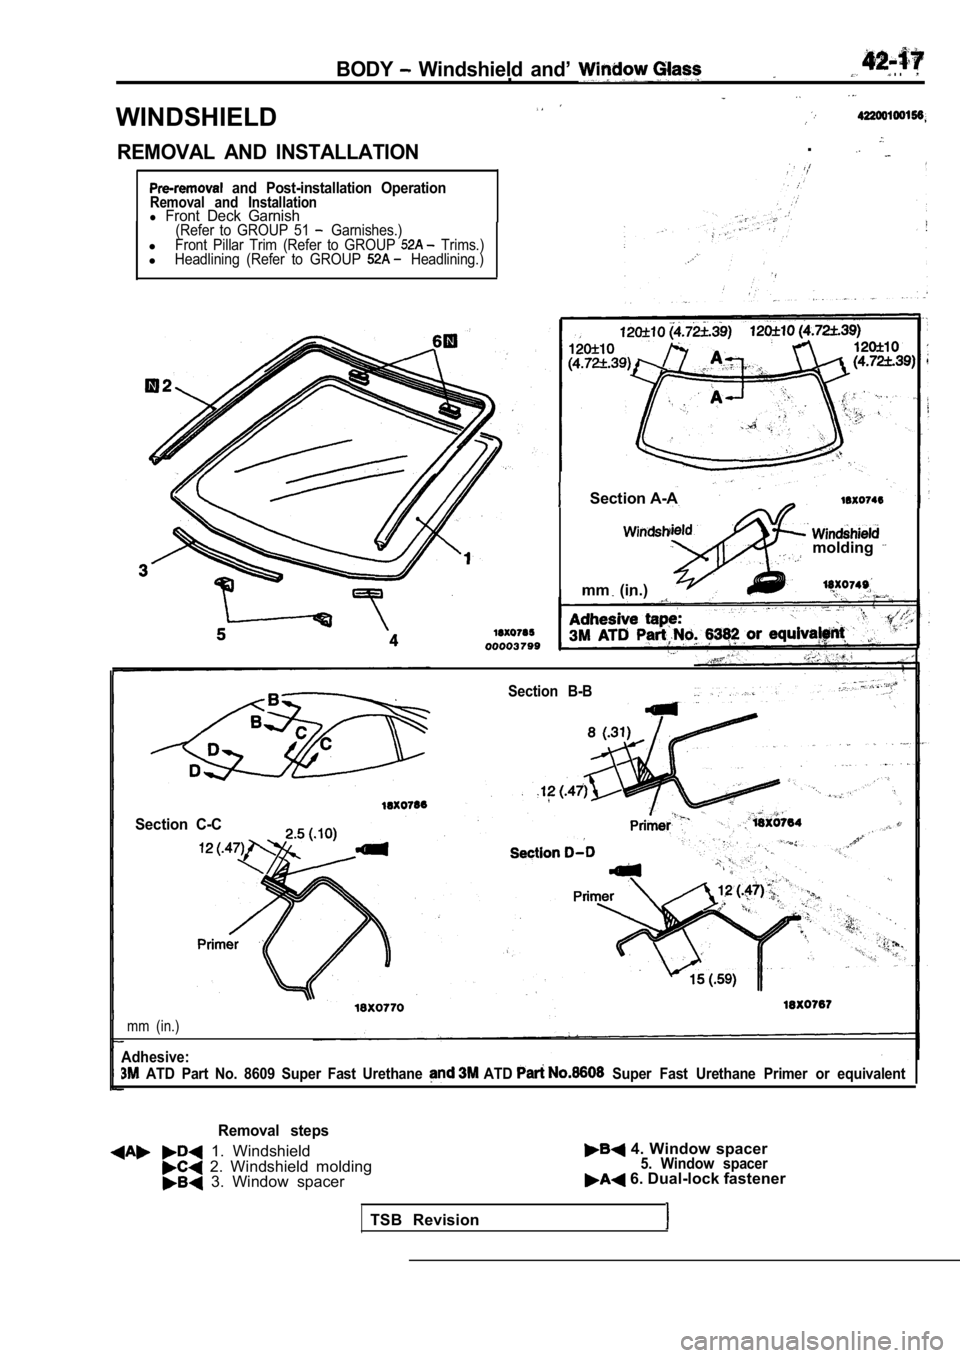
BODY Windshield and’ . ..
WINDSHIELD
REMOVAL AND INSTALLATION.
and Post-installation OperationRemoval and Installationl Front Deck Garnish(Refer to GROUP 51 Garnishes.)lFront Pillar Trim (Refer to GROUP Trims.)lHeadlining (Refer to GROUP Headlining.)
Section A-A
molding
mm (in.)
Section B-B
Section C-C
mm (in.)
Adhesive:
ATD Part No. 8609 Super Fast Urethane ATD Super Fast Urethane Primer or equivalent
Removal steps
1. Windshield 4. Window spacer
2. Windshield molding5. Window spacer
3. Window spacer 6. Dual-lock fastener
TSB Revision
Page 1842 of 2103
42-18BODY Windshield and Window Glass
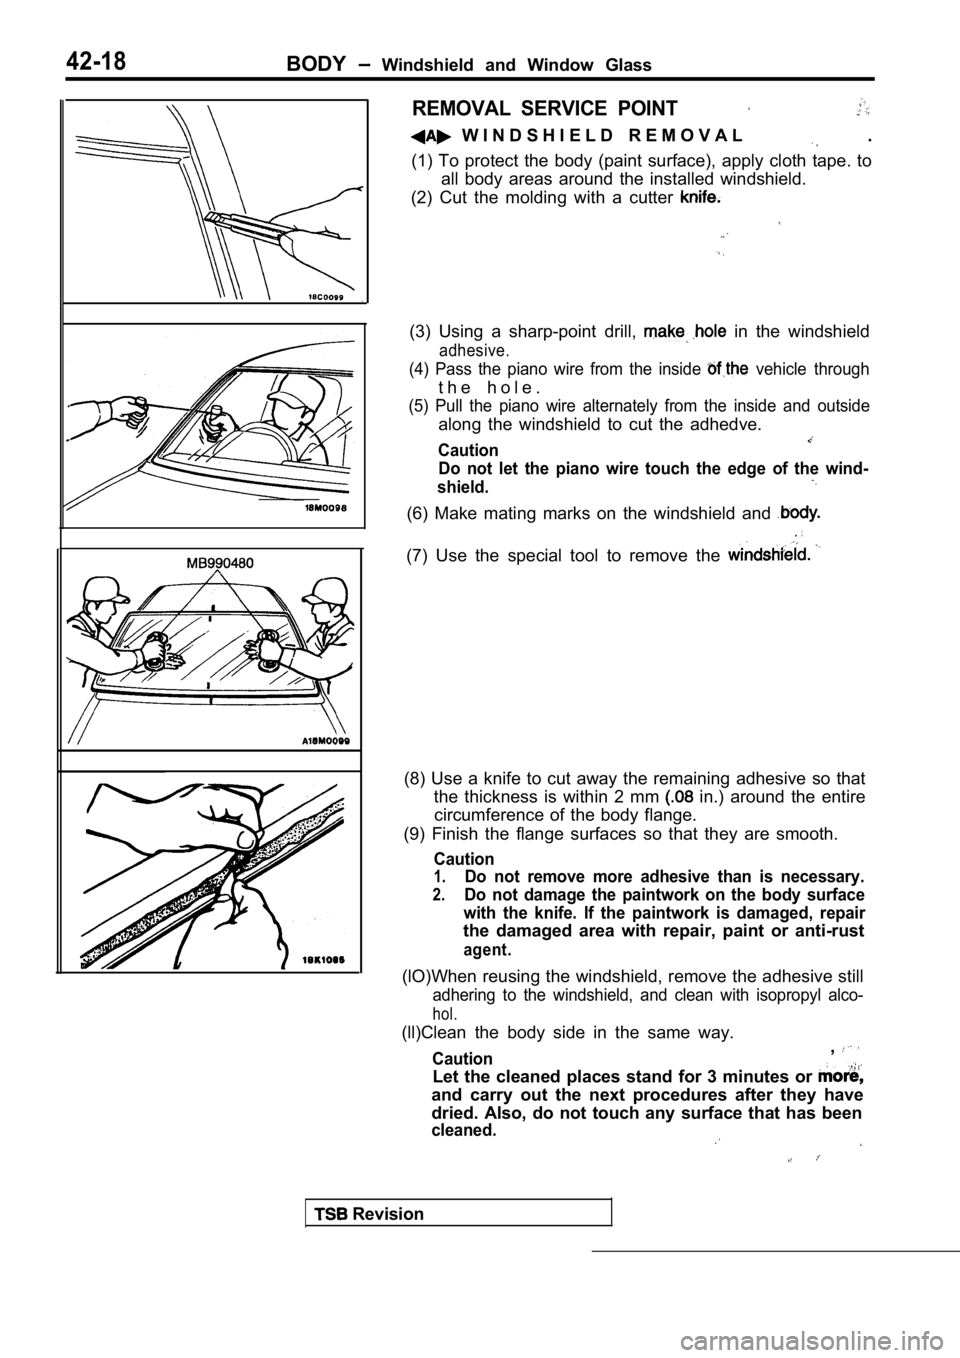
REMOVAL SERVICE POINT
W I N D S H I E L D R E M O V A L .
(1) To protect the body (paint surface), apply clot h tape. to
all body areas around the installed windshield.
(2) Cut the molding with a cutter
(3) Using a sharp-point drill, in the windshield
adhesive.
(4) Pass the piano wire from the inside vehicle through
t h e h o l e .
(5) Pull the piano wire alternately from the inside and outside
along the windshield to cut the adhedve.
Caution
Do not let the piano wire touch the edge of the win d-
shield.
(6) Make mating marks on the windshield and
.
(7) Use the special tool to remove the
(8) Use a knife to cut away the remaining adhesive so that
the thickness is within 2 mm
in.) around the entire
circumference of the body flange.
(9) Finish the flange surfaces so that they are smo oth.
Caution
1.Do not remove more adhesive than is necessary.
2.Do not damage the paintwork on the body surface
with the knife. If the paintwork is damaged, repair
the damaged area with repair, paint or anti-rust
agent.
(lO)When reusing the windshield, remove the adhesiv e still
adhering to the windshield, and clean with isopropyl alco-
hol.
(ll)Clean the body side in the same way.
Caution,
Let the cleaned places stand for 3 minutes or
and carry out the next procedures after they have
dried. Also, do not touch any surface that has been
cleaned.
Revision
Page 1843 of 2103
B O D Y Windshield and
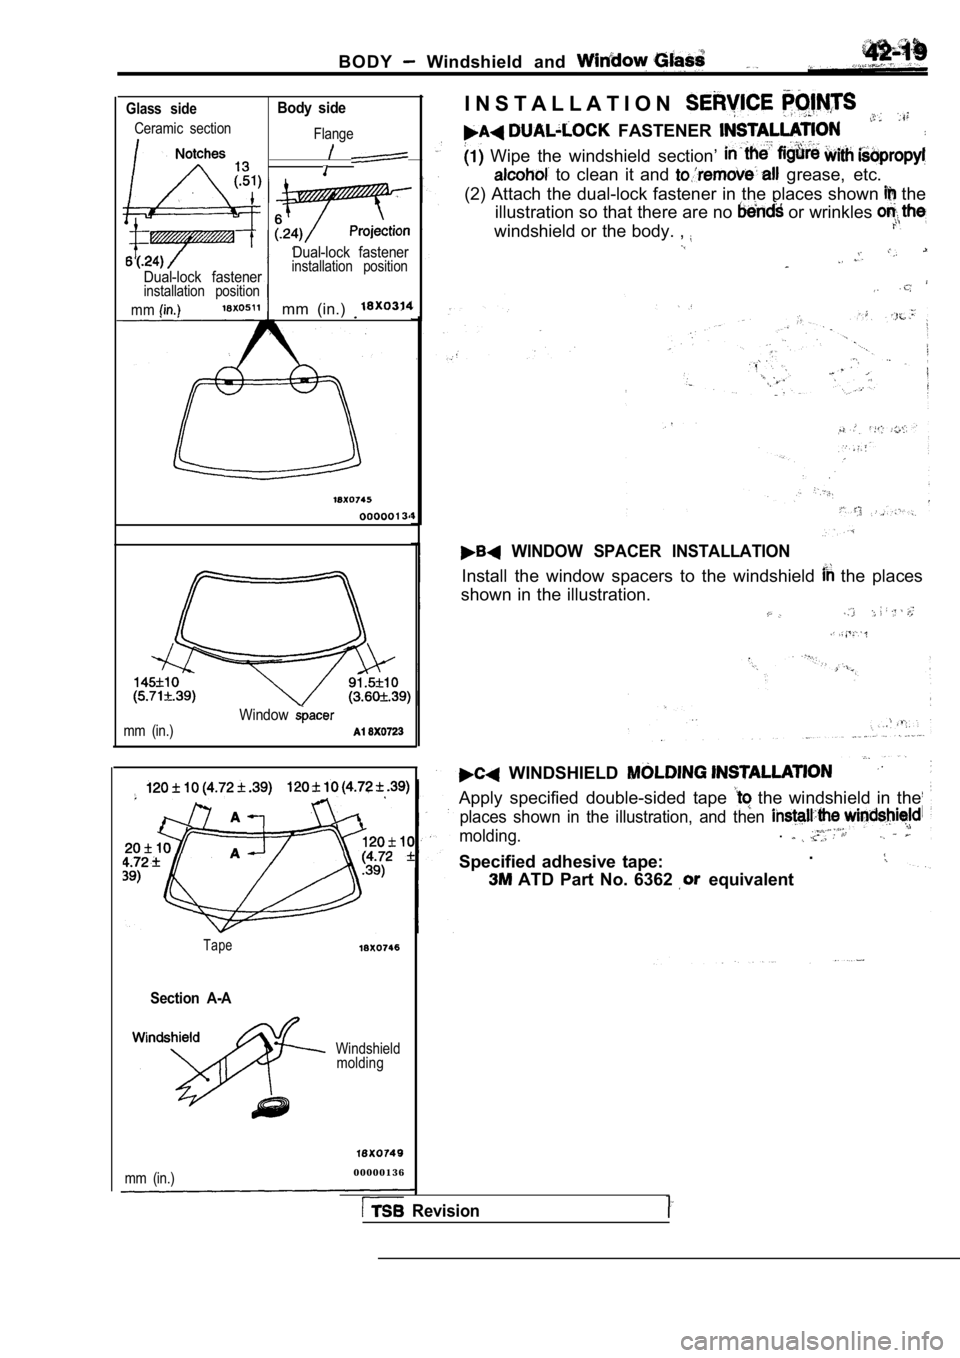
Glass side
Ceramic section
Dual-lock fastenerinstallation position
mm
Body side
Flange
Dual-lock fastenerinstallation position
mm (in.)
mm (in.)Window
Tape
Section A-A
Windshieldmolding
mm (in.)
0 0 0 0 0 1 3 6 I N S T A L L A T I O N
FASTENER
Wipe the windshield section’
to clean it and grease, etc.
(2) Attach the dual-lock fastener in the places sho wn
the
illustration so that there are no
or wrinkles
windshield or the body. ,
WINDOW SPACER INSTALLATION
Install the window spacers to the windshield the places
shown in the illustration.
WINDSHIELD
Apply specified double-sided tape the windshield in the
places shown in the illustration, and then
molding..
Specified adhesive tape: .
ATD Part No. 6362 equivalent
Revision
Page 1844 of 2103
BODY Windshield and Window .
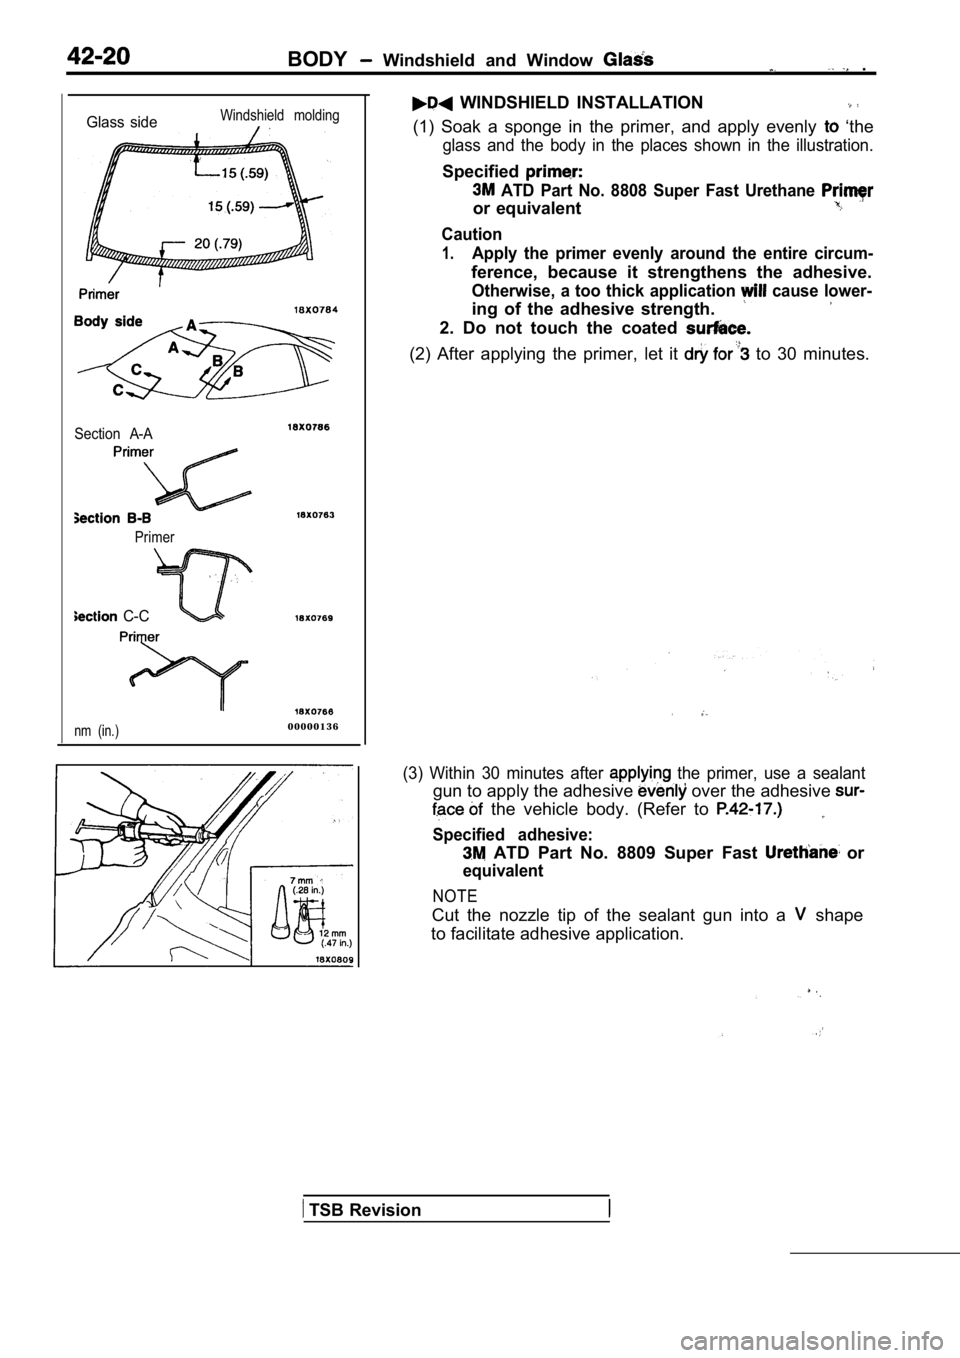
Glass sideWindshield molding
Section A-A
Primer
C-C
nm (in.)0 0 0 0 0 1 3 6
WINDSHIELD INSTALLATION
(1) Soak a sponge in the primer, and apply evenly ‘the
glass and the body in the places shown in the illustration.
Specified
ATD Part No. 8808 Super Fast Urethane
or equivalent
Caution
1.Apply the primer evenly around the entire circum-
ference, because it strengthens the adhesive.
Otherwise, a too thick application cause lower-
ing of the adhesive strength.
2. Do not touch the coated
(2) After applying the primer, let it to 30 minutes.
(3) Within 30 minutes after the primer, use a sealant
gun to apply the adhesive over the adhesive
the vehicle body. (Refer to
Specified adhesive:
ATD Part No. 8809 Super Fast or
equivalent
NOTE
Cut the nozzle tip of the sealant gun into a shape
to facilitate adhesive application.
TSB Revision
Page 1845 of 2103
B O D Y and Window
(4) aligning
and evenly so that” it “adheres completely.
glass), place it somewhere where it will not disturbed,
Caution
If heat is applied with an infra-red light to shorten
the setting time, keep the surface temperature of t he
a d h e s i v e
(6) After attaching the windshield to the body, let it stand
far 30 minutes or more, then test for water leakage.
1. If moving the vehicle: should be done gently.
2.When testing for water do not pinch the
end of the to spray the water.
TSB Revision
Page 1846 of 2103
BODY Windshield and Window Glass
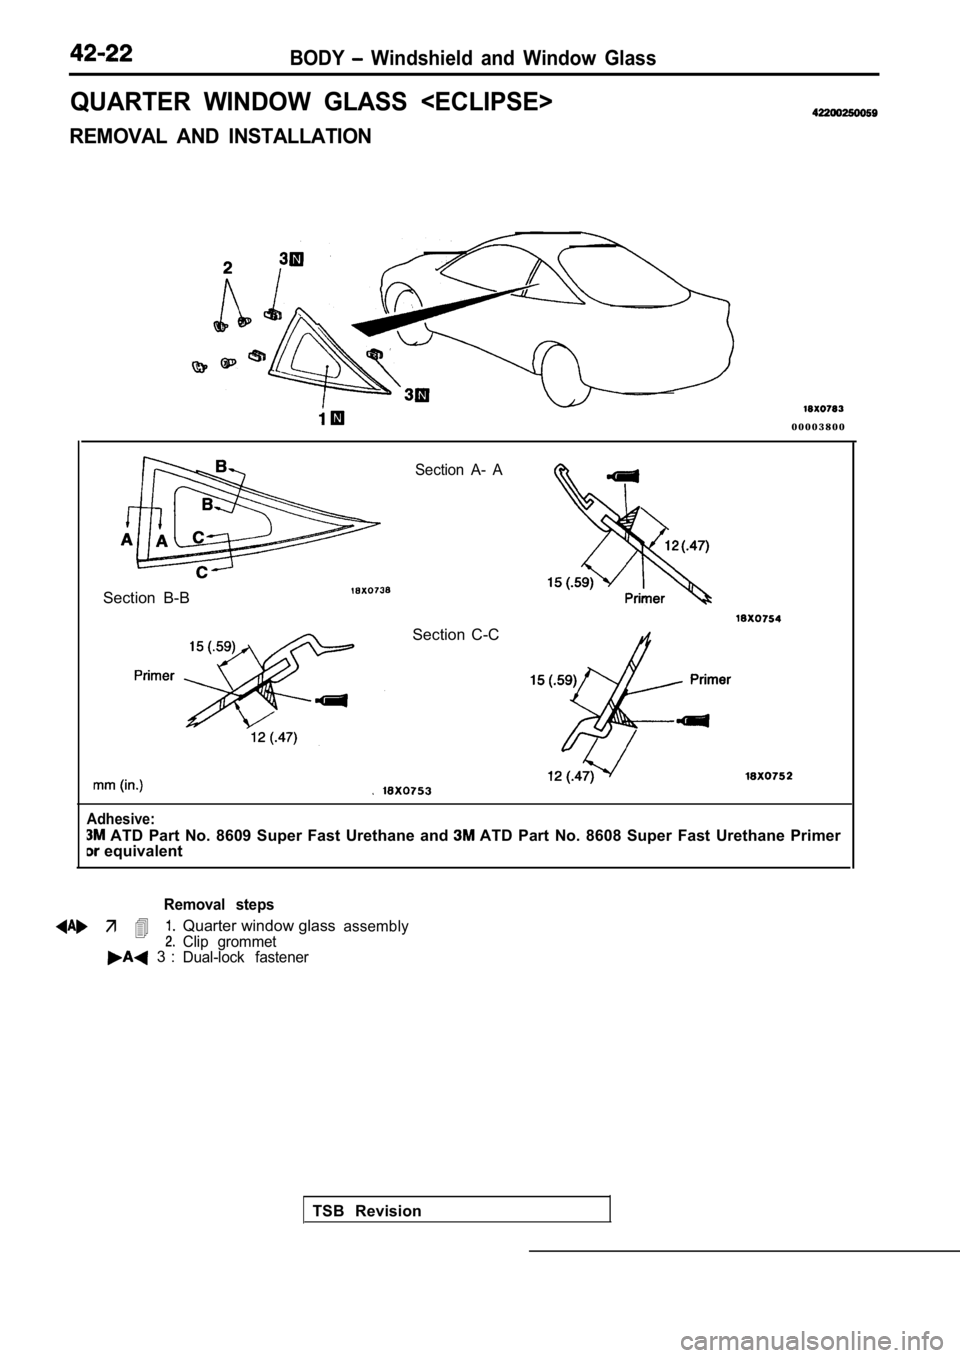
QUARTER WINDOW GLASS
REMOVAL AND INSTALLATION
0 0 0 0 3 8 0 0
Section A- A
Section B-B
Section C-C
TSB Revision
Adhesive:
ATD Part No. 8609 Super Fast Urethane and ATD Part No. 8608 Super Fast Urethane Primer equivalent
Removal steps
Page 1847 of 2103
IIII
B O D YWindshieldand Window
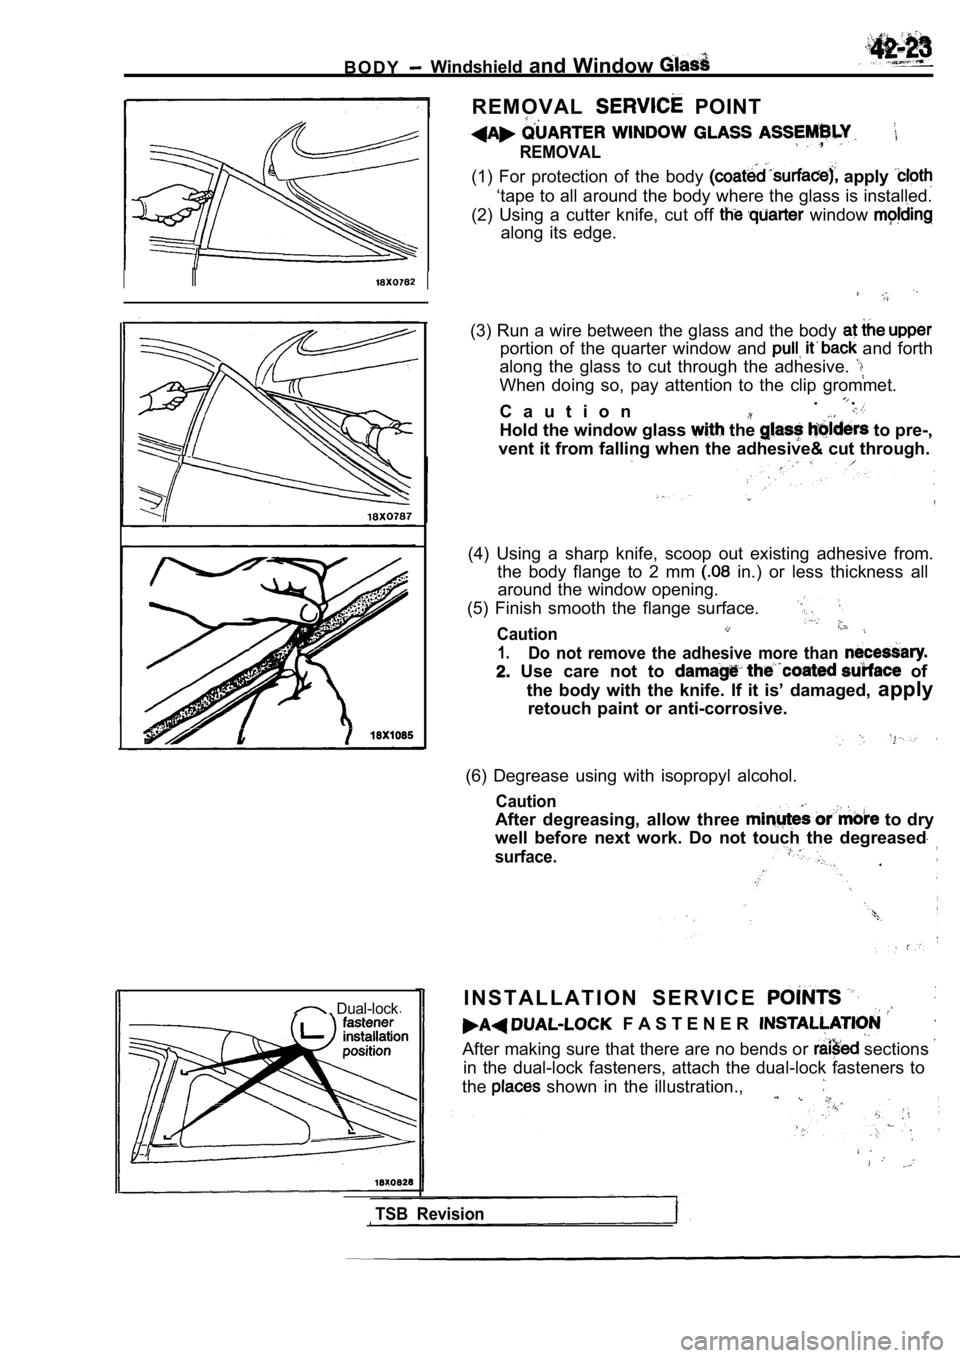
R E M O V A L POINT
,REMOVAL
(1) For protection of the body apply
‘tape to all around the body where the glass is ins talled.
(2) Using a cutter knife, cut off
window
along its edge.
Dual-lock
(3) Run a wire between the glass and the body
portion of the quarter window and and forth
along the glass to cut through the adhesive.
When doing so, pay attention to the clip grommet.
C a u t i o n . .
Hold the window glass the to pre-,
vent it from falling when the adhesive& cut through .
(4) Using a sharp knife, scoop out existing adhesiv e from.
the body flange to 2 mm
in.) or less thickness all
around the window opening.
(5) Finish smooth the flange surface.
Caution
1.Do not remove the adhesive more than
Use care not to of
the body with the knife. If it is’ damaged, apply
retouch paint or anti-corrosive.
(6) Degrease using with isopropyl alcohol.
Caution
After degreasing, allow three to dry
well before next work. Do not touch the degreased
surface.
TSB Revision
I N S T A L L A T I O N S E R V I C E
F A S T E N E R
After making sure that there are no bends or sections
in the dual-lock fasteners, attach the dual-lock fa steners to
the
shown in the illustration.,
Page 1848 of 2103
BODY Windshield and Window Glass
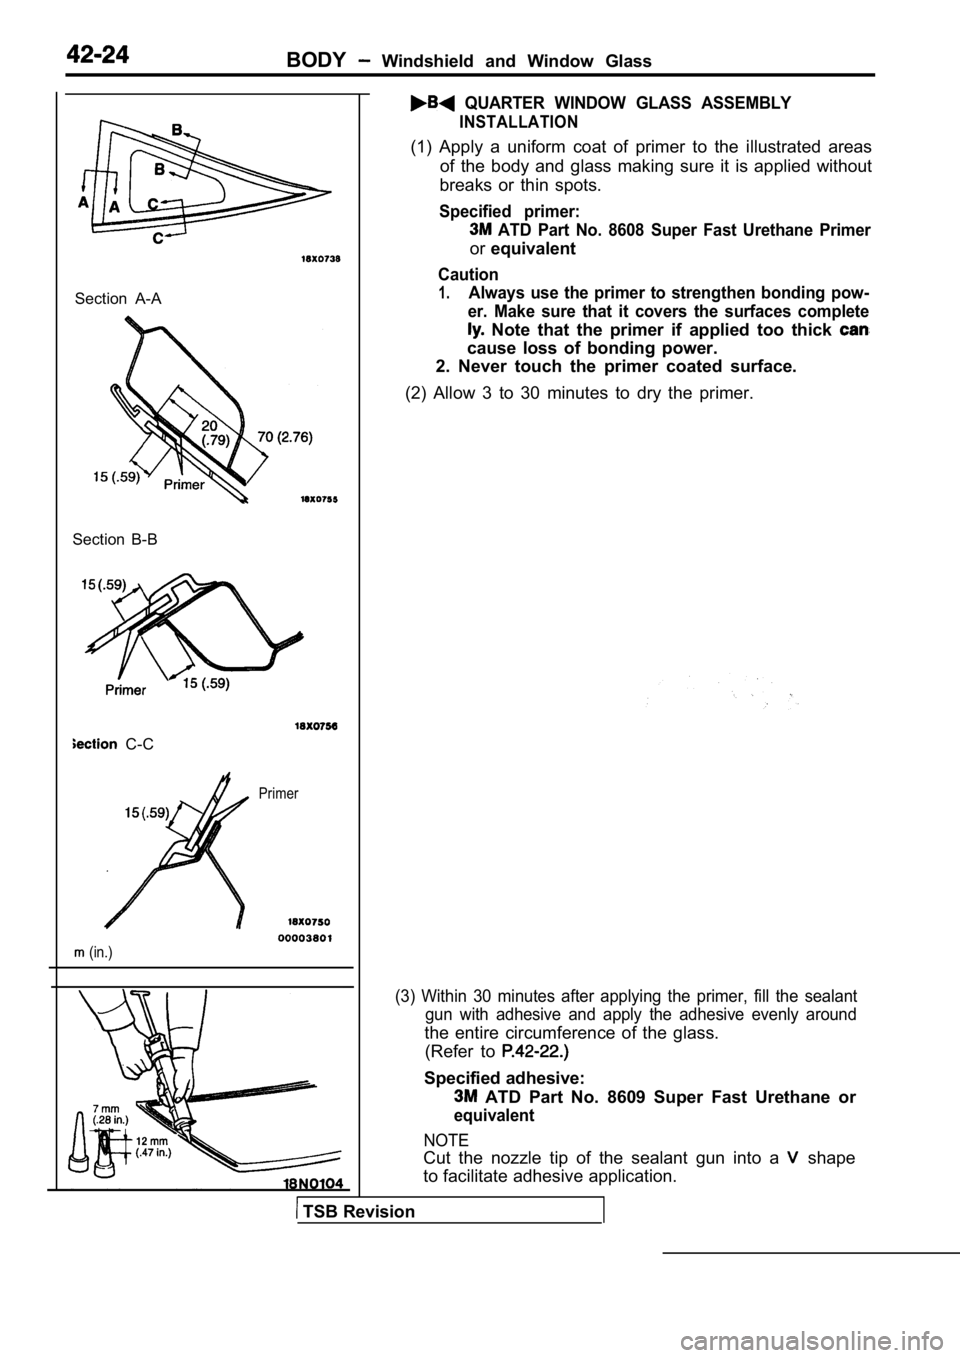
QUARTER WINDOW GLASS ASSEMBLY
INSTALLATION
Section A-A
Section B-B
C-C
Primer
(in.)
(1) Apply a uniform coat of primer to the illustrat ed areas
of the body and glass making sure it is applied wit hout
breaks or thin spots.
Specified primer:
ATD Part No. 8608 Super Fast Urethane Primer
or equivalent
Caution
1.Always use the primer to strengthen bonding pow-
er. Make sure that it covers the surfaces complete
Note that the primer if applied too thick
cause loss of bonding power.
2. Never touch the primer coated surface.
(2) Allow 3 to 30 minutes to dry the primer.
(3) Within 30 minutes after applying the primer, fi ll the sealant
gun with adhesive and apply the adhesive evenly aro und
the entire circumference of the glass.
(Refer to
Specified adhesive:
ATD Part No. 8609 Super Fast Urethane or
equivalent
NOTE
Cut the nozzle tip of the sealant gun into a shape
to facilitate adhesive application.
TSB Revision
Page 1849 of 2103
BODY Windshield and Window
(4) After
and onto the body
Remove the adhesive
b o d y
clean.
(6) After the
to until the adhesive
C a u t i o n
When using an infrared lamp or other means for quick-
er hardening, keep the surface temperature
or lower.
(7) After about 30 minutes or more following bondin g of the
quarter glass to the body, check for water leaks.
Caution
1. If the vehicle is to be moved, do so gently.
2. When
for water leaks, do not squeeze
the
end.
TSB Revision
Page 1850 of 2103
BODY Windshield and Window Glass
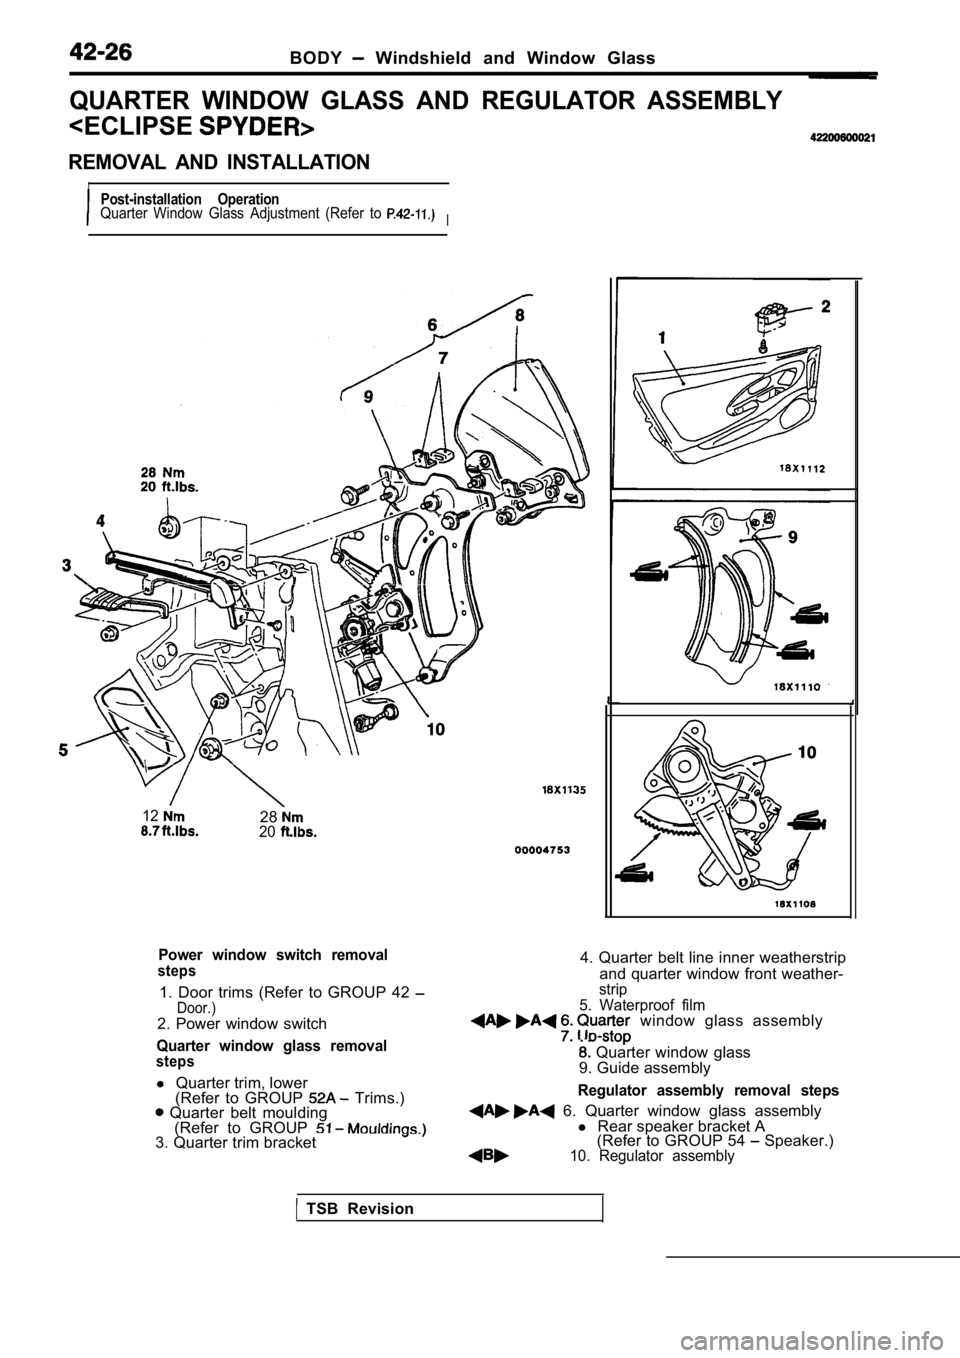
QUARTER WINDOW GLASS AND REGULATOR ASSEMBLY
IPost-installation OperationQuarter Window Glass Adjustment (Refer to I
122820
Power window switch removalsteps
1. Door trims (Refer to GROUP 42 Door.)2. Power window switch
Quarter window glass removalsteps
l Quarter trim, lower
(Refer to GROUP Trims.) Quarter belt moulding (Refer to GROUP
3. Quarter trim bracket
4. Quarter belt line inner weatherstrip
and quarter window front weather-
strip
5. Waterproof film
window glass assembly
Quarter window glass
9. Guide assembly
Regulator assembly removal steps
6. Quarter window glass assembly l Rear speaker bracket A
(Refer to GROUP 54 Speaker.)10. Regulator assembly
TSB Revision