NISSAN ALMERA N15 1995 Service Manual
Manufacturer: NISSAN, Model Year: 1995, Model line: ALMERA N15, Model: NISSAN ALMERA N15 1995Pages: 1701, PDF Size: 82.27 MB
Page 221 of 1701
BODY
&
TRIM
SECTION
BT
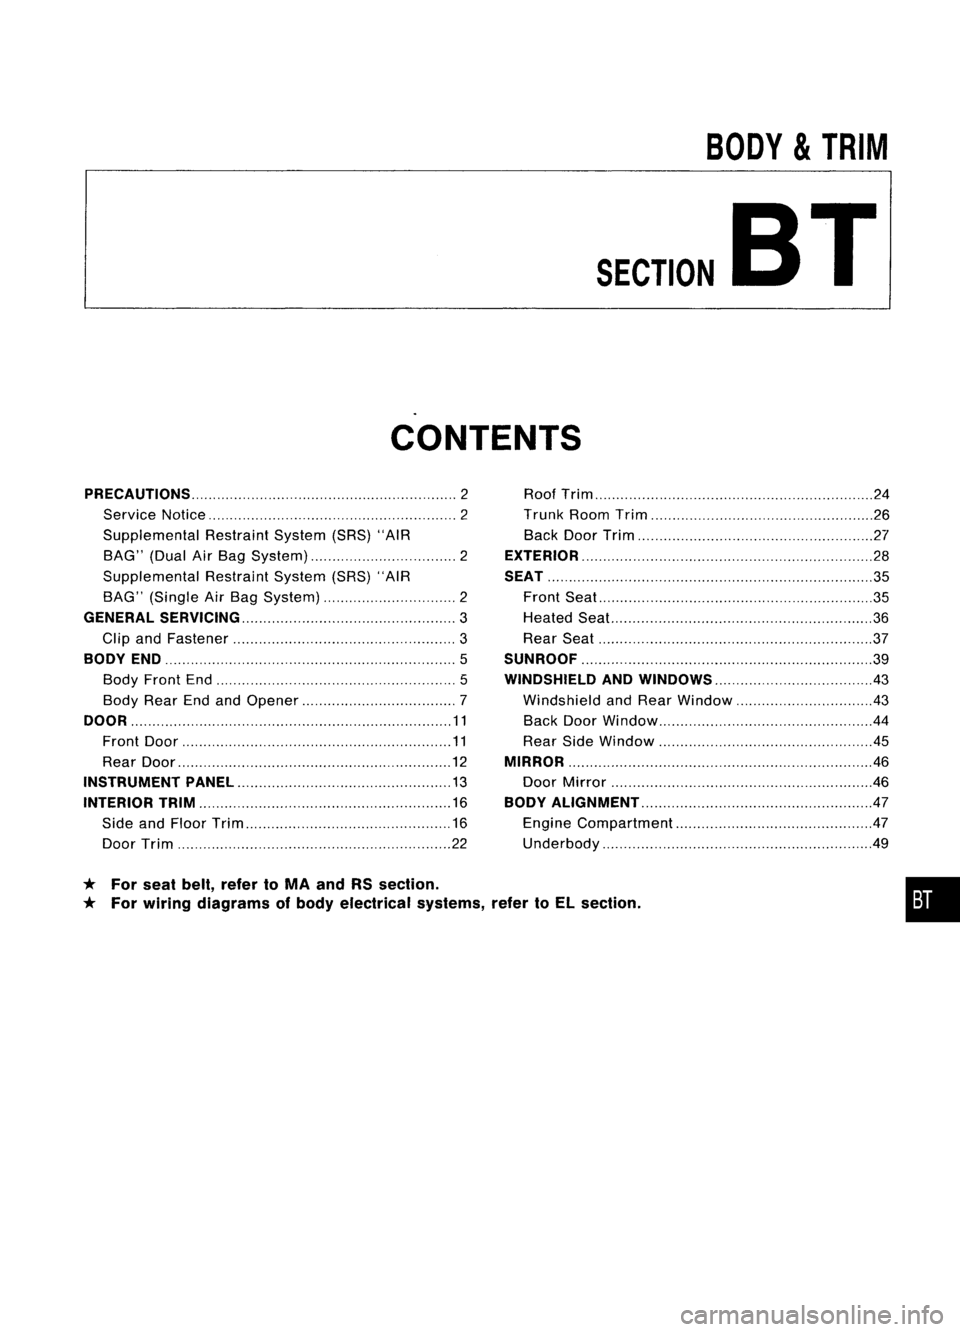
CONTENTS
* For seat belt,refer toMA and RSsection.
* For wiring diagrams ofbody electrical systems,refertoEL section.
PRECAUTIONS
2
Service Notice 2
Supplemental RestraintSystem(SRS)"AIR
BAG" (DualAirBag System) 2
Supplemental RestraintSystem(SRS)"AIR
BAG" (Single AirBag System) 2
GENERAL SERViCiNG 3
Clip andFastener
3
BODY END
5
Body Front End
5
Body RearEndandOpener 7
DOOR 11
Front Door 11
Rear Door
12
INSTRUMENT PANEL
13
INTERIOR TRIM 16
Side andFloor Trim
16
Door Trim 22Roof
Trim 24
Trunk RoomTrim 26
Back DoorTrim 27
EXTERIOR 28
SEAT 35
Front Seat
35
Heated Seal... 36
Rear Seat 37
SUNROOF 39
WINDSHIELD ANDWINDOWS 43
Windshield andRear Window 43
Back DoorWindow 44
Rear SideWindow
.45
MIRROR 46
Door Mirror .46
BODY ALIGNMENT 47
Engine Compartment 47
Underbody .49
•
Page 222 of 1701
PRECAUTIONS
Service Notice
• When removing orinstalling variousparts,placeacloth orpadding ontothevehicle bodytoprevent
scratches.
• Handle trim,molding, instruments, grille,etc.carefully duringremoving orinstalling. Becareful not
to soil ordamage them.
• Apply sealing compound wherenecessary wheninstalling parts.
• When applying sealingcompound, becareful thatthesealing compound doesnotprotrude from
parts.
• When replacing anymetal parts(forexample bodyouter panel, members, etc.),besure totake rust
prevention measures.
SupplementalRestraintSystem(SRS)"AIR
BAG" (DualAirBag System)
The Supplemental RestraintSystem"AirBag", usedalong withaseat belt,helps toreduce therisk or
severity ofinjury tothe driver andfront passenger inafrontal collision. TheSupplemental Restraint
System consists ofair bag modules (locatedinthe center ofthe steering wheelandonthe instrument
panel onthe passenger side),adiagnosis sensorunit,warning lamp,wiring harness andspiral cable.
Information necessarytoservice thesystem safelyisincluded inthe
RSsection
ofthis Service Manual.
WARNING:
• Toavoid rendering theSRS inoperative, whichcouldincrease therisk ofpersonal injuryordeath
in the event ofacollision whichwould resultinair bag inflation, allmaintenance mustbeperformed
by an authorized NISSANdealer.
• Improper maintenance, includingincorrectremovalandinstallation ofthe SRS, canlead topersonal
injury caused byunintentional activationofthe system.
• Donot use electrical testequipment onany circuit related tothe SRS unless instructed tointhis
Service Manual. SRSwiring harnesses arecovered withyellow insulation eitherjustbefore the
harness connectors orfor the complete harness,foreasy identification.
Supplemental RestraintSystem(SRS)"AIR
BAG" (Single AirBag System)
The Supplemental RestraintSystem"AirBag", usedalong withaseat belt,helps toreduce therisk or
severity ofinjury tothe driver inafrontal collision. TheSupplemental RestraintSystemconsists ofan
air bag module (located inthe center ofthe steering wheel),adiagnosis sensorunit,warning lamp,
wiring harness andspiral cable. Information necessarytoservice thesystem safelyisincluded inthe
RS section
ofthis Service Manual.
WARNING:
• Toavoid rendering theSRS inoperative, whichcouldincrease therisk ofpersonal injuryordeath
in the event ofacollision whichwould resultinair bag inflation, allmaintenance mustbeperformed
by an authorized NISSANdealer.
• Improper maintenance, includingincorrectremovalandinstallation ofthe SRS, canlead topersonal
injury caused byunintentional activationofthe system.
• Donot use electrical testequipment onany circuit related tothe SRS unless instructed tointhis
Service Manual.
BT-2
Page 223 of 1701
GENERALSERVICING
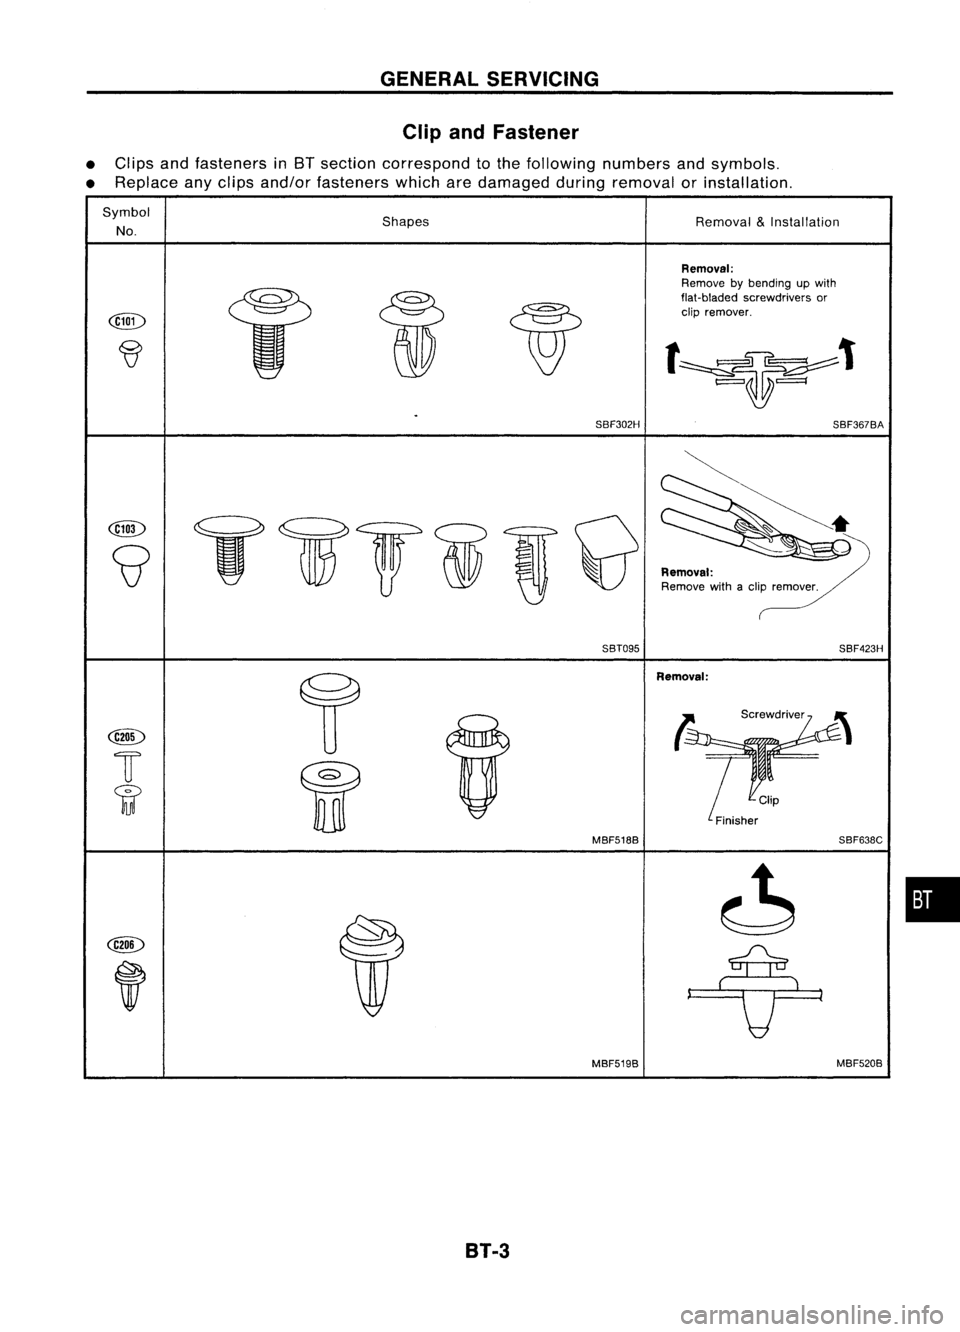
Clip andFastener
Removal
&
Installation
Shapes
•
Clips andfasteners inBT section correspond tothe following numbersandsymbols.
• Replace anyclips and/or fasteners whicharedamaged duringremoval orinstallation.
Symbol
No.
Removal:
Remove bybending upwith
flat -bladed screwdrivers or
clip remover.
SBF302H SBF367BA
@D
T1f1f~,Q
9
Removal:
Remove withaclip remover.
SBT095 SBF423H
f
Removal:
@ID
~s""ru'
u
w
l1!
y
Finisher
MBF518B SBF638C
•
@D
,
MBF519BMBF520B
81-3
Page 224 of 1701
GENERALSERVICING
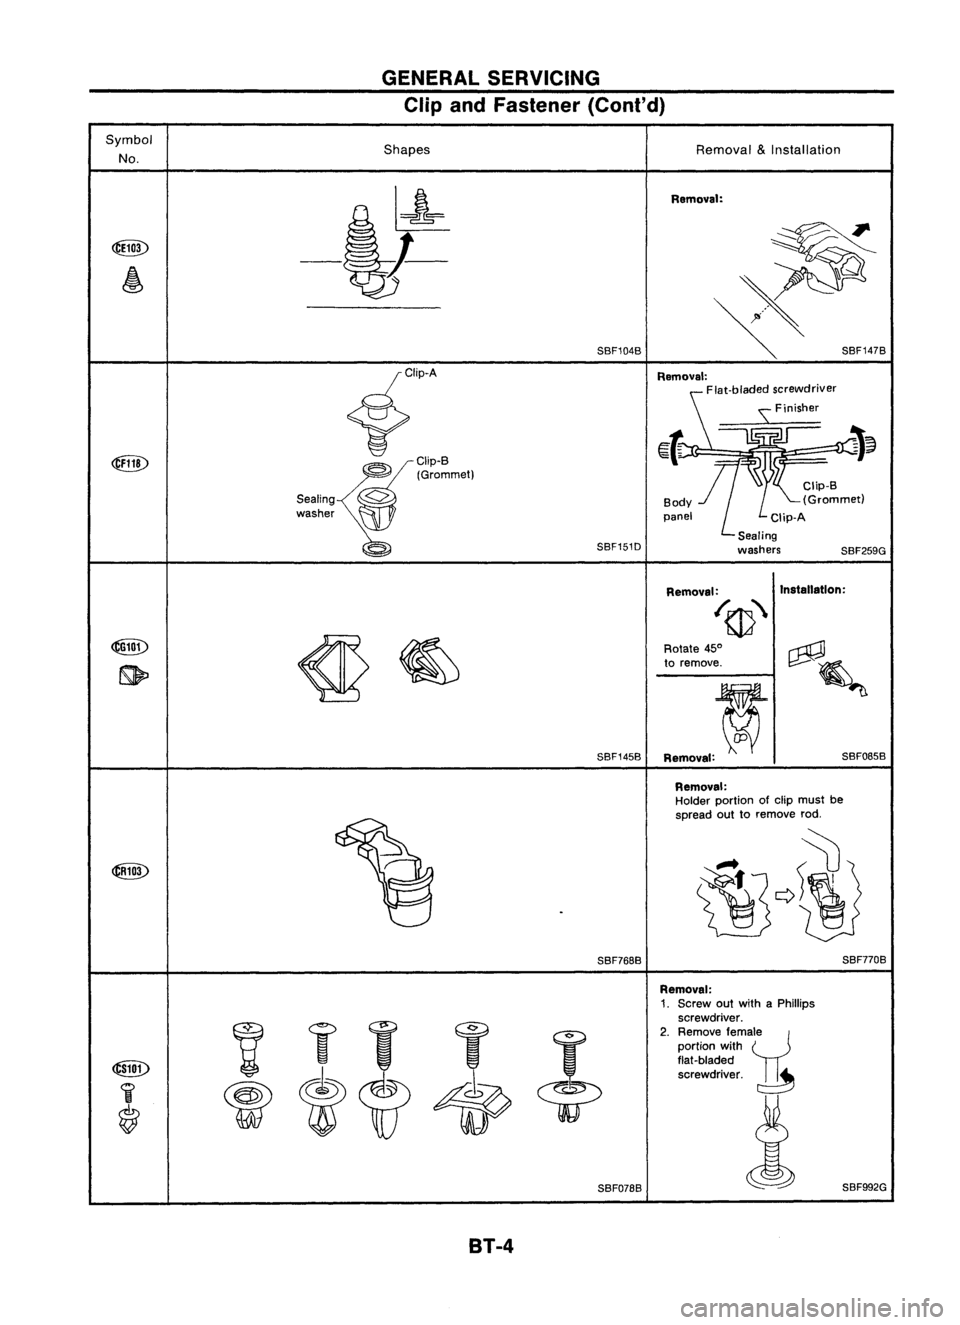
Clip andFastener (Cont'd)
Symbol No. Shapes
Removal
&
Installation
Removal:
Clip-B
(Grommet)
Clip-A
Sealing
washers
SBF259G
Removal:
Flat-bladed screwdriver
s:
Finisher
~ ~~
SBF151D SBF104B
f ..'. ......
7~~;~met)
Sealing
0
washer
Removal:Installation:
/(1}"
SBF145B
Rotate
45°
to remove.
,
Removal: SBF085B
Removal:
Holder portion ofclip must be
spread outtoremove rod.
SBF768B SBF770B
SBF078B Removal:
1. Screw outwith aPhillips
screwdriver.
2. Remove fema~e
portion with
flat -bladed
~~~'l
SBF992G
BT-4
Page 225 of 1701
BODYEND
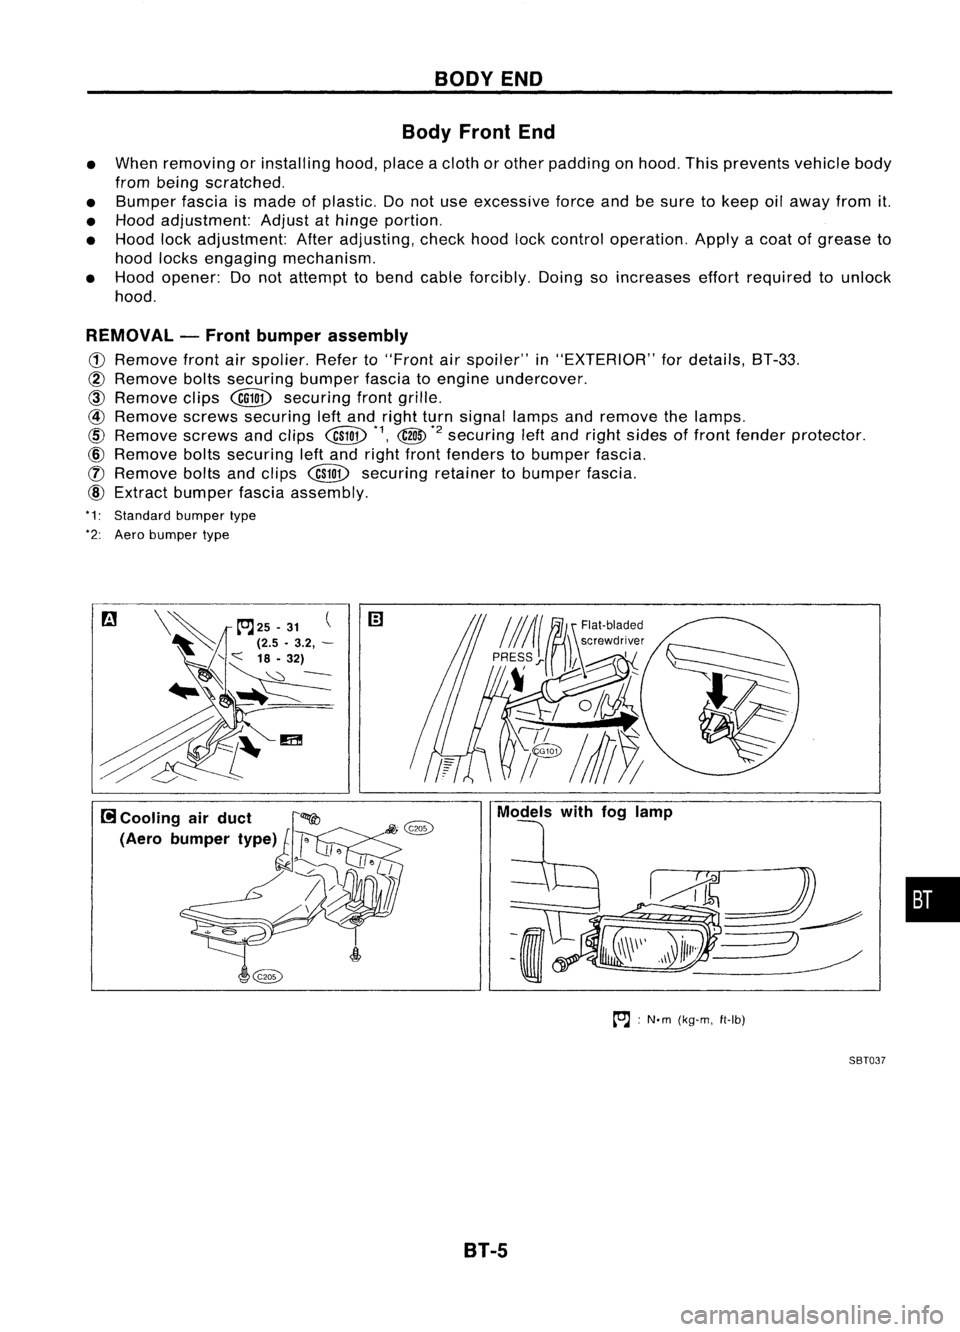
Body Front End
• When removing orinstalling hood,placeacloth orother padding onhood. Thisprevents vehiclebody
from being scratched.
• Bumper fasciaismade ofplastic. Donot use excessive forceandbesure tokeep oilaway fromit.
• Hood adjustment: Adjustathinge portion.
• Hood lockadjustment: Afteradjusting, checkhoodlockcontrol operation. Applyacoat ofgrease to
hood locks engaging mechanism.
• Hood opener: Donot attempt tobend cable forcibly. Doingsoincreases effortrequired tounlock
hood.
REMOVAL -Front bumper assembly
CD
Remove frontairspolier. Referto"Front
air
spoiler" in"EXTERIOR" fordetails, BT-33.
@
Remove boltssecuring bumperfasciatoengine undercover.
CID
Remove clips
@QD
securing frontgrille.
@
Remove screwssecuring leftand right turnsignal lampsandremove thelamps.
@
Remove screwsandclips
@W
*1,
@
*2
securing
leftand right sides offront fender protector.
@)
Remove boltssecuring leftand right front fenders tobumper fascia.
([) Remove boltsandclips
@W
securing retainertobumper fascia.
@)
Extract bumper fasciaassembly.
*1: Standard bumpertype
*2: Aero bumper type
to.J:
N'm (kg-m, ft-Ib)
SBT037
B1-5
•
Page 226 of 1701
BODYEND
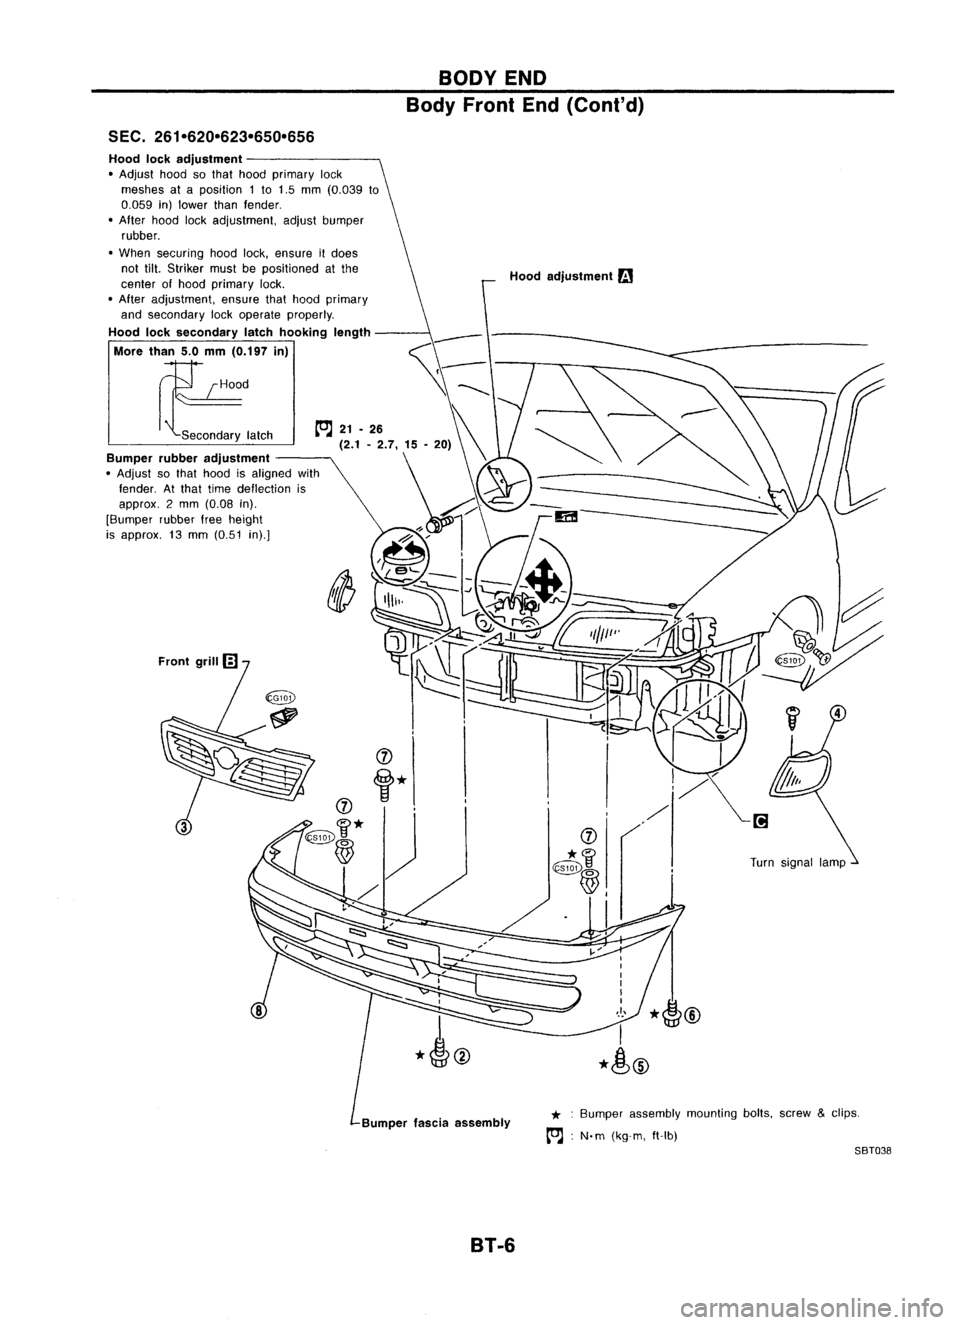
Body Front End(Cont'd)
SEC. 261-620-623-650-656
Bumperfasciaassembly
Hood
lockadjustment
• Adjust hoodsothat hood primary lock
meshes ataposition 1to 1.5 mm (0.039 to
0.059 in)lower thanfender .
• After hoodlockadjustment, adjustbumper
rubber.
• When securing hoodlock,ensure itdoes
not tilt.Striker mustbepositioned atthe
center ofhood primary lock.
• After adjustment, ensurethathood primary
and secondary lockoperate properly.
Hood locksecondary latchhooking length
More than5.0mm (0.197 in)
E
Secondary latch Hood
adjustment
r.:.1
* :Bumper assembly mountingbolts,screw
&
clips.
[OJ :
N. m (kg-m, ft-Ib)
SBT038
B1-6
Page 227 of 1701
BODYEND
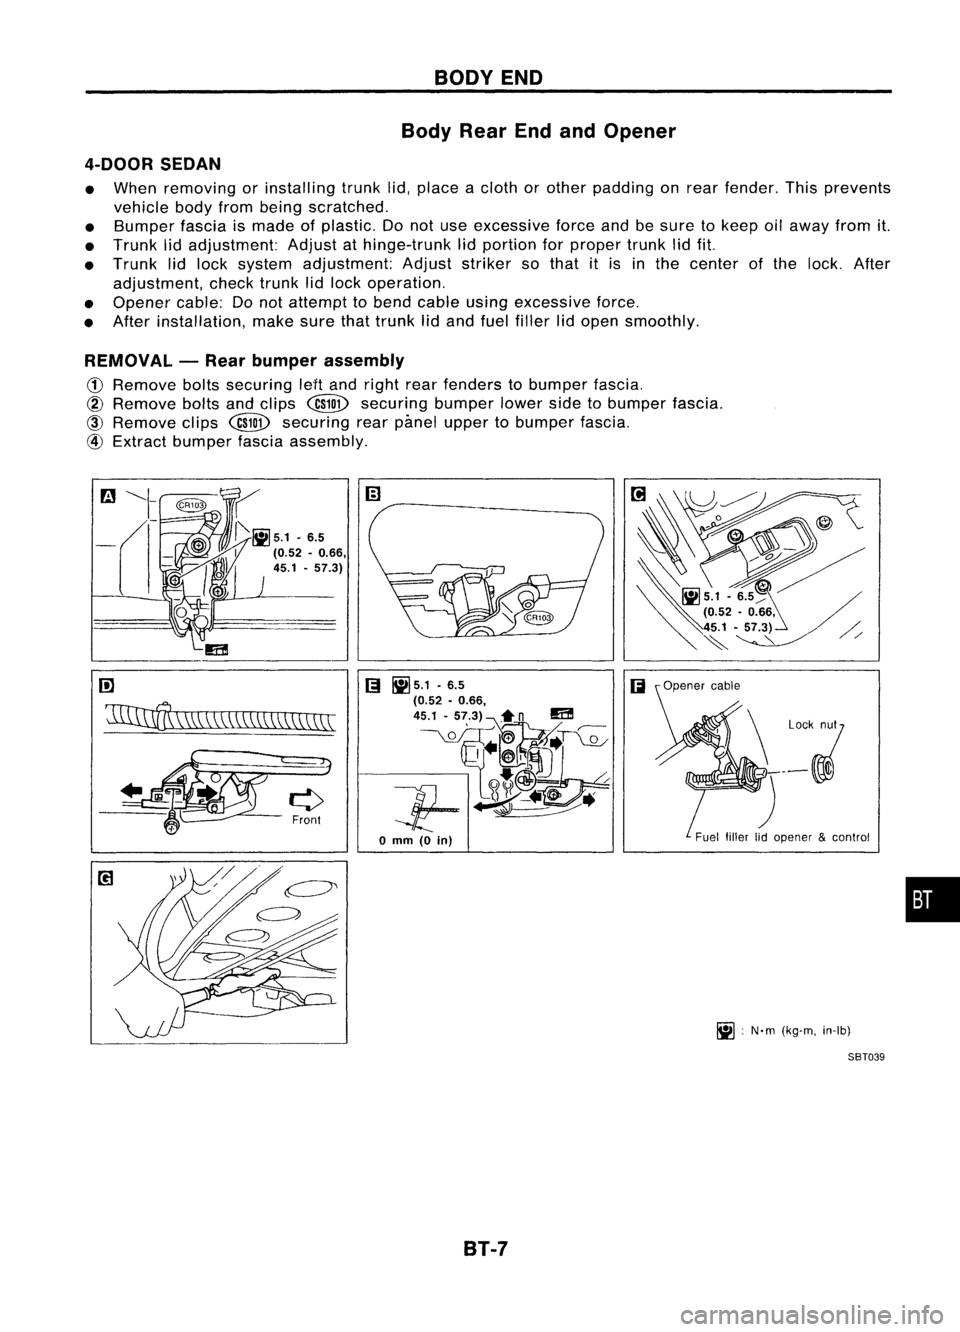
Body RearEndandOpener
4-DOOR SEDAN
• When removing orinstalling trunklid,place acloth orother padding onrear fender. Thisprevents
vehicle bodyfrombeing scratched.
• Bumper fasciaismade ofplastic. Donot use excessive forceandbesure tokeep oilaway fromit.
• Trunk lidadjustment: Adjustathinge-trunk lidportion forproper trunklidfit.
• Trunk lidlock system adjustment: Adjuststriker sothat itis inthe center ofthe lock. After
adjustment, checktrunklidlock operation.
• Opener cable:Donot attempt tobend cable usingexcessive force.
• After installation, makesurethattrunk lidand fuel filler lidopen smoothly.
REMOVAL -Rear bumper assembly
CD
Remove boltssecuring leHand right rearfenders tobumper fascia.
@
Remove boltsandclips
@ID
securing bumperlowersidetobumper fascia.
@
Remove clips
@ID
securing rearpimel upper tobumper fascia.
@
Extract bumper fasciaassembly.
rn
'11IInff\
\W,\\CC\\\\\\\\\\\\\\
[;I
~5.1 .6.5
(;I
(0.52 •0.66,
45.1 -57.3)~n
m
__ \.QL_OIT~~T~
Jf-~~
o
mm
(0
in)
B1-7 Fuel
fillerlidopener &control
~ :N'm (kg-m, in-Ib)
SBT039
•
Page 228 of 1701
SEC.843-844-850-998
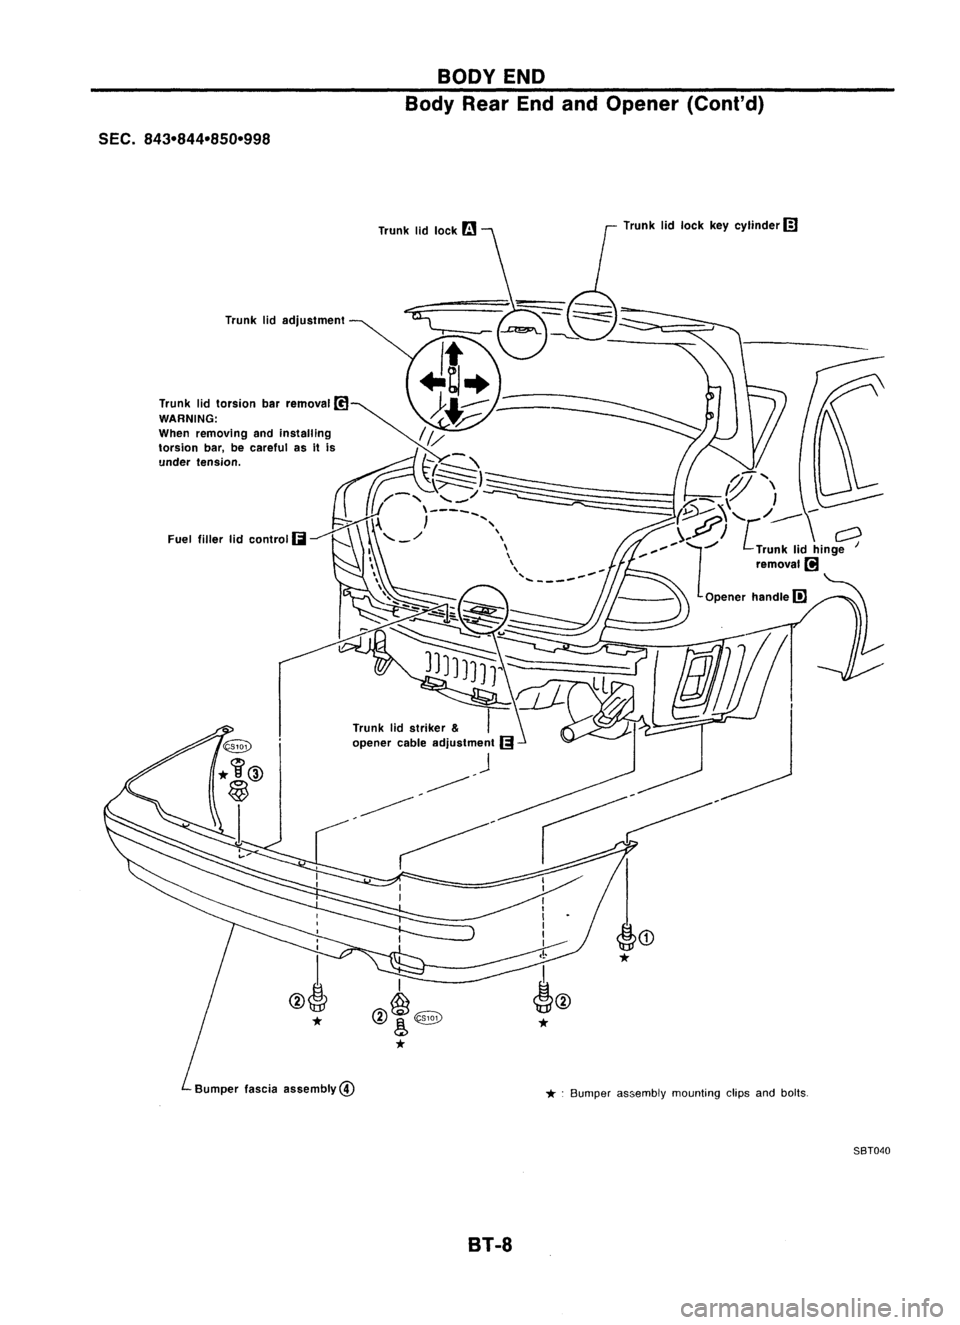
Trunklidadjustment
*
Bumper fasciaassembly@
BODY
END
Body RearEndandOpener (Cont'd)
Trunk lidlock keycylinder
rn
* .
Bumper assembly mountingclipsandbolts.
BT-8 SBT040
Page 229 of 1701
BODYEND
Body RearEndandOpener (Cont'd)
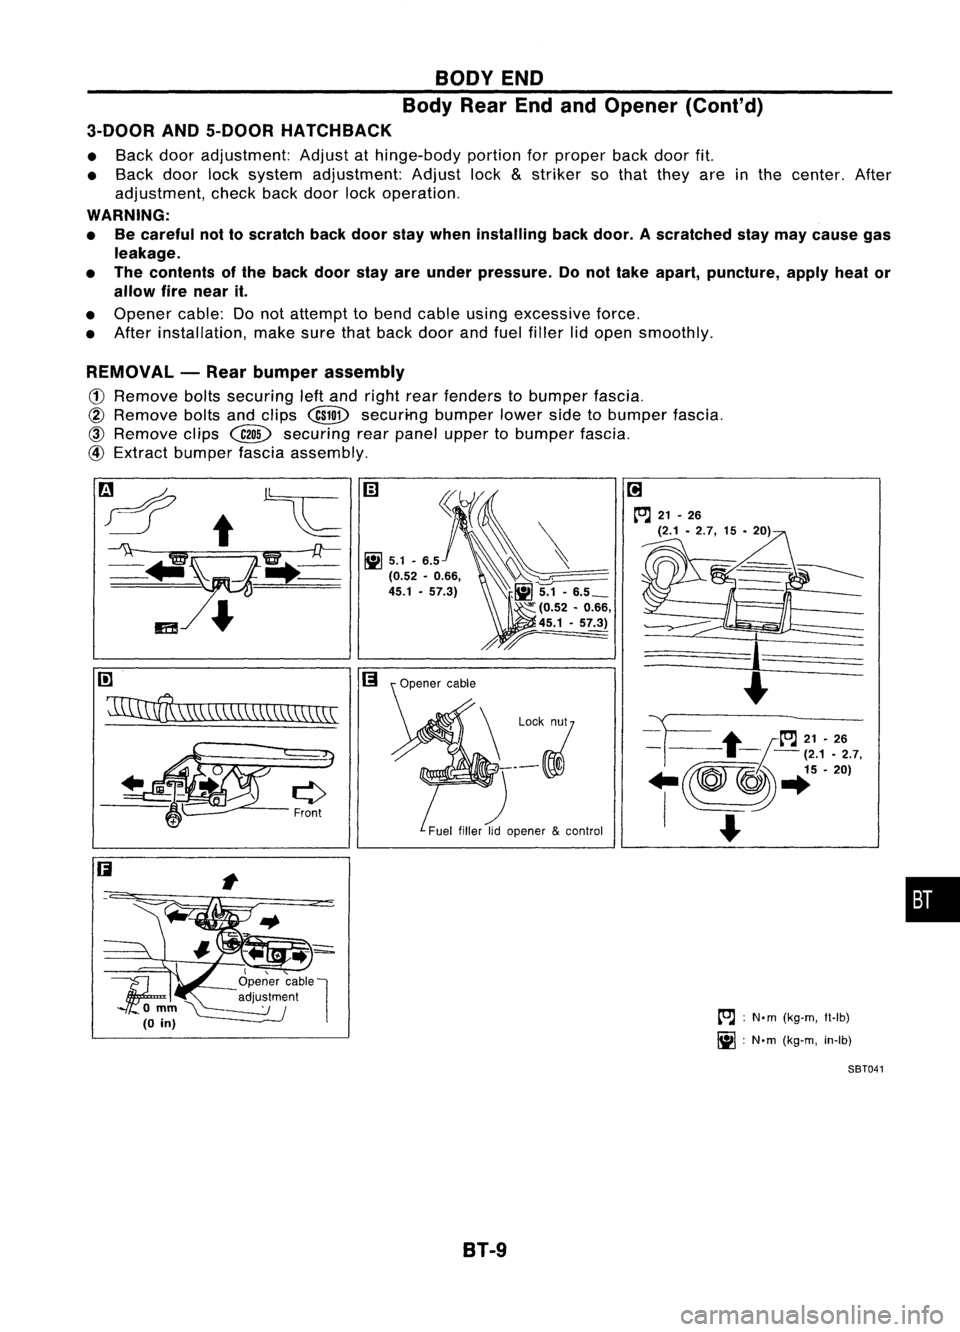
3-DOOR AND5-DOOR HATCHBACK
• Back dooradjustment: Adjustathinge-body portionforproper backdoorfit.
• Back doorlocksystem adjustment: Adjustlock
&
striker sothat they areinthe center. After
adjustment, checkbackdoor lockoperation.
WARNING:
• Becareful nottoscratch backdoor staywhen installing backdoor. Ascratched staymay cause gas
leakage.
• The contents ofthe back doorstayareunder pressure. Donot take apart, puncture, applyheator
allow firenear it.
• Opener cable:Donot attempt tobend cable usingexcessive force.
• After installation, makesurethatback doorandfuel filler lidopen smoothly.
REMOVAL -Rear bumper assembly
(1)
Remove boltssecuring leftand right rearfenders tobumper fascia.
@
Remove boltsandclips
@ill>
securi-ng bumperlowersidetobumper fascia.
@)
Remove clips~ securing rearpanel upper tobumper fascia.
@
Extract bumper fasciaassembly.
rn
~\\\\\\\\\\\\\\\\\\\\\\
I,"-
1f;
Openercable
l
'\ '--- adju~~m~nl
omm~
(0
in)
B1-9
[O.J
:
N.m (kg-m, Il-Ib)
~ :N'm (kg-m, in-Ib)
SBT041
•
Page 230 of 1701
BODYEND
Body RearEndandOpener (Cont'd)
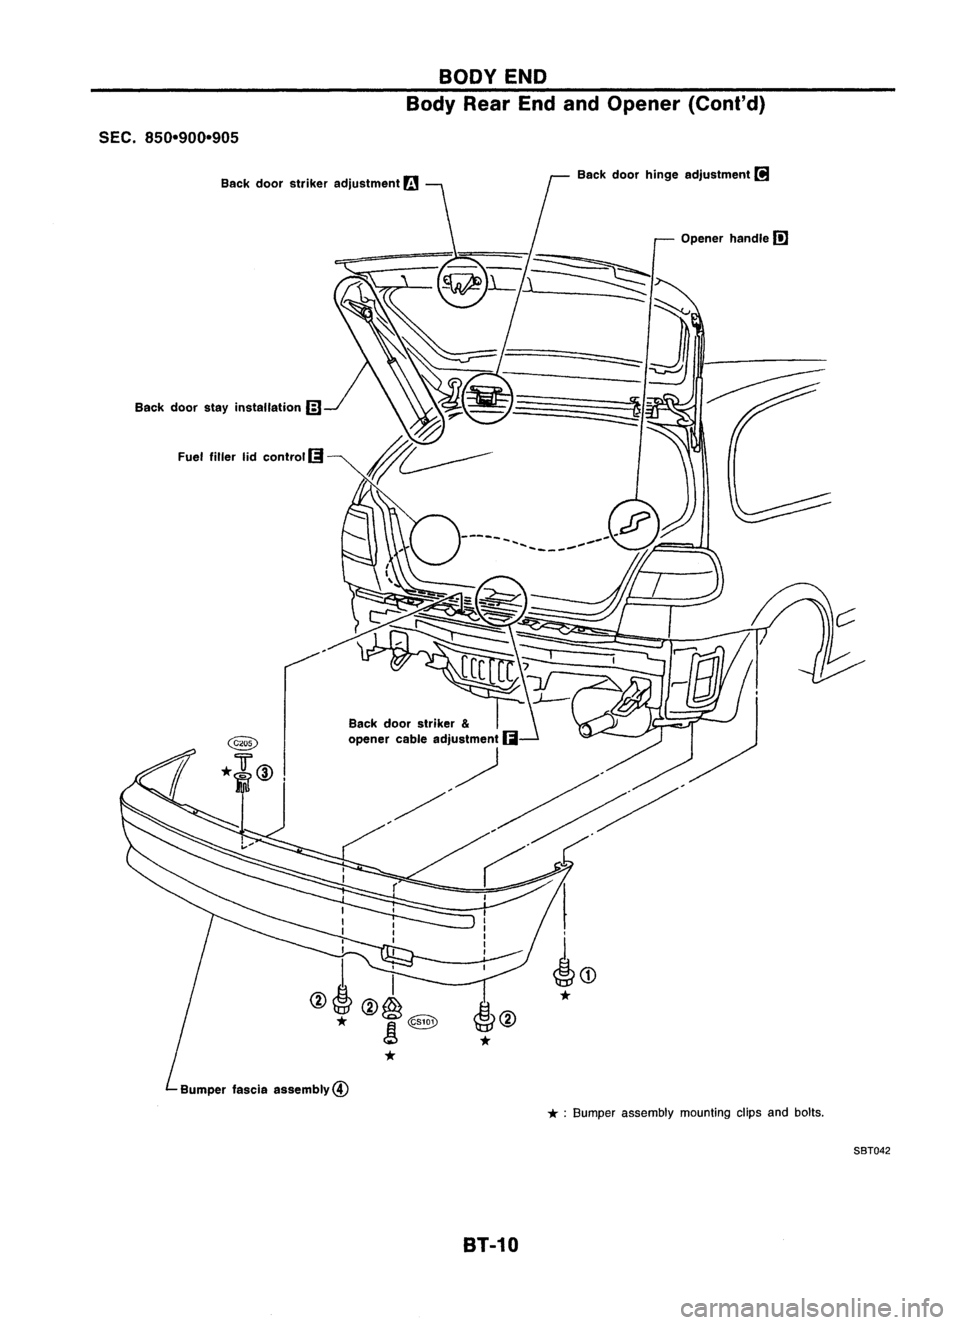
SEC. 850-900-905
Back doorstayinstallation
Gl
Fuel filler lidcontrol
fi!I
I
I
I
I
I '
@!@~
*
!
<@Y
*
Bumper fasciaassembly@
*
Back
doorhinge adjustment
(!J
Opener handle
m
B1-10
*
:
Bumper assembly mountingclipsandbolls.
SBT042