NISSAN ALMERA N15 1995 Service Manual
Manufacturer: NISSAN, Model Year: 1995, Model line: ALMERA N15, Model: NISSAN ALMERA N15 1995Pages: 1701, PDF Size: 82.27 MB
Page 201 of 1701
__________ BODYALIGNMENT _
_HANDLINGPRECAUTIONS FORPLASTICS _
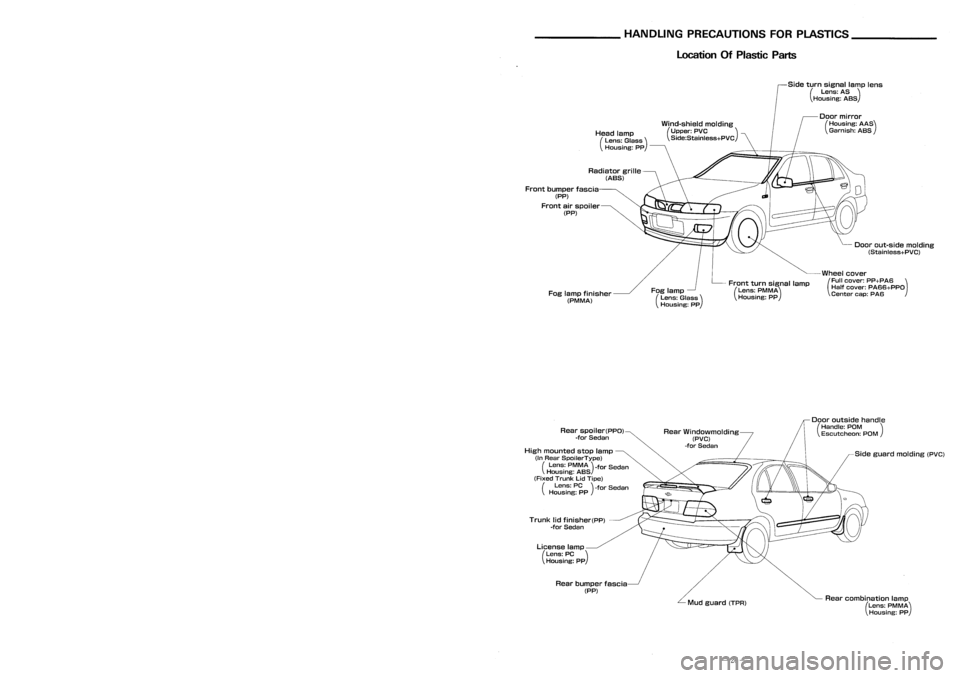
Passenger Compartment Sedan
5-door Hatchback Location
OfPlastic Parts
Side turnsignal lamplens
(Lens: AS)
Housing: ASS
Wind-shield molding
(Upper: PVC )
Side:Stainless+PVC
Doorout-side molding
(Stainless+PVC)
Wheel cover
(Full cover: PP+PA6 )
Half cover: PA66+PPO
Center cap:PA6
Door
mirror
(Housing: AAS)
Garnish: ASS
Front turnsignal lamp
(Lens: PMMA)
Housing: PP
Fog
lamp
(Lens: Glass)
Housing: PP
Head
lamp
(Lens: Glass)
Housing: pp
Radiator grille
(ABS)
Fog lamp finisher
(PM MA)
Front
bumper fascia
(PP)
Front airspoiler
(PP)
Point
Dimension
@-@
1228
CB-
@-@
1366
(8)-{6)
1159
CD--cD
1387
Q)-{J) 1367
@--@
1156
(b)--{[)
1385
~-4iV
1370
@~
1364
@~
1364
C'e)--@
1598
@--@
989*
@-{E)
918*
@~
1156*
@--{[)
917*
@~@
975*
@~(b)
757*
@~
1004*
@--@
723*
,
... ._MEASURMENT _
Figures marked witha
*
show symmetrically identical
dimensions onboth right andlefthand sides ofthe
vehicle.
Unit:
mm
@ :
Cowl tophole center (5dia.)
CB>
:
Front roofflange endatcenter
Positioning mark ~~
~}Outer frontpillarjoggle
Sideguard molding (PVC)
Rear combination lamp
(Lens: PMMA)
Housing: PP
Door
outside handle
(Handle: POM )
Escutcheon: POM
Mud guard (TPR)
Rear
Windowmolding
(PVC)
-for Sedan
Rear bumper fascia
(PP)
License
lamp
(Lens: PC)
Housing: PP
Trunk
lidfinisher(pp)
-for Sedan
Rear
spoiler(PPO)
-for Sedan
High mounted stoplamp
(In Rear SpoilerType)
(Lens: PMMA)-for Sedan
Housing: ASS
(Fixed Trunk LidTipe)
(Lens: PC)-for Sedan
Housing: PP
(f3),Cfi),Q),CD,@,@,CD,CD,~,@ :
Outer center pillarindention
CDCD :
Outer center pillarstandard hole
center
CBCD:
}
~@:
Outerfrontpillar indention
@@
:
Dash upper flange endcorner
-19- -26-
Page 202 of 1701
______ HANDLINGPRECAUTIONS FORPLASTICS __
BODYALIGNMENT _
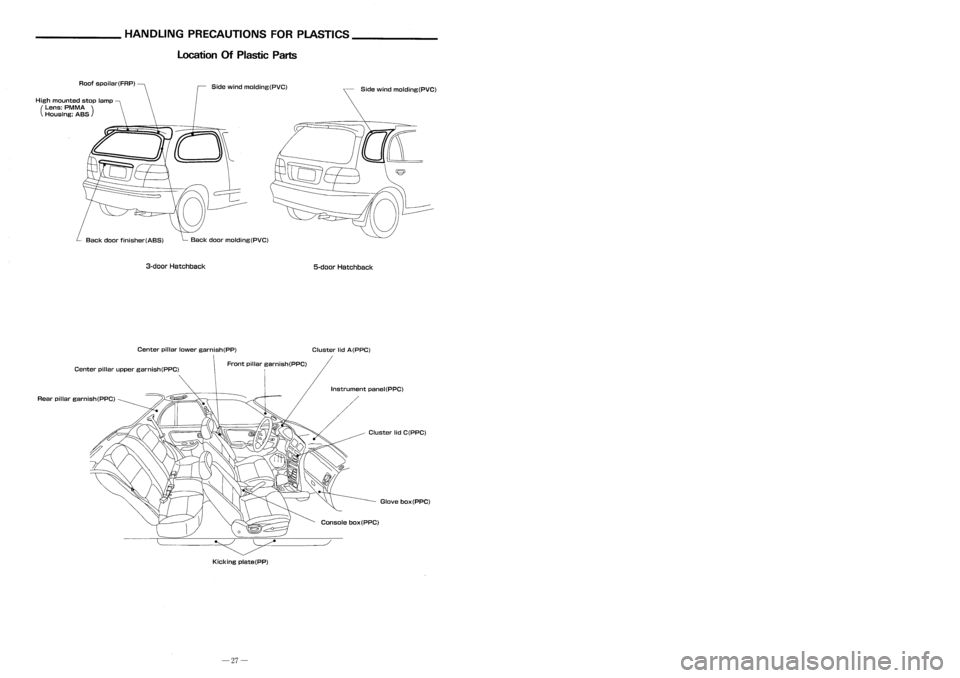
Location OfPlastic Parts
Underbody
Kicking plate(PP)
Front
@,
076
dia.
Rear
@,@
62 dia.
Front
Rear
coordinates: coordinates:
@,@ @,@@
X :250
X:393.5
X:475
V :-632
V:1,460
V:3,082
Z :224.8
Z:126.9
Z:336.8
@,@
(8),
@
@
X :492 X
:572
X:-542
V :-450 V
:1,940
V:3,082
Z :355 Z
:200
Z:336.8
@,@
CD,
CD
X :406
X:600
V :64
V:2,035
Z :172
Z:235.2
@,@
Q)
X :352.7 X
:150
V :69 V
:2,442.9
Z :240 Z
:241
@,
@
@
X :432
X:300
V :338
V:2,480
Z :128
Z:381.8
(f),
CD
@
X :395
X:-300
V :515
V:2,480
Z :129.2
Z:405.8
@,
@)
X :393
Y :2,560
Z :365
@
X :470
Y :2,911
Z :339.6
@
X :-539
Y :2,911
Z :339.6
Unit: mm
Coordinates:
@,0
X :522.2
V :18.1
Z :571.7
@,@ X :465
V :2,456.4
Z :522
Front
andrear strut tower centers
I
~t-~
Rear
(f
••@
LH side
RHside
Q
Q
Bottom
view of
,1
vehicle
__
MEASURMENT POINTS__
Glove box(PPC)
Side
wind molding(PVC)
Cluster lidC(PPC)
Instrument
panel(PPC)
Console box(PPC)
5-door
Hatchback
Cluster lidA(PPC)
~----_/
Front
pillargarnish(PPC)
Side
wind molding(PVC)
Back doorfinisher(ABS)
Roof
spoilar(FRP)
3-doorHatchback
Center pillarlower garnish(PP)
Center pillarupper garnish(PPC)
Rear pillar garnish(PPC)
High
mounted stoplamp
(Lens: PMMA )
Housing: ABS
FrontSBT097
-27-
-18-
Page 203 of 1701
__________ BODYALIGNMENT ___________
PRECAUTIONS _
Underbody Precautions
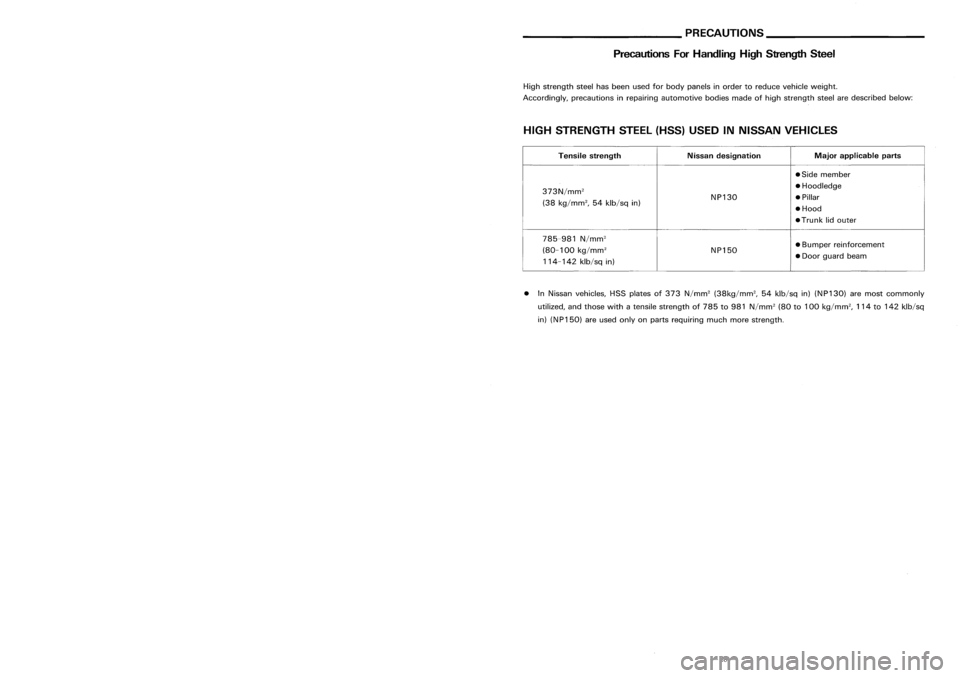
ForHandling HighStrength Steel
• InNissan vehicles, HSSplates of373 N/mm
2
(38kg/mm
2,
54klb/sq in)(NP130) aremost commonly
utilized, andthose withatensile strength of785 to981 N/mm
2
(80to100 kg/mm
2,
114to142 klb/sq
in) (NP150) areused onlyonparts requiring muchmorestrength.
HIGH
STRENGTH STEEL(HSS)USED INNISSAN VEHICLES
High
strength steelhasbeen usedforbody panels inorder toreduce vehicle weight.
Accordingly, precautionsinrepairing automotive bodiesmadeofhigh strength steelaredescribed below:
Tensile strength Nissan designation Major
applicable parts
• Side member
373N/mm
2
•
Hoodledge
(38 kg/mm
2,
54klb/sq in) NP130
•
Pillar
• Hood
.Trunk lidouter
785-981 N/mm
2
•Bumper reinforcement
(80-100 kg/mm
2
NP150
114-142 klb/sqin) •
Door guard beam
E
E
127
@>@)
235
~200
ee
@@
o
It)
CD
N
.. CD
.. 00
~ N~
It)
CD
CD
It)
C!.
~
CD
It)
It)
en
N
It)
CD CD
IIIlI:t'
(ij
Q)
er:
iJ
--------
en
It)
C!.
N
~ en
co
____
MEASURMENT _
..
o
.. It)
0)
It)
o
I'
..
.. 0
CD CD
en~
0) .,
~
129
@8
@@
@)@)
225
SBT096
-17- -28-
Page 204 of 1701
__________ PRECAUTIONS ___________
BODYALIGNMENT _
Precautions ForHandling HighStregth Steel Engine
Compartment
__ MEASURMENT POINTS__
Unit:mm
Front side
SBT088
Traction direction: ...
Not
recommended
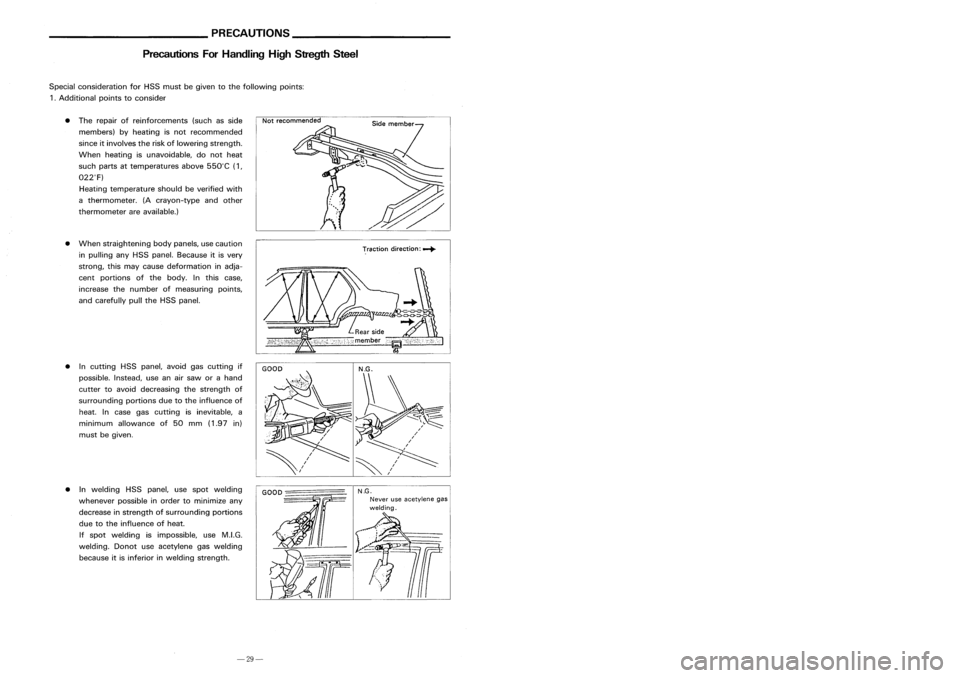
• The repair ofreinforcements (suchasside
members) byheating isnot recommended
since itinvolves theriskoflowering strength.
When heating isunavoidable, donot heat
such parts attemperatures above550°C (1,
022°F)
Heating temperature shouldbeverified with
a thermometer. (Acrayon-type andother
thermometer areavailable.)
• When straightening bodypanels, usecaution
in pulling anyHSS panel. Because itis very
strong, thismay cause deformation inadja-
cent portions ofthe body. Inthis case,
increase thenumber ofmeasuring points,
and carefully pulltheHSS panel.
Special
consideration forHSS must begiven tothe following points:
1 .Additional pointstoconsider
• Incutting HSSpanel, avoidgascutting if
possible. Instead,useanairsaw orahand
cutter toavoid decreasing thestrength of
surrounding portionsduetothe influence of
heat. Incase gascutting isinevitable, a
minimum allowance of50 mm (1.97 in)
must begiven.
SBT090
Radiator
coresupport lower
•
(b)
11
dia.
SBT094
• Inwelding HSSpanel, usespot welding
whenever possibleinorder tominimize any
decrease instrength ofsurrounding portions
due tothe influence ofheat.
If spot welding isimpossible, useM.LG.
welding. Donotuseacetylene gaswelding
because itis inferior inwelding strength.
GOOD
-================
N.G.
Never useacetylene .gas
welding.
Radiator
coresupport uppercenter
SBT091
-29-
-16-
Page 205 of 1701

__________ BODYALIGNMENT _
_ PRECAUTIONS _
Description PrecautionsForHandling HighStrength Steel
• Alldimensions indicatedinfigures areactual ones.
• When usingatracking gauge,adjustbothpointers toequal length. Thencheck thepointers andgauge
itself tomake surethere isno free play.
• When ameasuring tapeisused, check tobe sure there isno elongation, twistingorbending.
• Measurements shouldbetaken atthe center ofthe mounting holes.
• Anasterisk
(*)
following thevalue atthe measuring pointindicates thatthemeasuring pointonthe other
side issymmetrically thesame value.
• The coordinates ofthe measurement pointsarethe distances measured fromthestandard lineof"X", "V"
and "Z".
EngineCompartment
D=2T+3(mm)
D=2T+O.12 (in)
•
The electrode tipdiameter mustbereformed
properly according tothe panels thickness.
•
The spot ungget onHSS panel isharder than
that ofan ordinary steelpanel.
Therefore, forspot cutting HSSpanel, ahigh
torque drillofalow speed (1,000 to1,200
rpm) maybeused tomaintain itsdurability
and facilitate theoperation.
• HSS panels withatensile strength of785 to981 N/mm
2
(80to100 kg/mm
2,
114to142 klb/sq in),
used asreinforcement inthe door guard barand inthe bumper, istoo high intensile strength touse
for general repairs.Whenthesepanels aredamaged, theouter panels alsosustain consequential
damage; therefore, thesepanels arenever remedied withoutreplacing thedoor assembly orbumper
assembly.
2. Precautions inspot welding
This work should beperformed understandard workconditions. However,workcontrol mustbeexercised
as folloows:
SBF8?4GB
"Z":
Imaginary baseline
[200 mmbelow datum line
("OZ" atdesign plan)]
Front axlecenter
/
y (_)
(0)
Incorrect
Incorrect
Correct
D==Tip+diameter
T
,::=T====p=la::t_e=-=-_t_h=i_C=k=_n=_e_s=s= __,-- ~
• The panel surfaces mustbefitted toeach
other, leaving nogaps.
____
MEASURMENT _
SBT08?
-15- -30-
Page 206 of 1701

__________ PRECAUTIONS _
_ BODYALIGNMENT _
Precautions ForHandling HighStrength Steel
PanelPartsMatching Marks
~ViewE
3-Door Hatchback
and 5-Door Hatchback
A
mark hasbeen placed oneach partofthe body toindicate thepanel partsmatching positions.Whenrepairing
parts damaged byan accident whichmightaffectthevehicle frame(members, pillars,etc.)more accurate,
effective repairwillbepossible byusing these marks together wi~hbody alignment data.
Welding
current
Pressure
Unit:mrr
(C•
Thickness
(t)
Minimum pitch(
Q )
0.6 (0.024)
I
10 (0.39)
orover
0.8 (0.031) 12(0.47)
orover
1.0 (0.039) 18(0.71)
orover
1.2 (0.047) 20(0.79)
orover
1.6 (0.063) 27(1.06)
orover
~71) 31
11.221
orover
•
Follow established specifications forthe
appropriate pressurelevel,current leveland
weld time.
• Follow thespecifications forthe proper
welding pitch.
• After welding, weldingstrength mustbe
tested.
J
Type
W:
@----- ~
Et
Type V:~----- ~
View A ViewS
ViewC
View D-1 View
D-2
ViewE
Sedan and5-door Hatchback 3-door
Hatchback
3-door
Hatchback and5-door Hatchback
/w-..IE
+-W
II (-
'- r )
o
-31- -14-
Page 207 of 1701
Description
_________
BODYALIGNMENT _
Body Center Marks ________
REPLACEMENTOPERATIONS _
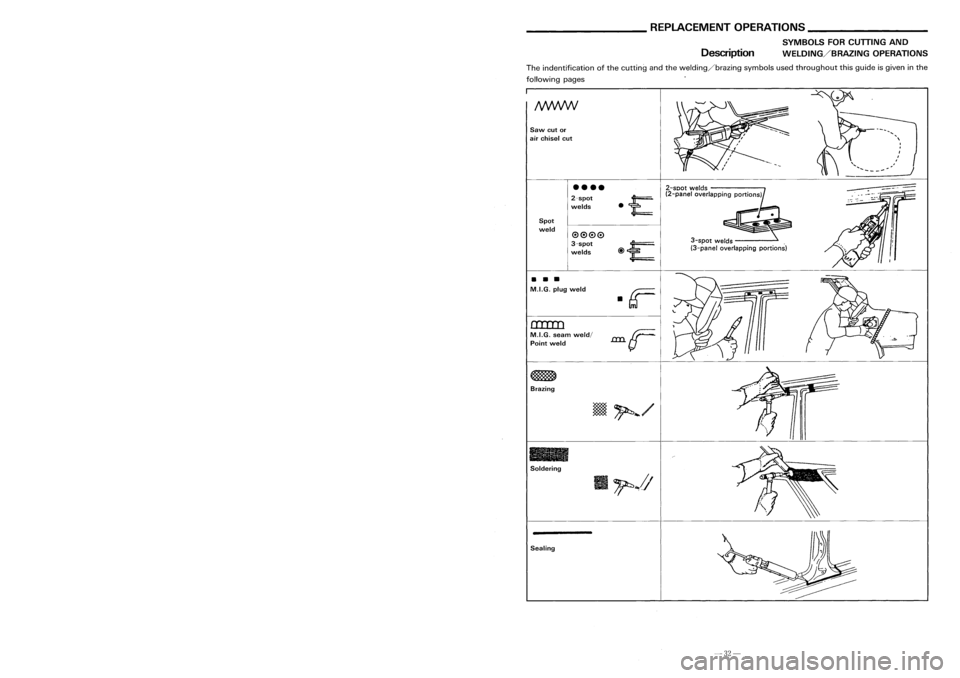
SYMBOLS FORCUITING AND
WELDING/BRAZING OPERATIONS
..J
3-spot welds
(3-panel overlapping portions)
2-SDOt
welds
(2-panel overlapping portions)
••••
2-spot
welds
0000
3-spot
welds
Spot
weld
Brazing
Soldering
(ItIlI)
M.LG. seamweld/
Point weld
Saw
cutor
air chisel cut
•
•
•
M.LG. plugweld
-
The
indentification ofthe cutting andthewelding/brazing symbolsusedthroughout thisguide isgiven inthe
following pages
Portion F
Portion
C
Unit:
mm
Porton
H
3-Door Hatchback
and 5-Door Hatchback
• Front roof
• Second crossmember
Portion
D-Sedan
Portion E
-Sedan
Portion F
Portion E
Portion
8
Portion
G
~
Slot(7X 11)
/~/
• Rear waist panelslot
•
Cowl top
Portion
BPortion
C
Hole(4
dial
Portion
A
Portion D
Portion
A
• Rear roof
•
Upper radiator coresupport
A
mark hasbeen placed oneach partofthe body toindicate thevehicle center.Whenrepairing partsdamaged
by an accident whichmightaffectthevehicle frame(members, pillars,etc.)more accurate, effectiverepairwill
be possible byusing these marks together withbody alignment data.
Portion G
3-door and5-door Hatchback
Lozenge
mark
Portion
H
3-door and5-door Hatchback Sealing
• Rear roof •
Rear panel
-13- -32-
Page 208 of 1701
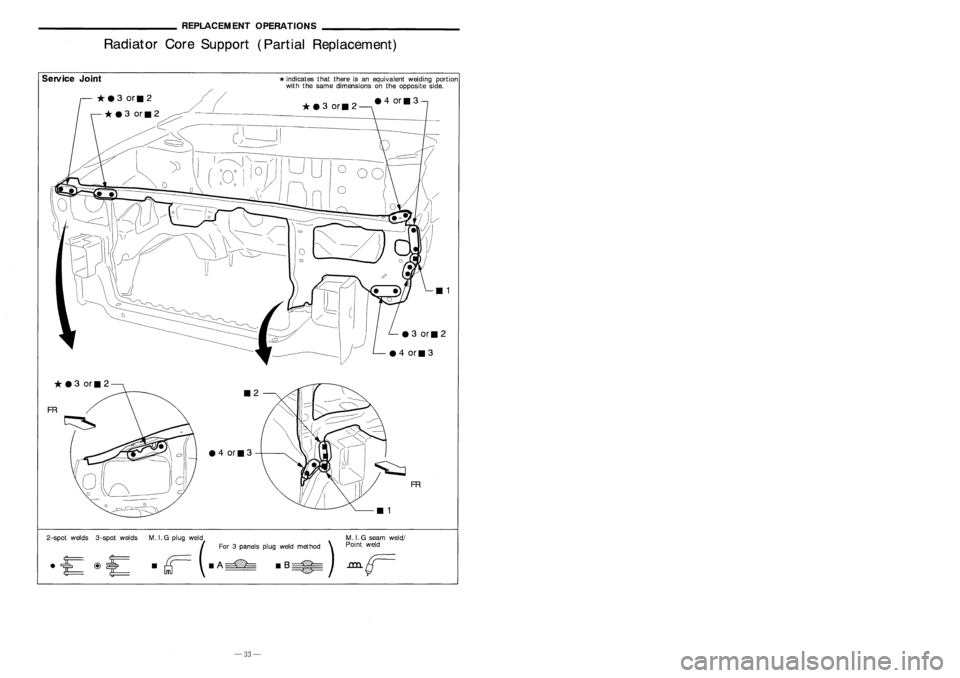
REPLACEMENTOPERATIONS _
------------
RadiatorCoreSupport (PartialReplacement) BODY
CONSTRUCTION _
-----------
BodyConstruction
\
Section
L-L:
Section P-P:
Section
D-D:
Section H-H:
Section K-K:
Section
C-C:
Section G-G:
Section 0-0:
Section
J-J:
Section
F-F:
Section
8-8:
. Section N-N:
Section
I-I:
Section
E-E:
Section
A-A:
Section M-M:
_1
FR
(
e
4orll3 *
indicates thatthere isan equivalent wel~ing.portion
with thesame dimensions onthe opposite Side.
o
*
e
3
or 112
FR
Service
Joint
Section
0-0:
Section
R-R:
2-spot welds 3-spotwelds
M.1.Gplug weld )M.I.Gseam weld/
(Point weld
For 3panels plugweld m.ethod
· r ·
A
=='*= •
B
===:=
.an
F
-33- -12-
Page 209 of 1701
BODYCONSTRUCTION _
------------
BodyConsb"uction. REPLACEMENT
OPERATIONS _
------------
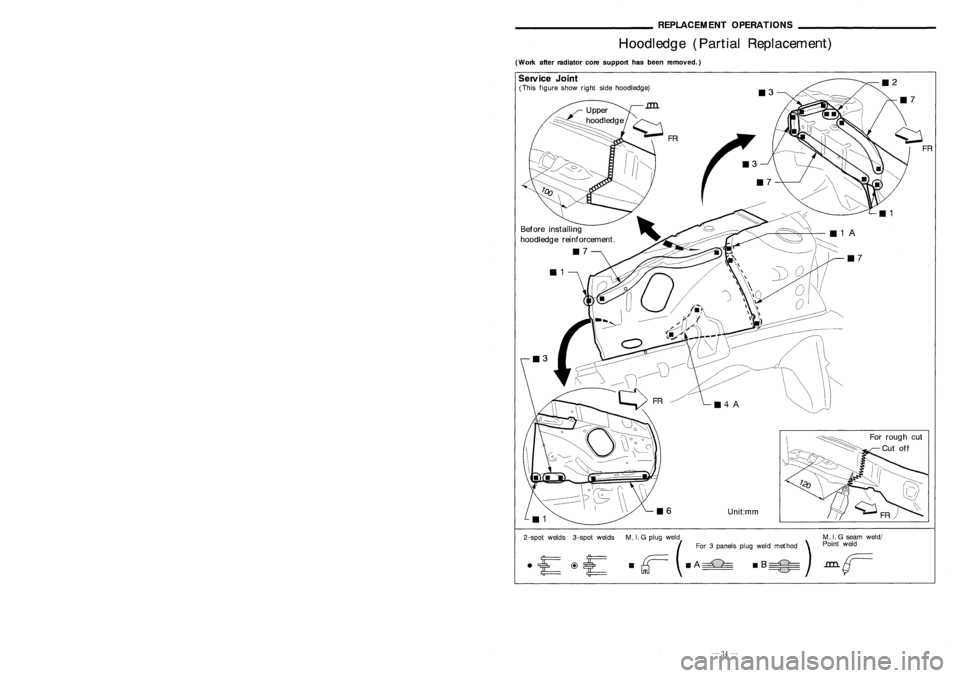
Hoodledge(PartialReplacement)
(Work afterradiator coresupport hasbeen removed.)
114AUnit:mm
Before
installing
hoodledge reinforcement.
117
Service
Joint
(This figure showrightsidehoodledge)
Sedan
3-d oar Hatchback
5-door Hatchback 2-spot
welds 3-spotwelds
M.1.
Gplug weld )
M.I.
Gseam weld/
(For 3panels plugweld method. Pointweld
· r
.A~ .B~
.an.F
-34-
-11-
Page 210 of 1701
REPLACEMENTOPERATIONS
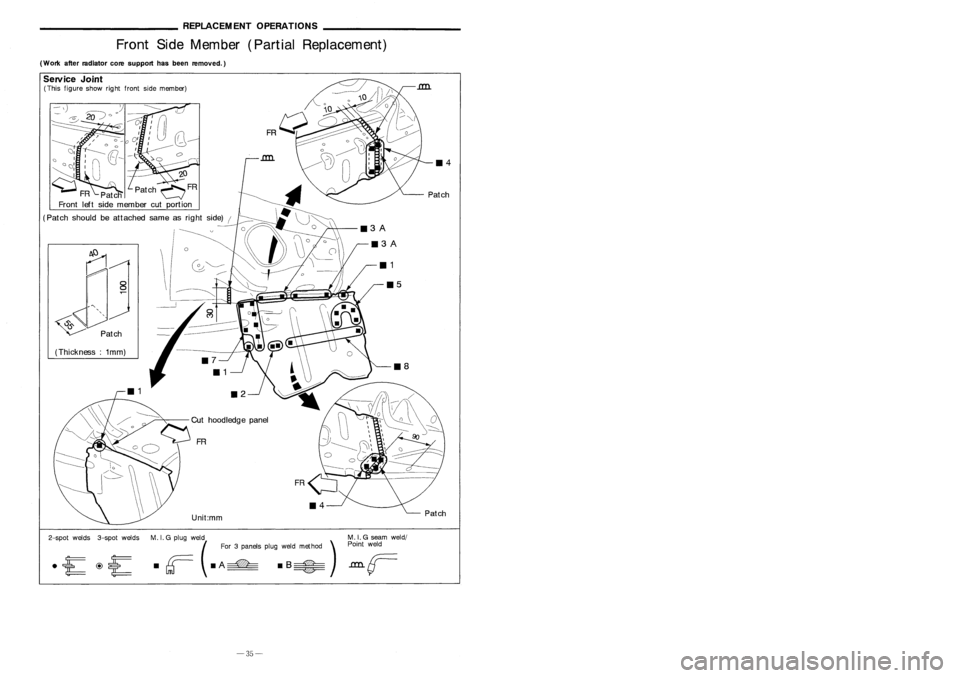
Front SideMember (PartialReplacement)
(Work afterradiator coresupport hasbeen removed.) ________
CORROSIONPROTECTION _
Stone Guard Coat
SectionB-B
Section
A-A
--r':":'
To
prevent damage causedbystones, thelower outerbodypanels (fender, door,etc.)have anadditional layer
of Stone Guard CoatovertheEDprimer coating. Thus,when replacing orrepairing thesepanels, apply
undercoat tothe same portions asbefore. Useacoat which isrust preventive, durable,shockresistant andhas
a long shelf life.
~mm1111i :
Indicates stoneguard coated portions
114
Patch
118
111
115
114
hoodledge
panel
117
111
Unit:mm
8
Patch
""
"
"
(Thickness: 1mm)
-\
Service
Joint
(This figure showrightfront sidemember)
2-spot welds 3-spotwelds M.1.
Gplug weld MIG seam weld/
(For 3panels plugweld method )P1ID.~irit
F
weld
• rr=
.A=-= .B~
G1J --- ~
Section
C-C
-35- -10-