NISSAN ALMERA TINO 2001 Service Repair Manual
ALMERA TINO 2001
NISSAN
NISSAN
https://www.carmanualsonline.info/img/5/57352/w960_57352-0.png
NISSAN ALMERA TINO 2001 Service Repair Manual
Trending: ESP, rear view mirror, steering, dimensions, tires, spare wheel, water pump
Page 1901 of 3051
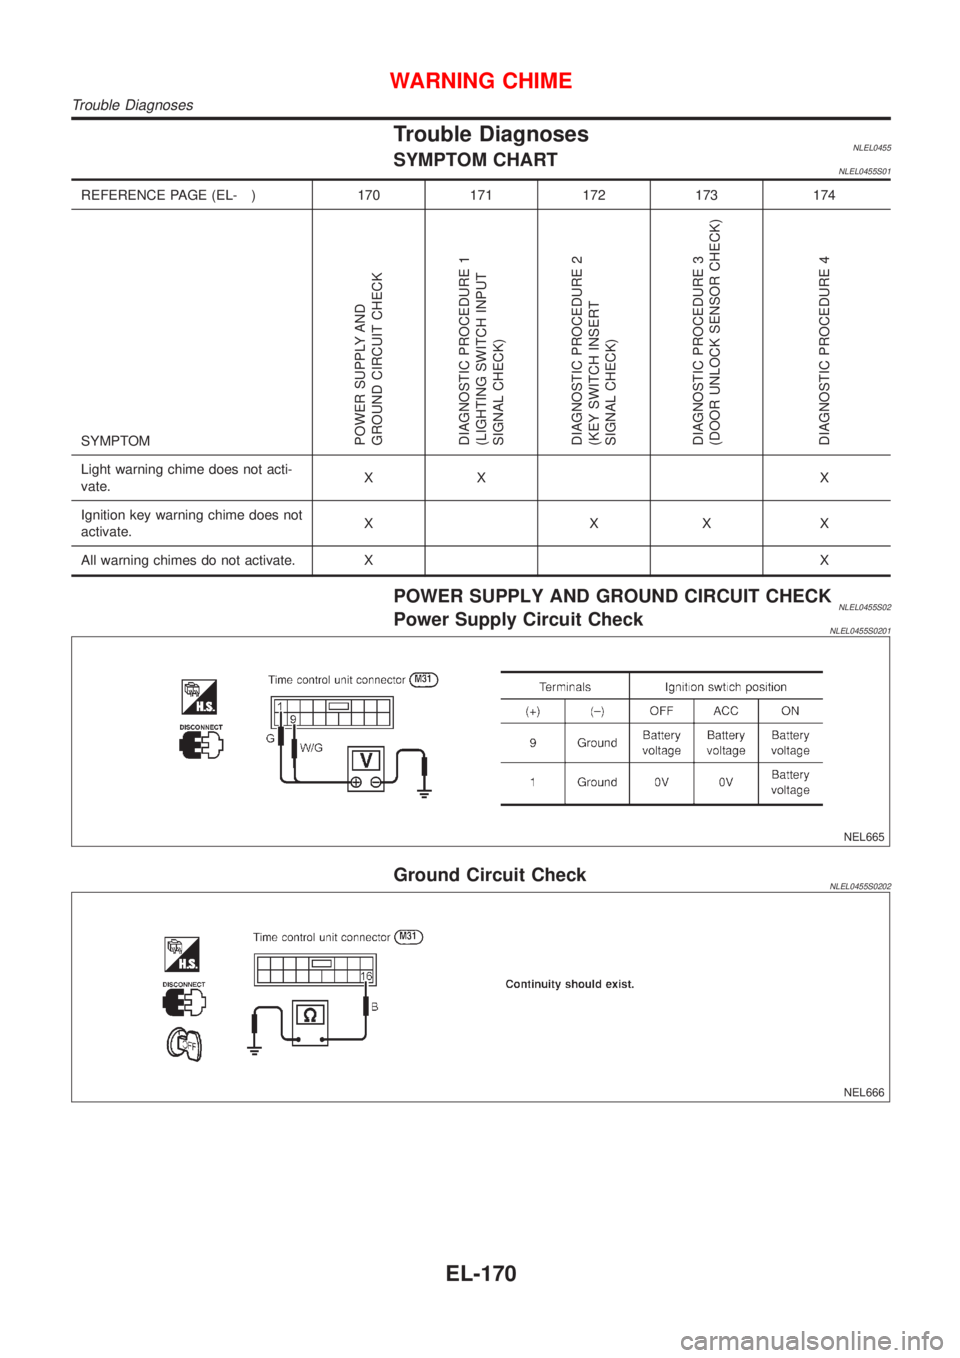
Trouble DiagnosesNLEL0455SYMPTOM CHARTNLEL0455S01
REFERENCE PAGE (EL- ) 170 171 172 173 174
SYMPTOM
POWER SUPPLY AND
GROUND CIRCUIT CHECK
DIAGNOSTIC PROCEDURE 1
(LIGHTING SWITCH INPUT
SIGNAL CHECK)
DIAGNOSTIC PROCEDURE 2
(KEY SWITCH INSERT
SIGNAL CHECK)
DIAGNOSTIC PROCEDURE 3
(DOOR UNLOCK SENSOR CHECK)
DIAGNOSTIC PROCEDURE 4
Light warning chime does not acti-
vate.XX X
Ignition key warning chime does not
activate.XXXX
All warning chimes do not activate. XX
POWER SUPPLY AND GROUND CIRCUIT CHECKNLEL0455S02Power Supply Circuit CheckNLEL0455S0201
NEL665
Ground Circuit CheckNLEL0455S0202
NEL666
WARNING CHIME
Trouble Diagnoses
EL-170
Page 1902 of 3051
DIAGNOSTIC PROCEDURE 1 (LIGHTING SWITCH
INPUT SIGNAL CHECK)
=NLEL0455S03
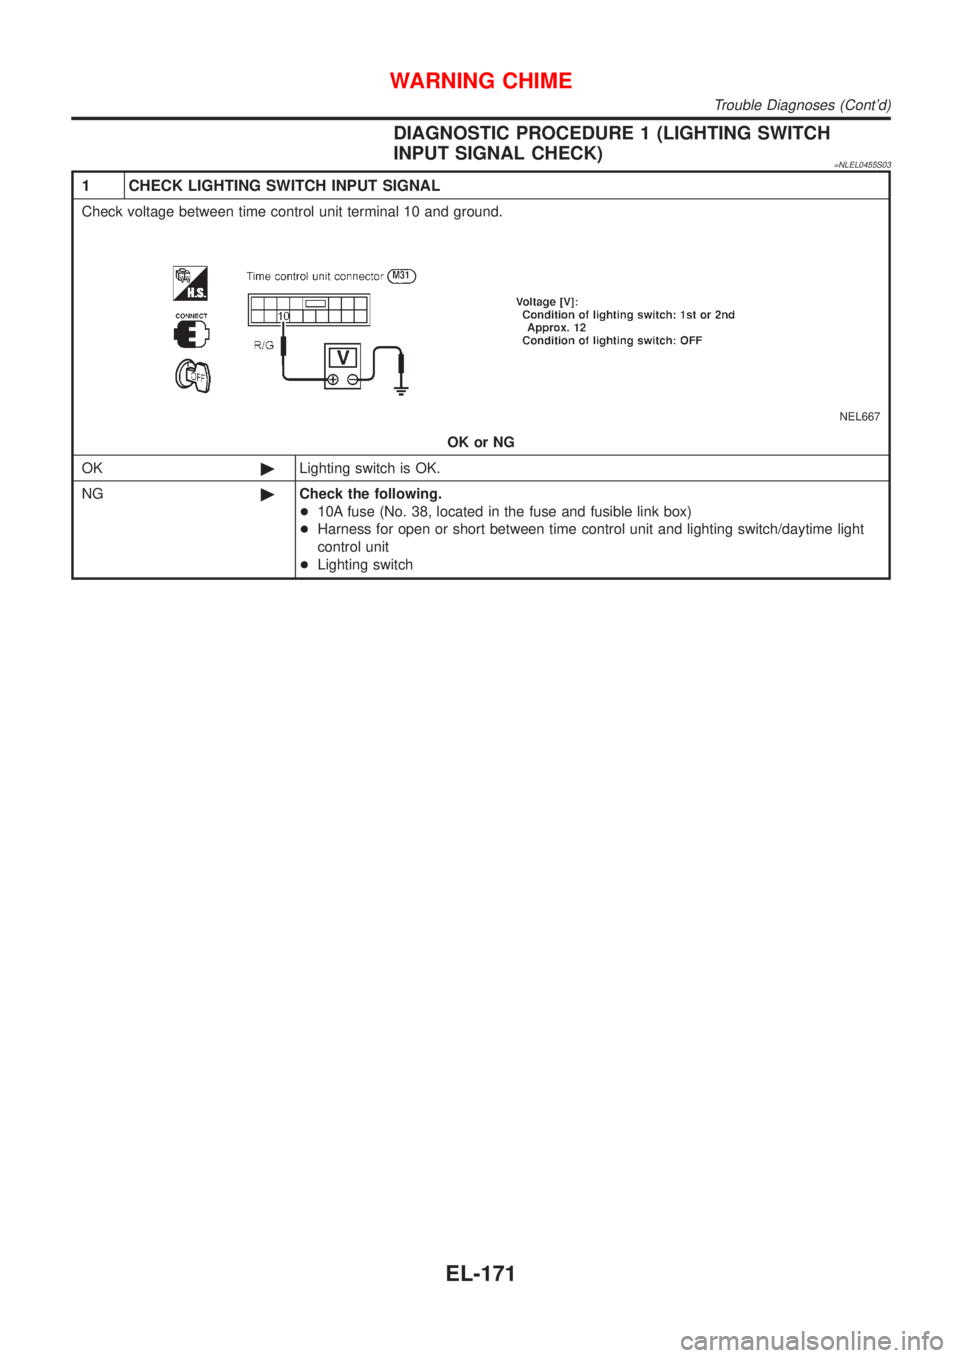
1 CHECK LIGHTING SWITCH INPUT SIGNAL
Check voltage between time control unit terminal 10 and ground.
NEL667
OK or NG
OK©Lighting switch is OK.
NG©Check the following.
+10A fuse (No. 38, located in the fuse and fusible link box)
+Harness for open or short between time control unit and lighting switch/daytime light
control unit
+Lighting switch
WARNING CHIME
Trouble Diagnoses (Cont'd)
EL-171
Page 1903 of 3051
DIAGNOSTIC PROCEDURE 2 (KEY SWITCH INSERT
SIGNAL CHECK)
=NLEL0455S04
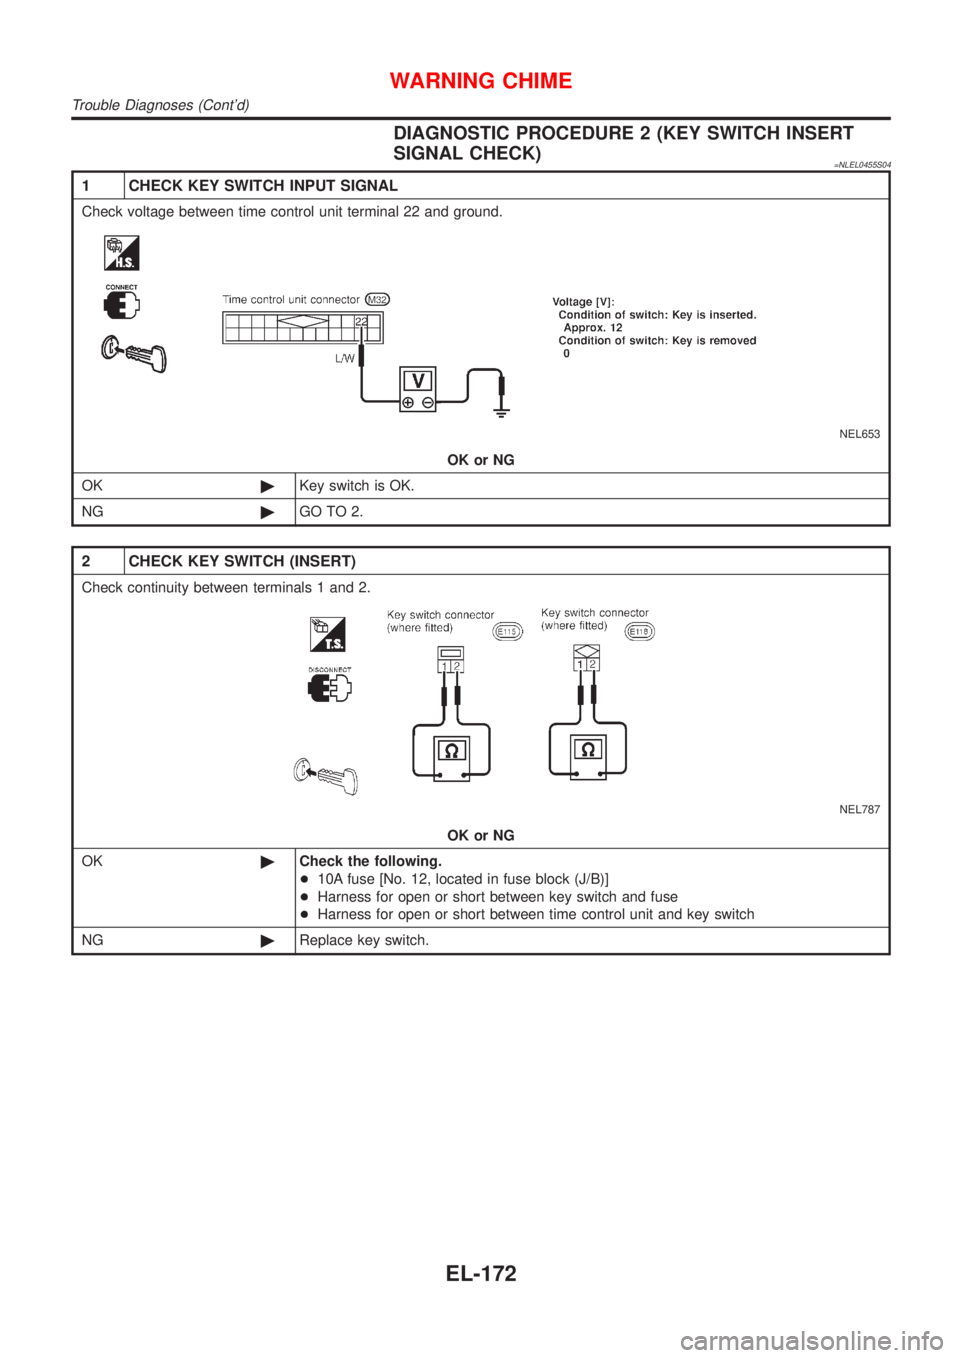
1 CHECK KEY SWITCH INPUT SIGNAL
Check voltage between time control unit terminal 22 and ground.
NEL653
OK or NG
OK©Key switch is OK.
NG©GO TO 2.
2 CHECK KEY SWITCH (INSERT)
Check continuity between terminals 1 and 2.
NEL787
OK or NG
OK©Check the following.
+10A fuse [No. 12, located in fuse block (J/B)]
+Harness for open or short between key switch and fuse
+Harness for open or short between time control unit and key switch
NG©Replace key switch.
WARNING CHIME
Trouble Diagnoses (Cont'd)
EL-172
Page 1904 of 3051
DIAGNOSTIC PROCEDURE 3 (DOOR UNLOCK SENSOR
CHECK)
NLEL0455S05
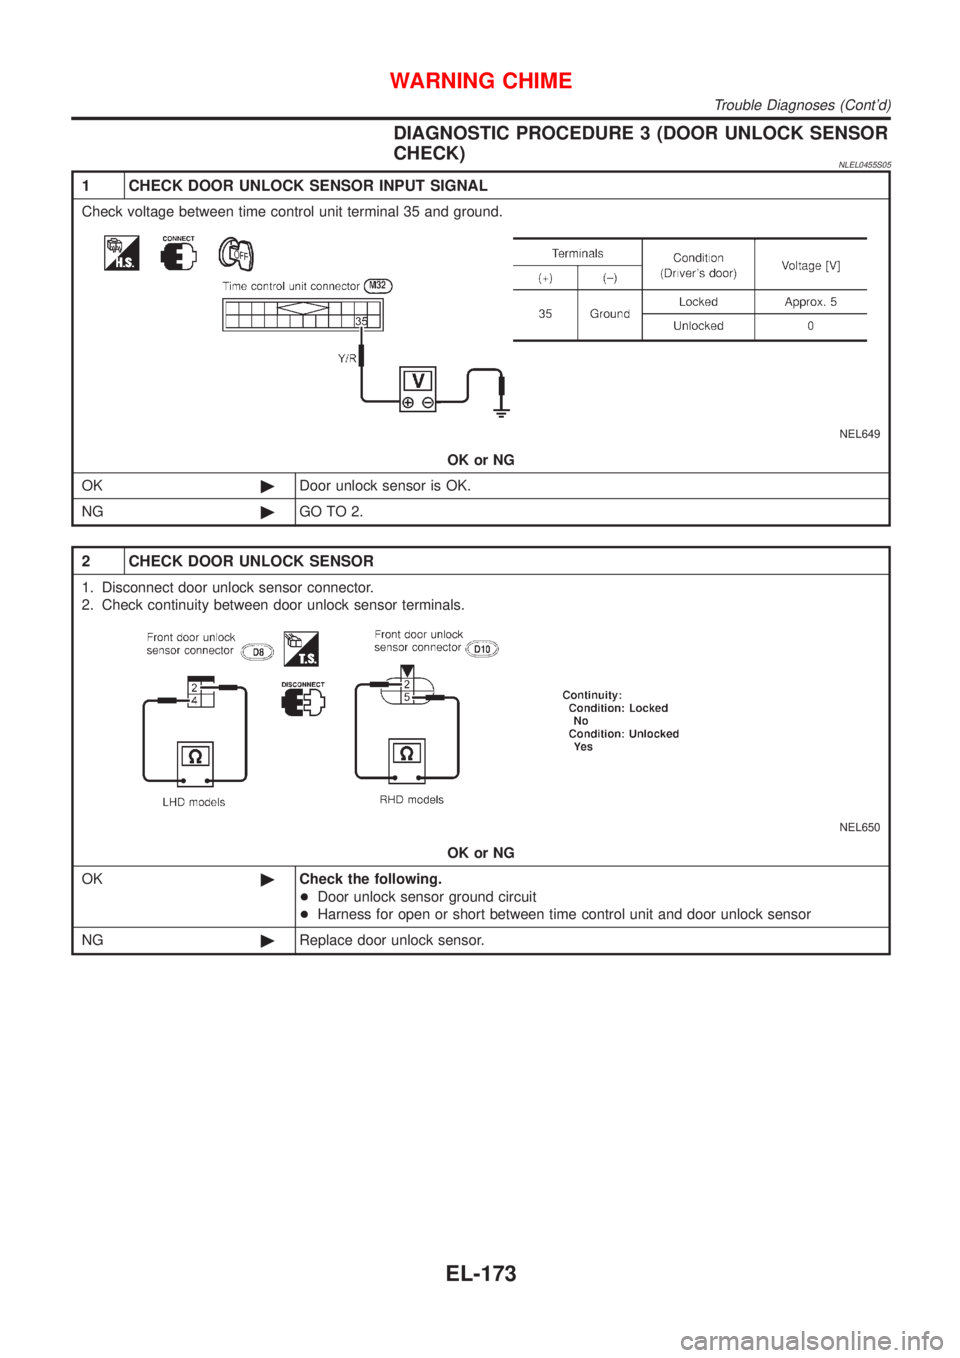
1 CHECK DOOR UNLOCK SENSOR INPUT SIGNAL
Check voltage between time control unit terminal 35 and ground.
NEL649
OK or NG
OK©Door unlock sensor is OK.
NG©GO TO 2.
2 CHECK DOOR UNLOCK SENSOR
1. Disconnect door unlock sensor connector.
2. Check continuity between door unlock sensor terminals.
NEL650
OK or NG
OK©Check the following.
+Door unlock sensor ground circuit
+Harness for open or short between time control unit and door unlock sensor
NG©Replace door unlock sensor.
WARNING CHIME
Trouble Diagnoses (Cont'd)
EL-173
Page 1905 of 3051
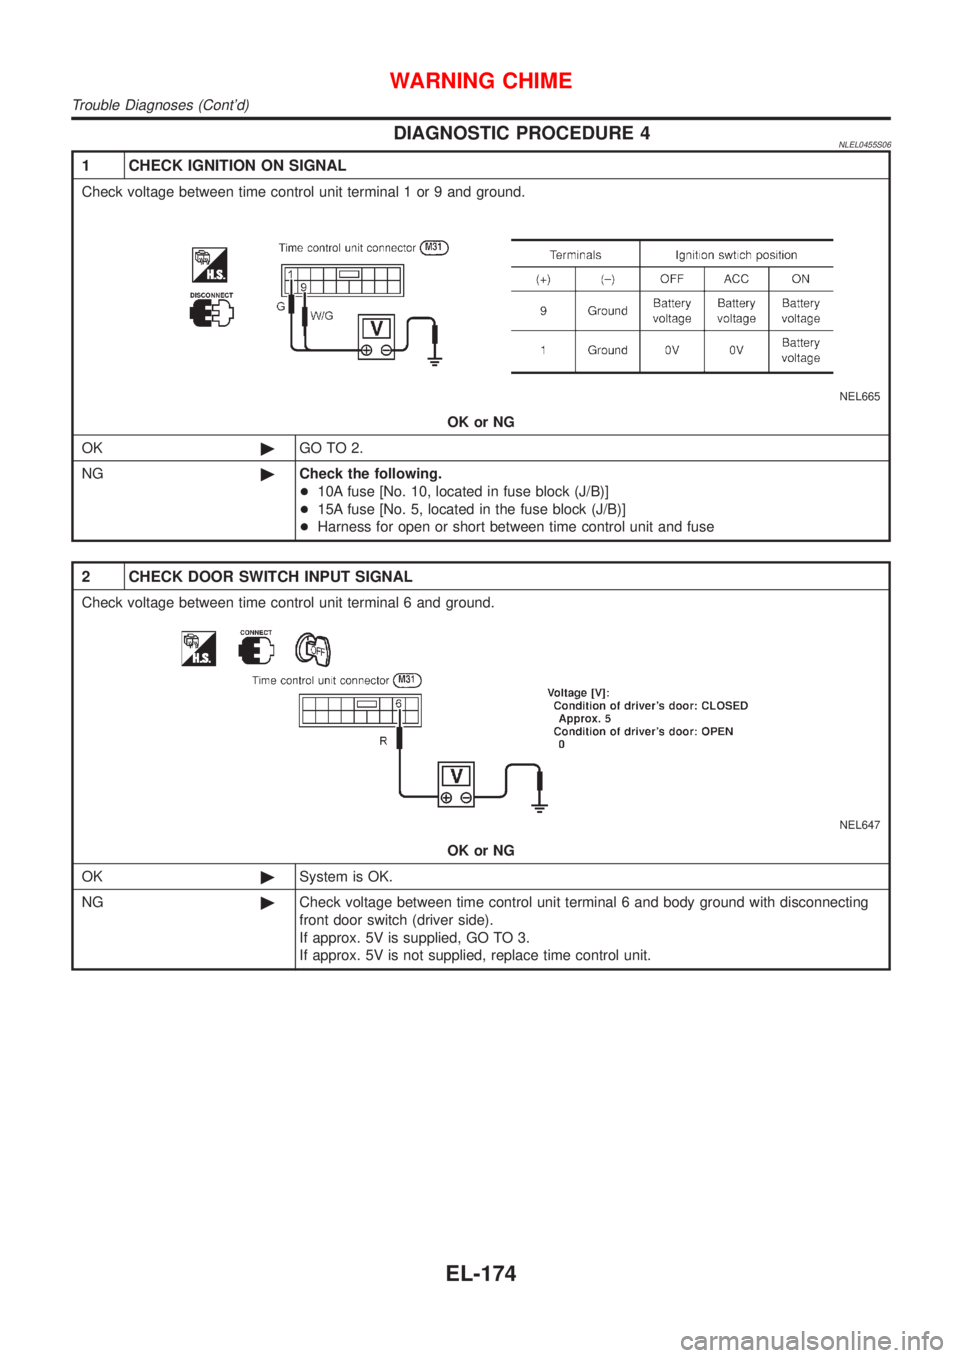
DIAGNOSTIC PROCEDURE 4NLEL0455S06
1 CHECK IGNITION ON SIGNAL
Check voltage between time control unit terminal 1 or 9 and ground.
NEL665
OK or NG
OK©GO TO 2.
NG©Check the following.
+10A fuse [No. 10, located in fuse block (J/B)]
+15A fuse [No. 5, located in the fuse block (J/B)]
+Harness for open or short between time control unit and fuse
2 CHECK DOOR SWITCH INPUT SIGNAL
Check voltage between time control unit terminal 6 and ground.
NEL647
OK or NG
OK©System is OK.
NG©Check voltage between time control unit terminal 6 and body ground with disconnecting
front door switch (driver side).
If approx. 5V is supplied, GO TO 3.
If approx. 5V is not supplied, replace time control unit.
WARNING CHIME
Trouble Diagnoses (Cont'd)
EL-174
Page 1906 of 3051
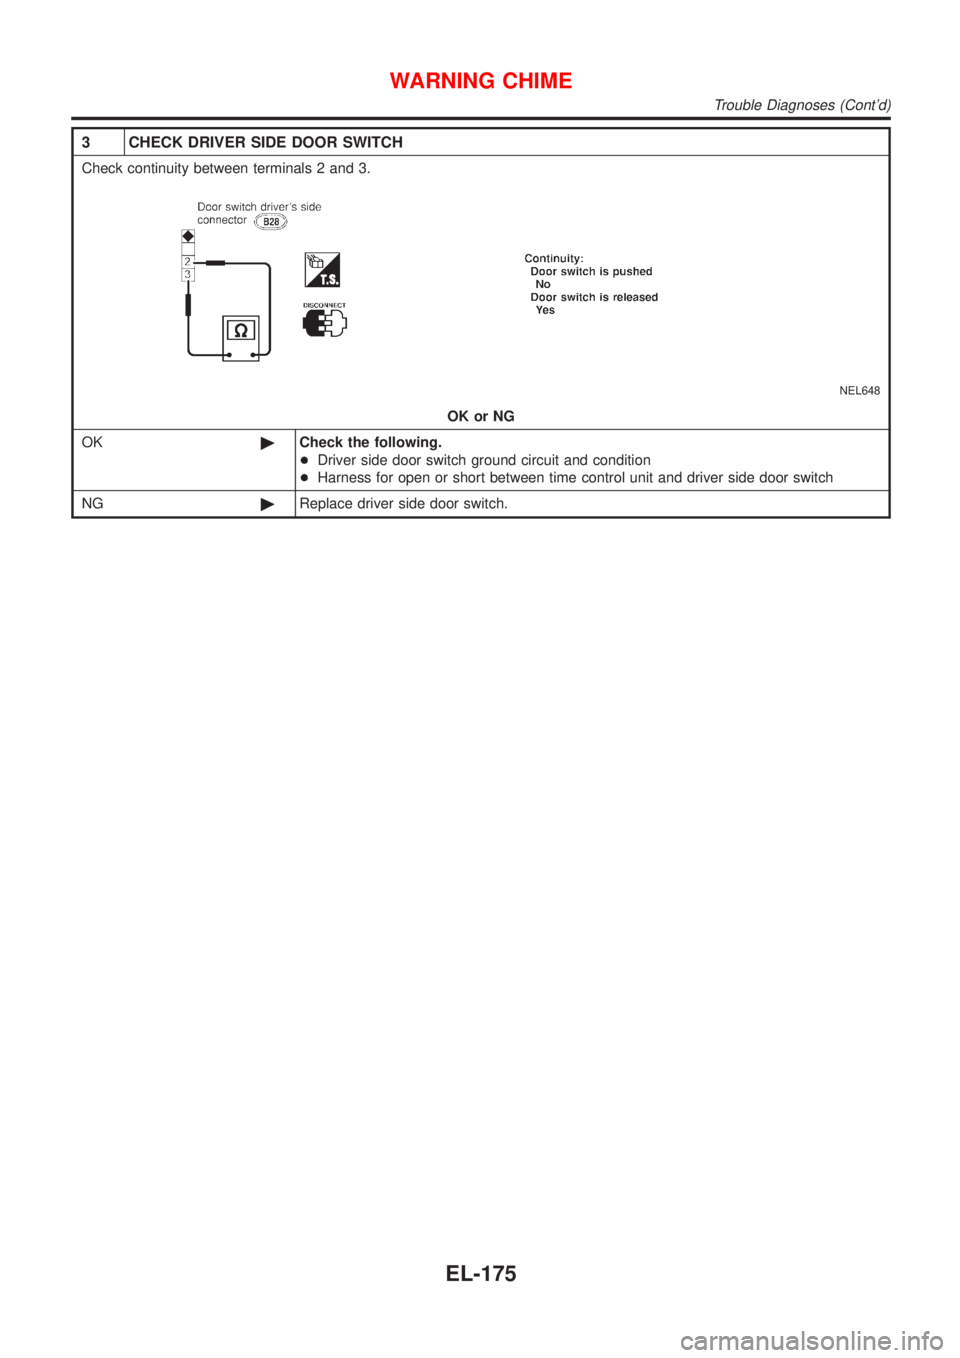
3 CHECK DRIVER SIDE DOOR SWITCH
Check continuity between terminals 2 and 3.
NEL648
OK or NG
OK©Check the following.
+Driver side door switch ground circuit and condition
+Harness for open or short between time control unit and driver side door switch
NG©Replace driver side door switch.
WARNING CHIME
Trouble Diagnoses (Cont'd)
EL-175
Page 1907 of 3051
System DescriptionNLEL0456WIPER OPERATIONNLEL0456S01The wiper switch is controlled by a lever built into the combination switch.
There are three wiper switch positions:
+LO speed
+HI speed
+INT (Intermittent)
Power is supplied at all time
+through 30A fuse
+to front wiper relay-1 terminal 5, and
+through 40A fusible link
+through ignition switch terminal 1 and 3 when the switch is in the ON or START position
+to front wiper relay-1 terminal 1.
Ground is supplied
+to front wiper relay-1 terminal 2
+through body grounds E24 and E73
With power and ground supplied, the front wiper relay-1 is energized.
Low and High Speed Wiper OperationNLEL0456S0101Ground is supplied to wiper and washer switch terminal 17 through body grounds E30 and E73.
When the wiper switch is placed in the LO position, ground is supplied
+through terminal 14 of the front wiper and washer switch
+to front wiper motor terminal 4.
With power and ground supplied, the wiper motor operates at low speed.
When the wiper switch is placed in the HI position, ground is supplied
+through terminal 16 of the front wiper and washer switch
+to wiper motor terminal 5.
With power and ground supplied, the wiper motor operates at high speed.
Auto Stop OperationNLEL0456S0102With wiper switch turned OFF, wiper motor will continue to operate until wiper arms reach windshield base.
When wiper arms are not located at base of windshield with wiper switch OFF, ground is provided
+from terminal 14 of the front wiper and washer switch
+to front wiper motor terminal 4, in order to continue wiper motor operation at low speed.
Ground is also supplied
+through terminal 13 of the front wiper and washer switch
+to front wiper relay-2 terminal 3
+through terminal 4 of the front wiper relay-2.
+to front wiper motor terminal 2
+through terminal 3 of front wiper motor
+through body grounds E24 and E73.
When wiper arms reach base of windshield, front wiper motor terminals 2 and 3 are connected instead of ter-
minals 2 and 1. Wiper motor will then stop wiper arms at the STOP position.
Intermittent OperationNLEL0456S0103The front wiper motor operates the wiper arms one time at low speed at a set interval of approximately 1 to
13 seconds. This feature is controlled by the wiper amplifier (INT SW) combined with front wiper switch.
When the wiper switch is placed in the INT position, ground is supplied to wiper amplifier (WIPER SW INT)
and (ACC).
The desired interval time is input to wiper amplifier (INT VR) from wiper volume switch combined with front
wiper and washer switch.
Then intermittent ground is supplied
+from body grounds E24 and E73
+through terminal 5 of front wiper relay-2,
+through terminal 3 of front wiper relay-2,
FRONT WIPER AND WASHER
System Description
EL-176
Page 1908 of 3051
+through terminal 13 of front wiper switch and,
+through terminal 14 of front wiper switch
+to terminal 4 of front wiper motor.
The desired interval time is input
+to front wiper relay-2 terminal 1
+from terminal 20 of front wiper switch
WASHER OPERATIONNLEL0456S02With the ignition switch in the ON or START position and the lever is pulled to the WASH/F position, power
is supplied
+through 10A fuse [No. 27, located in the fuse block (J/B)]
+to front wiper switch terminal 5.
+through front wiper switch terminal 3
+to front washer motor terminal 1.
When the lever is pulled to the WASH/F position, ground is supplied
+from body grounds E24 and E73
+through terminal 4 of the front wiper switch
+through terminal 18 of the front wiper switch
+to front washer motor terminal 2.
With power and ground supplied, the washer motor operates.
When the lever is pulled to the WASH position for one second or more, the wiper motor operates at low speed
for approximately 3 seconds to clean windshield. This feature is controlled by the wiper amplifier in the same
manner as the intermittent operation.
FRONT WIPER AND WASHER
System Description (Cont'd)
EL-177
Page 1909 of 3051
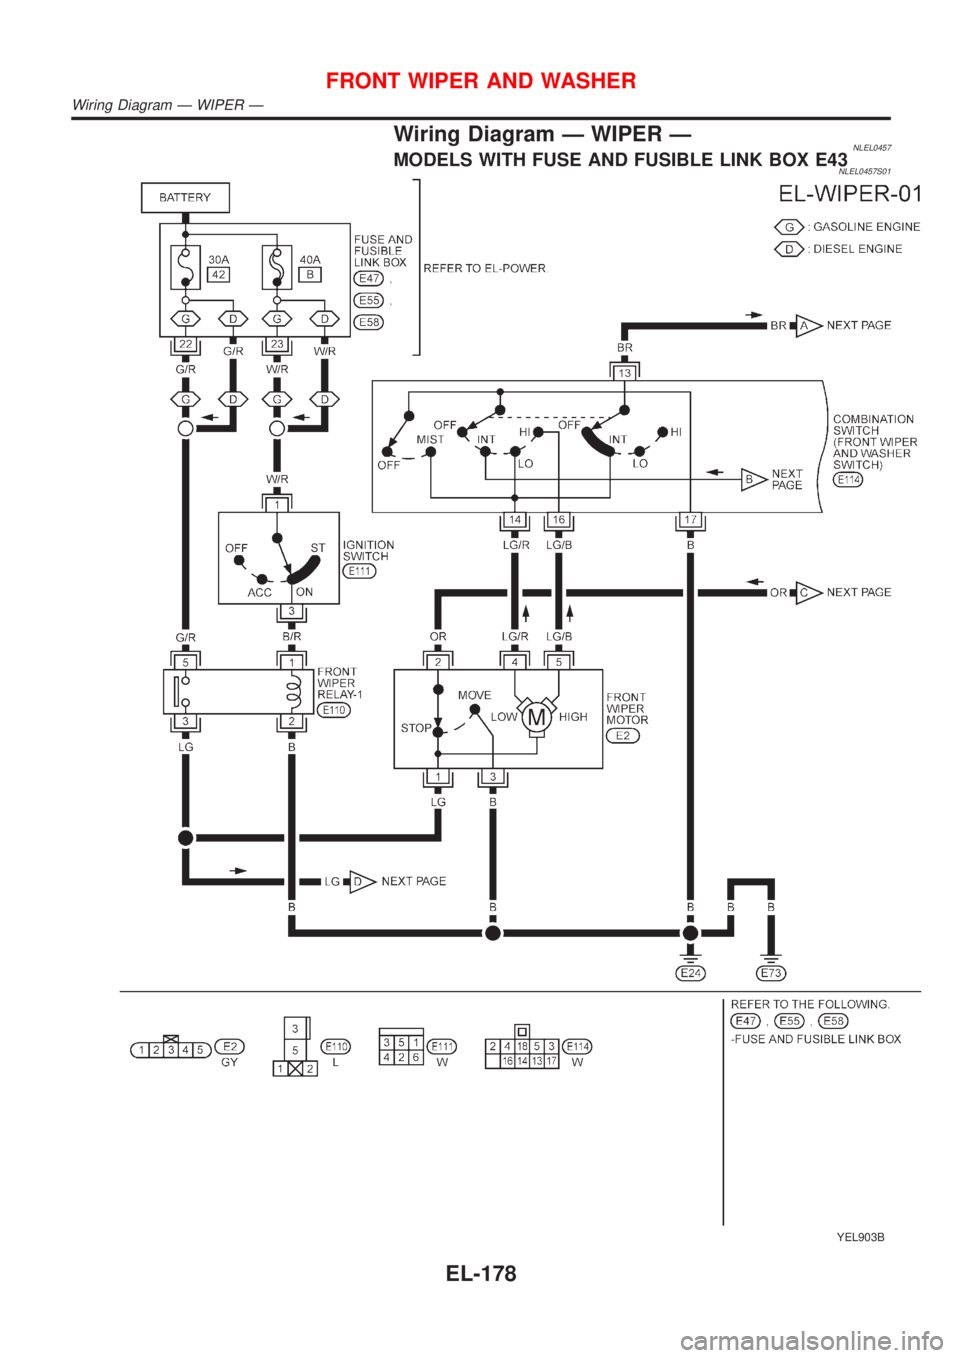
Wiring Diagram Ð WIPER ÐNLEL0457MODELS WITH FUSE AND FUSIBLE LINK BOX E43NLEL0457S01
YEL903B
FRONT WIPER AND WASHER
Wiring Diagram Ð WIPER Ð
EL-178
Page 1910 of 3051
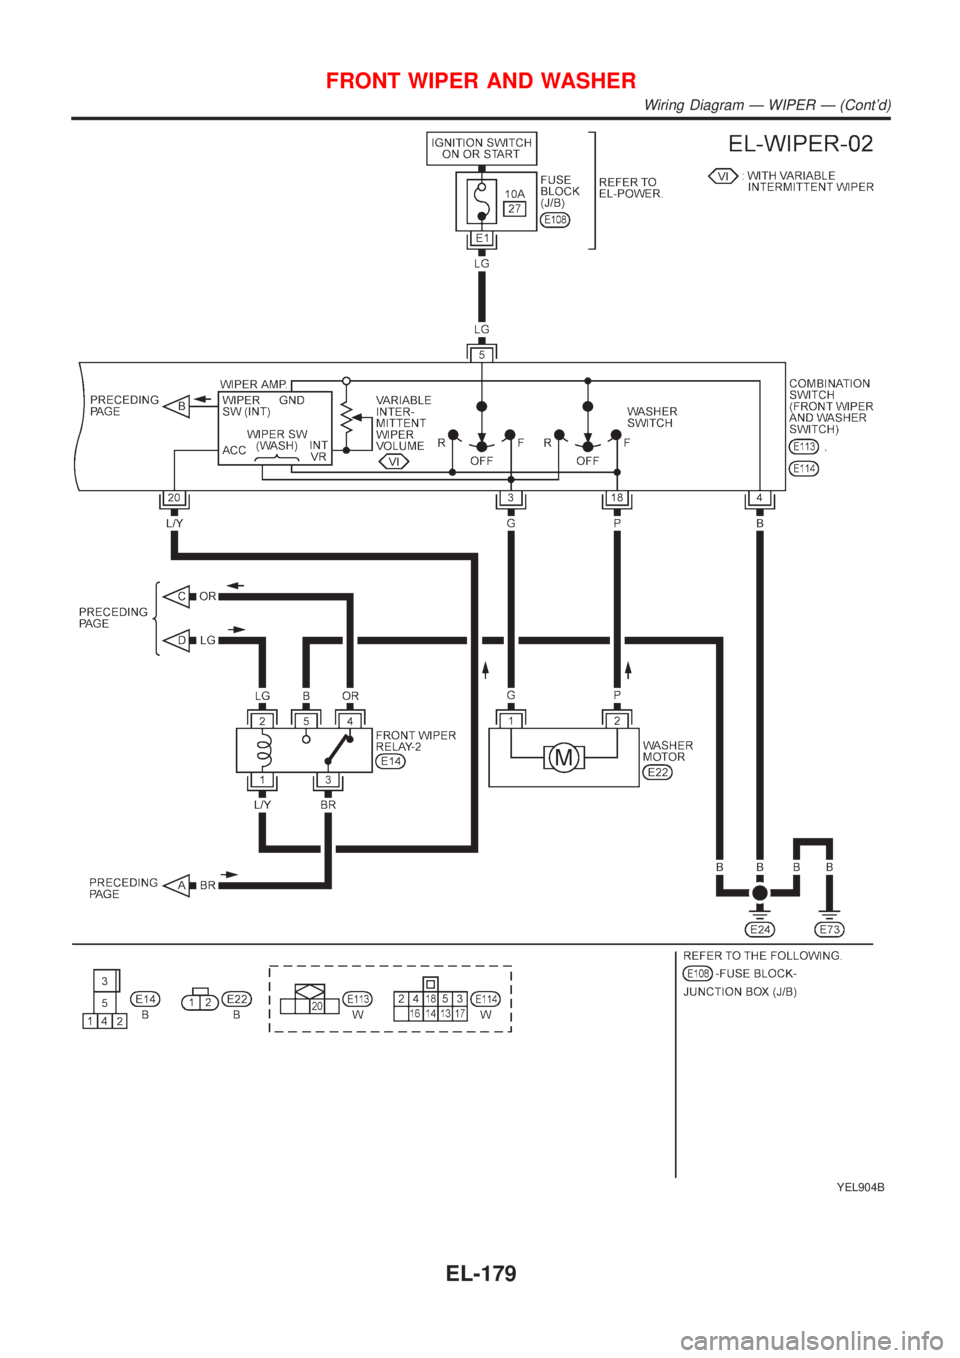
YEL904B
FRONT WIPER AND WASHER
Wiring Diagram Ð WIPER Ð (Cont'd)
EL-179
Trending: Dash, warning light, steering wheel, wiring, jump cable, fuel cap release, radiator cap
