NISSAN NAVARA 2005 Repair Workshop Manual
Manufacturer: NISSAN, Model Year: 2005, Model line: NAVARA, Model: NISSAN NAVARA 2005Pages: 3171, PDF Size: 49.59 MB
Page 2261 of 3171
LU-4
LUBRICATION SYSTEM
LUBRICATION SYSTEM
PFP:15010
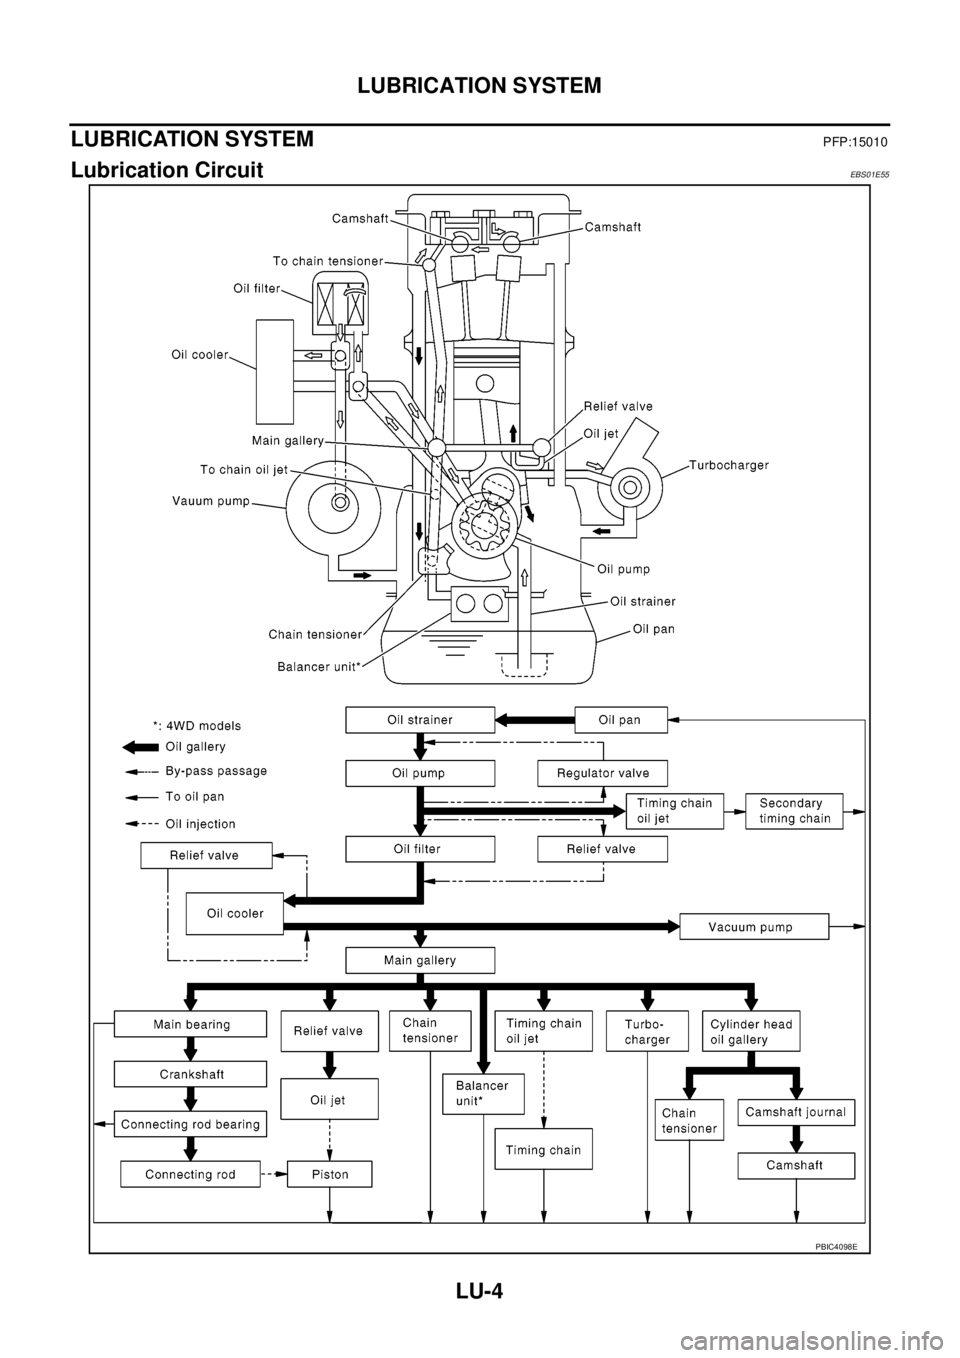
Lubrication CircuitEBS01E55
PBIC4098E
Page 2262 of 3171
ENGINE OIL
LU-5
C
D
E
F
G
H
I
J
K
L
MA
LU
ENGINE OILPFP:KLA92
InspectionEBS01E56
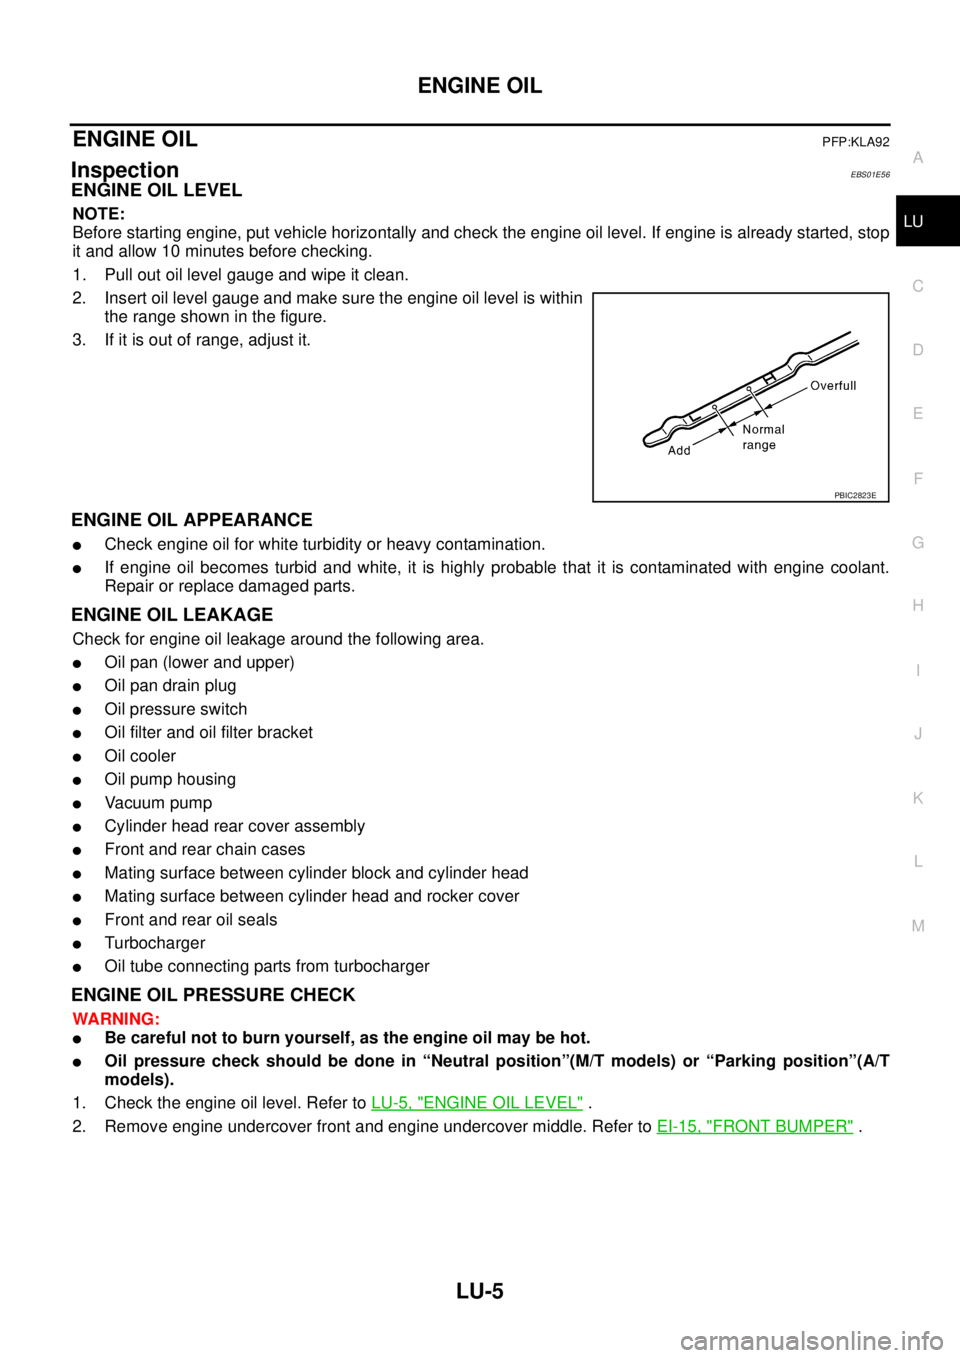
ENGINE OIL LEVEL
NOTE:
Before starting engine, put vehicle horizontally and check the engine oil level. If engine is already started, stop
it and allow 10 minutes before checking.
1. Pull out oil level gauge and wipe it clean.
2. Insert oil level gauge and make sure the engine oil level is within
the range shown in the figure.
3. If it is out of range, adjust it.
ENGINE OIL APPEARANCE
lCheck engine oil for white turbidity or heavy contamination.
lIf engine oil becomes turbid and white, it is highly probable that it is contaminated with engine coolant.
Repair or replace damaged parts.
ENGINE OIL LEAKAGE
Check for engine oil leakage around the following area.
lOil pan (lower and upper)
lOil pan drain plug
lOil pressure switch
lOil filter and oil filter bracket
lOil cooler
lOil pump housing
lVa c u u m p u m p
lCylinder head rear cover assembly
lFront and rear chain cases
lMating surface between cylinder block and cylinder head
lMating surface between cylinder head and rocker cover
lFront and rear oil seals
lTurbocharger
lOil tube connecting parts from turbocharger
ENGINE OIL PRESSURE CHECK
WARNING:
lBe careful not to burn yourself, as the engine oil may be hot.
lOil pressure check should be done in “Neutral position”(M/T models) or “Parking position”(A/T
models).
1. Check the engine oil level. Refer toLU-5, "
ENGINE OIL LEVEL".
2. Remove engine undercover front and engine undercover middle. Refer toEI-15, "
FRONT BUMPER".
PBIC2823E
Page 2263 of 3171
LU-6
ENGINE OIL
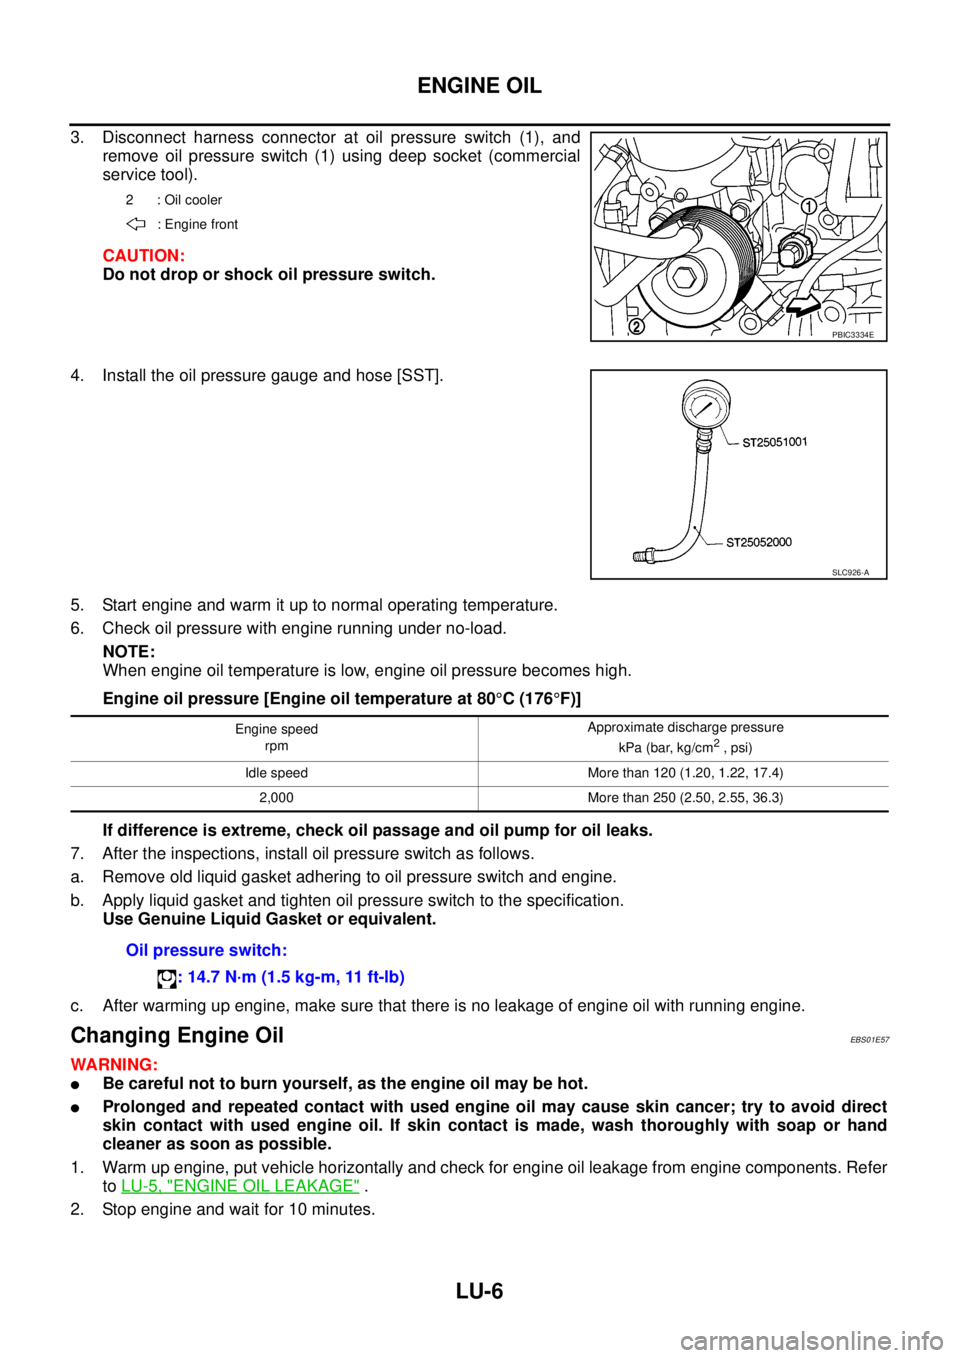
3. Disconnect harness connector at oil pressure switch (1), and
remove oil pressure switch (1) using deep socket (commercial
service tool).
CAUTION:
Do not drop or shock oil pressure switch.
4. Install the oil pressure gauge and hose [SST].
5. Start engine and warm it up to normal operating temperature.
6. Check oil pressure with engine running under no-load.
NOTE:
When engine oil temperature is low, engine oil pressure becomes high.
Engine oil pressure [Engine oil temperature at 80°C(176°F)]
If difference is extreme, check oil passage and oil pump for oil leaks.
7. After the inspections, install oil pressure switch as follows.
a. Remove old liquid gasket adhering to oil pressure switch and engine.
b. Apply liquid gasket and tighten oil pressure switch to the specification.
Use Genuine Liquid Gasket or equivalent.
c. After warming up engine, make sure that there is no leakage of engine oil with running engine.
Changing Engine OilEBS01E57
WARNING:
lBe careful not to burn yourself, as the engine oil may be hot.
lProlonged and repeated contact with used engine oil may cause skin cancer; try to avoid direct
skin contact with used engine oil. If skin contact is made, wash thoroughly with soap or hand
cleaner as soon as possible.
1. Warm up engine, put vehicle horizontally and check for engine oil leakage from engine components. Refer
toLU-5, "
ENGINE OIL LEAKAGE".
2. Stop engine and wait for 10 minutes.
2 : Oil cooler
: Engine front
PBIC3334E
SLC926-A
Engine speed
rpmApproximate discharge pressure
kPa (bar, kg/cm2, psi)
Idle speed More than 120 (1.20, 1.22, 17.4)
2,000 More than 250 (2.50, 2.55, 36.3)
Oil pressure switch:
: 14.7 N·m (1.5 kg-m, 11 ft-lb)
Page 2264 of 3171
ENGINE OIL
LU-7
C
D
E
F
G
H
I
J
K
L
MA
LU
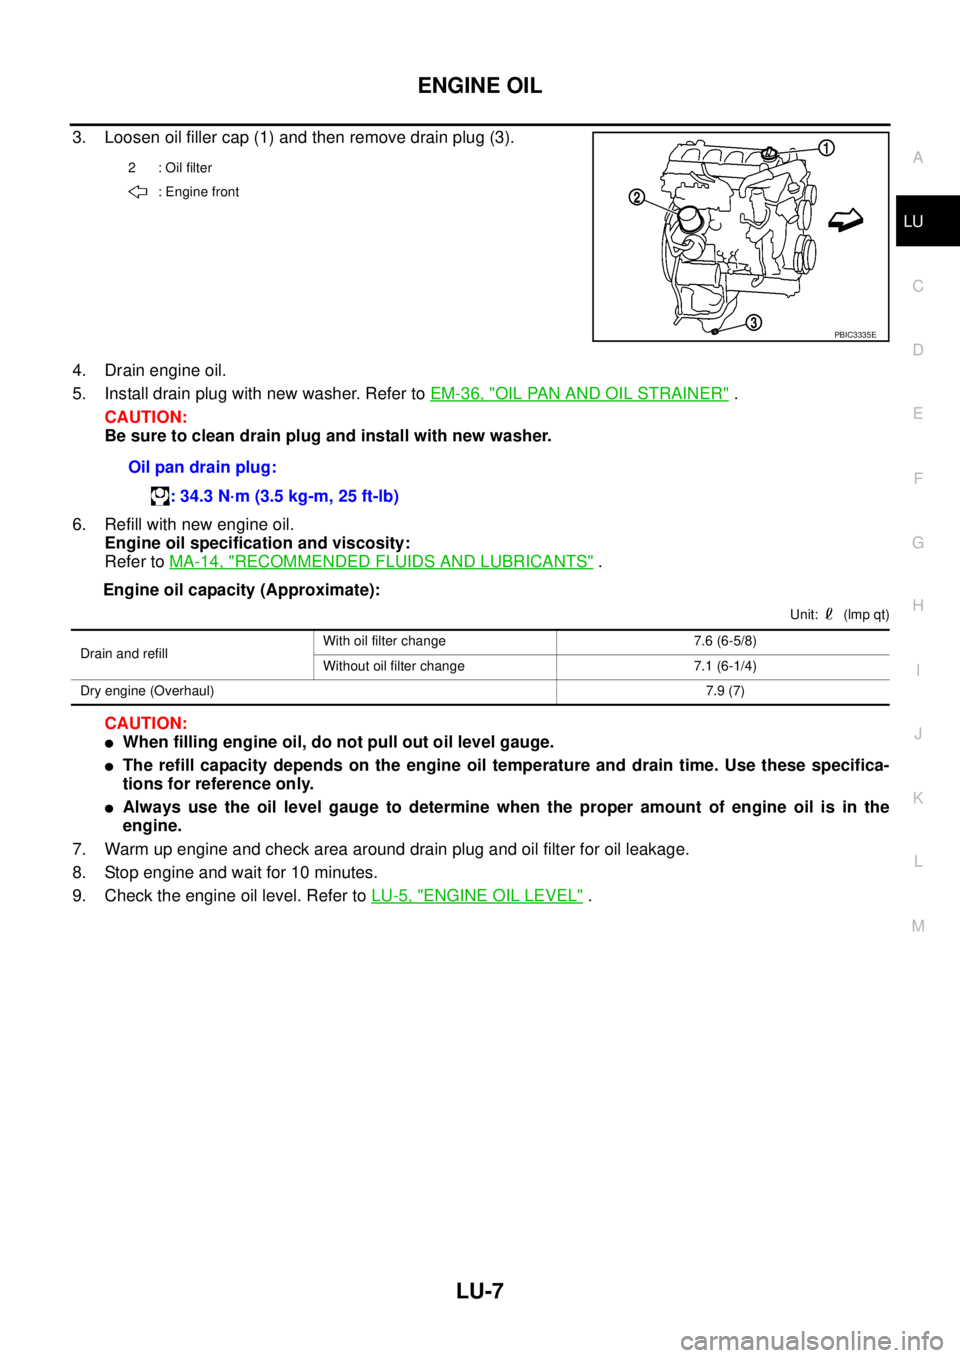
3. Loosen oil filler cap (1) and then remove drain plug (3).
4. Drain engine oil.
5. Install drain plug with new washer. Refer toEM-36, "
OIL PAN AND OIL STRAINER".
CAUTION:
Be sure to clean drain plug and install with new washer.
6. Refill with new engine oil.
Engine oil specification and viscosity:
Refer toMA-14, "
RECOMMENDED FLUIDS AND LUBRICANTS".
Engine oil capacity (Approximate):
Unit: (lmp qt)
CAUTION:
lWhen filling engine oil, do not pull out oil level gauge.
lThe refill capacity depends on the engine oil temperature and drain time. Use these specifica-
tions for reference only.
lAlways use the oil level gauge to determine when the proper amount of engine oil is in the
engine.
7. Warm up engine and check area around drain plug and oil filter for oil leakage.
8. Stop engine and wait for 10 minutes.
9. Check the engine oil level. Refer toLU-5, "
ENGINE OIL LEVEL".
2 : Oil filter
: Engine front
PBIC3335E
Oil pan drain plug:
: 34.3 N·m (3.5 kg-m, 25 ft-lb)
Drain and refillWith oil filter change 7.6 (6-5/8)
Without oil filter change 7.1 (6-1/4)
Dry engine (Overhaul)7.9 (7)
Page 2265 of 3171
LU-8
OIL FILTER
OIL FILTER
PFP:15208
Removal and InstallationEBS01E58
REMOVAL
1. Remove engine undercover middle.
2. Place a pan to catch the engine oil under the lower part of drain hose outlet before removing oil filter.
3. Using the oil filter wrench, remove oil filter.
CAUTION:
lBe careful not to get burned when engine and engine oil are hot.
lWhen removing, prepare a shop cloth to absorb any engine oil leakage or spillage.
lDo not allow engine oil to adhere to drive belts.
lCompletely wipe off any engine oil that adhere to engine and vehicle.
lOil filter is provided with a relief valve. Use Genuine Nissan Oil Filter or equivalent.
INSTALLATION
1. Remove foreign materials adhering to the oil filter installation surface.
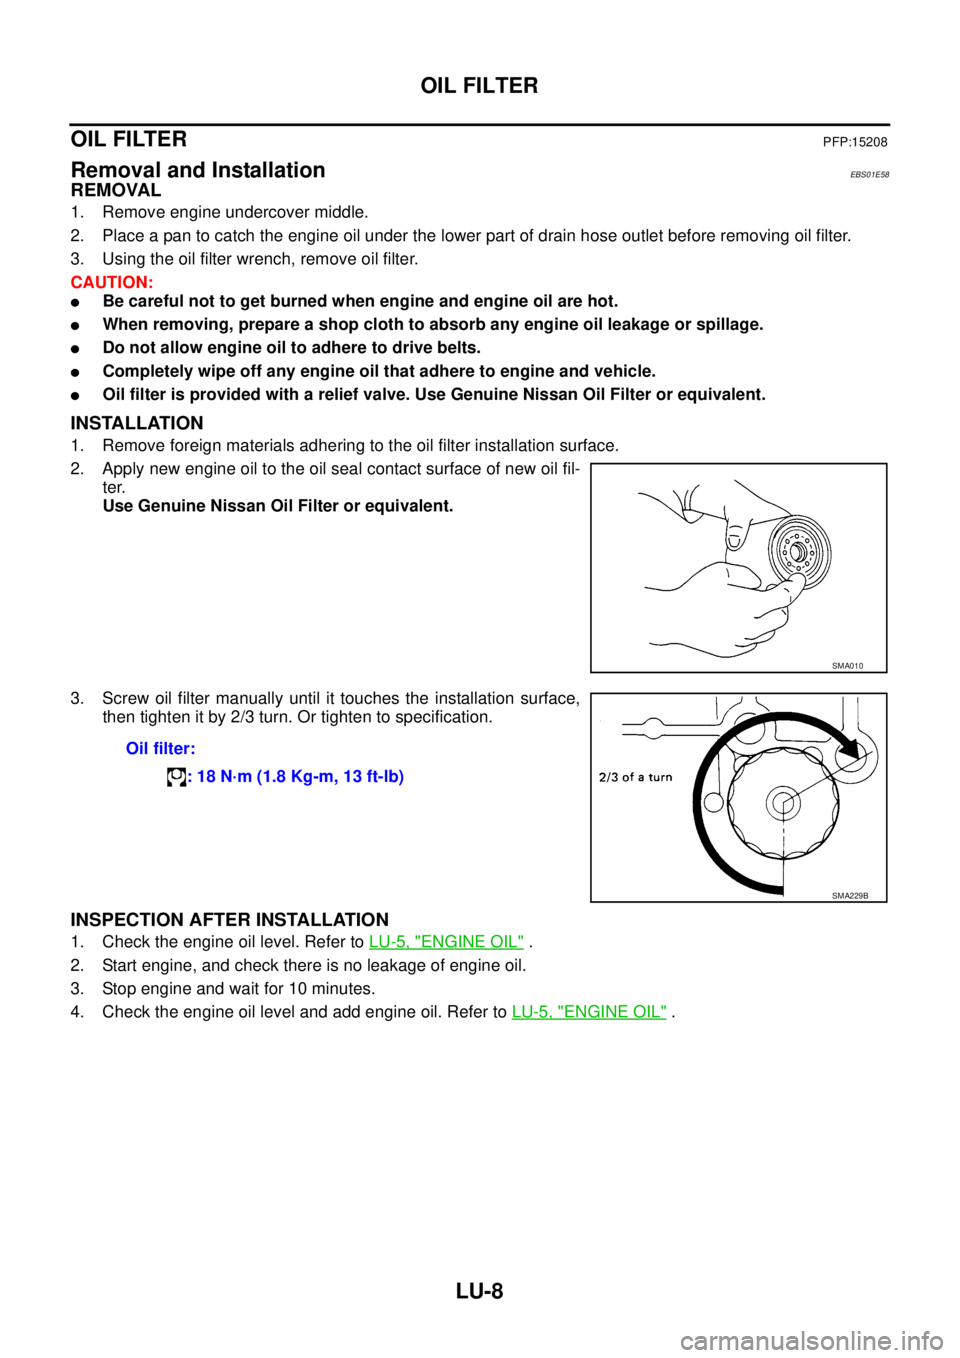
2. Apply new engine oil to the oil seal contact surface of new oil fil-
ter.
Use Genuine Nissan Oil Filter or equivalent.
3. Screw oil filter manually until it touches the installation surface,
then tighten it by 2/3 turn. Or tighten to specification.
INSPECTION AFTER INSTALLATION
1. Check the engine oil level. Refer toLU-5, "ENGINE OIL".
2. Start engine, and check there is no leakage of engine oil.
3. Stop engine and wait for 10 minutes.
4. Check the engine oil level and add engine oil. Refer toLU-5, "
ENGINE OIL".
SMA010
Oil filter:
: 18 N·m (1.8 Kg-m, 13 ft-lb)
SMA229B
Page 2266 of 3171
OIL FILTER BRACKET
LU-9
C
D
E
F
G
H
I
J
K
L
MA
LU
OIL FILTER BRACKETPFP:15238
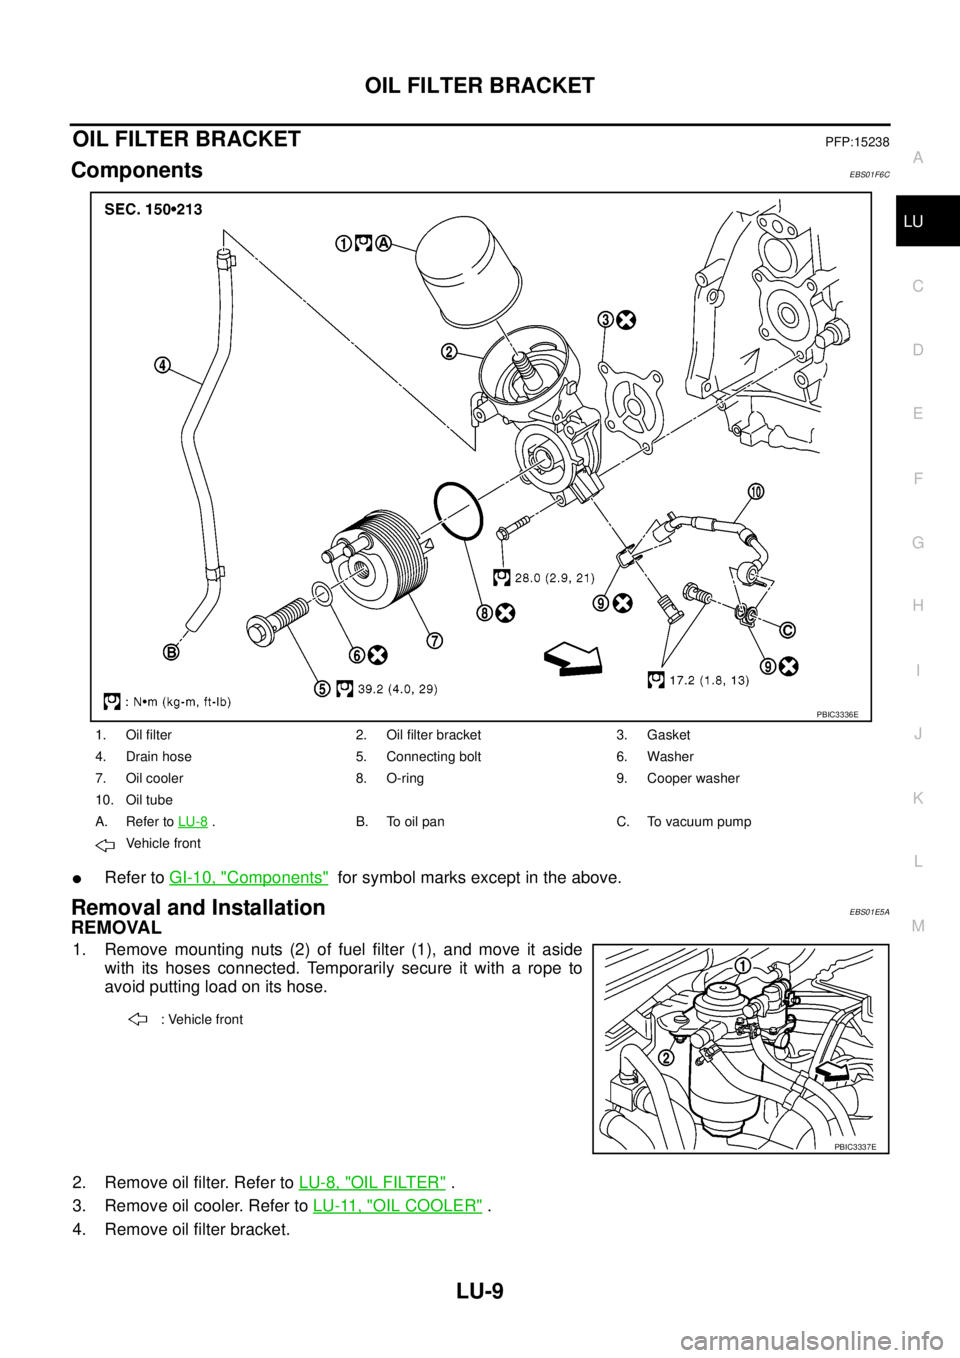
ComponentsEBS01F6C
lRefer toGI-10, "Components"for symbol marks except in the above.
Removal and InstallationEBS01E5A
REMOVAL
1. Remove mounting nuts (2) of fuel filter (1), and move it aside
with its hoses connected. Temporarily secure it with a rope to
avoid putting load on its hose.
2. Remove oil filter. Refer toLU-8, "
OIL FILTER".
3. Remove oil cooler. Refer toLU-11, "
OIL COOLER".
4. Remove oil filter bracket.
1. Oil filter 2. Oil filter bracket 3. Gasket
4. Drain hose 5. Connecting bolt 6. Washer
7. Oil cooler 8. O-ring 9. Cooper washer
10. Oil tube
A. Refer toLU-8
. B. To oil pan C. To vacuum pump
Vehicle front
PBIC3336E
: Vehicle front
PBIC3337E
Page 2267 of 3171
LU-10
OIL FILTER BRACKET
INSTALLATION
Install all removed parts in the reverse order of removal.
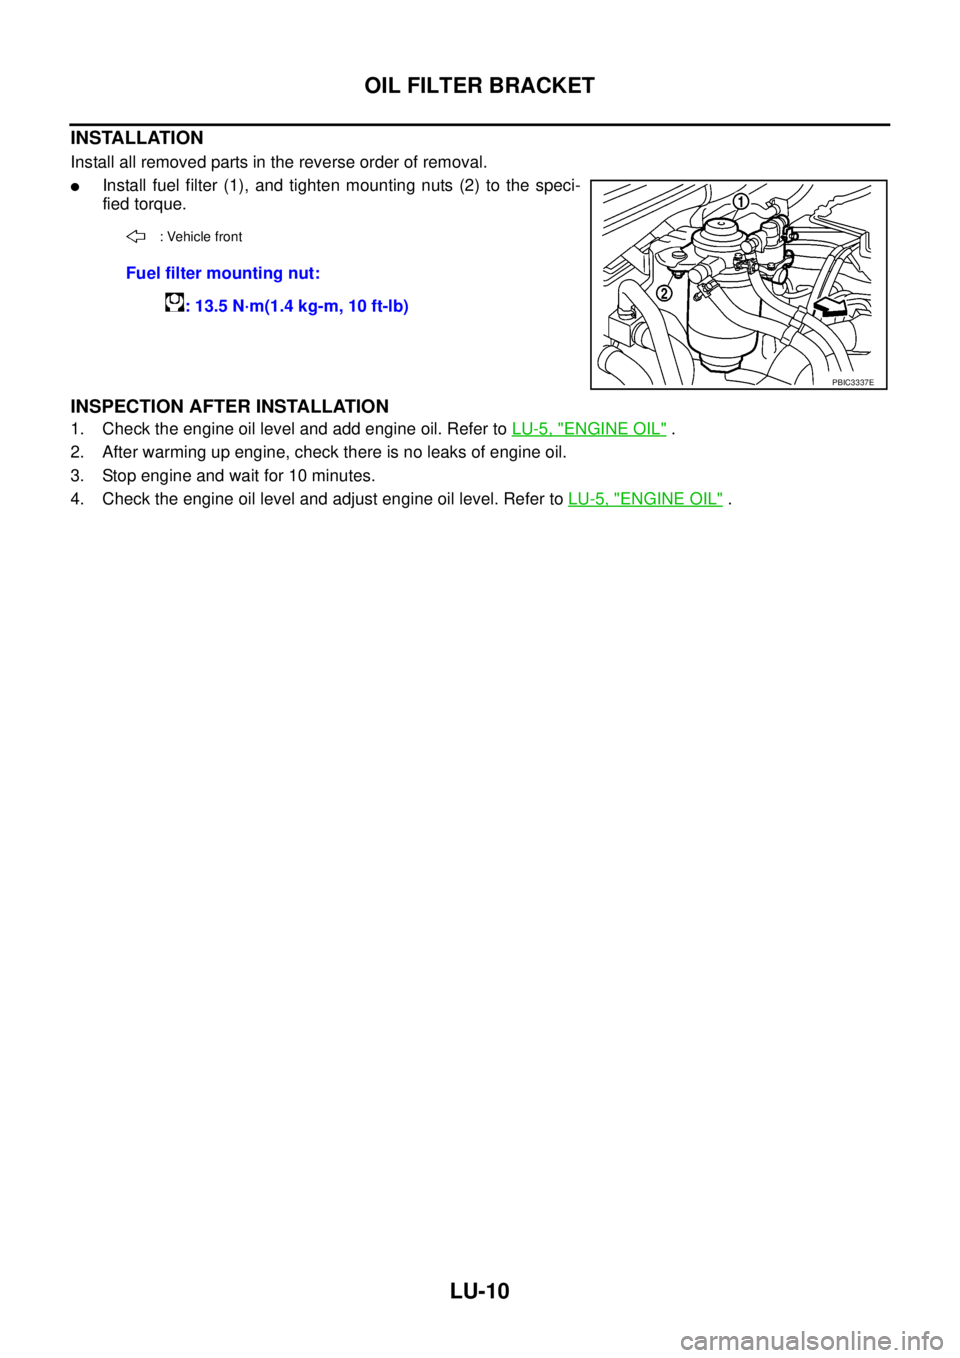
lInstall fuel filter (1), and tighten mounting nuts (2) to the speci-
fied torque.
INSPECTION AFTER INSTALLATION
1. Check the engine oil level and add engine oil. Refer toLU-5, "ENGINE OIL".
2. After warming up engine, check there is no leaks of engine oil.
3. Stop engine and wait for 10 minutes.
4. Check the engine oil level and adjust engine oil level. Refer toLU-5, "
ENGINE OIL".
: Vehicle front
Fuel filter mounting nut:
: 13.5 N·m(1.4 kg-m, 10 ft-lb)
PBIC3337E
Page 2268 of 3171
OIL COOLER
LU-11
C
D
E
F
G
H
I
J
K
L
MA
LU
OIL COOLERPFP:21305
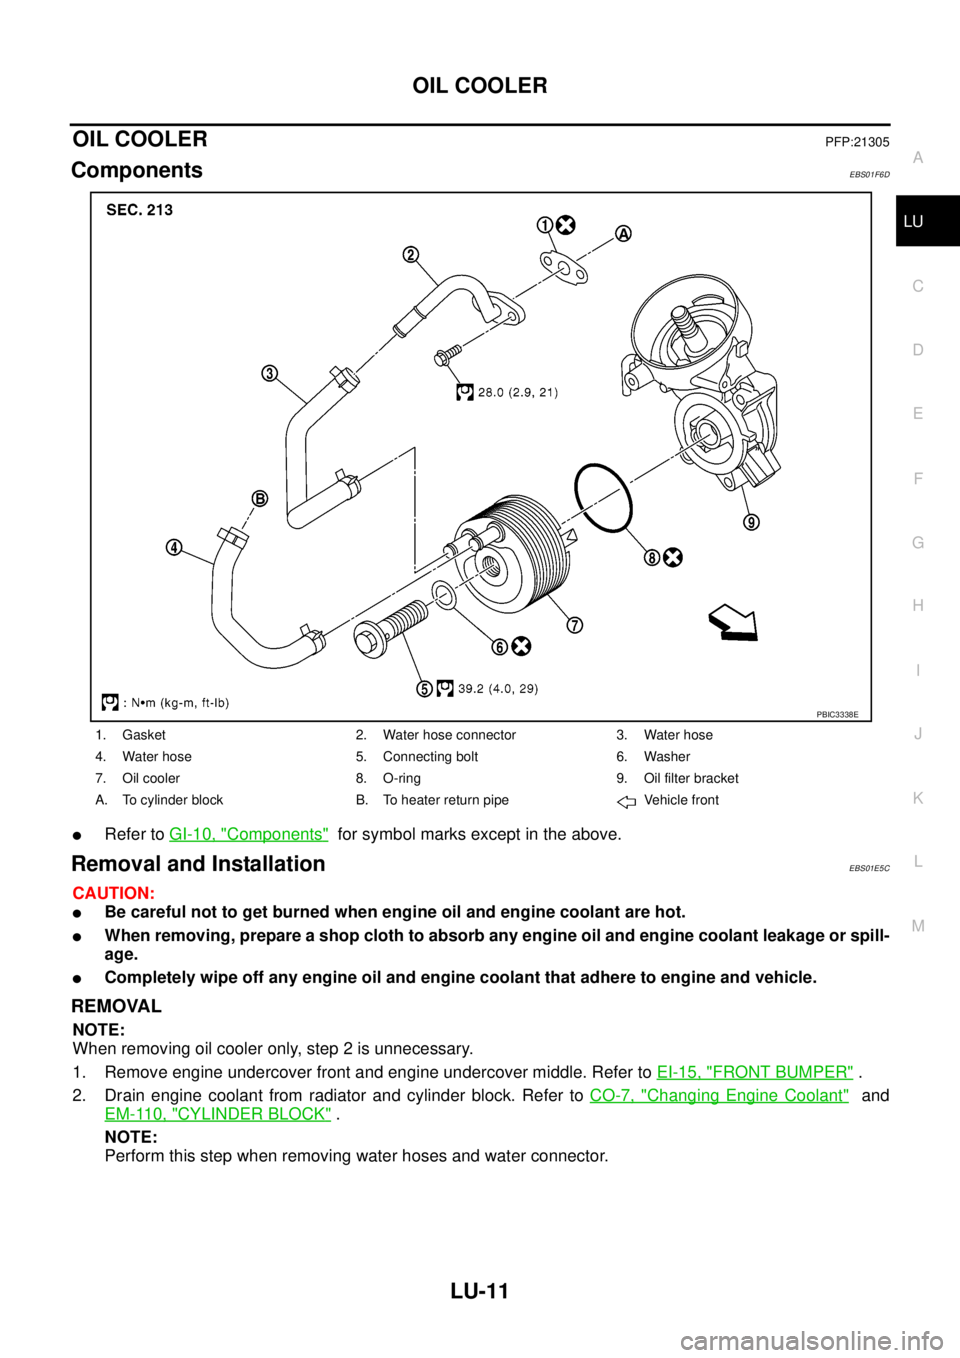
ComponentsEBS01F6D
lRefer toGI-10, "Components"for symbol marks except in the above.
Removal and InstallationEBS01E5C
CAUTION:
lBe careful not to get burned when engine oil and engine coolant are hot.
lWhen removing, prepare a shop cloth to absorb any engine oil and engine coolant leakage or spill-
age.
lCompletely wipe off any engine oil and engine coolant that adhere to engine and vehicle.
REMOVAL
NOTE:
When removing oil cooler only, step 2 is unnecessary.
1. Remove engine undercover front and engine undercover middle. Refer toEI-15, "
FRONT BUMPER".
2. Drain engine coolant from radiator and cylinder block. Refer toCO-7, "
Changing Engine Coolant"and
EM-110, "
CYLINDER BLOCK".
NOTE:
Perform this step when removing water hoses and water connector.
1. Gasket 2. Water hose connector 3. Water hose
4. Water hose 5. Connecting bolt 6. Washer
7. Oil cooler 8. O-ring 9. Oil filter bracket
A. To cylinder block B. To heater return pipe Vehicle front
PBIC3338E
Page 2269 of 3171
LU-12
OIL COOLER
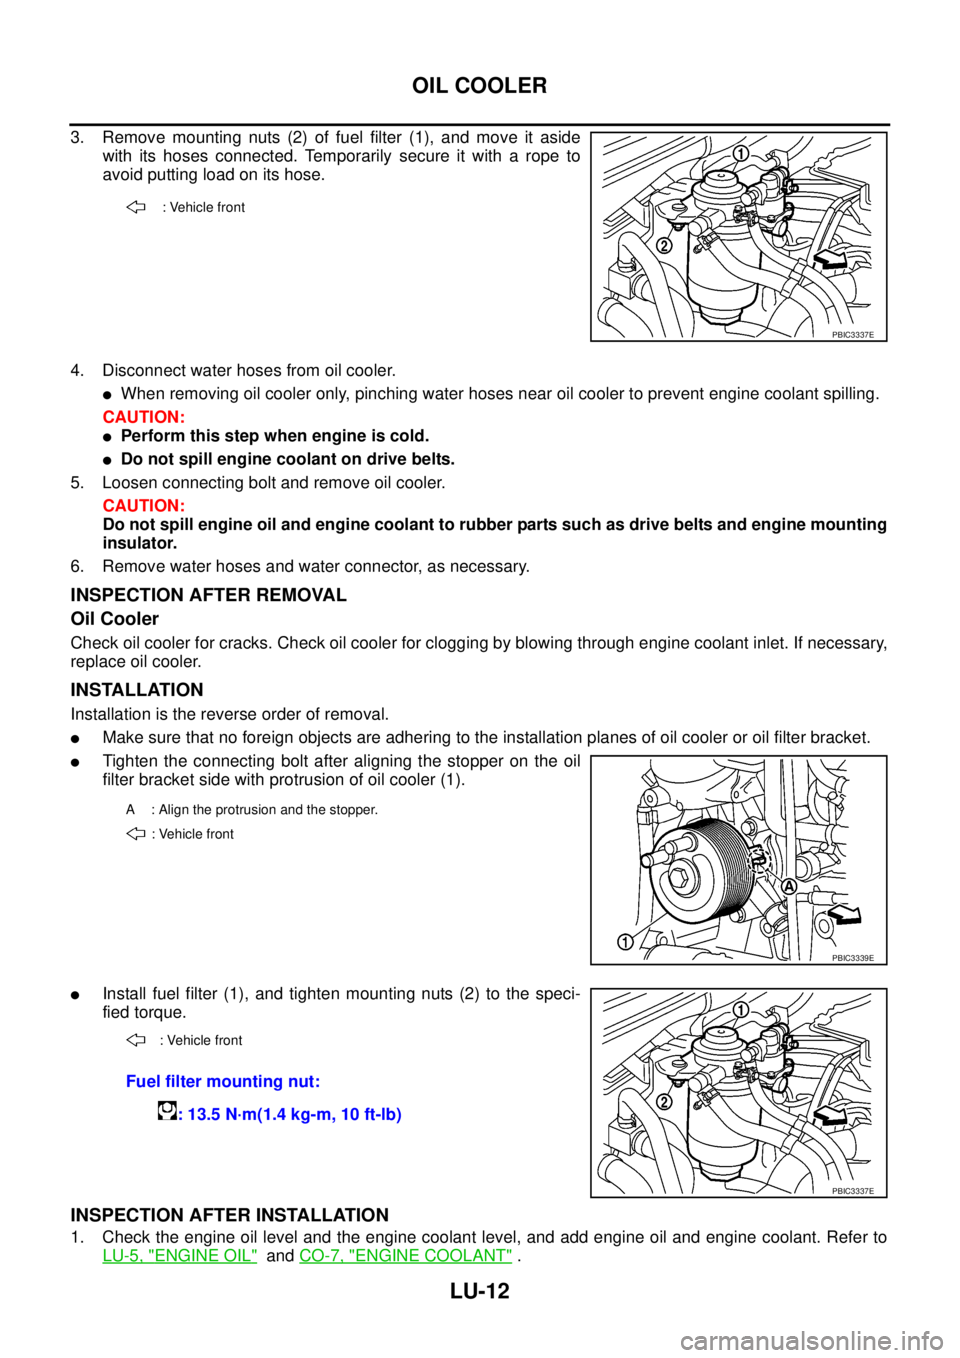
3. Remove mounting nuts (2) of fuel filter (1), and move it aside
with its hoses connected. Temporarily secure it with a rope to
avoid putting load on its hose.
4. Disconnect water hoses from oil cooler.
lWhen removing oil cooler only, pinching water hoses near oil cooler to prevent engine coolant spilling.
CAUTION:
lPerform this step when engine is cold.
lDo not spill engine coolant on drive belts.
5. Loosen connecting bolt and remove oil cooler.
CAUTION:
Do not spill engine oil and engine coolant to rubber parts such as drive belts and engine mounting
insulator.
6. Remove water hoses and water connector, as necessary.
INSPECTION AFTER REMOVAL
Oil Cooler
Check oil cooler for cracks. Check oil cooler for clogging by blowing through engine coolant inlet. If necessary,
replace oil cooler.
INSTALLATION
Installation is the reverse order of removal.
lMake sure that no foreign objects are adhering to the installation planes of oil cooler or oil filter bracket.
lTighten the connecting bolt after aligning the stopper on the oil
filter bracket side with protrusion of oil cooler (1).
lInstall fuel filter (1), and tighten mounting nuts (2) to the speci-
fied torque.
INSPECTION AFTER INSTALLATION
1. Check the engine oil level and the engine coolant level, and add engine oil and engine coolant. Refer to
LU-5, "
ENGINE OIL"andCO-7, "ENGINE COOLANT".
: Vehicle front
PBIC3337E
A : Align the protrusion and the stopper.
: Vehicle front
PBIC3339E
: Vehicle front
Fuel filter mounting nut:
: 13.5 N·m(1.4 kg-m, 10 ft-lb)
PBIC3337E
Page 2270 of 3171
OIL COOLER
LU-13
C
D
E
F
G
H
I
J
K
L
MA
LU
2. Start engine, and make sure that there is no leaks of engine oil or engine coolant.
3. Stop engine and wait for 10 minutes.
4. Check the engine oil level and the engine coolant level again. Refer toLU-5, "
ENGINE OIL"andCO-7,
"ENGINE COOLANT".