NISSAN PATROL 2000 Electronic Repair Manual
PATROL 2000
NISSAN
NISSAN
https://www.carmanualsonline.info/img/5/57367/w960_57367-0.png
NISSAN PATROL 2000 Electronic Repair Manual
Trending: ESP, Defogger, height adjustment, fuel type, wiring diagram, AUX, four wheel drive
Page 161 of 1033
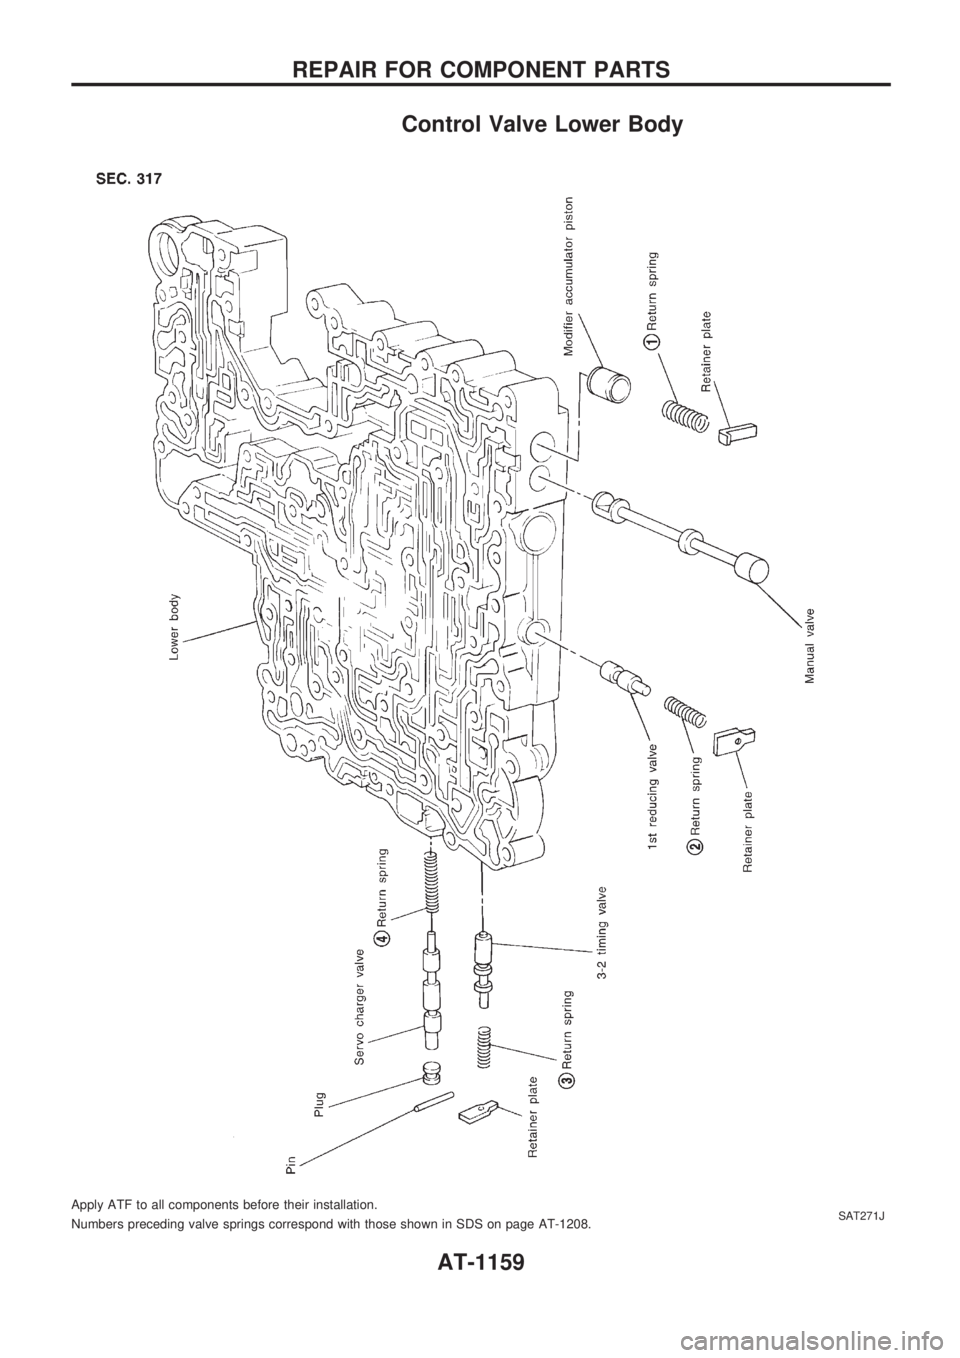
Control Valve Lower Body
Apply ATF to all components before their installation.
Numbers preceding valve springs correspond with those shown in SDS on page AT-1208.SAT271J
REPAIR FOR COMPONENT PARTS
AT-1159
Page 162 of 1033
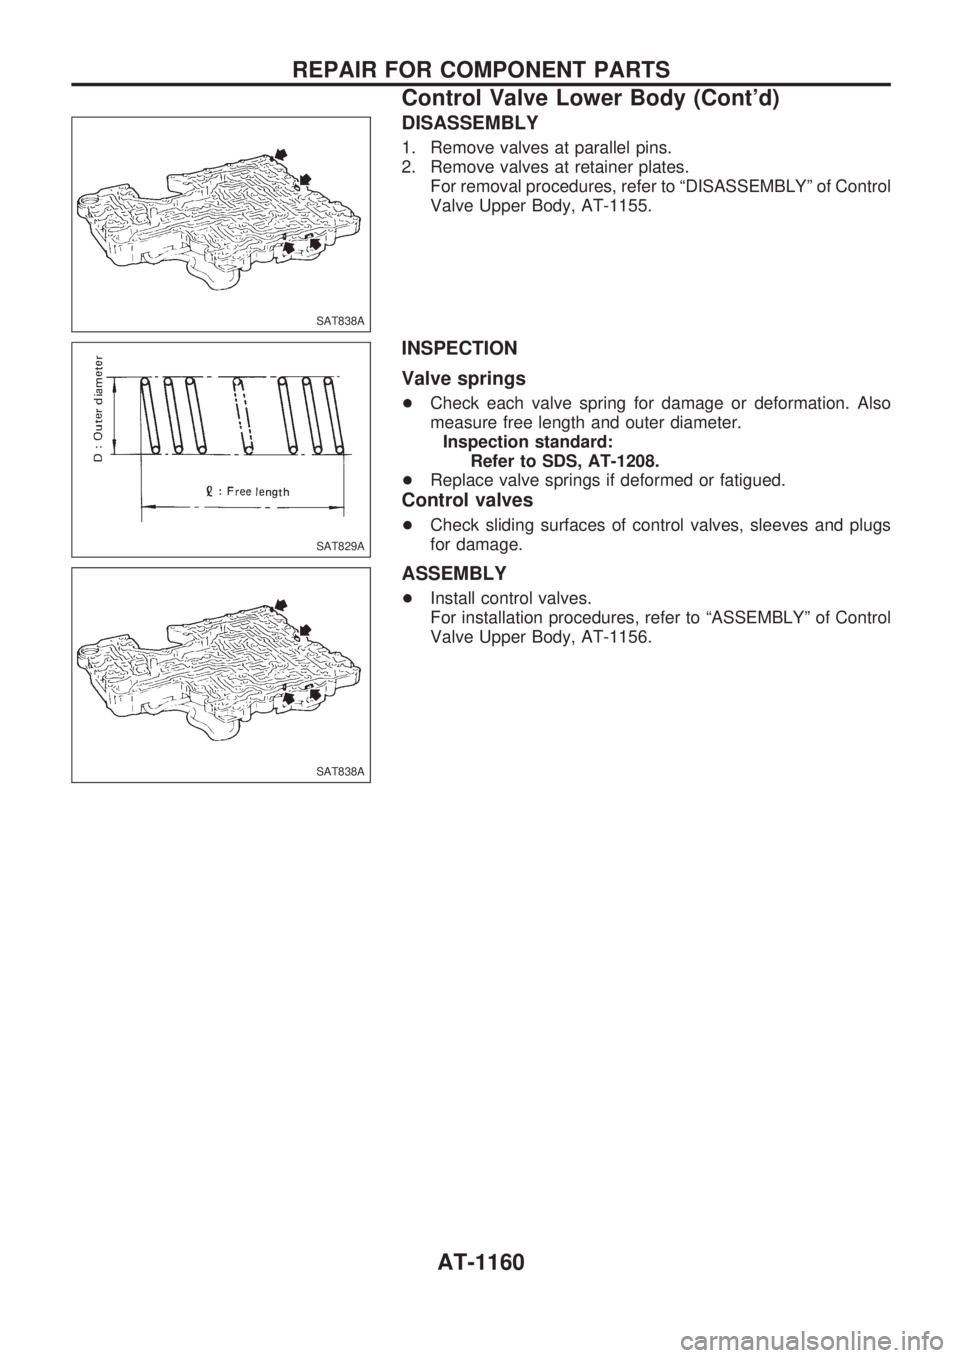
DISASSEMBLY
1. Remove valves at parallel pins.
2. Remove valves at retainer plates.
For removal procedures, refer to ªDISASSEMBLYº of Control
Valve Upper Body, AT-1155.
INSPECTION
Valve springs
+Check each valve spring for damage or deformation. Also
measure free length and outer diameter.
Inspection standard:
Refer to SDS, AT-1208.
+Replace valve springs if deformed or fatigued.
Control valves
+Check sliding surfaces of control valves, sleeves and plugs
for damage.
ASSEMBLY
+Install control valves.
For installation procedures, refer to ªASSEMBLYº of Control
Valve Upper Body, AT-1156.
SAT838A
SAT829A
SAT838A
REPAIR FOR COMPONENT PARTS
Control Valve Lower Body (Cont'd)
AT-1160
Page 163 of 1033
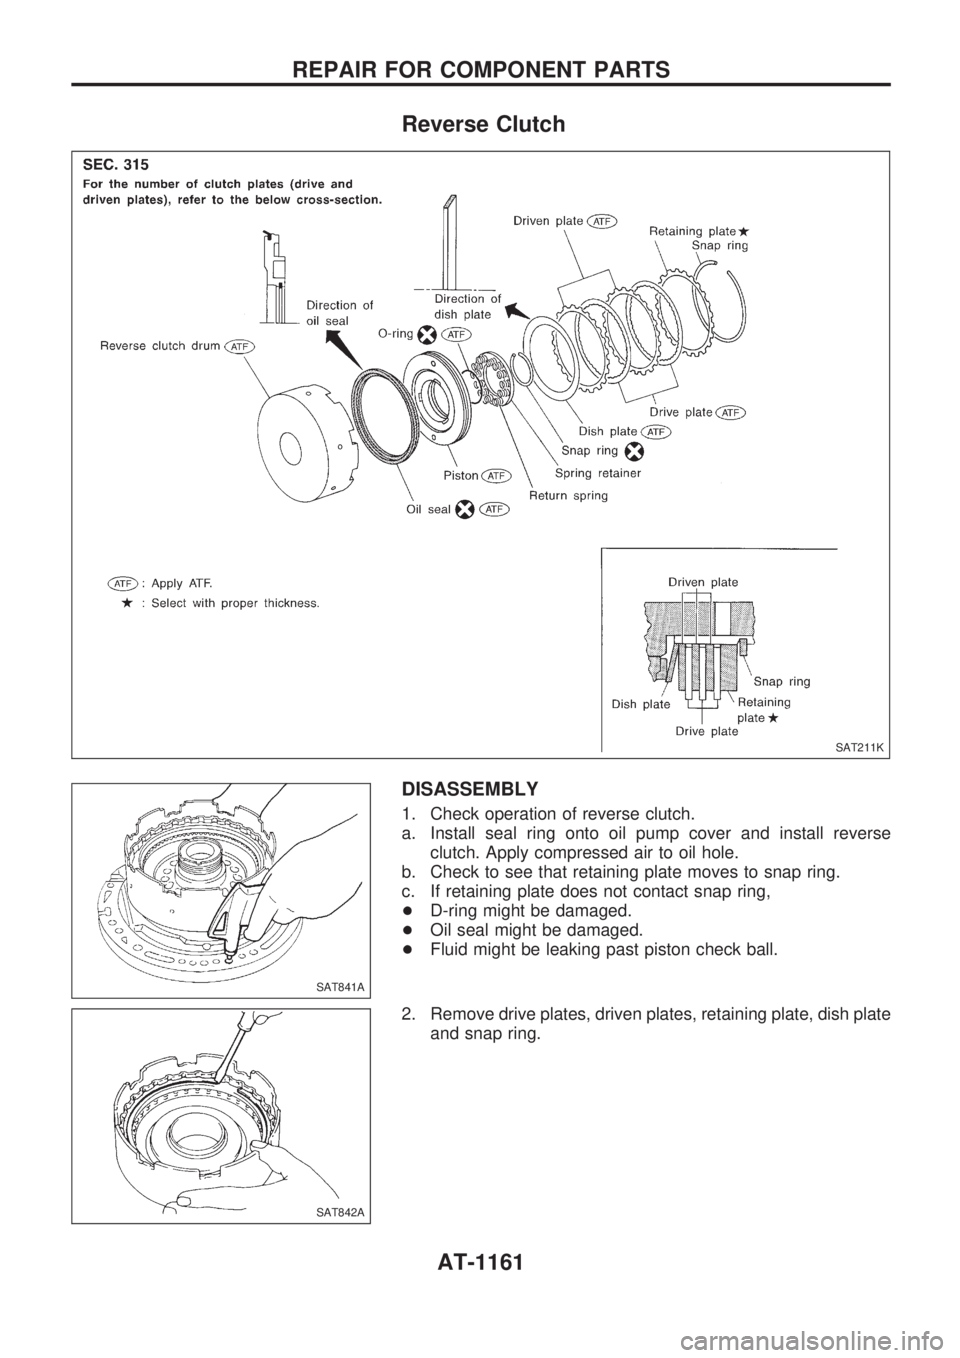
Reverse Clutch
DISASSEMBLY
1. Check operation of reverse clutch.
a. Install seal ring onto oil pump cover and install reverse
clutch. Apply compressed air to oil hole.
b. Check to see that retaining plate moves to snap ring.
c. If retaining plate does not contact snap ring,
+D-ring might be damaged.
+Oil seal might be damaged.
+Fluid might be leaking past piston check ball.
2. Remove drive plates, driven plates, retaining plate, dish plate
and snap ring.
SAT211K
SAT841A
SAT842A
REPAIR FOR COMPONENT PARTS
AT-1161
Page 164 of 1033
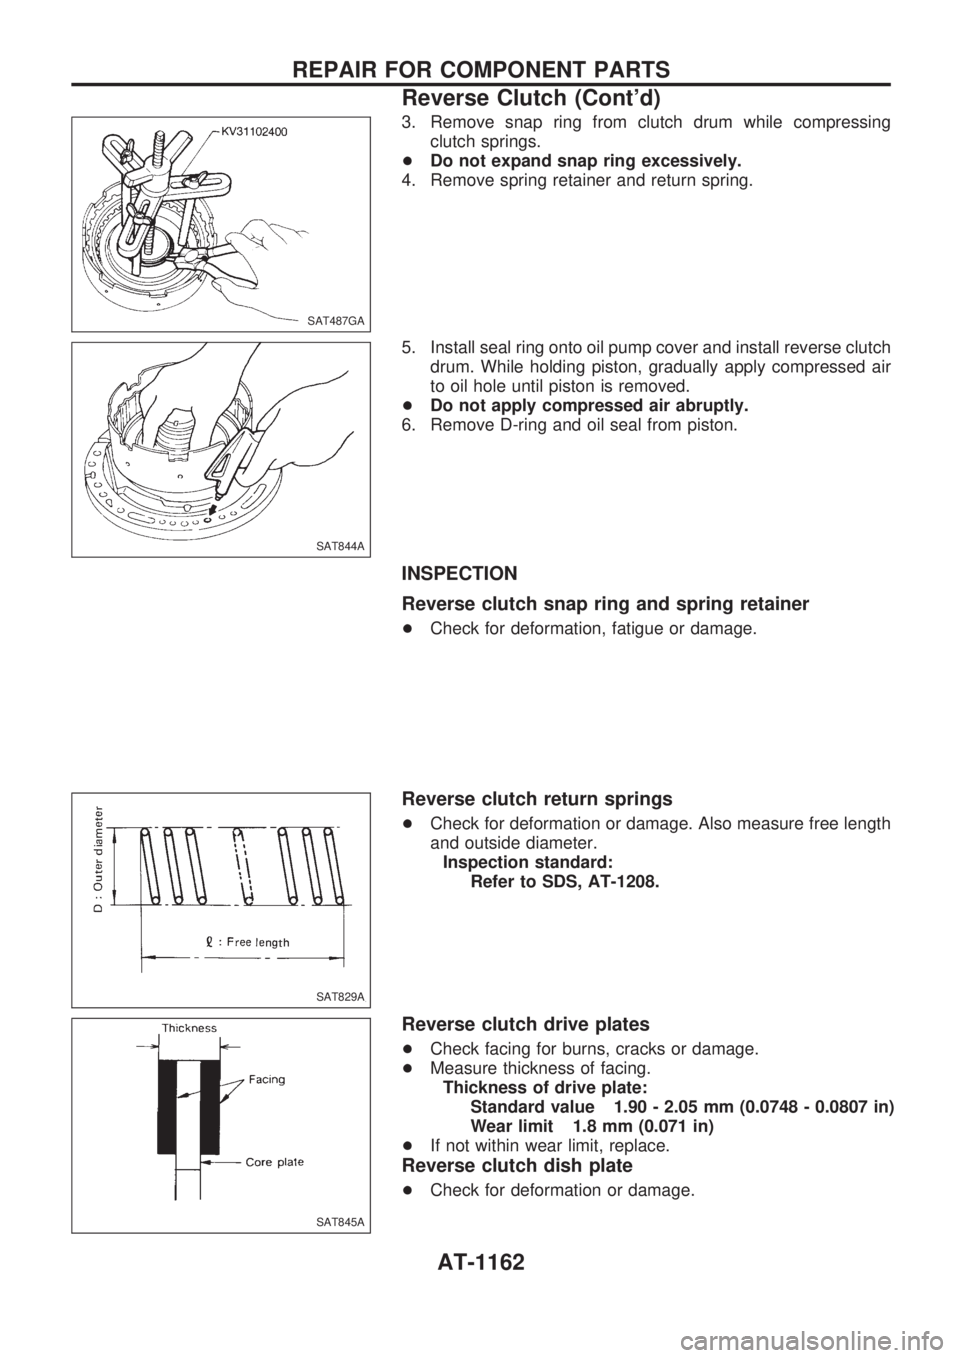
3. Remove snap ring from clutch drum while compressing
clutch springs.
+Do not expand snap ring excessively.
4. Remove spring retainer and return spring.
5. Install seal ring onto oil pump cover and install reverse clutch
drum. While holding piston, gradually apply compressed air
to oil hole until piston is removed.
+Do not apply compressed air abruptly.
6. Remove D-ring and oil seal from piston.
INSPECTION
Reverse clutch snap ring and spring retainer
+Check for deformation, fatigue or damage.
Reverse clutch return springs
+Check for deformation or damage. Also measure free length
and outside diameter.
Inspection standard:
Refer to SDS, AT-1208.
Reverse clutch drive plates
+Check facing for burns, cracks or damage.
+Measure thickness of facing.
Thickness of drive plate:
Standard value 1.90 - 2.05 mm (0.0748 - 0.0807 in)
Wear limit 1.8 mm (0.071 in)
+If not within wear limit, replace.
Reverse clutch dish plate
+Check for deformation or damage.
SAT487GA
SAT844A
SAT829A
SAT845A
REPAIR FOR COMPONENT PARTS
Reverse Clutch (Cont'd)
AT-1162
Page 165 of 1033
Reverse clutch piston
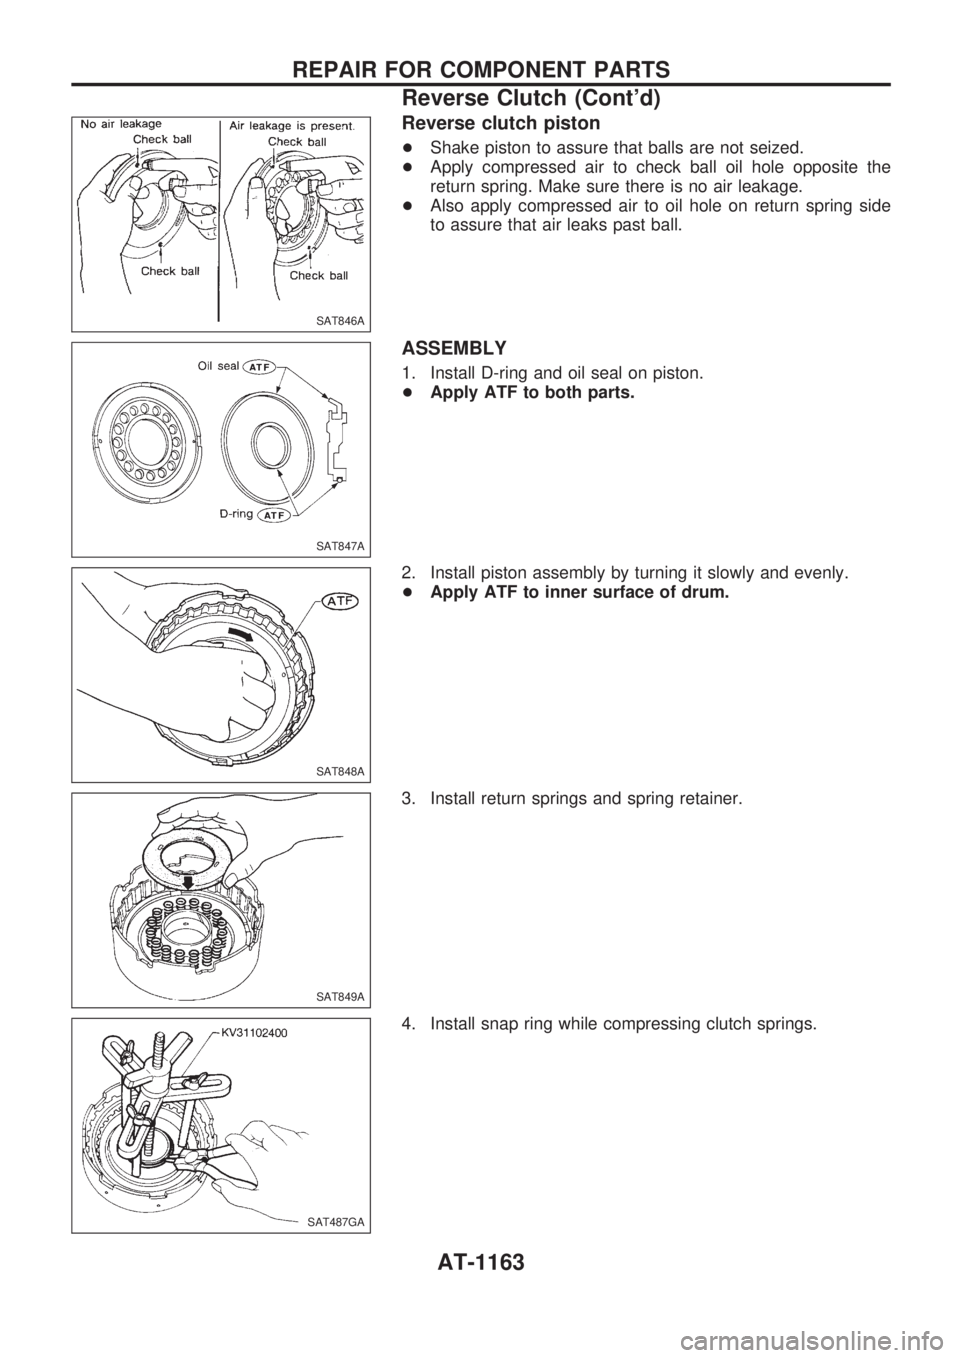
+Shake piston to assure that balls are not seized.
+Apply compressed air to check ball oil hole opposite the
return spring. Make sure there is no air leakage.
+Also apply compressed air to oil hole on return spring side
to assure that air leaks past ball.
ASSEMBLY
1. Install D-ring and oil seal on piston.
+Apply ATF to both parts.
2. Install piston assembly by turning it slowly and evenly.
+Apply ATF to inner surface of drum.
3. Install return springs and spring retainer.
4. Install snap ring while compressing clutch springs.
SAT846A
SAT847A
SAT848A
SAT849A
SAT487GA
REPAIR FOR COMPONENT PARTS
Reverse Clutch (Cont'd)
AT-1163
Page 166 of 1033
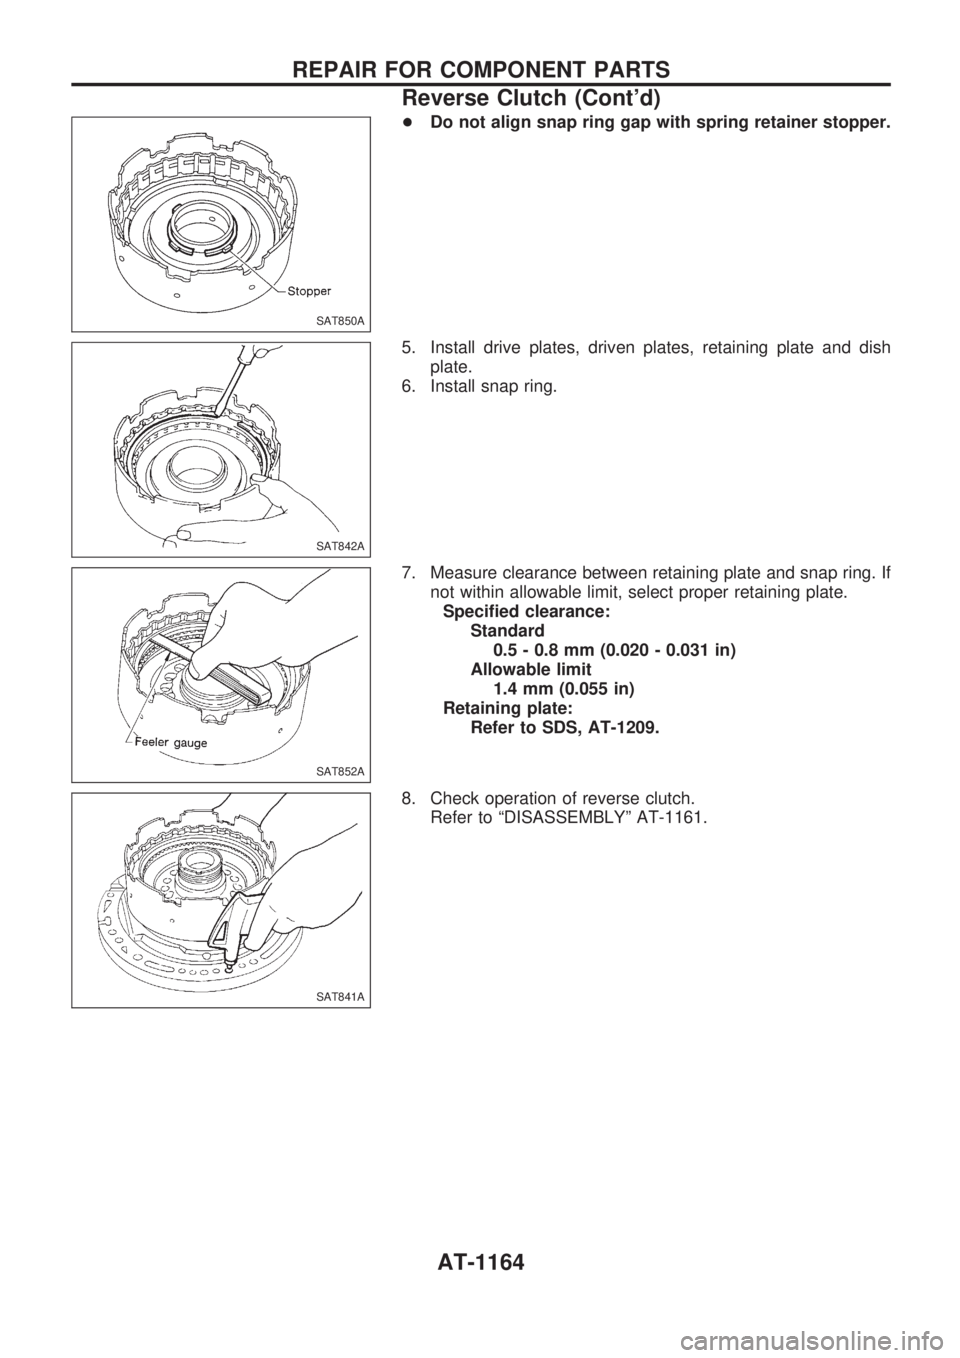
+Do not align snap ring gap with spring retainer stopper.
5. Install drive plates, driven plates, retaining plate and dish
plate.
6. Install snap ring.
7. Measure clearance between retaining plate and snap ring. If
not within allowable limit, select proper retaining plate.
Specified clearance:
Standard
0.5 - 0.8 mm (0.020 - 0.031 in)
Allowable limit
1.4 mm (0.055 in)
Retaining plate:
Refer to SDS, AT-1209.
8. Check operation of reverse clutch.
Refer to ªDISASSEMBLYº AT-1161.
SAT850A
SAT842A
SAT852A
SAT841A
REPAIR FOR COMPONENT PARTS
Reverse Clutch (Cont'd)
AT-1164
Page 167 of 1033
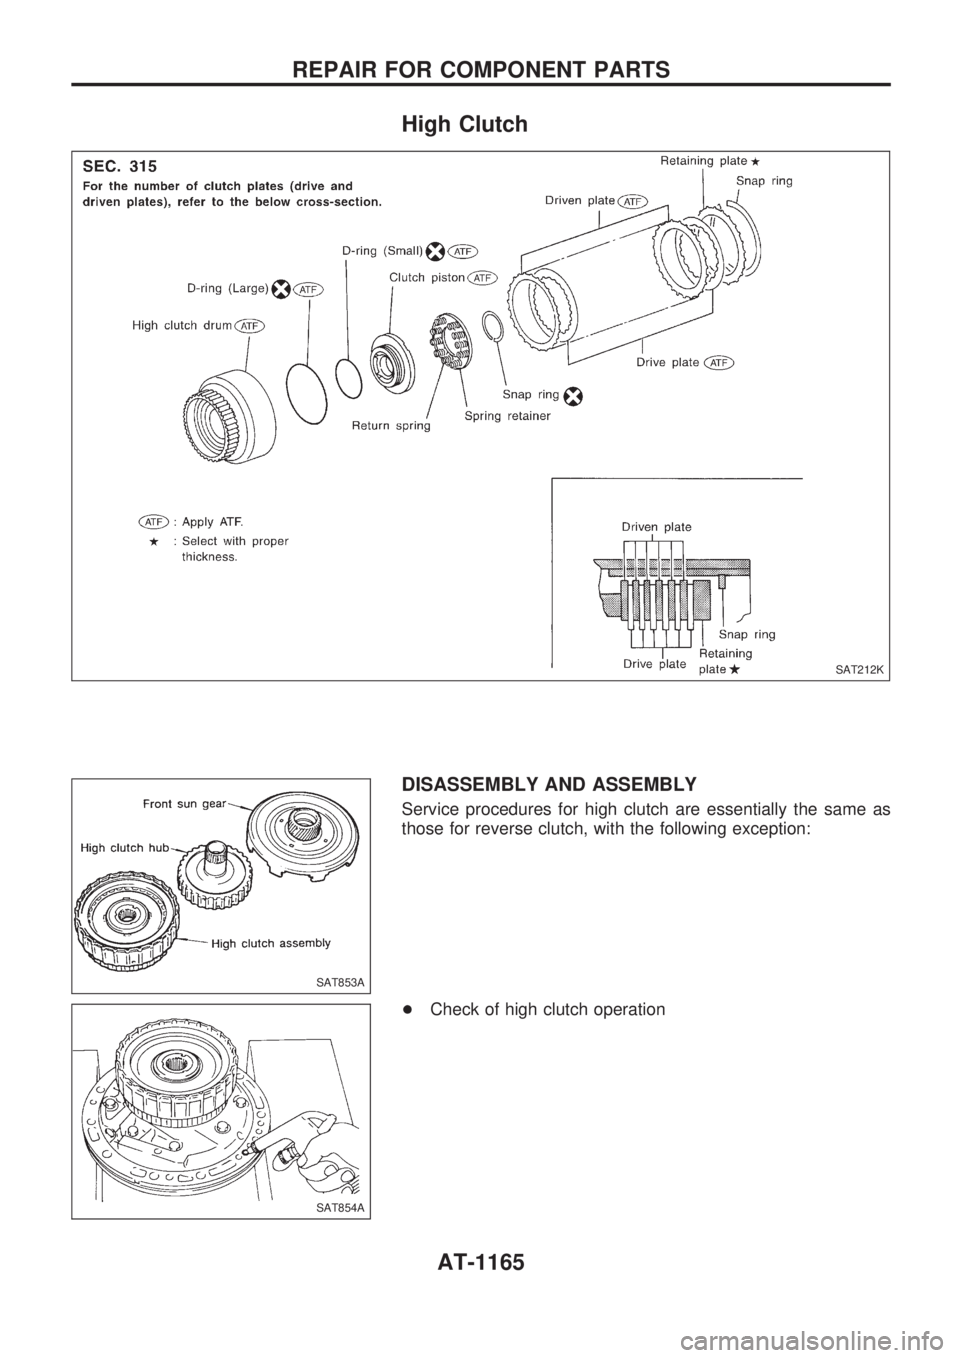
High Clutch
DISASSEMBLY AND ASSEMBLY
Service procedures for high clutch are essentially the same as
those for reverse clutch, with the following exception:
+Check of high clutch operation
SAT212K
SAT853A
SAT854A
REPAIR FOR COMPONENT PARTS
AT-1165
Page 168 of 1033
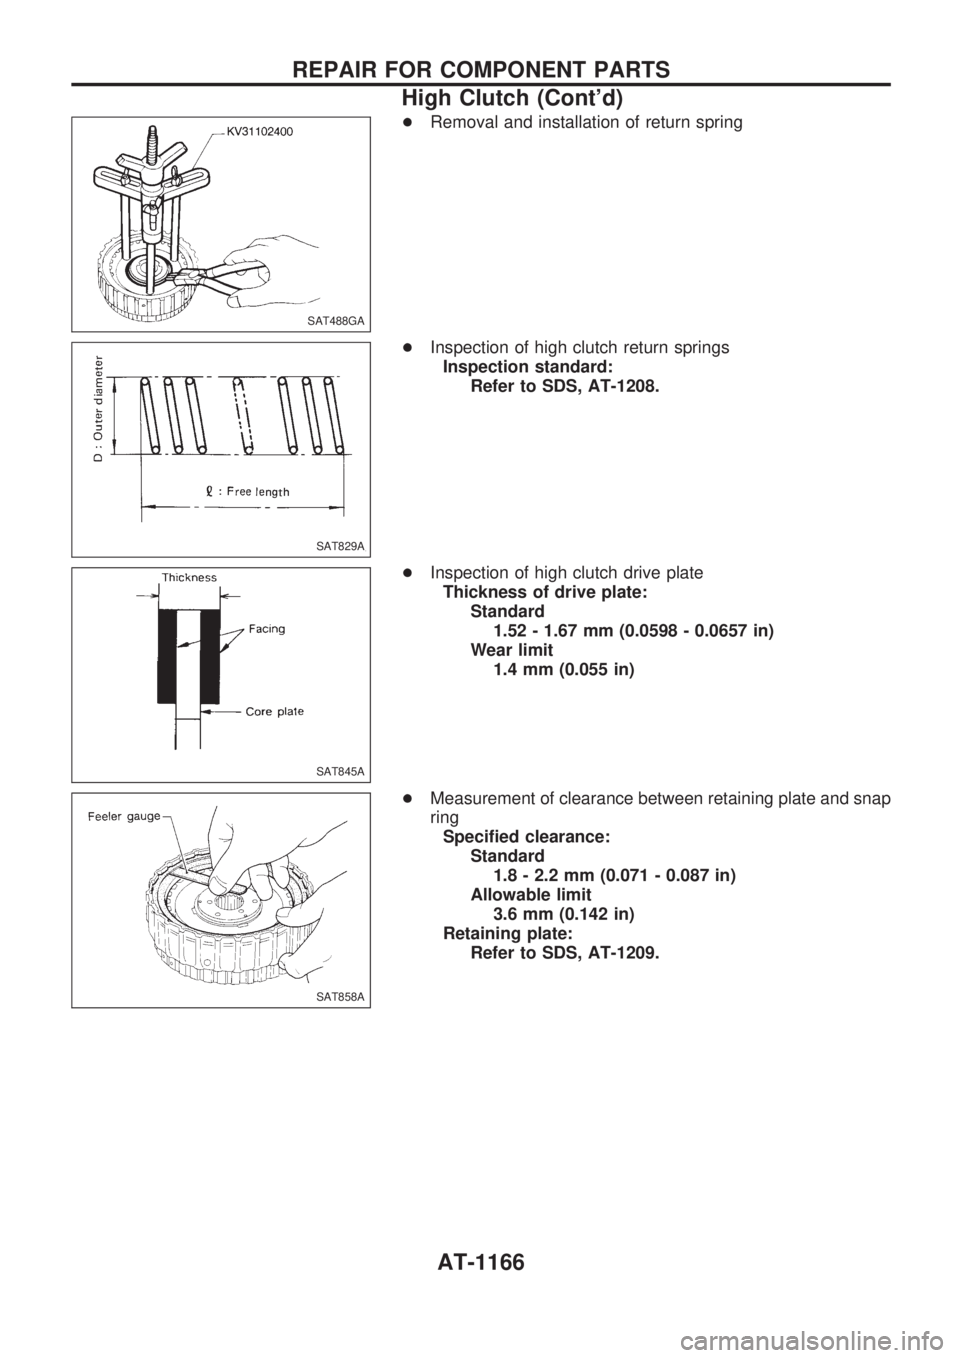
+Removal and installation of return spring
+Inspection of high clutch return springs
Inspection standard:
Refer to SDS, AT-1208.
+Inspection of high clutch drive plate
Thickness of drive plate:
Standard
1.52 - 1.67 mm (0.0598 - 0.0657 in)
Wear limit
1.4 mm (0.055 in)
+Measurement of clearance between retaining plate and snap
ring
Specified clearance:
Standard
1.8 - 2.2 mm (0.071 - 0.087 in)
Allowable limit
3.6 mm (0.142 in)
Retaining plate:
Refer to SDS, AT-1209.
SAT488GA
SAT829A
SAT845A
SAT858A
REPAIR FOR COMPONENT PARTS
High Clutch (Cont'd)
AT-1166
Page 169 of 1033
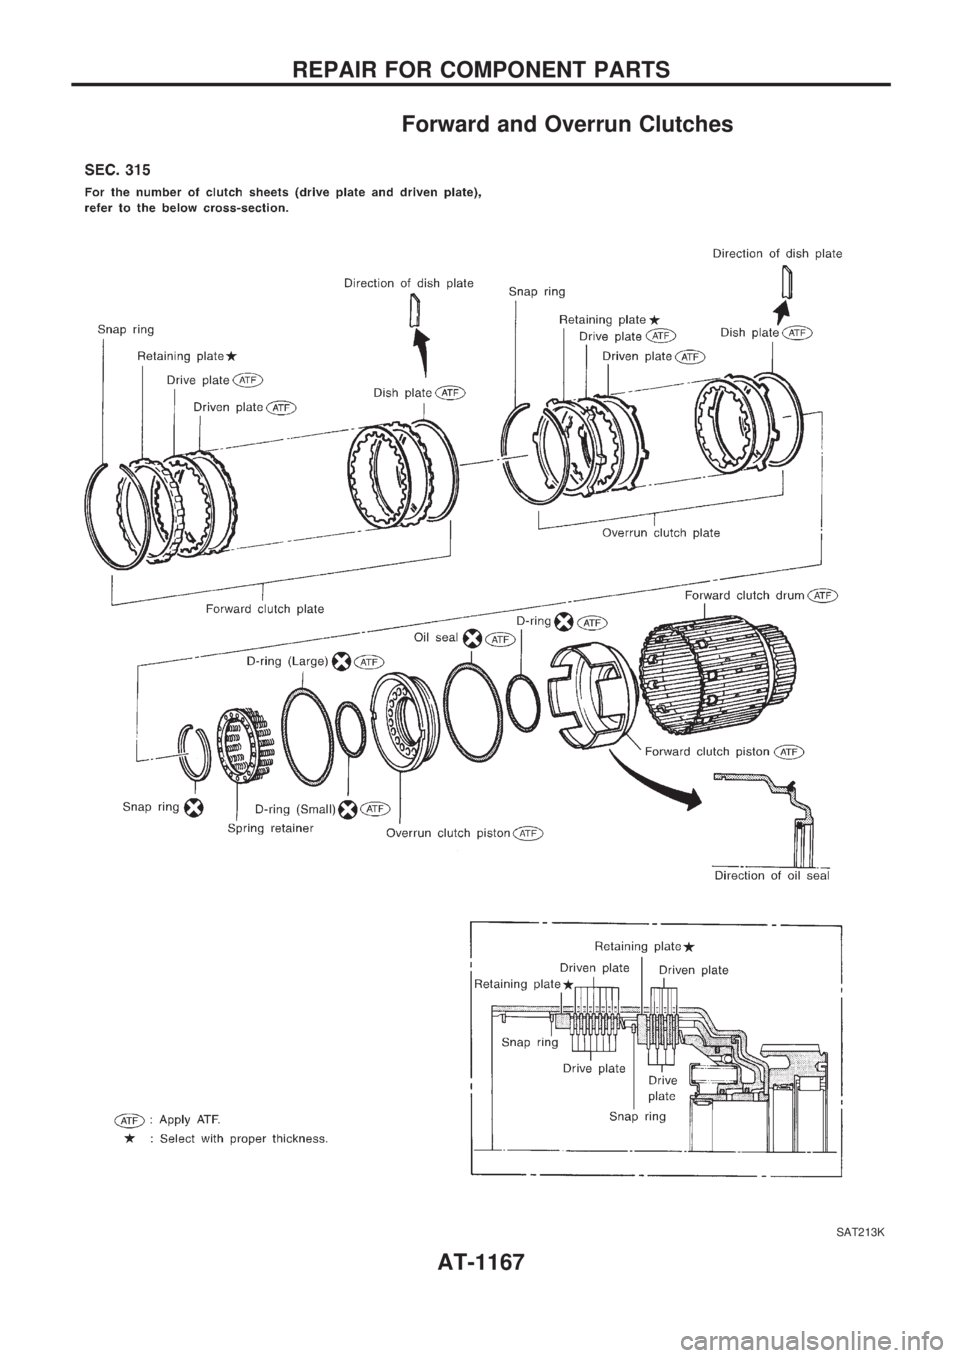
Forward and Overrun Clutches
SAT213K
REPAIR FOR COMPONENT PARTS
AT-1167
Page 170 of 1033
DISASSEMBLY AND ASSEMBLY
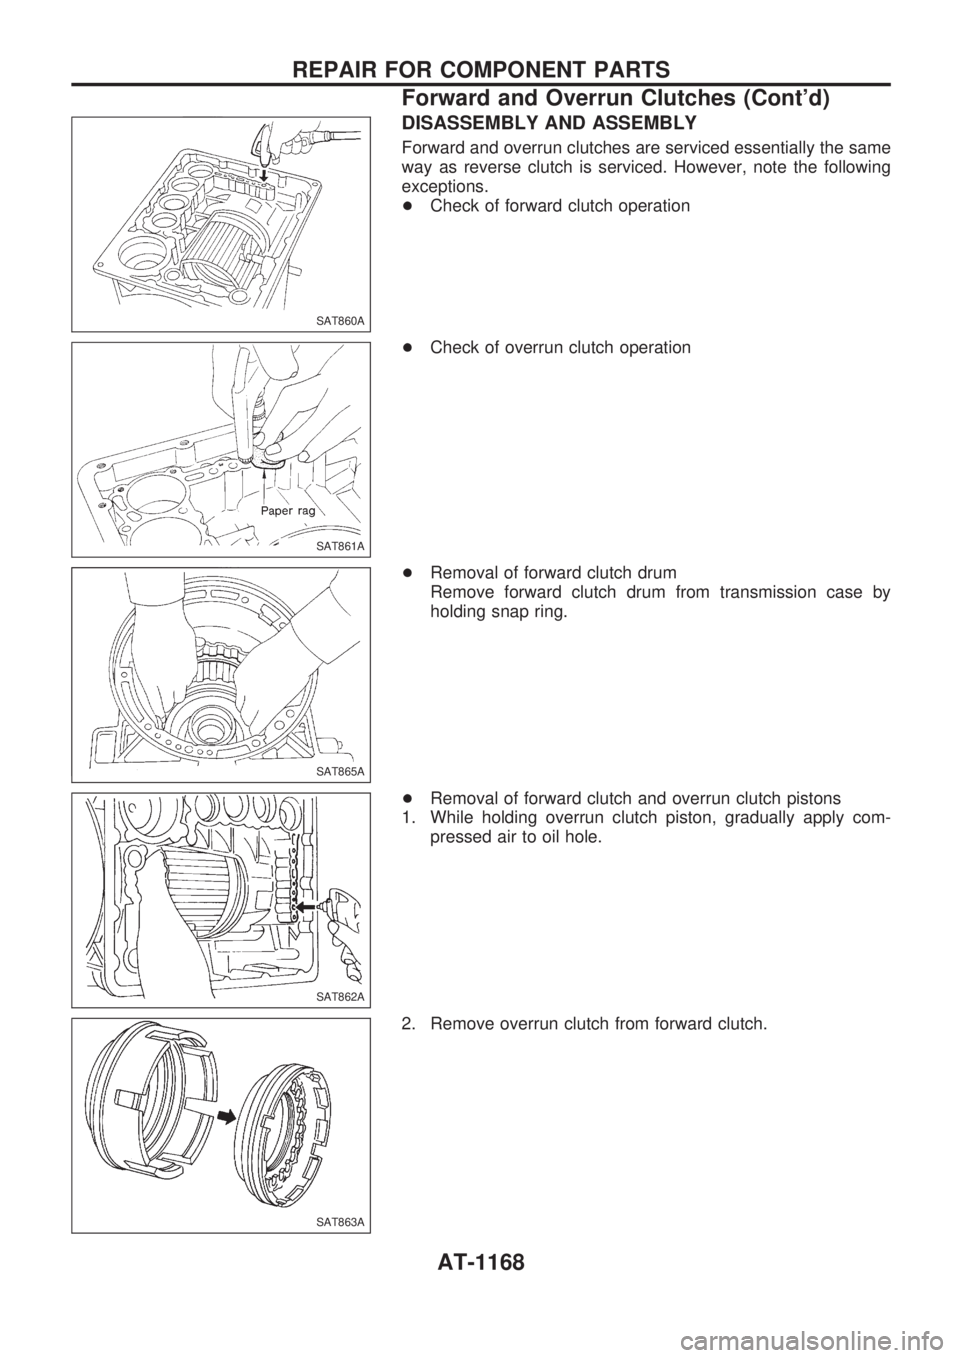
Forward and overrun clutches are serviced essentially the same
way as reverse clutch is serviced. However, note the following
exceptions.
+Check of forward clutch operation
+Check of overrun clutch operation
+Removal of forward clutch drum
Remove forward clutch drum from transmission case by
holding snap ring.
+Removal of forward clutch and overrun clutch pistons
1. While holding overrun clutch piston, gradually apply com-
pressed air to oil hole.
2. Remove overrun clutch from forward clutch.
SAT860A
SAT861A
SAT865A
SAT862A
SAT863A
REPAIR FOR COMPONENT PARTS
Forward and Overrun Clutches (Cont'd)
AT-1168
Trending: load capacity, fuel filter, emergency towing, wheelbase, change wheel, mirror, low oil pressure
