NISSAN PATROL 2000 Electronic Repair Manual
PATROL 2000
NISSAN
NISSAN
https://www.carmanualsonline.info/img/5/57367/w960_57367-0.png
NISSAN PATROL 2000 Electronic Repair Manual
Trending: brakes, battery capacity, cruise control, remove seats, headlamp, radio, airbag
Page 191 of 1033
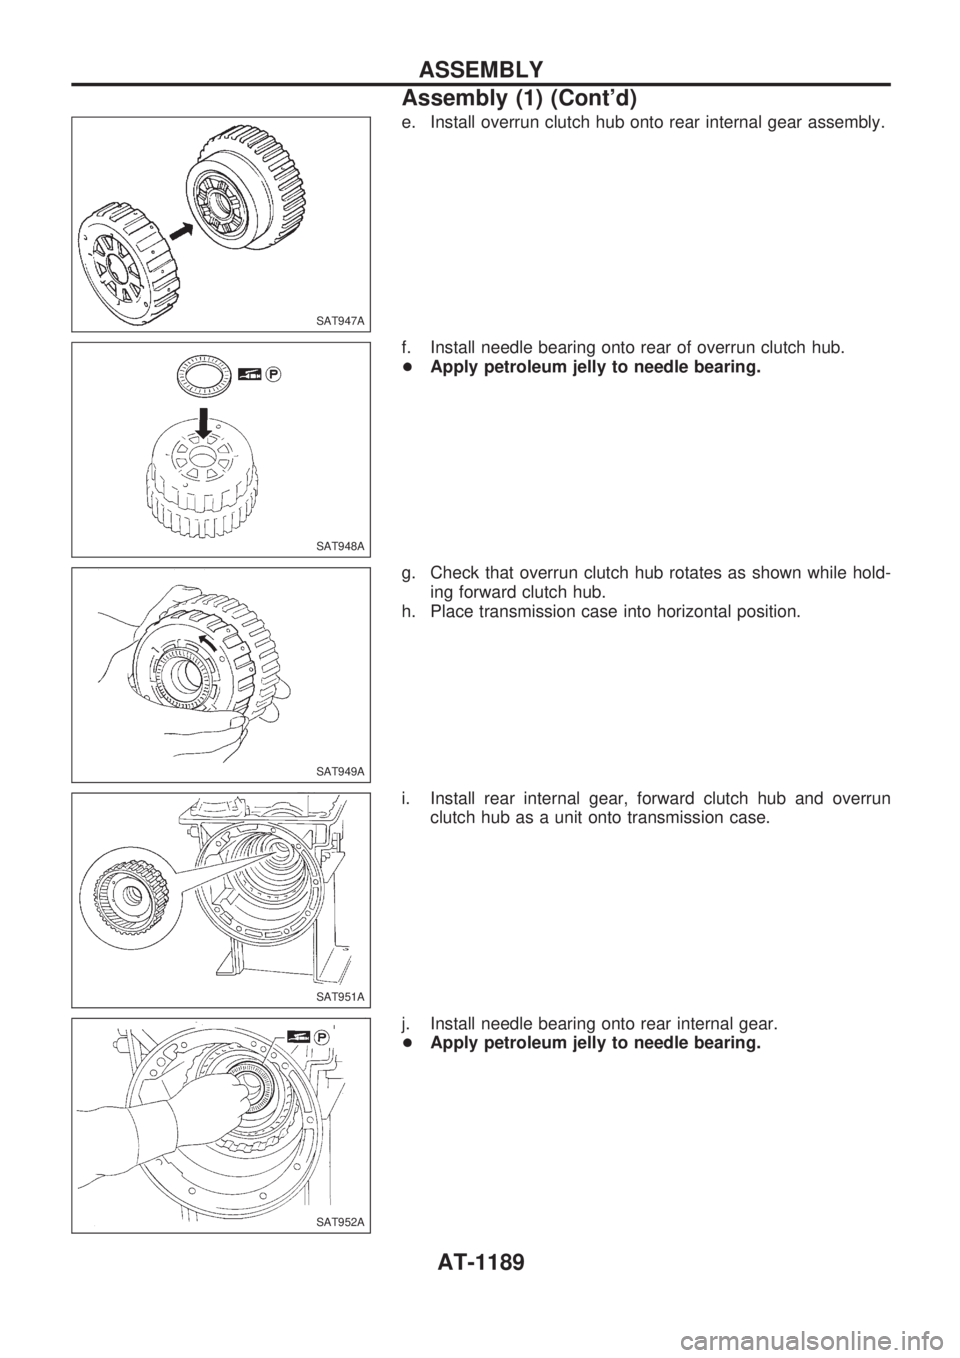
e. Install overrun clutch hub onto rear internal gear assembly.
f. Install needle bearing onto rear of overrun clutch hub.
+Apply petroleum jelly to needle bearing.
g. Check that overrun clutch hub rotates as shown while hold-
ing forward clutch hub.
h. Place transmission case into horizontal position.
i. Install rear internal gear, forward clutch hub and overrun
clutch hub as a unit onto transmission case.
j. Install needle bearing onto rear internal gear.
+Apply petroleum jelly to needle bearing.
SAT947A
SAT948A
SAT949A
SAT951A
SAT952A
ASSEMBLY
Assembly (1) (Cont'd)
AT-1189
Page 192 of 1033
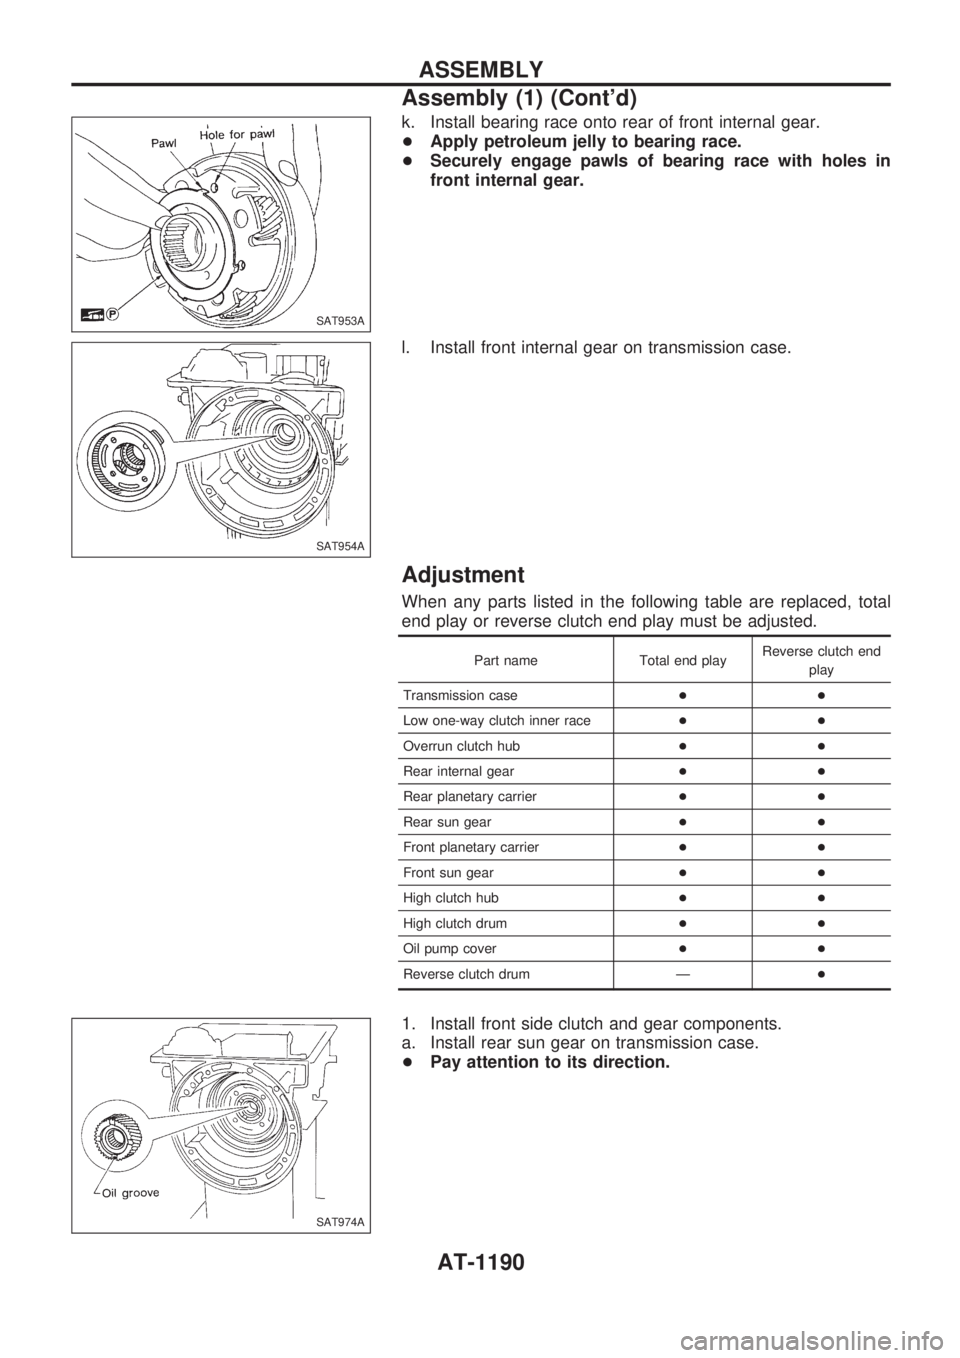
k. Install bearing race onto rear of front internal gear.
+Apply petroleum jelly to bearing race.
+Securely engage pawls of bearing race with holes in
front internal gear.
l. Install front internal gear on transmission case.
Adjustment
When any parts listed in the following table are replaced, total
end play or reverse clutch end play must be adjusted.
Part name Total end playReverse clutch end
play
Transmission case++
Low one-way clutch inner race++
Overrun clutch hub++
Rear internal gear++
Rear planetary carrier++
Rear sun gear++
Front planetary carrier++
Front sun gear++
High clutch hub++
High clutch drum++
Oil pump cover++
Reverse clutch drum Ð+
1. Install front side clutch and gear components.
a. Install rear sun gear on transmission case.
+Pay attention to its direction.
SAT953A
SAT954A
SAT974A
ASSEMBLY
Assembly (1) (Cont'd)
AT-1190
Page 193 of 1033
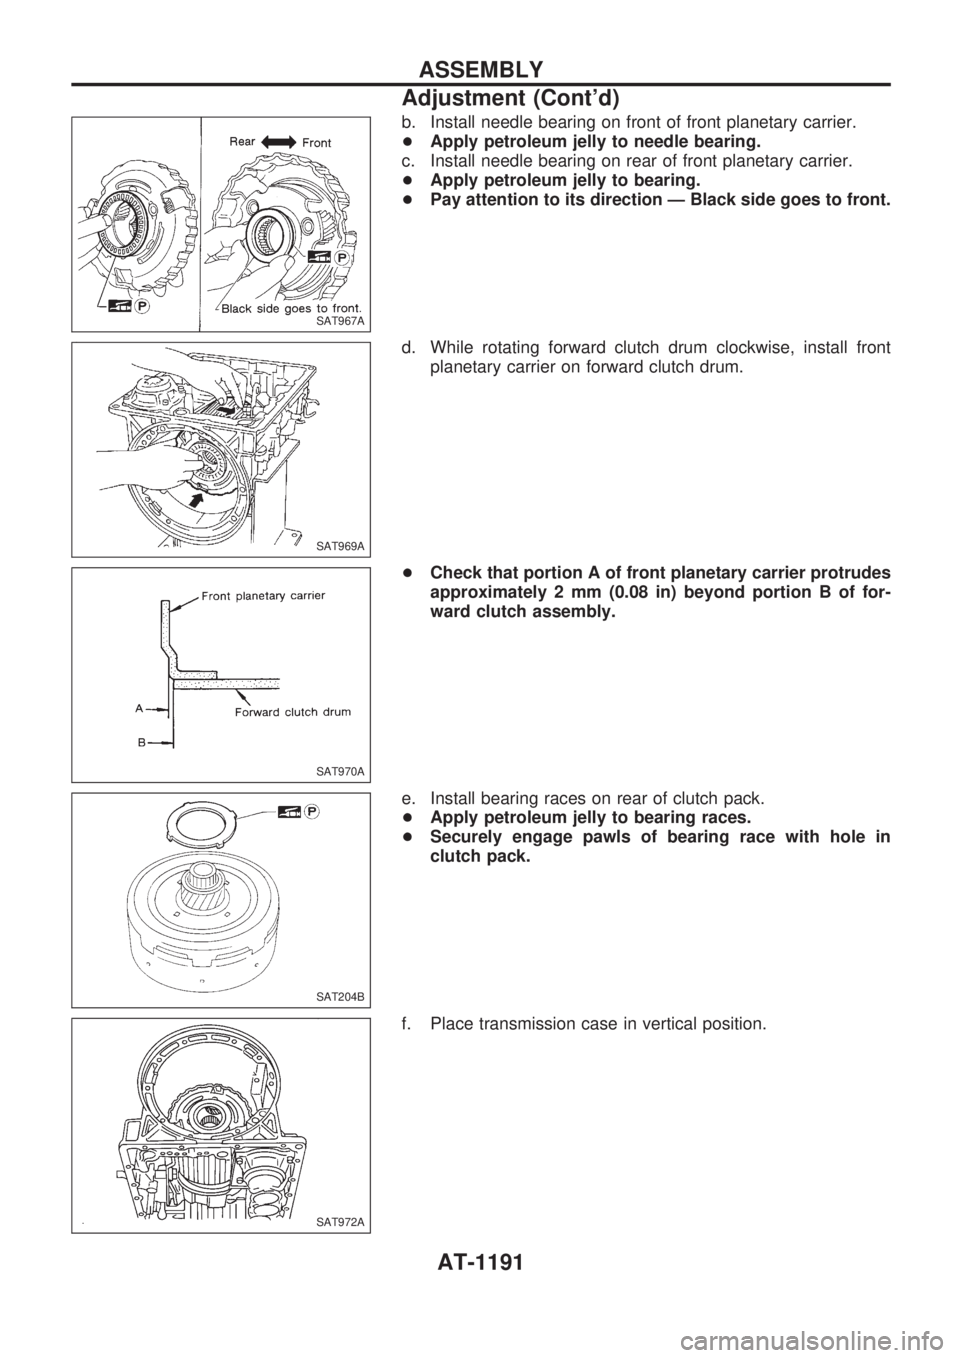
b. Install needle bearing on front of front planetary carrier.
+Apply petroleum jelly to needle bearing.
c. Install needle bearing on rear of front planetary carrier.
+Apply petroleum jelly to bearing.
+Pay attention to its direction Ð Black side goes to front.
d. While rotating forward clutch drum clockwise, install front
planetary carrier on forward clutch drum.
+Check that portion A of front planetary carrier protrudes
approximately 2 mm (0.08 in) beyond portion B of for-
ward clutch assembly.
e. Install bearing races on rear of clutch pack.
+Apply petroleum jelly to bearing races.
+Securely engage pawls of bearing race with hole in
clutch pack.
f. Place transmission case in vertical position.
SAT967A
SAT969A
SAT970A
SAT204B
SAT972A
ASSEMBLY
Adjustment (Cont'd)
AT-1191
Page 194 of 1033
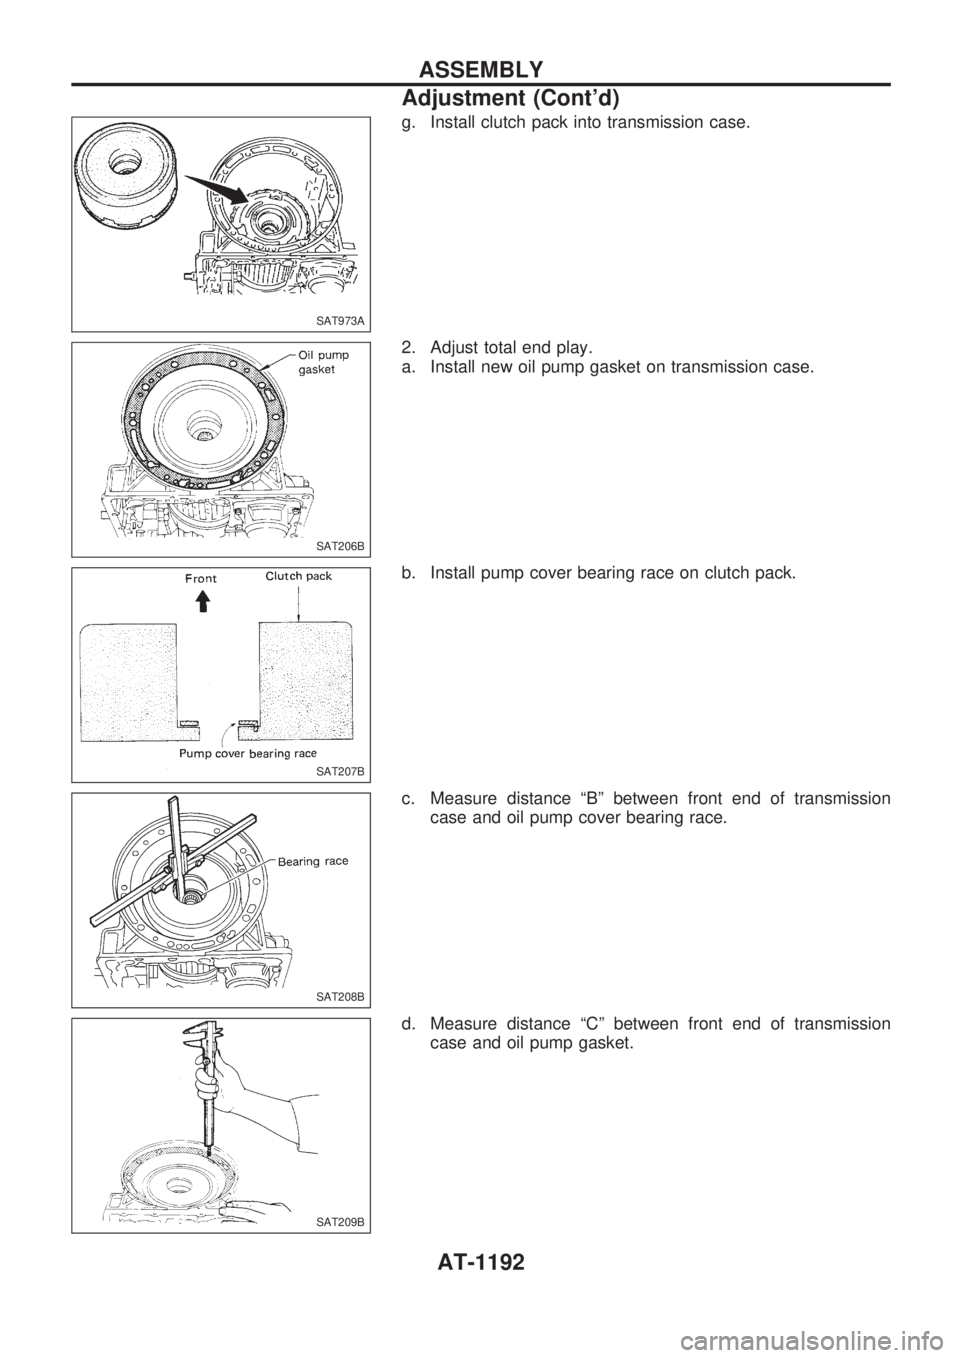
g. Install clutch pack into transmission case.
2. Adjust total end play.
a. Install new oil pump gasket on transmission case.
b. Install pump cover bearing race on clutch pack.
c. Measure distance ªBº between front end of transmission
case and oil pump cover bearing race.
d. Measure distance ªCº between front end of transmission
case and oil pump gasket.
SAT973A
SAT206B
SAT207B
SAT208B
SAT209B
ASSEMBLY
Adjustment (Cont'd)
AT-1192
Page 195 of 1033
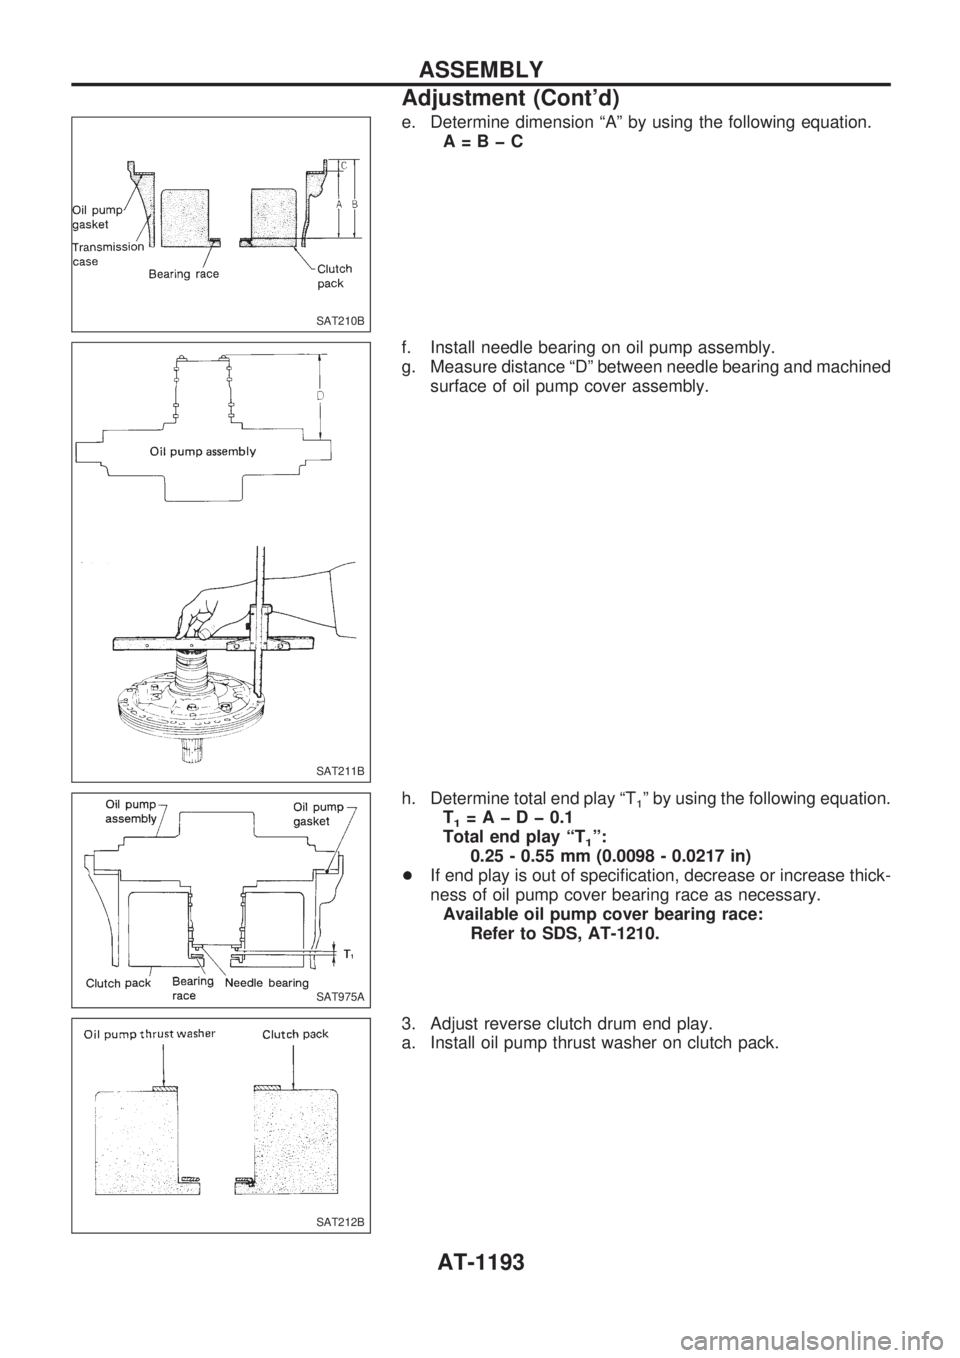
e. Determine dimension ªAº by using the following equation.
A=BþC
f. Install needle bearing on oil pump assembly.
g. Measure distance ªDº between needle bearing and machined
surface of oil pump cover assembly.
h. Determine total end play ªT
1º by using the following equation.
T
1=AþDþ0.1
Total end play ªT
1º:
0.25 - 0.55 mm (0.0098 - 0.0217 in)
+If end play is out of specification, decrease or increase thick-
ness of oil pump cover bearing race as necessary.
Available oil pump cover bearing race:
Refer to SDS, AT-1210.
3. Adjust reverse clutch drum end play.
a. Install oil pump thrust washer on clutch pack.
SAT210B
SAT211B
SAT975A
SAT212B
ASSEMBLY
Adjustment (Cont'd)
AT-1193
Page 196 of 1033
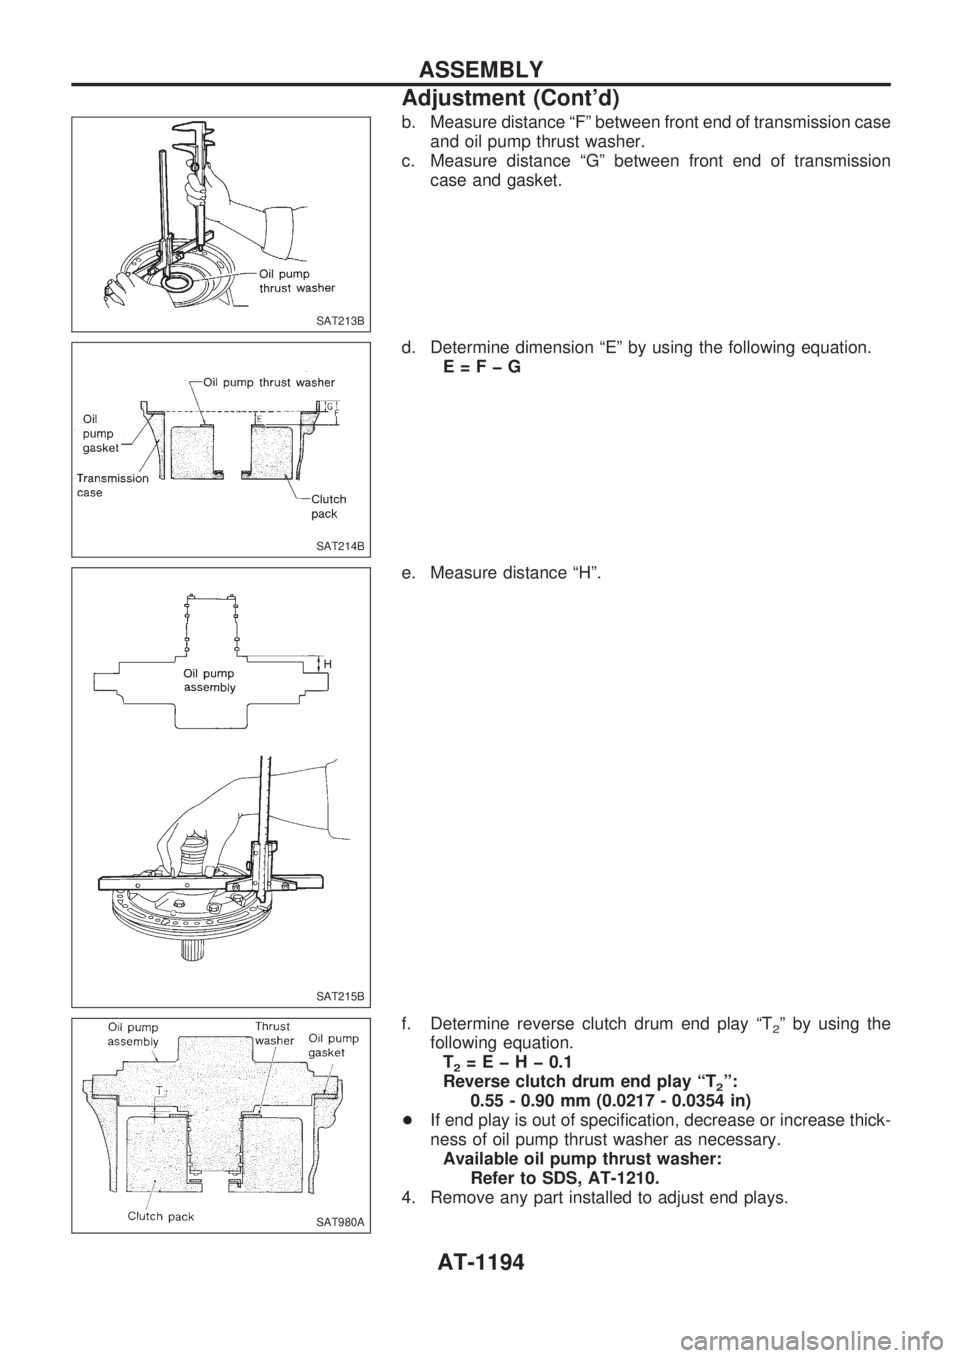
b. Measure distance ªFº between front end of transmission case
and oil pump thrust washer.
c. Measure distance ªGº between front end of transmission
case and gasket.
d. Determine dimension ªEº by using the following equation.
E=FþG
e. Measure distance ªHº.
f. Determine reverse clutch drum end play ªT
2º by using the
following equation.
T
2=EþHþ0.1
Reverse clutch drum end play ªT
2º:
0.55 - 0.90 mm (0.0217 - 0.0354 in)
+If end play is out of specification, decrease or increase thick-
ness of oil pump thrust washer as necessary.
Available oil pump thrust washer:
Refer to SDS, AT-1210.
4. Remove any part installed to adjust end plays.
SAT213B
SAT214B
SAT215B
SAT980A
ASSEMBLY
Adjustment (Cont'd)
AT-1194
Page 197 of 1033
Assembly (2)
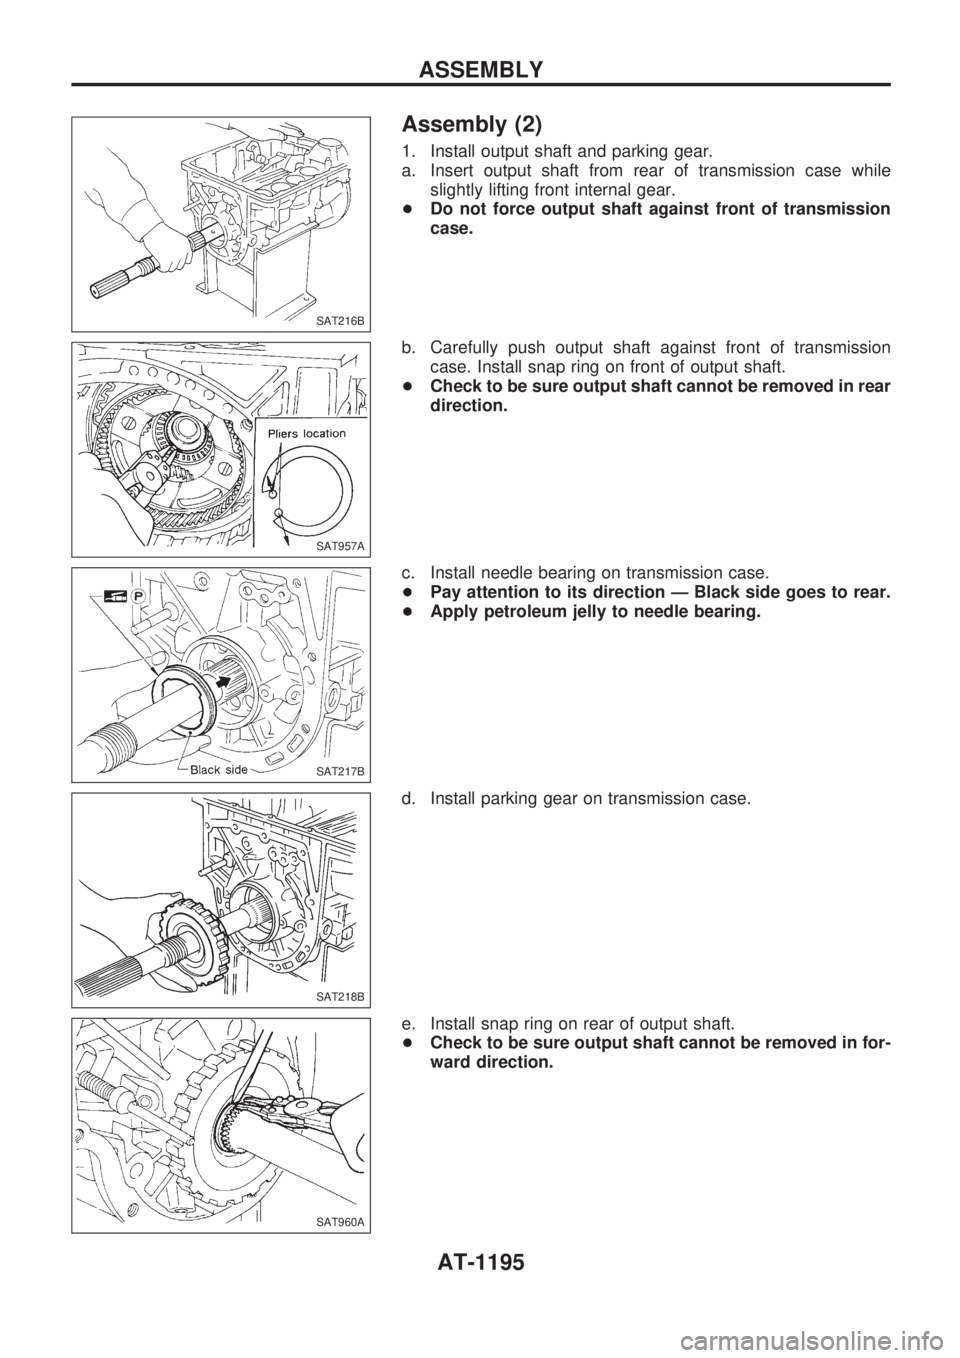
1. Install output shaft and parking gear.
a. Insert output shaft from rear of transmission case while
slightly lifting front internal gear.
+Do not force output shaft against front of transmission
case.
b. Carefully push output shaft against front of transmission
case. Install snap ring on front of output shaft.
+Check to be sure output shaft cannot be removed in rear
direction.
c. Install needle bearing on transmission case.
+Pay attention to its direction Ð Black side goes to rear.
+Apply petroleum jelly to needle bearing.
d. Install parking gear on transmission case.
e. Install snap ring on rear of output shaft.
+Check to be sure output shaft cannot be removed in for-
ward direction.
SAT216B
SAT957A
SAT217B
SAT218B
SAT960A
ASSEMBLY
AT-1195
Page 198 of 1033
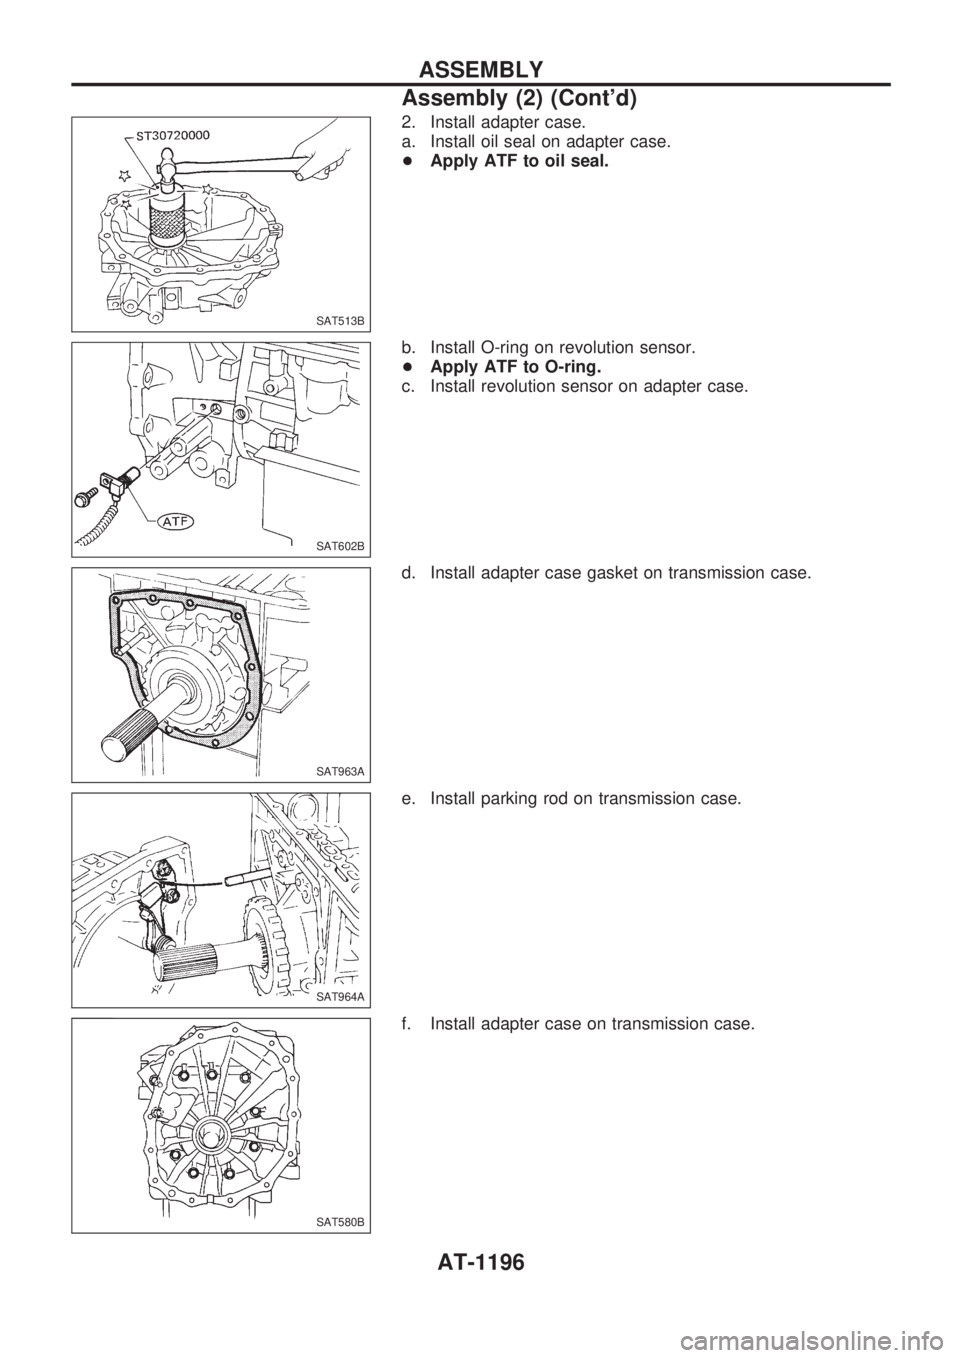
2. Install adapter case.
a. Install oil seal on adapter case.
+Apply ATF to oil seal.
b. Install O-ring on revolution sensor.
+Apply ATF to O-ring.
c. Install revolution sensor on adapter case.
d. Install adapter case gasket on transmission case.
e. Install parking rod on transmission case.
f. Install adapter case on transmission case.
SAT513B
SAT602B
SAT963A
SAT964A
SAT580B
ASSEMBLY
Assembly (2) (Cont'd)
AT-1196
Page 199 of 1033
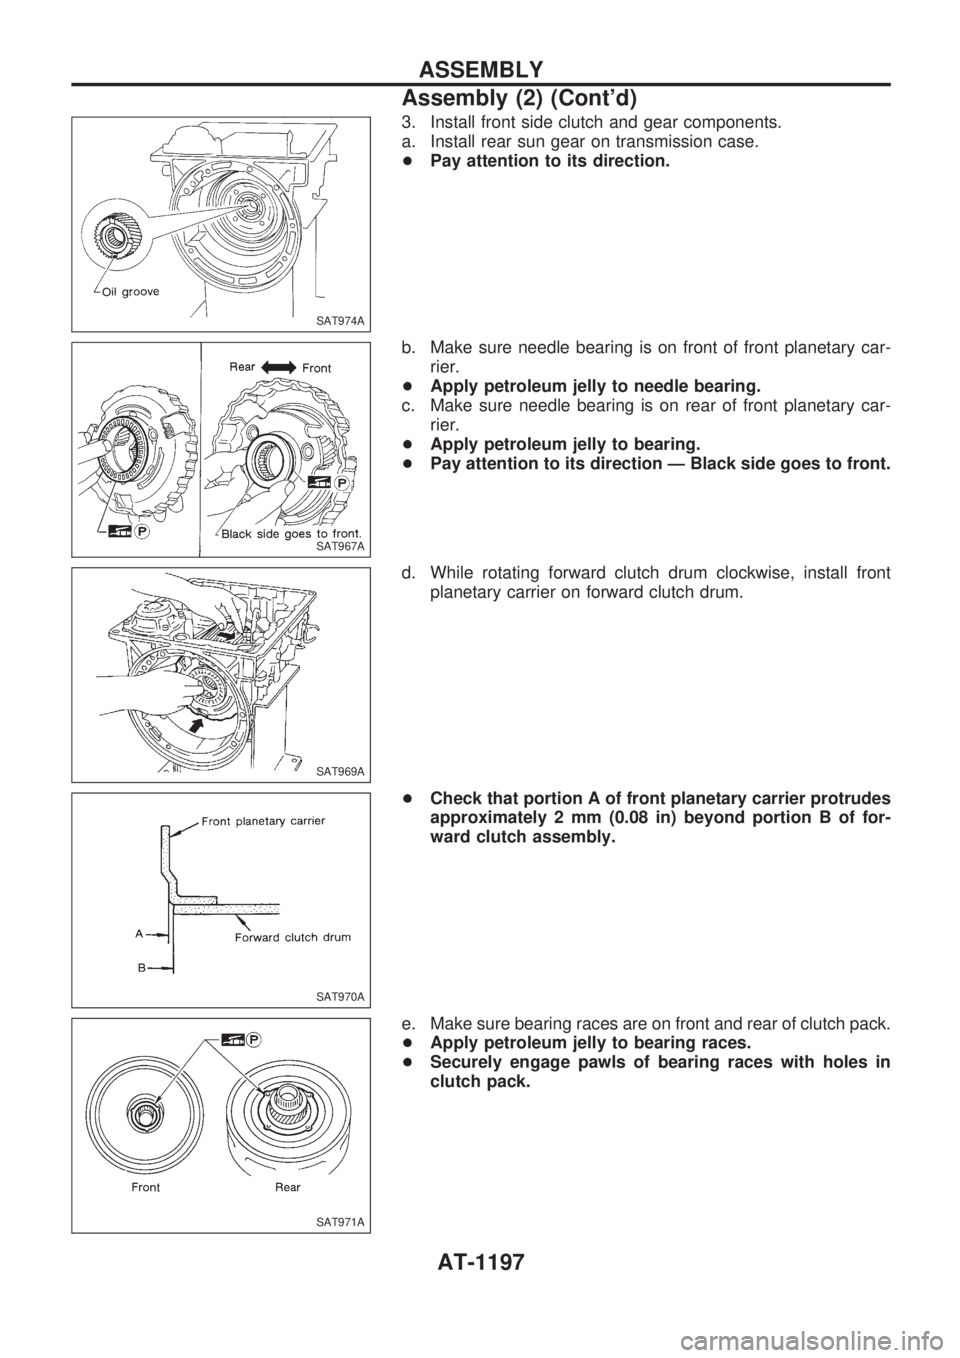
3. Install front side clutch and gear components.
a. Install rear sun gear on transmission case.
+Pay attention to its direction.
b. Make sure needle bearing is on front of front planetary car-
rier.
+Apply petroleum jelly to needle bearing.
c. Make sure needle bearing is on rear of front planetary car-
rier.
+Apply petroleum jelly to bearing.
+Pay attention to its direction Ð Black side goes to front.
d. While rotating forward clutch drum clockwise, install front
planetary carrier on forward clutch drum.
+Check that portion A of front planetary carrier protrudes
approximately 2 mm (0.08 in) beyond portion B of for-
ward clutch assembly.
e. Make sure bearing races are on front and rear of clutch pack.
+Apply petroleum jelly to bearing races.
+Securely engage pawls of bearing races with holes in
clutch pack.
SAT974A
SAT967A
SAT969A
SAT970A
SAT971A
ASSEMBLY
Assembly (2) (Cont'd)
AT-1197
Page 200 of 1033
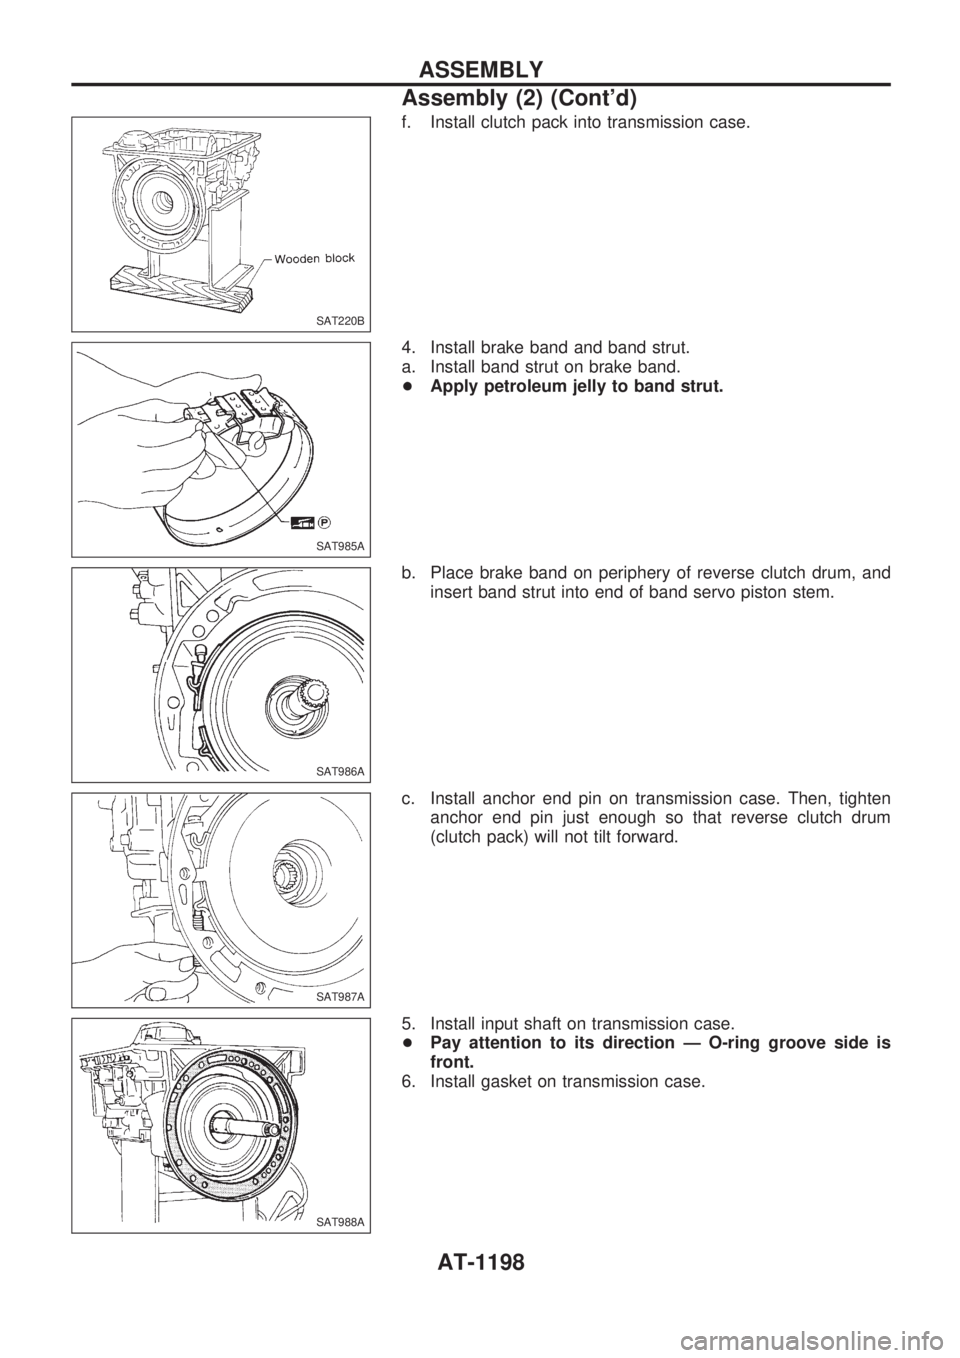
f. Install clutch pack into transmission case.
4. Install brake band and band strut.
a. Install band strut on brake band.
+Apply petroleum jelly to band strut.
b. Place brake band on periphery of reverse clutch drum, and
insert band strut into end of band servo piston stem.
c. Install anchor end pin on transmission case. Then, tighten
anchor end pin just enough so that reverse clutch drum
(clutch pack) will not tilt forward.
5. Install input shaft on transmission case.
+Pay attention to its direction Ð O-ring groove side is
front.
6. Install gasket on transmission case.
SAT220B
SAT985A
SAT986A
SAT987A
SAT988A
ASSEMBLY
Assembly (2) (Cont'd)
AT-1198
Trending: brake, rear view mirror, load capacity, revolution per minute, recommended oil, coolant level, tire type
