NISSAN PATROL 2000 Electronic Repair Manual
PATROL 2000
NISSAN
NISSAN
https://www.carmanualsonline.info/img/5/57367/w960_57367-0.png
NISSAN PATROL 2000 Electronic Repair Manual
Trending: height, fuel cap, dimensions, automatic transmission, fuse box location, torque, sun
Page 171 of 1033
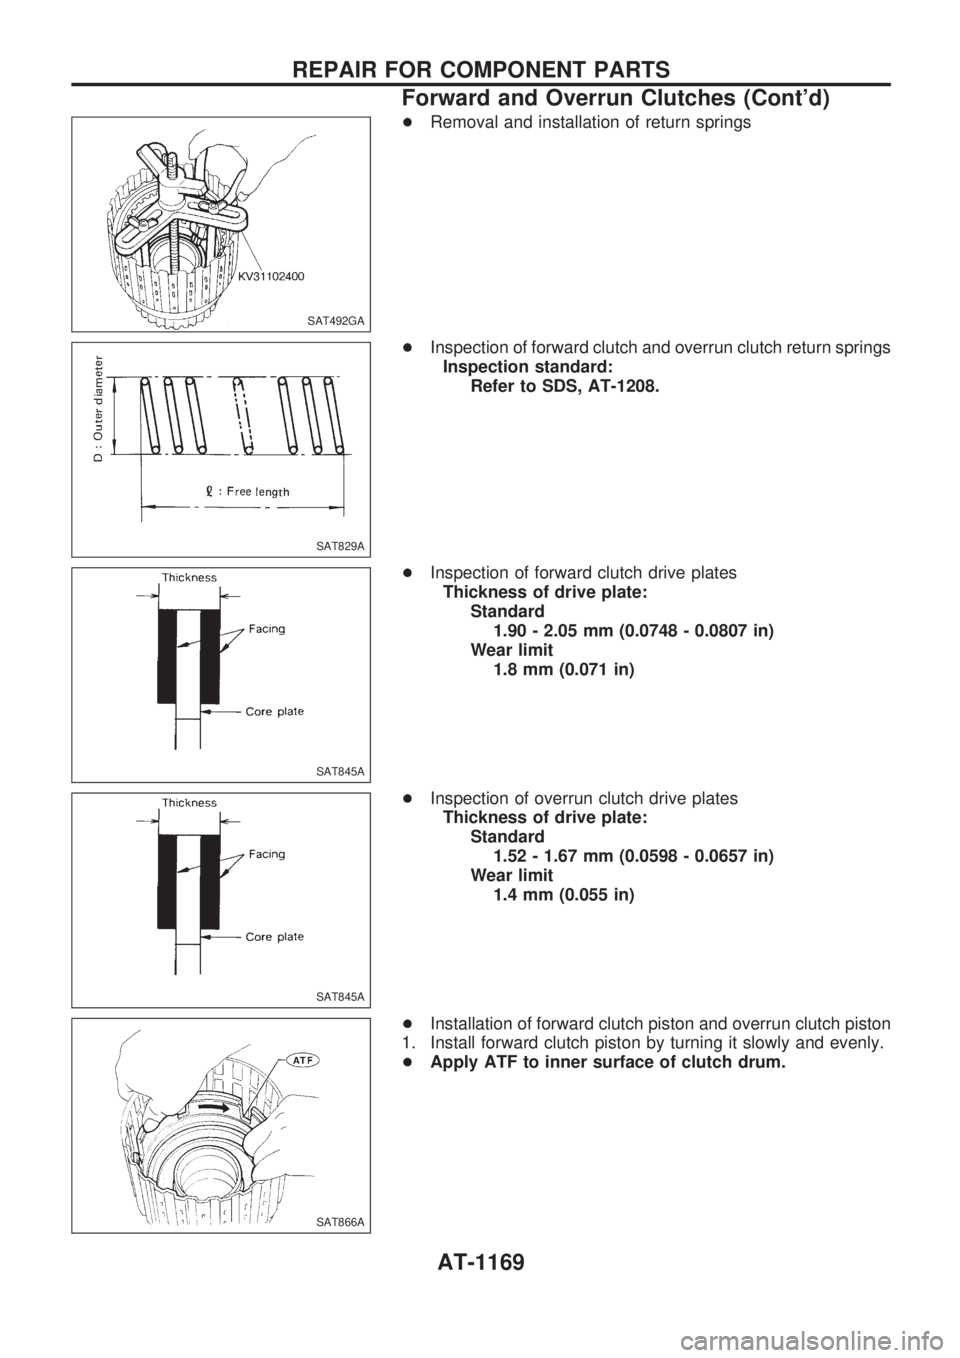
+Removal and installation of return springs
+Inspection of forward clutch and overrun clutch return springs
Inspection standard:
Refer to SDS, AT-1208.
+Inspection of forward clutch drive plates
Thickness of drive plate:
Standard
1.90 - 2.05 mm (0.0748 - 0.0807 in)
Wear limit
1.8 mm (0.071 in)
+Inspection of overrun clutch drive plates
Thickness of drive plate:
Standard
1.52 - 1.67 mm (0.0598 - 0.0657 in)
Wear limit
1.4 mm (0.055 in)
+Installation of forward clutch piston and overrun clutch piston
1. Install forward clutch piston by turning it slowly and evenly.
+Apply ATF to inner surface of clutch drum.
SAT492GA
SAT829A
SAT845A
SAT845A
SAT866A
REPAIR FOR COMPONENT PARTS
Forward and Overrun Clutches (Cont'd)
AT-1169
Page 172 of 1033
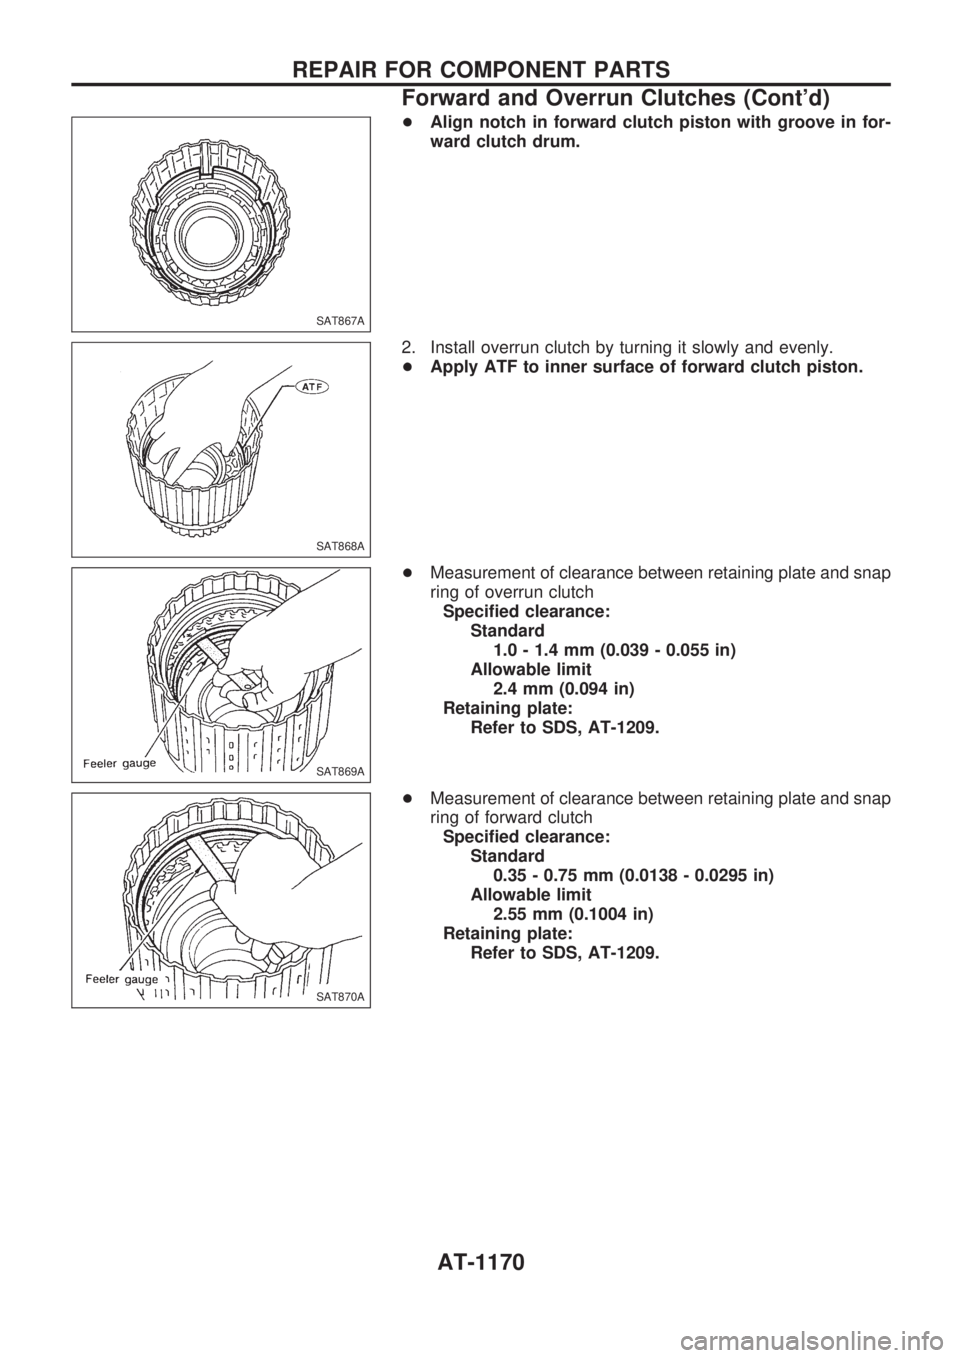
+Align notch in forward clutch piston with groove in for-
ward clutch drum.
2. Install overrun clutch by turning it slowly and evenly.
+Apply ATF to inner surface of forward clutch piston.
+Measurement of clearance between retaining plate and snap
ring of overrun clutch
Specified clearance:
Standard
1.0 - 1.4 mm (0.039 - 0.055 in)
Allowable limit
2.4 mm (0.094 in)
Retaining plate:
Refer to SDS, AT-1209.
+Measurement of clearance between retaining plate and snap
ring of forward clutch
Specified clearance:
Standard
0.35 - 0.75 mm (0.0138 - 0.0295 in)
Allowable limit
2.55 mm (0.1004 in)
Retaining plate:
Refer to SDS, AT-1209.
SAT867A
SAT868A
SAT869A
SAT870A
REPAIR FOR COMPONENT PARTS
Forward and Overrun Clutches (Cont'd)
AT-1170
Page 173 of 1033
Low & Reverse Brake
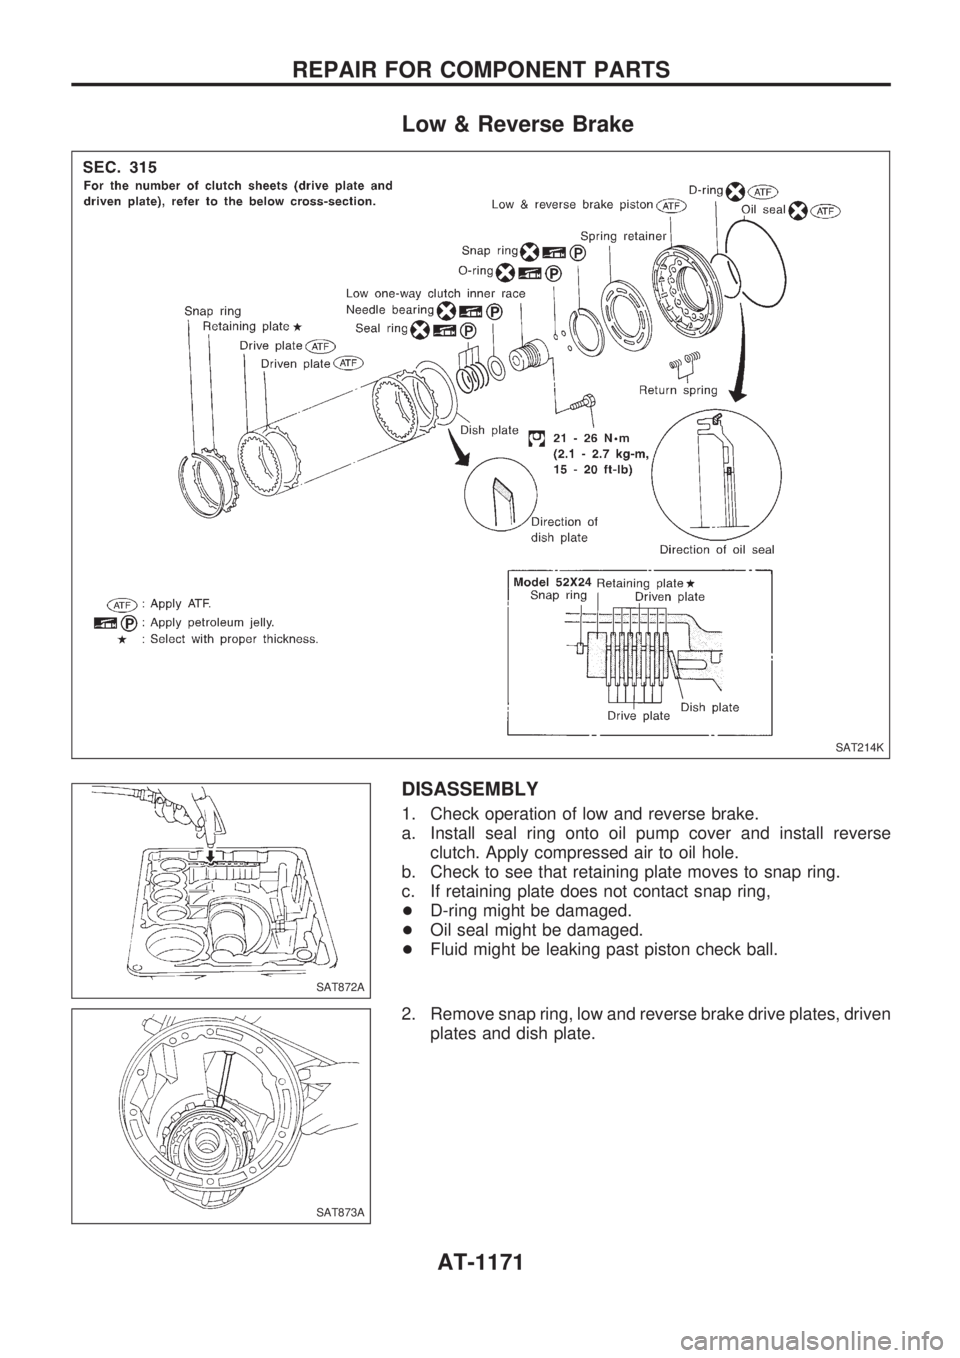
DISASSEMBLY
1. Check operation of low and reverse brake.
a. Install seal ring onto oil pump cover and install reverse
clutch. Apply compressed air to oil hole.
b. Check to see that retaining plate moves to snap ring.
c. If retaining plate does not contact snap ring,
+D-ring might be damaged.
+Oil seal might be damaged.
+Fluid might be leaking past piston check ball.
2. Remove snap ring, low and reverse brake drive plates, driven
plates and dish plate.
SAT214K
SAT872A
SAT873A
REPAIR FOR COMPONENT PARTS
AT-1171
Page 174 of 1033
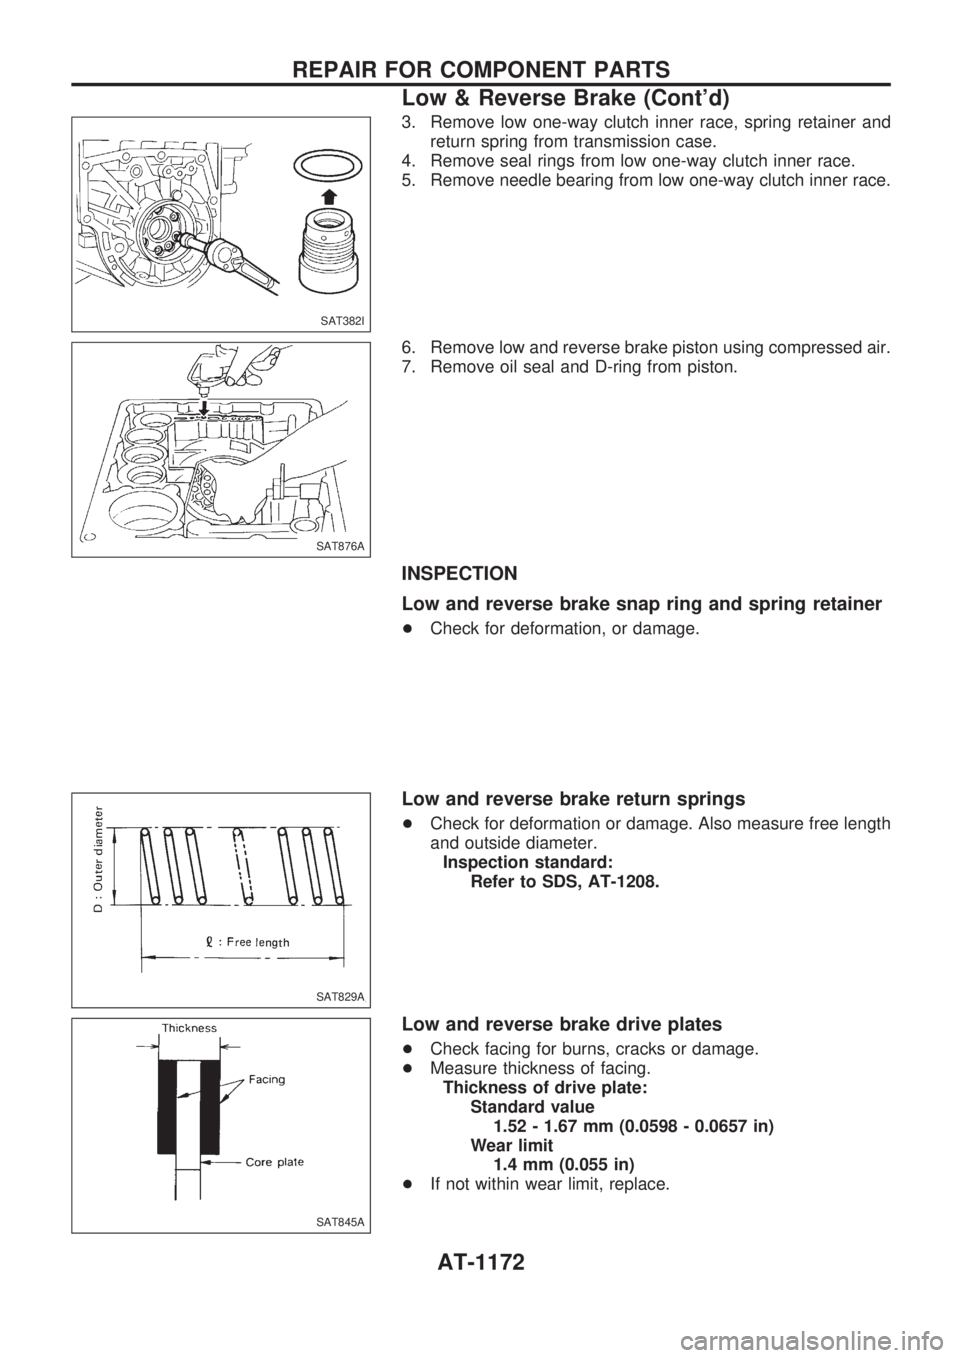
3. Remove low one-way clutch inner race, spring retainer and
return spring from transmission case.
4. Remove seal rings from low one-way clutch inner race.
5. Remove needle bearing from low one-way clutch inner race.
6. Remove low and reverse brake piston using compressed air.
7. Remove oil seal and D-ring from piston.
INSPECTION
Low and reverse brake snap ring and spring retainer
+Check for deformation, or damage.
Low and reverse brake return springs
+Check for deformation or damage. Also measure free length
and outside diameter.
Inspection standard:
Refer to SDS, AT-1208.
Low and reverse brake drive plates
+Check facing for burns, cracks or damage.
+Measure thickness of facing.
Thickness of drive plate:
Standard value
1.52 - 1.67 mm (0.0598 - 0.0657 in)
Wear limit
1.4 mm (0.055 in)
+If not within wear limit, replace.
SAT382I
SAT876A
SAT829A
SAT845A
REPAIR FOR COMPONENT PARTS
Low & Reverse Brake (Cont'd)
AT-1172
Page 175 of 1033
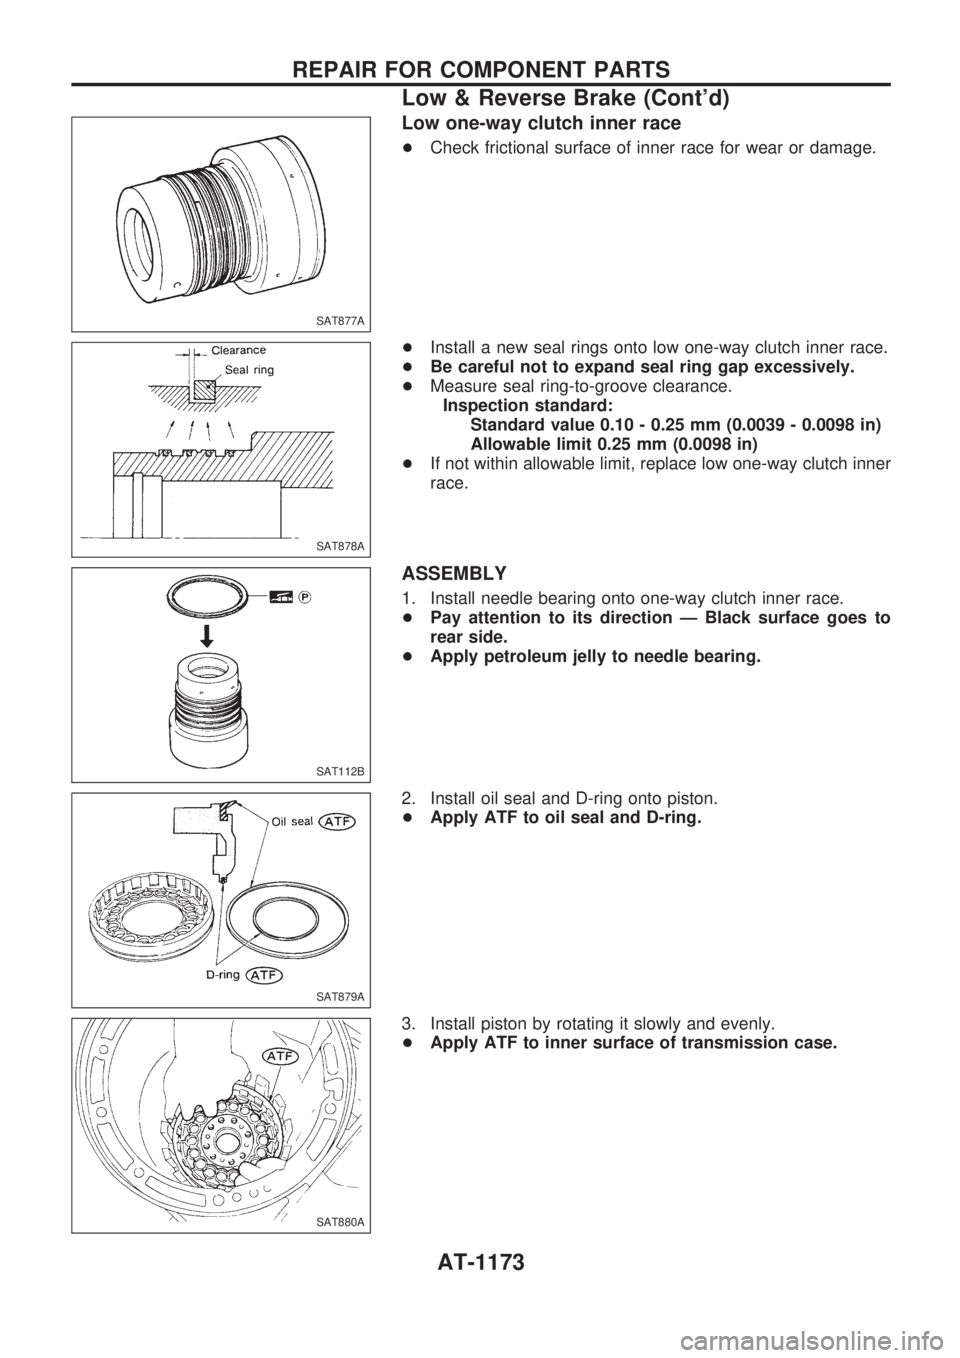
Low one-way clutch inner race
+Check frictional surface of inner race for wear or damage.
+Install a new seal rings onto low one-way clutch inner race.
+Be careful not to expand seal ring gap excessively.
+Measure seal ring-to-groove clearance.
Inspection standard:
Standard value 0.10 - 0.25 mm (0.0039 - 0.0098 in)
Allowable limit 0.25 mm (0.0098 in)
+If not within allowable limit, replace low one-way clutch inner
race.
ASSEMBLY
1. Install needle bearing onto one-way clutch inner race.
+Pay attention to its direction Ð Black surface goes to
rear side.
+Apply petroleum jelly to needle bearing.
2. Install oil seal and D-ring onto piston.
+Apply ATF to oil seal and D-ring.
3. Install piston by rotating it slowly and evenly.
+Apply ATF to inner surface of transmission case.
SAT877A
SAT878A
SAT112B
SAT879A
SAT880A
REPAIR FOR COMPONENT PARTS
Low & Reverse Brake (Cont'd)
AT-1173
Page 176 of 1033
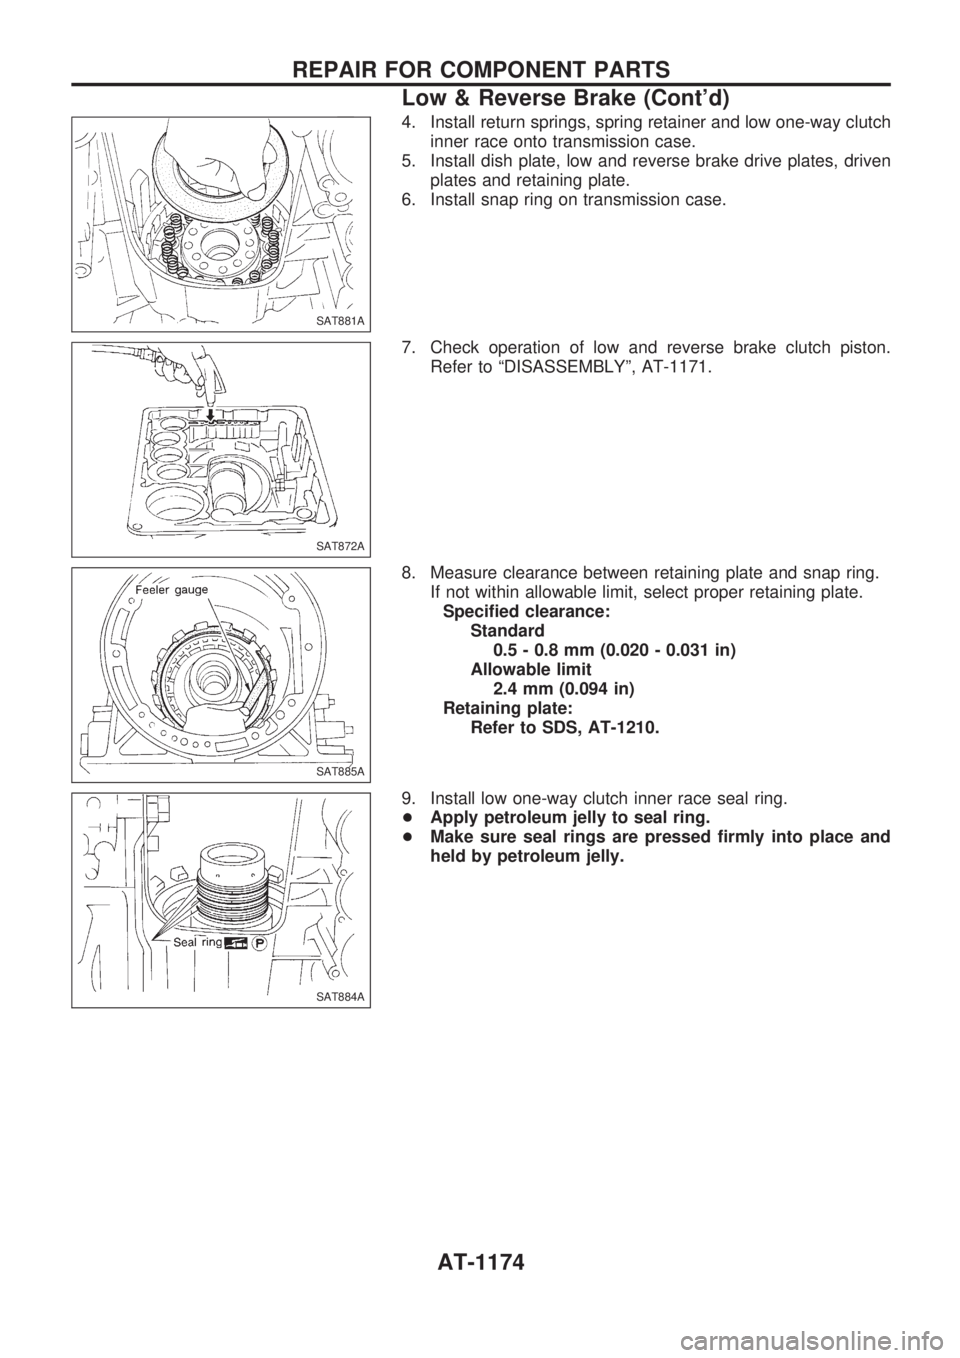
4. Install return springs, spring retainer and low one-way clutch
inner race onto transmission case.
5. Install dish plate, low and reverse brake drive plates, driven
plates and retaining plate.
6. Install snap ring on transmission case.
7. Check operation of low and reverse brake clutch piston.
Refer to ªDISASSEMBLYº, AT-1171.
8. Measure clearance between retaining plate and snap ring.
If not within allowable limit, select proper retaining plate.
Specified clearance:
Standard
0.5 - 0.8 mm (0.020 - 0.031 in)
Allowable limit
2.4 mm (0.094 in)
Retaining plate:
Refer to SDS, AT-1210.
9. Install low one-way clutch inner race seal ring.
+Apply petroleum jelly to seal ring.
+Make sure seal rings are pressed firmly into place and
held by petroleum jelly.
SAT881A
SAT872A
SAT885A
SAT884A
REPAIR FOR COMPONENT PARTS
Low & Reverse Brake (Cont'd)
AT-1174
Page 177 of 1033
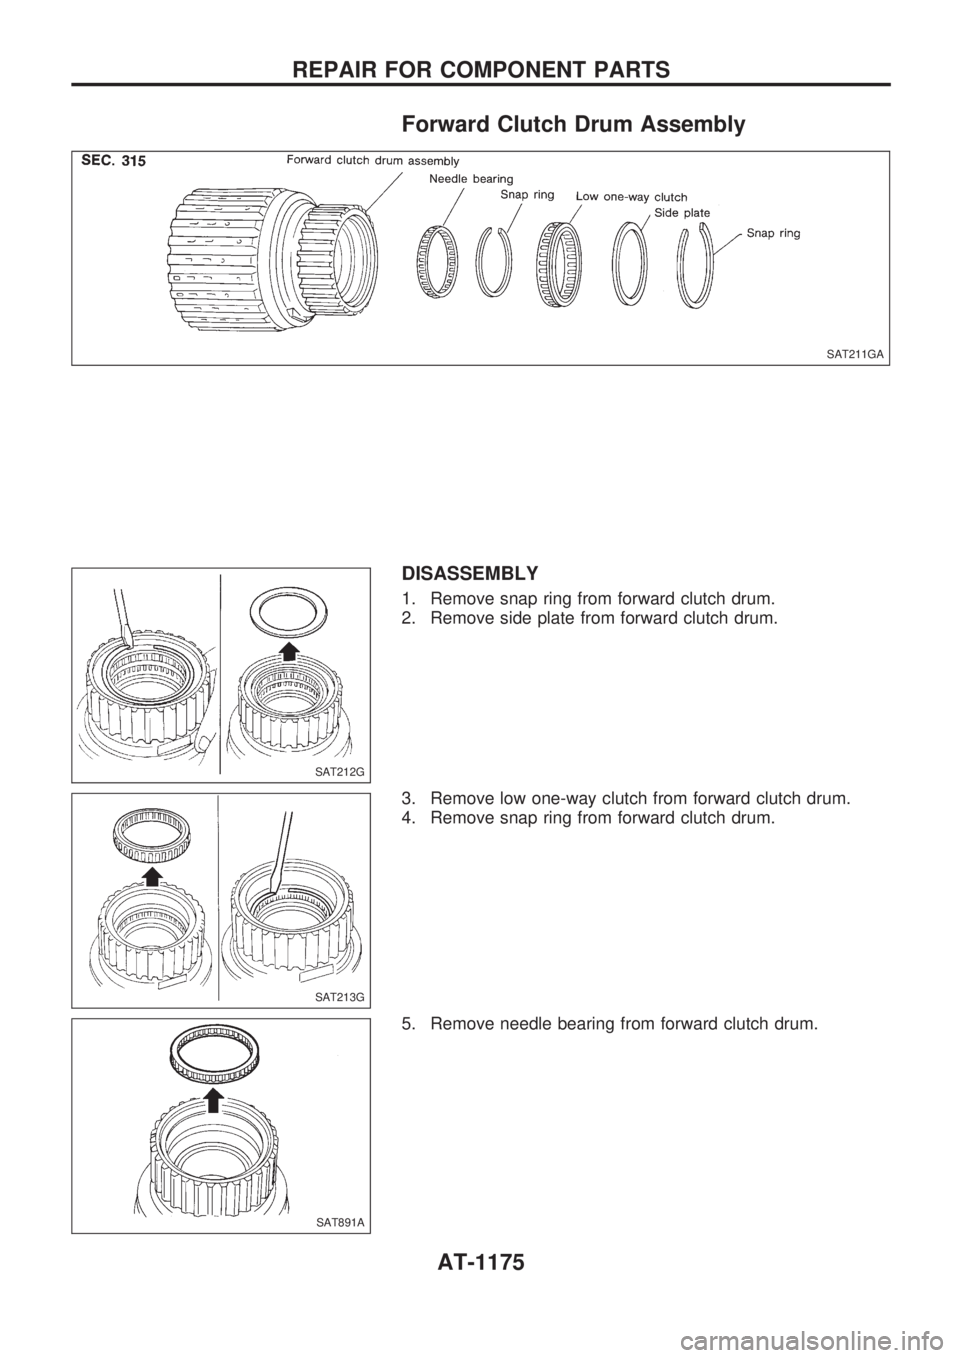
Forward Clutch Drum Assembly
DISASSEMBLY
1. Remove snap ring from forward clutch drum.
2. Remove side plate from forward clutch drum.
3. Remove low one-way clutch from forward clutch drum.
4. Remove snap ring from forward clutch drum.
5. Remove needle bearing from forward clutch drum.
SAT211GA
SAT212G
SAT213G
SAT891A
REPAIR FOR COMPONENT PARTS
AT-1175
Page 178 of 1033
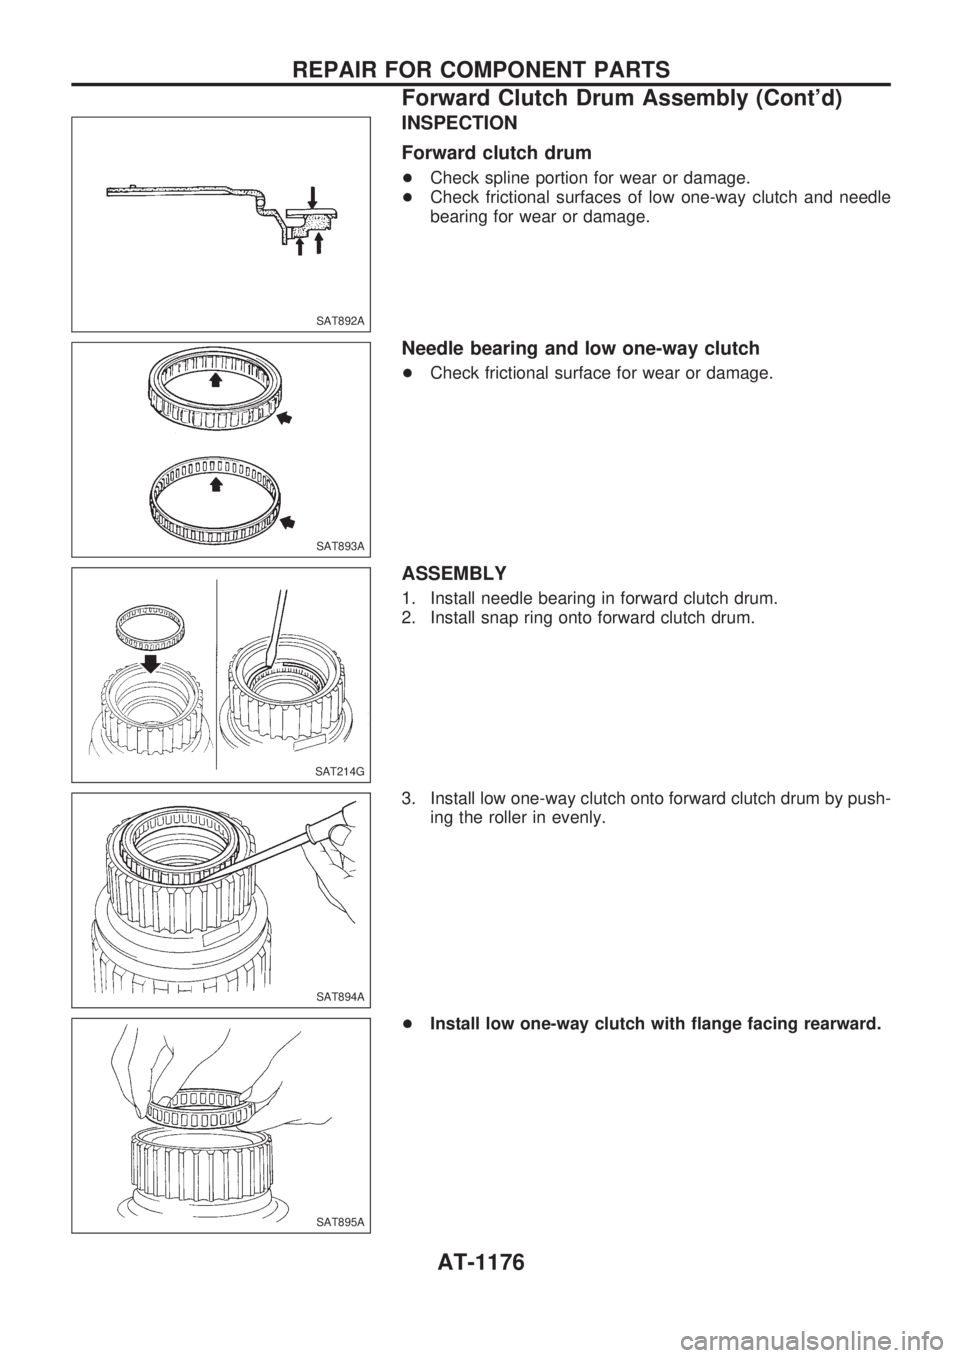
INSPECTION
Forward clutch drum
+Check spline portion for wear or damage.
+Check frictional surfaces of low one-way clutch and needle
bearing for wear or damage.
Needle bearing and low one-way clutch
+Check frictional surface for wear or damage.
ASSEMBLY
1. Install needle bearing in forward clutch drum.
2. Install snap ring onto forward clutch drum.
3. Install low one-way clutch onto forward clutch drum by push-
ing the roller in evenly.
+Install low one-way clutch with flange facing rearward.
SAT892A
SAT893A
SAT214G
SAT894A
SAT895A
REPAIR FOR COMPONENT PARTS
Forward Clutch Drum Assembly (Cont'd)
AT-1176
Page 179 of 1033
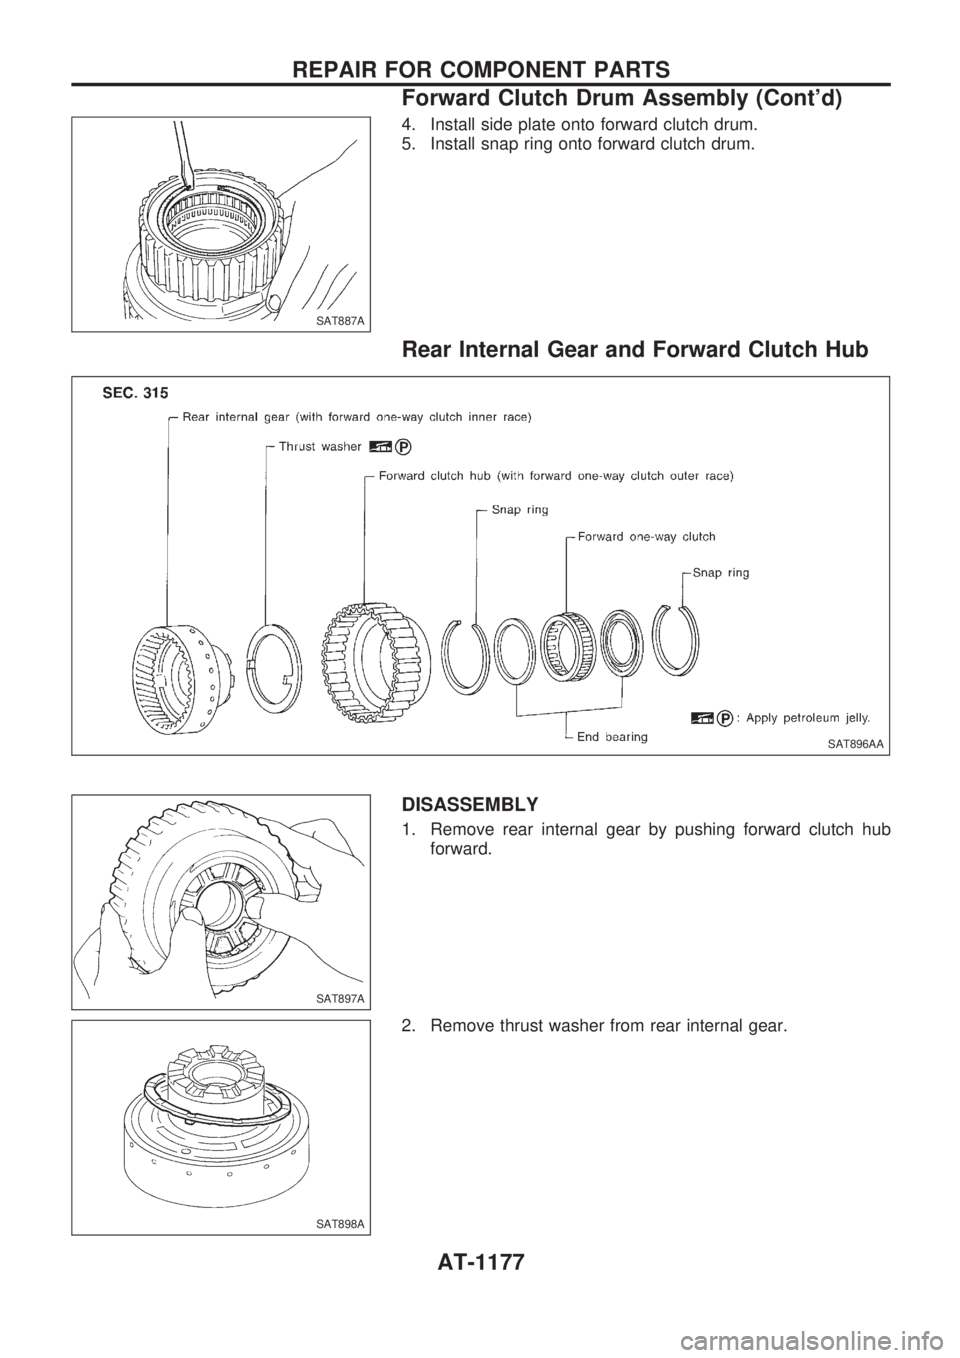
4. Install side plate onto forward clutch drum.
5. Install snap ring onto forward clutch drum.
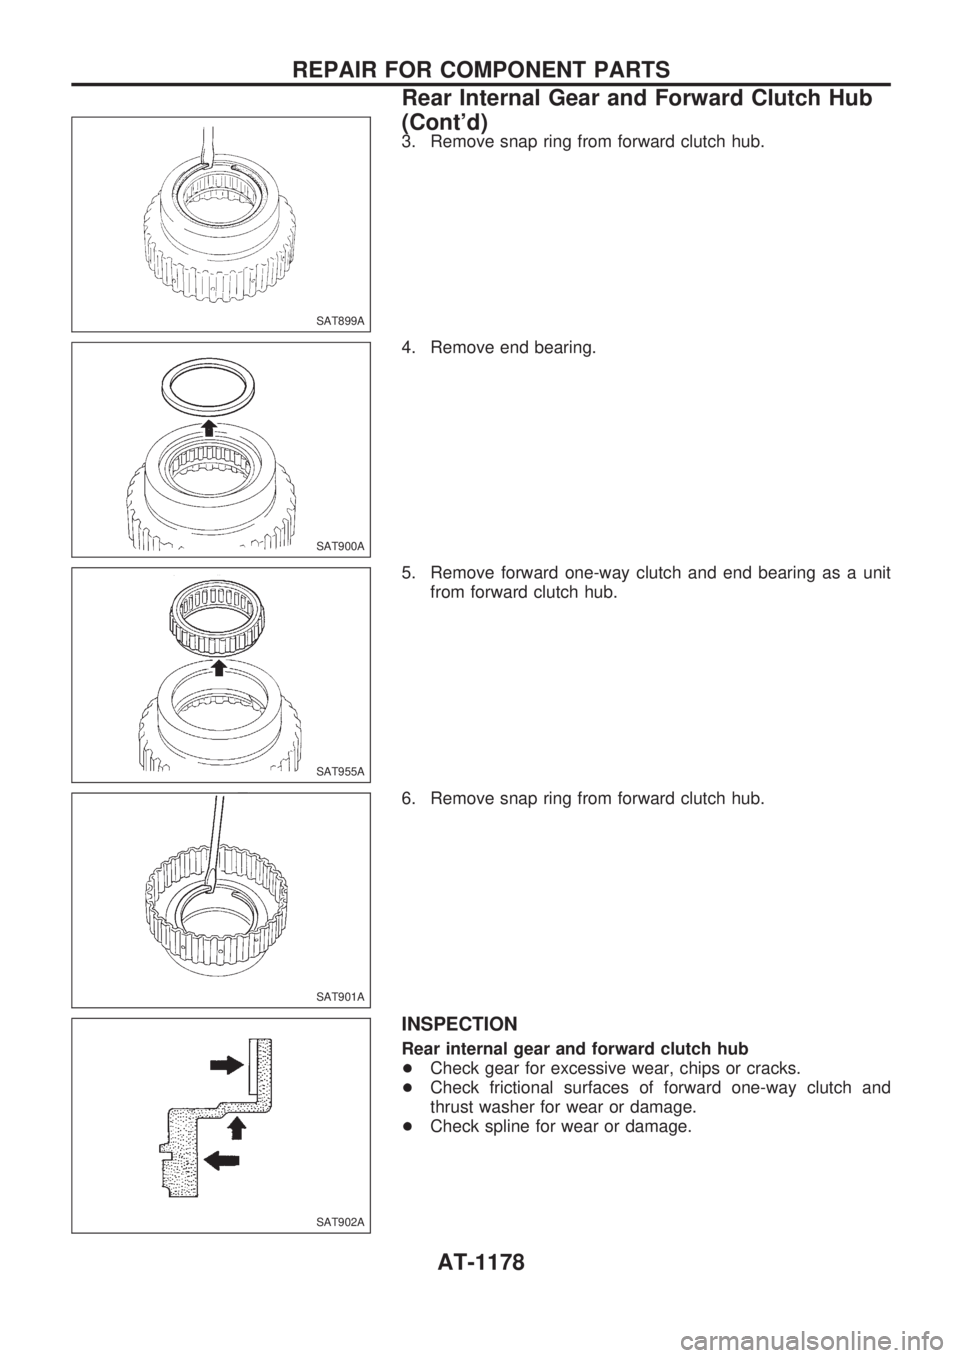
Rear Internal Gear and Forward Clutch Hub
DISASSEMBLY
1. Remove rear internal gear by pushing forward clutch hub
forward.
2. Remove thrust washer from rear internal gear.
SAT887A
SAT896AA
SAT897A
SAT898A
REPAIR FOR COMPONENT PARTS
Forward Clutch Drum Assembly (Cont'd)
AT-1177
Page 180 of 1033
3. Remove snap ring from forward clutch hub.
4. Remove end bearing.
5. Remove forward one-way clutch and end bearing as a unit
from forward clutch hub.
6. Remove snap ring from forward clutch hub.
INSPECTION
Rear internal gear and forward clutch hub
+Check gear for excessive wear, chips or cracks.
+Check frictional surfaces of forward one-way clutch and
thrust washer for wear or damage.
+Check spline for wear or damage.
SAT899A
SAT900A
SAT955A
SAT901A
SAT902A
REPAIR FOR COMPONENT PARTS
Rear Internal Gear and Forward Clutch Hub
(Cont'd)
AT-1178
Trending: tow, cooling, radiator, compression ratio, air suspension, headlamp, heating
