NISSAN PRIMERA 1999 Electronic Repair Manual
Manufacturer: NISSAN, Model Year: 1999, Model line: PRIMERA, Model: NISSAN PRIMERA 1999Pages: 2267, PDF Size: 35.74 MB
Page 1571 of 2267
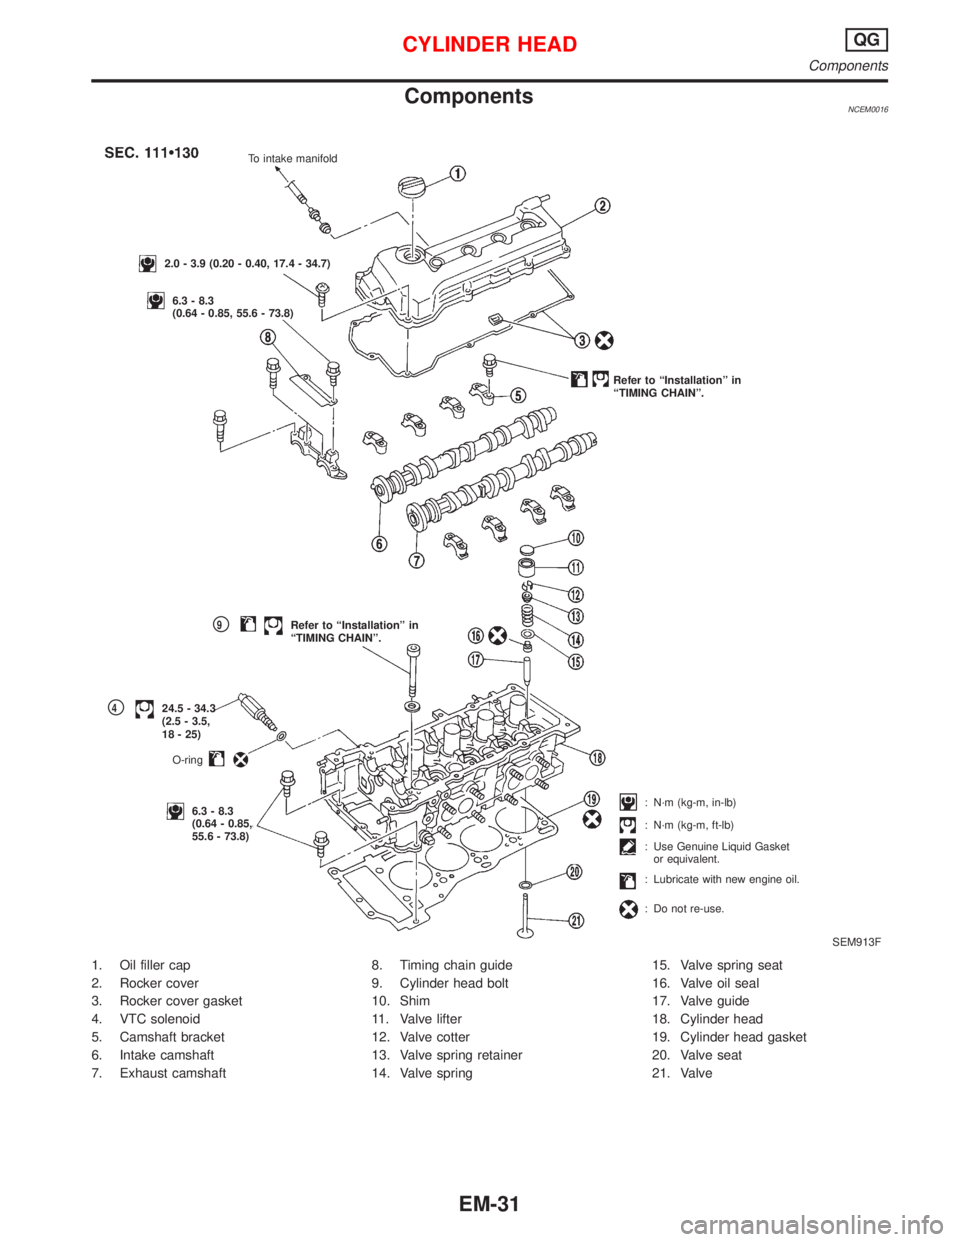
ComponentsNCEM0016
1. Oil filler cap
2. Rocker cover
3. Rocker cover gasket
4. VTC solenoid
5. Camshaft bracket
6. Intake camshaft
7. Exhaust camshaft8. Timing chain guide
9. Cylinder head bolt
10. Shim
11. Valve lifter
12. Valve cotter
13. Valve spring retainer
14. Valve spring15. Valve spring seat
16. Valve oil seal
17. Valve guide
18. Cylinder head
19. Cylinder head gasket
20. Valve seat
21. Valve
SEM913F To intake manifold
2.0 - 3.9 (0.20 - 0.40, 17.4 - 34.7)
6.3 - 8.3
(0.64 - 0.85, 55.6 - 73.8)
Refer to ªInstallationº in
ªTIMING CHAINº.
p9Refer to ªInstallationº in
ªTIMING CHAINº.
p424.5 - 34.3
(2.5 - 3.5,
18 - 25)
O-ring
6.3 - 8.3
(0.64 - 0.85,
55.6 - 73.8): N´m (kg-m, in-lb)
: N´m (kg-m, ft-lb)
: Use Genuine Liquid Gasket
or equivalent.
: Lubricate with new engine oil.
: Do not re-use.
CYLINDER HEADQG
Components
EM-31
Page 1572 of 2267
CAUTION:
IWhen installing camshaft and oil seal, lubricate contacting
surfaces with new engine oil.
IWhen tightening cylinder head bolts, camshaft sprocket
bolts and camshaft bracket bolts, lubricate bolt threads
and seat surfaces with new engine oil.
IAttach tags to valve lifters so as not to mix them up.
RemovalNCEM00171. Drain engine coolant from radiator and cylinder block.
Be careful not to spill coolant on drive belts.
2. Release fuel pressure.
Refer to EC section (ªFuel Pressure Releaseº, ªBASIC SER-
VICE PROCEDUREº).
3. Remove air duct to intake manifold collector.
4. Remove front undercovers.
5. Remove front exhaust tube.
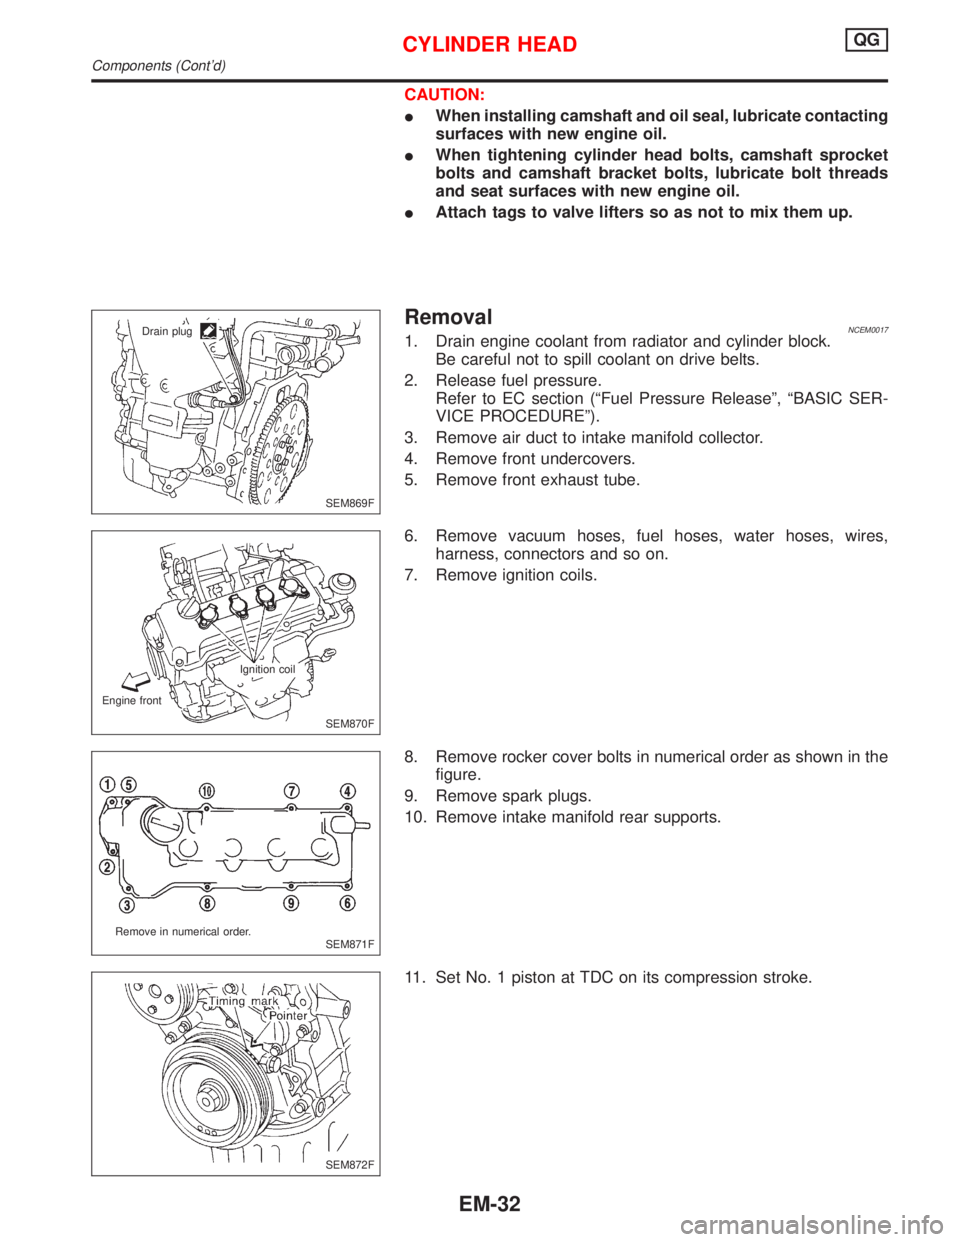
6. Remove vacuum hoses, fuel hoses, water hoses, wires,
harness, connectors and so on.
7. Remove ignition coils.
8. Remove rocker cover bolts in numerical order as shown in the
figure.
9. Remove spark plugs.
10. Remove intake manifold rear supports.
11. Set No. 1 piston at TDC on its compression stroke.
SEM869F Drain plug
SEM870F Ignition coil
Engine front
SEM871F Remove in numerical order.
SEM872F
CYLINDER HEADQG
Components (Cont'd)
EM-32
Page 1573 of 2267
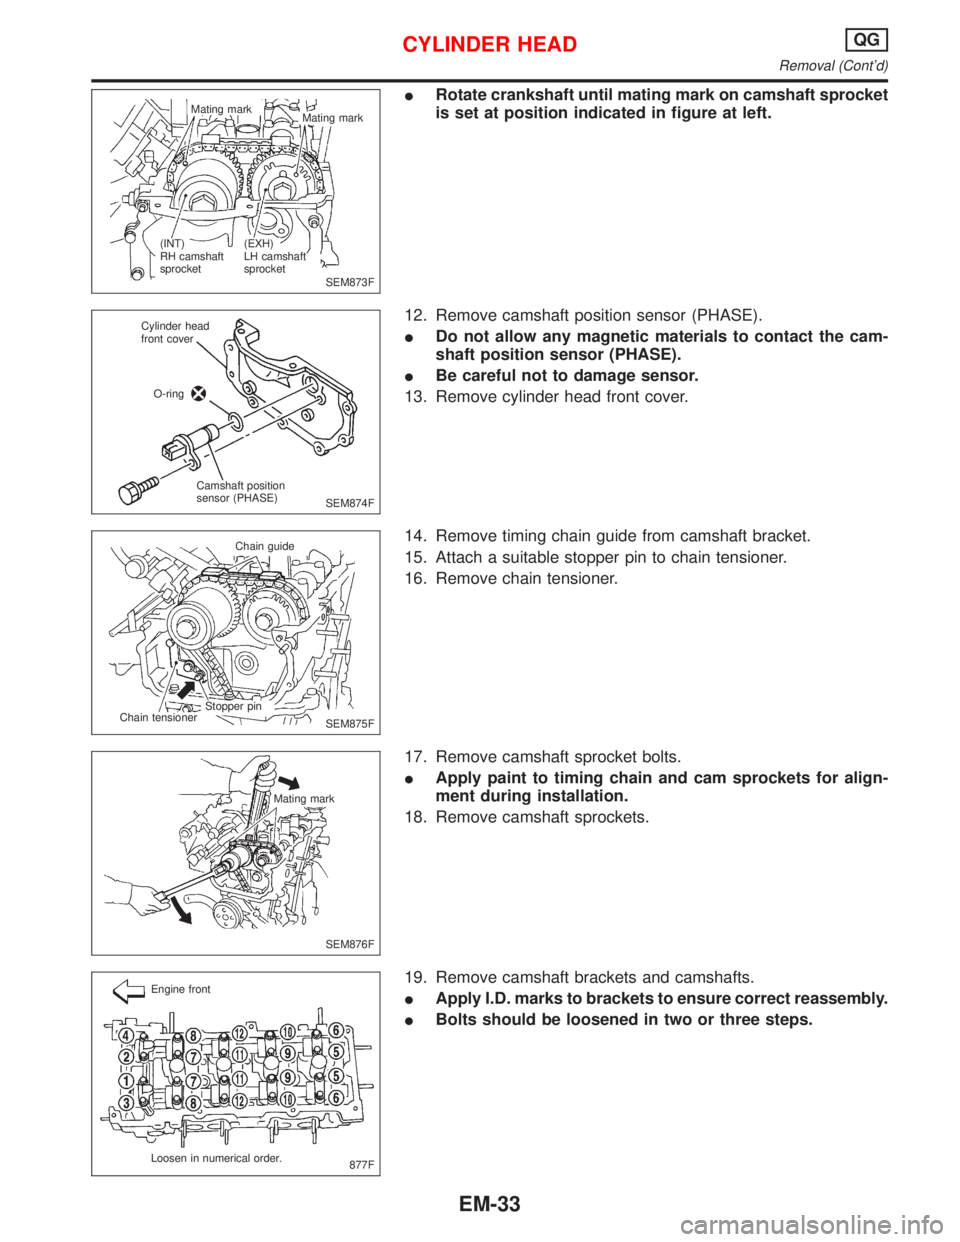
IRotate crankshaft until mating mark on camshaft sprocket
is set at position indicated in figure at left.
12. Remove camshaft position sensor (PHASE).
IDo not allow any magnetic materials to contact the cam-
shaft position sensor (PHASE).
IBe careful not to damage sensor.
13. Remove cylinder head front cover.
14. Remove timing chain guide from camshaft bracket.
15. Attach a suitable stopper pin to chain tensioner.
16. Remove chain tensioner.
17. Remove camshaft sprocket bolts.
IApply paint to timing chain and cam sprockets for align-
ment during installation.
18. Remove camshaft sprockets.
19. Remove camshaft brackets and camshafts.
IApply I.D. marks to brackets to ensure correct reassembly.
IBolts should be loosened in two or three steps.
SEM873F Mating mark
Mating mark
(EXH)
LH camshaft
sprocket (INT)
RH camshaft
sprocket
SEM874F Cylinder head
front cover
O-ring
Camshaft position
sensor (PHASE)
SEM875F Chain guide
Stopper pin
Chain tensioner
SEM876F Mating mark
877F Engine front
Loosen in numerical order.
CYLINDER HEADQG
Removal (Cont'd)
EM-33
Page 1574 of 2267
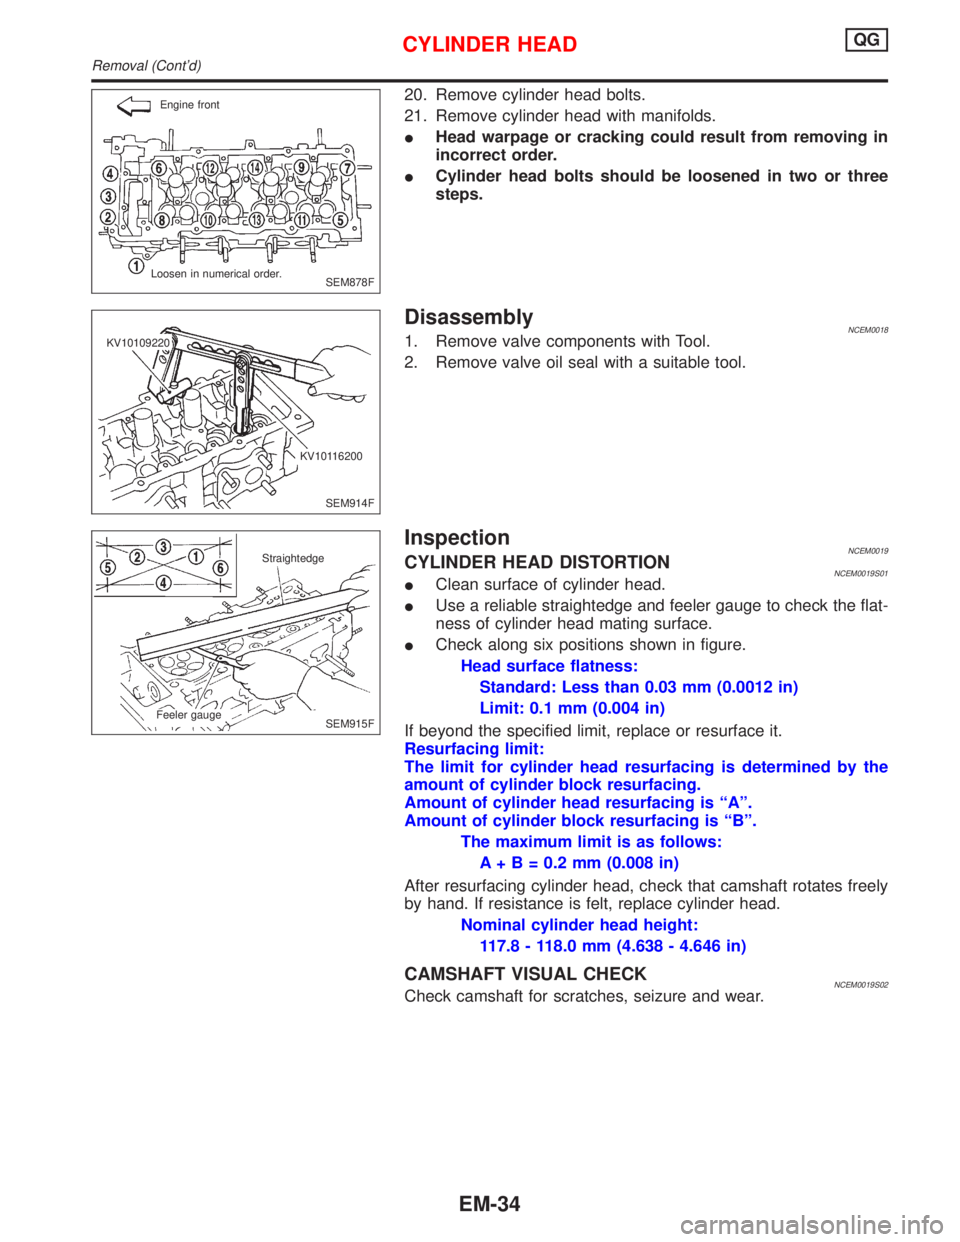
20. Remove cylinder head bolts.
21. Remove cylinder head with manifolds.
IHead warpage or cracking could result from removing in
incorrect order.
ICylinder head bolts should be loosened in two or three
steps.
DisassemblyNCEM00181. Remove valve components with Tool.
2. Remove valve oil seal with a suitable tool.
InspectionNCEM0019CYLINDER HEAD DISTORTIONNCEM0019S01IClean surface of cylinder head.
IUse a reliable straightedge and feeler gauge to check the flat-
ness of cylinder head mating surface.
ICheck along six positions shown in figure.
Head surface flatness:
Standard: Less than 0.03 mm (0.0012 in)
Limit: 0.1 mm (0.004 in)
If beyond the specified limit, replace or resurface it.
Resurfacing limit:
The limit for cylinder head resurfacing is determined by the
amount of cylinder block resurfacing.
Amount of cylinder head resurfacing is ªAº.
Amount of cylinder block resurfacing is ªBº.
The maximum limit is as follows:
A + B = 0.2 mm (0.008 in)
After resurfacing cylinder head, check that camshaft rotates freely
by hand. If resistance is felt, replace cylinder head.
Nominal cylinder head height:
117.8 - 118.0 mm (4.638 - 4.646 in)
CAMSHAFT VISUAL CHECKNCEM0019S02Check camshaft for scratches, seizure and wear.
SEM878F Loosen in numerical order.Engine front
SEM914F KV10109220
KV10116200
SEM915F Straightedge
Feeler gauge
CYLINDER HEADQG
Removal (Cont'd)
EM-34
Page 1575 of 2267
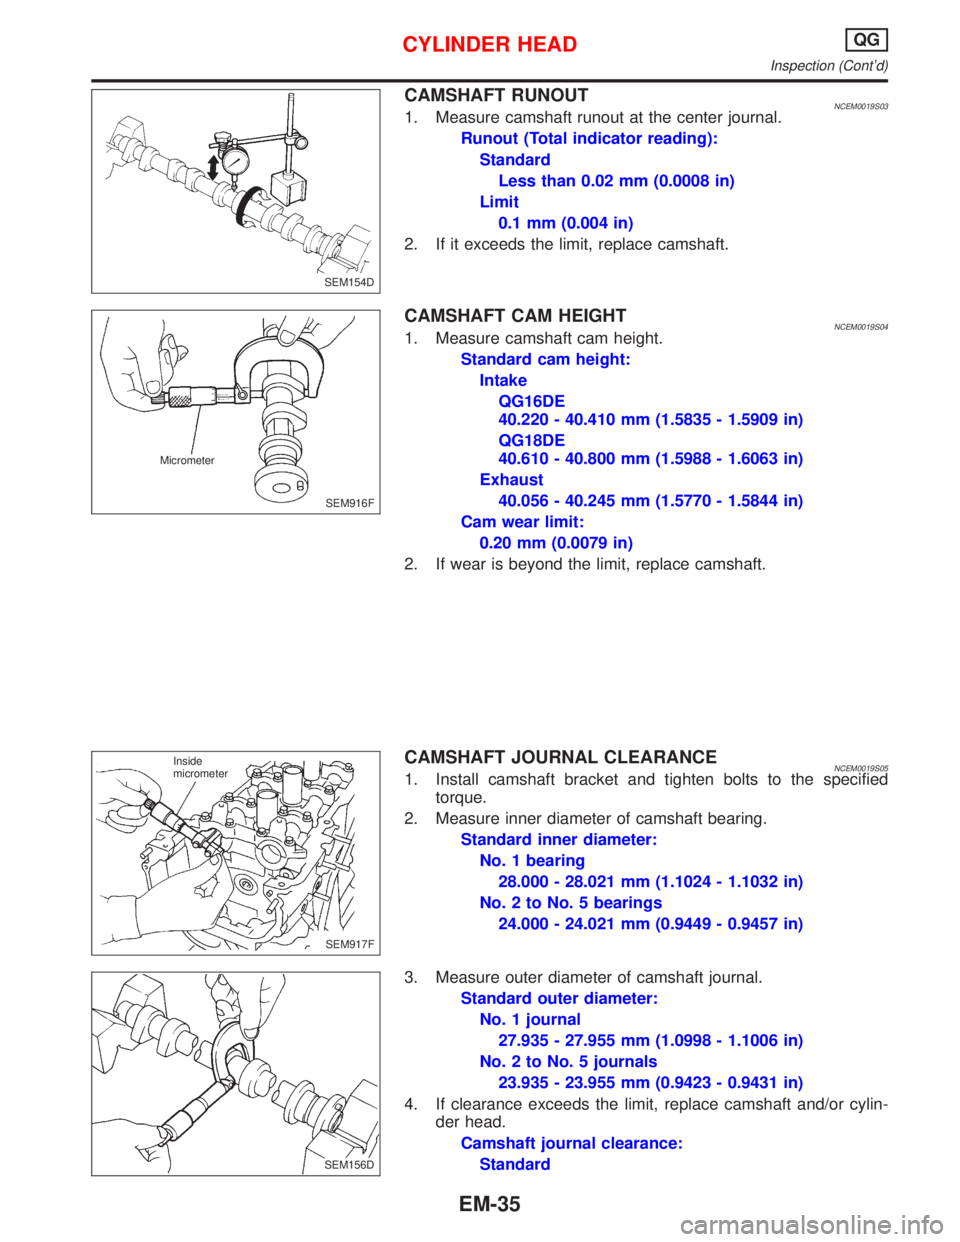
CAMSHAFT RUNOUTNCEM0019S031. Measure camshaft runout at the center journal.
Runout (Total indicator reading):
Standard
Less than 0.02 mm (0.0008 in)
Limit
0.1 mm (0.004 in)
2. If it exceeds the limit, replace camshaft.
CAMSHAFT CAM HEIGHTNCEM0019S041. Measure camshaft cam height.
Standard cam height:
Intake
QG16DE
40.220 - 40.410 mm (1.5835 - 1.5909 in)
QG18DE
40.610 - 40.800 mm (1.5988 - 1.6063 in)
Exhaust
40.056 - 40.245 mm (1.5770 - 1.5844 in)
Cam wear limit:
0.20 mm (0.0079 in)
2. If wear is beyond the limit, replace camshaft.
CAMSHAFT JOURNAL CLEARANCENCEM0019S051. Install camshaft bracket and tighten bolts to the specified
torque.
2. Measure inner diameter of camshaft bearing.
Standard inner diameter:
No. 1 bearing
28.000 - 28.021 mm (1.1024 - 1.1032 in)
No. 2 to No. 5 bearings
24.000 - 24.021 mm (0.9449 - 0.9457 in)
3. Measure outer diameter of camshaft journal.
Standard outer diameter:
No. 1 journal
27.935 - 27.955 mm (1.0998 - 1.1006 in)
No. 2 to No. 5 journals
23.935 - 23.955 mm (0.9423 - 0.9431 in)
4. If clearance exceeds the limit, replace camshaft and/or cylin-
der head.
Camshaft journal clearance:
Standard
SEM154D
SEM916F Micrometer
SEM917F Inside
micrometer
SEM156D
CYLINDER HEADQG
Inspection (Cont'd)
EM-35
Page 1576 of 2267
0.045 - 0.086 mm (0.0018 - 0.0034 in)
Limit
0.15 mm (0.0059 in)
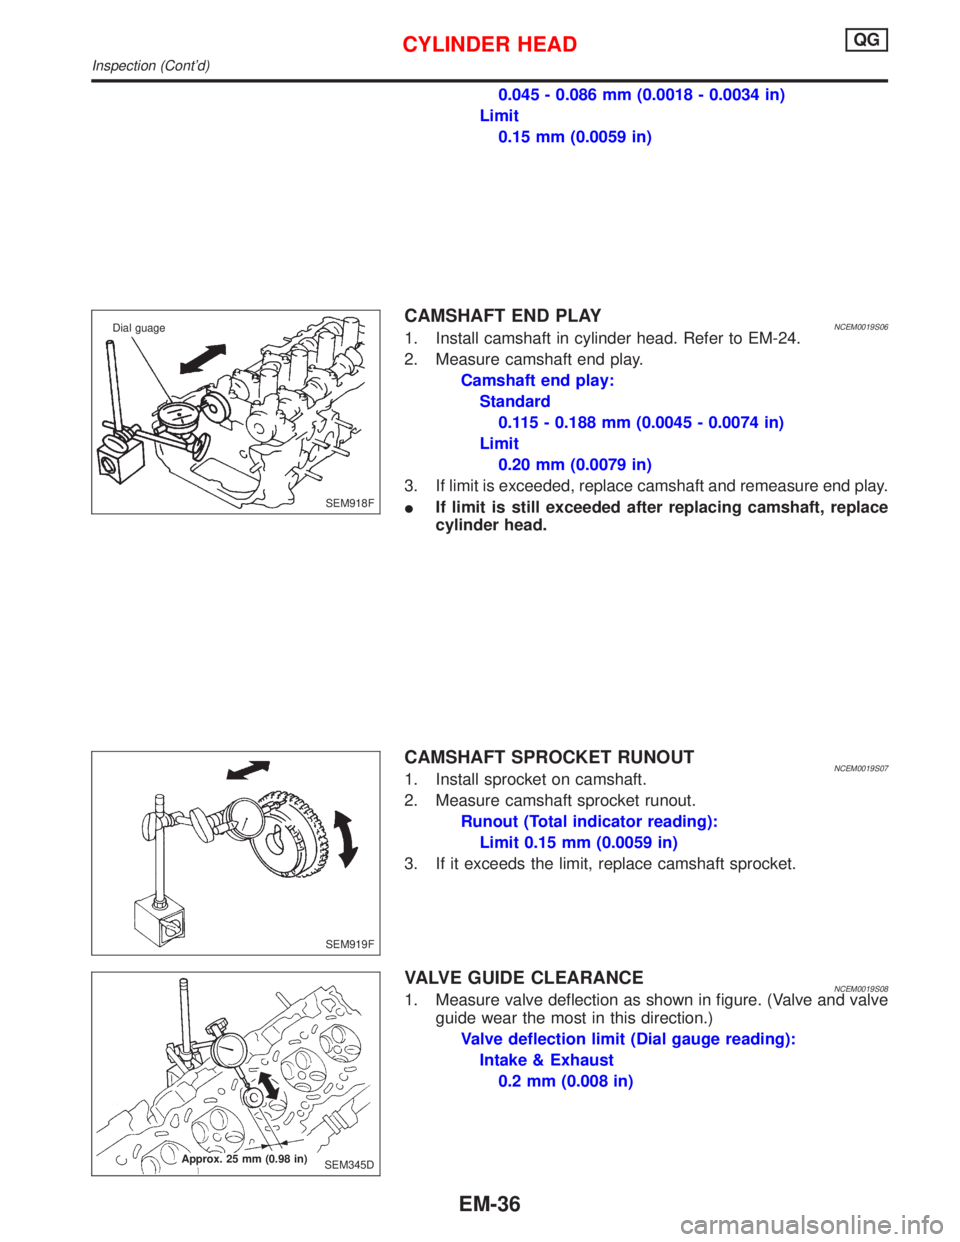
CAMSHAFT END PLAYNCEM0019S061. Install camshaft in cylinder head. Refer to EM-24.
2. Measure camshaft end play.
Camshaft end play:
Standard
0.115 - 0.188 mm (0.0045 - 0.0074 in)
Limit
0.20 mm (0.0079 in)
3. If limit is exceeded, replace camshaft and remeasure end play.
IIf limit is still exceeded after replacing camshaft, replace
cylinder head.
CAMSHAFT SPROCKET RUNOUTNCEM0019S071. Install sprocket on camshaft.
2. Measure camshaft sprocket runout.
Runout (Total indicator reading):
Limit 0.15 mm (0.0059 in)
3. If it exceeds the limit, replace camshaft sprocket.
VALVE GUIDE CLEARANCENCEM0019S081. Measure valve deflection as shown in figure. (Valve and valve
guide wear the most in this direction.)
Valve deflection limit (Dial gauge reading):
Intake & Exhaust
0.2 mm (0.008 in)
SEM918F Dial guage
SEM919F
SEM345D Approx. 25 mm (0.98 in)
CYLINDER HEADQG
Inspection (Cont'd)
EM-36
Page 1577 of 2267
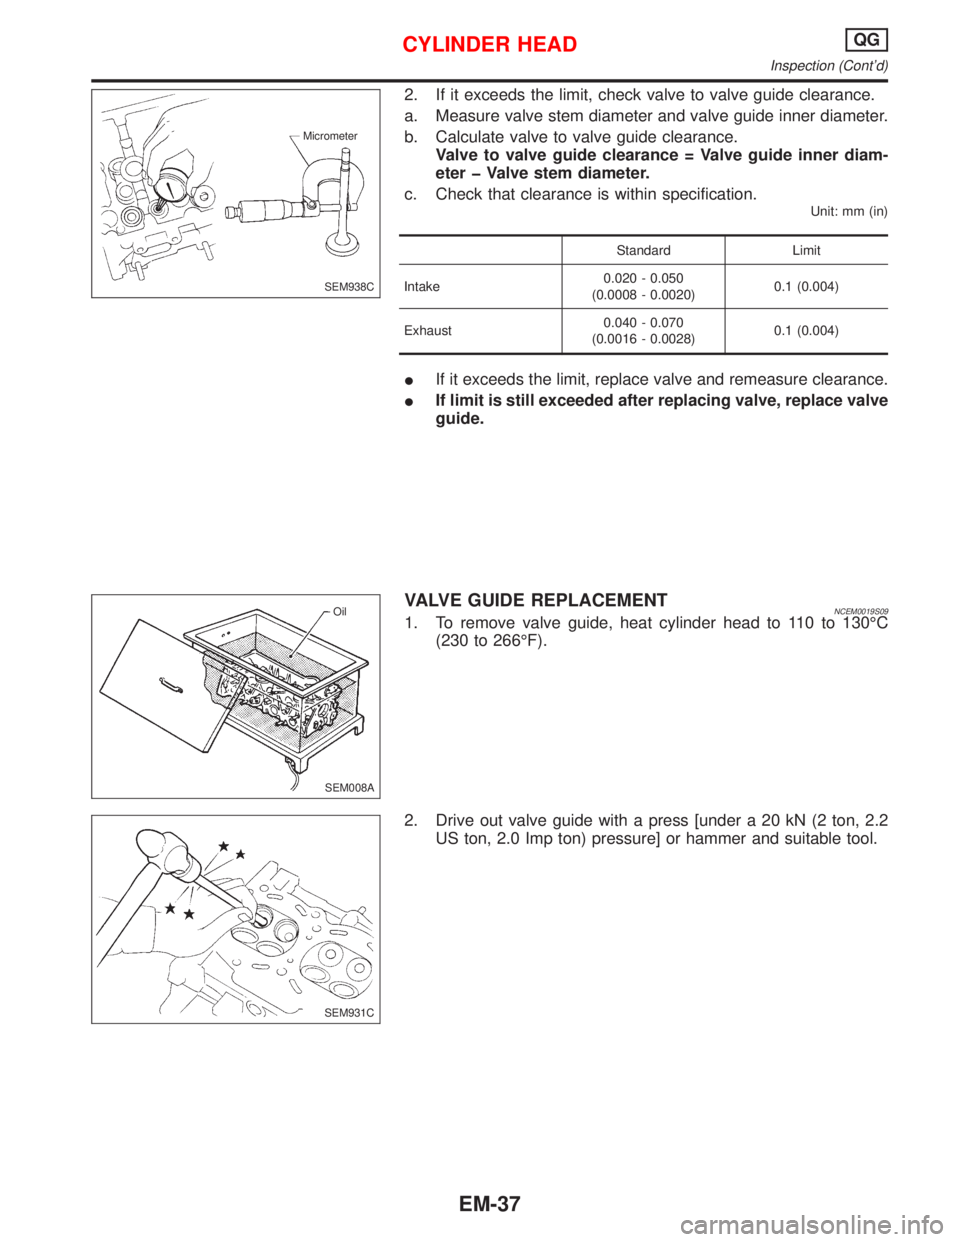
2. If it exceeds the limit, check valve to valve guide clearance.
a. Measure valve stem diameter and valve guide inner diameter.
b. Calculate valve to valve guide clearance.
Valve to valve guide clearance = Valve guide inner diam-
eter þ Valve stem diameter.
c. Check that clearance is within specification.
Unit: mm (in)
Standard Limit
Intake0.020 - 0.050
(0.0008 - 0.0020)0.1 (0.004)
Exhaust0.040 - 0.070
(0.0016 - 0.0028)0.1 (0.004)
IIf it exceeds the limit, replace valve and remeasure clearance.
IIf limit is still exceeded after replacing valve, replace valve
guide.
VALVE GUIDE REPLACEMENTNCEM0019S091. To remove valve guide, heat cylinder head to 110 to 130ÉC
(230 to 266ÉF).
2. Drive out valve guide with a press [under a 20 kN (2 ton, 2.2
US ton, 2.0 Imp ton) pressure] or hammer and suitable tool.
SEM938C Micrometer
SEM008AOil
SEM931C
CYLINDER HEADQG
Inspection (Cont'd)
EM-37
Page 1578 of 2267
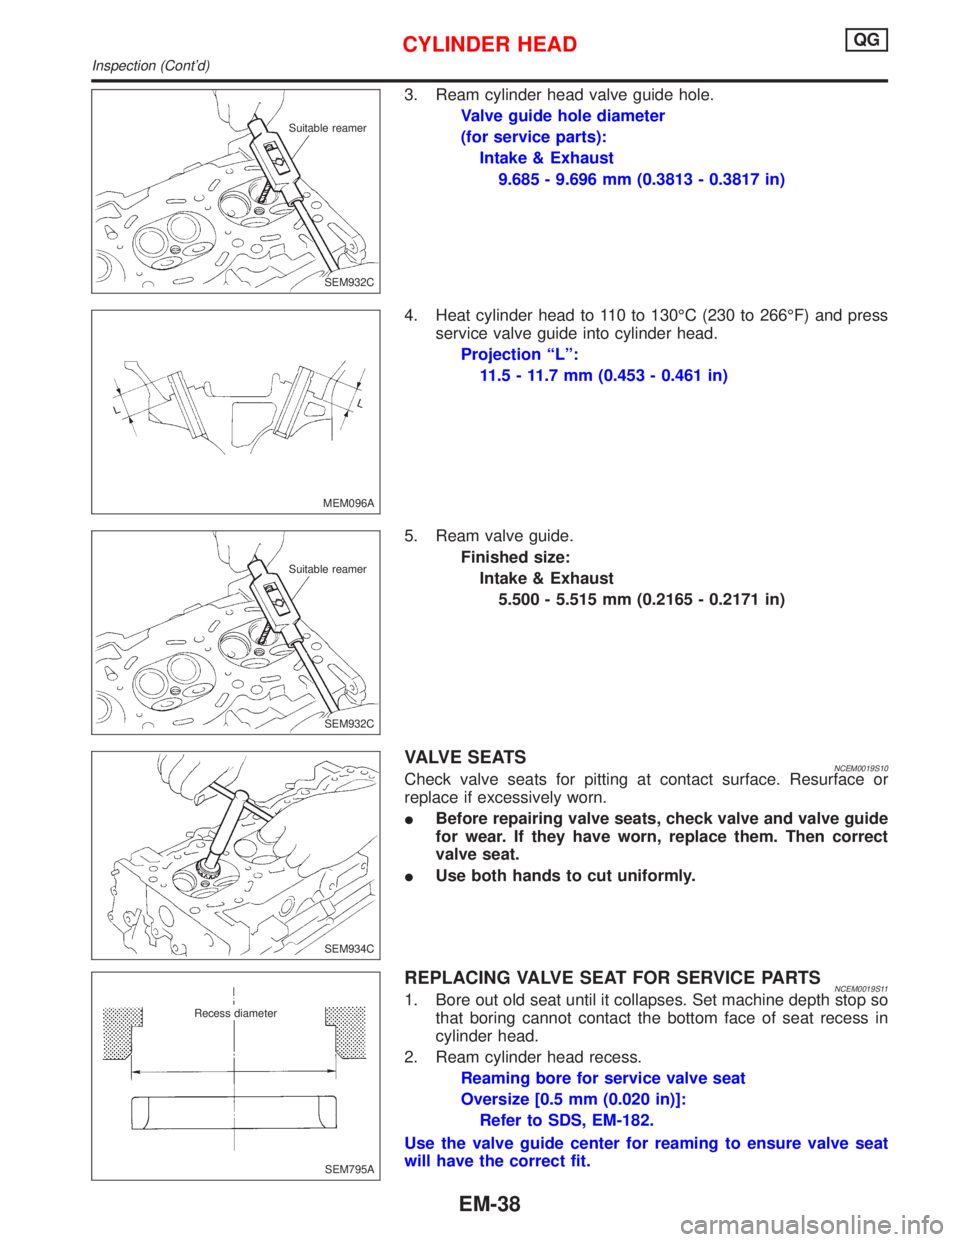
3. Ream cylinder head valve guide hole.
Valve guide hole diameter
(for service parts):
Intake & Exhaust
9.685 - 9.696 mm (0.3813 - 0.3817 in)
4. Heat cylinder head to 110 to 130ÉC (230 to 266ÉF) and press
service valve guide into cylinder head.
Projection ªLº:
11.5 - 11.7 mm (0.453 - 0.461 in)
5. Ream valve guide.
Finished size:
Intake & Exhaust
5.500 - 5.515 mm (0.2165 - 0.2171 in)
VALVE SEATSNCEM0019S10Check valve seats for pitting at contact surface. Resurface or
replace if excessively worn.
IBefore repairing valve seats, check valve and valve guide
for wear. If they have worn, replace them. Then correct
valve seat.
IUse both hands to cut uniformly.
REPLACING VALVE SEAT FOR SERVICE PARTSNCEM0019S111. Bore out old seat until it collapses. Set machine depth stop so
that boring cannot contact the bottom face of seat recess in
cylinder head.
2. Ream cylinder head recess.
Reaming bore for service valve seat
Oversize [0.5 mm (0.020 in)]:
Refer to SDS, EM-182.
Use the valve guide center for reaming to ensure valve seat
will have the correct fit.
SEM932C Suitable reamer
MEM096A
SEM932C Suitable reamer
SEM934C
SEM795A
.Recess diameter
CYLINDER HEADQG
Inspection (Cont'd)
EM-38
Page 1579 of 2267
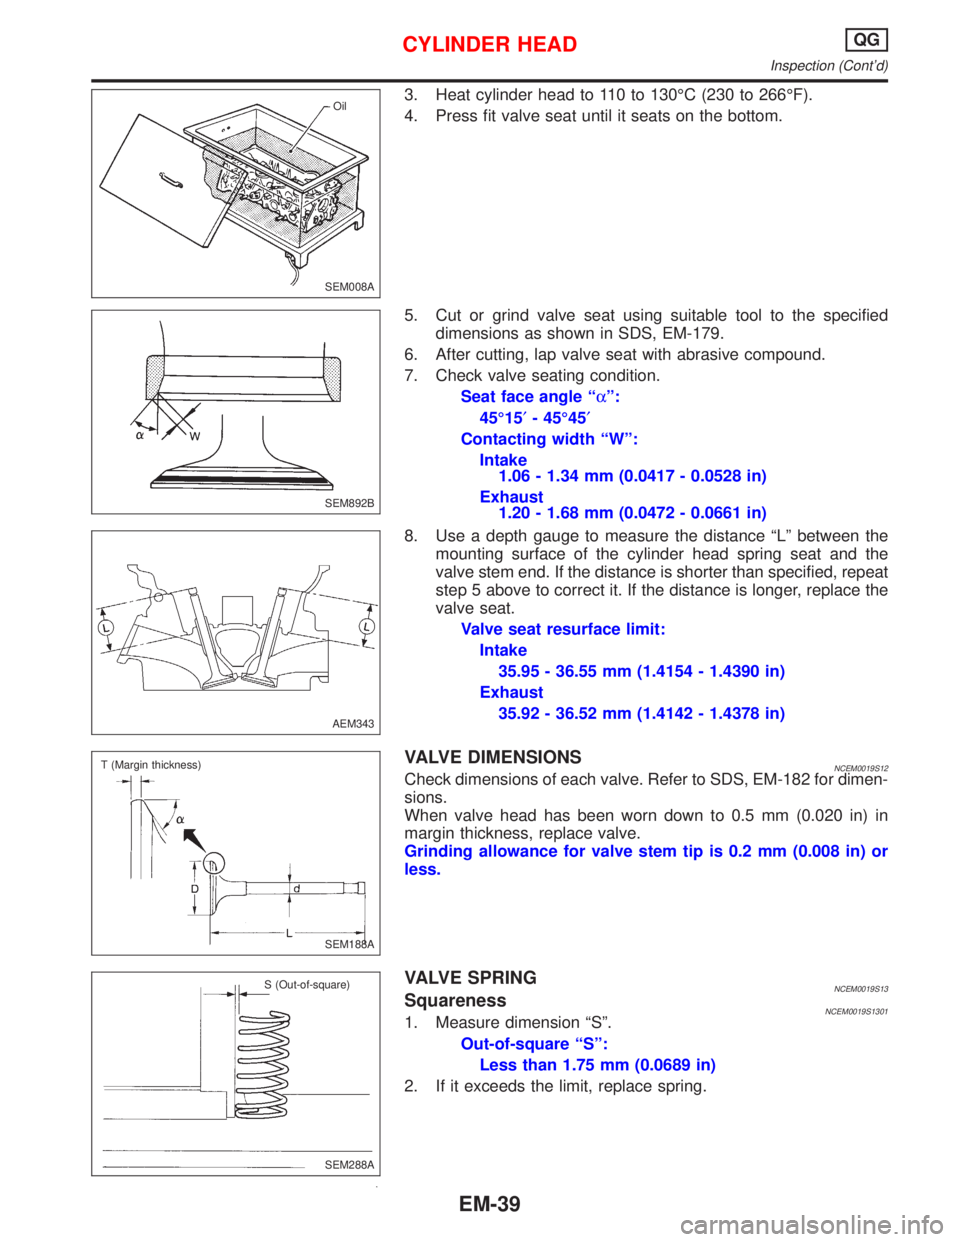
3. Heat cylinder head to 110 to 130ÉC (230 to 266ÉF).
4. Press fit valve seat until it seats on the bottom.
5. Cut or grind valve seat using suitable tool to the specified
dimensions as shown in SDS, EM-179.
6. After cutting, lap valve seat with abrasive compound.
7. Check valve seating condition.
Seat face angle ªaº:
45É15¢- 45É45¢
Contacting width ªWº:
Intake
1.06 - 1.34 mm (0.0417 - 0.0528 in)
Exhaust
1.20 - 1.68 mm (0.0472 - 0.0661 in)
8. Use a depth gauge to measure the distance ªLº between the
mounting surface of the cylinder head spring seat and the
valve stem end. If the distance is shorter than specified, repeat
step 5 above to correct it. If the distance is longer, replace the
valve seat.
Valve seat resurface limit:
Intake
35.95 - 36.55 mm (1.4154 - 1.4390 in)
Exhaust
35.92 - 36.52 mm (1.4142 - 1.4378 in)
VALVE DIMENSIONSNCEM0019S12Check dimensions of each valve. Refer to SDS, EM-182 for dimen-
sions.
When valve head has been worn down to 0.5 mm (0.020 in) in
margin thickness, replace valve.
Grinding allowance for valve stem tip is 0.2 mm (0.008 in) or
less.
VALVE SPRINGNCEM0019S13SquarenessNCEM0019S13011. Measure dimension ªSº.
Out-of-square ªSº:
Less than 1.75 mm (0.0689 in)
2. If it exceeds the limit, replace spring.
SEM008AOil
SEM892B
AEM343
SEM188A T (Margin thickness)
SEM288A S (Out-of-square)
CYLINDER HEADQG
Inspection (Cont'd)
EM-39
Page 1580 of 2267
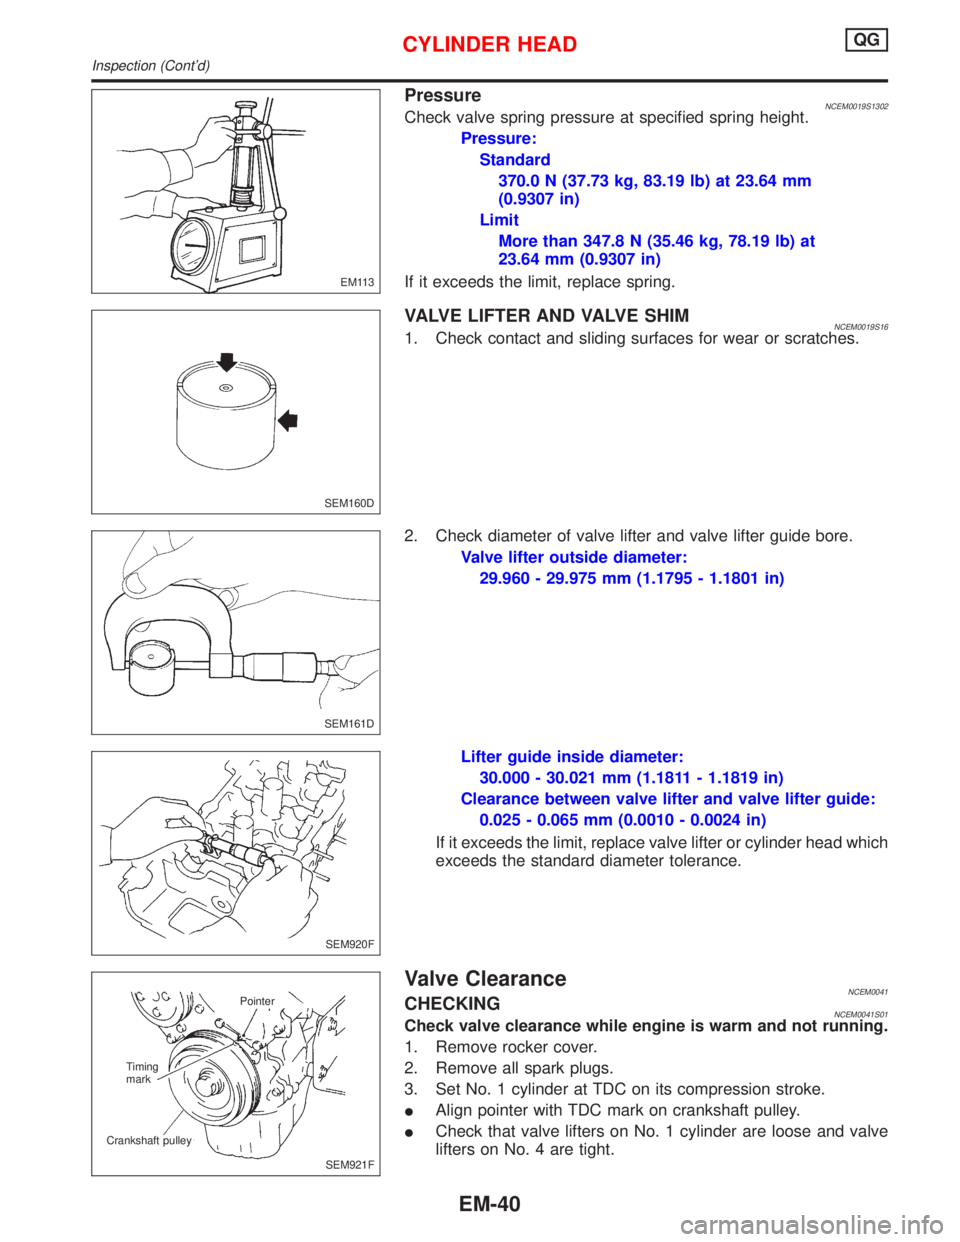
PressureNCEM0019S1302Check valve spring pressure at specified spring height.
Pressure:
Standard
370.0 N (37.73 kg, 83.19 lb) at 23.64 mm
(0.9307 in)
Limit
More than 347.8 N (35.46 kg, 78.19 lb) at
23.64 mm (0.9307 in)
If it exceeds the limit, replace spring.
VALVE LIFTER AND VALVE SHIMNCEM0019S161. Check contact and sliding surfaces for wear or scratches.
2. Check diameter of valve lifter and valve lifter guide bore.
Valve lifter outside diameter:
29.960 - 29.975 mm (1.1795 - 1.1801 in)
Lifter guide inside diameter:
30.000 - 30.021 mm (1.1811 - 1.1819 in)
Clearance between valve lifter and valve lifter guide:
0.025 - 0.065 mm (0.0010 - 0.0024 in)
If it exceeds the limit, replace valve lifter or cylinder head which
exceeds the standard diameter tolerance.
Valve ClearanceNCEM0041CHECKINGNCEM0041S01Check valve clearance while engine is warm and not running.
1. Remove rocker cover.
2. Remove all spark plugs.
3. Set No. 1 cylinder at TDC on its compression stroke.
IAlign pointer with TDC mark on crankshaft pulley.
ICheck that valve lifters on No. 1 cylinder are loose and valve
lifters on No. 4 are tight.
EM113
SEM160D
SEM161D
SEM920F
SEM921F Pointer
Timing
mark
Crankshaft pulley
CYLINDER HEADQG
Inspection (Cont'd)
EM-40