NISSAN PRIMERA 1999 Electronic Repair Manual
Manufacturer: NISSAN, Model Year: 1999, Model line: PRIMERA, Model: NISSAN PRIMERA 1999Pages: 2267, PDF Size: 35.74 MB
Page 1591 of 2267
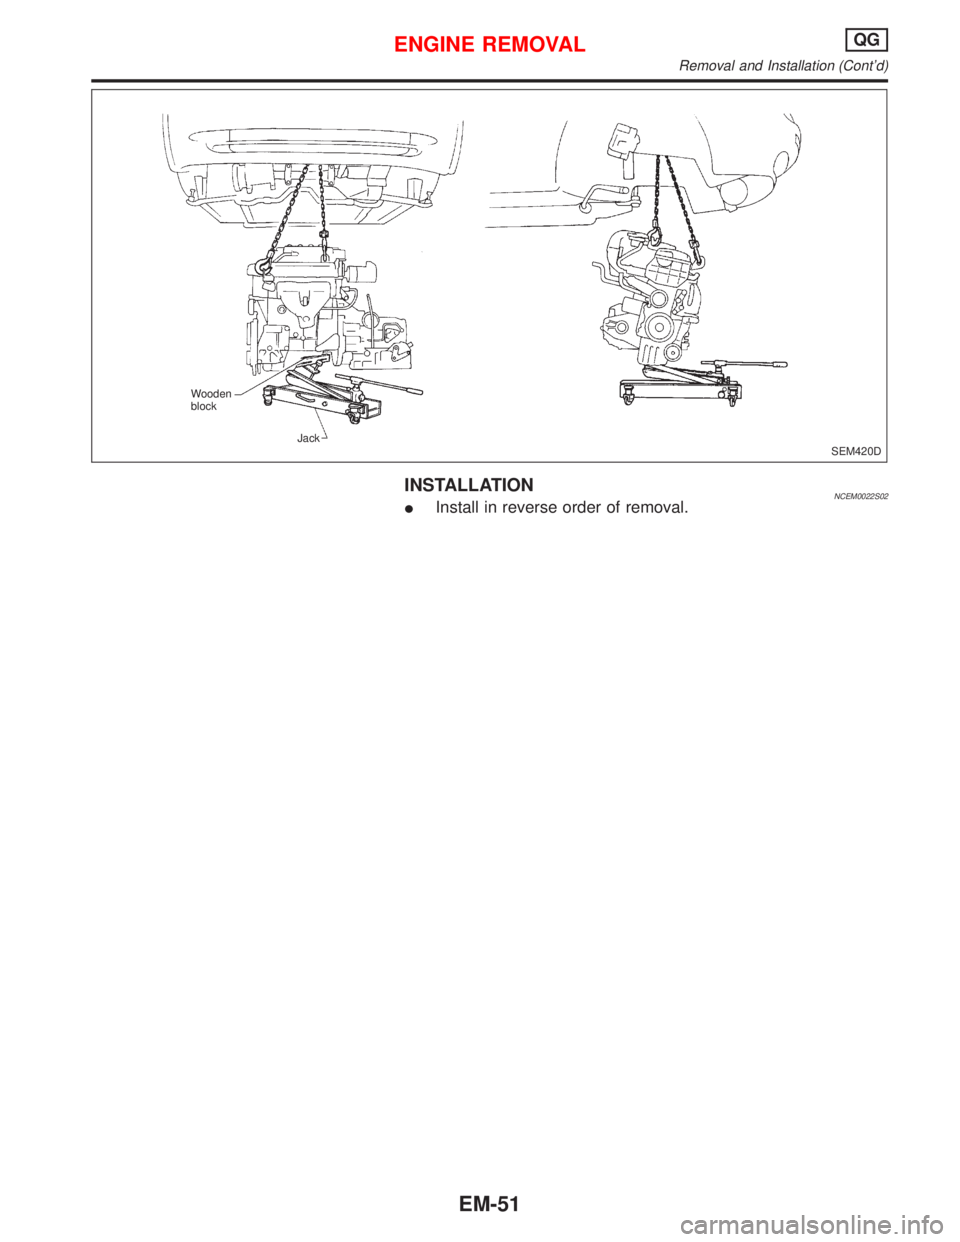
INSTALLATIONNCEM0022S02IInstall in reverse order of removal.
SEM420D Wooden
block
Jack
ENGINE REMOVALQG
Removal and Installation (Cont'd)
EM-51
Page 1592 of 2267
Components
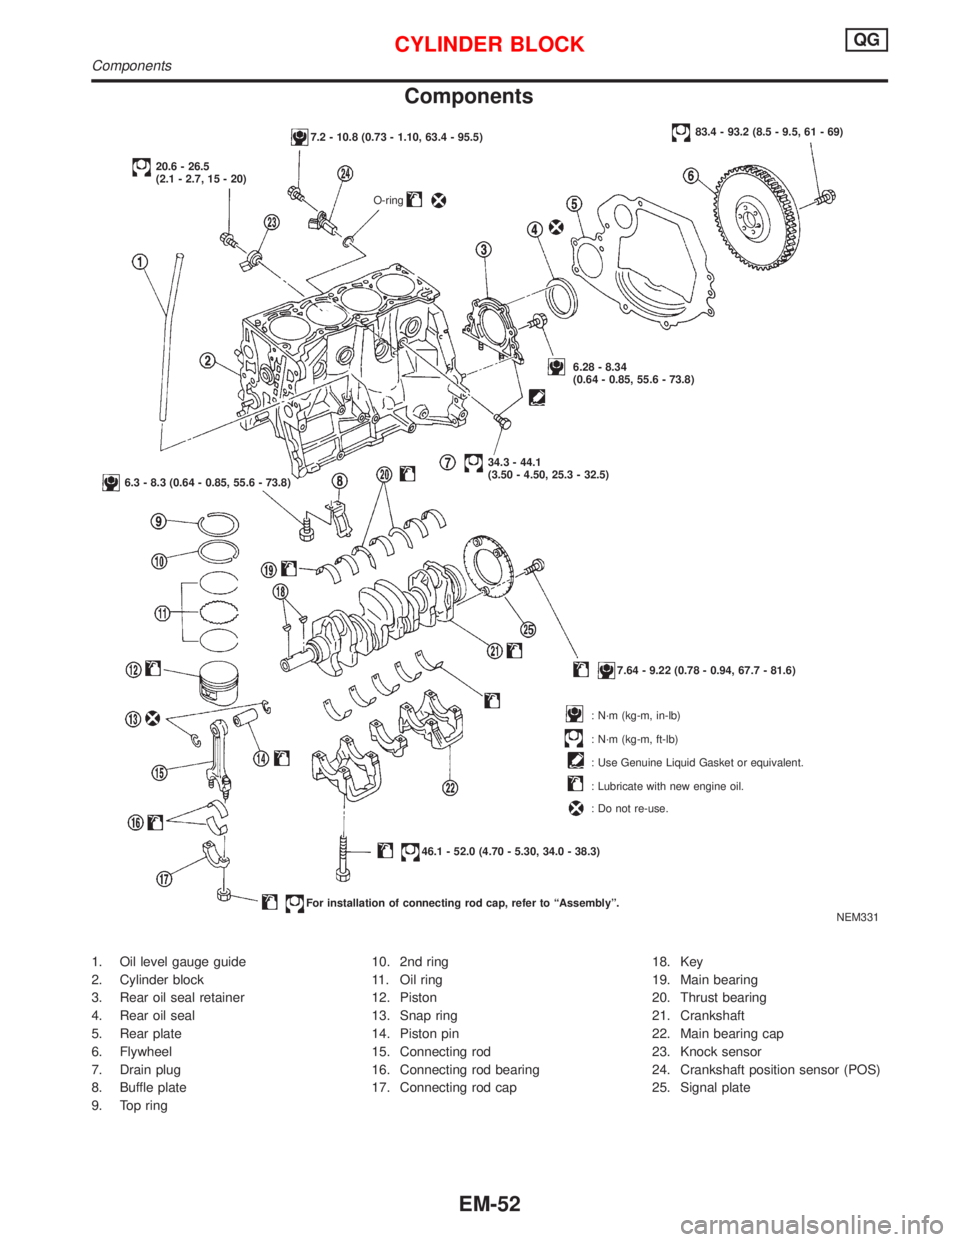
1. Oil level gauge guide
2. Cylinder block
3. Rear oil seal retainer
4. Rear oil seal
5. Rear plate
6. Flywheel
7. Drain plug
8. Buffle plate
9. Top ring10. 2nd ring
11. Oil ring
12. Piston
13. Snap ring
14. Piston pin
15. Connecting rod
16. Connecting rod bearing
17. Connecting rod cap18. Key
19. Main bearing
20. Thrust bearing
21. Crankshaft
22. Main bearing cap
23. Knock sensor
24. Crankshaft position sensor (POS)
25. Signal plate
NEM331
7.2 - 10.8 (0.73 - 1.10, 63.4 - 95.5)
20.6 - 26.5
(2.1 - 2.7, 15 - 20)
O-ring
83.4 - 93.2 (8.5 - 9.5, 61 - 69)
6.28 - 8.34
(0.64 - 0.85, 55.6 - 73.8)
34.3 - 44.1
(3.50 - 4.50, 25.3 - 32.5)
6.3 - 8.3 (0.64 - 0.85, 55.6 - 73.8)
7.64 - 9.22 (0.78 - 0.94, 67.7 - 81.6)
: N´m (kg-m, in-lb)
: N´m (kg-m, ft-lb)
: Use Genuine Liquid Gasket or equivalent.
: Lubricate with new engine oil.
: Do not re-use.
46.1 - 52.0 (4.70 - 5.30, 34.0 - 38.3)
For installation of connecting rod cap, refer to ªAssemblyº.
CYLINDER BLOCKQG
Components
EM-52
Page 1593 of 2267
Removal and InstallationNCEM0024CAUTION:
IWhen installing sliding parts such as bearings and
pistons, apply engine oil on the sliding surfaces.
IPlace removed parts, such as bearings and bearing caps,
in their proper order and direction.
IWhen installing connecting rod nuts and main bearing cap
bolts, apply new engine oil to threads and seating sur-
faces.
IDo not allow any magnetic materials to contact the signal
plate teeth of flywheel or drive plate, and rear plate.
IRemove the crankshaft position sensor (POS).
IBe careful not to damage sensor edges and single plate
teeth.
DisassemblyNCEM0025PISTON AND CRANKSHAFTNCEM0025S011. Place engine on a work stand.
2. Drain coolant and oil.
3. Remove timing chain.
Refer to EM-20.
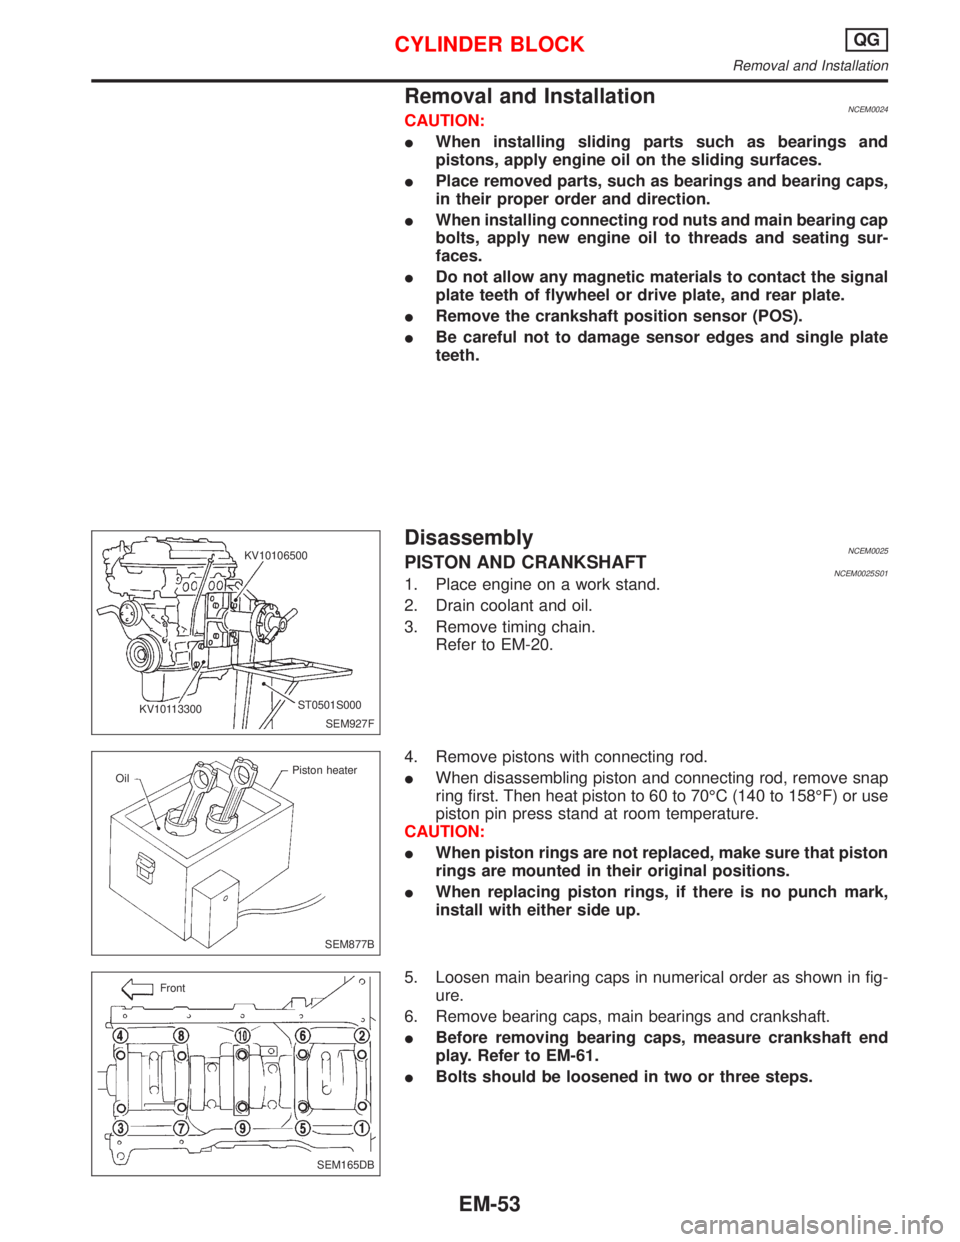
4. Remove pistons with connecting rod.
IWhen disassembling piston and connecting rod, remove snap
ring first. Then heat piston to 60 to 70ÉC (140 to 158ÉF) or use
piston pin press stand at room temperature.
CAUTION:
IWhen piston rings are not replaced, make sure that piston
rings are mounted in their original positions.
IWhen replacing piston rings, if there is no punch mark,
install with either side up.
5. Loosen main bearing caps in numerical order as shown in fig-
ure.
6. Remove bearing caps, main bearings and crankshaft.
IBefore removing bearing caps, measure crankshaft end
play. Refer to EM-61.
IBolts should be loosened in two or three steps.
SEM927F KV10106500
ST0501S000
KV10113300
SEM877B OilPiston heater
SEM165DB Front
CYLINDER BLOCKQG
Removal and Installation
EM-53
Page 1594 of 2267
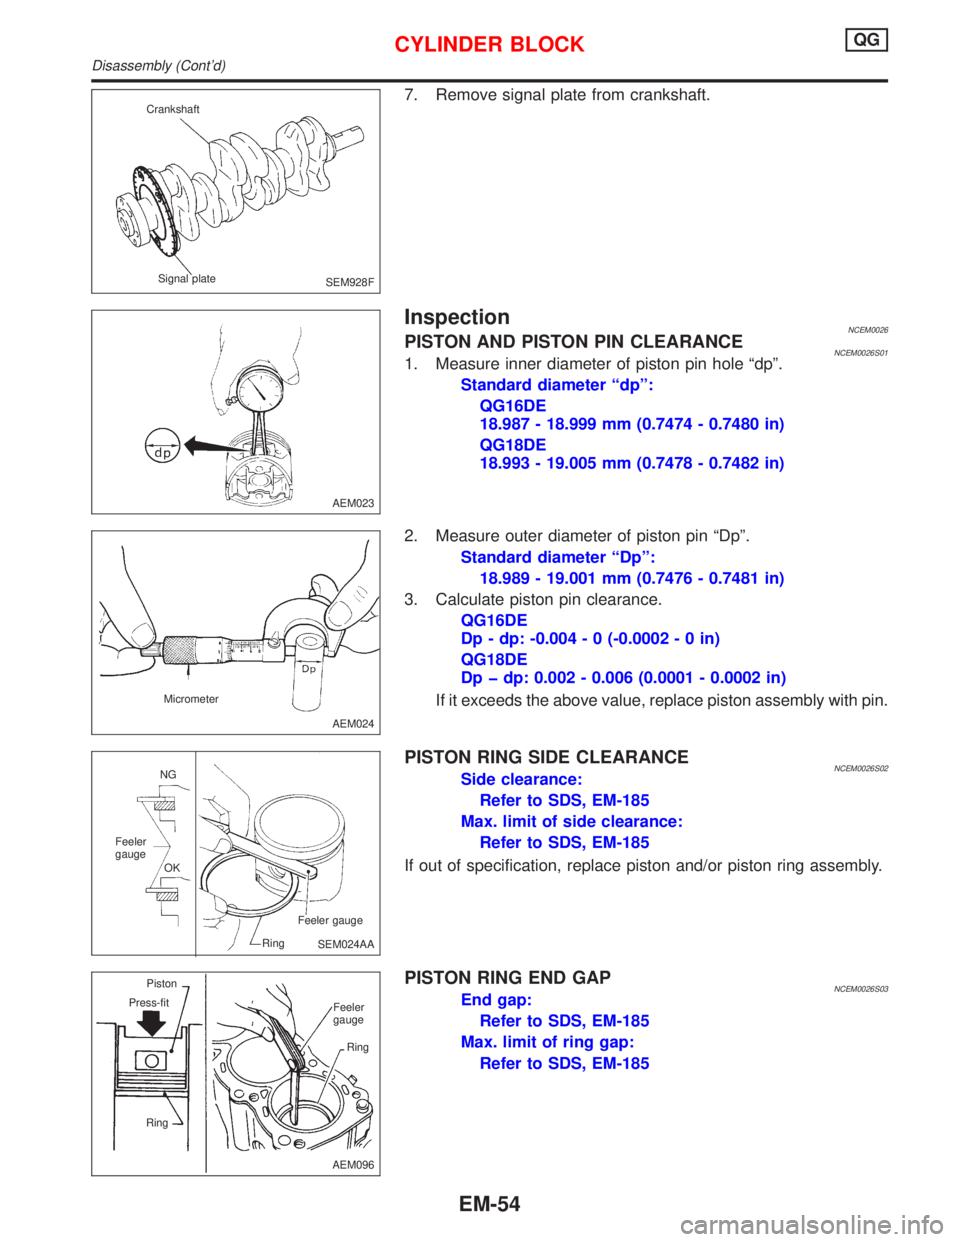
7. Remove signal plate from crankshaft.
InspectionNCEM0026PISTON AND PISTON PIN CLEARANCENCEM0026S011. Measure inner diameter of piston pin hole ªdpº.
Standard diameter ªdpº:
QG16DE
18.987 - 18.999 mm (0.7474 - 0.7480 in)
QG18DE
18.993 - 19.005 mm (0.7478 - 0.7482 in)
2. Measure outer diameter of piston pin ªDpº.
Standard diameter ªDpº:
18.989 - 19.001 mm (0.7476 - 0.7481 in)
3. Calculate piston pin clearance.
QG16DE
Dp - dp: -0.004 - 0 (-0.0002-0in)
QG18DE
Dp þ dp: 0.002 - 0.006 (0.0001 - 0.0002 in)
If it exceeds the above value, replace piston assembly with pin.
PISTON RING SIDE CLEARANCENCEM0026S02Side clearance:
Refer to SDS, EM-185
Max. limit of side clearance:
Refer to SDS, EM-185
If out of specification, replace piston and/or piston ring assembly.
PISTON RING END GAPNCEM0026S03End gap:
Refer to SDS, EM-185
Max. limit of ring gap:
Refer to SDS, EM-185
SEM928F Crankshaft
Signal plate
AEM023
AEM024 Micrometer
SEM024AA NG
OK Feeler
gauge
Feeler gauge
Ring
AEM096 Piston
Press-fit
RingFeeler
gauge
Ring
CYLINDER BLOCKQG
Disassembly (Cont'd)
EM-54
Page 1595 of 2267
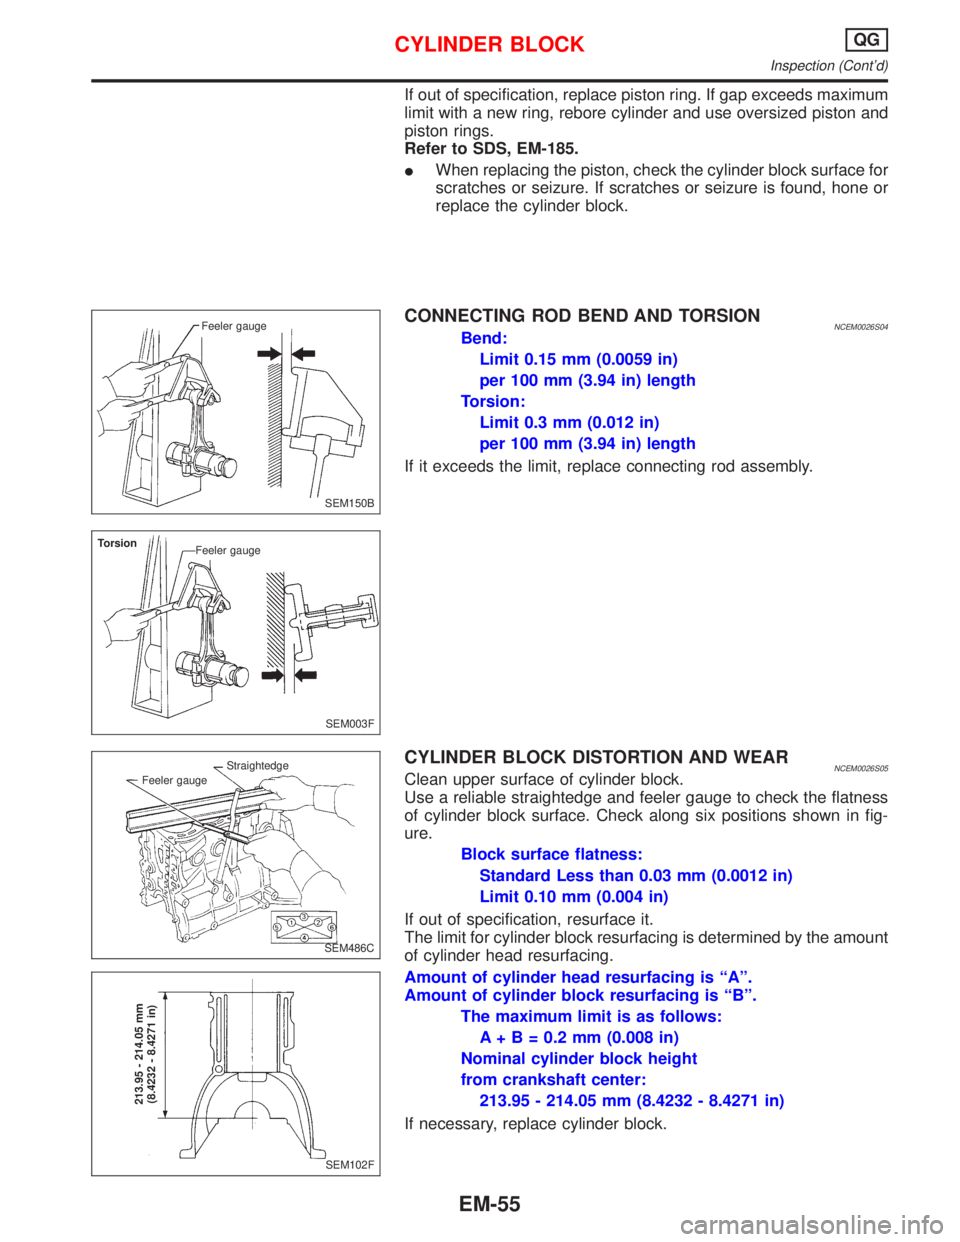
If out of specification, replace piston ring. If gap exceeds maximum
limit with a new ring, rebore cylinder and use oversized piston and
piston rings.
Refer to SDS, EM-185.
IWhen replacing the piston, check the cylinder block surface for
scratches or seizure. If scratches or seizure is found, hone or
replace the cylinder block.
CONNECTING ROD BEND AND TORSIONNCEM0026S04Bend:
Limit 0.15 mm (0.0059 in)
per 100 mm (3.94 in) length
Torsion:
Limit 0.3 mm (0.012 in)
per 100 mm (3.94 in) length
If it exceeds the limit, replace connecting rod assembly.
CYLINDER BLOCK DISTORTION AND WEARNCEM0026S05Clean upper surface of cylinder block.
Use a reliable straightedge and feeler gauge to check the flatness
of cylinder block surface. Check along six positions shown in fig-
ure.
Block surface flatness:
Standard Less than 0.03 mm (0.0012 in)
Limit 0.10 mm (0.004 in)
If out of specification, resurface it.
The limit for cylinder block resurfacing is determined by the amount
of cylinder head resurfacing.
Amount of cylinder head resurfacing is ªAº.
Amount of cylinder block resurfacing is ªBº.
The maximum limit is as follows:
A + B = 0.2 mm (0.008 in)
Nominal cylinder block height
from crankshaft center:
213.95 - 214.05 mm (8.4232 - 8.4271 in)
If necessary, replace cylinder block.
SEM150B Feeler gauge
SEM003F Torsion
Feeler gauge
SEM486C Feeler gaugeStraightedge
SEM102F
213.95 - 214.05 mm
(8.4232 - 8.4271 in)
CYLINDER BLOCKQG
Inspection (Cont'd)
EM-55
Page 1596 of 2267
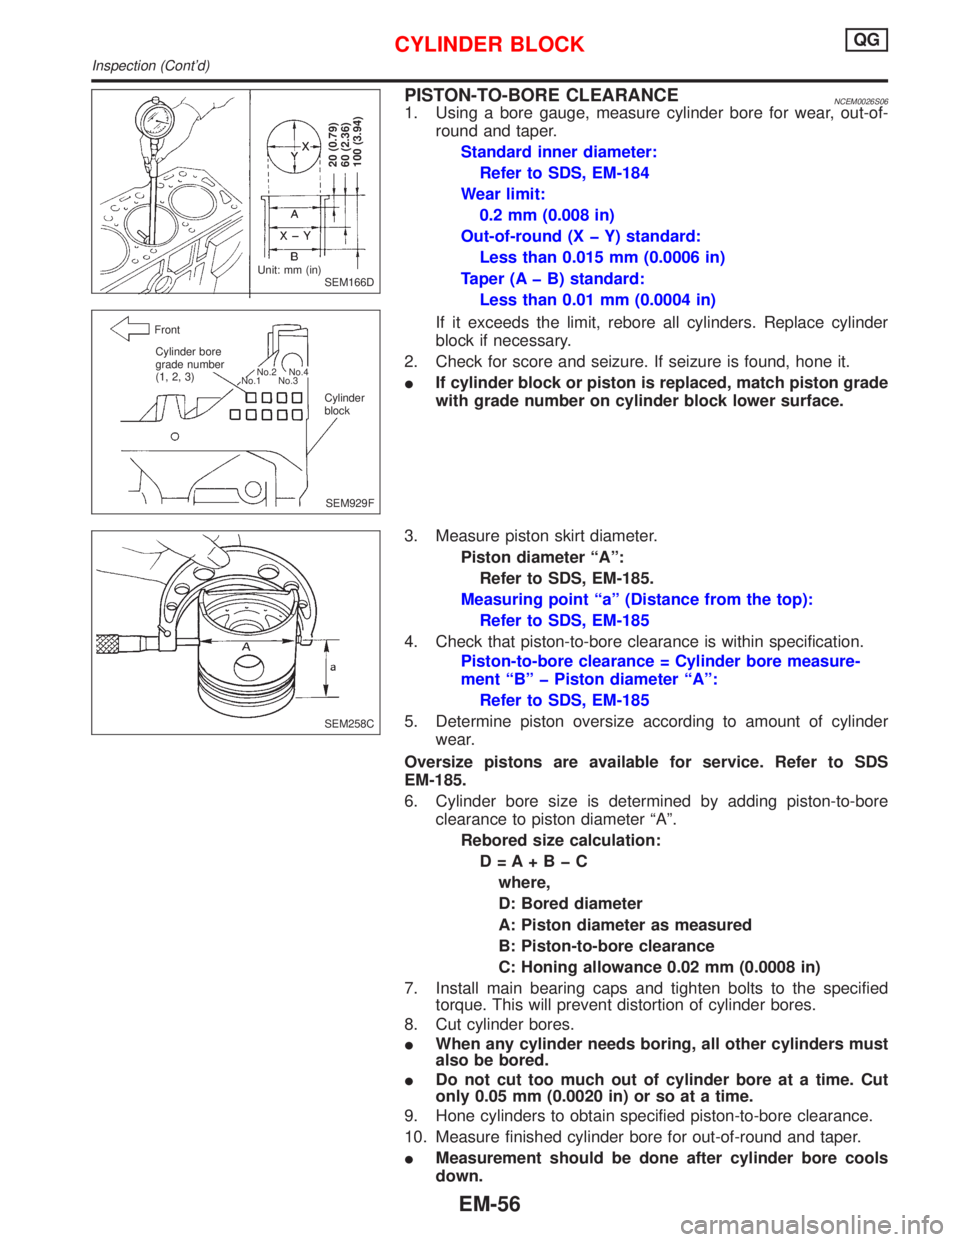
PISTON-TO-BORE CLEARANCENCEM0026S061. Using a bore gauge, measure cylinder bore for wear, out-of-
round and taper.
Standard inner diameter:
Refer to SDS, EM-184
Wear limit:
0.2 mm (0.008 in)
Out-of-round (X þ Y) standard:
Less than 0.015 mm (0.0006 in)
Taper (A þ B) standard:
Less than 0.01 mm (0.0004 in)
If it exceeds the limit, rebore all cylinders. Replace cylinder
block if necessary.
2. Check for score and seizure. If seizure is found, hone it.
IIf cylinder block or piston is replaced, match piston grade
with grade number on cylinder block lower surface.
3. Measure piston skirt diameter.
Piston diameter ªAº:
Refer to SDS, EM-185.
Measuring point ªaº (Distance from the top):
Refer to SDS, EM-185
4. Check that piston-to-bore clearance is within specification.
Piston-to-bore clearance = Cylinder bore measure-
ment ªBº þ Piston diameter ªAº:
Refer to SDS, EM-185
5. Determine piston oversize according to amount of cylinder
wear.
Oversize pistons are available for service. Refer to SDS
EM-185.
6. Cylinder bore size is determined by adding piston-to-bore
clearance to piston diameter ªAº.
Rebored size calculation:
D=A+BþC
where,
D: Bored diameter
A: Piston diameter as measured
B: Piston-to-bore clearance
C: Honing allowance 0.02 mm (0.0008 in)
7. Install main bearing caps and tighten bolts to the specified
torque. This will prevent distortion of cylinder bores.
8. Cut cylinder bores.
IWhen any cylinder needs boring, all other cylinders must
also be bored.
IDo not cut too much out of cylinder bore at a time. Cut
only 0.05 mm (0.0020 in) or so at a time.
9. Hone cylinders to obtain specified piston-to-bore clearance.
10. Measure finished cylinder bore for out-of-round and taper.
IMeasurement should be done after cylinder bore cools
down.
SEM166D
20 (0.79)
60 (2.36)
100 (3.94)
Unit: mm (in)
SEM929F Front
Cylinder bore
grade number
(1, 2, 3)
Cylinder
block
No.2
No.4
No.1 No.3
SEM258C
CYLINDER BLOCKQG
Inspection (Cont'd)
EM-56
Page 1597 of 2267
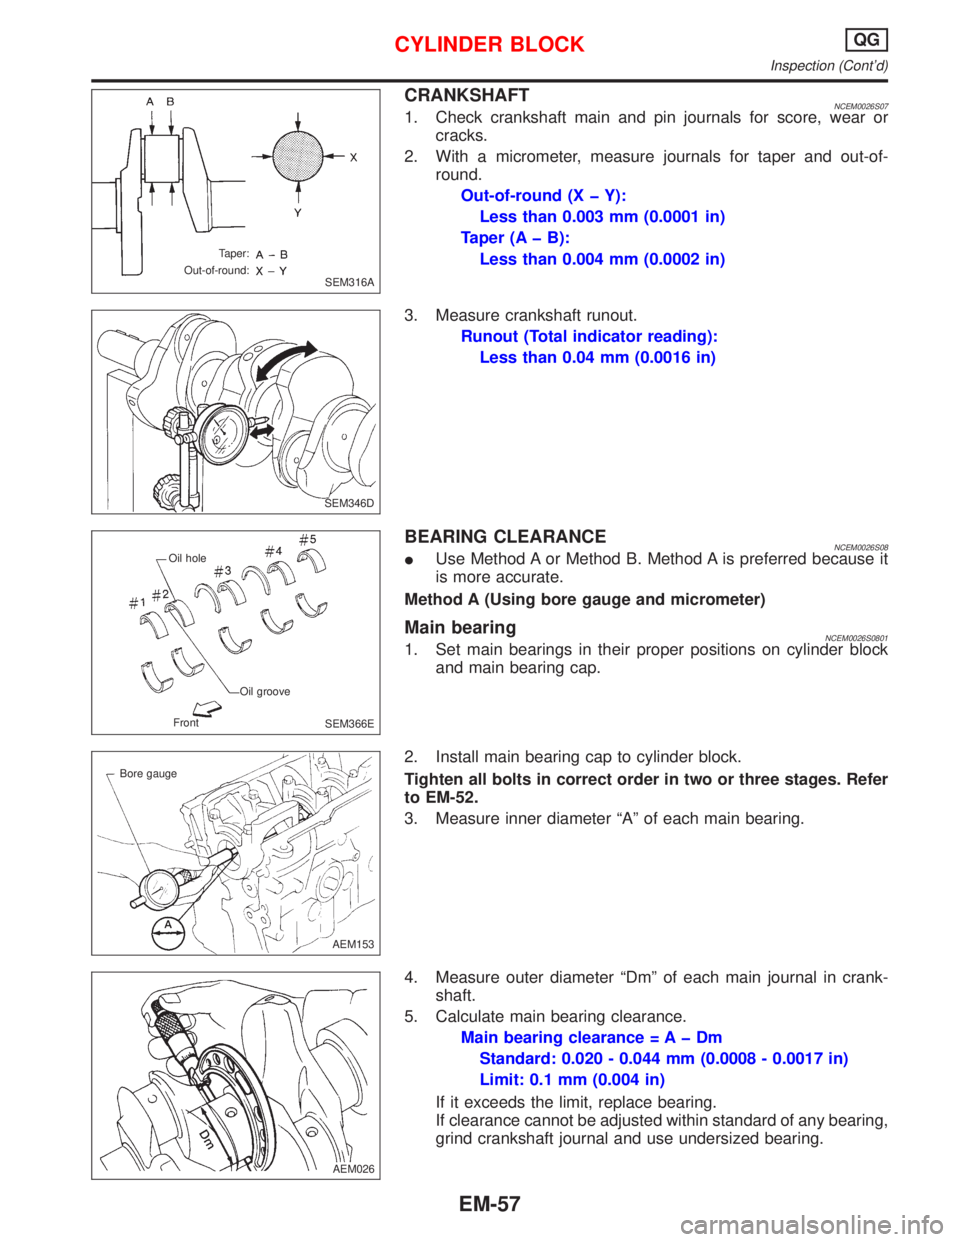
CRANKSHAFTNCEM0026S071. Check crankshaft main and pin journals for score, wear or
cracks.
2. With a micrometer, measure journals for taper and out-of-
round.
Out-of-round (X þ Y):
Less than 0.003 mm (0.0001 in)
Taper (A þ B):
Less than 0.004 mm (0.0002 in)
3. Measure crankshaft runout.
Runout (Total indicator reading):
Less than 0.04 mm (0.0016 in)
BEARING CLEARANCENCEM0026S08IUse Method A or Method B. Method A is preferred because it
is more accurate.
Method A (Using bore gauge and micrometer)
Main bearingNCEM0026S08011. Set main bearings in their proper positions on cylinder block
and main bearing cap.
2. Install main bearing cap to cylinder block.
Tighten all bolts in correct order in two or three stages. Refer
to EM-52.
3. Measure inner diameter ªAº of each main bearing.
4. Measure outer diameter ªDmº of each main journal in crank-
shaft.
5. Calculate main bearing clearance.
Main bearing clearance = A þ Dm
Standard: 0.020 - 0.044 mm (0.0008 - 0.0017 in)
Limit: 0.1 mm (0.004 in)
If it exceeds the limit, replace bearing.
If clearance cannot be adjusted within standard of any bearing,
grind crankshaft journal and use undersized bearing.
SEM316A Taper:
Out-of-round:
SEM346D
SEM366E Oil hole
Oil groove
Front
AEM153 Bore gauge
.AEM026
CYLINDER BLOCKQG
Inspection (Cont'd)
EM-57
Page 1598 of 2267
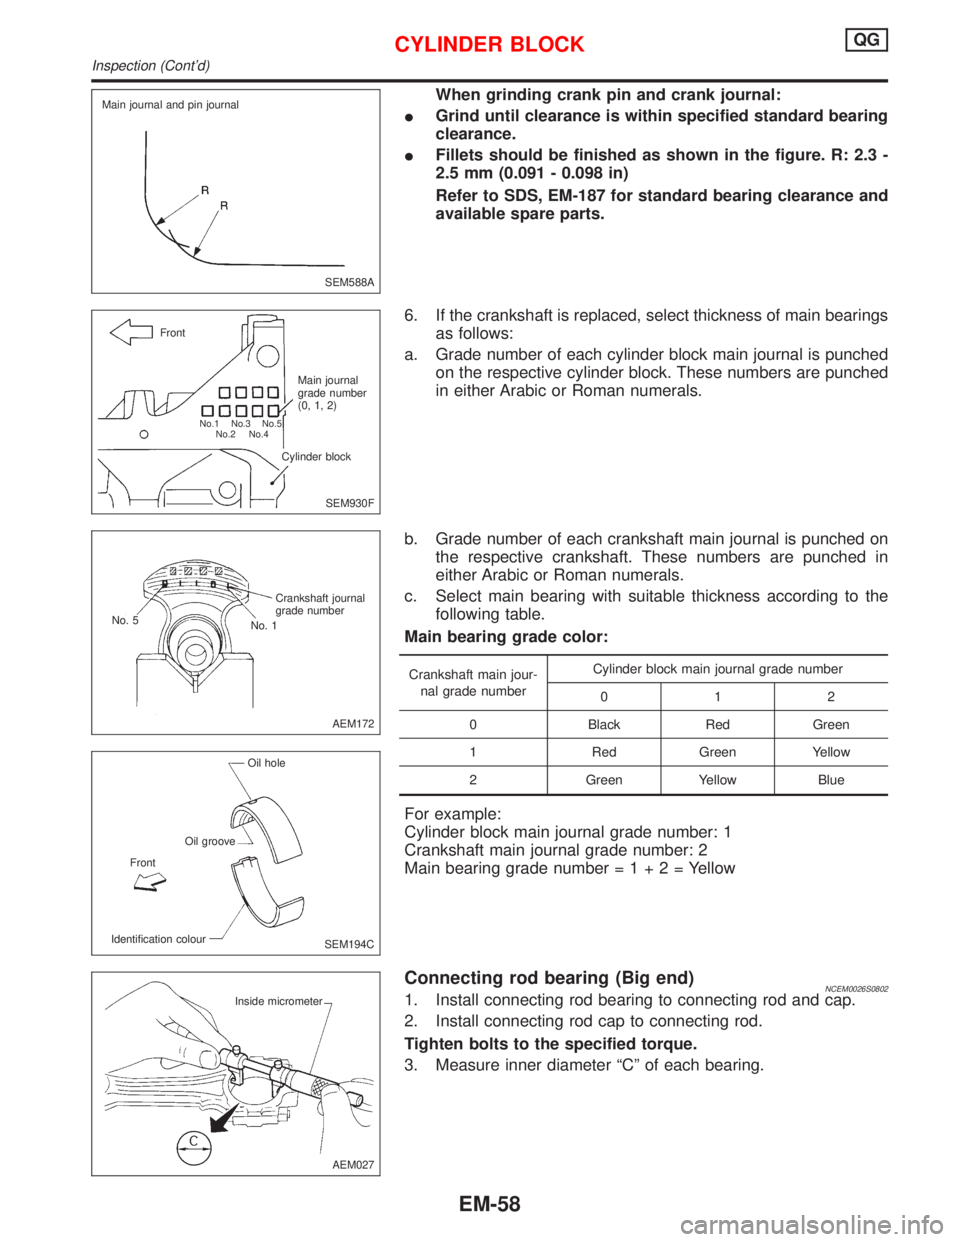
When grinding crank pin and crank journal:
IGrind until clearance is within specified standard bearing
clearance.
IFillets should be finished as shown in the figure. R: 2.3 -
2.5 mm (0.091 - 0.098 in)
Refer to SDS, EM-187 for standard bearing clearance and
available spare parts.
6. If the crankshaft is replaced, select thickness of main bearings
as follows:
a. Grade number of each cylinder block main journal is punched
on the respective cylinder block. These numbers are punched
in either Arabic or Roman numerals.
b. Grade number of each crankshaft main journal is punched on
the respective crankshaft. These numbers are punched in
either Arabic or Roman numerals.
c. Select main bearing with suitable thickness according to the
following table.
Main bearing grade color:
Crankshaft main jour-
nal grade numberCylinder block main journal grade number
012
0 Black Red Green
1 Red Green Yellow
2 Green Yellow Blue
For example:
Cylinder block main journal grade number: 1
Crankshaft main journal grade number: 2
Main bearing grade number=1+2=Yellow
Connecting rod bearing (Big end)NCEM0026S08021. Install connecting rod bearing to connecting rod and cap.
2. Install connecting rod cap to connecting rod.
Tighten bolts to the specified torque.
3. Measure inner diameter ªCº of each bearing.
SEM588A Main journal and pin journal
SEM930F Front
Main journal
grade number
(0, 1, 2)
Cylinder block
No.1 No.3 No.5
No.2 No.4
AEM172 Crankshaft journal
grade number
No. 1 No. 5
SEM194C Oil hole
Oil groove
Identification colourFront
AEM027 Inside micrometer
CYLINDER BLOCKQG
Inspection (Cont'd)
EM-58
Page 1599 of 2267
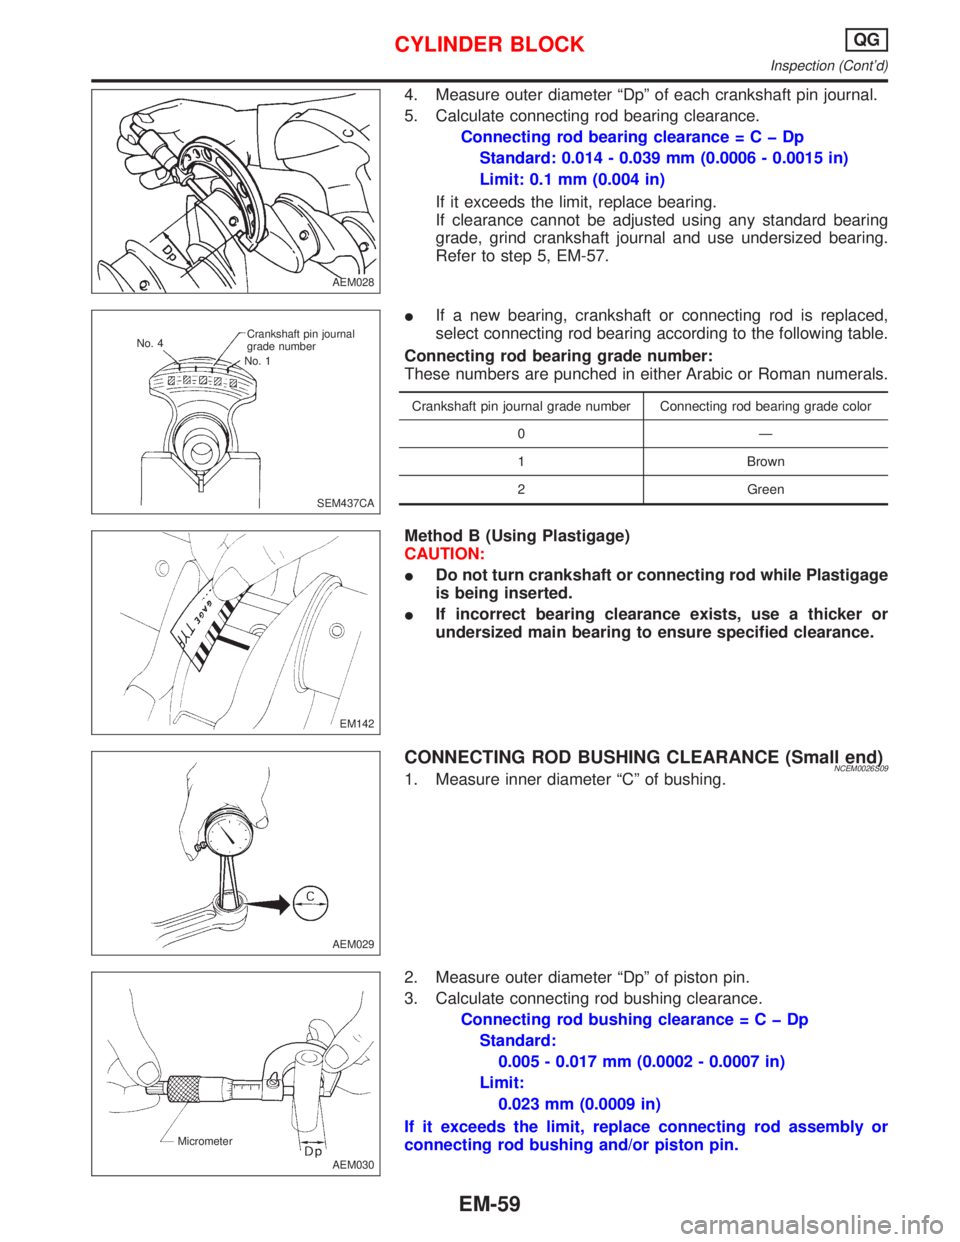
4. Measure outer diameter ªDpº of each crankshaft pin journal.
5. Calculate connecting rod bearing clearance.
Connecting rod bearing clearance=CþDp
Standard: 0.014 - 0.039 mm (0.0006 - 0.0015 in)
Limit: 0.1 mm (0.004 in)
If it exceeds the limit, replace bearing.
If clearance cannot be adjusted using any standard bearing
grade, grind crankshaft journal and use undersized bearing.
Refer to step 5, EM-57.
IIf a new bearing, crankshaft or connecting rod is replaced,
select connecting rod bearing according to the following table.
Connecting rod bearing grade number:
These numbers are punched in either Arabic or Roman numerals.
Crankshaft pin journal grade number Connecting rod bearing grade color
0Ð
1 Brown
2 Green
Method B (Using Plastigage)
CAUTION:
IDo not turn crankshaft or connecting rod while Plastigage
is being inserted.
IIf incorrect bearing clearance exists, use a thicker or
undersized main bearing to ensure specified clearance.
CONNECTING ROD BUSHING CLEARANCE (Small end)NCEM0026S091. Measure inner diameter ªCº of bushing.
2. Measure outer diameter ªDpº of piston pin.
3. Calculate connecting rod bushing clearance.
Connecting rod bushing clearance=CþDp
Standard:
0.005 - 0.017 mm (0.0002 - 0.0007 in)
Limit:
0.023 mm (0.0009 in)
If it exceeds the limit, replace connecting rod assembly or
connecting rod bushing and/or piston pin.
AEM028
SEM437CA Crankshaft pin journal
grade number
No. 1 No. 4
EM142
AEM029
AEM030 Micrometer
CYLINDER BLOCKQG
Inspection (Cont'd)
EM-59
Page 1600 of 2267
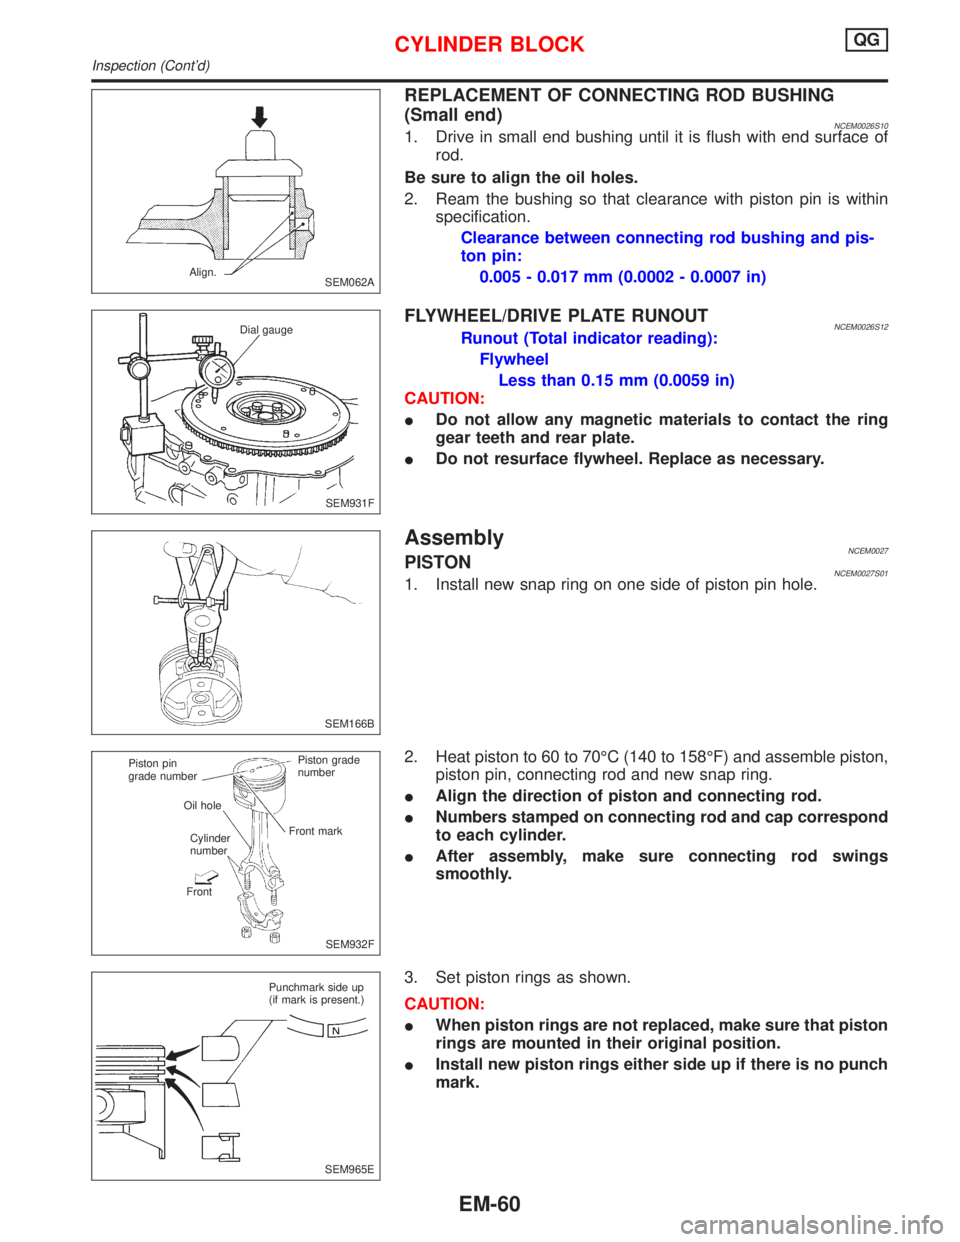
REPLACEMENT OF CONNECTING ROD BUSHING
(Small end)
NCEM0026S101. Drive in small end bushing until it is flush with end surface of
rod.
Be sure to align the oil holes.
2. Ream the bushing so that clearance with piston pin is within
specification.
Clearance between connecting rod bushing and pis-
ton pin:
0.005 - 0.017 mm (0.0002 - 0.0007 in)
FLYWHEEL/DRIVE PLATE RUNOUTNCEM0026S12Runout (Total indicator reading):
Flywheel
Less than 0.15 mm (0.0059 in)
CAUTION:
IDo not allow any magnetic materials to contact the ring
gear teeth and rear plate.
IDo not resurface flywheel. Replace as necessary.
AssemblyNCEM0027PISTONNCEM0027S011. Install new snap ring on one side of piston pin hole.
2. Heat piston to 60 to 70ÉC (140 to 158ÉF) and assemble piston,
piston pin, connecting rod and new snap ring.
IAlign the direction of piston and connecting rod.
INumbers stamped on connecting rod and cap correspond
to each cylinder.
IAfter assembly, make sure connecting rod swings
smoothly.
3. Set piston rings as shown.
CAUTION:
IWhen piston rings are not replaced, make sure that piston
rings are mounted in their original position.
IInstall new piston rings either side up if there is no punch
mark.
SEM062A Align.
SEM931F Dial gauge
SEM166B
SEM932F Piston pin
grade number
Oil hole
Cylinder
number
FrontFront markPiston grade
number
SEM965E Punchmark side up
(if mark is present.)
CYLINDER BLOCKQG
Inspection (Cont'd)
EM-60