NISSAN TEANA 2014 Service Manual
Manufacturer: NISSAN, Model Year: 2014, Model line: TEANA, Model: NISSAN TEANA 2014Pages: 4801, PDF Size: 51.2 MB
Page 111 of 4801

BRAKE FLUIDBR-15
< PERIODIC MAINTENANCE >
C
D E
G H
I
J
K L
M A
B
BR
N
O P
4. Repeat steps 2 and 3 until all of the air is out of the brake line.
5. Tighten the bleeder valve to the specified torque. Refer to BR-36, "BRAKE CALIPER ASSEMBLY :
Exploded View" (front disc brake) or BR-39, "BRAKE CALIPER ASSEMBLY : Exploded View" (rear disc
brake).
6. Repeat steps 1 to 5, for the remaining brake calipers with master cylinder reservoir tank filled at least half-
way, bleed air from brake hydraulic line bleeder valves in the following order:
Front right brake →Front left brake →Rear right brake →Rear left brake
Revision: November 20132014 Altima NAM
Page 112 of 4801

BR-16
< PERIODIC MAINTENANCE >
FRONT DISC BRAKE
FRONT DISC BRAKE
Brake BurnishingINFOID:0000000009463694
CAUTION:
• Burnish contact surfaces between brake pads and disc brake rotor according to the following proce-
dure after refinishing the disc brake rotor, replacing brake pads or if a soft pedal occurs at very low
mileage.
• Be careful of vehicle speed. Brakes do not operat e firmly/securely until pads and disc rotor are
securely seated.
• Only perform this procedure under safe road and traffic conditions. Use extreme caution.
1. Drive the vehicle on straight, flat road.
2. Depress the brake pedal until the vehicle stops.
3. Release the brake pedal for a few minutes to allow the brake components to cool.
4. Repeat steps 1 to 3 until pad and disc rotor are securely seated.
Revision: November 20132014 Altima NAM
Page 113 of 4801

REAR DISC BRAKEBR-17
< PERIODIC MAINTENANCE >
C
D E
G H
I
J
K L
M A
B
BR
N
O P
REAR DISC BRAKE
Brake BurnishingINFOID:0000000009463695
CAUTION:
• Burnish contact surfaces between brake pads and disc brake rotor according to the following proce-
dure after refinishing the disc brake rotor, replacing brake pads or if a soft pedal occurs at very low
mileage.
• Be careful of vehicle speed. Br akes do not operate firmly/securely until pads and disc rotor are
securely seated.
• Only perform this procedure under safe road and traffic conditions. Use extreme caution.
1. Drive the vehicle on straight, flat road.
2. Depress the brake pedal until the vehicle stops.
3. Release the brake pedal for a few minutes to allow the brake components to cool.
4. Repeat steps 1 to 3 until pad and disc rotor are securely seated.
Revision: November 20132014 Altima NAM
Page 114 of 4801
BR-18
< REMOVAL AND INSTALLATION >
BRAKE PEDAL
REMOVAL AND INSTALLATION
BRAKE PEDAL
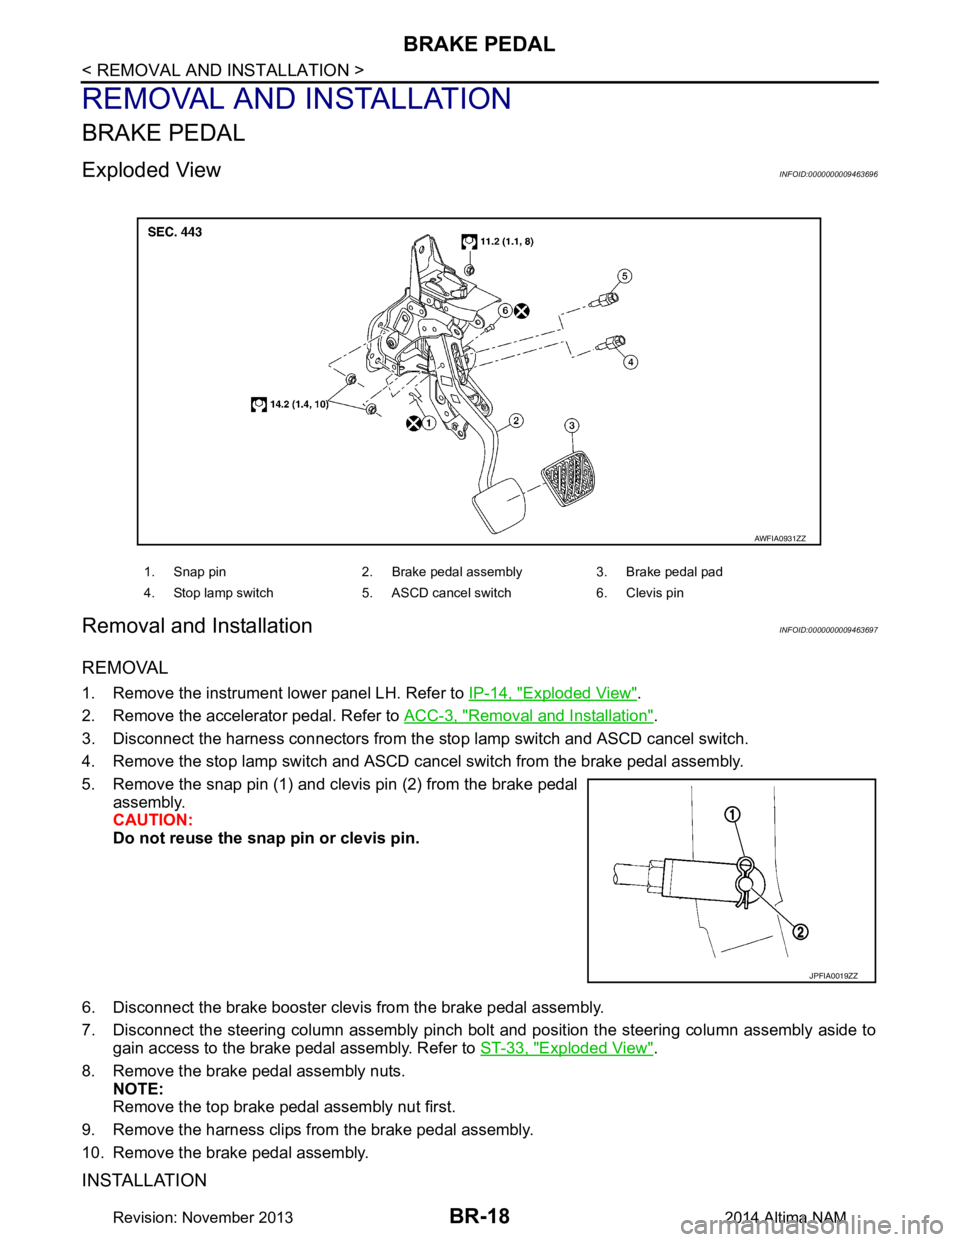
Exploded ViewINFOID:0000000009463696
Removal and InstallationINFOID:0000000009463697
REMOVAL
1. Remove the instrument lower panel LH. Refer to IP-14, "Exploded View".
2. Remove the accelerator pedal. Refer to ACC-3, "Removal and Installation"
.
3. Disconnect the harness connectors from the stop lamp switch and ASCD cancel switch.
4. Remove the stop lamp switch and ASCD canc el switch from the brake pedal assembly.
5. Remove the snap pin (1) and clevis pin (2) from the brake pedal assembly.
CAUTION:
Do not reuse the snap pin or clevis pin.
6. Disconnect the brake booster clevis from the brake pedal assembly.
7. Disconnect the steering column assembly pinch bolt and position the steering column assembly aside to
gain access to the brake pedal assembly. Refer to ST-33, "Exploded View"
.
8. Remove the brake pedal assembly nuts. NOTE:
Remove the top brake pedal assembly nut first.
9. Remove the harness clips from the brake pedal assembly.
10. Remove the brake pedal assembly.
INSTALLATION
1. Snap pin 2. Brake pedal assembly 3. Brake pedal pad
4. Stop lamp switch 5. ASCD cancel switch 6. Clevis pin
AWFIA0931ZZ
JPFIA0019ZZ
Revision: November 20132014 Altima NAM
Page 115 of 4801

BRAKE PEDALBR-19
< REMOVAL AND INSTALLATION >
C
D E
G H
I
J
K L
M A
B
BR
N
O P
Installation is in the reverse order of removal.
CAUTION:
Do not reuse the snap pin or clevis pin.
• Adjust the brake pedal height after installing the brake pedal assembly. Refer to BR-13, "Inspection and
Adjustment".
• Tighten the clevis lock nut to the specified torque. Refer to BR-28, "Exploded View"
.
Revision: November 20132014 Altima NAM
Page 116 of 4801
BR-20
< REMOVAL AND INSTALLATION >
BRAKE PIPING
BRAKE PIPING
FRONT
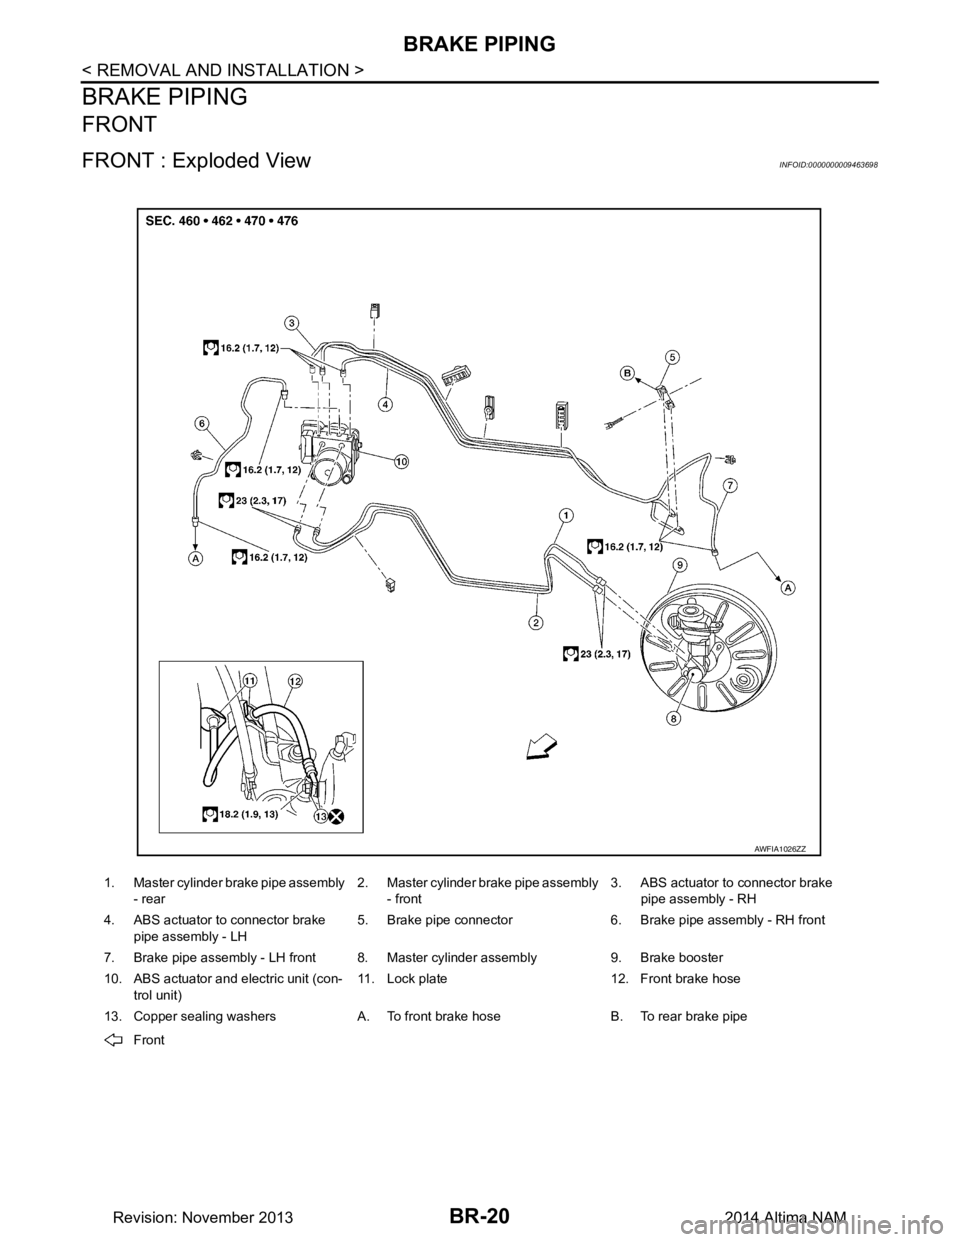
FRONT : Exploded ViewINFOID:0000000009463698
1. Master cylinder brake pipe assembly - rear 2. Master cylinder brake pipe assembly
- front 3. ABS actuator to connector brake
pipe assembly - RH
4. ABS actuator to connector brake
pipe assembly - LH 5. Brake pipe connector 6. Brake pipe assembly - RH front
7. Brake pipe assembly - LH front 8. Master cylinder assembly 9. Brake booster
10. ABS actuator and el ectric unit (con-
trol unit) 11. Lock plate 12. Front brake hose
13. Copper sealing washers A. To front brake hose B. To rear brake pipe Front
AWFIA1026ZZ
Revision: November 20132014 Altima NAM
Page 117 of 4801
BRAKE PIPINGBR-21
< REMOVAL AND INSTALLATION >
C
D E
G H
I
J
K L
M A
B
BR
N
O P
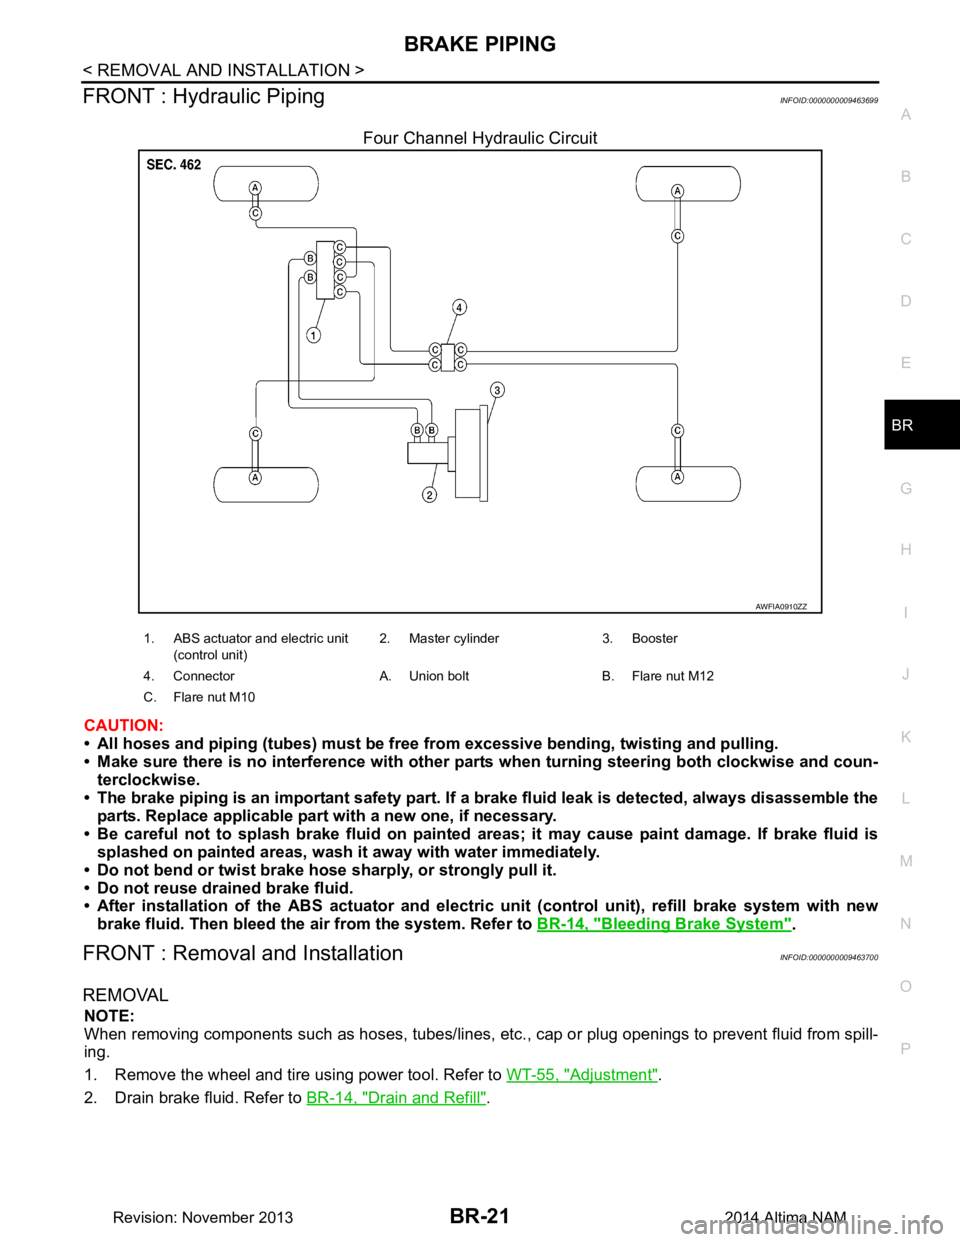
FRONT : Hydraulic PipingINFOID:0000000009463699
Four Channel Hydraulic Circuit
CAUTION:
• All hoses and piping (tubes) must be fr ee from excessive bending, twisting and pulling.
• Make sure there is no interference with other pa rts when turning steering both clockwise and coun-
terclockwise.
• The brake piping is an important safety part. If a brake fluid leak is detected, always disassemble the
parts. Replace applicable part with a new one, if necessary.
• Be careful not to splash brake fluid on painted areas; it may cause paint damage. If brake fluid is
splashed on painted areas, wash it away with water immediately.
• Do not bend or twist brake hose sharply, or strongly pull it.
• Do not reuse drained brake fluid.
• After installation of the ABS actuator and electri c unit (control unit), refill brake system with new
brake fluid. Then bleed the ai r from the system. Refer to BR-14, "Bleeding Brake System"
.
FRONT : Removal and InstallationINFOID:0000000009463700
REMOVAL
NOTE:
When removing components such as hoses, tubes/lines, etc. , cap or plug openings to prevent fluid from spill-
ing.
1. Remove the wheel and tire using power tool. Refer to WT-55, "Adjustment"
.
2. Drain brake fluid. Refer to BR-14, "Drain and Refill"
.
AWFIA0910ZZ
1. ABS actuator and electric unit
(control unit) 2. Master cylinder 3. Booster
4. Connector A. Union bolt B. Flare nut M12
C. Flare nut M10
Revision: November 20132014 Altima NAM
Page 118 of 4801
BR-22
< REMOVAL AND INSTALLATION >
BRAKE PIPING
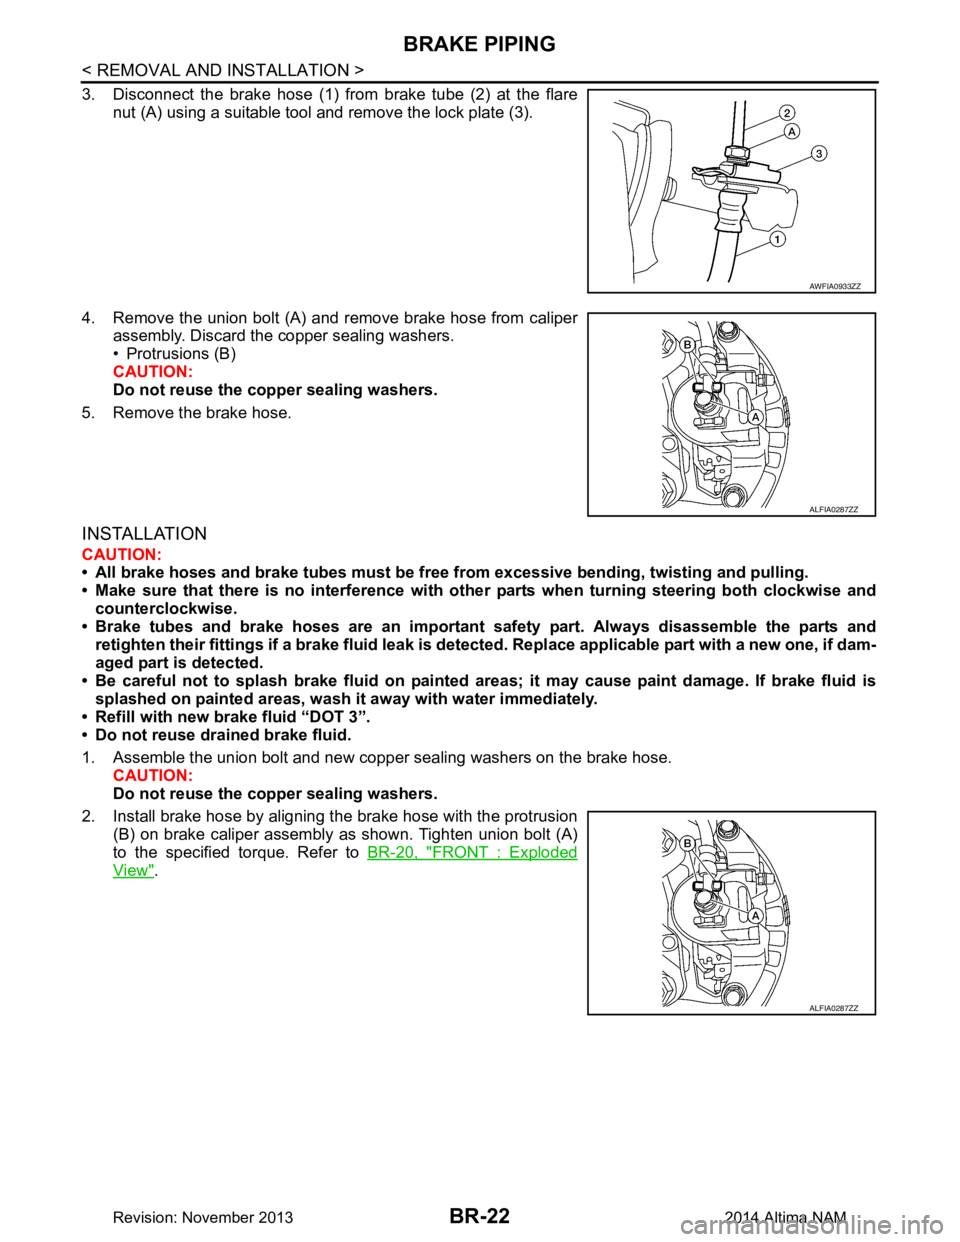
3. Disconnect the brake hose (1) from brake tube (2) at the flarenut (A) using a suitable tool and remove the lock plate (3).
4. Remove the union bolt (A) and remove brake hose from caliper assembly. Discard the copper sealing washers.
• Protrusions (B)
CAUTION:
Do not reuse the copper sealing washers.
5. Remove the brake hose.
INSTALLATION
CAUTION:
• All brake hoses and brake tubes must be free fr om excessive bending, twisting and pulling.
• Make sure that there is no interference with othe r parts when turning steering both clockwise and
counterclockwise.
• Brake tubes and brake hoses are an important safety part. Always disassemble the parts and
retighten their fittings if a brake fluid leak is detect ed. Replace applicable part with a new one, if dam-
aged part is detected.
• Be careful not to splash brake fluid on painted areas; it may cause paint damage. If brake fluid is
splashed on painted areas, wash it away with water immediately.
• Refill with new brake fluid “DOT 3”.
• Do not reuse drained brake fluid.
1. Assemble the union bolt and new copper sealing washers on the brake hose. CAUTION:
Do not reuse the copper sealing washers.
2. Install brake hose by aligning the brake hose with the protrusion (B) on brake caliper assembly as shown. Tighten union bolt (A)
to the specified torque. Refer to BR-20, "FRONT : Exploded
View".
AWFIA0933ZZ
ALFIA0287ZZ
ALFIA0287ZZ
Revision: November 20132014 Altima NAM
Page 119 of 4801
BRAKE PIPINGBR-23
< REMOVAL AND INSTALLATION >
C
D E
G H
I
J
K L
M A
B
BR
N
O P
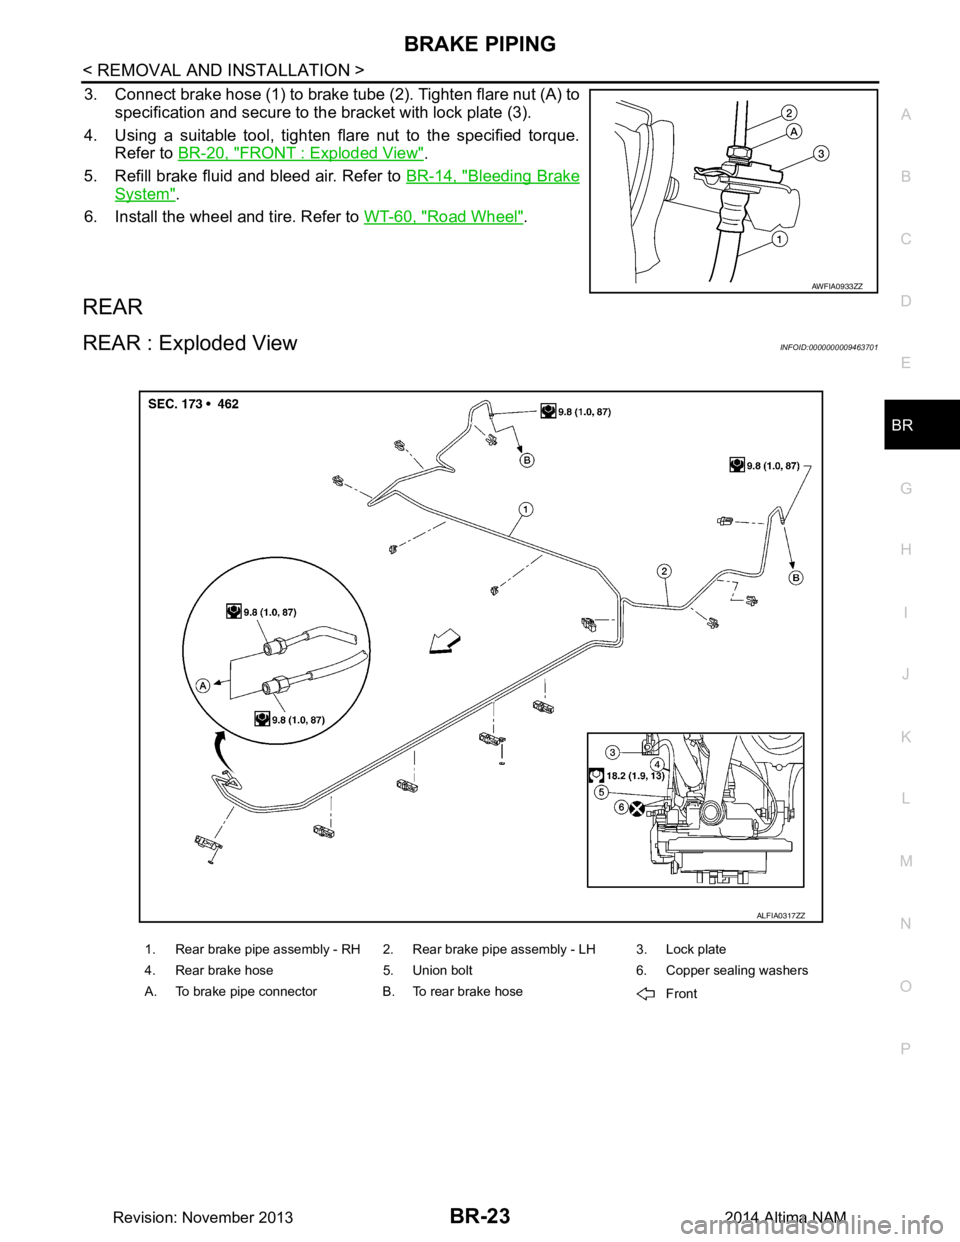
3. Connect brake hose (1) to brake tube (2). Tighten flare nut (A) to specification and secure to the bracket with lock plate (3).
4. Using a suitable tool, tighten flare nut to the specified torque. Refer to BR-20, "FRONT : Exploded View"
.
5. Refill brake fluid and bleed air. Refer to BR-14, "Bleeding Brake
System".
6. Install the wheel and tire. Refer to WT-60, "Road Wheel"
.
REAR
REAR : Exploded ViewINFOID:0000000009463701
AWFIA0933ZZ
1. Rear brake pipe assembly - RH 2. Rear brake pipe assembly - LH 3. Lock plate
4. Rear brake hose 5. Union bolt 6. Copper sealing washers
A. To brake pipe connector B. To rear brake hose Front
ALFIA0317ZZ
Revision: November 20132014 Altima NAM
Page 120 of 4801
BR-24
< REMOVAL AND INSTALLATION >
BRAKE PIPING
REAR : Hydraulic Piping
INFOID:0000000009463702
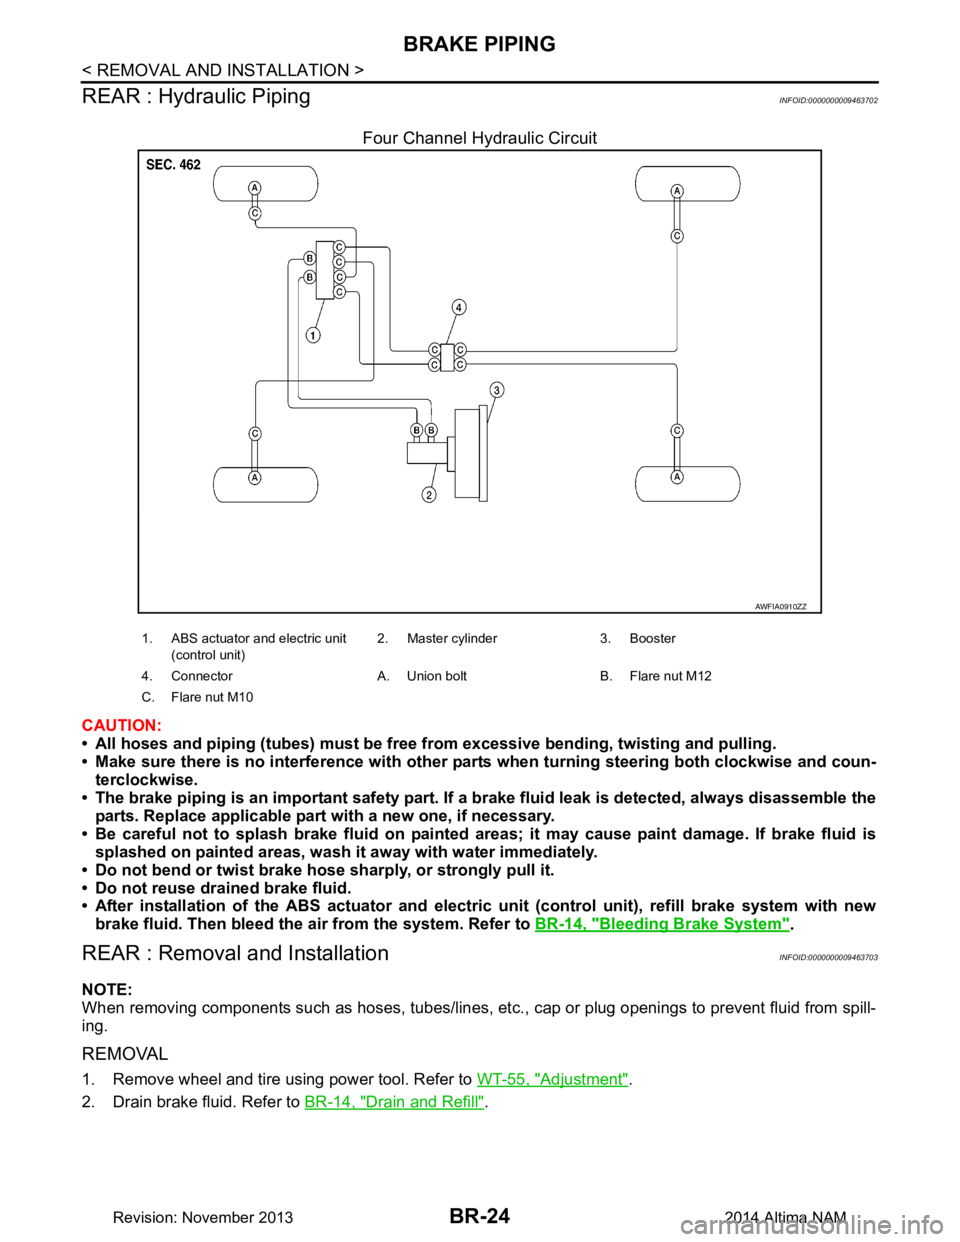
Four Channel Hydraulic Circuit
CAUTION:
• All hoses and piping (tubes) must be free from excessive bending, twisting and pulling.
• Make sure there is no interference with other part s when turning steering both clockwise and coun-
terclockwise.
• The brake piping is an important safety part. If a brake fluid leak is detected, always disassemble the
parts. Replace applicable part with a new one, if necessary.
• Be careful not to splash brake fluid on painted areas; it may cause paint damage. If brake fluid is
splashed on painted areas, wash it away with water immediately.
• Do not bend or twist brake hose sharply, or strongly pull it.
• Do not reuse drained brake fluid.
• After installation of the ABS actuator and electric unit (control unit), refill brake system with new
brake fluid. Then bleed the ai r from the system. Refer to BR-14, "Bleeding Brake System"
.
REAR : Removal and InstallationINFOID:0000000009463703
NOTE:
When removing components such as hoses, tubes/lines, etc. , cap or plug openings to prevent fluid from spill-
ing.
REMOVAL
1. Remove wheel and tire using power tool. Refer to WT-55, "Adjustment".
2. Drain brake fluid. Refer to BR-14, "Drain and Refill"
.
AWFIA0910ZZ
1. ABS actuator and electric unit
(control unit) 2. Master cylinder 3. Booster
4. Connector A. Union bolt B. Flare nut M12
C. Flare nut M10
Revision: November 20132014 Altima NAM