fuel pump NISSAN TERRANO 2004 Service Owner's Manual
[x] Cancel search | Manufacturer: NISSAN, Model Year: 2004, Model line: TERRANO, Model: NISSAN TERRANO 2004Pages: 1833, PDF Size: 53.42 MB
Page 296 of 1833
Normal control
Input/output signal chart
SensorInput Signal to ECM ECM Function Actuator
Crankshaft position sensor (TDC) Engine speed
Fuel injection con-
trol (Normal con-
trol)Electronic control fuel injec-
tion pump
Accelerator position sensor
Accelerator position
Vehicle speed sensor Vehicle speed
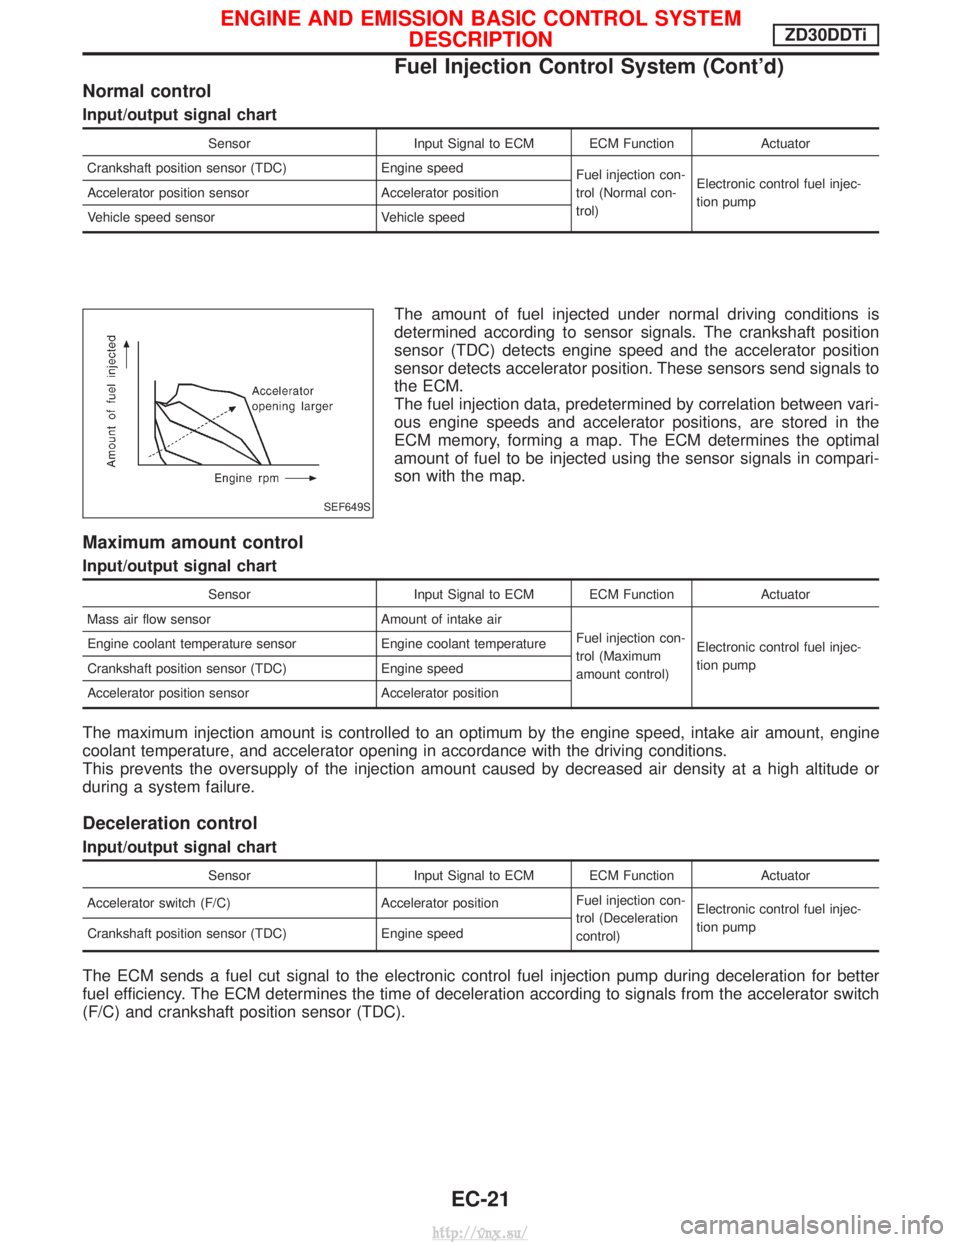
The amount of fuel injected under normal driving conditions is
determined according to sensor signals. The crankshaft position
sensor (TDC) detects engine speed and the accelerator position
sensor detects accelerator position. These sensors send signals to
the ECM.
The fuel injection data, predetermined by correlation between vari-
ous engine speeds and accelerator positions, are stored in the
ECM memory, forming a map. The ECM determines the optimal
amount of fuel to be injected using the sensor signals in compari-
son with the map.
Maximum amount control
Input/output signal chart
SensorInput Signal to ECM ECM Function Actuator
Mass air flow sensor Amount of intake air
Fuel injection con-
trol (Maximum
amount control)Electronic control fuel injec-
tion pump
Engine coolant temperature sensor Engine coolant temperature
Crankshaft position sensor (TDC) Engine speed
Accelerator position sensor Accelerator position
The maximum injection amount is controlled to an optimum by the engine speed, intake air amount, engine
coolant temperature, and accelerator opening in accordance with the driving conditions.
This prevents the oversupply of the injection amount caused by decreased air density at a high altitude or
during a system failure.
Deceleration control
Input/output signal chart
Sensor
Input Signal to ECM ECM Function Actuator
Accelerator switch (F/C) Accelerator positionFuel injection con-
trol (Deceleration
control)Electronic control fuel injec-
tion pump
Crankshaft position sensor (TDC) Engine speed
The ECM sends a fuel cut signal to the electronic control fuel injection pump during deceleration for better
fuel efficiency. The ECM determines the time of deceleration according to signals from the accelerator switch
(F/C) and crankshaft position sensor (TDC).
SEF649S
ENGINE AND EMISSION BASIC CONTROL SYSTEM
DESCRIPTIONZD30DDTi
Fuel Injection Control System (Cont'd)
EC-21
http://vnx.su/
Page 297 of 1833
Fuel Injection Timing Control System
DESCRIPTION
The target fuel injection timing in accordance with the engine speed and the fuel injection amount are recorded
as a map in the ECM beforehand. The ECM and the injection pump control unit exchange signals and per-
form feedback control for optimum injection timing in accordance with the map.
Air Conditioning Cut Control
DESCRIPTION
Input/output signal chart
SensorInput Signal to ECM ECM Function Actuator
Air conditioner switch Air conditioner ªONº signal
Air conditioner cut
controlAir conditioner relay
Accelerator position sensor
Accelerator valve opening
angle
Vehicle speed sensor Vehicle speed
Engine coolant temperature sensor Engine coolant temperature
System description
This system improves acceleration when the air conditioner is used.
When the accelerator pedal is fully depressed, the air conditioner is turned off for a few seconds.
When engine coolant temperature becomes excessively high, the air conditioner is turned off. This continues
until the engine coolant temperature returns to normal.
Fuel Cut Control (at no load & high engine
speed)
DESCRIPTION
Input/output signal chart
SensorInput Signal to ECM ECM Function Actuator
Vehicle speed sensor Vehicle speed
Fuel cut controlElectronic control fuel injec-
tion pump
Park/Neutral position (PNP) switch
Neutral position
Accelerator position switch or Accelerator
switch (F/C) Accelerator position
Engine coolant temperature sensor Engine coolant temperature
Crankshaft position sensor (TDC) Engine speed
If the engine speed is above 2,700 rpm with no load (for example, in neutral and engine speed over 2,700
rpm) fuel will be cut off after some time. The exact time when the fuel is cut off varies based on engine speed.
Fuel cut will operate until the engine speed reaches 1,500 rpm, then fuel cut is cancelled.
NOTE:
This function is different from deceleration control listed under ªFuel Injection Control Systemº, EC-20.
ENGINE AND EMISSION BASIC CONTROL SYSTEM
DESCRIPTIONZD30DDTi
EC-22
http://vnx.su/
Page 301 of 1833
Inspection for spill tube airtightness
Before the rocker cover is installed, perform the inspection as fol-
lows.
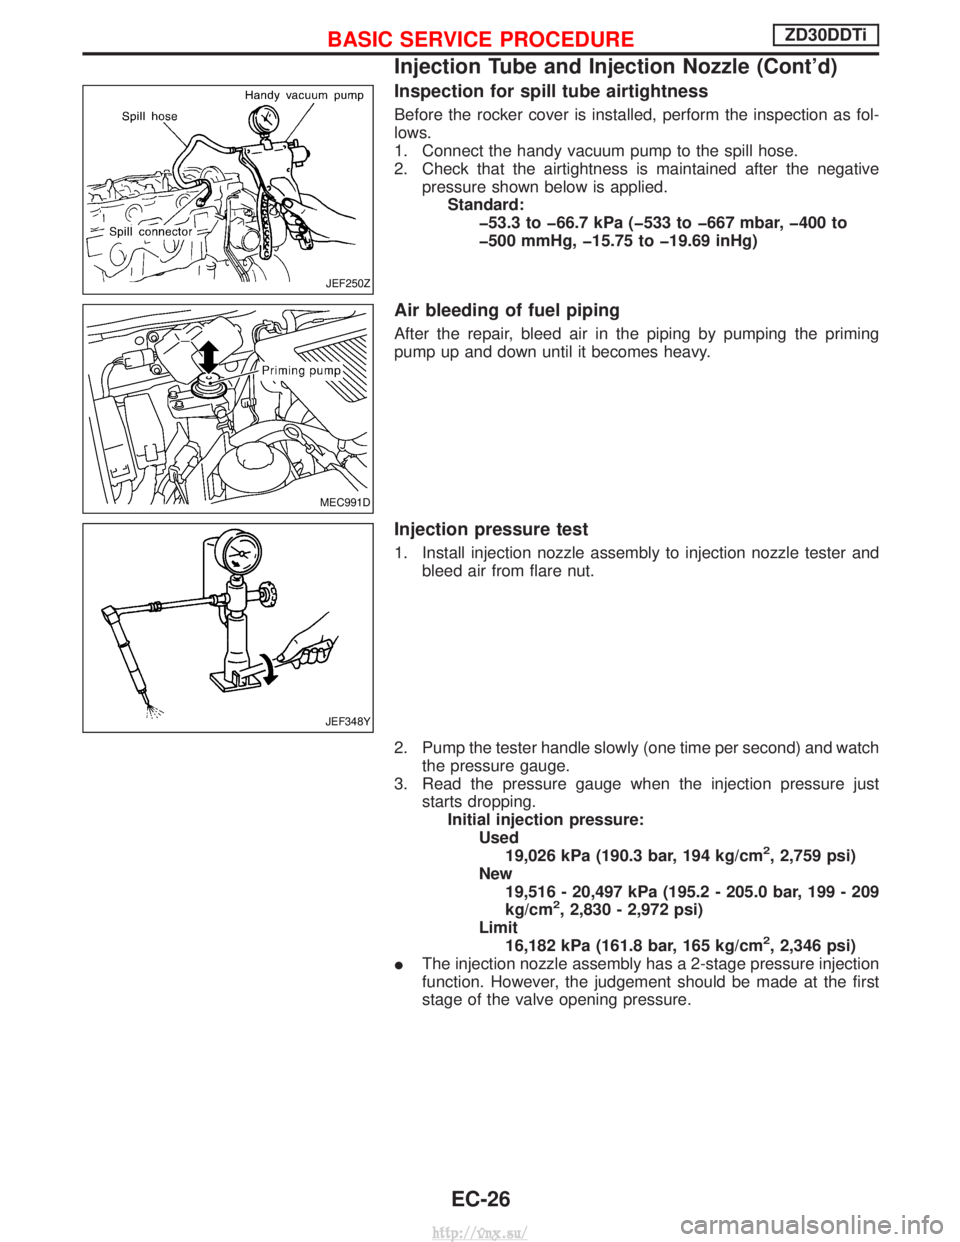
1. Connect the handy vacuum pump to the spill hose.
2. Check that the airtightness is maintained after the negativepressure shown below is applied.Standard: þ53.3 to þ66.7 kPa (þ533 to þ667 mbar, þ400 to
þ500 mmHg, þ15.75 to þ19.69 inHg)
Air bleeding of fuel piping
After the repair, bleed air in the piping by pumping the priming
pump up and down until it becomes heavy.
Injection pressure test
1. Install injection nozzle assembly to injection nozzle tester andbleed air from flare nut.
2. Pump the tester handle slowly (one time per second) and watch the pressure gauge.
3. Read the pressure gauge when the injection pressure just starts dropping.Initial injection pressure: Used19,026 kPa (190.3 bar, 194 kg/cm
2, 2,759 psi)
New 19,516 - 20,497 kPa (195.2 - 205.0 bar, 199 - 209
kg/cm
2, 2,830 - 2,972 psi)
Limit 16,182 kPa (161.8 bar, 165 kg/cm
2, 2,346 psi)
I The injection nozzle assembly has a 2-stage pressure injection
function. However, the judgement should be made at the first
stage of the valve opening pressure.
JEF250Z
MEC991D
JEF348Y
BASIC SERVICE PROCEDUREZD30DDTi
Injection Tube and Injection Nozzle (Cont'd)
EC-26
http://vnx.su/
Page 302 of 1833
Spray pattern test
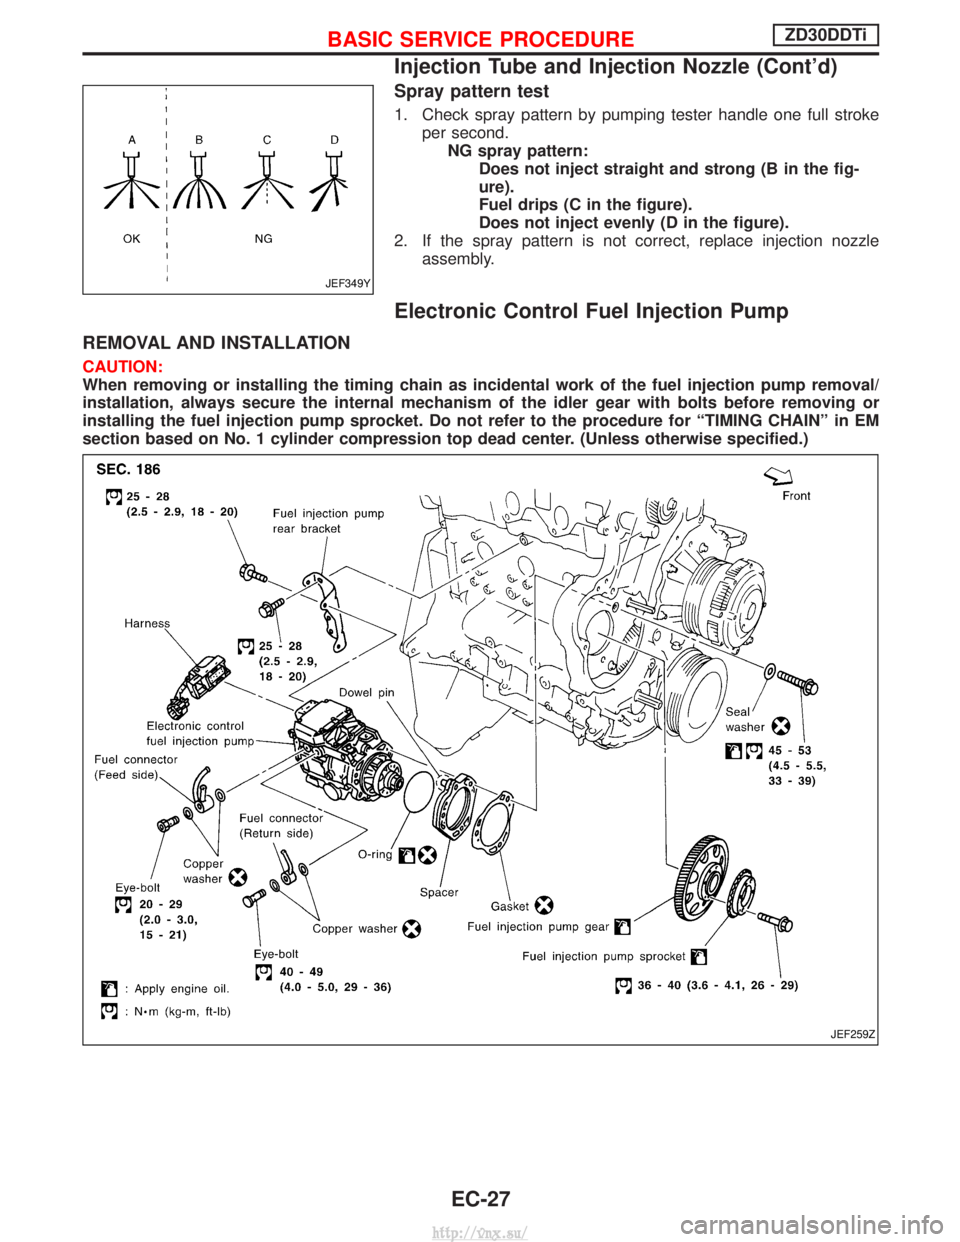
1. Check spray pattern by pumping tester handle one full strokeper second.NG spray pattern: Does not inject straight and strong (B in the fig-
ure).
Fuel drips (C in the figure).
Does not inject evenly (D in the figure).
2. If the spray pattern is not correct, replace injection nozzle assembly.
Electronic Control Fuel Injection Pump
REMOVAL AND INSTALLATION
CAUTION:
When removing or installing the timing chain as incidental work of the fuel injection pump removal/
installation, always secure the internal mechanism of the idler gear with bolts before removing or
installing the fuel injection pump sprocket. Do not refer to the procedure for ªTIMING CHAINº in EM
section based on No. 1 cylinder compression top dead center. (Unless otherwise specified.)
JEF349Y
JEF259Z
BASIC SERVICE PROCEDUREZD30DDTi
Injection Tube and Injection Nozzle (Cont'd)
EC-27
http://vnx.su/
Page 303 of 1833
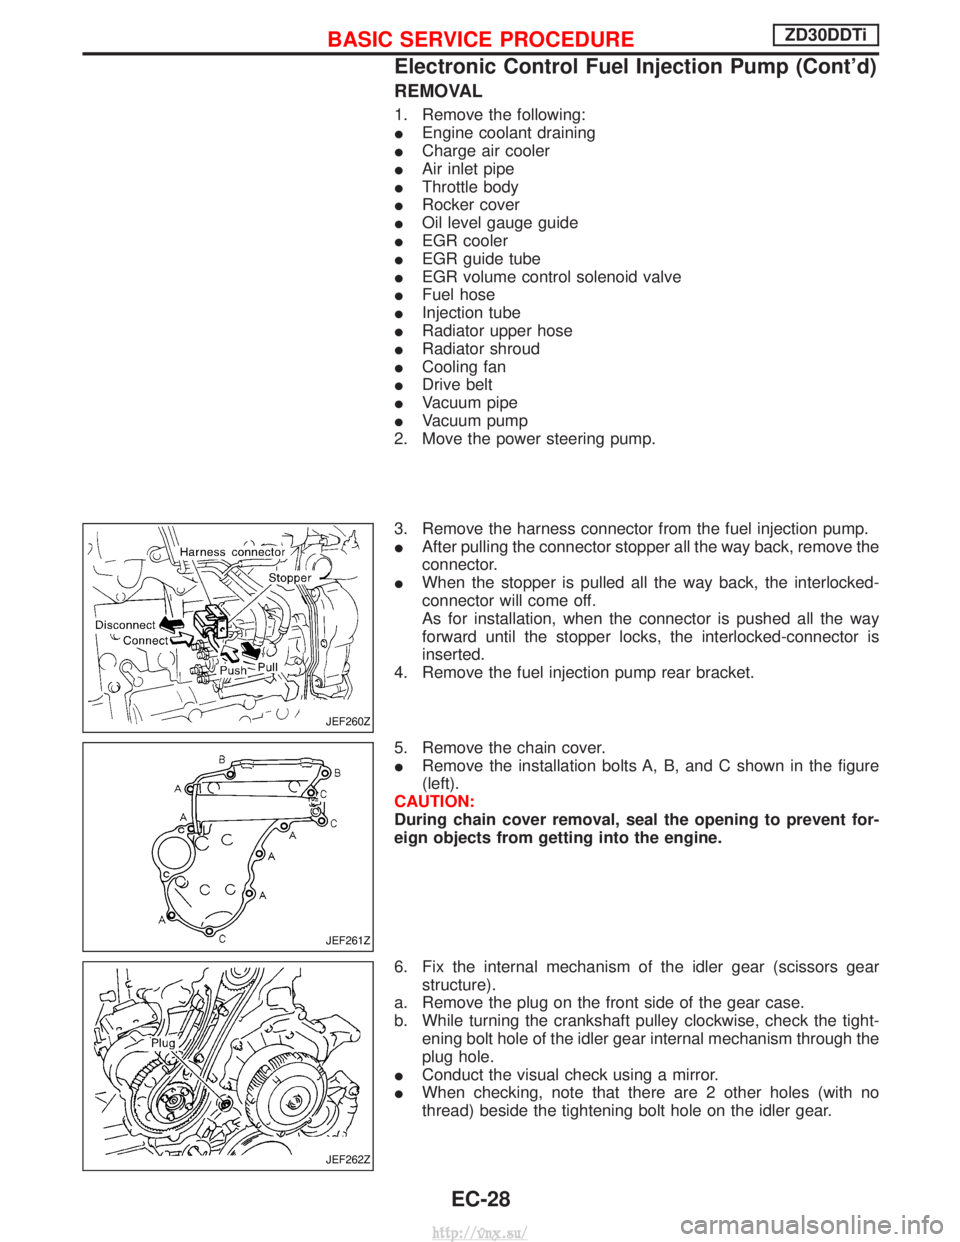
REMOVAL
1. Remove the following:
IEngine coolant draining
I Charge air cooler
I Air inlet pipe
I Throttle body
I Rocker cover
I Oil level gauge guide
I EGR cooler
I EGR guide tube
I EGR volume control solenoid valve
I Fuel hose
I Injection tube
I Radiator upper hose
I Radiator shroud
I Cooling fan
I Drive belt
I Vacuum pipe
I Vacuum pump
2. Move the power steering pump.
3. Remove the harness connector from the fuel injection pump.
I After pulling the connector stopper all the way back, remove the
connector.
I When the stopper is pulled all the way back, the interlocked-
connector will come off.
As for installation, when the connector is pushed all the way
forward until the stopper locks, the interlocked-connector is
inserted.
4. Remove the fuel injection pump rear bracket.
5. Remove the chain cover.
I Remove the installation bolts A, B, and C shown in the figure
(left).
CAUTION:
During chain cover removal, seal the opening to prevent for-
eign objects from getting into the engine.
6. Fix the internal mechanism of the idler gear (scissors gear structure).
a. Remove the plug on the front side of the gear case.
b. While turning the crankshaft pulley clockwise, check the tight- ening bolt hole of the idler gear internal mechanism through the
plug hole.
I Conduct the visual check using a mirror.
I When checking, note that there are 2 other holes (with no
thread) beside the tightening bolt hole on the idler gear.
JEF260Z
JEF261Z
JEF262Z
BASIC SERVICE PROCEDUREZD30DDTi
Electronic Control Fuel Injection Pump (Cont'd)
EC-28
http://vnx.su/
Page 304 of 1833
![NISSAN TERRANO 2004 Service Owners Manual c. Install the tightening bolt [Part No.: 81-20620-28, thread diam-eter: M6, under head: 20 mm (0.79 in), pitch: 1.0 mm (0.039 in)]
to the idler gear tightening bolt hole, and tighten to the speci-
fi NISSAN TERRANO 2004 Service Owners Manual c. Install the tightening bolt [Part No.: 81-20620-28, thread diam-eter: M6, under head: 20 mm (0.79 in), pitch: 1.0 mm (0.039 in)]
to the idler gear tightening bolt hole, and tighten to the speci-
fi](/img/5/57394/w960_57394-303.png)
c. Install the tightening bolt [Part No.: 81-20620-28, thread diam-eter: M6, under head: 20 mm (0.79 in), pitch: 1.0 mm (0.039 in)]
to the idler gear tightening bolt hole, and tighten to the speci-
fied torque:
: 2.5 - 3.4 N ×m (0.25 - 0.35 kg-m, 22 - 30 in-lb)
CAUTION:
I To protect the idler gear from damage, do not use the sub-
stitute part for the tightening bolt.
I Hereafter, do not turn the crankshaft to avoid hitting tight-
ening bolt head against the gear case.
I Do not remove the idler gear tightening bolt before instal-
lations of the timing chain and related parts are completed.
7. Make mating marks on the cam sprocket, fuel injection pump sprocket, and timing chain with paint.
8. Make mating marks on the fuel injection pump gear and idler gear with paint.
9. Remove the chain tensioner.
(1) Loosen the upper and lower installation bolts.
(2) While holding the chain tensioner by hand, remove the upper installation bolt to release the spring tension.
(3) Remove the lower installation bolt first, and then the chain ten- sioner.
I Since the chain tensioner does not have a mechanism to pre-
vent the plunger pop-out, watch out for the fall of the plunger
and spring. (Return prevention mechanism is available.)
10. Remove the timing chain slack guide.
11. Remove the cam sprocket and timing chain at the same time.
I Make mating marks on each sprocket and timing chain.
I Hold the hexagon head of the camshaft on the exhaust mani-
fold side, and loosen the cam sprocket installation bolt.
CAUTION:
Do not loosen the installation bolt using a chain tension.
12. Remove the fuel injection pump sprocket and gear as an assembly.
I Fix the fuel injection pump gear with the pulley holder (SST),
and loosen the installation bolt for removal.
I Try not to move the pump shaft when removing.
I Connect the sprocket and gear with a dowel pin, and tighten
them together with the installation bolt.
JEF263Z
JEF264Z
JEF265Z
JEF266Z
JEF267Z
BASIC SERVICE PROCEDUREZD30DDTi
Electronic Control Fuel Injection Pump (Cont'd)
EC-29
http://vnx.su/
Page 305 of 1833
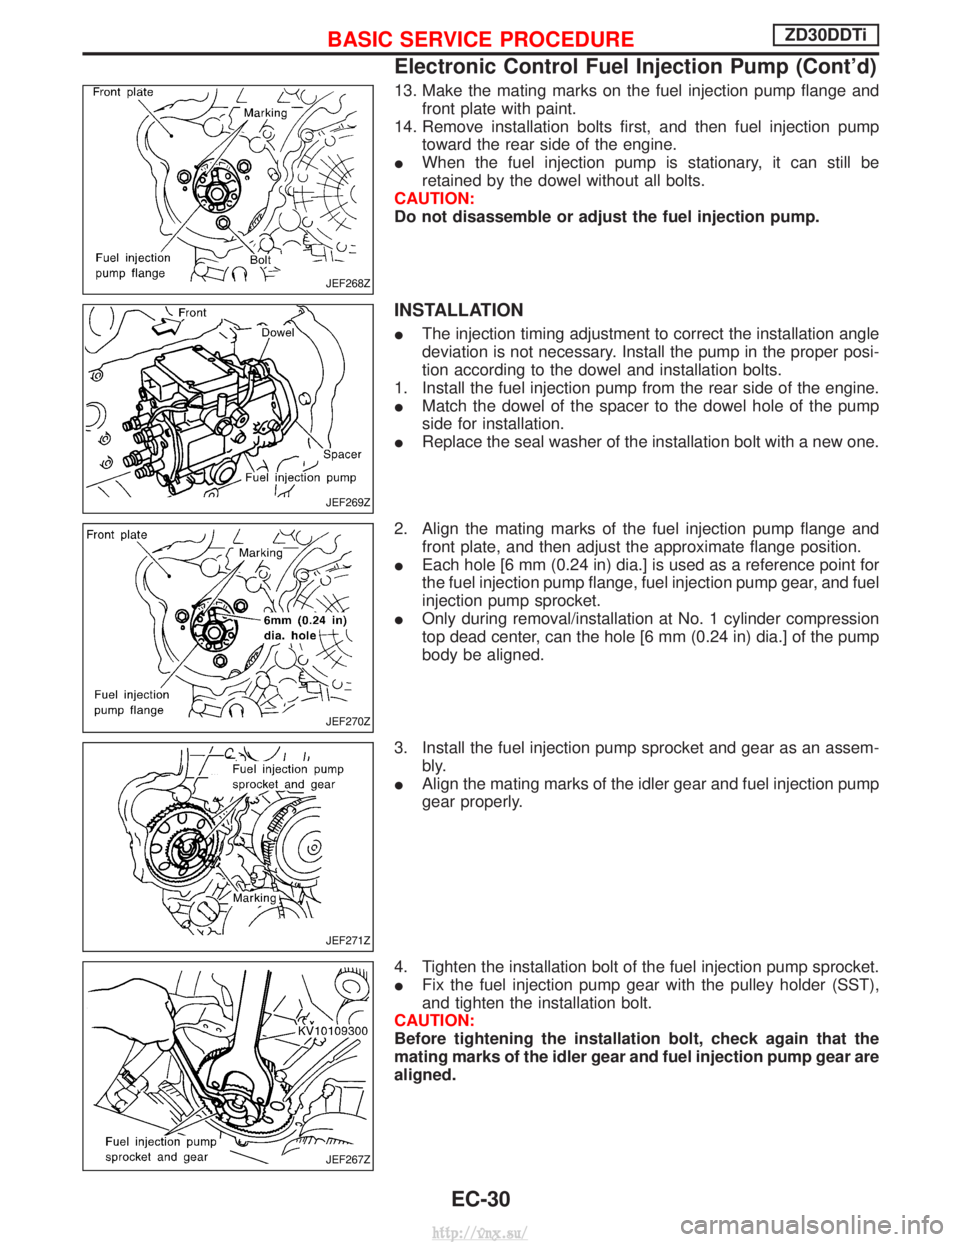
13. Make the mating marks on the fuel injection pump flange andfront plate with paint.
14. Remove installation bolts first, and then fuel injection pump toward the rear side of the engine.
I When the fuel injection pump is stationary, it can still be
retained by the dowel without all bolts.
CAUTION:
Do not disassemble or adjust the fuel injection pump.
INSTALLATION
I The injection timing adjustment to correct the installation angle
deviation is not necessary. Install the pump in the proper posi-
tion according to the dowel and installation bolts.
1. Install the fuel injection pump from the rear side of the engine.
I Match the dowel of the spacer to the dowel hole of the pump
side for installation.
I Replace the seal washer of the installation bolt with a new one.
2. Align the mating marks of the fuel injection pump flange and front plate, and then adjust the approximate flange position.
I Each hole [6 mm (0.24 in) dia.] is used as a reference point for
the fuel injection pump flange, fuel injection pump gear, and fuel
injection pump sprocket.
I Only during removal/installation at No. 1 cylinder compression
top dead center, can the hole [6 mm (0.24 in) dia.] of the pump
body be aligned.
3. Install the fuel injection pump sprocket and gear as an assem- bly.
I Align the mating marks of the idler gear and fuel injection pump
gear properly.
4. Tighten the installation bolt of the fuel injection pump sprocket.
I Fix the fuel injection pump gear with the pulley holder (SST),
and tighten the installation bolt.
CAUTION:
Before tightening the installation bolt, check again that the
mating marks of the idler gear and fuel injection pump gear are
aligned.
JEF268Z
JEF269Z
JEF270Z
JEF271Z
JEF267Z
BASIC SERVICE PROCEDUREZD30DDTi
Electronic Control Fuel Injection Pump (Cont'd)
EC-30
http://vnx.su/
Page 306 of 1833
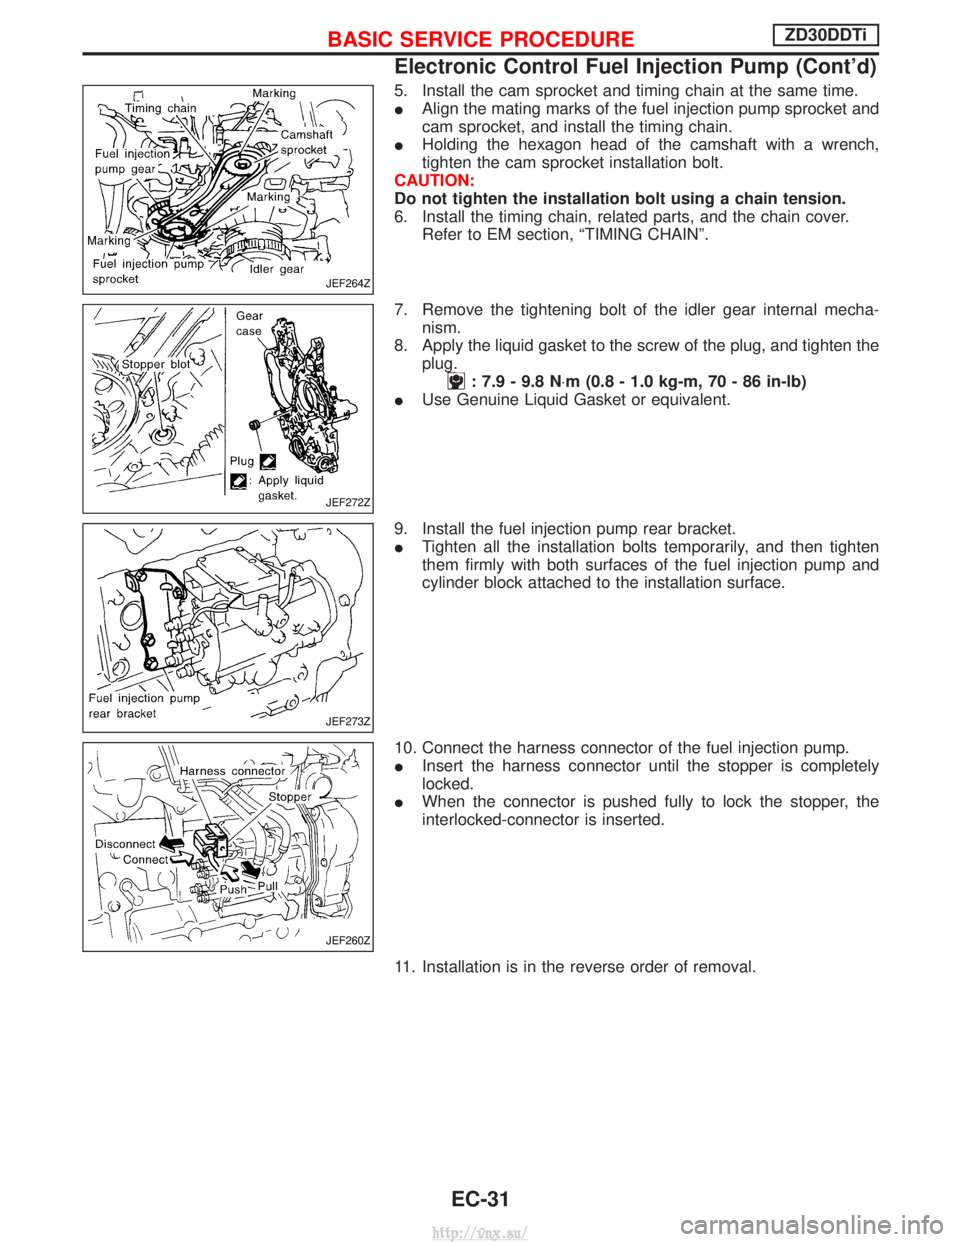
5. Install the cam sprocket and timing chain at the same time.
IAlign the mating marks of the fuel injection pump sprocket and
cam sprocket, and install the timing chain.
I Holding the hexagon head of the camshaft with a wrench,
tighten the cam sprocket installation bolt.
CAUTION:
Do not tighten the installation bolt using a chain tension.
6. Install the timing chain, related parts, and the chain cover. Refer to EM section, ªTIMING CHAINº.
7. Remove the tightening bolt of the idler gear internal mecha- nism.
8. Apply the liquid gasket to the screw of the plug, and tighten the plug.
: 7.9 - 9.8 N ×m (0.8 - 1.0 kg-m, 70 - 86 in-lb)
I Use Genuine Liquid Gasket or equivalent.
9. Install the fuel injection pump rear bracket.
I Tighten all the installation bolts temporarily, and then tighten
them firmly with both surfaces of the fuel injection pump and
cylinder block attached to the installation surface.
10. Connect the harness connector of the fuel injection pump.
I Insert the harness connector until the stopper is completely
locked.
I When the connector is pushed fully to lock the stopper, the
interlocked-connector is inserted.
11. Installation is in the reverse order of removal.
JEF264Z
JEF272Z
JEF273Z
JEF260Z
BASIC SERVICE PROCEDUREZD30DDTi
Electronic Control Fuel Injection Pump (Cont'd)
EC-31
http://vnx.su/
Page 307 of 1833
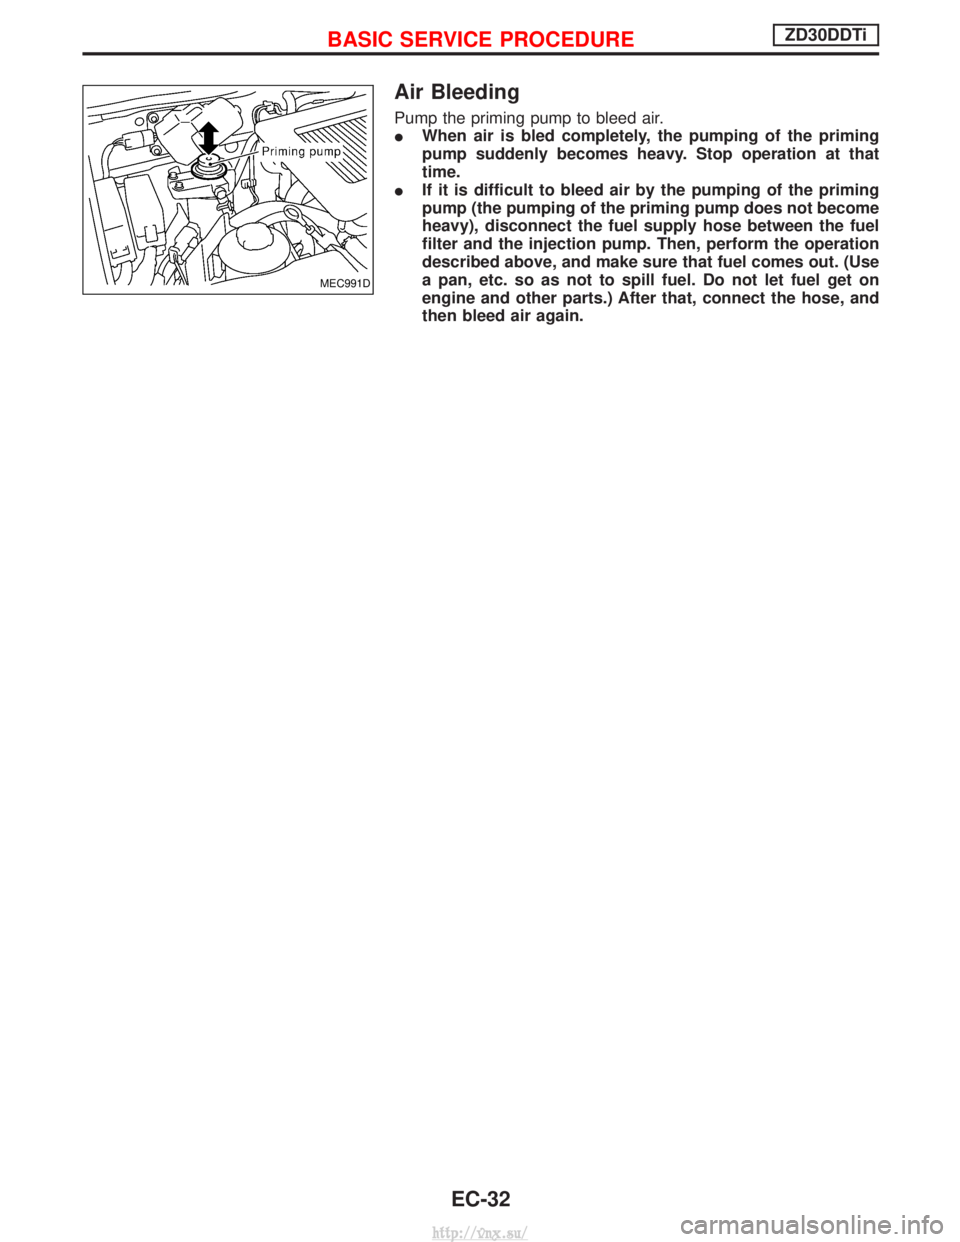
Air Bleeding
Pump the priming pump to bleed air.
IWhen air is bled completely, the pumping of the priming
pump suddenly becomes heavy. Stop operation at that
time.
I If it is difficult to bleed air by the pumping of the priming
pump (the pumping of the priming pump does not become
heavy), disconnect the fuel supply hose between the fuel
filter and the injection pump. Then, perform the operation
described above, and make sure that fuel comes out. (Use
a pan, etc. so as not to spill fuel. Do not let fuel get on
engine and other parts.) After that, connect the hose, and
then bleed air again.
MEC991D
BASIC SERVICE PROCEDUREZD30DDTi
EC-32
http://vnx.su/
Page 315 of 1833
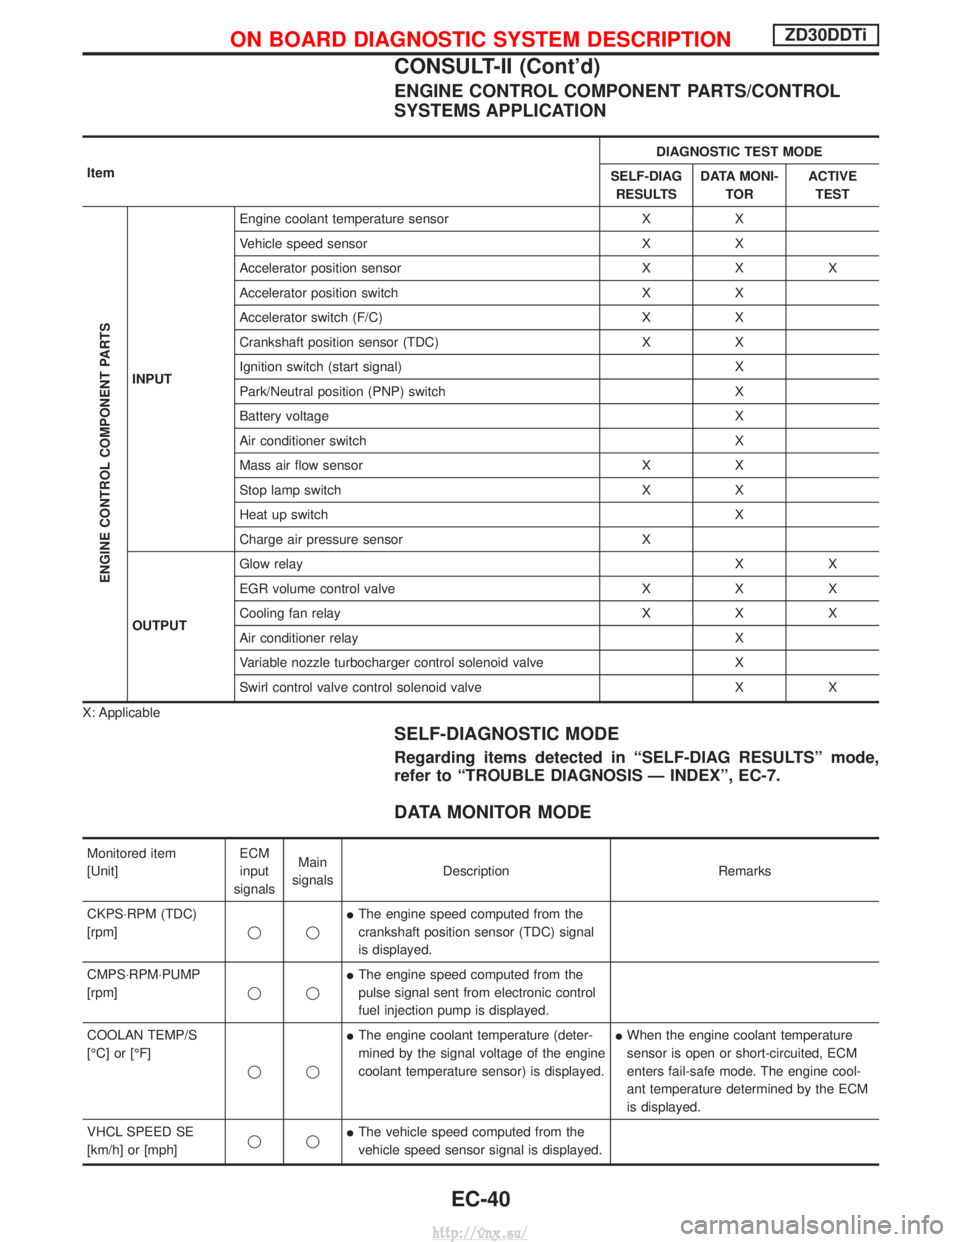
ENGINE CONTROL COMPONENT PARTS/CONTROL
SYSTEMS APPLICATION
ItemDIAGNOSTIC TEST MODE
SELF-DIAG RESULTS DATA MONI-
TOR ACTIVE
TEST
ENGINE CONTROL COMPONENT PARTS
INPUT Engine coolant temperature sensor X X
Vehicle speed sensor X X
Accelerator position sensor X X X
Accelerator position switch X X
Accelerator switch (F/C) X X
Crankshaft position sensor (TDC) X X
Ignition switch (start signal) X
Park/Neutral position (PNP) switch X
Battery voltage X
Air conditioner switch X
Mass air flow sensor X X
Stop lamp switch X X
Heat up switch X
Charge air pressure sensor X
OUTPUT Glow relay
XX
EGR volume control valve X X X
Cooling fan relay X X X
Air conditioner relay X
Variable nozzle turbocharger control solenoid valve X
Swirl control valve control solenoid valve X X
X: Applicable
SELF-DIAGNOSTIC MODE
Regarding items detected in ªSELF-DIAG RESULTSº mode,
refer to ªTROUBLE DIAGNOSIS Ð INDEXº, EC-7.
DATA MONITOR MODE
Monitored item
[Unit] ECM
input
signals Main
signals Description Remarks
CKPS×RPM (TDC)
[rpm] qqI
The engine speed computed from the
crankshaft position sensor (TDC) signal
is displayed.
CMPS×RPM×PUMP
[rpm] qqI
The engine speed computed from the
pulse signal sent from electronic control
fuel injection pump is displayed.
COOLAN TEMP/S
[ÉC] or [ÉF] qqI
The engine coolant temperature (deter-
mined by the signal voltage of the engine
coolant temperature sensor) is displayed. I
When the engine coolant temperature
sensor is open or short-circuited, ECM
enters fail-safe mode. The engine cool-
ant temperature determined by the ECM
is displayed.
VHCL SPEED SE
[km/h] or [mph] qqI
The vehicle speed computed from the
vehicle speed sensor signal is displayed.
ON BOARD DIAGNOSTIC SYSTEM DESCRIPTIONZD30DDTi
CONSULT-II (Cont'd)
EC-40
http://vnx.su/