NISSAN TIIDA 2007 Service Repair Manual
Manufacturer: NISSAN, Model Year: 2007, Model line: TIIDA, Model: NISSAN TIIDA 2007Pages: 5883, PDF Size: 78.95 MB
Page 4851 of 5883
SRC-82
< SYMPTOM DIAGNOSIS >
SRS AIR BAG SYSTEM
SYMPTOM DIAGNOSIS
SRS AIR BAG SYSTEM
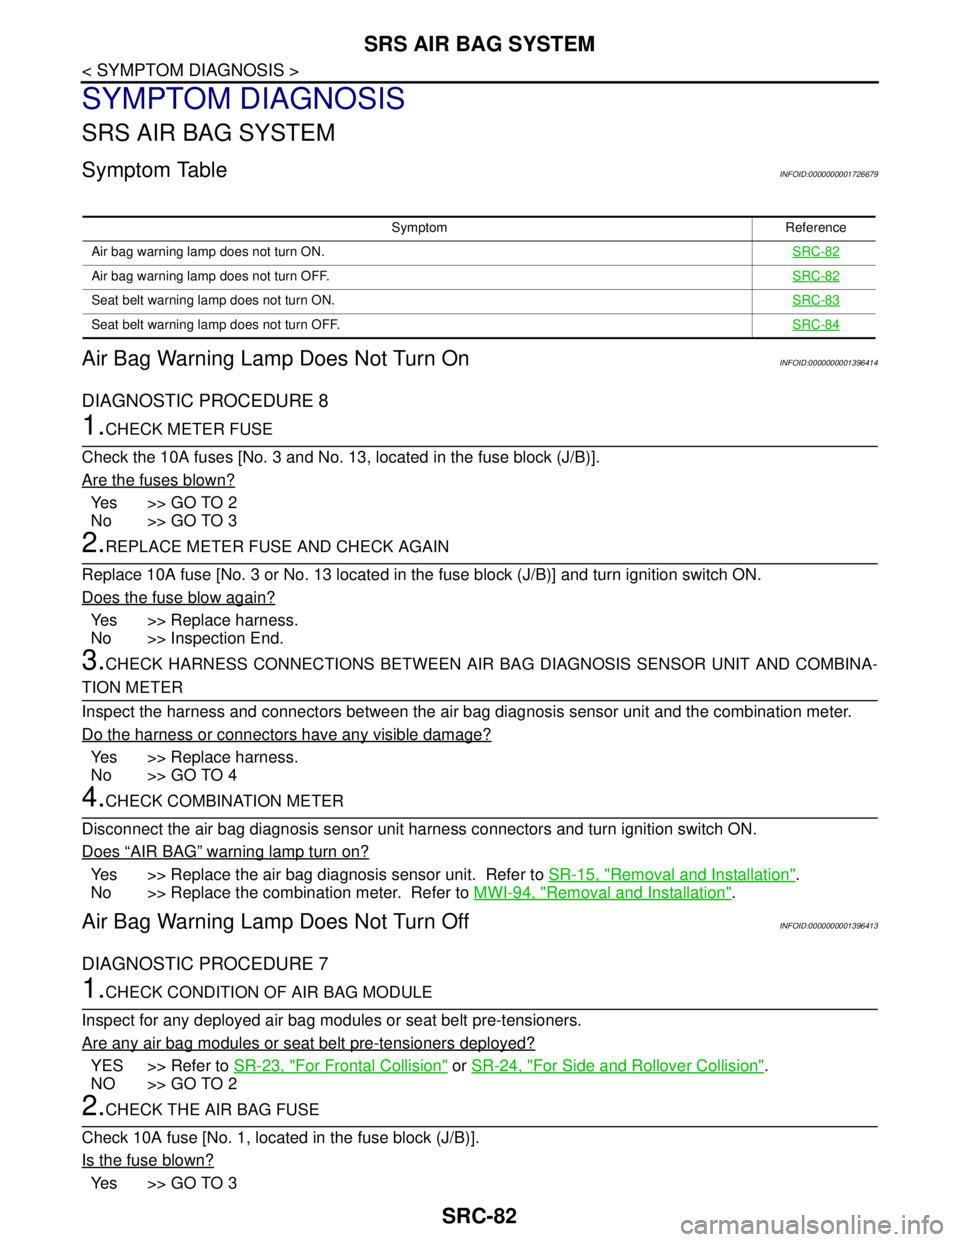
Symptom TableINFOID:0000000001726679
Air Bag Warning Lamp Does Not Turn OnINFOID:0000000001396414
DIAGNOSTIC PROCEDURE 8
1.CHECK METER FUSE
Check the 10A fuses [No. 3 and No. 13, located in the fuse block (J/B)].
Are the fuses blown?
Ye s > > G O T O 2
No >> GO TO 3
2.REPLACE METER FUSE AND CHECK AGAIN
Replace 10A fuse [No. 3 or No. 13 located in the fuse block (J/B)] and turn ignition switch ON.
Does the fuse blow again?
Yes >> Replace harness.
No >> Inspection End.
3.CHECK HARNESS CONNECTIONS BETWEEN AIR BAG DIAGNOSIS SENSOR UNIT AND COMBINA-
TION METER
Inspect the harness and connectors between the air bag diagnosis sensor unit and the combination meter.
Do the harness or connectors have any visible damage?
Yes >> Replace harness.
No >> GO TO 4
4.CHECK COMBINATION METER
Disconnect the air bag diagnosis sensor unit harness connectors and turn ignition switch ON.
Does
“AIR BAG” warning lamp turn on?
Yes >> Replace the air bag diagnosis sensor unit. Refer to SR-15, "Removal and Installation".
No >> Replace the combination meter. Refer to MWI-94, "
Removal and Installation".
Air Bag Warning Lamp Does Not Turn OffINFOID:0000000001396413
DIAGNOSTIC PROCEDURE 7
1.CHECK CONDITION OF AIR BAG MODULE
Inspect for any deployed air bag modules or seat belt pre-tensioners.
Are any air bag modules or seat belt pre-tensioners deployed?
YES >> Refer to SR-23, "For Frontal Collision" or SR-24, "For Side and Rollover Collision".
NO >> GO TO 2
2.CHECK THE AIR BAG FUSE
Check 10A fuse [No. 1, located in the fuse block (J/B)].
Is the fuse blown?
Ye s > > G O T O 3
Symptom Reference
Air bag warning lamp does not turn ON.SRC-82
Air bag warning lamp does not turn OFF.SRC-82
Seat belt warning lamp does not turn ON.SRC-83
Seat belt warning lamp does not turn OFF.SRC-84
Page 4852 of 5883
![NISSAN TIIDA 2007 Service Repair Manual SRS AIR BAG SYSTEM
SRC-83
< SYMPTOM DIAGNOSIS >
C
D
E
F
G
I
J
K
L
MA
B
SRC
N
O
P
No >> GO TO 4
3.CHECK AIR BAG FUSE AGAIN
Replace 10A fuse [No. 1, located in the fuse block (J/B)] and turn ignition sw NISSAN TIIDA 2007 Service Repair Manual SRS AIR BAG SYSTEM
SRC-83
< SYMPTOM DIAGNOSIS >
C
D
E
F
G
I
J
K
L
MA
B
SRC
N
O
P
No >> GO TO 4
3.CHECK AIR BAG FUSE AGAIN
Replace 10A fuse [No. 1, located in the fuse block (J/B)] and turn ignition sw](/img/5/57395/w960_57395-4851.png)
SRS AIR BAG SYSTEM
SRC-83
< SYMPTOM DIAGNOSIS >
C
D
E
F
G
I
J
K
L
MA
B
SRC
N
O
P
No >> GO TO 4
3.CHECK AIR BAG FUSE AGAIN
Replace 10A fuse [No. 1, located in the fuse block (J/B)] and turn ignition switch ON.
Does the fuse blow again?
YES >> Replace harness.
NO >> Inspection End.
4.CHECK AIR BAG DIAGNOSIS SENSOR UNIT
Connect CONSULT-III.
Is
“AIR BAG” displayed on CONSULT-III?
YES >> GO TO 5
NO >> Visually inspect the air bag diagnosis sensor unit harness connections. If the connections are OK,
replace the air bag diagnosis sensor unit. Refer to SR-15, "
Removal and Installation".
5.CHECK HARNESS CONNECTION
Check for loose connections between the combination meter and the air bag diagnosis sensor unit.
Are there any loose connections?
Yes >> Properly connect the combination meter and air bag diagnosis sensor unit harness connectors. If
“AIR BAG” warning lamp still does not turn off, replace the wiring harness.
No >> Replace air bag diagnosis sensor unit.
Seat Belt Warning Lamp Does Not Turn OnINFOID:0000000001726690
1.DETERMINE WHICH LAMP IS MALFUNCTIONING
Determine if at least one of the seat belt warning lamps function.
Does either the driver or passenger seat belt warning lamps operate?
Yes >> GO TO 2
No >> Refer to XXX SEAT BELT WARNING LAMP P&G TEST.
2.PERFORM BULB CHECK
Unfasten both seat belts and turn the ignition switch ON.
Does the malfunctioning side pass bulb check?
Yes >> GO TO 3
No >> Replace combination meter (Driver side) or check instrument panel warning lamp assembly.
Refer to XXX. (SEE MWI)
3.PERFORM SEAT BELT BUCKLE SWITCH CIRCUIT CHECK
Test the seat belt buckle switch circuit on the affected side. Refer to XXX SEAT BELT BUCKLE SWITCH CIR-
CUIT CHECK.
Are the inspection results normal?
Yes >> GO TO 4 (Driver side) or GO TO 5 (Passenger side)
No >> Repair as necessary.
4.CHECK HARNESS BETWEEN SEAT BELT WARNING LAMP CONTROL UNIT AND COMBINATION
METER
1. Turn ignition switch OFF.
2. Disconnect the seat belt warning lamp control unit harness connector and the combination meter connec-
tor.
Page 4853 of 5883
SRC-84
< SYMPTOM DIAGNOSIS >
SRS AIR BAG SYSTEM
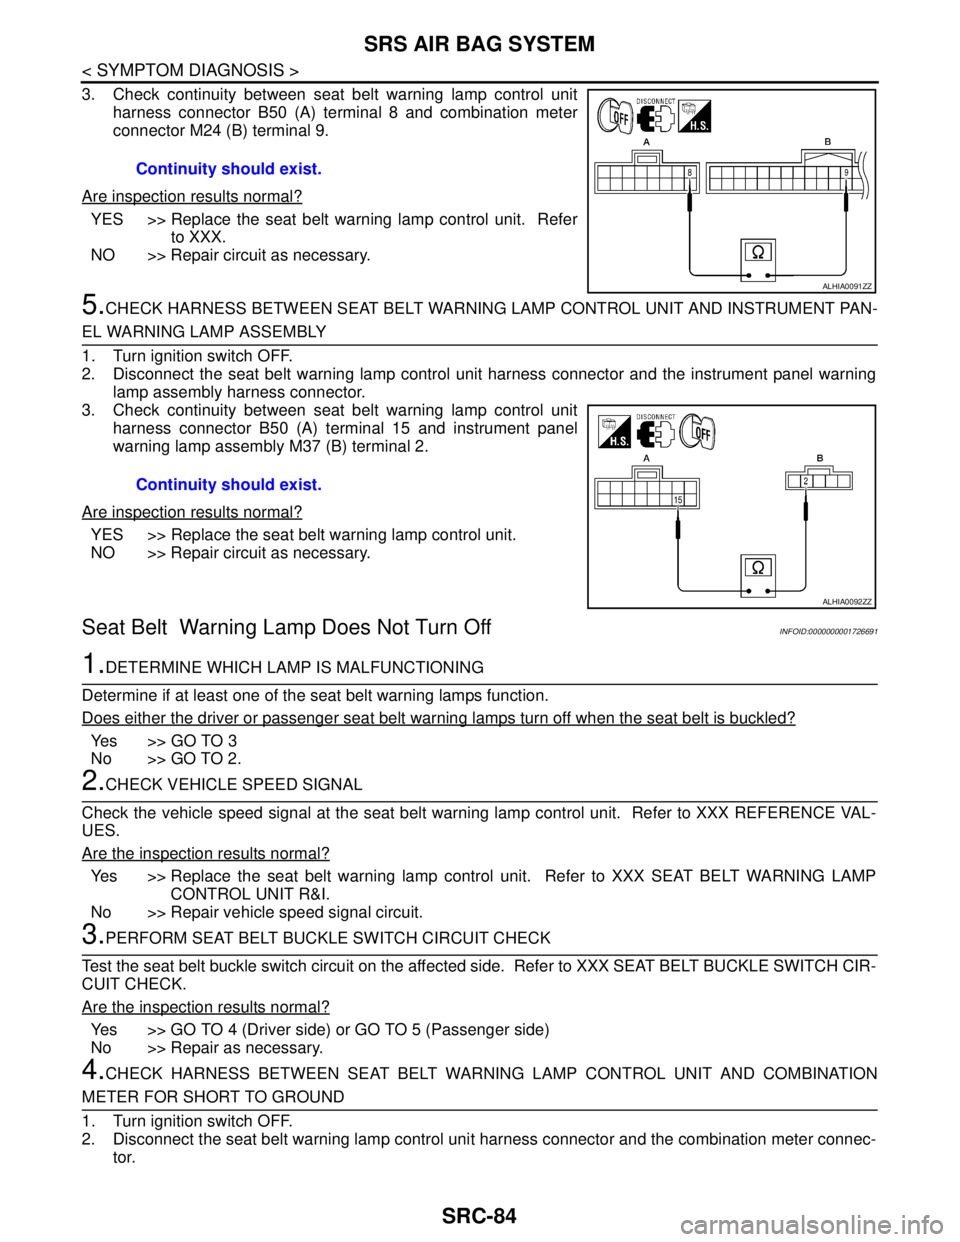
3. Check continuity between seat belt warning lamp control unit
harness connector B50 (A) terminal 8 and combination meter
connector M24 (B) terminal 9.
Are inspection results normal?
YES >> Replace the seat belt warning lamp control unit. Refer
to XXX.
NO >> Repair circuit as necessary.
5.CHECK HARNESS BETWEEN SEAT BELT WARNING LAMP CONTROL UNIT AND INSTRUMENT PAN-
EL WARNING LAMP ASSEMBLY
1. Turn ignition switch OFF.
2. Disconnect the seat belt warning lamp control unit harness connector and the instrument panel warning
lamp assembly harness connector.
3. Check continuity between seat belt warning lamp control unit
harness connector B50 (A) terminal 15 and instrument panel
warning lamp assembly M37 (B) terminal 2.
Are inspection results normal?
YES >> Replace the seat belt warning lamp control unit.
NO >> Repair circuit as necessary.
Seat Belt Warning Lamp Does Not Turn OffINFOID:0000000001726691
1.DETERMINE WHICH LAMP IS MALFUNCTIONING
Determine if at least one of the seat belt warning lamps function.
Does either the driver or passenger seat belt warning lamps turn off when the seat belt is buckled?
Ye s > > G O T O 3
No >> GO TO 2.
2.CHECK VEHICLE SPEED SIGNAL
Check the vehicle speed signal at the seat belt warning lamp control unit. Refer to XXX REFERENCE VAL-
UES.
Are the inspection results normal?
Yes >> Replace the seat belt warning lamp control unit. Refer to XXX SEAT BELT WARNING LAMP
CONTROL UNIT R&I.
No >> Repair vehicle speed signal circuit.
3.PERFORM SEAT BELT BUCKLE SWITCH CIRCUIT CHECK
Test the seat belt buckle switch circuit on the affected side. Refer to XXX SEAT BELT BUCKLE SWITCH CIR-
CUIT CHECK.
Are the inspection results normal?
Yes >> GO TO 4 (Driver side) or GO TO 5 (Passenger side)
No >> Repair as necessary.
4.CHECK HARNESS BETWEEN SEAT BELT WARNING LAMP CONTROL UNIT AND COMBINATION
METER FOR SHORT TO GROUND
1. Turn ignition switch OFF.
2. Disconnect the seat belt warning lamp control unit harness connector and the combination meter connec-
tor.Continuity should exist.
ALHIA0091ZZ
Continuity should exist.
ALHIA0092ZZ
Page 4854 of 5883
SRS AIR BAG SYSTEM
SRC-85
< SYMPTOM DIAGNOSIS >
C
D
E
F
G
I
J
K
L
MA
B
SRC
N
O
P
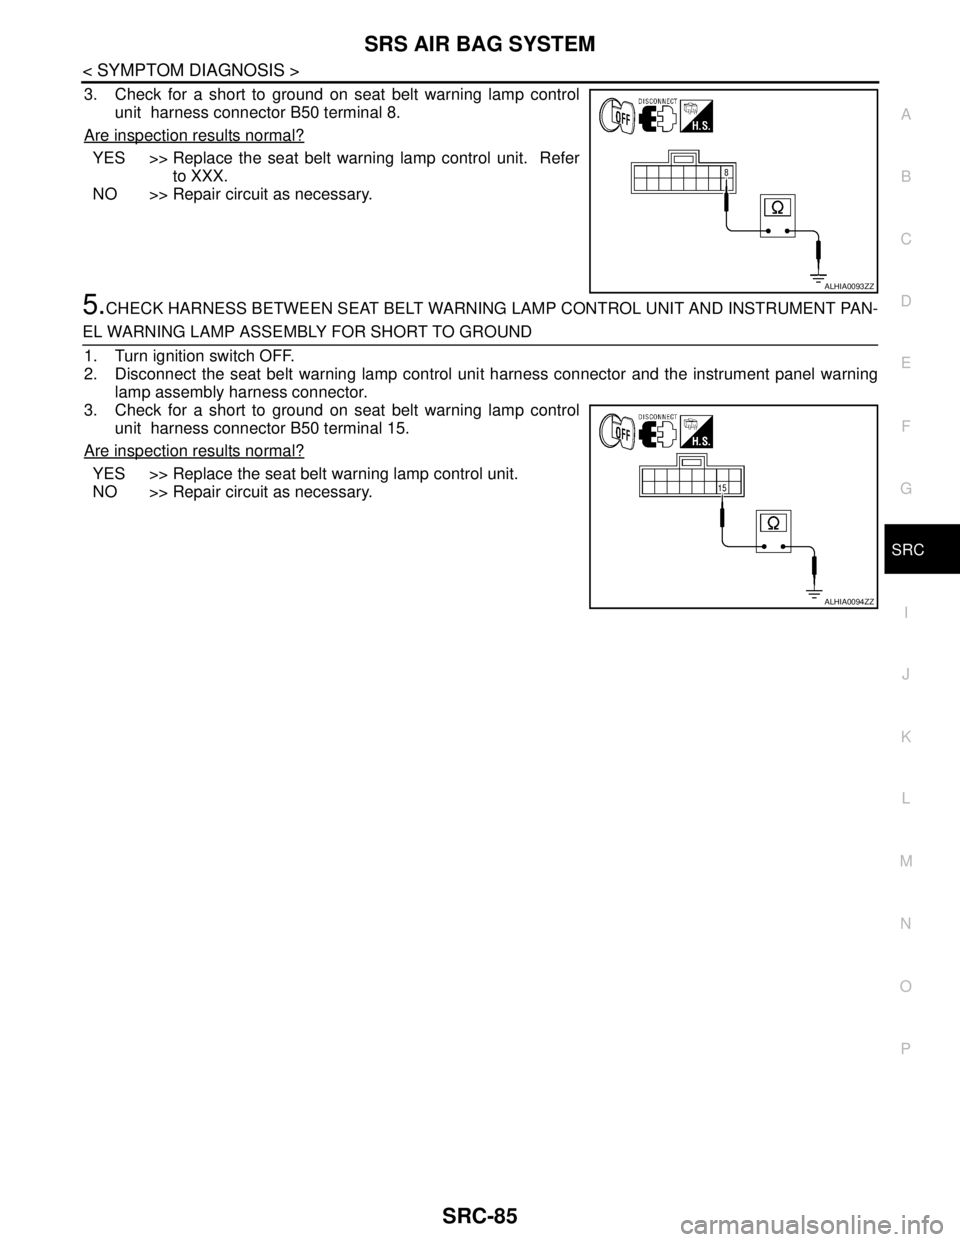
3. Check for a short to ground on seat belt warning lamp control
unit harness connector B50 terminal 8.
Are inspection results normal?
YES >> Replace the seat belt warning lamp control unit. Refer
to XXX.
NO >> Repair circuit as necessary.
5.CHECK HARNESS BETWEEN SEAT BELT WARNING LAMP CONTROL UNIT AND INSTRUMENT PAN-
EL WARNING LAMP ASSEMBLY FOR SHORT TO GROUND
1. Turn ignition switch OFF.
2. Disconnect the seat belt warning lamp control unit harness connector and the instrument panel warning
lamp assembly harness connector.
3. Check for a short to ground on seat belt warning lamp control
unit harness connector B50 terminal 15.
Are inspection results normal?
YES >> Replace the seat belt warning lamp control unit.
NO >> Repair circuit as necessary.
ALHIA0093ZZ
ALHIA0094ZZ
Page 4855 of 5883

SRC-86
< PRECAUTION >
PRECAUTIONS
PRECAUTION
PRECAUTIONS
Precaution for Supplemental Restraint System (SRS) "AIR BAG" and "SEAT BELT
PRE-TENSIONER"
INFOID:0000000001396424
The Supplemental Restraint System such as “AIR BAG” and “SEAT BELT PRE-TENSIONER”, used along
with a front seat belt, helps to reduce the risk or severity of injury to the driver and front passenger for certain
types of collision. Information necessary to service the system safely is included in the SR and SB section of
this Service Manual.
WARNING:
To avoid rendering the SRS inoperative, which could increase the risk of personal injury or death in
the event of a collision which would result in air bag inflation, all maintenance must be performed by
an authorized NISSAN/INFINITI dealer.
Improper maintenance, including incorrect removal and installation of the SRS, can lead to personal
injury caused by unintentional activation of the system. For removal of Spiral Cable and Air Bag
Module, see the SR section.
Do not use electrical test equipment on any circuit related to the SRS unless instructed to in this
Service Manual. SRS wiring harnesses can be identified by yellow and/or orange harnesses or har-
ness connectors.
Precaution for SRS "AIR BAG" and "SEAT BELT PRE-TENSIONER" Service
INFOID:0000000001396425
Do not use electrical test equipment to check SRS circuits unless instructed to in this Service Manual.
Before servicing the SRS, turn ignition switch OFF, disconnect both battery cables and wait at least 3 min-
utes.
For approximately 3 minutes after the cables are removed, it is still possible for the air bag and seat belt pre-
tensioner to deploy. Therefore, do not work on any SRS connectors or wires until at least 3 minutes have
passed.
The air bag diagnosis sensor unit must always be installed with the arrow mark “⇐” pointing toward the front
of the vehicle for proper operation. Also check air bag diagnosis sensor unit for cracks, deformities or rust
before installation and replace as required.
The spiral cable must be aligned with the neutral position since its rotations are limited. Do not attempt to
turn steering wheel or column after removal of steering gear.
Handle air bag module carefully. Always place driver and front passenger air bag modules with the pad side
facing upward and seat mounted front side air bag module standing with the stud bolt side facing down.
Conduct self-diagnosis to check entire SRS for proper function after replacing any components.
After air bag inflates, the front instrument panel assembly should be replaced if damaged.
Page 4856 of 5883

ST-1
STEERING
C
D
E
F
H
I
J
K
L
M
SECTION ST
A
B
ST
N
O
P
CONTENTS
STEERING SYSTEM
PRECAUTION ...............................................2
PRECAUTIONS ...................................................2
Precaution for Supplemental Restraint System
(SRS) "AIR BAG" and "SEAT BELT PRE-TEN-
SIONER" ...................................................................
2
Precaution Necessary for Steering Wheel Rota-
tion After Battery Disconnect .....................................
2
Precaution for Steering System ................................2
PREPARATION ............................................4
PREPARATION ...................................................4
Special Service Tool .................................................4
Commercial Service Tool ..........................................4
SYMPTOM DIAGNOSIS ...............................5
NOISE, VIBRATION AND HARSHNESS
(NVH) TROUBLESHOOTING .............................
5
NVH Troubleshooting Chart ......................................5
ON-VEHICLE MAINTENANCE .....................6
STEERING WHEEL .............................................6
On-Vehicle Inspection and Service ...........................6
ON-VEHICLE REPAIR ..................................8
STEERING WHEEL ...........................................8
Removal and Installation ..........................................8
STEERING COLUMN .........................................9
Removal and Installation ..........................................9
STEERING GEAR .............................................12
Removal and Installation .........................................12
DISASSEMBLY AND ASSEMBLY ..............14
STEERING GEAR .............................................14
Disassembly and Assembly .....................................14
SERVICE DATA AND SPECIFICATIONS
(SDS) ............................................................
18
SERVICE DATA AND SPECIFICATIONS
(SDS) .................................................................
18
Steering Wheel ........................................................18
Steering Angle .........................................................18
Steering Column ......................................................18
Steering Outer Socket and Inner Socket .................19
Steering Gear ..........................................................19
Page 4857 of 5883

ST-2
< PRECAUTION >
PRECAUTIONS
PRECAUTION
PRECAUTIONS
Precaution for Supplemental Restraint System (SRS) "AIR BAG" and "SEAT BELT
PRE-TENSIONER"
INFOID:0000000001282485
The Supplemental Restraint System such as “AIR BAG” and “SEAT BELT PRE-TENSIONER”, used along
with a front seat belt, helps to reduce the risk or severity of injury to the driver and front passenger for certain
types of collision. Information necessary to service the system safely is included in the SR and SB section of
this Service Manual.
WARNING:
• To avoid rendering the SRS inoperative, which could increase the risk of personal injury or death in
the event of a collision which would result in air bag inflation, all maintenance must be performed by
an authorized NISSAN/INFINITI dealer.
Improper maintenance, including incorrect removal and installation of the SRS, can lead to personal
injury caused by unintentional activation of the system. For removal of Spiral Cable and Air Bag
Module, see the SR section.
Do not use electrical test equipment on any circuit related to the SRS unless instructed to in this
Service Manual. SRS wiring harnesses can be identified by yellow and/or orange harnesses or har-
ness connectors.
Precaution Necessary for Steering Wheel Rotation After Battery Disconnect
INFOID:0000000001282486
NOTE:
This procedure is applied only to models with Intelligent Key system and NATS (NISSAN ANTI-THEFT SYS-
TEM).
Remove and install all control units after disconnecting both battery cables with the ignition switch in the
″LOCK″ position.
Always use CONSULT-III to perform self-diagnosis as a part of each function inspection after finishing work.
If DTC is detected, perform trouble diagnosis according to self-diagnostic results.
For models equipped with the Intelligent Key system and NATS, an electrically controlled steering lock mech-
anism is adopted on the key cylinder.
For this reason, if the battery is disconnected or if the battery is discharged, the steering wheel will lock and
steering wheel rotation will become impossible.
If steering wheel rotation is required when battery power is interrupted, follow the procedure below before
starting the repair operation.
OPERATION PROCEDURE
1. Connect both battery cables.
NOTE:
Supply power using jumper cables if battery is discharged.
2. Use the Intelligent Key or mechanical key to turn the ignition switch to the ″ACC″ position. At this time, the
steering lock will be released.
3. Disconnect both battery cables. The steering lock will remain released and the steering wheel can be
rotated.
4. Perform the necessary repair operation.
5. When the repair work is completed, return the ignition switch to the ″LOCK″ position before connecting
the battery cables. (At this time, the steering lock mechanism will engage.)
6. Perform a self-diagnosis check of all control units using CONSULT-III.
Precaution for Steering SystemINFOID:0000000001282487
Observe the following precautions when disassembling.
- Before disassembly, thoroughly clean the outside of the unit.
- Disassembly should be done in a clean work area. It is important to prevent the internal parts from becoming
contaminated by dirt or other foreign matter.
- For easier and proper assembly, place disassembled parts in order on a parts rack.
Page 4858 of 5883

PRECAUTIONS
ST-3
< PRECAUTION >
C
D
E
F
H
I
J
K
L
MA
B
ST
N
O
P
- Use nylon cloth or paper towels to clean the parts; common shop rags can leave lint that might interfere with
their operation.
- Do not reuse non-reusable parts.
- Before assembling, apply the specified grease to the directed parts.
Page 4859 of 5883
ST-4
< PREPARATION >
PREPARATION
PREPARATION
PREPARATION
Special Service ToolINFOID:0000000001282488
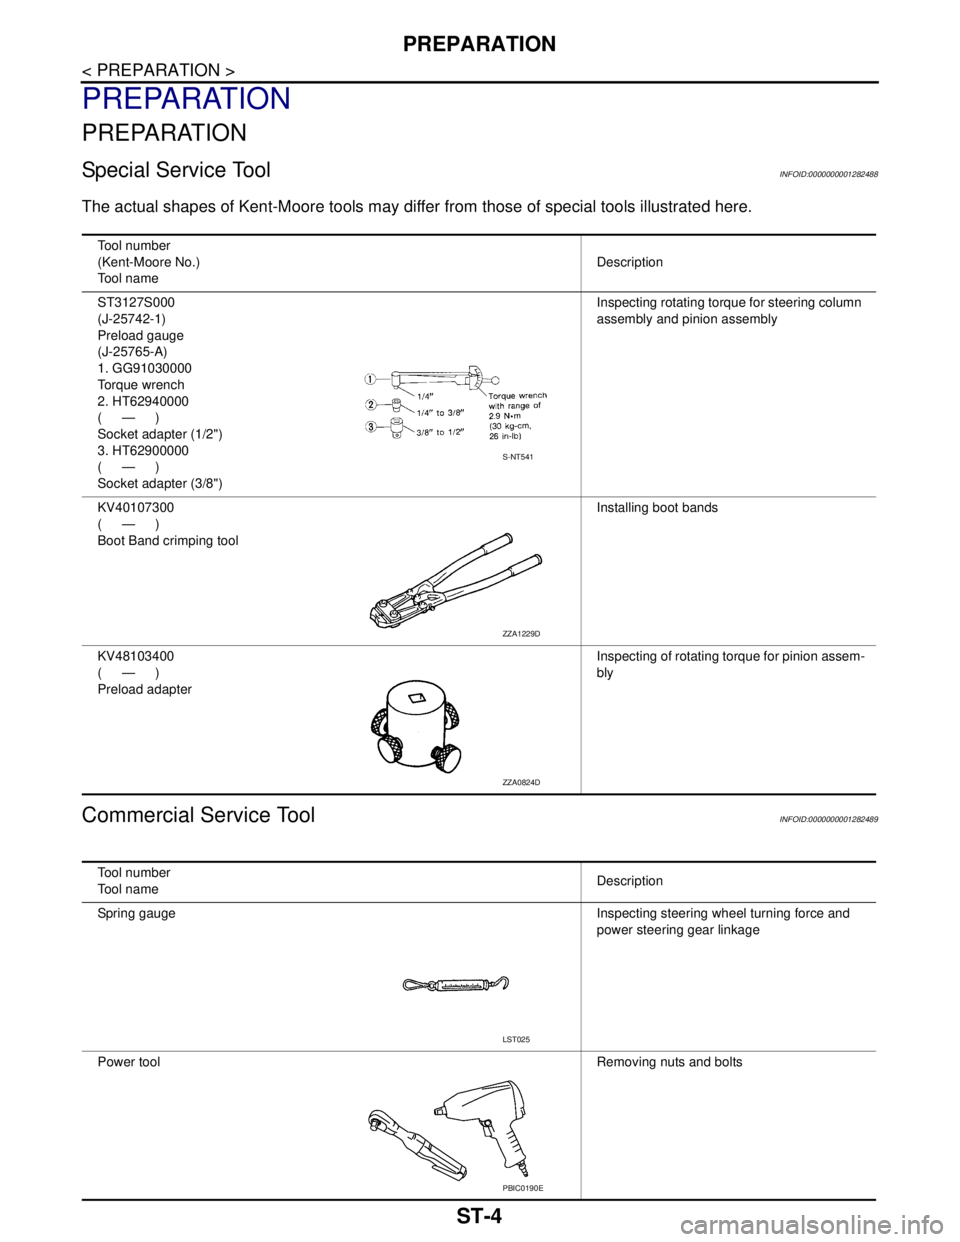
The actual shapes of Kent-Moore tools may differ from those of special tools illustrated here.
Commercial Service ToolINFOID:0000000001282489
Tool number
(Kent-Moore No.)
Tool nameDescription
ST3127S000
(J-25742-1)
Preload gauge
(J-25765-A)
1. GG91030000
Torque wrench
2. HT62940000
(—)
Socket adapter (1/2")
3. HT62900000
(—)
Socket adapter (3/8")Inspecting rotating torque for steering column
assembly and pinion assembly
KV40107300
(—)
Boot Band crimping toolInstalling boot bands
KV48103400
(—)
Preload adapterInspecting of rotating torque for pinion assem-
bly
S-NT541
ZZA1229D
ZZA0824D
Tool number
Tool nameDescription
Spring gauge Inspecting steering wheel turning force and
power steering gear linkage
Power toolRemoving nuts and bolts
LST025
PBIC0190E
Page 4860 of 5883
NOISE, VIBRATION AND HARSHNESS (NVH) TROUBLESHOOTING
ST-5
< SYMPTOM DIAGNOSIS >
C
D
E
F
H
I
J
K
L
MA
B
ST
N
O
P
SYMPTOM DIAGNOSIS
NOISE, VIBRATION AND HARSHNESS (NVH) TROUBLESHOOTING
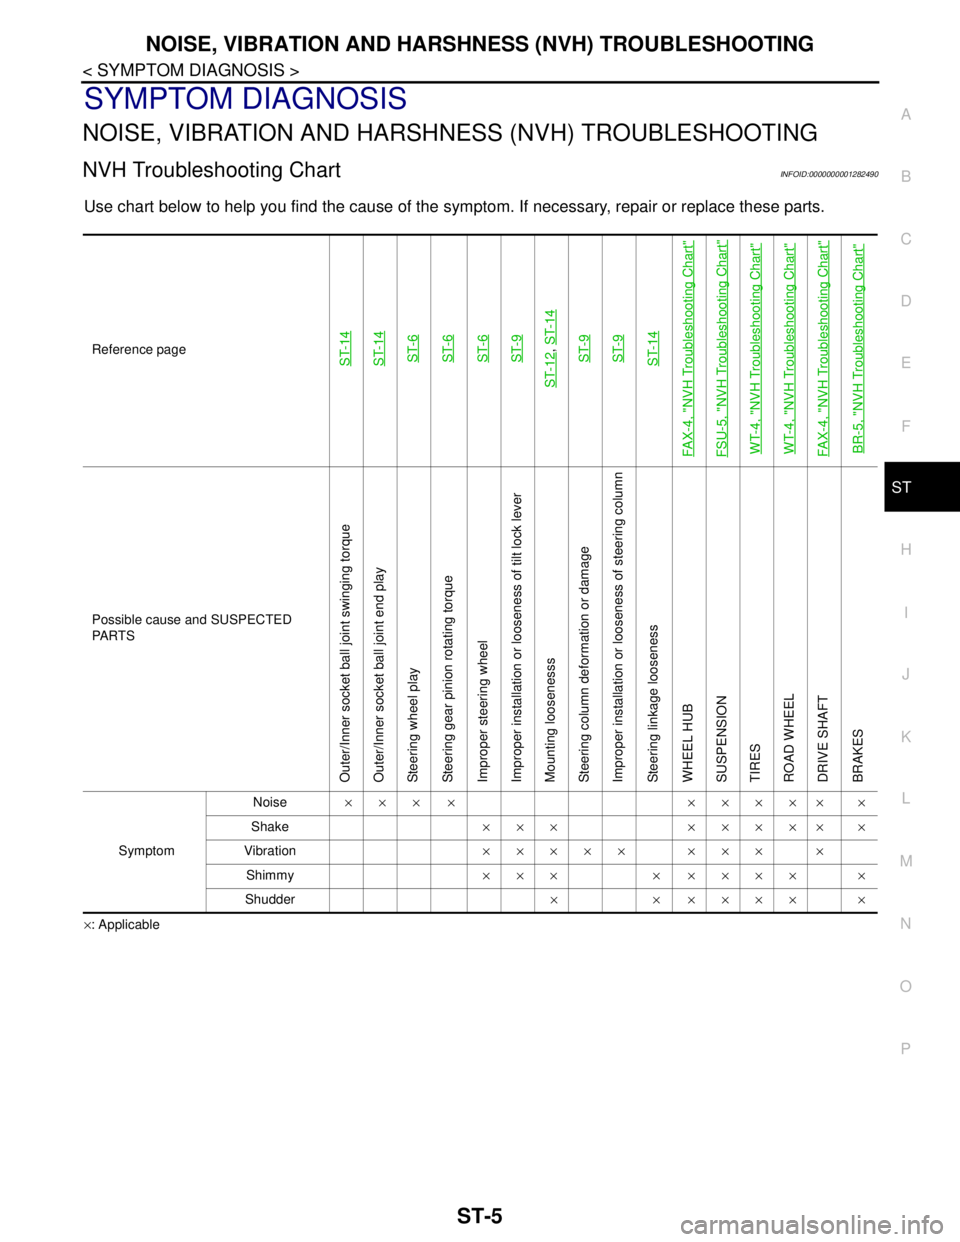
NVH Troubleshooting ChartINFOID:0000000001282490
Use chart below to help you find the cause of the symptom. If necessary, repair or replace these parts.
×: ApplicableReference page
ST-14ST-14ST-6ST-6ST-6ST-9
ST-12
, ST-14ST-9ST-9ST-14
FAX-4, "
NVH Troubleshooting Chart
"
FSU-5, "
NVH Troubleshooting Chart
"
WT-4, "
NVH Troubleshooting Chart
"
WT-4, "
NVH Troubleshooting Chart
"
FAX-4, "
NVH Troubleshooting Chart
"
BR-5, "
NVH Troubleshooting Chart
"
Possible cause and SUSPECTED
PA R T S
Outer/Inner socket ball joint swinging torque
Outer/Inner socket ball joint end play
Steering wheel play
Steering gear pinion rotating torque
Improper steering wheel
Improper installation or looseness of tilt lock lever
Mounting loosenesss
Steering column deformation or damage
Improper installation or looseness of steering column
Steering linkage looseness
WHEEL HUB
SUSPENSION
TIRES
ROAD WHEEL
DRIVE SHAFT
BRAKES
SymptomNoise××× × ××××× ×
Shake××× ××××× ×
Vibration××××× ××× ×
Shimmy××× × ×××× ×
Shudder× × ×××× ×